Diogenes Club SoCKs
by Laika Ahlstedt / Lai-la-lai Yarnz The Diogenes Club is a gentlemen's club for the gentlemen unsuited for clubs. As described in the Sherlock Holmes story The Greek Interpreter:
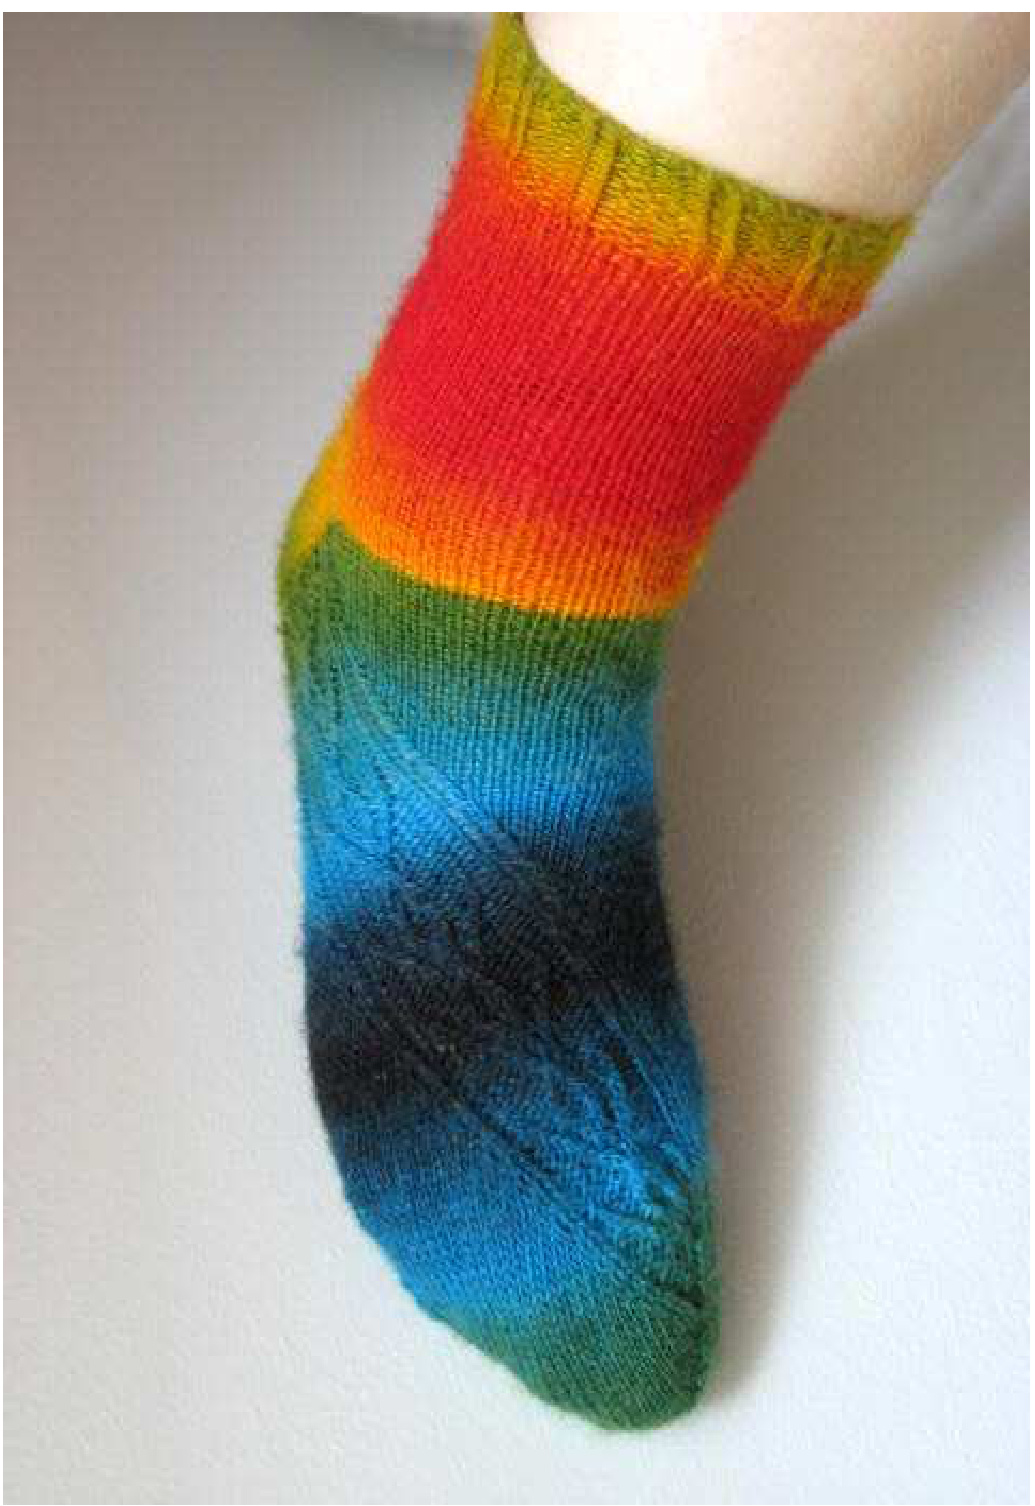
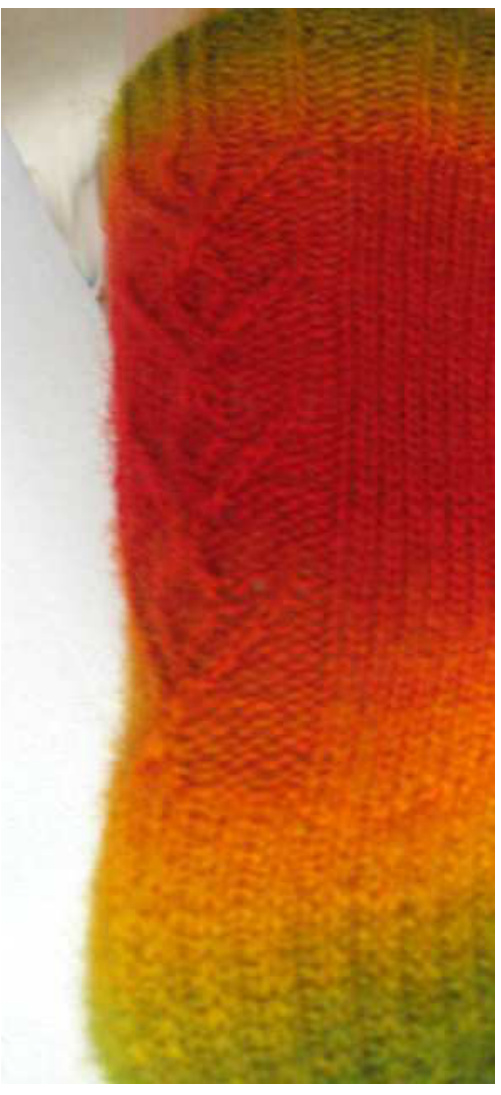
"There are many men in London, you know, who, some from shyness, some from misanthropy, have no wish for the company of their fellows. Yet they are not averse to comfortable chairs and the latest periodicals. It is for the convenience of these that the Diogenes Club was started, and it now contains the most unsociable and unclubable men in town. No member is permitted to take the least notice of any other one. Save in the Stranger's Room, no talking is, under any circumstances, allowed, and three offences, if brought to the notice of the committee, render the talker liable to expulsion. My brother was one of the founders, and I have myself found it a very soothing atmosphere." The candelabra cable in these socks reminds me of - well, candelabra. In my mind I've always imagined gentlemen's clubs being lit by candelabra, regardless of the historical accuracy or lack thereof. Gentlemen's club $=$ candlelight in my book. The cable traveling around the foot requires some concentration, so what's beter than a club devoted to being left alone in silence? Maybe a well lit one, instead of candlelight. But that's for sissies! And intelligent people! I'm not either. Please read the whole pattern carefully before starting. Especially the toe. You'll be sorry if you don't. Also do note, that the right sock and the left sock are mirrored. All instructions given apply to both socks unless stated otherwise.
What you'll need:
5 dpns, size US2 / $2.75\:\mathrm{mm}$ (not absolutely necessary) 5 dpns, size US1 / $2.25\:\mathrm{mm}$ 1 skein of Lai-la-lai Yarnz Sock, $420\:\mathrm{m}\:/\:100\:\mathrm{g},\:75\:\%$ superwash wool & $25\;\%$ nylon. You can use any yarn around the same specs. The sock in the pictures is knit using Schoppel-Wolle Zauberball. a cable needle (though I recommend learning how to knit without one) stitch markers a crafting needle
Terms used:
k knit p purl ktbl/k1-b knit the next stitch through the back loop k2tbl knit the next 2 stitches through the back loop (not together) pm place marker (slip markers on the following rounds as you come to them) sl1 slip the next stitch purlwise with yarn in back ssk slip two next sts separately knitwise, place back on the left needle and knit together tbl p2tog purl two together ml with the left needle pick up the strand between the last knitted and the next stitch front to back, knit the lifted loop through the back LT left cross: slip 1 st on a cable needle in front of work, ktbl, ktbl from the cable needle PLT purl left cross: slip 1 st on a cable needle in front of work, pl, ktbl from the cable needle PRT purl right cross: slip 1 st on a cable needle in back of work, ktbl, p1 from the cable needle Cast on 63 sts using the larger dpns. Distribute sts on the smaller dpns as follows: 15 sts on needle 1, 15 sts on needle 2, 16 sts on needle 3, 17 sts on needle 4. Join to knit in round.
The cuff:
p1, [k2tbl, p3] 8 times, ktbl, p3, k2tbl, p3, ktbl, p3, k2tbl, p3, k2tbl, p2 Repeat for 15 rounds in total. The leg: Knit 40, pm, work row 1 of chart, pm, knit to the end of round. Work rows 1-12 of the chart between the markers four times in total. Knit all other sts. Work rows 13-15 of the chart once. 62 sts. Knit 30 (instep sts) and place on a spare needle to wait. The heel flap (worked on needles 3 & 4 with 32 sts):
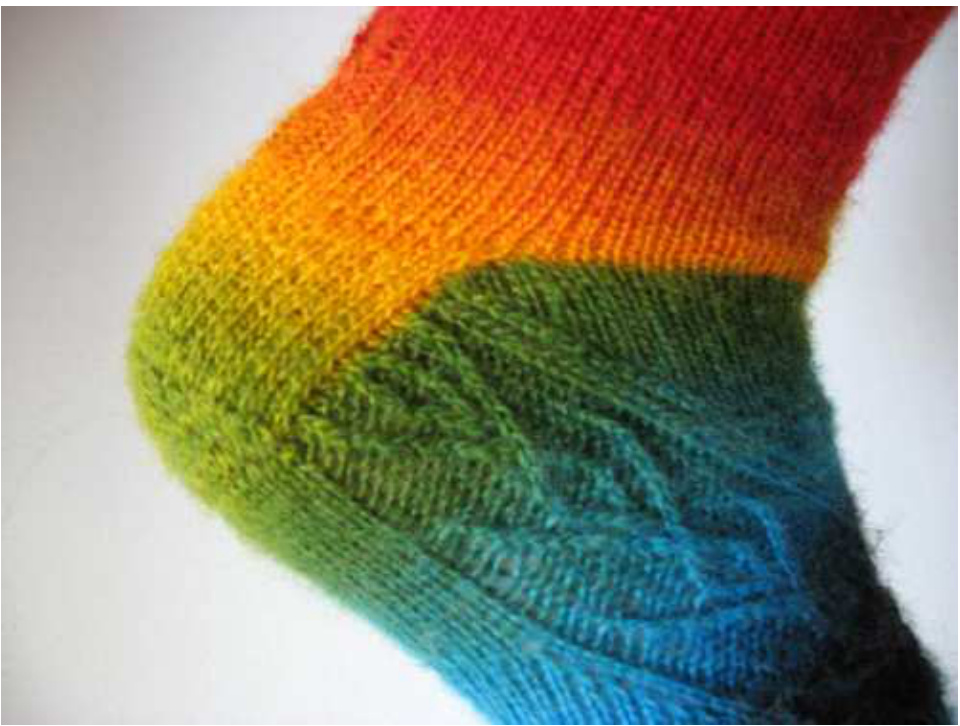
Work the heel flap as follows: row1: [sl1, k1] 16 times row2: sl1, purl Repeat rows 1 & 2 15 times more. (32 rows in total.) Turn heel: You're supposed to make short rows here. This sounds trickier than it is. You can do it! Row 1: sl1, knit 17, ssk, knit 1, turn Row 2: sll, purl 6, p2tog, pl, turn Row 3: sl1, knit 7, ssk, k1, turn Row 4: sll, purl 8, p2tog, pl, turn Row 5: sl1, knit 9, ssk, k1, turn Row 6: sll, purl 10, p2tog, pl, turn Row 7: sl1, knit 11, ssk, k1, turn Row 8: sl1, purl 12, p2tog, pl, turn Row 9: sl1, knit 13, ssk, k1, turn Row 10: sl1, purl 14, p2tog, p1, turn Row 11: sl1, knit 15, ssk, k1, turn Row 12: sl1, purl 16, p2tog, p1, turn Row 13: sl1, knit 17, ssk, turn Row 14: sl1, purl 16, p2tog, turn 18 heel sts. Gussets You made it past the heel! Congratulations! Now this is where it gets fun!
Set up round:
Needle 1: Knit 9, pm for the new start of round, knit 9. Pick up and knit 1 stitch in each slipped stitch on the edge of the heel flap. There should be 16 sts picked up. Pick up 2 stitches more in the gap between the heel flap and the instep stitches. Needle 2: Knit 15 instep stitches. Needle 3: Knit 15 instep stitches. Needle 4: Pick up 2 stitches in the gap, then 16 sts along the edge of the heel flap. Knit 9 from needle 1 onto needle 4. 84 stitches.
Right sock only:
Knit one round, knitting the picked up sts through the back loop to avoid holes. Place markers as follows: Knit 10, pm, knit 12, pm, knit to the end of needle 3, pm, knit to end. Round 1: Knit to the first marker, work row 1 of the chart, knit 1, ssk, knit to the next marker, ssk, knit to end. 82 stitches. Round 2: Knit to the first marker, work the next row of the chart, knit to end. Round 3: Knit to the first marker, work the next row of the chart, knit 1, ssk, knit to the next marker, ssk, knit to end. 80 stitches. Repeat rounds 2 and 3 until you have 68 sts left.
Left sock only:
Knit one round, kniing the picked up sts through the back loop. Place markers as follows: Knit to the end of needle 1, pm, knit needles 2 and 3, knit 6, pm, knit 12, pm, knit to end. Round 1: Knit to two stitches before the first marker, k2tog, knit to three stitches before the next marker, k2tog, k1, work row 1 of the chart, knit to end. 82 stitches. Round 2: Knit to the second marker, work the next row of the chart, knit to end. Round 3: Knit to two stitches before the first marker, k2tog, knit to three stitches before the next marker, k2tog, k1, work the next row of the chart, knit to end. 80 stitches. Repeat rounds 2 and 3 until you have 68 sts left. Foot:
Right sock only:
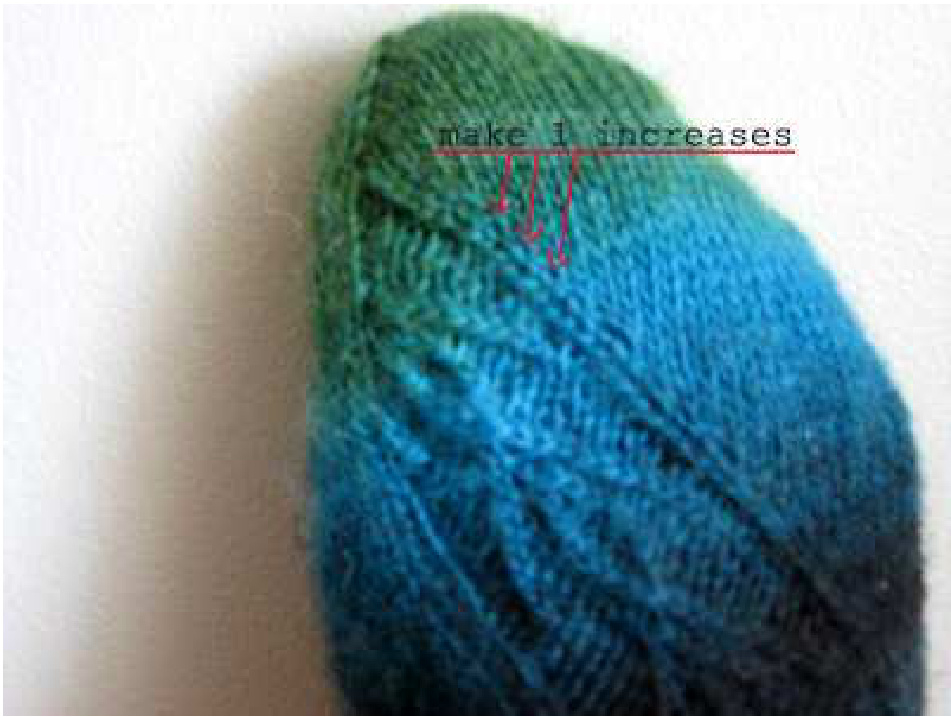
Round 1: Knit to the first marker, work the next row in the chart, knit to end. Round 2: Knit to one stitch before the first marker, m1, k1, work the next row in the chart, k1, ssk, knit to end. The make 1 and the matching decrease will make the cable travel around the foot. The stitch count won't change. Repeat rounds 1 and 2 until the length of the foot is about $2"$ $\left(5\ \mathrm{cm}\right)$ less than desired. If the second marker and the third marker have only 1 stitch left between them, repeat round 1 only from that point on.
Left sock only:
Round 1: Knit to the second marker, work the next row in the chart, knit to end. Round 2: Knit to three stitches before the second marker, k2tog, k1, work the next row in the chart, k1, m1, knit to end. Repeat rounds 1 and 2 until the lenght of the foot is about 2" $\left(5\;\mathrm{cm}\right)$ less than desired. If the first marker and the second marker have only 1 stitch left between them, repeat round 1 only from that point on. Read all of this before you start knitting. Knit 9, pm for the new start of round. Rearrange your stitches so you have 17 sts on each needle. Decreases: Round 1: Knit. Round 2: Needle 1: K1, ssk, knit. Needle 2: Knit to last three stitches, k2tog, k1. Needle 3: K1, ssk, knit. Needle 4: Knit to last three stitches, k2tog, k1. Repeat rounds 1 & 2 until the sock is at the desired length. Cut yarn and craft the last stitches together with the kitchener stitch. AT THE SAME TIME keep working the chart AND the ml of the foot round 2. You will eventually decrease the stitches of the cable panel itself. You can also omit this part if you want to, but in that case stop working the chart on the foot at the row 8, 10 or 12 for the best look. The decreases will affect the way you can work the chart by eg. leaving you with no stitch to switch places with when making a twist. In that case just ignore the twist. Simply work the chart with as many stitches as you can until you have decreased all of the chart stitches or need to craft the sock, whichever happens first. And don't forget to keep on with the m1 stitch, it will make the toe decreases slower but it keeps the cable traveling as it should. When you're out of chart sts, stop increasing as well.
Finally, weave in ends and block. Take pictures and post them online so everyone can see how cool socks you have made. Wear with pride.
Chart
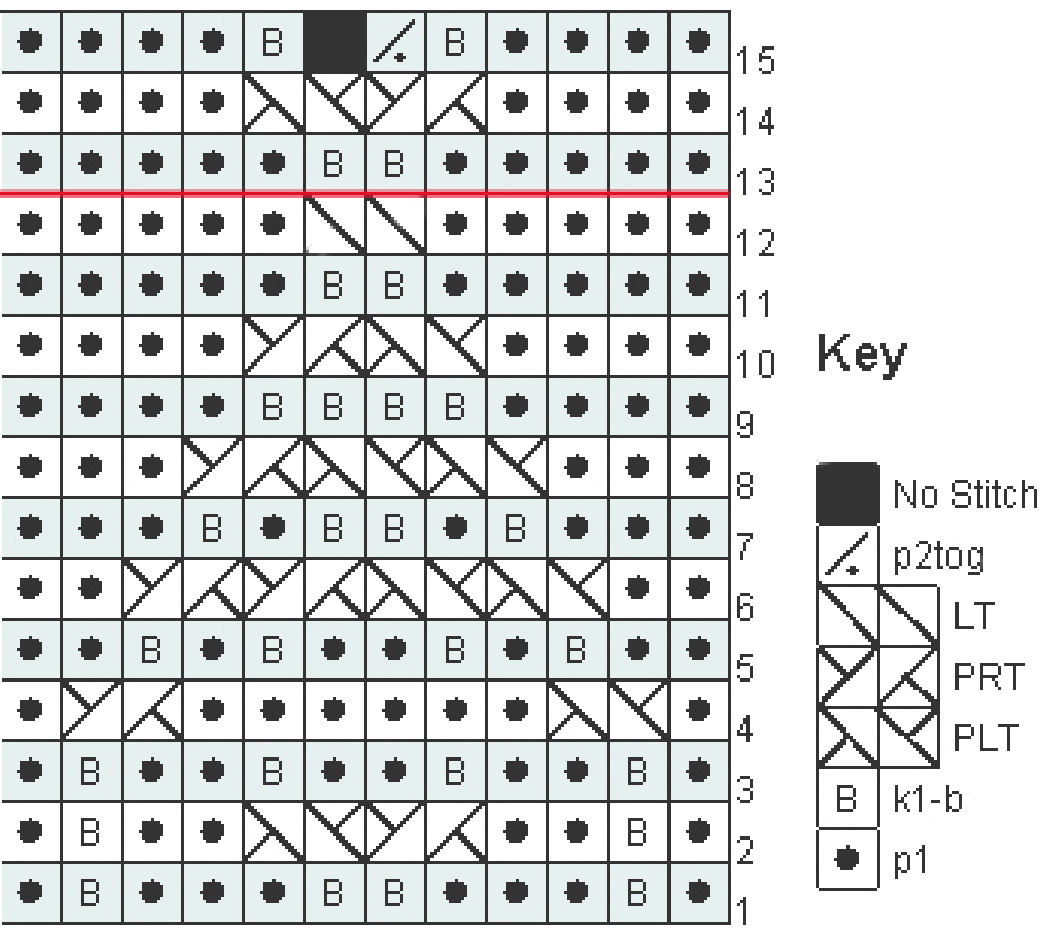
Do note, that on row 4 you purl all the center stitches. The rows 13-15 are worked only once, right before the heel flap. The repeat of the pattern both on the leg and foot is rows 1-12.


