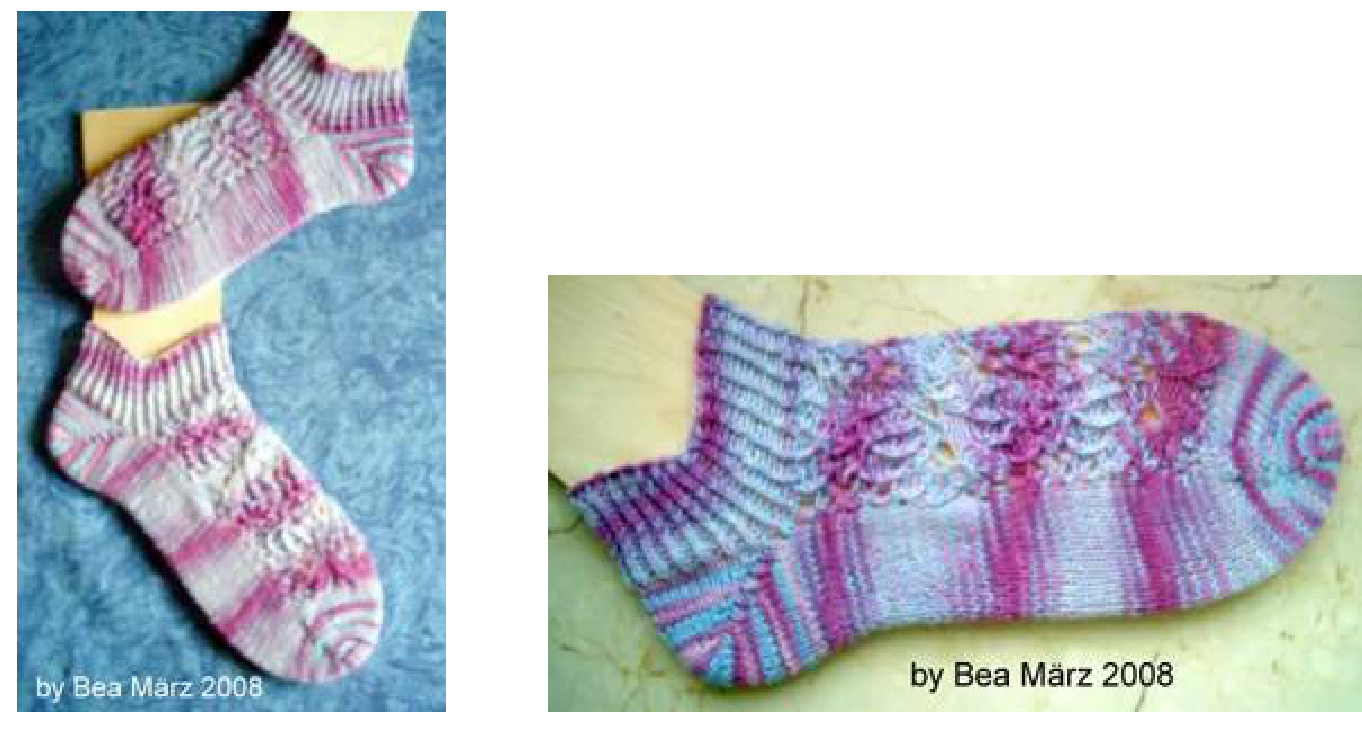
I worked these sneakers toe-up, both at the same time using the magic loop method. You can also work them top-down or with DPN's without any probiems, the pattern doesn't have to be changed therefore. The pattern itself is based on a Japanese pattern, I changed it for knitting in rounds and rewrote the chart into more common symbols, I chose this one because it reminds me on butterflies and little flowers, perfect for springtime. As usual for lacey patterns, this one is fairly stretchy, if necessary you have to play a bit with different needle sizes, so the sneakers fit well.I wear an European size 41 (U.S. size $9\%$ ) and have smallfeet, the sneakers fit very well respectively are a bit loose by this instructions.
You need:
Approximately 40-50 g sock yarn (depending on your size), preferably a solid colour. Knitting needles size $2.25\ \mathrm{mm}$ (US size 1), for smaller feet size $2.0\ \mathsf{m m}$ (US size O), for bigger feet size $2.5\ \mathrm{mm}$ (US size $1\%$ ) or up. Please try which size is perfect for your preferences. Cable needle or short DPN for ,wrapping" the stitches. This ,instruction" assumes you know the basic techniques in knitting socks, thus I don't explain toe or heel, I also think, everyone has it's own favourite instructions therefore.
Foot:
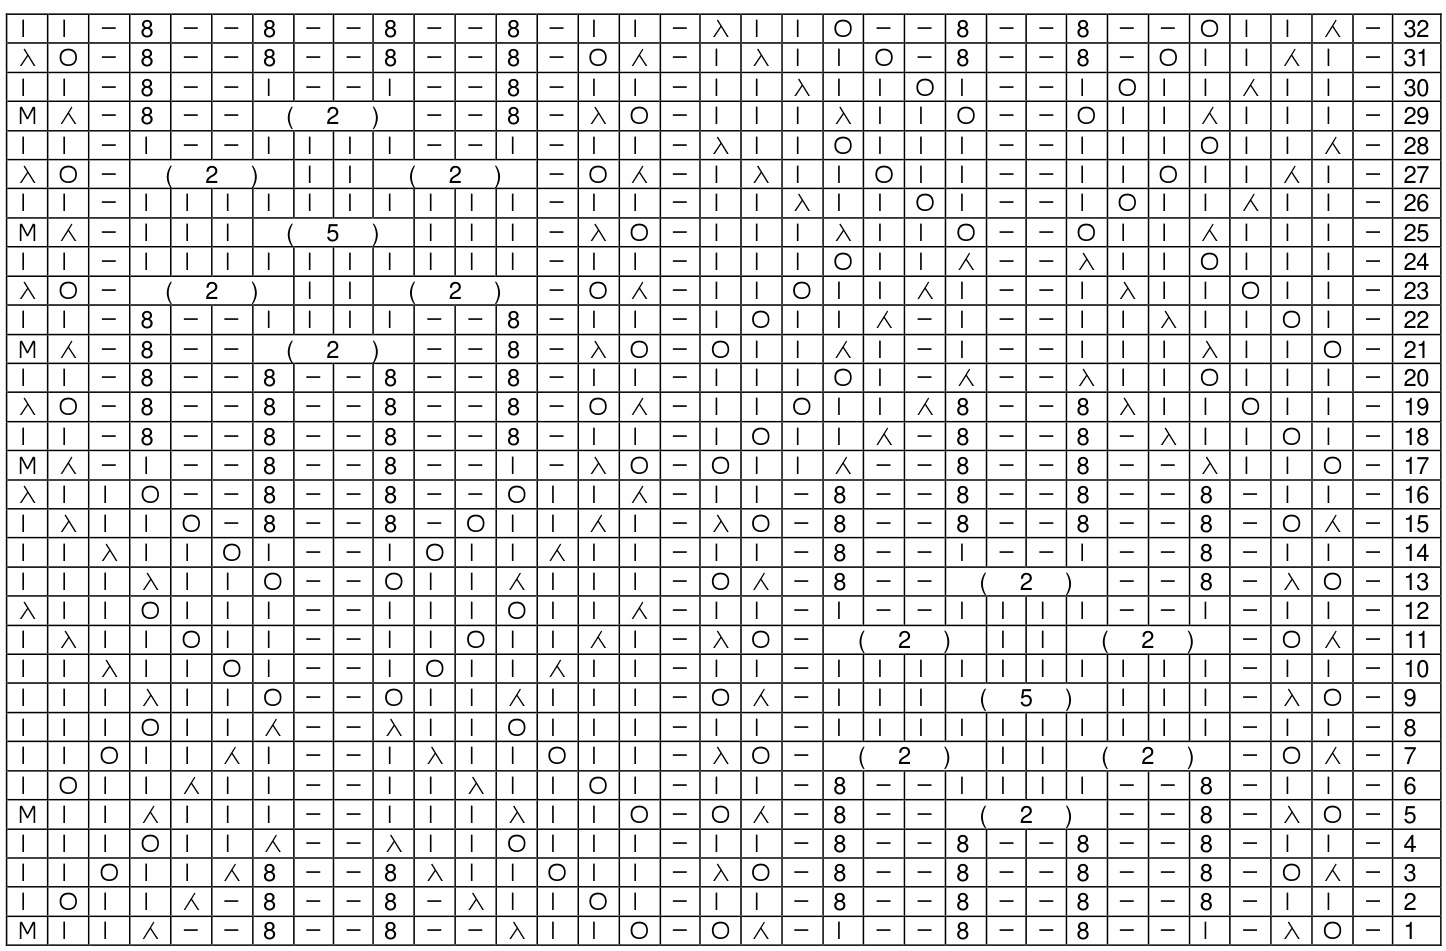
Start toe-up with your preferred method. I've used the figure eight cast on with 14 loops each needle. Now make increases until you have 30 stitches for the sole and 34 stitches for the top of the foot on your needle, you need 64 stitches in total (for a bigger foot you can increase more stitches at the sole). Now start the pattern, it's over 34 stitches and 32 rounds. Read the chart from right to left every round and from bottom to top. = purl = knit 8 = knit through back loop 人 $=$ knit 2 stitches together ( $\overset{\cdot}{=}$ right leaning decrease) 入 = ssk: slip 1 stitch knitwise, slip another stitch knitwise, place both slipped stitches back to left hand needle and knit them together through back loop (alternatives: slip 1 stitch, knit 1 stitch, pass slipped stitch over knit one or knit 2 stitches together through back loop $=$ lef leaning decrease) = yarn over M = make one through back loop of the strand (2)= 2 wraps: knit 4 stitches with the cable needle, wrap the working yarn around those 4 stitches 2 times and place the 4 stitches onto your right hand needle (5)= 5 wraps: knit 4 stitches with the cable needle, wrap the working yarn around those 4 stitches 5 times and place the 4 stitches onto your right hand needle For the wraps it's important not to pull the working yarn too tight, otherwise it would be difficult to place them onto the right hand neeedle, pull the yarn only if you already have the stitches on the right hand needle.
Heel: I've needed exactly 2 pattern repeats for the foot, start your preferred heel approximately 5 cm (2 inch) before reaching the total length of the foot. If it happens you have to start the heel within a pattern repeat, you can work the missing rounds of the pattern repeat after the heel, for example you can then stop after round 16 with the pattern.
Cuff:
After the pattern I've knitted one round and reduced the stitches from the top of the foot to 30 (knit 2 stiches together evenly spread). You should now have the number of stitches you always use for the cuff. Work \*knit 1 through back loop, purl $1^{\star}$ over allstitches, work as much rounds as you like, I made 15 rounds.
Bind off:
I used a method that's very common for shawl knitting because it makes a stretchy edge, you can also use any other method you like. Knit 1 through back loop, purl 1, place both stitches back to let hand needle and knit them together trough back loop. Now continue with working one stitch in pattern, place 2 stitches back to left hand needle and knit them together trough back loop, cut yarn and pullit through the last stitch. Now only sew the threads, hope for good weather and having much fun while wearing the spring sneakers (if necessary don't forget to work the second sneaker)! $\circledcirc$ $\copyright$ by Bea Marz 2008, all rights reserved. This instruction is only for your private noncommercial use. Contact: tippmaus23@yahoo.de


