CHARLIE BROWN SOCKS
by sharonf This is a simple, utilitarian children's sock. Other than the lattice cable, it is straightforward toe-up sock. Although it's called a cable pattern, no cable needle is required--it's just left and right twists.
SIZE and MEASUREMENTS
Children's US size 9 Circumference: 6 inches Foot length: 6 inches The lattice cable has a 16-stitch repeat, so the easiest way to adjust the size of the sock is to use a yarn/needle combination that yields a different gauge and change the length of the foot and leg as appropriate. 28 sts per 4 inches $=7$ inches circumference 24 sts per 4 inches $=8$ inches circumference 20 sts per 4 inches $=9$ inches circumference

12/09 I have added an expanded 20-stitch chart at the end of the pattern. To use this chart, you would work the sock over 60 stitches, rather than 48. This allows you to knit an adult-size sock using fingering weight yarn (for example, a gauge of 30 sts per 4 inches would yield an 8" circumference or women's size small). Another way to make an adult size using fingering weight yarn is to work the original 16-stitch chart over 64 stitches, rather than 48.
MATERIALS
Elann Sock It To Me 4 Ply $[75\%$ superwash wool, $25\%$ nylon; 229 yd/210 m per $50\,\mathrm{g}$ skein]; color: 44864; 1 skein Feel free to use any yarn with which you get gauge. I found the Sock It To Me didn't stand up well to frogging, but you can't beat the price. (1) 32- to 60-inch circular needle; I got gauge with a US #1.5 / 2.5mm circular needle This sock is knit on one long circular needle using the magic loop technique, although the pattern can easily be adapted for DPNs or two circulars. (4) DPNs of the same size (optional; for heel gusset and for tubular bindoff) If you don't have, or prefer not to use, DPNs, you can use the circular needle for the heel gusset - just make sure you use a needle with a very long, flexible cable (such as a 60"KnitPicks). For the tubular bindoff, smaller DPNs will also work, and you only need two stitch markers yarn needle
GAUGE
32 sts/44 rounds $=4$ inches in stockinette stitch Copyright $\copyright$ 2009 sharonf Free pattern on ravelry.com Personal use only. Alother rights reserved. Do not distribute pattern in print or lectronic form, or produce itms for sale without the express written permission of the author. sharon $@$ sharonmattnadia.com
TECHNIQUES and ABBREVIATIONS
This pattern assumes that you are familiar with standard knitting abbreviations. For a complete list, visit Knitty at knitty.com/ISSUEwinter04/patterns.html#ksbbb. Judy's Magic Cast-On Instructions can be found at knitty.com/ISSUEspring06/FEATmagiccaston.html. Knit Left Loop (KLL) - right-leaning increase Insert tip of left needle from back to front into st 2 rounds below current st on right needle. Knit this stitch through the back loop. Knit Right Loop (KRL) - left-leaning increase Insert tip of right needle from back to front into st below current st on left needle. Lift this stitch onto the left needle and knit it. Feel free to use your favorite increases. I've specified these two because I like how easy they are. SKP - left-leaning decrease Slip1 stitch as if to purl, knit 1, and pass the slipped stitch over the stitch you just knit. One stitch decreased. This makes a good mirror for k2tog, which is a right-leaning decrease.
Working Over Three "Needles" Using Magic Loop
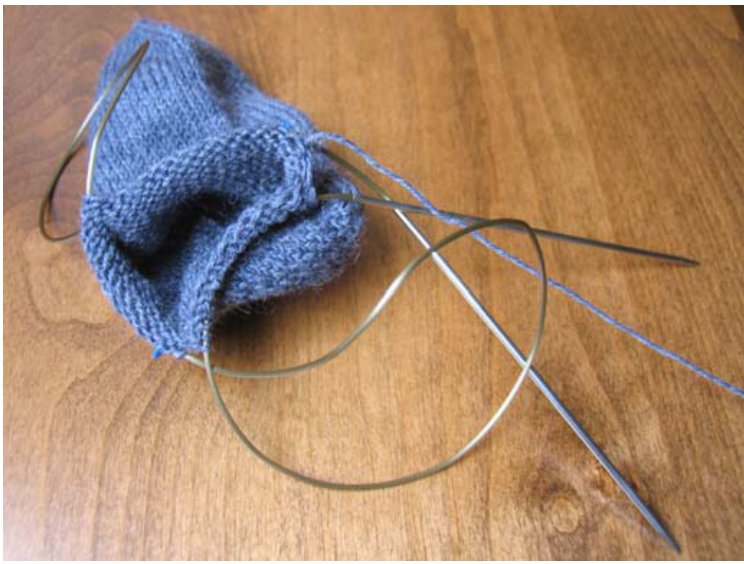
When you get to the gusset, you will distribute the stitches over three needles: · the easy and obvious choice is to switch to DPNs · it is also possible to use magic loop with more than two "batches" of stitches to emulate the effect of several DPNs 0 this technique is fussier than using DPNs and should be used only if: ■you want to show off ■ you have a dedicated aversion to DPNs ■ you can't find your DPNs 0 this technique will work only on circular needles with long cables (you can do it on 47" cables, but $60"$ is hetter) this technique will work only on circular needles with very flexible cables (you can do it on Addis, but KnitPicks are better)
How to do it:
The picture pretty much says it all. The "needle 1" stitches are on the lower right, needle 2 on the lower left and needle 3 on the top. As you move from knitting one set of stitches to the next, adjust the cable so you have enough slack to use your needles and a loop of cable remains between each set of stitches.
Left Twist (LT)
. bring right needle behind work and knit second stitch on left needle through the back loop; do not drop off left needle · knit first stitch on left needle through front loop and slip both sts to right needle
Right Twist (RT)
· bring right needle in front of work and knit second stitch on left needle; do not drop off left needle · knit first stitch on left needle and slip both sts to right needle Lattice Cable (16 st and 18 round repeat) See end of pattern for an expanded version with a 20 st and 22 round repeat. Rnd 1: k7, LT \* k6, LT \* \*LT, k6\* (last LT in round will use last st from Rnd 1 and first st from Rnd 2) Rnd 2: (and all even rounds) knit Rnd 3: \* LT, k4, RT \* Rnd 5: \* k1, LT, k2, RT, k1 \* Rnd 7: \* k2, LT, RT, k2 \* Rnd 9: \* k3, RT, k3 \* Rnd 11: \* k2, RT, LT, k2 \* Rnd 13: \* k1, RT, k2, LT, k1 \* Rnd 15: \* RT, k4, LT \* Rnd 17: repeat Rnd 1 If you were going to work additional rounds in this pattern, you would repeat rounds 1 Twisted Rib Over an even number of stitches: $\ast\,_{\mathrm{kl}}$ through the back loop, p1 \*
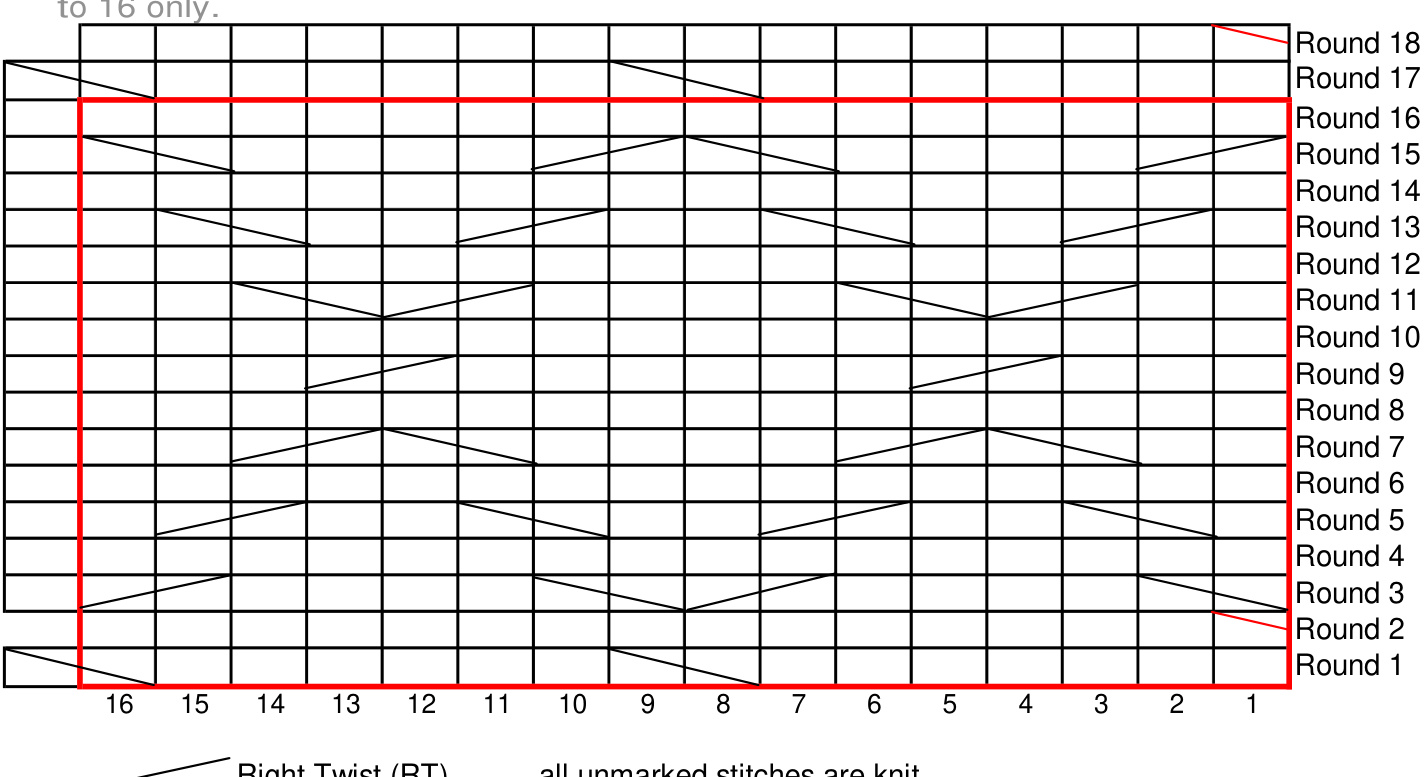
Right Twist (RT) all unmarked stitches are knit Left Twist (LT) on Rounds 1 and 17, the last Left Twist of the round uses the last stitch of the current round and the first stitch of the next round Tubular Bind Off Slip the purl stitches onto one DPN and knit stitches onto another. Graft the stitches on the two needles together, using Kitchener stitch. Instructions for Kitchener stitch can be found at knitty.com/ISSUEsummer04/FEATtheresasum04.html.
PATTERN
Toe Using Judy's Magic Cast-On, CO 20 sts (10 sts on each needle). Needle 1 (N1) holds sole stitches and Needle 2 (N2) holds instep stitches. Round 1: knit Round 2: $^{*}\mathrm{kl}$ , KLL, knit to 2 st before end of needle, KRL, $\mathrm{k}1^{*}$ (4 sts increased) Work Rounds 1 and 2 for a total of 14 rounds EXCEPT that, on the last increase round: · work one increase only in the middle of N1 · work the regular increases on N2, plus an increase in the middle You now have 23 sts on N1 and 25 sts on N2 (for a total of 48 sts).
Work in stockinette st for 2.5 inches, ending after knitting across N1. If you are using a looser gauge to knit a larger sock, use your row gauge to determine how long the heel flap will be and knit to the length of the target foot minus the length of the heel flap.
Heel Flap (bottom of foot)
Work heel flap back and forth on N1, starting with a WS row. Row 1 (WS): k1, purl to last st, sl 1 keeping yarn in front Row 2: knit to last st, bring yarn to front, sl 1 Work Rows 1-2 for a total of 24 rows.
Heel Turn
Row 1 (WS): sl 1, p12, p2tog, pl, turn Row 2: sl 1, k4, SKP, k1, turn Row 3: sl 1, purl to within 1 st of gap, p2tog, pl, turn Row 4: sl 1, knit to within 1 st of gap, SKP, k1, turn Repeat Rows 3 and 4 until all side stitches are worked, ending with completed Row 4 (13 sts). Note that, on the final repeat, you won't have a p1 or k1 at the end of Rows 3 and 4.
Pick Up Gusset Stitches
Now is a good time to switch to DPNs, but you can also continue in magic loop, if preferred (see instructions in Techniques and Abbreviations). By following these instructions, you will be dividing the stitches into 3 sets, or "needles" (denoted as N1, N2, and N3). N1 will comprise the back of heel stitches, N2 the gusset and instep stitches on the first side, and N3 the gusset and instep stitches on the other side. The point of al this is to make it easier to work the hee stitch pattern along the back of the heel. ? With RS facing you, pick up and knit first 3 sts from side of heel flap onto N1. ? Pick up and knit remaining 9 stitches from heel flap onto N2. Pick up and knit 2 sts at bottom of gusset (the loops facing each other just under the bar of yarn at the corner - knit through the back loop as needed to prevent holes) Place marker and work 12 instep sts ? Knit remaining instep sts onto N3, place marker, pick up and knit 2 sts at bottom of gusset, pick up and knit first 9 stitches from side of heel flap. With N1, pick up and knit remaining 3 stitches from side of heel flap. You now have 19 sts on N1, 23 on N2, and 24 on N3 (for a total of 66 sts).
Close Gusset Top
Needle 1 - knit the remaining 16 stitches Needle 2 - knit to 2 sts before marker, SKP, slip marker, knit to end Needle 3 - knit to marker, slip marker, k2tog, knit to end
Gusset Decrease
Round 1
Needle 1 - work heel stitch pattern - sl 1, \* k1, sl 1 \* Needle 2 - knit to 3 sts before marker, k2tog, k1, slip marker, knit to end Needle 3 - knit to marker, slip marker, k1, SKP, knit to end Round 2 - knit across all needles Work Rounds 1 and 2 nine times until 48 sts remain. Youll know you're done when only 2 sts are left outside the stitch markers. Remove markers on last round. Knit 9 stitches from N1 onto N3. Slip remaining stitches from N1 onto N2, so that there are 24 stitches on each needle. The beginning of the round is now at the center back. If you were using DPNs for the gusset, this is a good time to switch back to magic loop.
Work Rounds 1-18 of the Lattice Cable chart for three horizontal repeats around the leg. Since this sock uses an odd number of pattern repeats, and the beginning of the round is in the center back, there is a diamond point centered in back, but not in front.
In my sample, I forgot Rounds 1-2, so the pattern looks a bit unfinished at the bottom. Work in stockinette st until leg (including Lattice Cable), measures 3 inches, or desired length. Cuff Work in Twisted Rib until cuff measures 1 inch.
FINISHING
Bind off using your favorite sock bindoff (I am partial to the tubular bindoff). Weave in loose ends. Block if desired.
ABOUT THE DESIGNER

Sharon (sharonf on Ravelry) has resumed knitting after a hiatus of twenty years and is attempting to make up for lost time. She keeps a sporadic knitting and miscellany blog (blog.sharonmattnadia.com), but thinks her cake design blog (cake.sharonmattnadia.com) is more interesting. Enlarged Lattice Cable (20 st and 22 round repeat) Rnd 1: k9, LT \* k8, LT \* (last LT in round will use last st from Rnd 1 and first st from Rnd 2) Rnd 2: (and all even rounds) knit Rnd 3: \* LT, k6, RT \* Rnd 5: \* k1, LT, k4, RT, k1 \* Rnd 7: \* k2, LT, k2, RT, k2 \* Rnd 9: \* k3, LT, RT, k3 \* Rnd 11: \* k4, RT, k4 \* Rnd 13: \* k3, RT, LT, k3 \* Rnd 15: \* k2, RT, k2, LT, k2 \* Rnd 17: \* k1, RT, k4, LT, k1 \* Rnd 19: \* RT, k6, LT \* Rnd 21: repeat Rnd 1 If you were going to work additional rounds in this pattern, you would repeat rounds 1 to 20 onlv
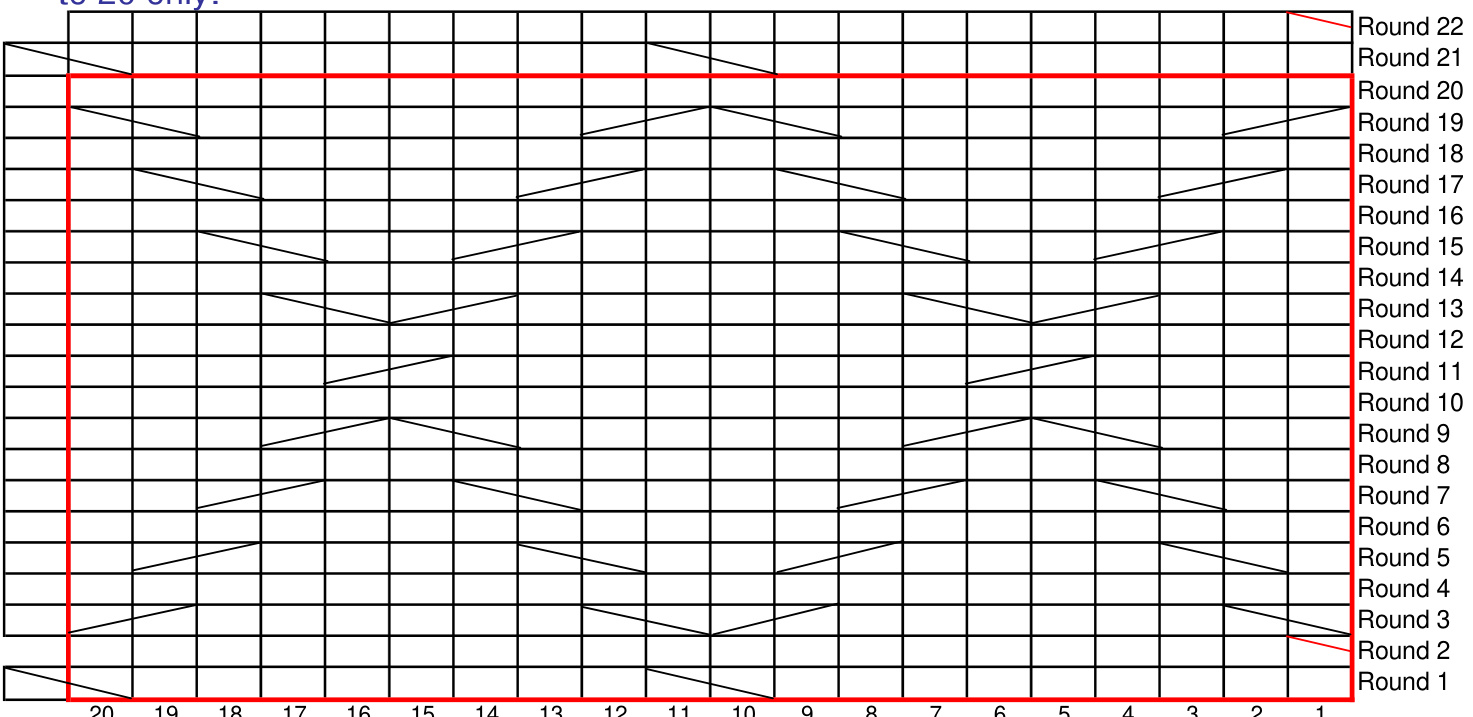
Right Twist (RT) all unmarked stitches are knit Left Twist (LT) on Rounds 1 and 21, the last Left Twist of the round uses the las stitch of the current round and the first stitch of the next round


