Htow happy is the blaweless vestal's lot Tre word fprgeting og te word forgot Etermal sunshive og tie spotless mind Each prayr acceted and each wishreigd -Alexander Pope

Materials
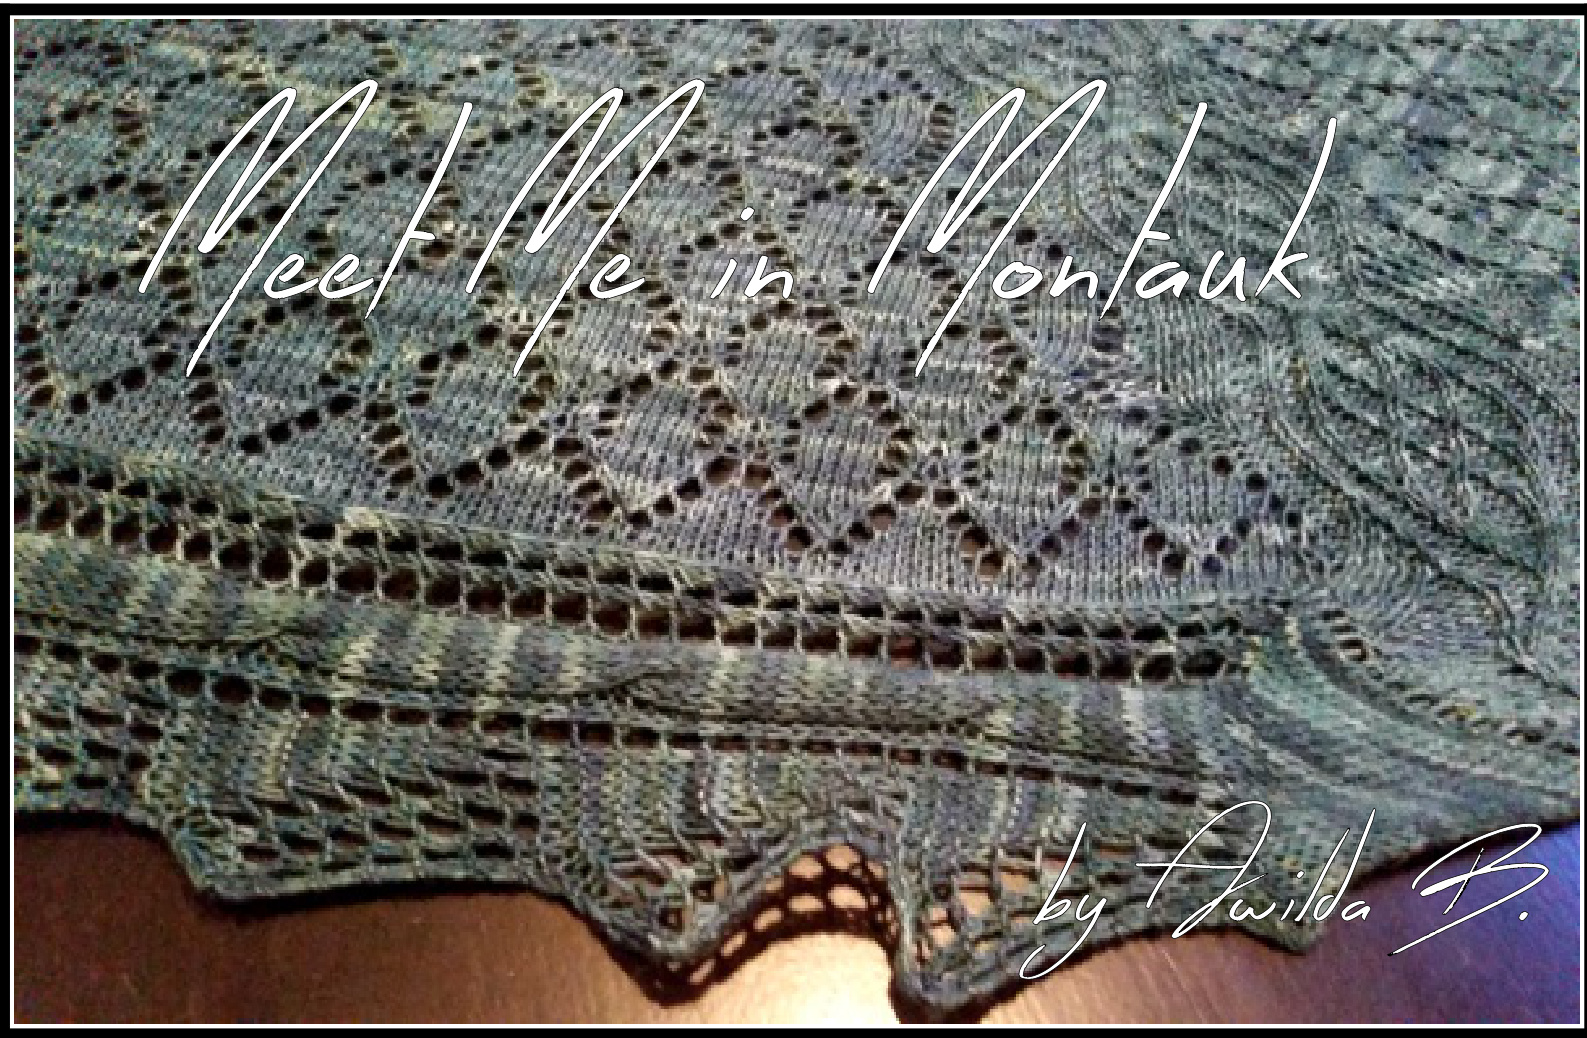
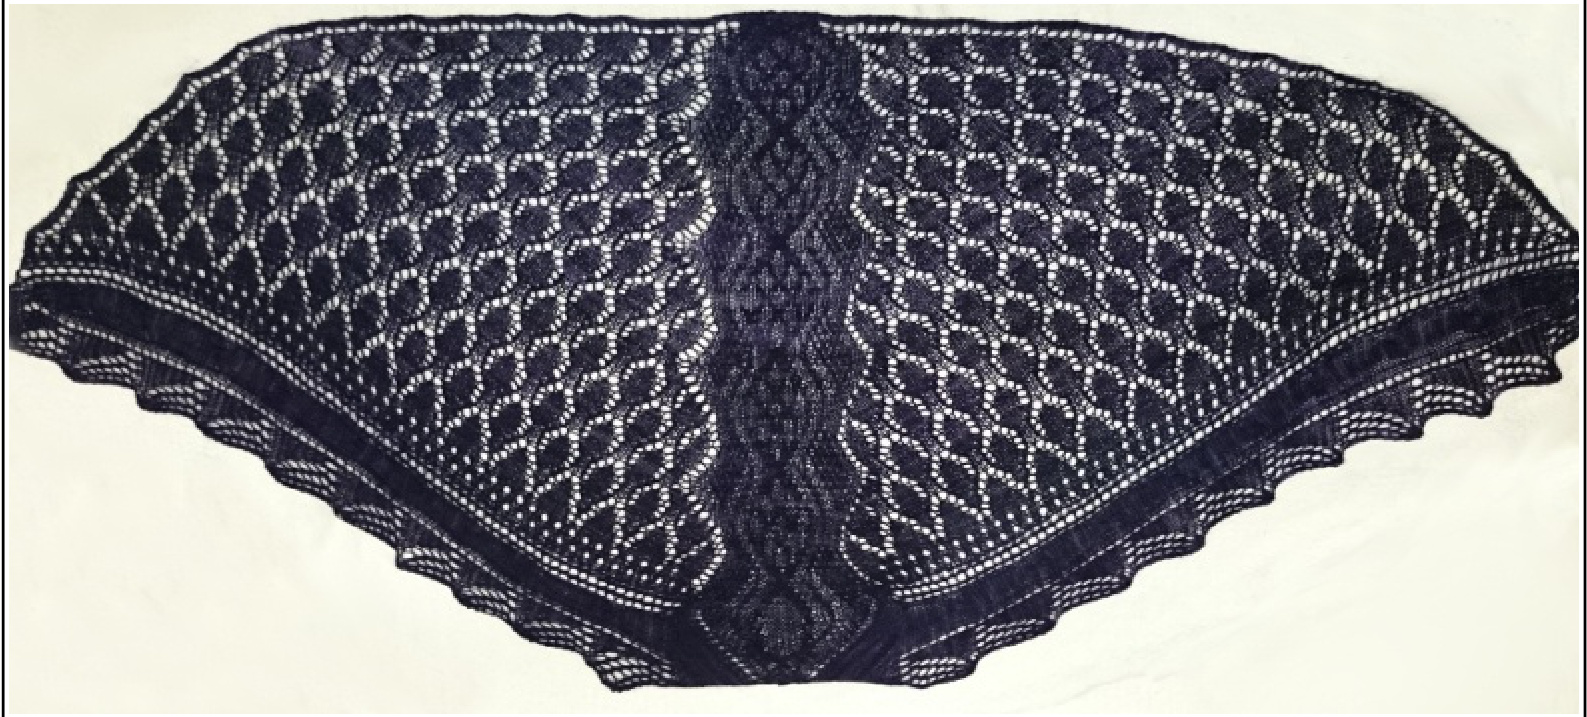
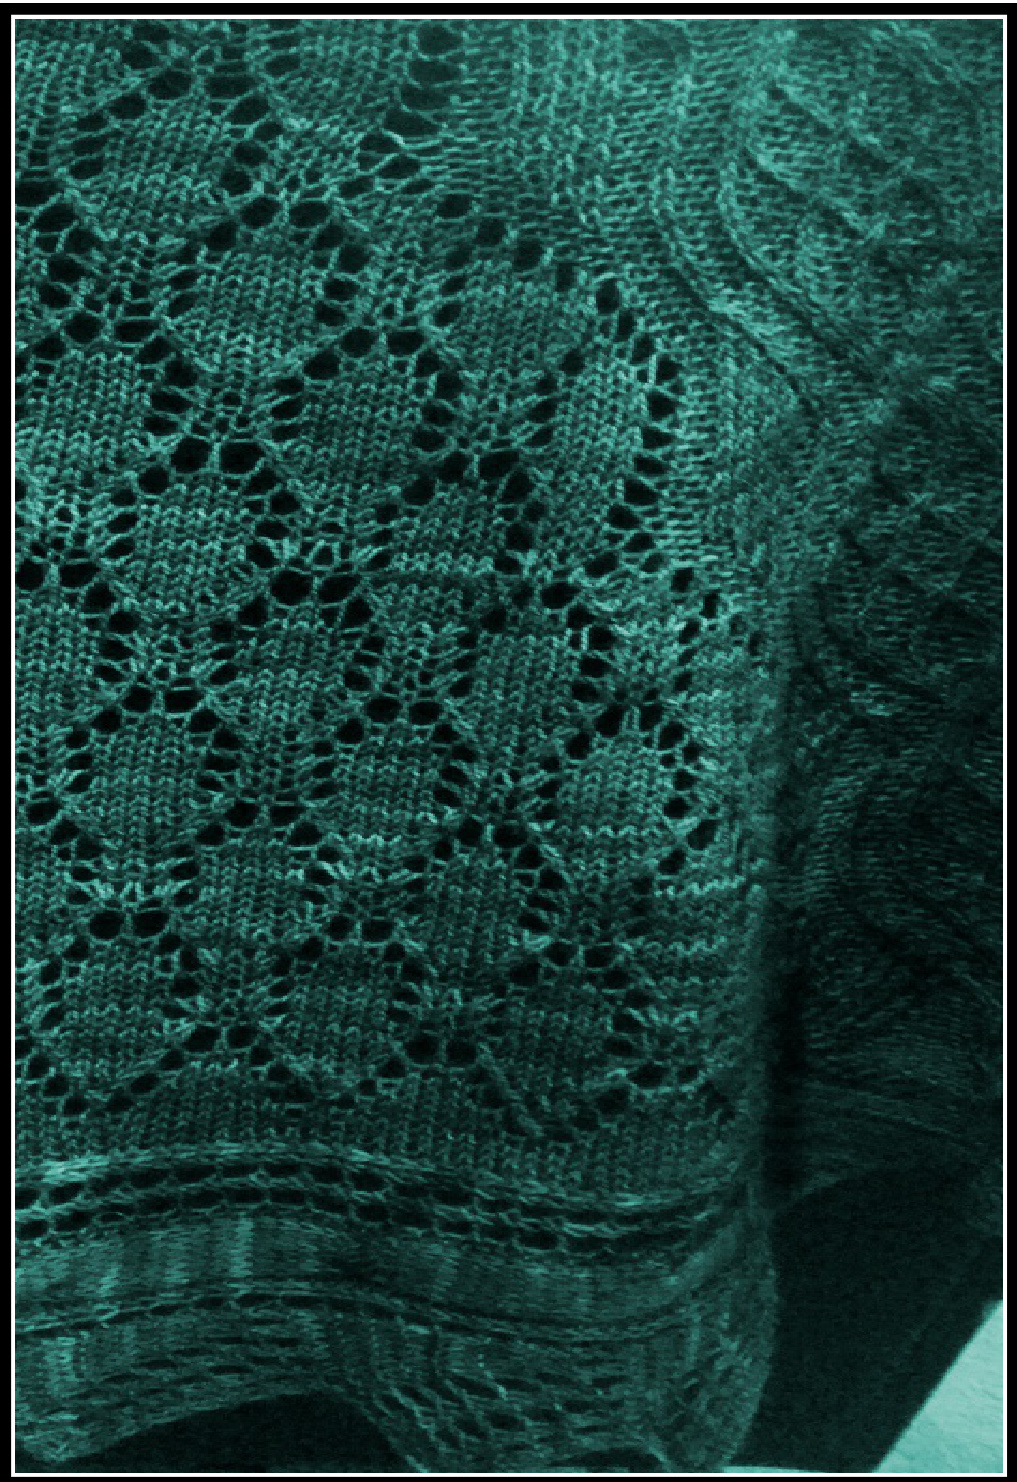
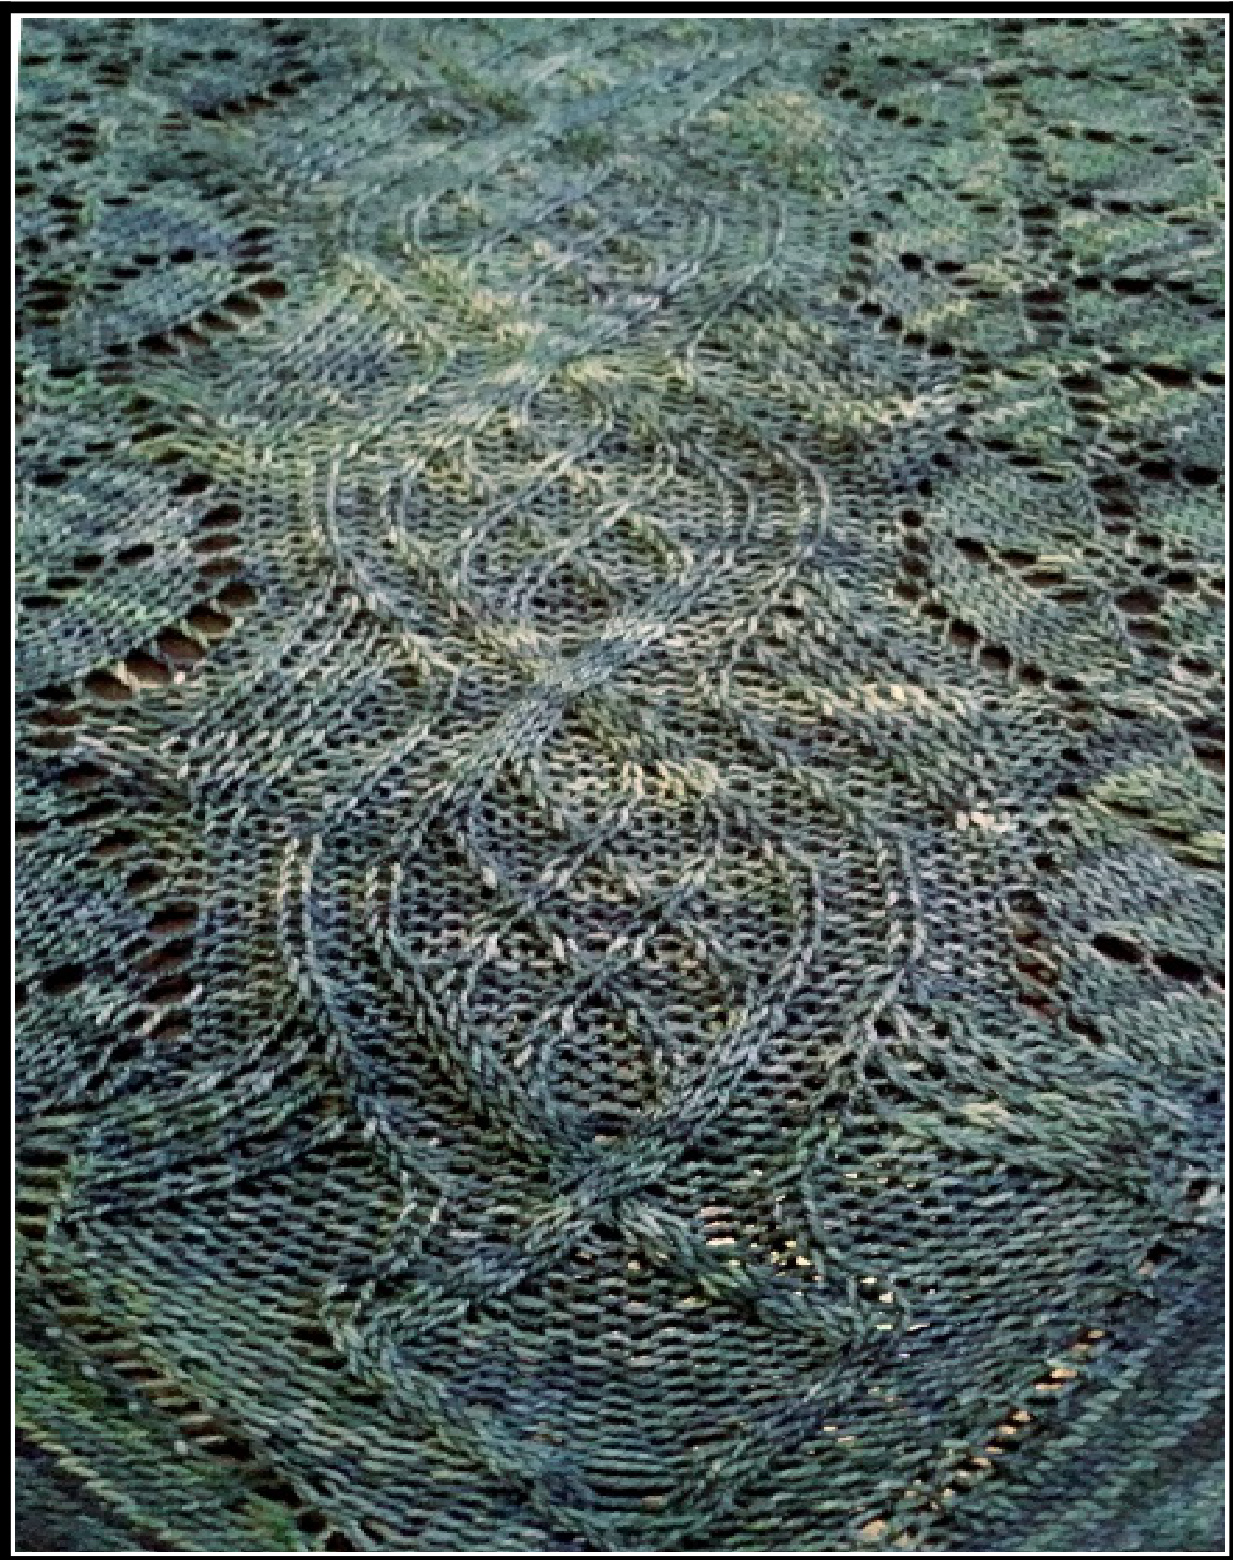
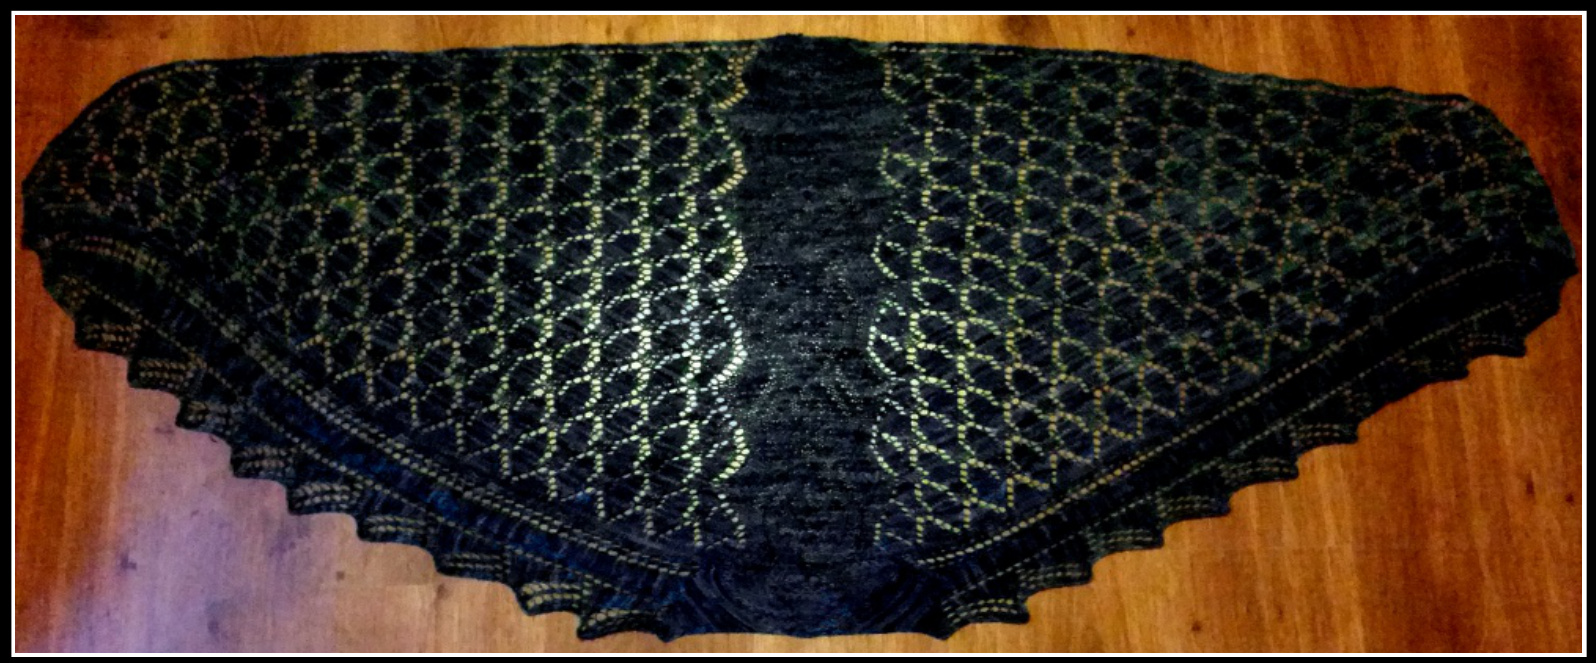
Five skeins of Knitsch Yarns 100% Merino Sock, or approximately 780 meters (855 yards) similar fingering weight yarn. Shawls are shown in the “Emo Nemo" (teal) and "The Dark Side" (purple) Knitsch colourways.
Tools
One 3.75mm (US Size 5) circular needle, at least 60 cm (24 inches) and ideally 100 cm (40 inches long. You will also need a shorter 3.75mm (US 5) circular needle, or a set of 3.75mm (US 5) DPNs. · Stitch Markers, and one cable needle or small double pointed needle to work the centre cable.
Skills Needed
Basic lace knitting skills (knit; purl; yo; k2tog; p2tog; ssk, sk2p) · Moderate cable knitting skills (1x1 cross, 2x1 cross, 3x1 cross, 2x2 cross, 3x3 cross, 5x5 cross) · Picking up stitches from an edge Short Rows (wrap and turn)
Gauge
auge when blocked is approximately 24 stitches over 10 cm (4 inches) in stockinett
Finished Dimensions
Approximately 163 cm (64 inches) across the widest point and 72.5 cm (28.5 inches) from top centre to bottom centre.
Abbreviations
K: Knit Ktbl: Knit through the back loop K2tog: Knit two together M1: Make one. This can be any method you choose that will not result in a hole - knit in the front and back loop of one stitch, pick up the loop from the stitch below, or pick up the bar between the stitch just knit and the next stitch. Whichever method with which you're most comfortable. P:Purl PM: Place marker P2tog: Purl two together Sk2p: Slip one stitch knitwise, knit two together, pass slipped stitch over SM: Slip Marker SSK: slip one stitch knitwise, slip second stitch knitwise, knit the two stitches together through the back loop. YO: yarn over Decrease 8 to 1: K1, slip st back to left needle, pass the next 7 sts over the slipped st, K the stitch again.
Cable Twists
3x3 Back Cross: Slip next 3 stitches to cable needle and hold to back, K3, K3 from cable needle. P under K Back Cross: Slip 1 stitch to cable needle and hold to back, K1, P1 from cable needle. P under K3 Back Cross: Slip 1 stitch to cable needle and hold to back, K3, P1 from cable needle. K3 over P Front Cross: Slip 3 stitches to cable needle and hold to front, P1, K3 from cable needle. K over P Front Cross: Slip 1 stitch to cable needle and hold to front, P1, K1 from the cable needle. K2 over P2 Front Cross: Slip 2 stitches to cable needle and hold to front, P2, K2 from cable needle. 2x2 Back Cross: Slip 2 stitches to cable needle and hold to back, K2, K2 from cable needle. P under K2 Back Cross: Slip 1 stitch to cable needle and hold to back, K2, P1 from cable needle. K2 over P Front Cross: Slip 2 stitches to cable needle and hold to front, P1, K2 from cable needle. WS P under P Cross: Slip 1 stitch and hold to back, P1, P1 from cable needle. K over K Front Cross: Slip 1 stitch and hold to front, K1, K1 from cable needle. K under K Back Cross: Slip 1 stitch and hold to back, K1, K1 from cable needle. P2 under K2 Back Cross: Slip 2 stitches to cable needle and hold to back, K2, P2 from cable needle. 4x3 Front Cross: Slip 4 stitches to cable needle and hold to front, K3, K4 from cable needle. 3x4 Back Cross: Slip 3 stitches to cable needle and hold to back, K4, K3 from cable needle.
Getting Started
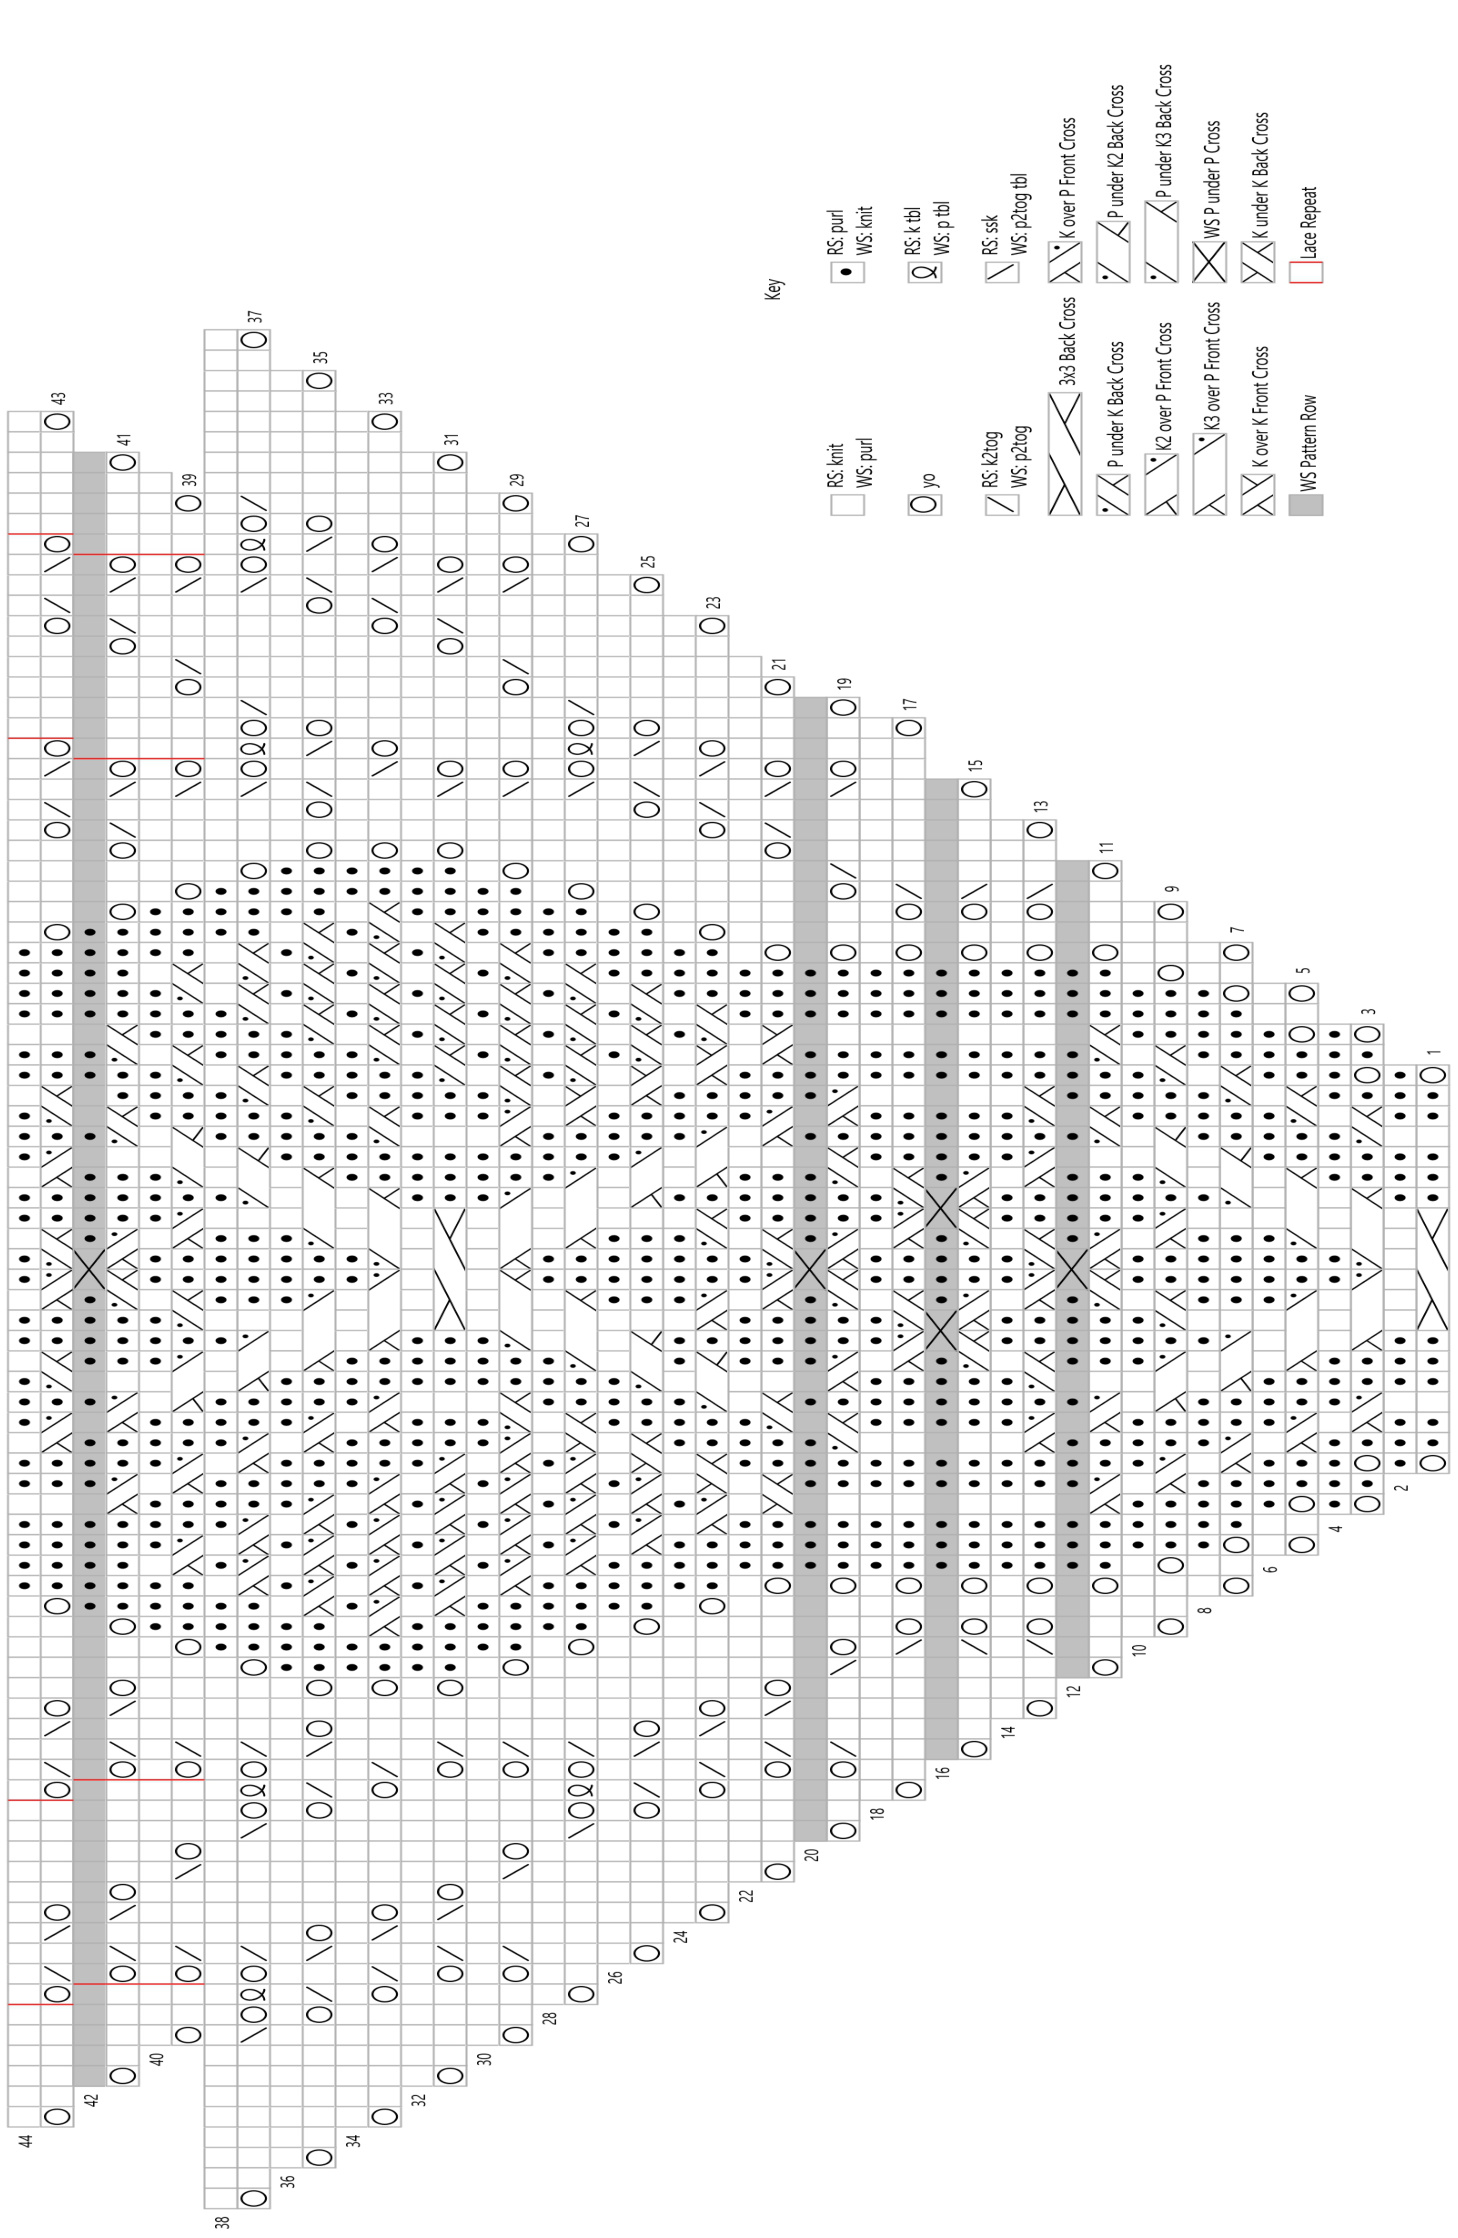
This pattern is made up of a centre cable panel, two body lace panels, and two edge panels. All instructions are provided in written and charted form. The body is broken up into a beginning chart, a middle chart, and end chart, and there are two edge charts for each side. Once the edge charts have been completed, the shawl is done - there is no binding off.
Cast on 3 stitches. Knit 12 rows. At the end of these 12 rows you will have a small rectangular piece of garter stitch fabric. Turn and knit another 3 stitch row. Then at the end of this row, pick up and knit one stitch in each of the 6 garter ridges along the long left side →9 stitches on the needle. Next, pick up and knit three stitches from the cast on edge. →12 stitches on the needle. Next Row (RS): K3, PM, [K1, M1] 6 times, PM, K3. →18 sts (3 border - 12 body - 3 border). Next Row (WS): K3, SM, P to next marker, SM, K3. Next Row (RS): K3, SM, [K2, M1] 6 times, SM, K3. →24 sts (3 border - 18 body - 3 border). Next Row (WS): K3, SM, K2, P1, K3, P6, K3, P1, K2, SM, K3. Stitch check! At the end of this section you will have 24 stitches.
Section 1 (Chart 1)
Things to Remember:
Each row begins and ends with three stitches K on both the right and wrong sides. These stitches are not charted. The only markers you need are the ones that separate the edge stitches from the rest of the patterning. The centre panel and lace patterning change too much for repeat markers to be useful. There will always be a YO between the lace knitting of the body and the purls that start and end the center panel - once the pattern is established and the edges of the centre panel move, remembering this will help you "read" your work and know where the edges of the centre panel are. There are seven WS rows highlighted in grey on both the chart and the written instructions. These rows have a 1xl cable cross in the middle of the row; otherwise, you will be kniting the knits and purling the purls (and the YOs) as you come to them. Check your work from time to time to make sure your cable crosses and lace patterning are lining up and you'll be fine.
Stitch check! At the end of Section 1, you will have 110 stitches.
Section 2 (Chart 2)
Things to Remember:
This section continues on from the last, in pattern. Like Section 1, each row begins and ends with three stitches K on both the right and wrong sides, and they are not charted. Repeat the chart four times while increasing the number of lace pattern repeats as specified. ? At the end of the First Repeat, you will have 170 stitches on the needles. ? At the end of the Second Repeat, you will have 230 stitches on the needles. .At the end of the Third Repeat, you will have 290 stitches on the needles. ·At the end of the Fourth Repeat, you will have 350 stitches on the needles.
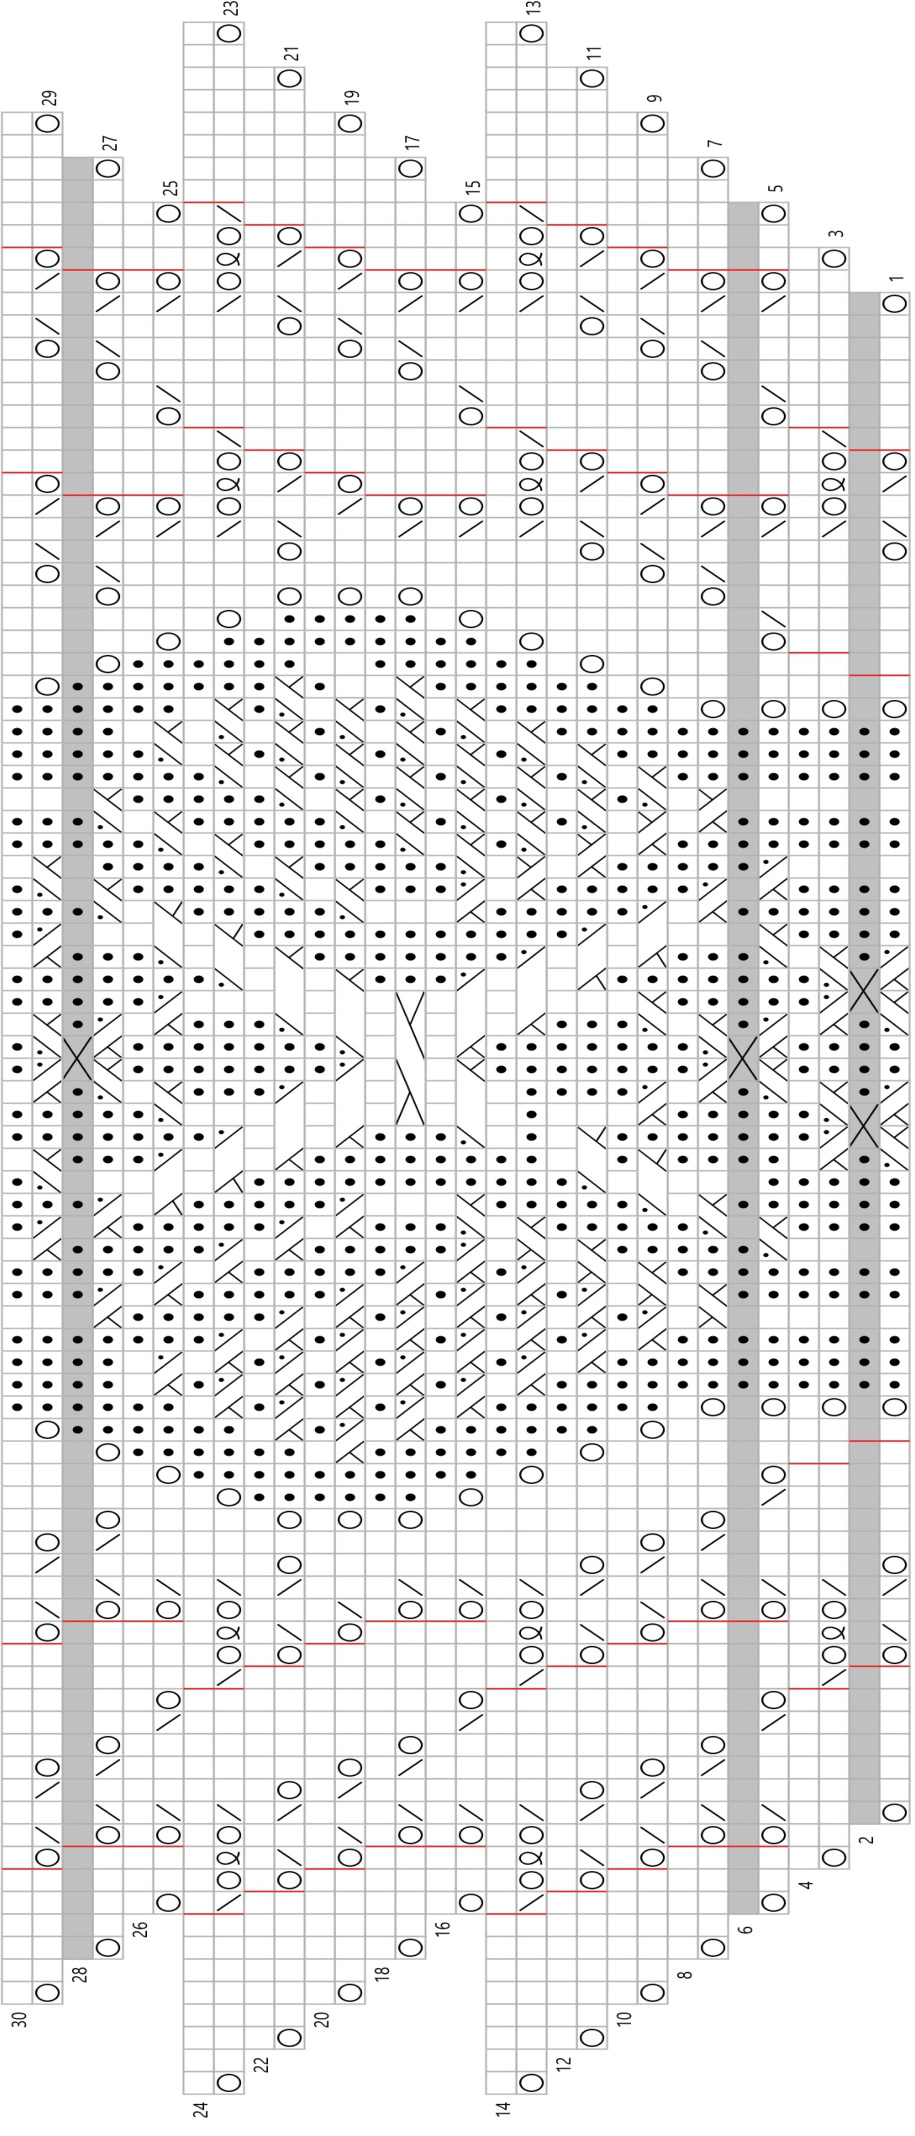
Section 3 (Chart 3)
Things to Remember:
This section continues on from the last in pattern until Row 12, including the three uncharted K stitches at the beginning and the end of each row. Beginning on Row 13, the pattern changes from row to row. After the first half of Row 23 is complete, all stitches except the centre panel stitches are held live. You will only be working with the centre panel stitches until they have all been bound off.
IMPORTANT:
The instructions are written so that you can keep the live stitches from the two halves of the shawl on the working needle if you are using a long circular needle. After the centre panel is bound off, you will have 167 stitches on the left needle and 168 stitches on the right needle (right side facing) with the needle tips pointed at the bound off area. After the k2tog on Row 48, cut yarn and pull end through remaining stitch.

Section 4: Edging
Things to Remember:
You will be using a shorter circular needle or DPNs and knitting the edging onto the body as you go. Body stitches are joined on both the beginning (RS) and end (WS) of the edge rows. Edge 1 (a and b) is worked first, from the centre panel to the edge, then Edge 2 (a and b). There is short row shaping while setting up, done on the WS on Edge 1 and the RS on Edge 2. 0To wrap and turn (W&T) on the WS: move the yarn to the back of your work, slip the next stitch from the left needle to the right needle, bring the yarn to front, and place the slipped stitch back on the left needle. Turn work to the RS. 0To W&T on the RS: bring the yarn to the front of your work, slip the next stitch from the left needle to the right needle, move the yarn to the back, and place the stitch back on the left needle. Turn the worktotheWS.
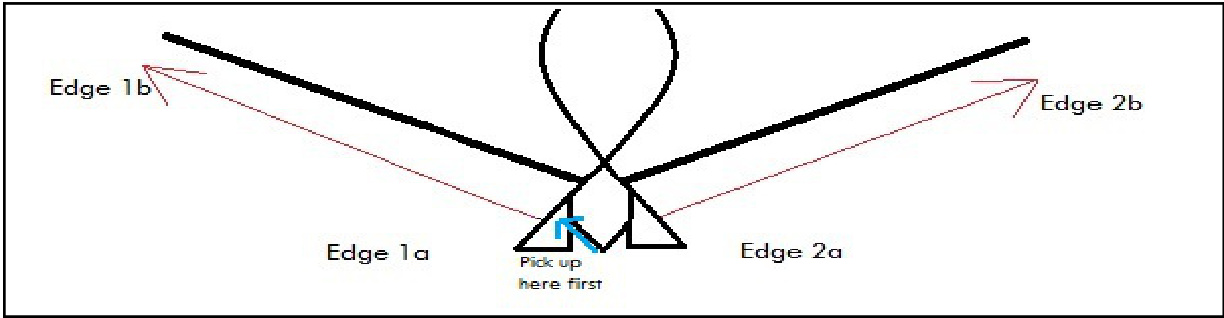
First Edge
With RS facing, pick up all of the purl bumps along the right edge of the centre panel with the left needle, starting at the bound off tip. →17 sts. Starting from the shawl body end (RS): K4, \*Knit in front and back of the next stitch; repeat from \* 8 times, k4. →26 sts. Next row (WS): K2, P to end. Next Row: K to end. Next Row: K2, P to 3 stitches before end, W&T. Next Row: K to end. Next Row (WS): K2, P to 3 stitches before last turn, W&T. Next Row (RS): K to end. Repeat the last two rows 10 more times. Next Row (WS): K2, P23 while picking up and purling wraps with the stitch it wrapped, P the last stitch with a stitch from where the centre panel meets the shawl body and the first live stitch from the body (purl the 3 together) to close the gap. the charts, begin the chart marked “"Edging 1a" now. Repeat the chart 9 times tota
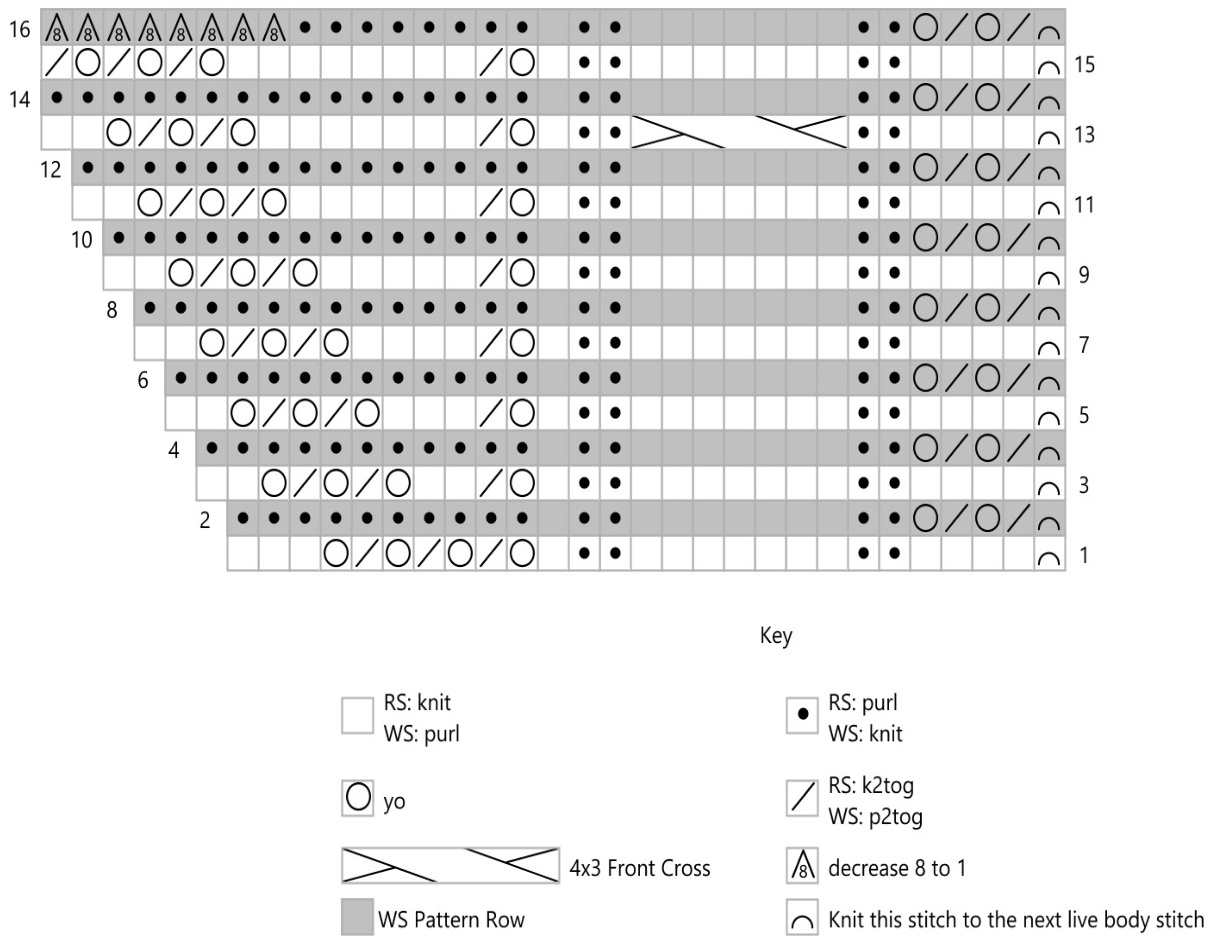
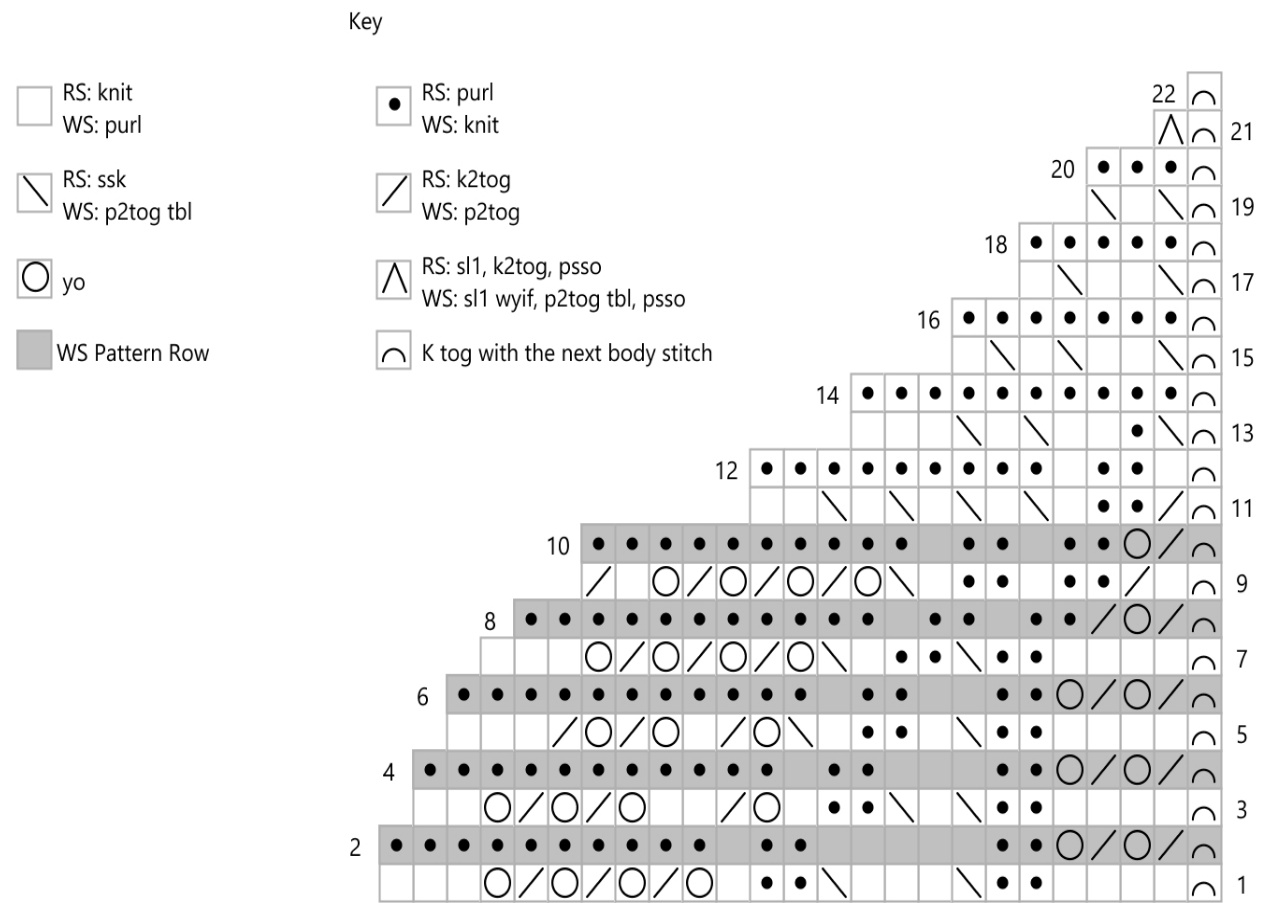
Then work the "Edging lb" chart once.
Second Edge
With RS facing, pick up all of the purl bumps along the left edge of the centre panel with the right needle, starting from the bound off tip. →17 sts. Starting from the shawl body end on the WS: P4, \*Knit in front and back of the next stitch; repeat from \* 8 times, P4. → 26 sts. Next row (RS): K to end. Next Row: P to lasts 2 sts, k2. Next Row: K to 3 stitches before end, W&T. Next Row: P to last 2 sts, k2. Next Row (RS): K to 3 stitches before last turn, W&T. Next Row (WS): P to last 2 sts, k2. Repeat the last two rows 10 more times. Next Row (RS): K25 while picking up and kniting wraps with the stitch it wrapped as you come to them, then k the last stitch with a stitch from where the centre panel meets the shawl body and the first live stitch from the body (knit the 3 together) to close the gap. Next Row (WS): P the first stitch together with the next live stitch held from the body through the back loop, p to end. If you are working from the charts, begin the chart marked “"Edging 2a" now. Repeat the chart 9 times total.
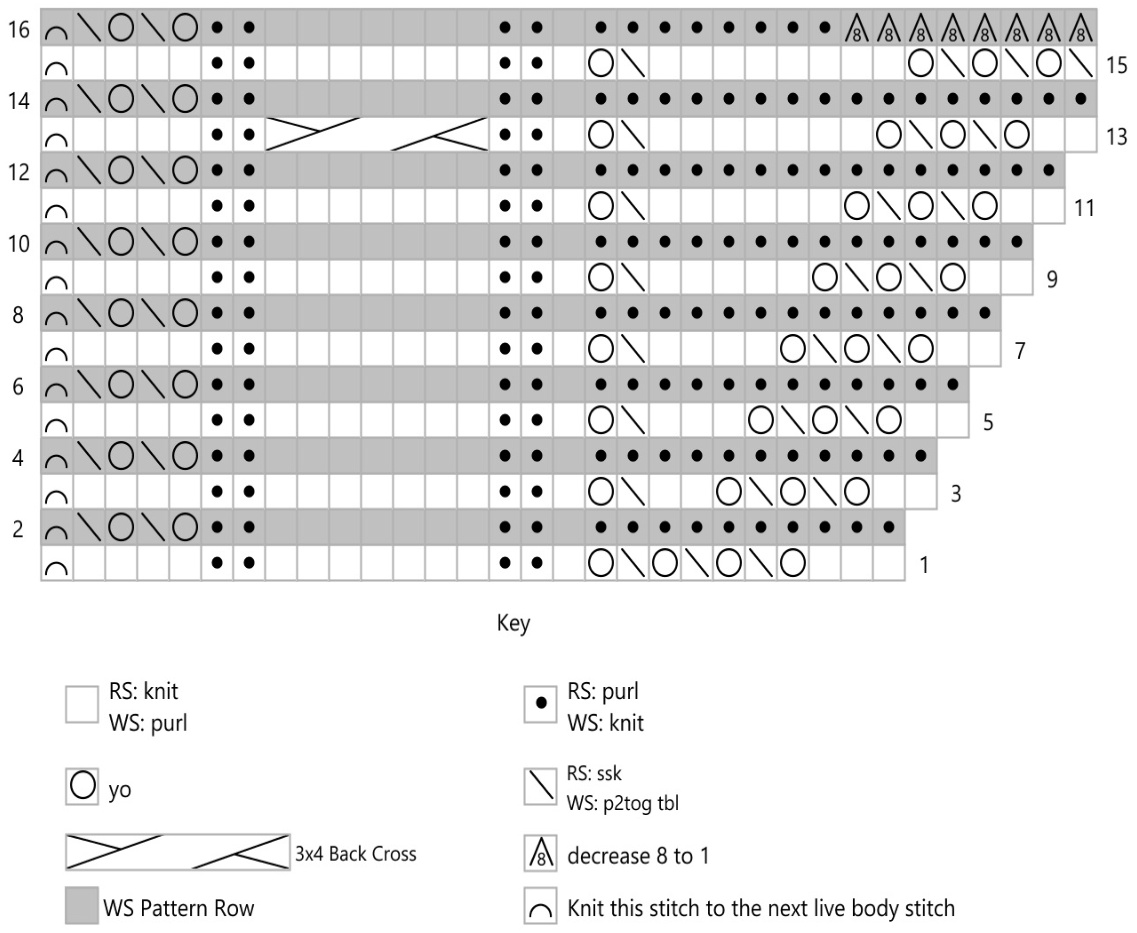
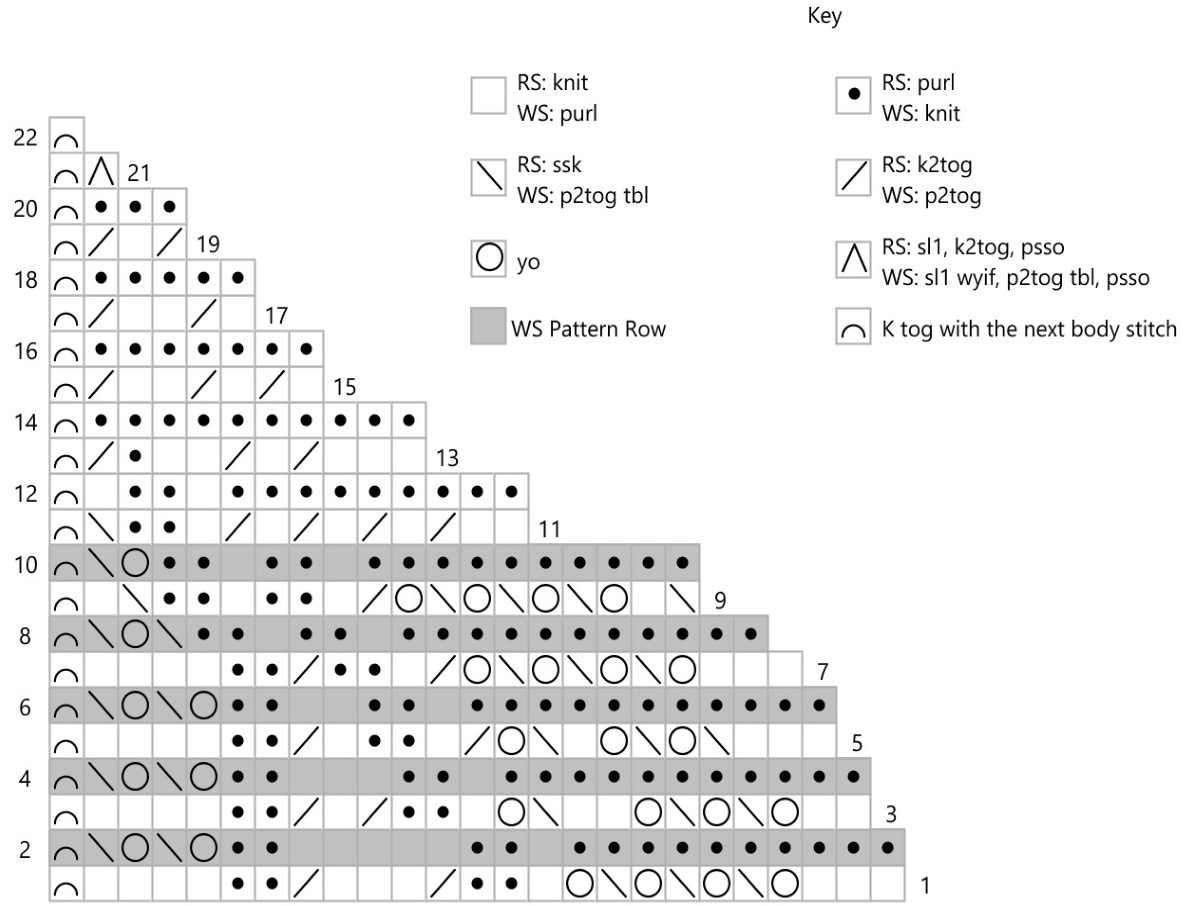
Then work the "Edging 2b" chart once.
Finishing
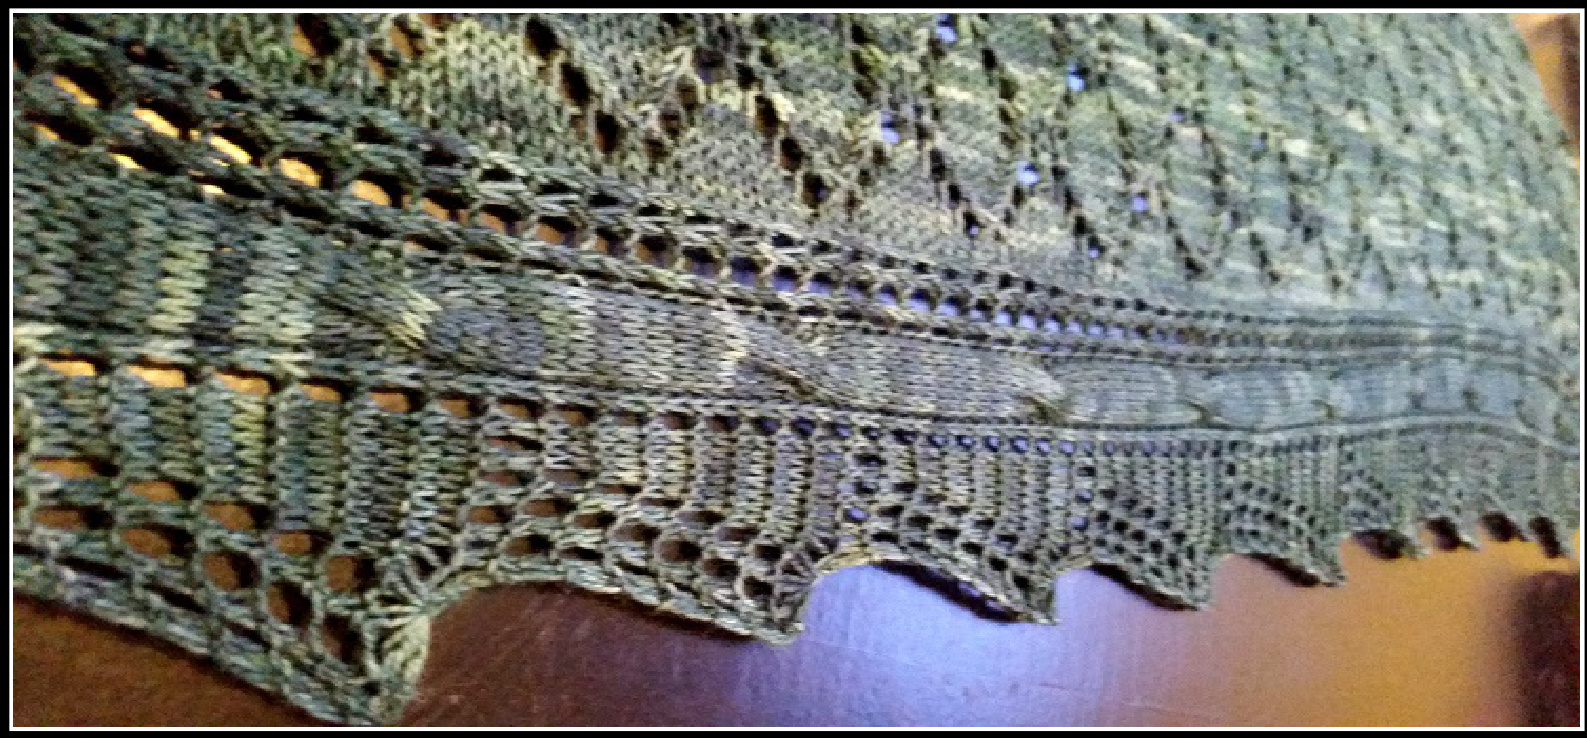
Block to finished dimensions: approximately 163 cm (64 inches) across the widest point and 72.5 cm (28.5 inches) from top centre to bottom centre. Remember, this is not a perfect half circle shawl - the top edge curves down a bit at the tips. The lace at bottom edge can be blocked to either points (as pictured) or a more rounded edge, depending on preference.
Have Any Questions?
:el free to message me (Awilda on Ravelry), or come join our group at Awilda B. Designs


