Stairway to Stranded Socks: A Tutorial
Author: Anja Freihube Dear fellow knitting folk. here you find not only a pattern but a whole tutorial on sock knitting. Especially stranded sock knitting. This document can be used in two ways. You will be lead through the knitting of a two-coloured sock step by step. The instructions are about the general concept of the current step first and then they will be applied to the specific chart/pattern. It's your decision how to use this. If you have some different pattern in mind, you can just stick with the general instructions and refer them to other patterns or you stick with the pattern given here. Throughout the document I will add links to video or photo-tutorials or further reading on some topics which might be useful for the understanding. In case of little mistakes or typos or something, you can just contact me and I'll be glad to fix it. Same applies to further questions on the topic itself. This pattern is for personal use only.
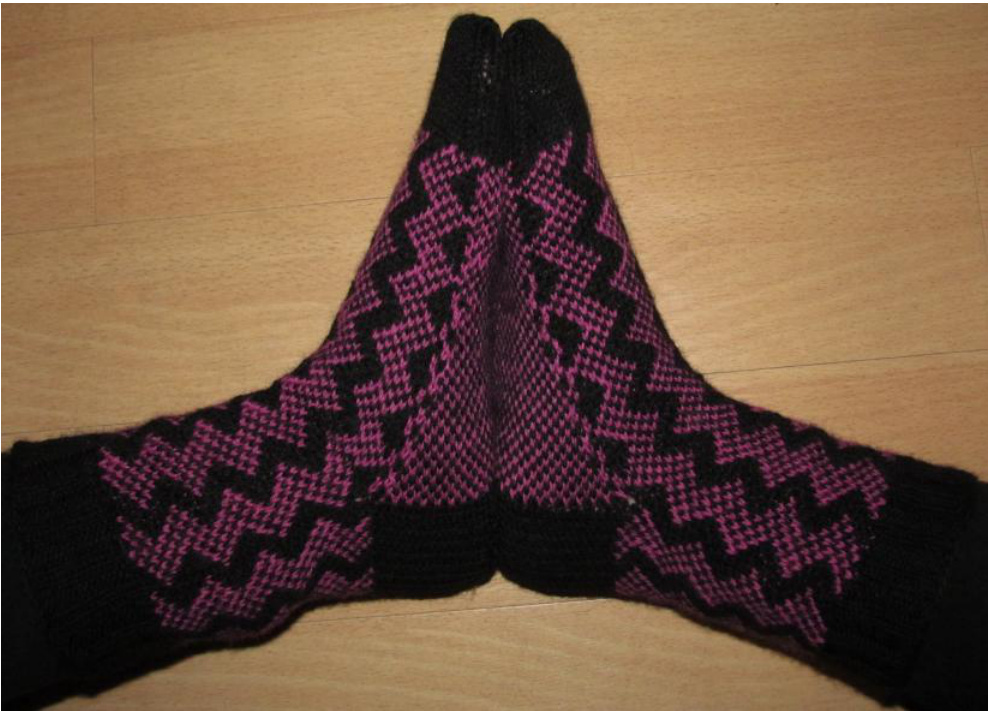
Figure 1: My pair of sample socks for this pattern
General Background on Sock Knitting
First, some overview over all of sock knitting. There are many different ways to do socks and I'll try to give a short outline on the most important aspects. Toe-Up or Cuff-Down - this is one of the first things to consider. Either you start working your sock from the toe and go all the way over our foot, your ankle and up to the leg. OR you start at the leg with working the cuff first and then proceed down to the ankle, the foot, the toes. This is mainly a question of personal preference. As I perSOnally only work Cuff-Down, THIS TUTORIAL wILL FEATURE CuFF-DowN-SoCKS. DPNs or Circular Needles - Again, this is mostly a matter of taste. Some people just don't like to handle five needles at a time with all their pointy ends, so they work on circs. You can either work on two circular needles or on only one very long one. The principle is the same in both cases: you knit in the round. In THIs TUTORIAL, I'LL USE NOTATION FOR DPNs, So the needles will be numbered from 1 to 4. If you use two circs instead, then the needles 1 and 2 are the first circ needle, and needles 3 and 4 is your second circ. Nothing else changes. If you use one long circular needle, you'll need to keep track of your stitches by counting and placing a stitch marker at the beginning of the round. Yarn - this one is crucial. There is this thing called sock yarn. Obviously, that is what you use for knitting socks. But what is it? Well, to speak in terms of ply, it's 4-ply yarn. It's fingering weight. It has gauges between 28 and 32 stitches (10cm/4in) on 2.5mm to 3mm needles (US 1, 2) and 100 gram of it run about 400m to 420m (435 yds to 460 yds). Sock yarn is a blend of different materials. Almost all sock yarns contain \~ 25% of Nylon or Polyamide or something similar. And this is good. This is what prevents socks from geting baggy and sloppy. It makes that the sock stays in shape while wearing and washing. The other 75% of the yarn could be anything. Usually it's just wool, but it can be Merino, Alpaca, Silk, Cashmere, whatever. Merino sock yarn is my favourite, it is lovely to work with, so squishy and so soft and warm. Just perfect! Don't worry if you can't come up with a sock yarn that doesn't feature some kind of poly-stuff. I wouldn't recommend that at all. Most sock yarns are super-wash, so you can easily put them into your usual washing routine, but take a look at your yarn, super-wash is always mentioned on the banderole. If it's not, be careful. For twO-coloured knitting I RECOMMEND THE USE OF TWO SOLID YARNS. Colourful yarnS usually destroy the pattern. Slightly semisolid or soft colour gradient yarns may work, it depends on the pattern. Needle Size - the needle size depends on your type of knitting. Whether you knit loose or tight. In general, working socks with sock yarn is done on needles from 2.25mm to 3mm (US 1 to 2). The needle size depends on the pattern and the techniques therein as well. For plain socks you can use very small needles, if you're dealing with cables and stuff, you might want it a little more loose. When working a technique such as stranded knitting, which causes a lack of stretchiness in the resulting fabric, you better go up a needle size. Personally, I work those socks on 2.75mm needles (US 2). Smaller needles result in a very stiff fabric, but maybe that is different with your tightness of knitting - try out. If the pattern doesn't easily allow modifying the size by adding or subtraction a pattern repeat, the needle size still gives you an instrument to do so. Just choose one size larger or smaller if it really is necessary.
Instructions
Cuff
· In General
The cuff is necessary to make your socks stay in place on your legs. It is usually worked in some kind of ribbing. Either k2,p2 or k1,p1. The knit stitches can be worked through the back loop (tbl). I recommend working the cuff on smaller needles than the rest of the sock, you don't want it to be loose or baggy. This is also the reason why the cuff has fewer stitches than the leg (at least this applies to stranded knitting). As mentioned before, stranded knitwork doesn't have as much horizontal stretch as standard socks. You just need more stitches to make your feet fit into it.
This pattern
Cast on 4 x 16 (=64 total) sts with Main Colour, evenly divided across four DPNs, size 2.5mm (US 1 1/2). Close to round and knit 12 to 20 rounds of k2,p2 ribbing. The length of your cuff is solely a matter of your preference.
Setup
· In General
Between cuff and leg you need to adjust your stitch count, so you work a set-up round where you change to larger DPNs (2.75mm or US 2) and make increases to reach the final stitch count, evenly distributed.
This pattern
Switch to larger DPNs and work one round as follows (increasing 8 sts to 72 sts total, evenly spaced): \*k7, kfb\* (knit front and back). Now you have increased your stitch count from 64 to 72. This may seem a lot, but it will work out! Again, the stretchinessmatter...
Leg, starting the pattern
· In General
About the chart: Charts for stranded knitting are basically an array of boxes which are shaded in two colours. Each colour represents one colour of your knitting. Most patterns differentiate between Main Colour (MC) and Contrast Colour (CC). For some patterns, it doesn't matter that much, but usually this information is given. You work these charts like other charts, from the bottom to the top, from right to left. You only work knit stitches, with the Colour indicated in the Chart. It's as simple as that. You repeat the chart as many times as possible. It might be up to 18 times per round or something! Some patterns have huge charts, which are only worked once or twice. The yarn which you hold to the left side of the knitting becomes a little dominant in the result. I recommend to put CC left and MC right. This way, they don't get entangled and the handling is much more comfortable. Alas, there is this thing called Floats, which will be topic of the next chapter.
This pattern
C and start knitting the chart (see Figure 2). The chart is repeated 8 times p round (twice per needle). Work until the leg reaches the desired length (something between 3 to 6 repeats, my sample shows 4).
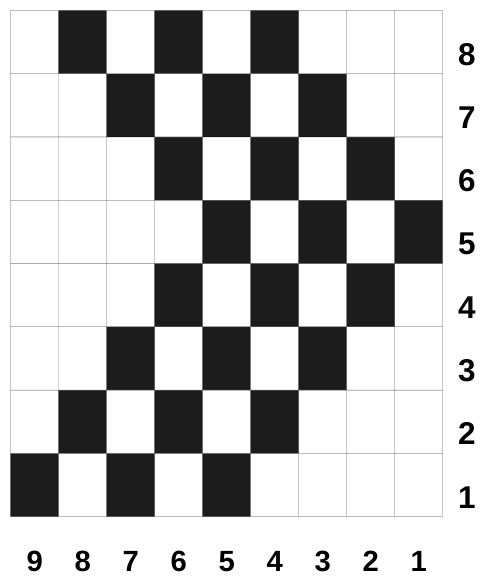
Figure 2: Chart for two-coloured stairways pattern
Stranded Knitting and Anchoring Floats
· In General
While you are knitting stitches with one of your yarns, the second yarn remains on the back of the knitting. When it is due again, you grab it and continue with it. This is an astoundingly simple principle, but it has some dark side. If you have to knit, say, 10 stitches of one colour only, the second yarn will have to make quite a way on the back side, before you grab it again. And this is bad, it is really bad because you completeley lose stretchiness. Your knitting becomes tight and stiff as hell. So, there has to be some way to fix this. It's called anchoring floats. Basically, you secure the inactive yarn by twisting it around the active yarn. The technique depends whether you have to secure CC or MC (left strand or right strand, see above). Anchoring the left strand: Insert the right hand needle into the next stitch as if to knit, but don't knit it. Wrap the left strand downwards over the needle. Wrap the right yarn upwards around the needle (just as if to knit) and then re-wrap the left strand off the needle (upwards). Knit the stitch with the right strand, which is already around your needle. Knit on, the left strand is now secured between this stitch and the next one. Anchoring the right strand: Insert the right hand needle into the next stitch as if to knit, but don't knit it. Wrap the right strand upwards around the needle. Wrap the left strand upwards around the needle (just as if to knit) and then re-wrap the right strand off the needle (downwards). Knit on, the right strand is now secured between this stitch and the next one. When to anchor? I do not know whether there is a global rule for after how many stitches you have to anchor your floats. My recommendation however, is to do it as soon as there are more than 3 stitches of one colour in a row. And if there's much more than this, I anchor on every third stitch. Patterns with many long floats turn out to be less stretchy than patterns with not so many and not so long floats. Anchoring can be quite annoying, so you might prefer patterns without massive amounts of floats. I get that this anchoring issue might be confusing from reading only, so there's a photo- and video-tutorial in the footnote. 1
This pattern
In this pattern, you only have one kind of floats which is nice for beginners (well, and everony else!). There are 4 stitches of MC per repeat in every row of the chart. Anchor stitches on second or third stitch of these four as described above.
Heel and Foot
· In General
There are various ways of knitting a sock's heel. Featuring all of them would kind of exceed the limits of this tutorial. Here, I will stick with two kinds of heel (sample socks feature heel-flap): · classic heel-flap construction (Advantages: can easily be reinforced by slippedstitch-pattern to make it last longer, good fit for every kind of instep. Disadvantages: you need to pick up stitches and work a gusset in which you have to fit in a pattern.) · short-row heel (Advantages: Quickly done, no gusset, no picking up stitches, pattern can be easily continued afterwards. Disadvantages: short-rows, not so easily reinforced, can be difficult to get good fit on high insteps.) At this point, decide for one heel and follow those instructions only.
Heel-Flap construction
A heel-flap-heel has three parts: the heel flap, the heel turn and the gusset. Figure 3 shows the anatomy of socks constructed this way to help understand what is happening next. The heel flap is only worked over half of your stitches while the other half stays at rest, untouched. It's worked in rows, not rounds. It's worked downwards until the bottom is reached. As a general rule you work as many RS and WS rows as there are stitches on a single needle. E.g. you are knitting with 72 sts total, which is 18 sts per needle. Then you work 18 WS and 18 RS rows on your heel flap. From this point you can start and think about whether to work more or fewer rows, depending on individual parameters. When the bottom is reached, the heel turn starts. This part is decreasing the stitch count and curving the rectangular heel flap inwards. Look at your heel - it's curved, not cubic :) In the footnote 2 you will find an overview for heel turns at various stitch counts and variations for more or less boxy heels. The one I use is the rounder heel. At last, you go and pick up stitches from the sides of the heel flap to join the instep stitches and continue working in the round. The sole needles now have way more stitches than before. Decreases are worked every other round (sometimes every third round) on the edge between instep and sole until the stitch count is back to normal. At this point, you have already worked half of the foot and are heading towards the toes.
This pattern
Start the heel at the beginning of the round. Turn your work, WS facing. Heel Flap With MC, work the stitches on needles 3 and 4 as follows: Sl1, p to end. Leave CC hanging. I recommend to put all heel stitches on a single needle. Turn work again, RS facing. (From now on, you will work these stitches only, back and forth in rows.) Work the following two rows 17 times each: RS: Sl1, \*(k1,sl1)\* to end. The last stitch mustn't be slipped! WS: Sl1, p to end. By working the flap in this manner, you create a double layered fabric which is very durable. Heel Turn You should now be ready to work a RS row. Continue as follows: Row 1 (RS): Sl1, k21, ssk, k1, turn work Row 2 (WS): Sl1, p7, p2tog, p1, turn work Take a look at your knitting. You can see a little gap between two stitches (where you turned your work before). Continue working in the manner of the previous two rows, always working together the two stitches around the gap. You should end being ready to work a RS row, having 22 sts left. Knit across them and divide the 22 stitches onto two needles again (11 on each). The beginning of the round has now moved here, between the two sole needles. This means that the needle count has also changed. The sole is worked on needles 1 and 4 while the instep is worked on needles 2 and 3. Gusset Pick up and knit 19 stitches from the side of the heel flap (needle 1). Make sure to pick up at the slipped stitches, under two loops of yarn! This is tricky to explain with words, so in the footnote, there is a video to illustrate this part3. Pick up 17 stitches, one for each slipped stitch at the edge and then pick up two more at the corner next to the instep, this prevents holes. The next needle is the instep again, where the CC strand is waiting for you. Continue working the chart across the instep (needles 2 and 3) until you reach the heel flap again. Now is the time to consider what you want your sole to look like. For beginners, I recommend to work either a checkerboard-like pattern as in my sample or plainstripes. For the checkerboard you alternate MC and CC for each stitch and work MC over CC and CC over MC in consecutive rounds. For stripes, you also alternate MC and CC (over one or two stitches) and then work MC over MC and CC over CC. The adventurous knitter might choose any kind of pattern for the sole, but has to consider the gusset stiches. Pick up and knit 19 sts again on this second side of the heel flap (needle 4). Do this alternating between MC and CC, making sure it is not too loose. Knit to end of round, establishing your sole pattern as desired. In the next round knit the picked up stitches through the back loop. Work the instep in pattern as established. The gusset decreases start in the second round after picking up the gusset stitches. Workasfollows: · (Round 1) On needle 1: k to 3 sts before end, k2tog, k1. On needle 4: k1, ssk, k to end. ·(Round 2) No decreases. Repeat these two rounds for the sole until the stitch count is back to 18 again. Continue knitting in pattern until the sock reaches your pinky toe. For my sample, this were 5.5 repeats of the chart, from instep on.
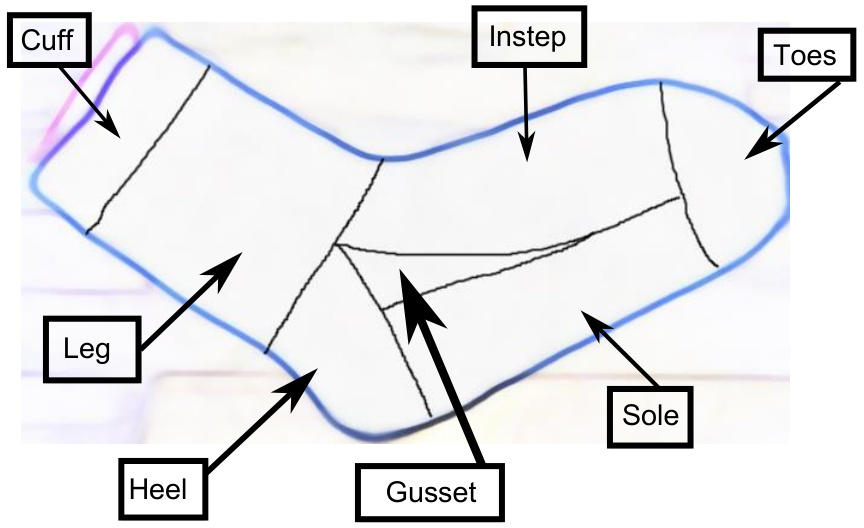
Figure 3: The anatomy of heel-flap socks
Short-Row Heel
A short-row heel is worked over half of the total stitch count, back and forth in rows. It consists of two mirrored parts: By always skipping one more stitch before the end of the row, the middle stitches are worked more often and create space for the heel. In the second part, you always knit one more stitch towards the end of the row, reversing the first part. This creates a cup for your heel. There are many ways to work these short rows. Usually, you don't want it to get holes at the point where you turn your work. Some methods work with extra increases and decreases to compensate, some work with wrap and turn and so on. In this pattern, the method of choice are German Short-Rows, which is no wrap, no increase/decrease, no counting, no holes. Follow the footnote to get a photo-tutorial 4.
This pattern
The heel is worked with MC over needles 1 and 2 as follows (leave CC hanging, don't cut it): 1. (RS) Knit to the last stitch of needles 1 and 2, putting them all on one needle only. Turn work, WS facing. Slip the first stitch on the left hand needle and pull the yarn over the needle, creating a double-legged stitch (see phototutorial in kws facing. the first ste-ehged stitch (see phd the footnote!). Bring yarn to the front again as usual and continue 2. (WS) Purl to the last stitch of the heel needle. Turn work, RS facing. Bring yarn in front and slip the next stitch. Pull yarn above the needle, creating a double-legged stitch (on this side, the two legs are a little twisted, that's fine). Continue 3. (RS) Knit to one stitch before the first double-legged stitch, proceed as in (1.) 4. (WS) Purl to one stitch before the first double-legged stitch, proceed as in (2.) 5. Continue working the last two rows until there are 12 centre stitches left. Continue for the second half of the heel as follows: 6. (RS) Sl1, knit across the centre stitches until you reach the first double-legged stitch. Knit the stitch with both legs (this may seem fiddly first, but you'll that tehre is plenty of space under this weird stitch to knit or purl). Turn work. 7. (WS) Sl1, purl across the centre stitches until you reach the first double-legged stitch. Purl this stitch with both legs. Turn work. 8. Continue working these last two rows, always working one more stitch than before, until you are back at the point where you started the heel. Here, the CC strand should be waiting for you. You can now redistribute the heel stitches onto two needles again. Rejoin CC yarn and continue working in the round, working the pattern on the instep. It's up to you, whether you continue the pattern on the sole as well or if choose to work a distinct sole pattern (stripes, checkerboard,...).
Toe
As soon as your socks have reached the desired length (approximately pinky toe), you stop kniting the chart and continue in MC only. Cut the CC yarn with approximately 20cm tail hanging. Knit one round and anchor this tail of CC yarn on every third stitch (for the whole round). By doing this you can avoid sewing in this end of yarn! In the following, there are Two oPTloNs for the toe. First, the wedge toe. This is the one I featured in my sample pair. It fits most people very well. You have to graft stitches in kitchener stitch in the end, which is explained. If you don't want to try this one, work a star toe.
·Wedge Toe
Cut the rest of CC and continue alternating the following two rounds: NOTE: If you worked a short-row heel, you have to change the needle count. The beginning of the round is between the two sole needles after the heel. Thus, the sole is worked on needles 1 and 4, the instep is worked on needles 2 and 3. · (Round 1) On needles 1 and 3: k to 3 sts before end, k2tog, k1. On needles 2 and 4: k1, ssk, k to end. (Round 2) K all sts. Work in this manner until there are 8 sts per needle left, ending with Round 2. Knit the stitches of needle 1 one more time, so you are at the edge between instep and sole. Place 16 sole stitches on one needle and 16 instep sts on another needle, holding them parallel. Cut yarn, leaving 30 cm tail. Pull yarn in blunt tapestry needle. Graft sts together with kitchener stitch as follows: · Pull yarn through first stitch on front needle (instep) as if to purl. Then pull yarn through first stitch on back needle as if to knit. · Pull yarn through first stitch on front needle as if to knit and let the stitch slide down from the needle. Pull yarn through next stitch on front needle (instep) as if to purl. · Pull yarn through first stitch on back needle as if to purl and let it slide down from the needle. Pull yarn through next stitch on the back needle as if to knit. · Repeat the last two steps until all stitches are worked. Use the tapestry needle to sew in the end of the yarn. Again, it might be helpful to actually look at grafting, so there's a photo5- and a videotutorial6 in the footnotes.
Star Toe
Cut the rest of CC and continue as follows: (k10, k2 tog) for one round (66 sts left). Knit two rounds. (k9, k2 tog) for one round (60 sts left). Knit two rounds. (k8, k2 tog) for one round (54 sts left). Knit two rounds. (k7, k2 tog) for one round (48 sts left). Knit two rounds. (k6, k2 tog) for one round (42 sts left). Knit two rounds. (k5, k2 tog) for one round (36 sts left). Knit two rounds. · (k4, k2 tog) for one round (30 sts left). · (k3, k2 tog) for one round (24 sts left). · (k2, k2 tog) for one round (18 sts left). · (k1, k2 tog) for one round (12 sts left). · (k2 tog) for one round (6 sts left). · Cut yarn, leaving 20 cm tail. Pull through remaining stitches twice, sew in end.
Finishing
All that is left is to weave in ends of yarn. And to knit a second sock, of course. Soft washing and blocking helps the pattern to really blossom and even out. So, don't worry if your piece looks kind of wrinkled right after knitting.
List of Abbreviations
· k: knit · p: purl ● st(s): stitch(es) ●MC: Main Colour CC: Contrast Colour · tbl: through the back loop · kfb: knit in front and back of one stitch (increase) ·RS: Right side · WS: Wrong side · k2tog: knit 2 stitches together (decrease) · ssk: slip, slip, knit the two slipped stitches together (decrease, slipping kn


