Making T Shirt Yarn
1 MATERIALS
Cotton (or mostly cotton) t-shirt with no side seams and minimal logos. Ruler (or other flat stick that is 1" wide) Pencil Good scissors
OTHERTIPSANDNOTES
Thicker strips make thicker yarn, thinner strips make thinner yarn. Heavier fabric will make thicker yarn if cut to the same width as a thinner fabric. You may need to adjust your strip widths based on the type of yarn you want and the thickness of your t-shirt. ·YouTube has lots of videos showing this process if you need more help. You can also find lots of patterns and ideas for using this yarn by just searching "T-shirt yarn" in Google or Pinterest.
2 MARKING THE T-SHIRT
Lay your t-shirt flat on a smooth surface. Lay a ruler straight or other straight edge across the t-shirt just under the arm pit and mark a line. The line does not need to go all the way across the shirt, just the length of the ruler. Continue marking parallel lines about 1 inch apart down the front of the t-shirt.
3 CUTTING THE T-SHIRT
Fold the t-shirt in half shoulder to shoulder with the marked lines facing up so you can see them and the bottom layer of the t-shirt extending beyond the top layer by about 1 inch. Cut the first line (under the arm pit of the shirt) all the way across and discard the sleevesand neckof the shirt.
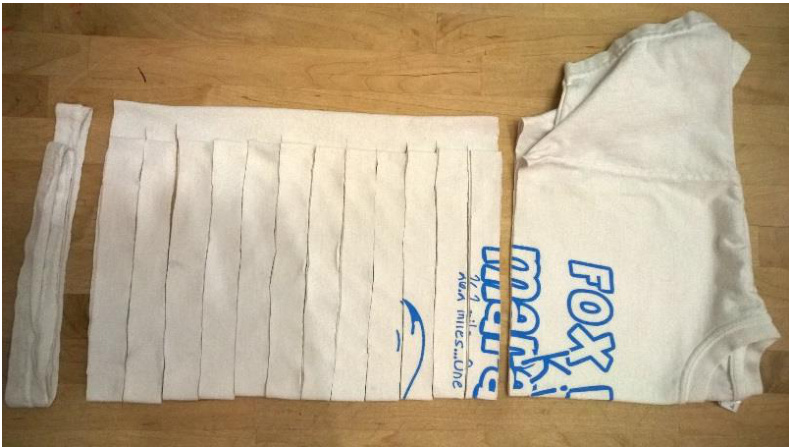
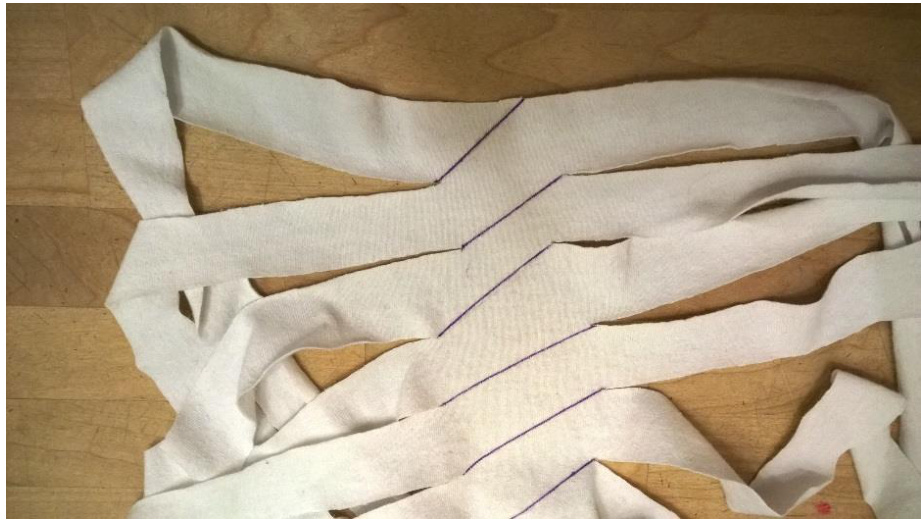
Cut all the remaining lines just to the point where the top layer ends - don't cut all the wayacross! The last strip will include the hem of the tshirt; go ahead and cut this off completely and discard. At this point, if you unfold the middle section of the t-shirt, you will now have what looks like a double thick hula skirt. Open up the hula skirt and make diagonal cuts across the 'band' from the end of one strip to the next. Making diagonal cuts gives you one long strip of fabric. The picture below shows where the cut lines would be but you don't need to mark these lines. You can also see that the lines are not parallel, don't worry about that! It will work out in the next step.
NOW It's TIME TO MAKE THE YARn!
Starting at one end of your long strip, grab a section of fabric about 1 feet long and pull firmly. The fabric will stretch and curl on the edges creating a tube which is your yarn. Continue pulling across the length of fabric and roll into a ball.
Crocheting a Basket
5 MATERIALS AND BASIC STITCHES
Yarn of your choice and a corresponding crochet hook that will give you a firm fabric, but you will have to experiment to find what works best for you.
| YarnWeight | Hook Size Guideline (for a firm fabric) |
| Fingering | 2-2.5 mm, size B |
| Sport | 2.5-3mm,sizeBorC |
| DK/LightWorsted | 3-3.5mm,sizeCorD |
| Worsted | 3.5-4 mm,sizeE,F,or G |
| Aran/HeavyWorsted | 4-5.0 mm,size G,H |
| Chunky | 5-6.5 mm, size H,I, J,K |
| Bulky | 7+mm ,size L, M, N, P |
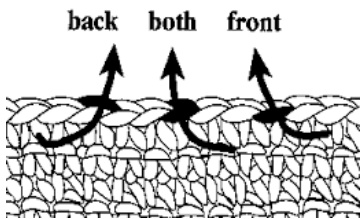
Single Crochet (SC): Insert hook from front under both sides of the V that forms the top of a stitch. Wrap yarn around the hook and pull through a loop (2 loops on hook). Wrap yarn around the hook again and pull it through both loops on the hook leaving you with 1 loop on the hook and a complete SC. Single Crochet Front Loop Only (SCFLO): Instead of inserting the hook under both legs of the V, insert it under just the front leg of the V. Slip Stitch (Ss): Insert hook from front under both sides of the V that forms the top of a stitch. Wrap yarn around the hook and pull through both the V legs and the loop on the hook leaving one loop on the hook again.
6 STARTING THE BASE
For some, this can be the trickiest part of the pattern. Don't get discouraged if you are new to crochet and this seems challenging.
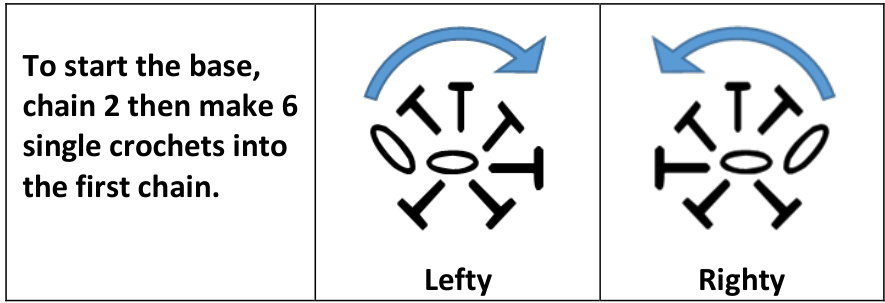
· The stitches will naturally spread around into a small circle. · If the chain that you are crocheting into opens up, you can pullit closed by tugging tightly on the tail of the yarn. · Don't worry if you crochet over the slip knot.
7 INCREASING THE BASE
The reason this pattern works for any yarn is because the formula for increasing is always the same. You will ALWAYS have a multiple 6 stitches around the edge of your base. You can make as many rounds as you want to get the size of the base you want.
Round 1:
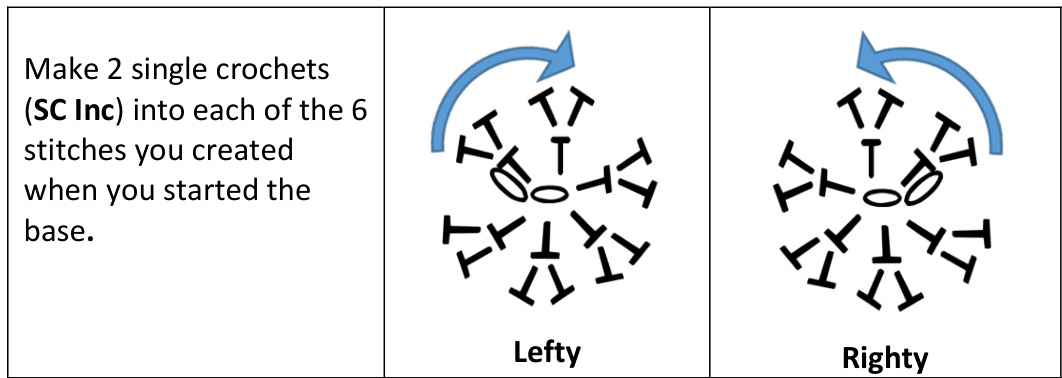
·It's a good idea to put a lockable stitch marker in the FIRST stitch of the round in case you lose trac of yourstitches. · The rounds work in a spiral, you do not need to join each round before starting the next, just continue the spiral. Round 2: Make 1 single crochet in the next stitch (1sC), then make 2 single crochets (SC inc) in the next stitch. Repeat this all the way around so you end your round with 18 stitches.
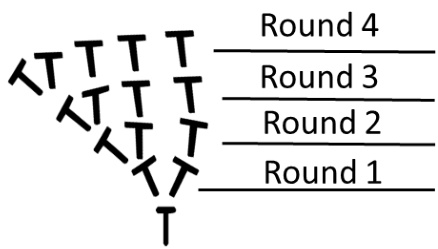
Round 3: Make 1 single crochets into each of the next 2 stitches (2SC), then make 2 single crochets in the next stitch (sC inc). Repeat this all the way around so you end your round with 24 stitches Subsequent rounds: continue in this pattern until the base is as large as you like. Stitch count in each round will always be a multiple of 6! Round 4: (3 SC, SC Inc) - repeat 5 more times, 30 SCs Round 5: (4 SC, SC inc) - repeat 5 more times, 36 SCs Etc.
8TRANSITION TO SIDES
Stop increasing and SC into each stich but go into the front loop only. This creates a small ridge around the outer edge of your bowl.
Continue crocheting 1 SC into each SC in a spiral until the bowl is as tall as you like. Slip stitch into next stitch and pull yarn through. Weave in ends.


