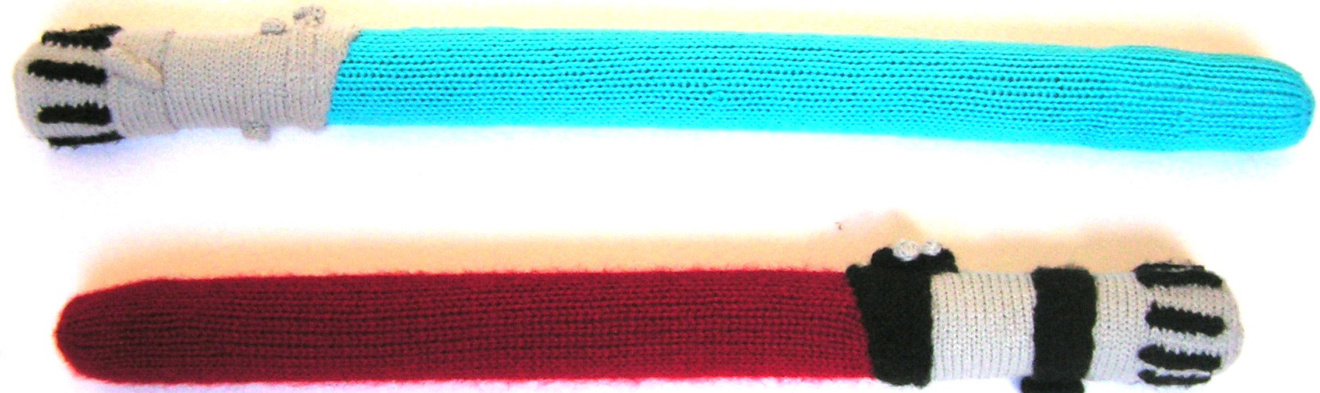
Knitting Pattern Luke Skywalker and Darth Vader Lightsabers
Please note : This pattern is not endorsed, sponsored or affiliated with the owners of the intellectual property relating to the Star Wars franchise. Lindum Crafts makes no claims to the trademarks, copyrights and logos relating to Star Wars or Lightsabers. Any claims to copyright are purely for the patterns, diagrams and pictures which make up this pattern. This pattern is provided for non profit use only, free of charge from the Lindum Crafts website.
Techniques :
Icords
· To knit an icord cast on the required number of stitches onto a double ended needle, and slide the cast on stitches along so that you are knitting from the tail end of the stitches. When you have knitted the stitches keep sliding the icord along the needle, so that you are always knitting from the tail end and creating a small loop. · Occasionally give a tug to the cast on end to help the icord develop.
Short Row Knitting
In short row knitting the the work is turned before reaching the end of the row and worked back in the opposite direction. By doing several repeats it is possible to build normally difficult to knit shapes, in this case the circular end of the lightsaber. After knitting (or purling) the required number of stitches, slip the next stitch onto the needle and then bring the yarn over to the opposite side. Turn the work and slip that stitch back to the original needle. This helps prevent holes.
Materials required :
50g ball blue aran wool 50g ball red aran wool 2x narrow pipe foam insulation tubes 2x 3mm double pointed needles 2x 4.5mm needles 50g ball silver double knit wool 50g ball black double knit wool Scissors Yarn needle Stuffing
Terminology
c/o = cast on, K1M1 = knit one and make one from the same stitch, PiM1 = purl one and make one from the same stitch, c/of = cast off, K2tog = knit two stitches together, P2tog = purl two stitches together, K = knit (number after the K means knit that many stitches), P = purl (number after the P means purl that many stitches), slip = transfer the stitches to the working needle (number after the slip means slip that many stitches). turn = slip one stitch, take yarn across the needle to the opposite side, turn the work, slip the stitch back to the original needle. Stocking stitch = knit one row, purl one row (this would equal 2 rows of stocking stitch). Garter stitch = knit all rows.
Darth Vader (DV) Lightsaber knitting instructions
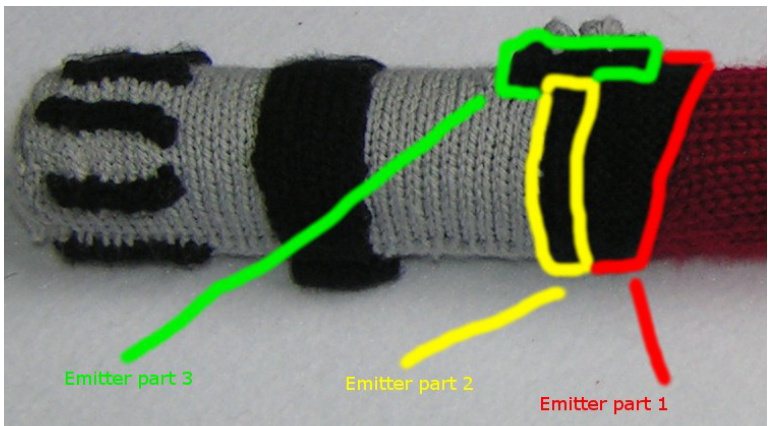
DV Emitter part 1
1. c/o 6 in black wool 2. Stocking stitch 48 rows, increasing by one stitch every 4th row until row 24 (don't increase on 24), then decrease by 1 every 4" row until complete. 3. c/of, then sew c/o edge to c/of edge to make a tube.
DV tube
DV Emitter part 3
1. c/o 3 in black wool 2. Stocking stitch 46 rows 3. c/of
DV Emitter part 2
DV Middle
1. c/o 3 in black wool 2. Stocking stitch 46 rows 3. c/of 1. c/o 8 in black wool 2. Stocking stitch 55 rows 3. c/of
DV tube end (Short row knitting)
1. c/o 5 in silver wool 2. K5 3. P4 4. K4 5. P2 6.K2 7.P5 8. Repeat 2-7 for a total of 7 times then c/of. 9. Sew the c/o and c/of ends together.
DV Control button 1
DV Control button 2
1. c/o 3 in silver wool 1. c/o 2 in silver wool 2. icord 6 rounds 2. icord 4 rounds 3. Sew into a ring by passing the c/o tail 3. Sew into a ring by passing the c/o tail through the stitches and pulling tight. through the stitches and pulling tight.
Grips (knit 8 of these)
1. c/o 3 in black wool 2. icord 14 rounds 3. c/of
Luke Skywalker (LS) lightsaber knitting instructions
Knit the DV tube end and grips. Also knit the DV middle, but in silver wool.
LS tube
1.c/o 40 in silver 2. Stocking stitch 45 rows, increasing by one stitch every 4" row until row 20 3. knit until row 25 then decrease on row 26, 4. decrease by 1 stitch every 4" row after this until complete. 5. c/of, then sew c/o edge to c/of edge to make a tube.
Emitter ring
Control buttons (knit two of these) 1. c/o 4 in silver 2. Stocking stitch 55 rows 3. c/of 1. c/o 4 in silver 2. icord 8 rounds 3. Sew into a ring by passing the c/o tail through the stitches and pulling tight.
Lightsaber blade knitting instructions
1. c/o 24 stitches on 4.5mm needles in blue (Luke Skywalker), red (Darth Vader) or the colour of your choice 2. Stocking stitch a minimum of 110 rows starting with a knit row. 3. (P2tog, P4, P2tog) x3 =18 stitches 4. (P1, P2tog, P2tog, P1) x3 = 12 stitches 5. P2tog x6 = 6 stitches 6. P2tog x3 = 3 stitches 7. c/of, then fold in half and sew up the side to make a closed tube. This will result in an approximately 39cm blade length. Rows may be added at step 2 if longer length is preferred.
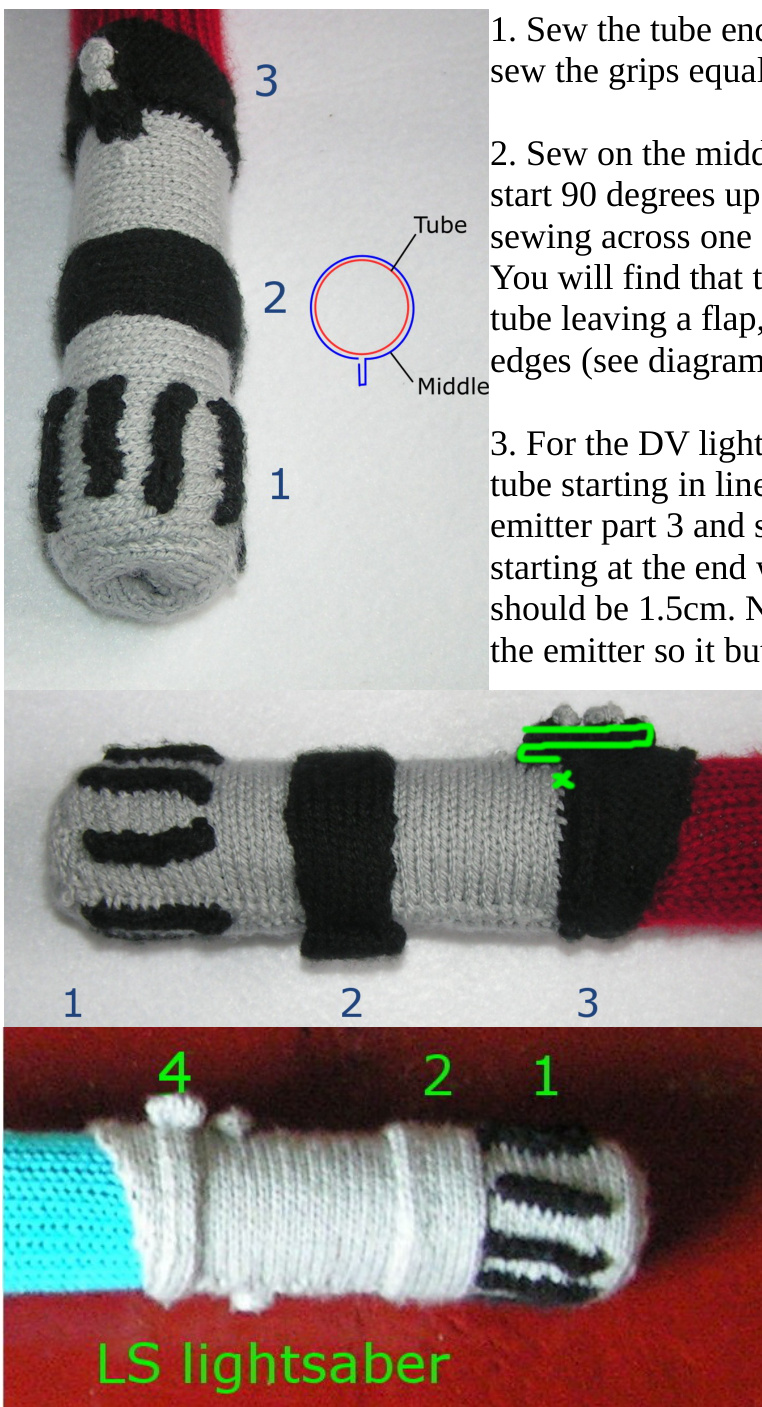
2. Sew on the middle (LS middle should butt up to the grips and start 90 degrees up from where the DV one starts) starting by sewing across one short end and then wrapping it around the tube. You will find that the middle is longer than the tube. Sew to the tube leaving a flap, then fold the flap in half and sew along the 1. Sew the tube end to the tube (flat end for the LS tube) and then sew the grips equally spaced around the tube at that end. 3. For the DV lightsaber sew emitter part 1 onto the far end of the tube starting in line with the flap created in part 2. Next take emitter part 3 and sew on, folding it, as shown below in green starting at the end with the green X. From the x to the first fold should be 1.5cm. Next wrap emitter part 2 around the tube end of the emitter so it butts up to emitter part 3 and sew it in place. 4. For the LS lightsaber sew on the emitter ring creating a flap in the same way as the middle in step 2 in the position shown left. Finally sew on the buttons (DV control button 1 goes at the blade end) as shown in the positions that can be seen in the pictures above. Take a piece of foam pipe insulation and trim to length, then cut a 1cm wide strip out of it (may vary slightly depending on tension of knitting). Put a small amount of stuffing in the tip of the lightsaber blade and then slide it over the pipe insulation. Next slide the assembled hilt onto the pipe insulation and sew the blade to the inside edge of the hilt. Your lightsabers are now complete.


