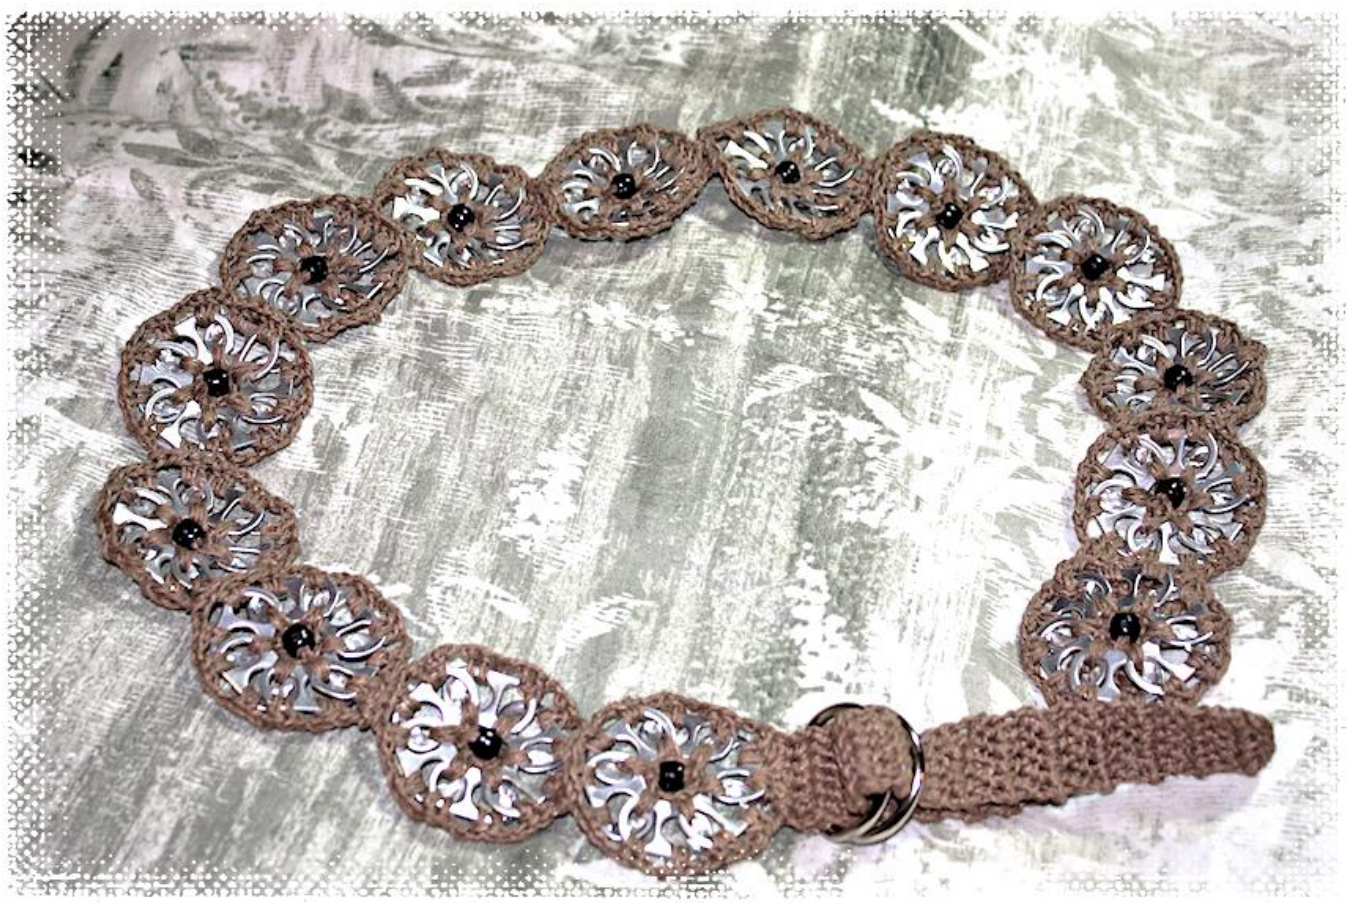
Emma's Pop Tab Hemp Hip Belt bychelseacraft
This belt is inspired by the belts we wore in the 1970s & 1980s around our hips. Either over top of hip hugger jeans or over a long blouse or jacket, the hip belt was a popular fashion item for a long time then vanished for a while. They are quite popular again so 1 made this one for a teen friend for Christmas. The hemp has a great movement to it. It's super sturdy nonetheless. I love upcycling. Nothing on this belt was purchased except the cord & it's a "green" item. Anything to promote textile hemp as a cash crop is a good thing for our ecology. The pop tabs I buy off Ebay from unemployed people who not only help the environment but are proving themselves resourceful. I urge you to do the same. It's so much better than handing out money to panhandlers. The belt can be made longer or shorter. It also makes a nice guitar strap too. Just modify the ends.
Materials:
● Hemp Cord - by "Elements" (Hemp Jewelry Cord) #1833 - Color: Taupe / Beige - 100yds (1 ball) Made by: The Beadery ( www.thebeadery.com) Ravelry link for photo of cord (Any sturdy stiff hemp cord will work. Ebay has a lot. This type has slightly waxed feel to it which I like.) D Hook, 3.25mm - Must be a sturdy hook, preferably metal. I used a Bates aluminum hook. 14 standard Pony Beads (or 1 for each motif you will make)(optional) · 2 silver color D rings (1 inch diameter) ·84 aluminum soda pop tabs (mine are from Coca Cola & similar drinks)(6 tabs per motif) ·Sturdy Steel Tapestry needle Sizing - Each motif adds 3 inches. The belt in the photo with 14 motifs is 42 inches. This one was intended for wear over long shirts at an angle slinging down lower on one hip... so one size fits most. The D Ring slider portion is 10 inches. 'he only stitches you need to know for this belt is single crochet and chain stitch.
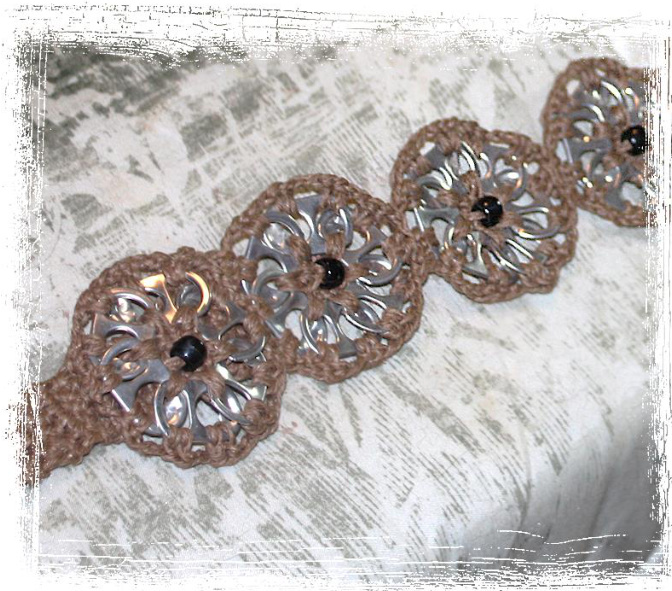
Pop tab flower motifs (Make 14 or as many as you need for your sizebelt) Thumb hole: The hole that you would have used your finger to lift up and open the soda can. The hole that is NOT attached to the can. Connector hole: The hole that was connected to the can that you do not use to open the can. You can tell which hole this is by the jagged part where it was torn off the can. Make sure there are no pointy pieces left sticking out. You can use pliers &/or a file to smooth these. They will not be sticking out much so it doesn't have to be perfect. Begin: Take your first pop tab and hold it so the front flat side is facing you like it would be on the can. Hold it horizontally so that the thumb hole is on the right and the part that attached to the can (connecter hole) is on the left. Attach your hemp cord with a slip stitch to the top side of the big thumb hole on the right, ch1 (counts as your first sc), then, sc again around that same thumb hole. Get your second pop tab ready by holding it the same way and matching it to the first tab you're working on by overlapping the new pop tab's thumb hole OVER the connector hole of the first tab. Now insert your hook through BOTH holes while you hold the 2 tabs together and make two single crochet around both pop tabs through those holes you are holding together. Now get your next pop tab and do the same thing. Overlap the thumb hole over the top of the connector hole and make 2 single crochets into both of them held together. Repeat this until all 6 pop tabs are in a line connected together with 2 scs. Now carefully align your last pop tab UNDER the thumb hole of the first tab so the connector hole lines up under the thumb hole and make 2 single crochets through those holes to close your "flower" of pop tabs. End off leaving a tail about 5 inches long. Using a metal tapestry needle sew this tail into the first ch 1 you made for an invisible joining, THEN thread a pony bead on the cord and sew it into the middle of your flower. Weave in your tails.
Finishing and joining motifs -
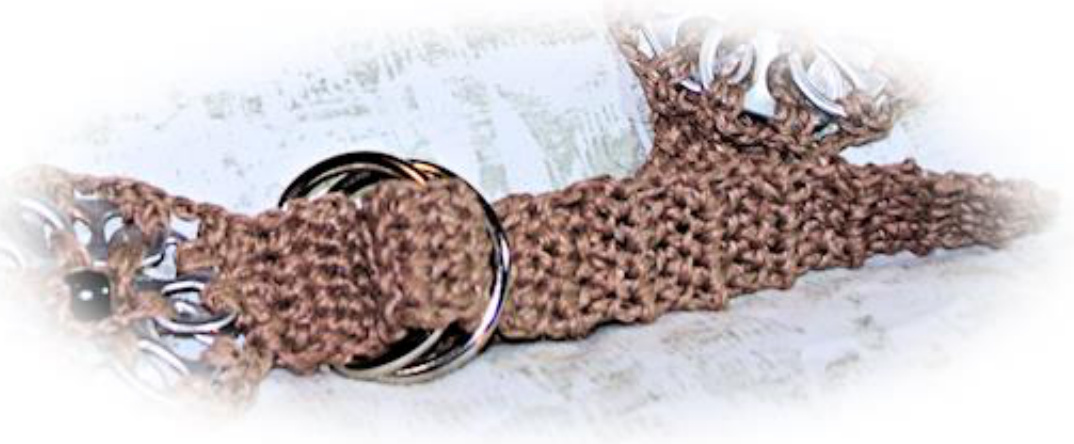
FIRST MOTiF ONLY - Holding a pop tab flower motif facing you, join your cord in any thumb hole on the outside edge, ch 1, sc in same hole,\* ch 2, 2 sc in next connector hole, ch 2, 2 sc in next thumbhole\*, repeat between asterisks \*\* for all holes then join with slip stitch to beginning ch 1. End off. ALL OTHER MOTiFs - Holding a motif facing you, join your cord in any thumb hole on the outside edge, ch 1, sc in same hole,\* ch 2, 2 sc in next connector hole, ch 2, 2 sc in next thumbhole\*, repeat between asterisks \*\* for all pop tabs of your motif EXCEPT ONE. Leave one set of holes on the last tab unworked .. both thumbhole and connector hole. You will now connect the motifs using this set of holes. Get your first motif you made and hold it side by side with your new motif, both facing up, where you are going to join the motifs. Insert your hook into one of the single crochets on your FIRST MoTiF and make a single crochet facing outward in the same direction that you are crocheting, then make a single crochet through the next pop tab hole on your SECOND MOTIF. Repeat again by skipping the next sc on your FIRST MOTIF, sc into the next sc, then sc into the same pop tab loop on your SECOND MOTiF. Continue for the next pop tab hole now by \*skipping the next sc on your FIRST MOTIF, make a sc in the next sc on the FIRST MOTIF, then sc in your next pop tab hole on your SECOND MOTIF\*. And repeat between \*\* one more time to finish joining the two together. Join with sl st to your beginning ch 1 on you second motif. End off. Weave in ends with tapestry needle. Complete this procedure for all 14 motifs or until your belt is the desired size. Belt buckle and tongue Tongue: Join your hemp cord into the first sc BEFORE the pop tab that is furthermost on your belt and facing vertically. (see photo where arrow is) Sc in the next 6 sc, ch 1, turn, sc 6, turn, ch 1, sc 6, repeat this row of 6 sc until the piece measures 10 inches. End off Buckle: Join your cord into the first sc BEFORE the pop tab that is furthermost on your belt and facing vertically. (see photo where arrow is) Sc in the next 6 sc, ch 1, turn, sc 6, turn, ch 1, sc 6, repeat this row of 6 sc, ch1, until the piece measures 2 inches. End off leaving a sewing tail. Slip both of your D Rings onto this piece then fold it over and under to meet the first starting row you made and using your tapestry needle sew this piece down flat to the starting row. Using your tapestry needle again separate the 2 D Rings and sew a seam between them to keep them separate so that the ring closest to the belt lays slightly behind and OVER top of the ring on the end. This is so that you can thread the tongue through both rings, then weave the tongue piece between the 2 rings and down through the first ring so it cinches tight and will not move. (see photo)
Copyright held by ChelseaCraft @ 2014 You may make and sellitems using this pattern but you may not reproduce, copy, or distribute this pattern in any way. You may print a copy for personal use. All rights reserved. Find more ChelseaCraft Designs on the Ravelry store here: http://www.ravelry.com/stores/chelsea-craft-designs
ChelseaCraft Blog:
http://chelseacraft.com/


