Frankie's Knitted Stuff

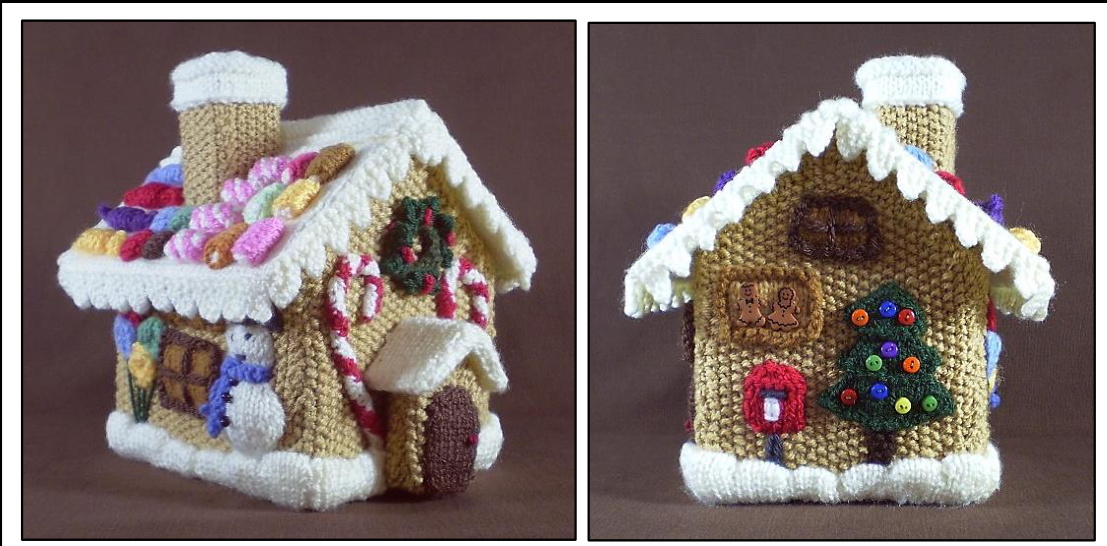
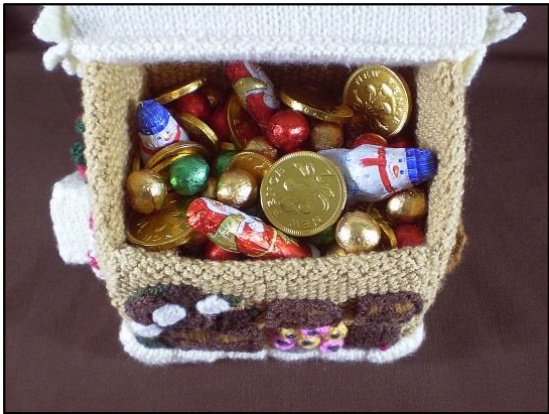
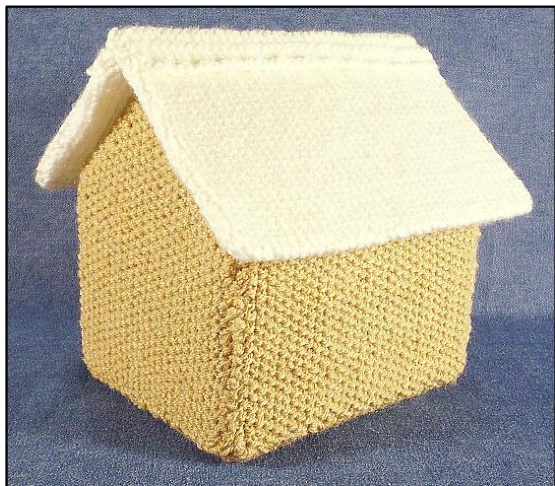
Every part of this Gingerbread House is covered with knitted treasures. Traditional sweets line the snowy roof and, between the doors and windows, are more treats as well as a snowman and a Christmas tree. There's even a knitted chimney - how else would Father Christmas visit? The house measures about 13 × 17 cm and is 20 cm tall (that's roughly 5 x 61/2" and 8" tall) and the structure is provided by plastic canvas, covered with knitting. The roof is hinged so that the house can be used to store things, maybe some favourite decorations or even real sweets for children who aren't too impressed by the knitted variety.
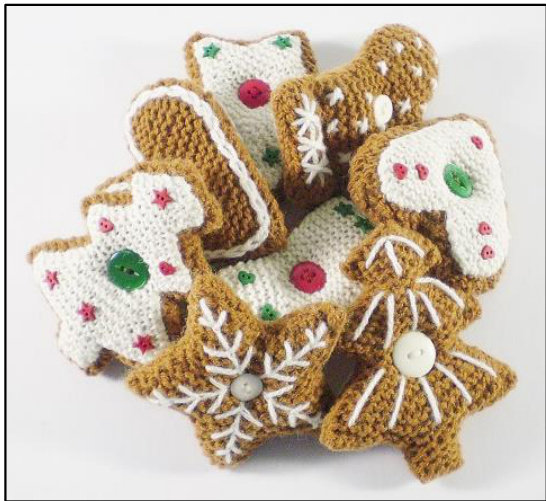
This first pattern deals with making the actual house; all the little things to decorate it are in 20 separate patterns. There are also four patterns for knitted gingerbread ornaments to keep in the house.
f
Building the House
At the end of this pattern is a comprehensive materials list for everything you will need to make the complete Gingerbread House with all its decorations plus a set of ornaments. For the actual house you will need:
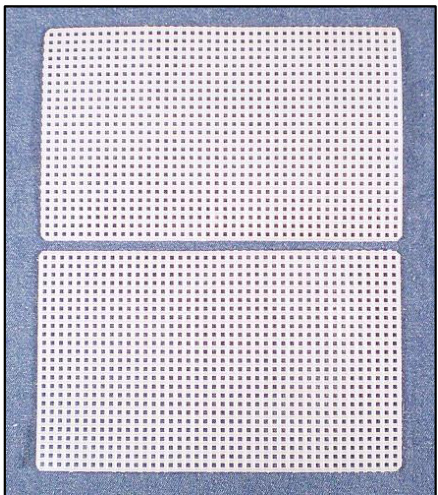
Plastic Canvas
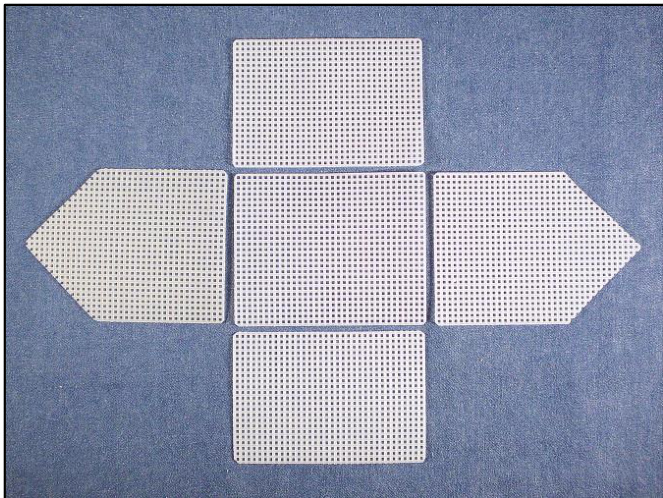
This is what gives the house its shape. It will also be used for the chimney and the front porch. You will need one sheet (about 34 x 55 cm / 1312 x 21%2") of ultra stiff canvas with seven holes to the inch. This is the larger sheet size and is sometimes listed as ^extra large plastic canvas'. It is important to get the right size and weight. Yarn 80g ginger DK. 40g cream DK. I used Stylecraft Special DK (295m / 100g) in Camel and Cream. Begin by cutting the parts of the house out of plastic canvas. You will need seven pieces all together: a base, two side walls, two end walls and two roof panels. The diagrams below show you how big each piece is; count the number of bars and then cut immediately after the last one.

The tops of the two end walls will need to be cut into a point. To do this mark the middle of one short side (between the 14th and 15th bar) and draw lines from this point to the 24"h bar, counting up from the other end. Cut along these lines. Trim the sharp points of all the right angled corners of your plastic pieces as these have a tendency to poke through knitting.
The House
The Roof This is what you should end up with. Now you just need to cover them with knitting. It is very important to get your tension right, both in this pattern and in the ones that follow. Each finished piece needs to be the right size to fit the plastic canvas (with a little stretching) and, if your knitted decorations turn out a different size, they will not all fit together on the house. Many of the decorations are too small for it to be worth knitting a tension sample but, in these cases, finished measurements are given.
The Base
This is knitted in stocking stitch, using ginger coloured DK weight yarn and 3.25mm / US size 3 needles. Tension: 12 stitches and 17 rows = 5 cm / 2"2 Change your needle size if necessary until you are knitting to tension. Using the long tail method, cast on 30 stitches. Work 33 rows in stocking stitch, beginning with a purl row. Cast off. Knit two of these pieces and then oversew them together round three sides, insert the plastic canvas base and close the last side. Two pieces will be knitted and then joined to cover each plastic canvas piece; this helps to reduce the bulk at the edges.
Side Walls
All the walls are knitted in moss stitch (US seed stitch). Again, ginger coloured DK and 3.25mm needles are used. Tension: 12 stitches and 25 rows = 5 cm / 2"2, working in moss stitch. Using the long tail method cast on 31 stitches. Work 41 rows in moss stitch: Every row: K1, \*P1, K1, repeat from \* to end. Cast off. You will need to knit four of these pieces, two for each wall. Sew them together over the plastic canvas walls in the same way as for thebase.
End Walls
Using the long tail method cast on 25 stitches. Work 41 rows in moss stitch: Every row: K1, \*P1, K1, repeat from \* to end. Now shape the top: Row 1: K1, \*P1, K1, repeat from \* to last 2 sts, K2tog. Row 2: K2, \*P1, K1, repeat from \* to last 2 sts, K2tog. Row 3: K1, \*K1, P1, repeat from \* to last 2 sts, K2tog. Row 4: \*K1, P1, repeat from \* to last 2 sts, K2tog. Work this four row pattern five times; you should now have five stitches left on your needle. Next row: K1, P1, K1, K2tog (4 sts). Next row: K2, K2tog (3 sts). Cast off, using the double decrease cast off: sl 1 kwise, K2tog, psso. Again, you will need to knit four of these pieces, two for each end Wall.
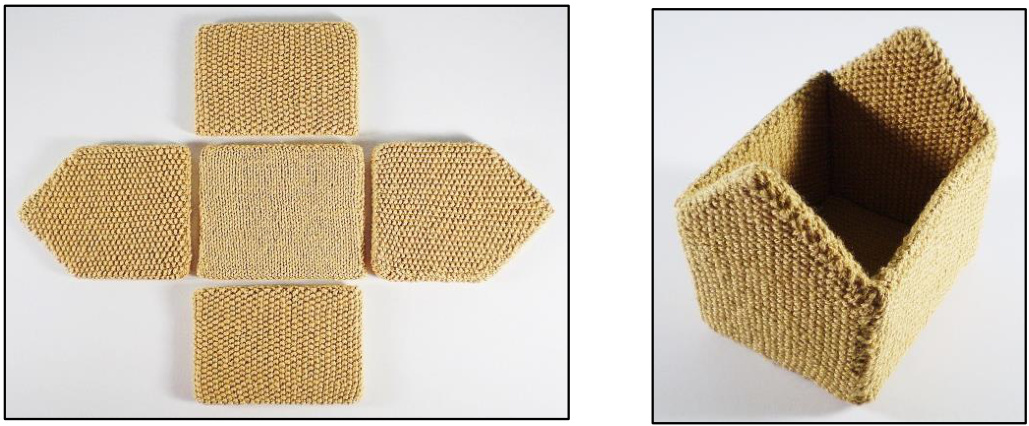
When you have covered all four walls and the base with knitting, you can sew them together. To do this, hold the pieces with the wrong sides facing and, using ginger yarn, oversew firmly along the edge. Join the four walls to the base first and then join the corners.
The Roof
The covering for the roof panels is knitted in stocking stitch using cream DK yarn and 3.25mm needles. Tension: 12 stitches and 17 rows = 5 cm / 2"2. Using the long tail method, cast on 40 stitches. Work 31 rows in stocking stitch, beginning with a purl row. Cast off. Make four pieces like this and sew them together over the plastic canvas roof panels. Join the two roof panels along one long edge. One half of the roof will be stitched to the house but leave it separate for now so that it's easier to sew things on to the walls.
Roof Ridge
This covers the join at the top of the roof. It is a mixture of knit and purl rows, using a row counter will help you keep track. Using the long tail method cast on 40 stitches. Row 1: Knit. Row 2: Purl. Rows 3 - 5: Knit. Row 6: Purl. Rows 7 & 8: Knit. Row 9: Purl. Row 10: Knit. Row 11: Purl Rows 12 & 13: Knit. Row 14: Purl. Rows 15 - 17: Knit. Row 18: Purl. Row 19: Knit.
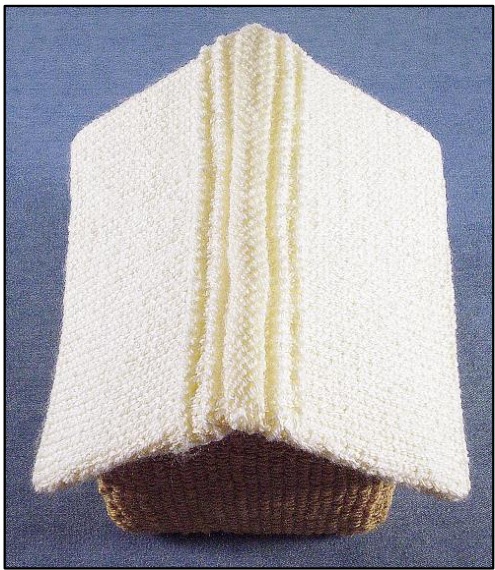
Cast off knitwise. Put the roof on the house and then pin the ridge in place. Sew to the roof with small running stitches, working just above the cast on and cast off edges. Then sew the ends down to the roof, joining the loose section at the top with a short vertical seam. Frankie Brown, 2014.
Abbreviations
st / sts stitch / stitches K knit P purl K2tog knit two stitches together sl1 slip one stitch kwise knitwise psso pass slipped stitch over
Gingerbread House Materials List
Plastic Canvas One large sheet (34 x 55 cm / 131/2x 211/2") of ultra stiff, seven bars to the inch plastic canvas. Yarn You will need to buy 100g balls of ginger and cream DK weight yarn. Other than this, only very small amounts of the other colours are used, normally less than 5g. At the end of this pattern is a list of the colours I used, obviously you can substitute other colours of your choice, depending on what yarn you have. Anchor tapestry yarn will knit to the right tension and comes in small skeins of about 5g so that might be another option. All the yarns I used were either Stylecraft Special DK (295m / 100g) or Sirdar Country Style DK (155m / 50g); if you use other yarns, try to get a similar weight as this will help to get your tension right. You will also need a small amount of thin 4 ply for the snowman's scarf. I used My First Regia (105m / 25g) in blue (shade 1887) but, of course, you could use any colour.
Sewing Thread
This is used for attaching beads and buttons and also for sewing all the things on to the house. You will need the following colours: Ginger (to match the house) Cream (to match the roof) Dark Green (to match the Christmas tree) Black
Pipe Cleaners
These are used to stiffen and shape a few of the decorations. You will need three thin 15 cm / 6" pipe cleaners or two 30 cm / 12". Beads and Buttons I have tried to keep these to a minimum although you could add any festive buttons that you like. This is what I used: Three 4 mm black seed beads for the snowman's buttons. Gingerbread People buttons. - for signs Itty Bitty Cut Out Cookies Buttons. - for signs Tiny Primary buttons. - to decorate the tree These buttons are all Dress It Up' buttons, easily available online.
Gingerbread Ornaments Materials List
There are patterns for two sets of gingerbread ornaments. One set is decorated with cream wool embroidery, the other has knitted icing and buttons. Embroidered Ornaments 20g ginger DK yarn. A small amount of cream DK yarn for the embroidery. I used Sirdar Country Style DK (155m / 50g) for both, Butterscotch (shade 611) for the ornaments and Cream (shade 411) for the embroidery. You will also need eight round cream buttons, four 10 mm and four 18 mm (1/2" and 3%").
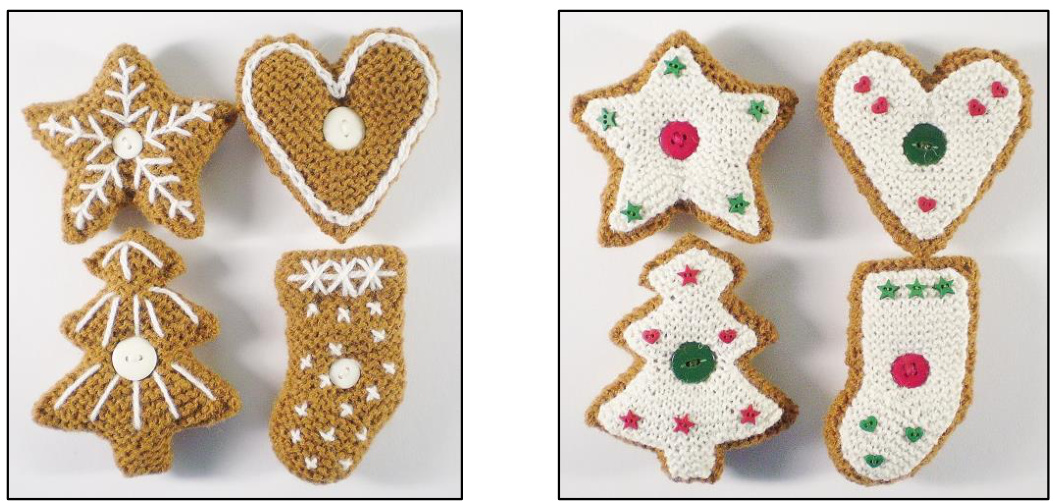
Iced Ornaments
20g ginger DK yarn. 15g cream 4 ply yarn I used Sirdar Country Style DK (155m / 50g) for the ornaments (shade 611, Butterscotch) and Sirdar Country Style 4 ply (226m / 50g) for the icing (shade 411, Cream). You will need four red 15mm / 5%" buttons and four green 18mm / 3%4"buttons. The ornaments are decorated with tiny red and green hearts and stars. These are ‘Dress It Up' buttons and come in a pack called 'Christmas Garland'. If you string the iced decorations together you will also need some pony beads, eight each in red and green.
Gingerbread House Shade Cards
Stylecraft Sirdar Camel Saffron Cream 477, Mink Bottle
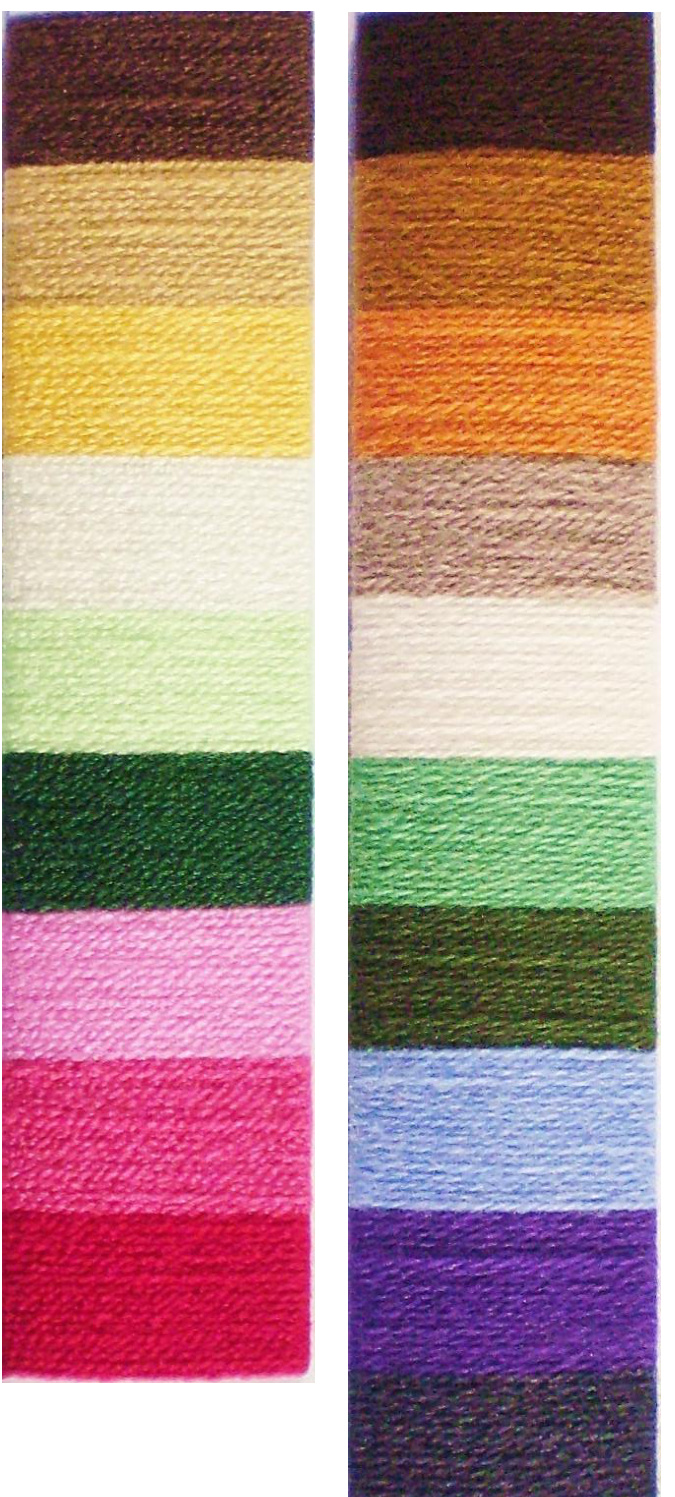
Fondant Pomegranate Stylecraft Special DK (295m / 100g). Sirdar Country Style DK (155m / 50g). Frankie Brown, 2014.


