CORINNE'S KNITS
Fridolin
Description
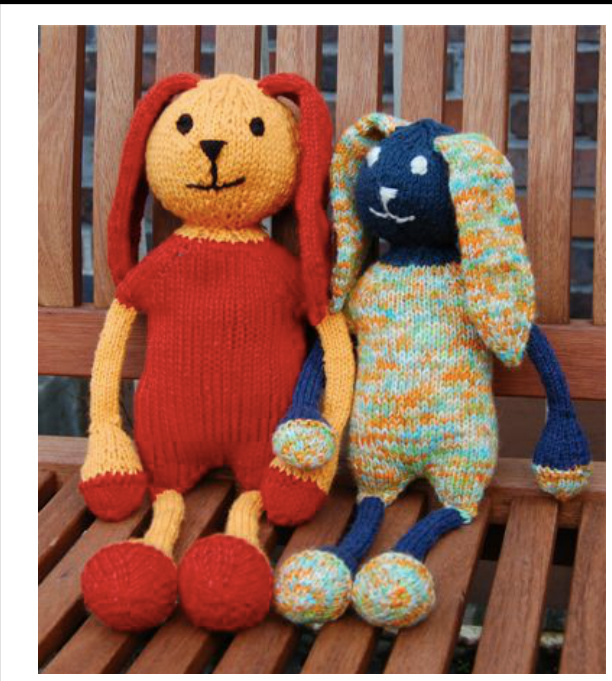
Fridolin's long, skinny legs and arms together with his long floppy ears make him perfect for small hands. He can easily be grabbed and carried around. He also makes a perfect snugly companion for anyone, who could resist his charm?
Difficulty
Intermediate
Yarn
The sock yarn version is knit using two strands of yarn About 200 yds / 185 m of MC and 310 yds / 285 m of CC of sock yarn Or about 80 yds / 75 m of MC and 90 yds / 80 m of CC of Knit Picks CotLin yarn Or about 70 yds / 65 m of MC and 110 yds / 100 m of CC of worsted weight yarn
Notions Needles
US6/4.0mm circular needle (or dpns) for sock weight yarn or US4/3.5mm needle for Knit Picks Cotlin yarn or Us7 /4.5mm needle for worsted Weight yarn or size needles needed to obtain gauge Accessories Darning needle 1 stitch marker Toy stuffing
Necessary Skills
Knitting in the round, toe-up magic cast on or Turkish cast on, ssk, k2tog, picking up stitches
Gauge
25 sts x 32 rows / 10 cm - 4" with Knit Picks CotLin yarn 20 sts x 28 rows / 10 cm - 4" with sock yarn 18 sts x 26 rows / 10 cm - 4" with worsted weight yarn in stocking stitch (stockinette) in the round
Size
35cm/14" tall in Knit Picks CotLin yarn 40cm/16" tall in sock yarn 50cm/19%2" in worsted weight yarn
About The Designer
Corinne's passion for yarn started around age 8 when she started to knit. Today, she especially loves to design with sock yarn. Although French, she lives in Germany with her English partner and their two boys, where she can fully put her second passion, languages, to the test.

Her patterns can be found on Ravelry on the Corinne's Knits designer page or on her blog: corinnesknits.wordpress.com. You can follow her on Twitter: @corinnesknits. For pattern support, email: corinnesknits@googlemail.com.
Notes
Fridolin is knit completely in the round and is seamless. He is knit from the bottom up, starting with the legs. The legs and arms are started using toe-up magic cast on or Turkish cast on. After you knit both legs you will join them together to knit the body until the underarm. You will then knit both arms and, once finished, join it all together with raglan decreases. Once you have finished the head, you will pick up stitches directly on the head to knit the ears. The directions are written for the magic loop technique using one circular needle but can very easily be adapted to dpns. Use 5 dpns. Whenever the directions say "1st needle", replace with "2nd needle" and when it says “2nd needle", replace by "3rd & 4th needles". Main colour (MC) refers to the arms, legs and head's colour and contrasting colour (CC) to the rest. The list of abbreviations used in the pattern is available on the last page.
Stitch Pattern
Fridolin is knit in stocking stitch (stockinette). Legs (make 2) Using CC, cast on 4 sts using toe-up magic cast on1 or Turkish cast on2, making sure you have 2 sts on each needle Rds 1,3,5,7,9, 11: k Rd 2: \*k1, m1\* rep to end (8 sts) Rd 4: \*k2, m1\* (12 sts) Rd 6: \*k3, m1\* (16 sts) Rd 8: \*k4, m1\* (20 sts) Rd 10: \*k5, m1\* (24 sts) Rd 12: p across, cut the yarn Change to MC Rd 13-14,16-18,20-22, 24-26:k Rd 15: \*k4, k2tog\* (20 sts) Rd 19: \*k3, k2tog\* (16 sts) Rd 23: \*k2, k2tog\* (12 sts) Rd 27: \*k1, k2tog\* (8 sts) This is where you stuff the foot as it willbe very hard to do if you wait until you have knit the leg. Just stuff it full up to where you are now. This is also a good time to weave the ends in as it will be impossible later. Rds 28-57 (30 rds): k across, cut the yarn ChangetoCC Rds 58-60, 62, 64, 66,68, 70: k Rds 61, 63, 65, 67: kto last st of 1st needle, m1, k2, m1, kto end (rd 61: 10 sts, rd 63: 12 sts, rd 65: 14 sts, rd 67: 16 sts) Rd 69: k1, m1, k to last st of 1st needle, m1, k2, m1, k to last st, m1, k1 (20 sts) Rd 71: rep rd 69 (24 sts) If this is your 1st leg, cut the yarn (long enough to sew the small gap between the legs) and knit the 2nd leg, if this is the 2nd leg, proceed to the next step, do not cut the yarn.
Body
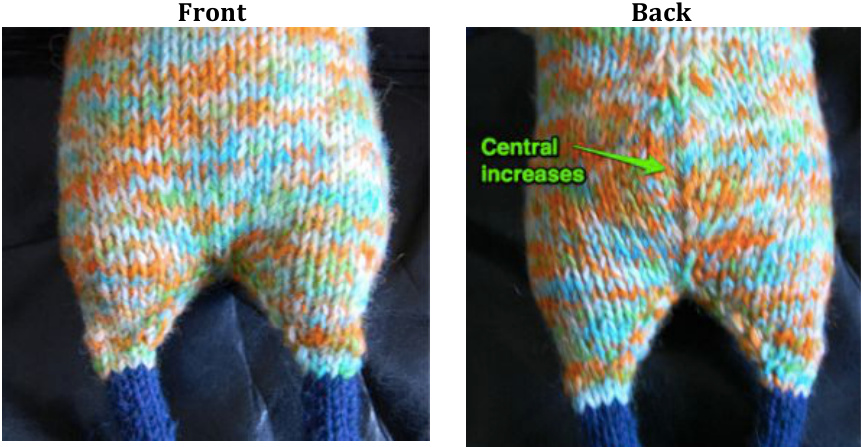
You will now join both legs together and start knitting the body. Start knitting with the second leg (where the yarn is uncut). Make sure to position the other leg in a mirrored way, i.e. the sides with the most increases should both be facing each other, on the inside. If you are unsure, look at the pictures on page 3. Rd 1: k11, k2tog (last st from 1st leg & 1st st from the other leg), k22, k2tog (as before), k to end (46 sts) Rd 2: k34, m1r, pm, k1, m11, k to end (48 sts) Rds 3-4, 6-7,9-13, 15, 17, 19-20, 22: k Rds 5 & 8: k to m, m1r, sl m, k1, m1l, k to end (rd 5: 50 sts, rd 8: 52 sts) Rds 14, 16, 18: kto 2 sts before m, ssk, k1, k2tog, kto end (rd 14: 50 sts, rd 16: 48 sts, rd 18: 46 sts) Rd 21 & 23: k1, ssk, kto last 3 sts of needle, k2tog, k2, ssk, k to last 3 sts, k2tog, k1 (rd 21: 42 sts, rd 23: 38 sts) Rd 24: k across, cut the yarn and put sts on hold There will be a small gap in the middle of both legs, close it with a couple of sewing sts on the inside using the tail from the 1st leg.
Arms
(make 2) Using CC, cast on 4 sts using toe-up magic cast on or Turkish cast on, making sure you have 2 sts on each nedle Rds 1, 3, 5, 7, 9: k Rd 2: \*k1, m1\* rep to end (8 sts) Rd 4: \*k2, m1\* (12 sts) Rd 6: \*k3, m1\* (16 sts) Rd 8: \*k4, m1\* (20 sts) Rd 10: p across, cut the yarn Change to MC Rds 11-12,14-16, 18-20: k Rd 13: \*k3, k2tog\* (16 sts) Rd 17: \*k2, k2tog\* (12 sts) Rd 21: \*k1, k2tog\* (8 sts) At this stage, stuff the hand and weave in the ends as you have done for the feet. Rds 22-46 (25 rds): k Change to CC Rds 47-48:k Rd 49: k1, m1, \*k2, m1\* 3 x, k1 (12 sts) Rds 50-51:k If this is your 1st arm, cut the yarn (long enough to sew the small gap between the arm and the body) and knit the 2nd arm, if this is the 2nd arm, proceed to the next step, do not cut the yarn.
Raglan Shaping
Start knitting with the second arm (where the yarn is uncut). Make sure to position the body with the front facing you (no central increases). Place the second arm with the yarn tail on the inside, you will use it later to close the small gap.
Rd 1: \*k5, ssk (last st from 1st arm & 1st st from body), kto last st of body, k2tog (last st of body & 1st st from 2nd arm), k to end of needle\* rep on 2nd needle (58 sts) Rd 2, 4, 6, 8, 10, 12: k Rds 3, 5, 7, 9, 11: \*k5, ssk, kto last 7 sts of 1st needle, k2tog, kto end of 1st needle\* rep on 2nd needle (rd 3: 54 sts, rd 5: 50 sts, rd 7: 46 sts, rd 9: 42, rd 11: 38 sts) Cut the yarn. As with the legs, there will be a small gap between each arm and the body, close these gaps with a couple of sewing sts on the inside using the tails from the 1st arm and the body. Once you have done that, weave in the ends, stuff the body and then start the neck shaping.
Neck and Head Shaping
Change to MC Rd 13, 15: k1, \*k1, k2tog\* to end of 1st needle, k1, \*k1, k2tog\* to end (rd 13: 26 sts, rd 15: 18 sts) Rds 14, 16,18, 20, 22, 24, 26,29,31, 33,35, 37,39, 41,43-45: k Rd 17: \*k1, k2tog\* (12 sts) Rd 19: \*k1, m1\* (24 sts) Rd 21: \*k2, m1\* (36 sts) Rd 23: \*k3, m1\* (48 sts) Rd 25: \*k4, m1\* (60 sts) Rd 27: k14, pm, k to end Rd 28, 30, 32: kto m, m1r, sl m, k2, m11, k t0 end (rd 28: 62 sts, rd 30: 64 sts, rd 32: 66 sts) Rd 34: k1, k2tog, kto 2 sts before m, k2tog, sl m, k2, ssk, kto last 3 sts of needle, k2tog, k2, k2tog, kto last 3 sts, k2tog, k1 (60 sts) Version 1.1 Rd 36: k1, k2tog, k to 3 sts before m, k2tog, k1, sl m, k3, ssk, k to last 3 sts of needle, k2tog, k2, k2tog, k to last 3 sts, k2tog, k1 (54 sts) Rd 38: k1, k2tog,kto 4 sts before m, k2tog, k2, sl m, k4, sk, kto last 3 sts of needle, k2tog, k2, k2tog, kto last 3 sts, k2tog, k1 (48 sts) Rd 40: \*k1, k2tog\* (32 sts) - remove m when you get to it Rd 42: k1,\*k1, k2tog\* to end of 1st needle, k1, \*k1, k2tog\* to end (22 sts) Rd 46: k1, \*k2tog\* to end of 1st needle, k1, \*k2tog\* to end (12 sts) Rd 47:k Cut the yarn. Stuff the head making sure it's fulland round, then weave the yarn tail through the remaining sts with darning needle and pull tight. Secure and thread in to hide.
Ears
(make 2) Look at the top of Fridolin's head and count about 5 rows down on the side. Using CC, pick up 7 sts, pull your needle through and then pick up another 7 sts just opposite. The ear is knit in the round so that it has a double layer and doesn't curl up. Rds 1-5,7-11,13-42,44,46,48, 50: k Rd 6: \*k1, m1r, k5, m1l, k1\* rep on 2nd needle (18 sts) Rd 12: \*k1, m1r, k7, m1l, k1\* rep on 2nd needle (22 sts) Rds 43, 45, 47: k1, ssk, kto last 3 sts of 1st needle, k2tog, k2, ssk, kto last 3 sts, k2tog, k1 (rd 43: 18 sts, rd 45: 14 sts, rd 47: 10 sts) Rd 49: ssk, k1, k2tog, ssk, k1, k2tog (6 sts) Rd 51: \*k2tog\* (3 sts) Cut the yarn, weave the yarn tail through the remaining sts with darning needle and pul tight. Secure and thread in to hide.
Finishing
Embroider the eyes, nose and mouth. I have found this tutorial3 to be helpful
Abbreviations
\*\*- Repeat instructions between \*\*s as noted CC - Contrast colour dpn(s) - Double pointed needle(s) k - Knit k2tog - Knit 2 sts together kfb - Knit in the front & back of the stitch (inc 1 st) m - Marker/s m1 - Make 1 m1l - Make 1 left m1r - Make 1 right MC - Main colour p - Purl pm - Place marker pu - Pick up rd - Round rep - Repeat sl m - Slip marker/s ssk - Slip, Slip, Knit st(s) - Stitch(es) st st - Stocking Stitch (Stockinette)


