InfiniCHRISTMAS ?
Deborah Tomasello
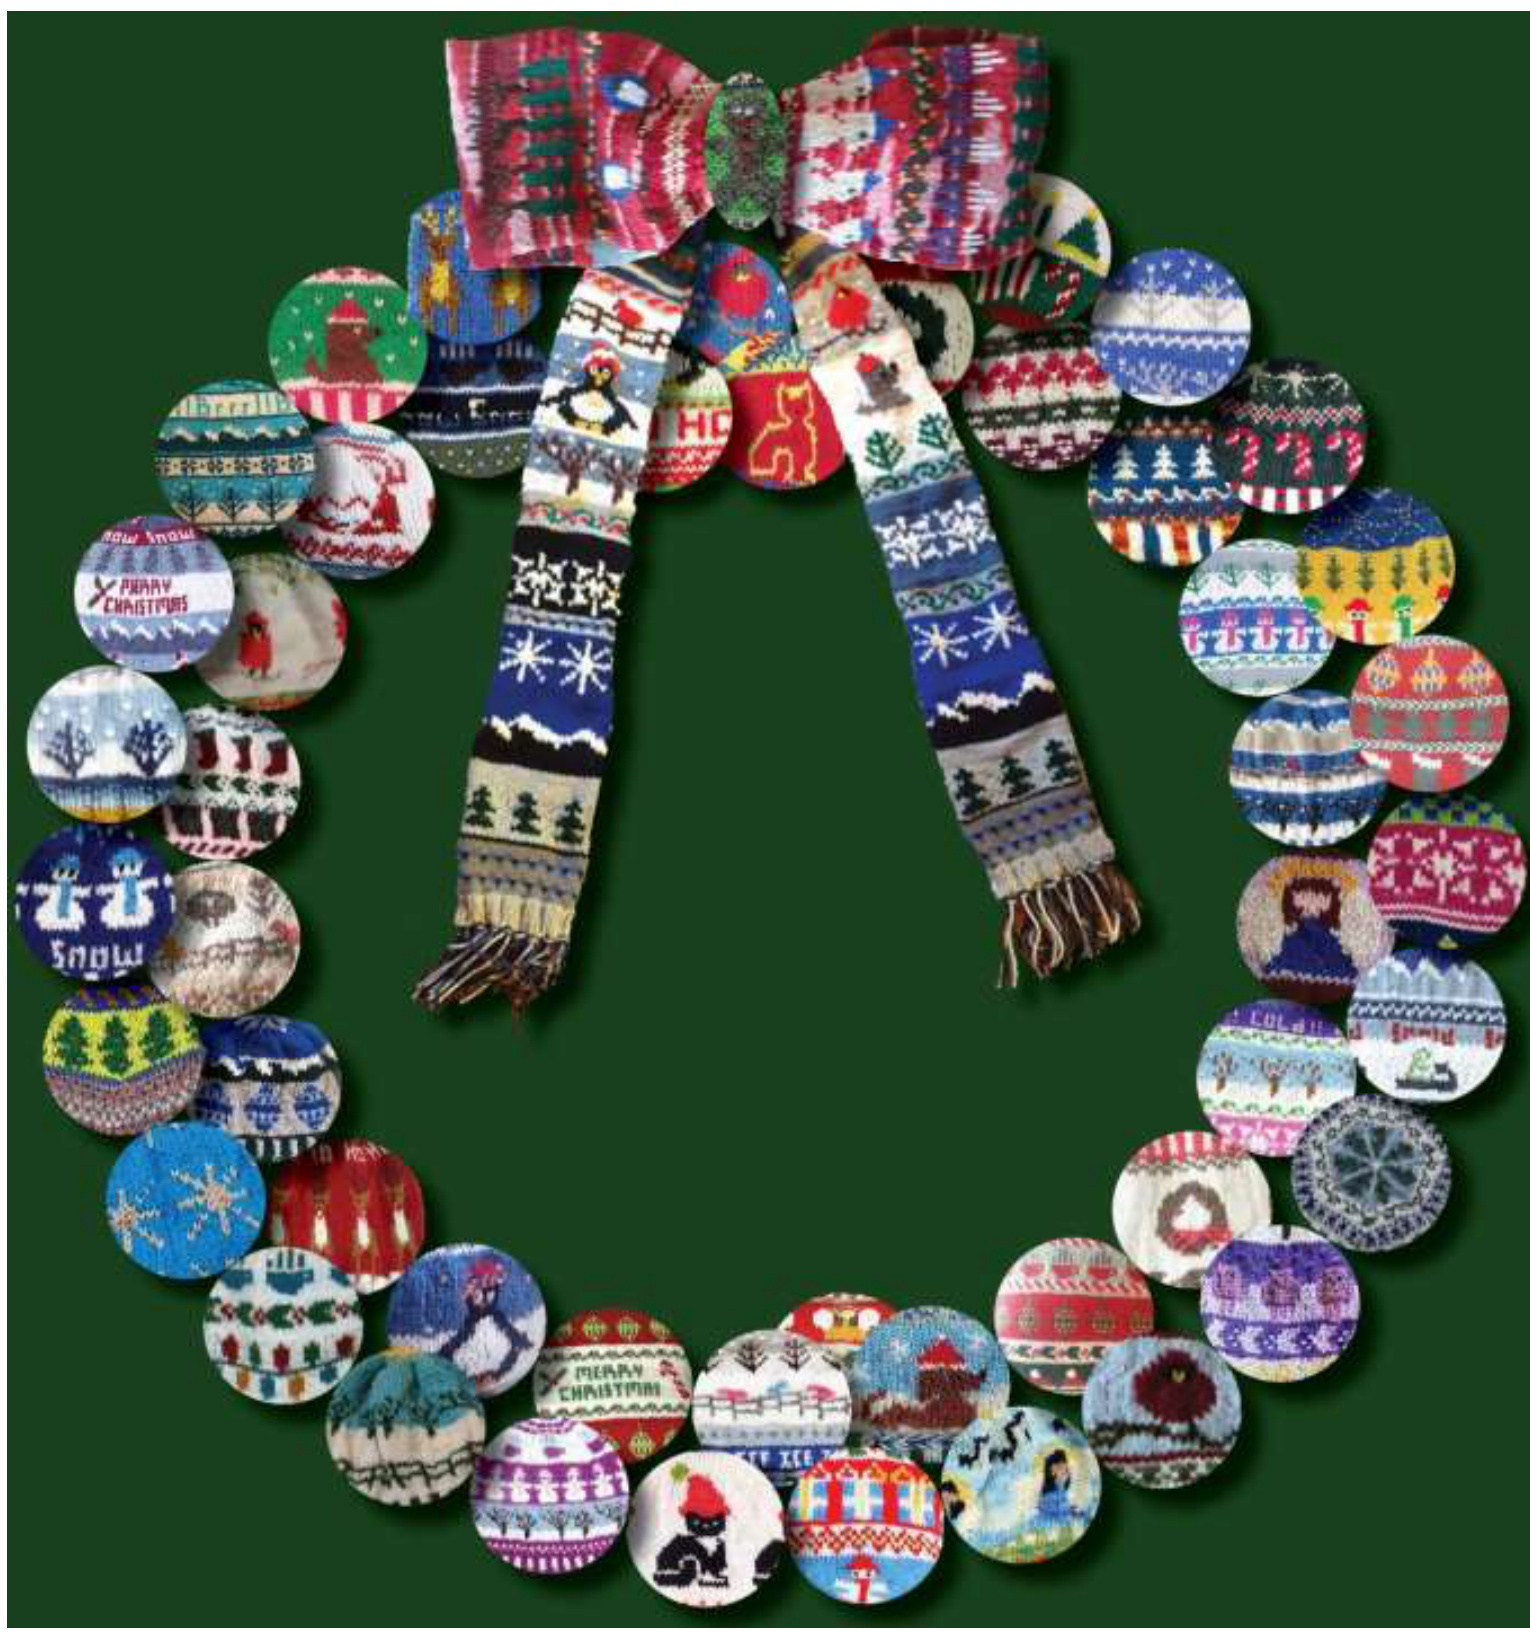
Cover Art by Pat Sample CozyknitsCA
All rights reserved. This pattern or any portion thereof may not be reproduced or used in any manner whatsoever without the express written permission of the publisher. WARNING: Giving or accepting a free copy of this pattern to another, without permission of the designer, is stealing.
InfiniCHRISTMAS Introduction and Thank Yous
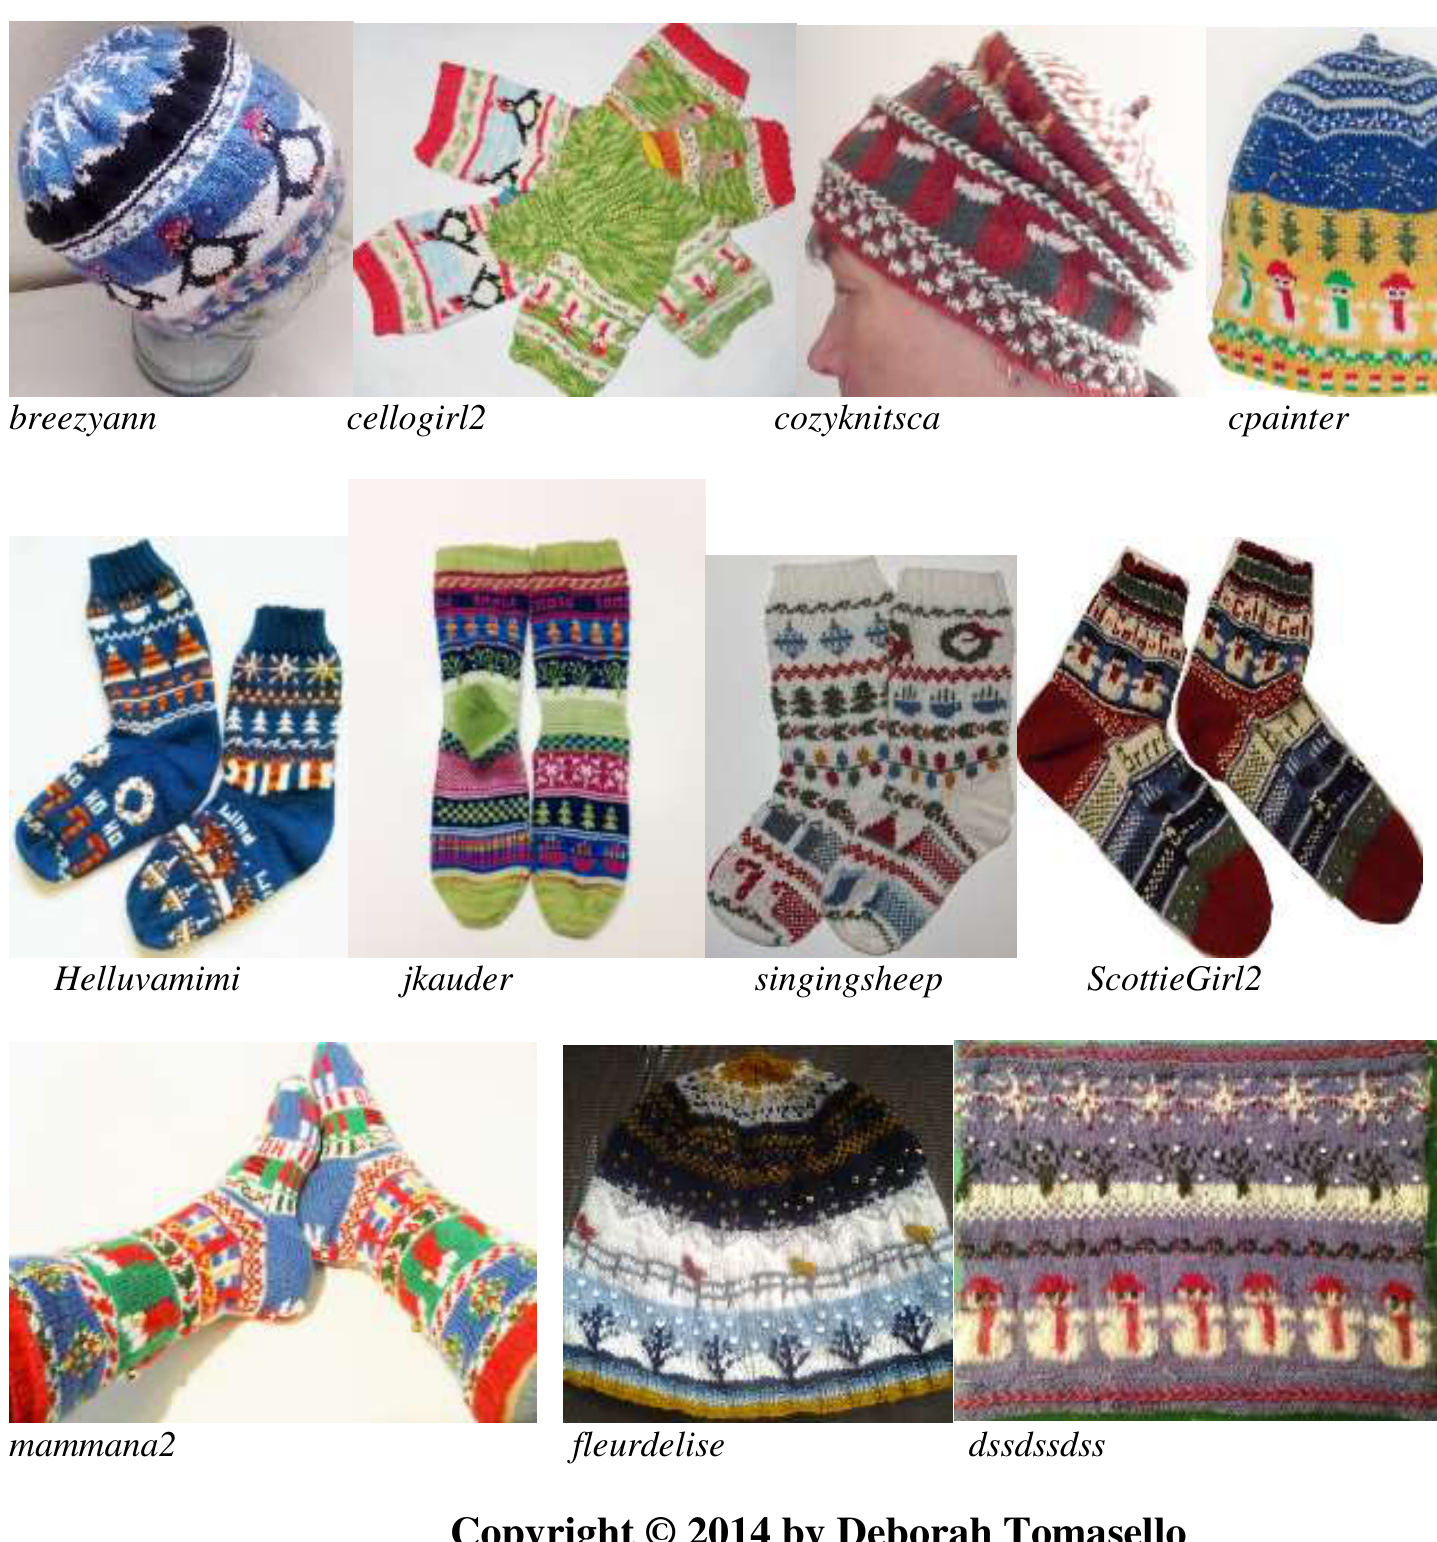
In recent years, knitting has become more than a mere hobby for knitters all over the world. It has become a way of life and, for some of us, a happy addiction. It has drawn generations closer together, and it is not an overstatement to say that it has united people globall. The Internet has allowed us to bridge geographical gaps, and we have made friends from faraway places through knitting whom we otherwise couldn't dream of knowing. We have been able to learn from each other, share techniques, exchange ideas. Knitters have even developed our own language. The following sentence, though nonsense to a non-knitter, makes perfect sense to us: Thanks to Rav, groups like CBD can host KALs and MALs. We knitters have our own strange and wonderful vocabulary. We are way cool! The knitting explosion has allowed people, largely women-folk, to start their own businesses, supplying hand-spun and hand-dyed yarns to keep us insatiable knitters happy. Our creative genes have been turned on, and some of us have begun designing our own patterns. We publish them so other knitters can use all that hand-spun, hand-dyed yarn. And, in the spirit of global camaraderie, we take part in knit-alongs and mystery knit-alongs together. Why do we do this? Because it's fun. Science has shown it is a healthy endeavor, as well. In the CBD group, we have had monthly KALs for two and a half years. The InfiniKALS have been mystery KALs (MALs), and these have been especially fun. We started with InfiniTAM. Then we did InfiniCOWL, and now, InfiniCHRISTMAS. These are huge logistical undertakings, and they would not be possible in my group were it not for the tireless efforts of HandmadeLove. I supply the designs and instructions---the general outline for the event—-and I plop it all in her lap. She works her magic, organizing, setting up rules to make things workable. HL, as she is fondly called, sets up a time schedule so the KALs can progress smoothly and complete on time. She answers questions, sends out clues, juggles all variables, and it's all a mystery to me. Thank you, HL. Mr. HL named the motifs so that even I can share in the surprise. Thank you to Mr. HL for some really good names. I designed the motifs, but even I couldn't identify some of them until I saw them.“St. Louis" was the best! The Infinipatterns are long. They contain so much information that they, by necessity, run for dozens of pages. It is my pleasure to include as much information as I can in each pattern. I like to include pictures of the projects worked during the time the KAL took place, and Pat Sample, (Cozyknitsca on Ravelry) has put the project pictures together to create great covers for the Infinipatterns. Pat is amazing, and she is a designer in her own right. She designed some of the motifs for this MAL, too. (See Toboggan Guy and Reindeer.) Pat will be hosting a KAL in the CBD group in 2015...stay tuned for that. Thank you, Pat, for your talent and for your generosity. And, finally, thank you to all you knitters who happily participated in the InfiniCHRISTMAS MAL, sharing your interpretations, your project pics and for letting us get to know you. It was an amazing couple of months. And now, all of us give to all of you the results of our labor. We encourage you to embellish, get wild with color, create your own masterpiece. Here is InfiniCHRISTMAS!
Table of Contents
Introduction and Thank Yous 3 Interesting MAL Stats 5 Unique Color Use 6 Clever Design Arrangement 7 Designers Among Us! 8 Abbreviations 11 Instructions for Hat 12 Instructions for Stocking Cap 14 Instructions for Socks 17 Instructions for Pillow 19 Instructions for Scarf 20 Instructions for Cowl 21 Pattern Motifs 22 Chart Your Design 37
InterestingInfiniCHRISTMAS MAL Stats
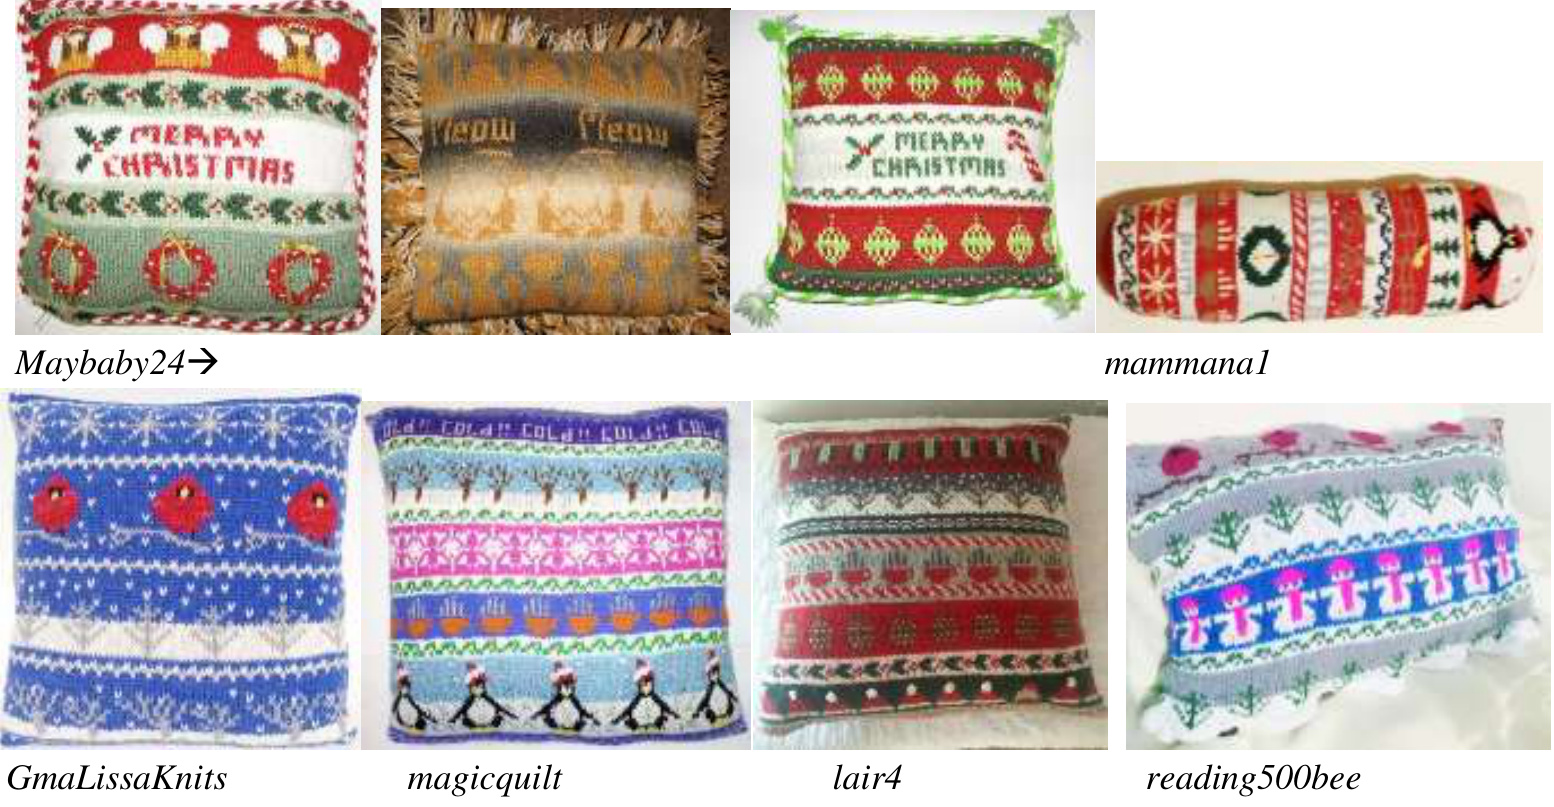
Handmadelove keeps track of everything! She has compiled a list of interesting KAL statistics. Here is a list of impressive KAL data. Number of Participants - 120 projects started during the KAL. 71 were completed for finishing rate of 60%. Number of Completed Projects Hats - 29 Scarves - 3 Cowls - 6 Stocking Caps - 5 Pillows - 12 Socks - 13 Other - 3
Top 10 Designs
Twinkle Landscape Chilly Leaves Winter friends (Tied) Tweet (Tied) Forest (Tied) Garland (Tied) Frozen Waves First to Complete Any Project - cellogirl2 made a hat in 7 days First to Complete Each Type of Project hat - cellogirl2 - 7 days scarf - angiann - 42 days short cowl - dssdssdss - 9 days long cowl - aimeeRN - 25 days stocking cap - aandersonmi - 14 days pillow - maybaby24 - 15 days socks - mammana1 - 13 days Innovations (We were going to have a “most innovative" knitter, but there were too many to narrow to 1!) tea cozy - cellogirl2 burying the word snow in a pile of snow - cozyknitsca vertical stripes on top of hat - amyhansen1222 braid on cap and initial on cup - cozyknitsca bottle cozy - mammana1 mini pillow/ornament - GmaLissaKnits made a scene with motifs - fleurdelise bolster - angiann hairband - angiann Most Projects Completed - cellogirl2 finished 6 projects
Unique Color Use
Color is the most amazing element in stranded knitting. Take the same design, work it up twice, changing up the colors, and the projects look completely different from each other. You will want to give thoughtful attention to your choice of color for your InfiniCHRISTMAS projects. It is good to use a hardtwist yarn that yields fine stitch definition, and it is good to use colors that are highly contrasting to ensure that the various parts of the design stand out and don't get lost in the background color. Below are some suggested color schemes, but as you thumb through the pages of this pattern, notice the wonderful, unique and non-traditional use of color by some of the knitters. And the word for the day is “embellish"! Use beads, sparkly yarn, duplicate stitching. Add bows to your wreaths. Make each motif your very own.
Suggested color schemes
Color scheme #1: Christmas green, red and white

Color scheme #2: Burgundy, Forest green, and cream

Color Scheme #3: Ice Blue, White and Silver (gray)

Color Scheme #4: Clover, Serrano (or a brick red) and Cream

Embellish with gold, red, blue, green or silver beads

Clever Design Arrangement
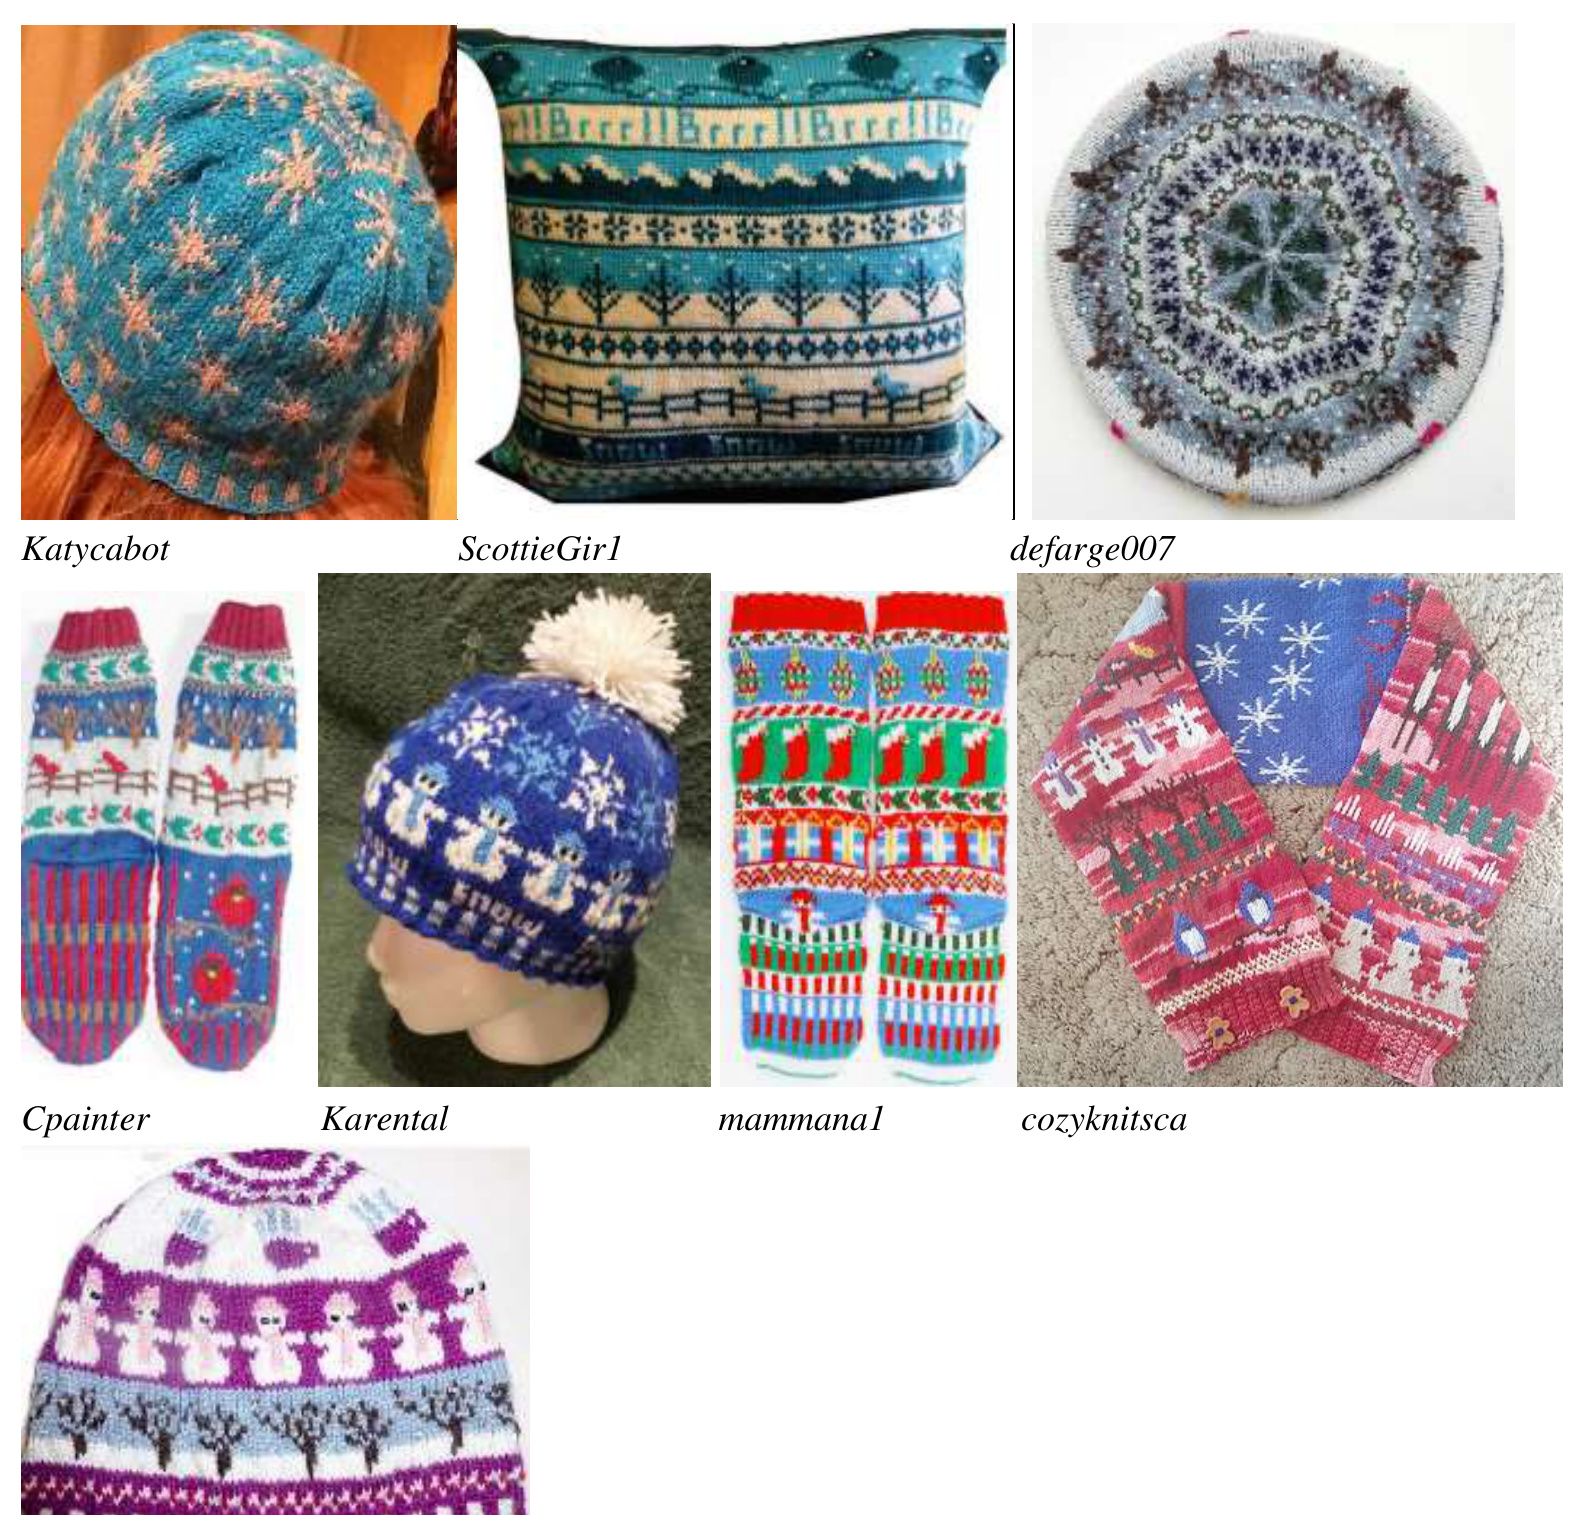
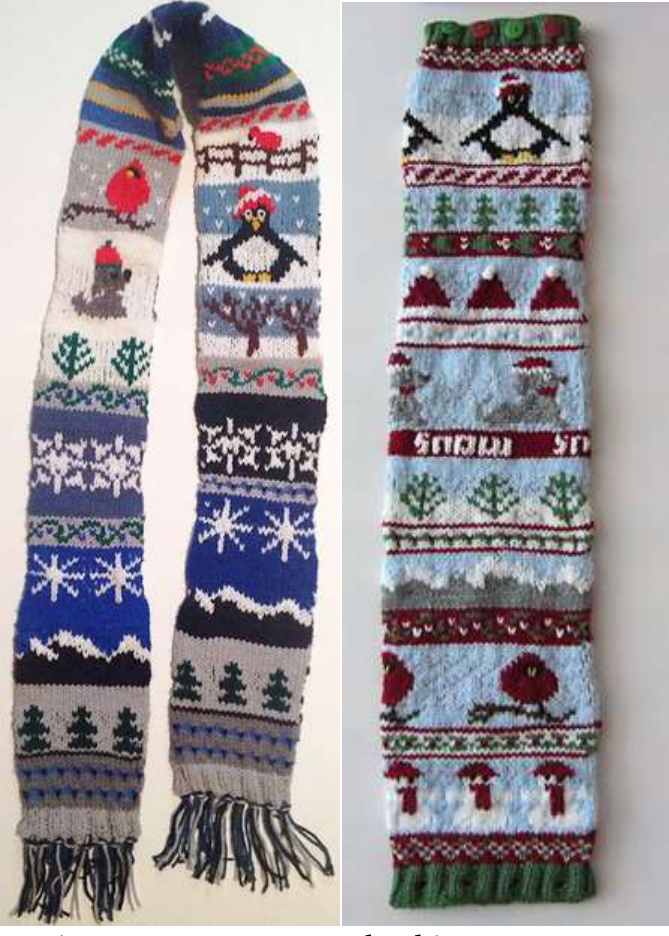
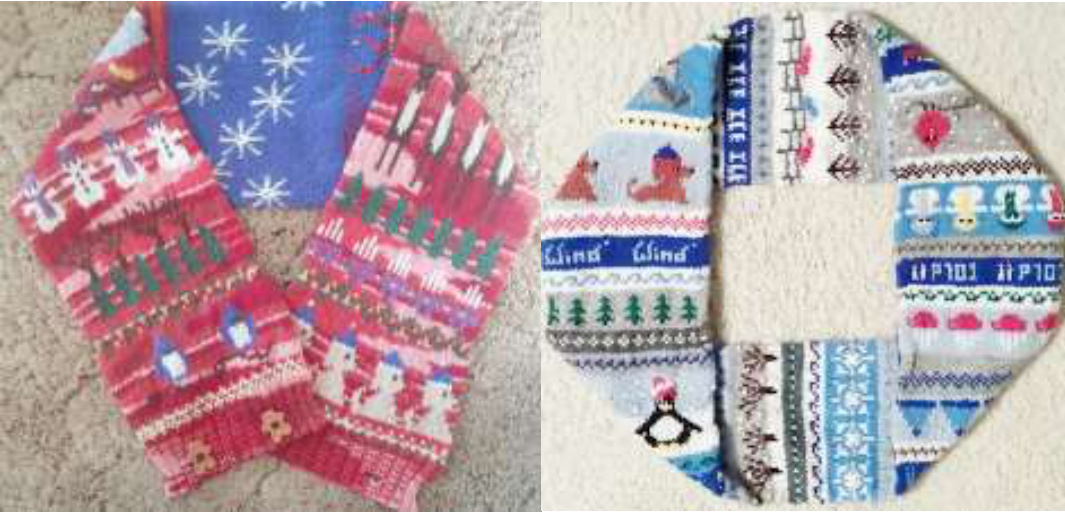
Planning out the way your project will ultimately look is great fun. And with so many motif choices, deciding can be a challenge. Some knitters repeated one motif throughout their project. (See katycabot's hat below.) Others chose thematically-related motifs, like various birds, (See cpainter's socks) some unifying motifs with a simple color scheme.(See ScottieGirl1's pillow below.) A few chose purely winter-related motifs and peeries, and others wanted Christmassy-looking finished projects. Several chose motifs in an order that allowed their projects to tell a story. And some were first-time stranders--yay, Renieandbo! You can see why this is called InfiniCHRISTMAS. The design possibilities are absolutely endless.
Renieandbo
Designers Among Us!
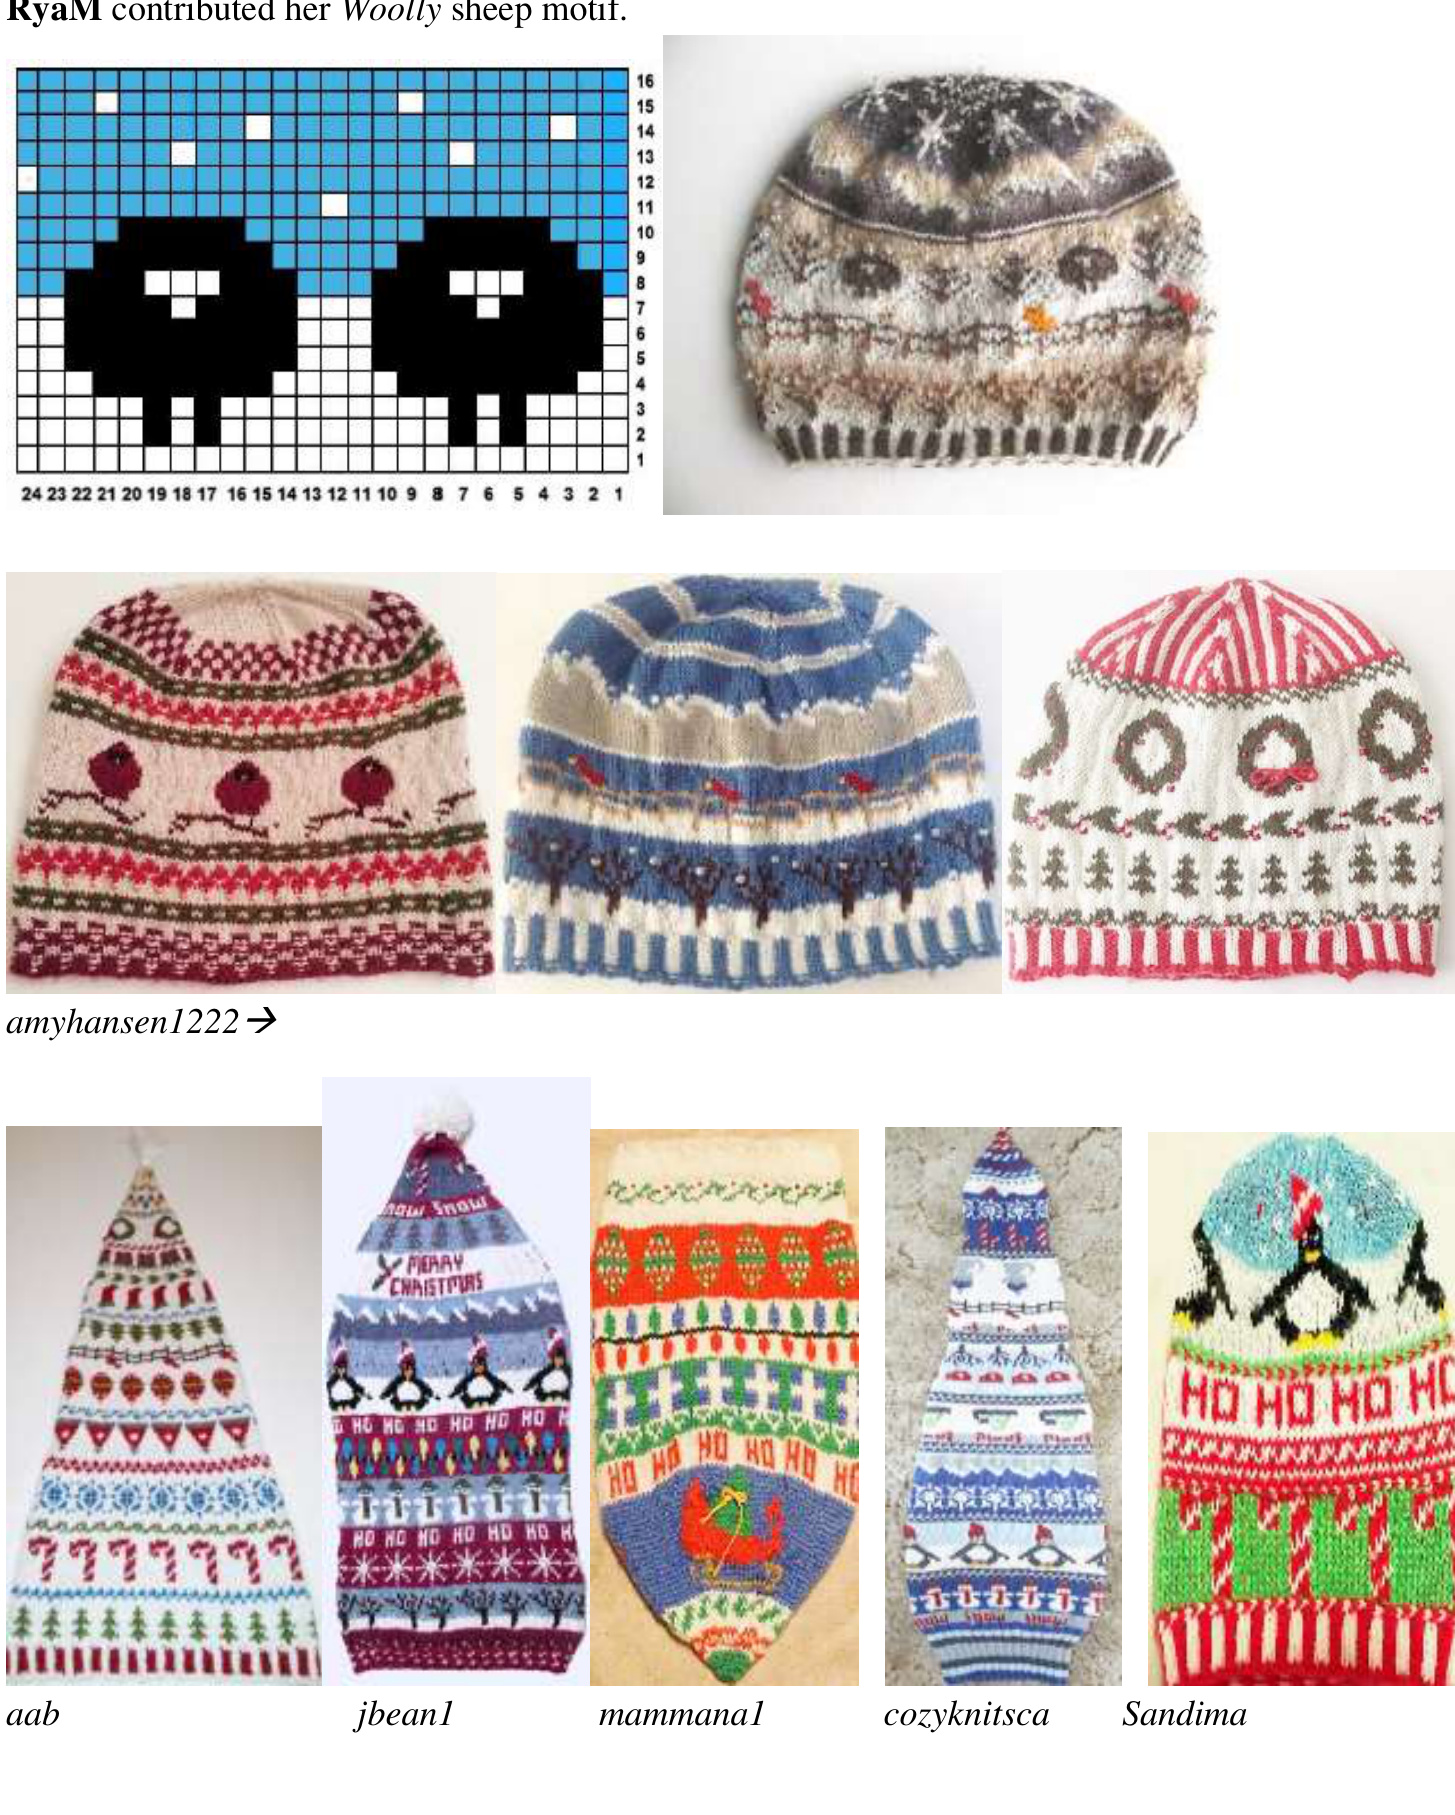
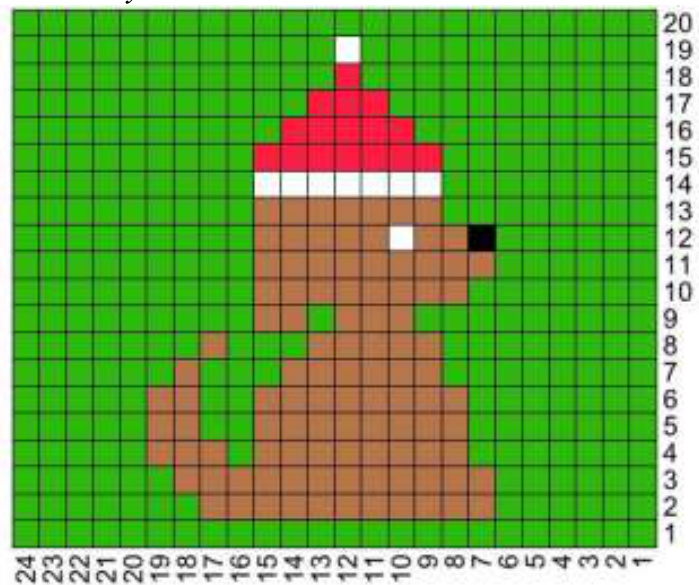
We were surprised by the clever, innovative use of color and motif in everyone's projects. But we were blown away to discover several had taken the leap and designed their own motifs. And each budding designer was kind and generous as she gladly supplied charts to share her design ideas with the other KAL participants. All have given permission for the motifs to be published in the pattern, so you can use them, too! The motifs are shown below, but they exist in the motif section of the pattern, as well. They are credited by their Ravelry names. Thank you, Cozyknitsca, GwenL, ScottieGirl1, aimeeRN, sandima, and RyaM. Cozyknitsca gave us three motifs: Run, Run, Toboggan Guy, and Reindeer.

jbeanl Glide and On Edge were designed by GwenL tains was adapted from one of Deborah Tomasello's designs by ScottieGirl1
Let's Play With a Friend was adapted from one of Deborah Tomasello's designs by aimeeRN.

Abbreviations
BO — bind off CO — cast on DPN — double-pointed needle Dec —— decrease Inc —— increase K — knit K2TOG — knit two stitches together M1 — knit in front loop and then again in the back loop of stitch MC — main color PM —— place marker P— purl Rnd — round SSK —— slip one stitch, then slip the next. Insert left needle into the front loops of the slipped stitches and knit them together from this position
Instructions for Hat
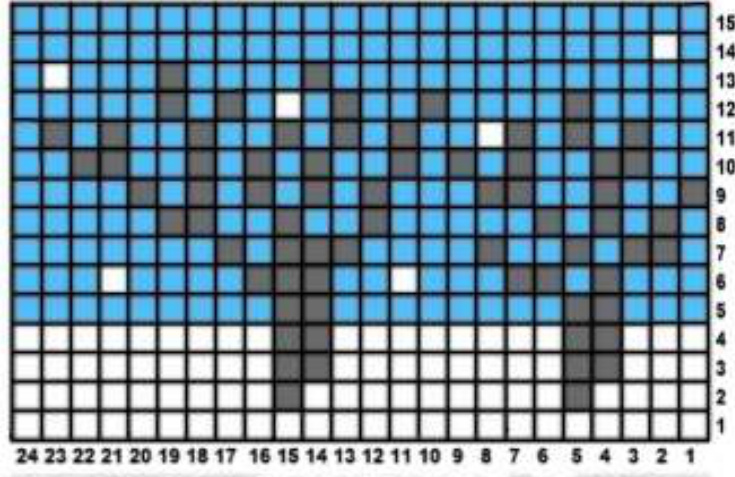
STEP 1 - Choosing Colors Look at your design and decide which colors you want to use. Your choices do NOT have to match the colors on the chart. Write down your choices so you will have them handy when you are ready to knit the chart. STEP 2 (OPTIONAL) - Changing the Size of Your Hat The number of stitches is based on a 24-stitch pattern repeat. If you want to make your hat smaller or larger, you need to decrease or increase your stitch count by 24 stitchesin order to be certain you will have full design repeats. If you want to change by a different number of stitches, you will need to figure out how many stitches to subtract or add between repeats to distribute your designs evenly around the hat. STEP 3 - Begin Knitting With a Size #3 16-inch circular needle or DPNs and one of the main colors, cast on 136 stitches. Join to work in the round, being careful not to twist. Place a marker to indicate the beginning of round. Work a 2x2 corrugated rib for 8 rounds. The chart shows black, gray and white, but you may use any three colors you would like. A dash in square indicates a purl stitch.

STEP 4 - Increase On the first round after your ribbing, you will need to increase to 168 stitches as follows: K4, \*K4, M1\*, repeat from \* to \* until 4 sts remain, K4 (168 sts). Begin knitting your first design, beginning with Round 2, working from the bottom up to the top of the chart. Since the spacing will not change for the entire project, you may want to place markers between each motif to help keep them lined up.
Top Decreases and Finishing Instructions
Blue represents the area possible for a motif placement. Choose a motif that will fit in the blue area. Then, chose a peerie for the smaller sections closer to the top.
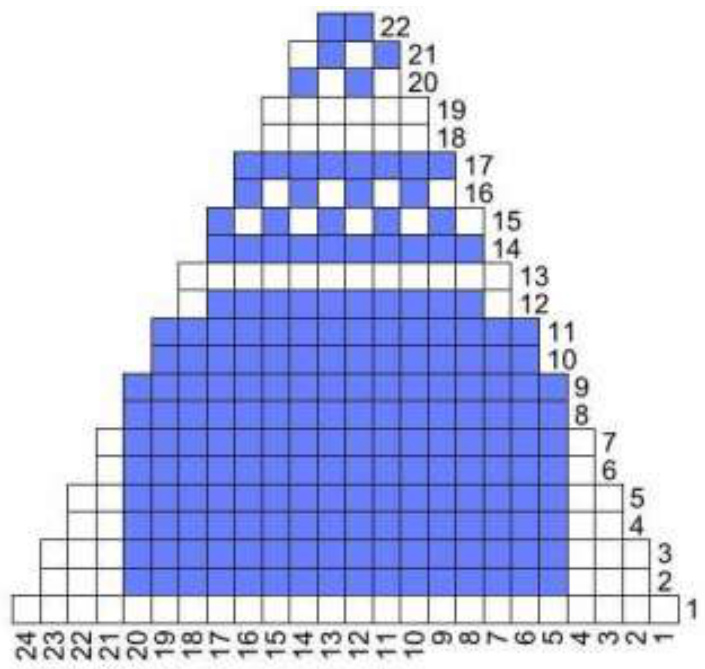
Ending with a Peerie/Band Blue represents possible areas for placement of knitter's choice ofpeerie(s).
Follow CHART (7 repeats per round) to desired size, decreasing as indicated and switching to DPNs when necessary. (Each decrease round has 2 decreases next to each other; k2tog for first decrease at beginning of chart repeat, and ssk for second each time at end of chart panel repeat.) After hat chart is complete, with 14 stitches onthe needles, k2tog around. 7 stitches will remain. Knit last seven stitches for 5 rounds. Cut the yarn leaving a tail several inches long. Thread a tapestry needle with the tail and run through the remaining stitches. Pull tightly and secure on the inside. Finishing: Tie and trim all yarn ends. Soak with color block and block to fit.
Instructions for Stocking Cap
STEP 1 - Choosing Colors Look at your design and decide which colors you want to use. Your choices do NOT have to match the colors on the chart. Write down your choices so you will have them handy when you are ready to knit the chart. STEP 2 (OPTIONAL) - Changing the Size of Your Stocking Cap The number of stitches is based on a 24-stitch pattern repeat. If you want to make your stocking cap smaller or larger, you need to decrease or increase your stitch count by 24 stitches in order to be certain you will have full design repeats. If you want to change by a different number of stitches, you will need to figure out how many stitches to subtract or add between repeats to distribute your designs evenly around the stocking cap. STEP 3 - Begin Knitting With a Size #3 16-inch circular needle or DPNs and one of the main colors, cast on 136 stitches. Join to work in the round, being careful not to twist. Place a marker to indicate the beginning of round. Work a 2x2 corrugated rib for 8 rounds. The chart shows black, gray and white, but you may use any three colors you would like. A dash in square indicates a purl stitch.

STEP 4 - Increase On the first round after your ribbing, you will need to increase to 168 stitches as follows: K4, \*K4, M1\*, repeat from \* to \* until 4 sts remain, K4 (168 sts). STEP 5 - Begin Your Design Begin knitting your first design, beginning with Round 2, working from the bottom upto the top of the chart. Since the spacing will not change for the entire project, you may want to place markers between each motif to help keep them
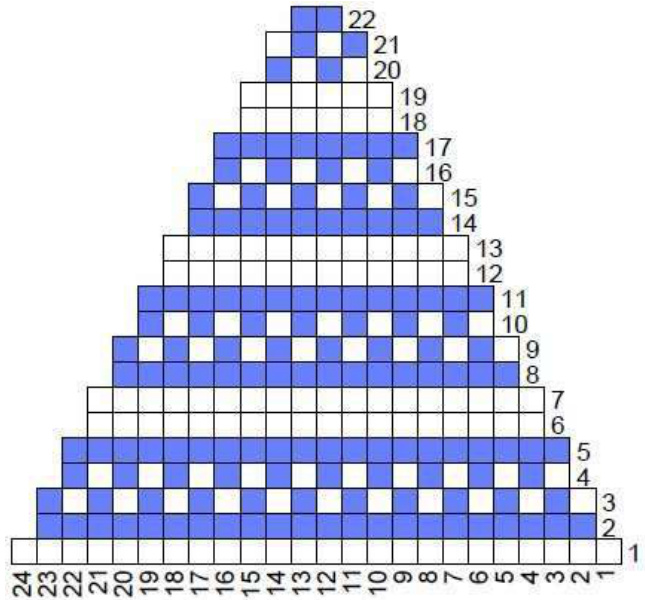
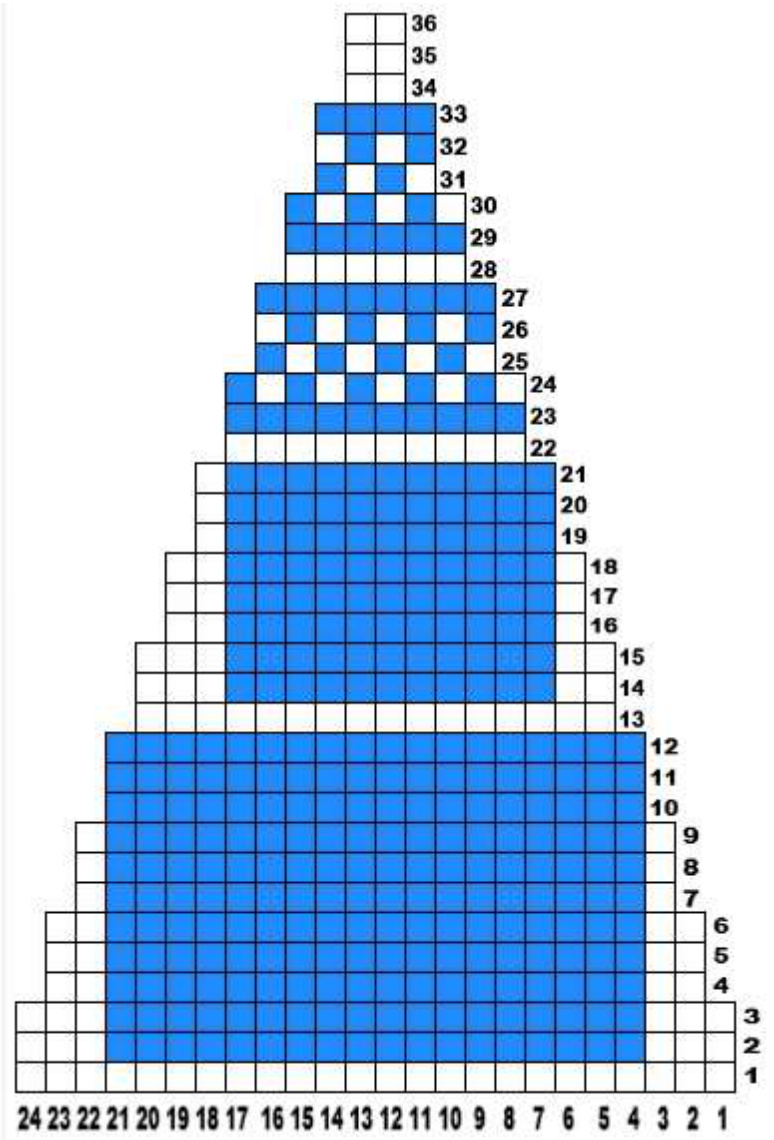
Top Decreases and Finishing Instructions
Ending with a Motif Blue represents the area possible for a motif placement. Choose a motif that will fit in the blue area. Then, chose a peerie for the smaller sections closer to the top.
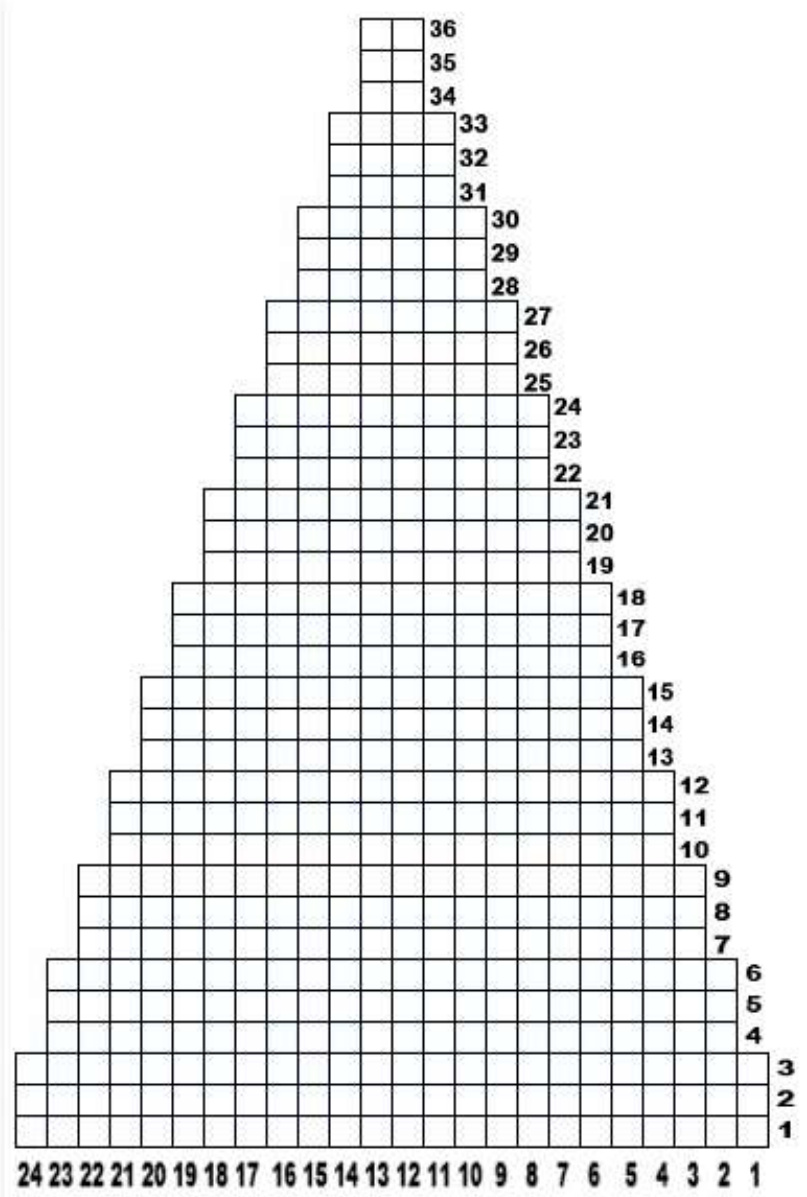
Ending with a Custom Design Below is a blank chart for you to use to design your own ending combination.
Follow CHART (7 repeats per round) to desired size, decreasing as indicated and switching to DPNs when necessary. (Each decrease round has 2 decreases next to each other; k2tog for first decrease at beginning of chart repeat, and ssk for second each time at end of chart panel repeat.) After hat chart is complete, with 14 stitches onthe needles, k2tog around. 7 stitches will remain. Knit last seven stitches for 5 rounds. Cut the yarn leaving a tail several inches long. Thread a tapestry needle with the tail and run through the remaining stitches. Pull tightly and secure on the inside. Finishing: Tie and trim all yarn ends. Soak with color block and block to fit.
Instructions for Socks
STEP 1 - Choosing Colors Look at your design and decide which colors you want to use. Your choices do NOT have to match the colors on the chart. Write down your choices so you will have them handy when you are ready to knit the chart. STEP 2 (OPTIONAL) - Changing the Size of Your Sock The number of stitches is based on a 24-stitch pattern repeat. If you want to make your socks smaller or larger, you need to decrease or increase your stitch count by 24 stitches in order to be certain you will have full design repeats. If you want to change by a different number of stitches, you will need to figure out how many stitches to subtract or add between repeats to distribute your designs evenly around the sock. STEP 3 (OPTIONAL) - Placing a Single Motif If you will not be working your design all the way around the sock, decide where you want it (left side, right side, or centered). Subtract to number of stitches in your design from 72. For a centered design, divide that number in half, this is the number of stitches to make before your design. For the sides, divide by 4. This is the number of stitches to make either before or after your design, depending on which side you want it to be. STEP 4 - Begin Knitting With Size# 2 DPNs or a long circular needle cast on 72 stitches. Join to work in the round, being careful not to twist. Place a marker to indicate the beginning of round. Work 15 rounds of 2x2 ribbing (2 knit, 2 purl). Begin knitting your first design, beginning with Round 1, working from the bottom upto the top of the chart. Since the spacing will not change for the entire project, you may want to place markers between each motif to help keep them lined up. HEEL- My socks feature the Sweet Tomato Heel (STH).You may use the heel of your choice, but I recommend one that does not employ a flap or gussets to allow for an even design flow through the instep. For a tutorial on the STH, see this video: http://www.youtube.com/watch?v=IRc3309JUyc#t=15 Once you understand how to knit the STH, proceed using the STH heel instructions, knitting heel with a darker color. Work three wedges on the 36sts on needles 1 and 4. Work wedges leaving 8 stitch pairs on each side (4 heel sts left unpaired between pairs). Knit according to pattern of your choice, or solid if you are between motifs, across the instep stitches between wedges. Follow the chart for the instep stitches (the sts you have on needles 2 and 3). After working the first halfof wedge one, work across the instep per chart, if you are knitting a peerie or motif---if not, just knit the solid color you are using or the heel. If working a design across the instep between wedges and not just knitting the solid color, when knitting down the first row of the first wedge, float the other color down and leave so you have it ready to use when working across the instep sts. After creating all the st pairs, knit across the instep and then pick up your st pairs on the second half of the wedge, alternating darker and lighter colors. When knitting row the first row of the second wedge, alternate colors, but leave the lighter color to be used on instep sts. Repeat until all 3 wedges are complete. See my YouTube tutorial here: https://www.youtube.com/watch?v=VeryK-gB84M FOOT- After you have completed your heel, you will begin the foot. The foot will comprise 50 rounds before starting the toe decreases. The chart numbers indicate 53 rounds, but this includes the 3 rounds used while working across the instep when creating the heel wedges. These are marked as Rounds 1-3 on the chart. Once the heelis completed, you will begin the foot with Round 4. Your foot stitches will be divided evenly, as they were for the sock leg, 18 stitches per 4 needles. Needles 1 and 4 will be the sole of the sock, and they will be knitted in a 2 color stripe to keep the sock smooth and not bulky. Your motifs and/or peeires will be worked on the top half of the foot (needles 2 and 3). You may choose the direction you want your motifs to be when doing the foot. They can continue in the same direction as with the leg, or you can turn them around so they face you. Knitter's choice. If you choose peeries, or choose to repeat one peerie throughout, directionality will not be an issue. I suggest choosing 2-color motifs and peeires only for the top of the foot. You don't want the added bulk in your shoe that stranding 3 yarns would create. You can always embellish with embroidery or duplicate stitch after you've knitted the foot, if you want more color there.
4826098565482559484 44443873654323329827262542322019181716154131211098765432 TOE: Using one, solid color, or two colors in stripes, decrease for toe as follows: Needle 1: K to last 3 sts of NEEDLE 1, SSK, K1 Needle 2: K 1, K2TOG, knit until the last 3 stitches of NEEDLE 3 Needle 3: K to last 3 sts, SSK, K1 Needle 4: K1, K2TOG knit to last 3 sts of NEEDLE 1 Repeat this until there are 8 stitches left on each needle. Place stitches from needles 4 and 1 onto one needle (16 stitches). Place stitches from needles 2 and 3 onto another needle (16 stitches) t the remaining stitches together using Kitchener stitch, and weave in all ends. Finishing: Tie and weave in or trim all yarn ends. Wash & block to fit.
Instructions for Pillow
STEP 1- Choosing Colors
Look at your design and decide which colors you want to use. Your choices do NOT have to match the colors on the chart. Write down your choices so you will have them handy when you are ready to knit the chart. STEP 2 (OPTIONAL) - Changing the Size of Pillow The number of stitches is based on a 24-stitch pattern repeat. If you want to make your pillow smaller or larger, you need to decrease or increase your stitch count by 24 stitches in order to be certain you will have full design repeats. If you want to change by a different number of stitches, you will need to figure out how many stitches to subtract or add between repeats in order to distribute your designs evenly across the pillow. STEP 3- Begin Knitting With a Size #3 16-inch circular needle and one of your main colors, CO 240 stitches. Join to work in the round, taking care not to twist stitches. Place a marker at the beginning of the round, and place another after the 120th stitch (the halfway point). Begin knitting your first design, starting with round 1 of the chart, working from the bottom up to the top of the chart. Because the spacing will not change the entire project, you may want to place markers between each motif to help keep them lined up. Finishing Ideas- There are no specific instructions for how to close your pillow, but there are options. You could simply sew it closed, possibly adding a braid or other trim. Another option would be to add a button band and buttons, so you could remove the cover for cleaning. Adding a zipper would also make the cover removable. A third removable option would be to continue knitting along just the front of the pillow cover until you have a strip of fabric that could be tucked down the backside of the pillow form. Snaps or hook-and- loop tape could be added if desired. And, of course, there's always fringe!
Instructions for Scarf
STEP 1 - Choosing Colors Look at your design and decide which colors you want to use. Your choices do NOT have to match the colors on the chart. Write down your choices so you will have them handy when you are ready to knit the chart. STEP 2 (OPTIONAL) - Changing the Size of Your Scarf The number of stitches is based on a 24-stitch pattern repeat. If you want to make your scarf smaller or larger, you need to decrease or increase your stitch count by 24 stitches in order to be certain you will have full design repeats. If you want to change by a different number of stitches, you will need to figure out how many stitches to subtract or add between repeats to distribute your designs evenly across the scarf. STEP 3 - Begin Knitting With a Size 3 circular needle and one of the main colors, cast on 144 stitches. Join to work in the round, being careful not to twist. Place a marker to indicate the beginning of round and another after the 72"d stitch to mark the halfway point. Begin knitting your first design, beginning with Round 1, working from the bottom upto the top of the chart. Since the spacing will not change for the entire project, you may want to place markers between each motif to help keep them lined up.
Instructions for Cowl
This cowl is designed to be knit across the width, not as an open circle that goes over your head. The floats and ends will be inside the “tube” and the designs will be visible on both the back and the front. The ends will be connected by either a row of buttons and buttonholes or by sewing them together. Look at your design and decide which colors you want to use. Your choices do NOT have to match the colors on the chart. Write down your choices so you will have them handy when you are ready to knit the chart. STEP 2 (OPTIONAL) - Changing the Size of Your Cowl The number of stitches is based on a 24-stitch pattern repeat. If you want to make your cowl narrower or wider, you need to decrease or increase your stitch count by 24 stitches in order to be certain you will have full design repeats. If you want to change by a different number of stitches, you will need to figure out how many stitches to subtract or add between repeats to distribute your designs evenly around the cowl. With a Size #3 16-inch circular needle and one of the main colors, cast on 144 stitches. Join to work in the round, taking care not to twist stitches. Place a marker to indicate the beginning of round (start of front) and another after the 72nd stitch to mark the halfway point (start of back). Begin knitting your first design, beginning with Round 1 of your chart, working from the bottom upto the top of the chart. Since the spacing will not change for the entire project, you may want to place markers between each motif to help keep them lined up.
Cozyknitsca aimeeRN
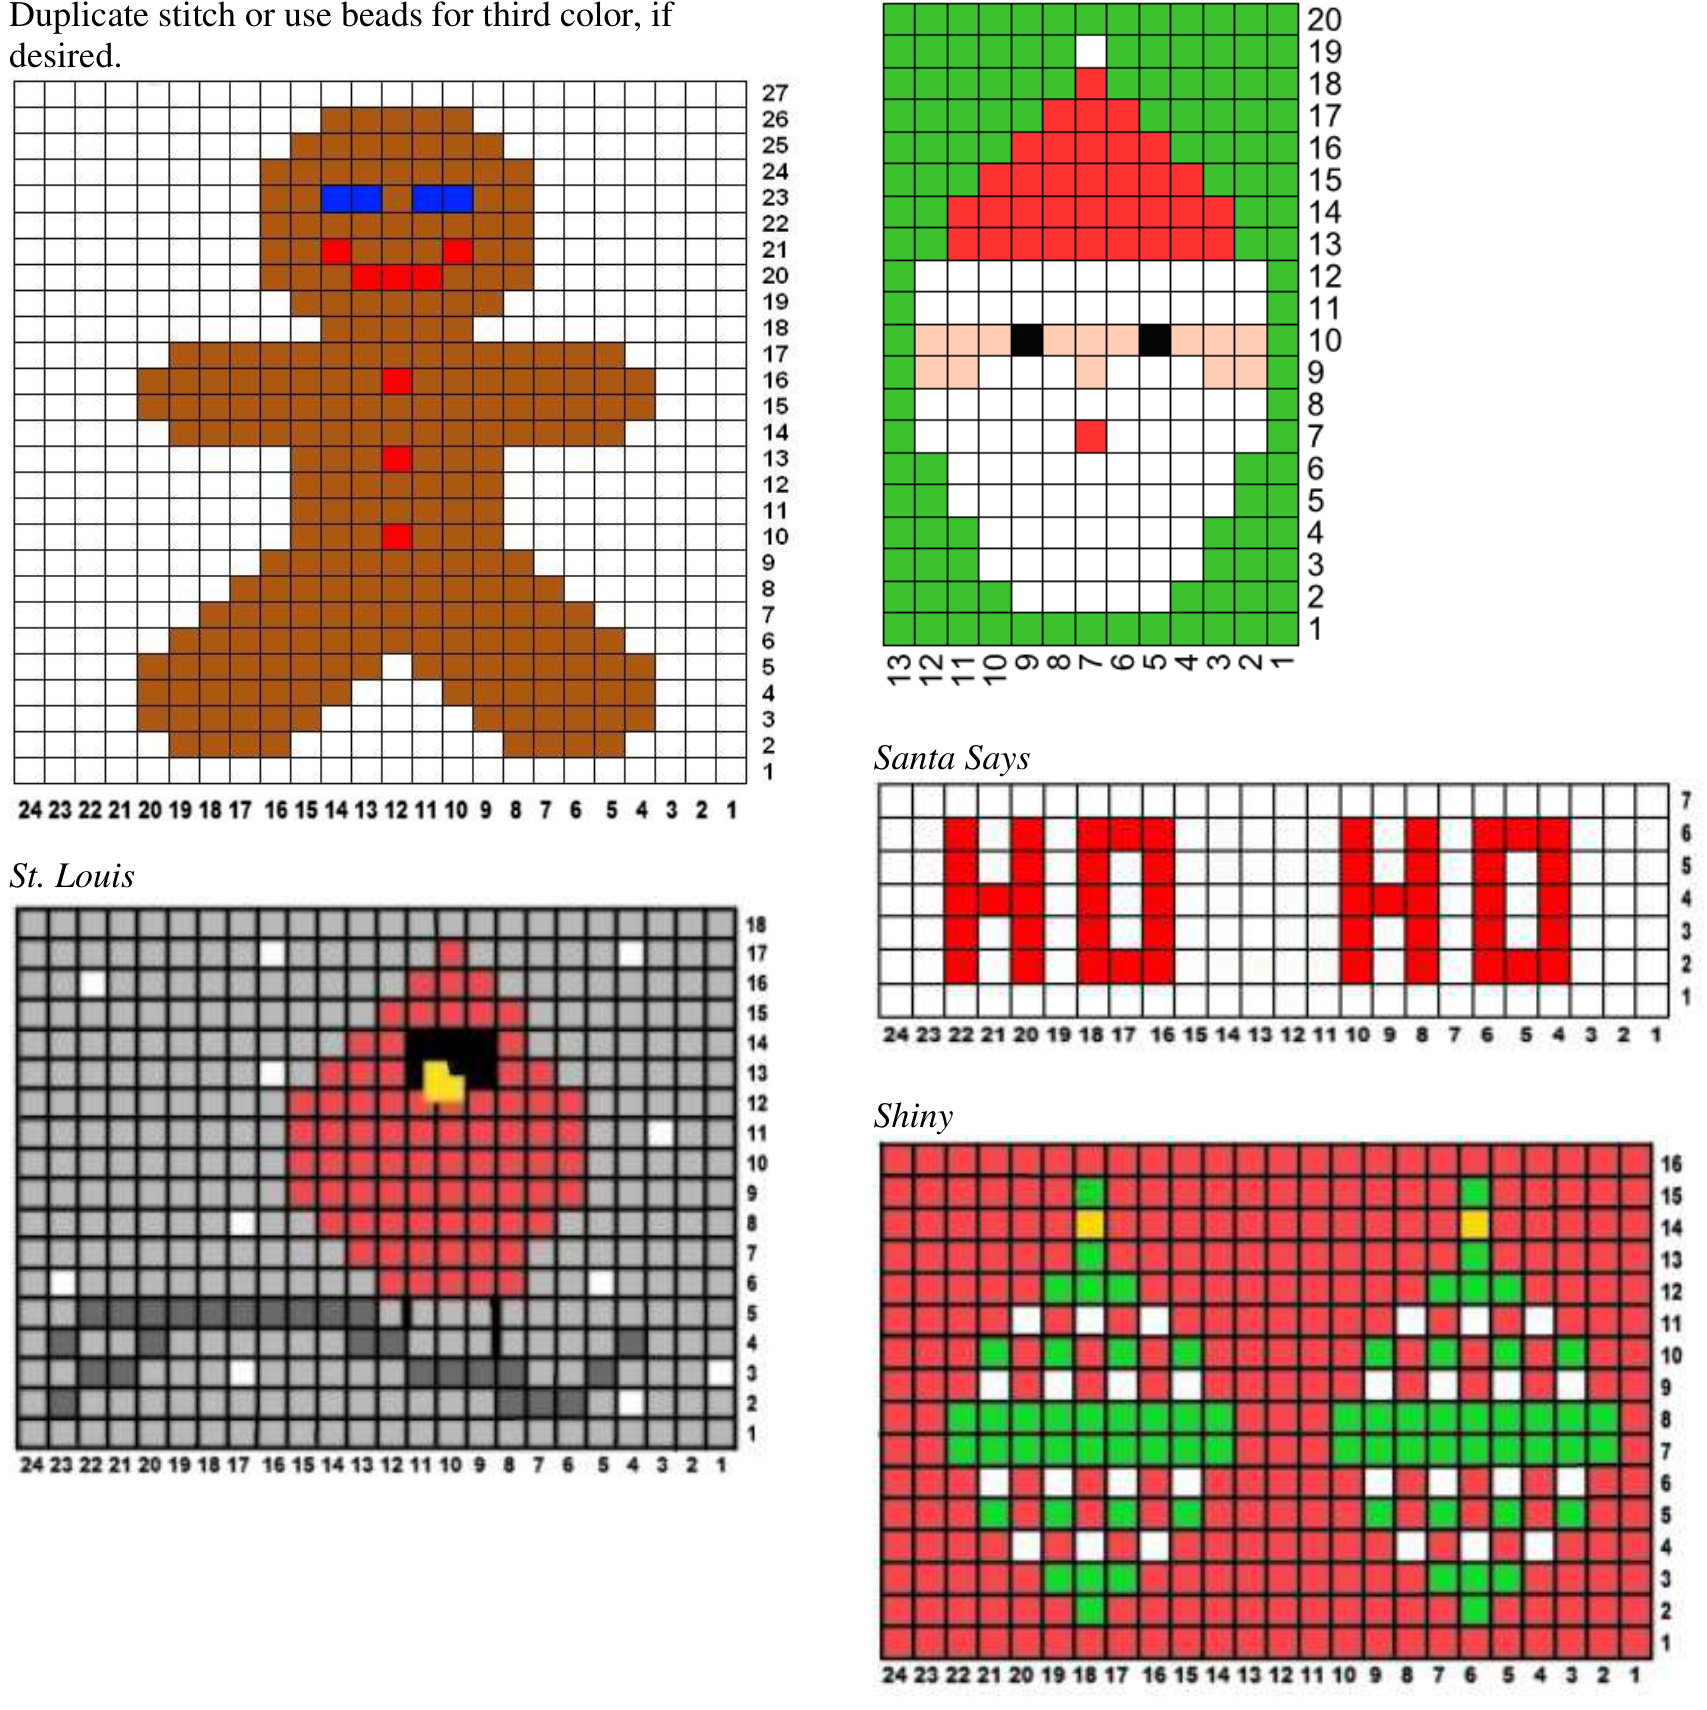
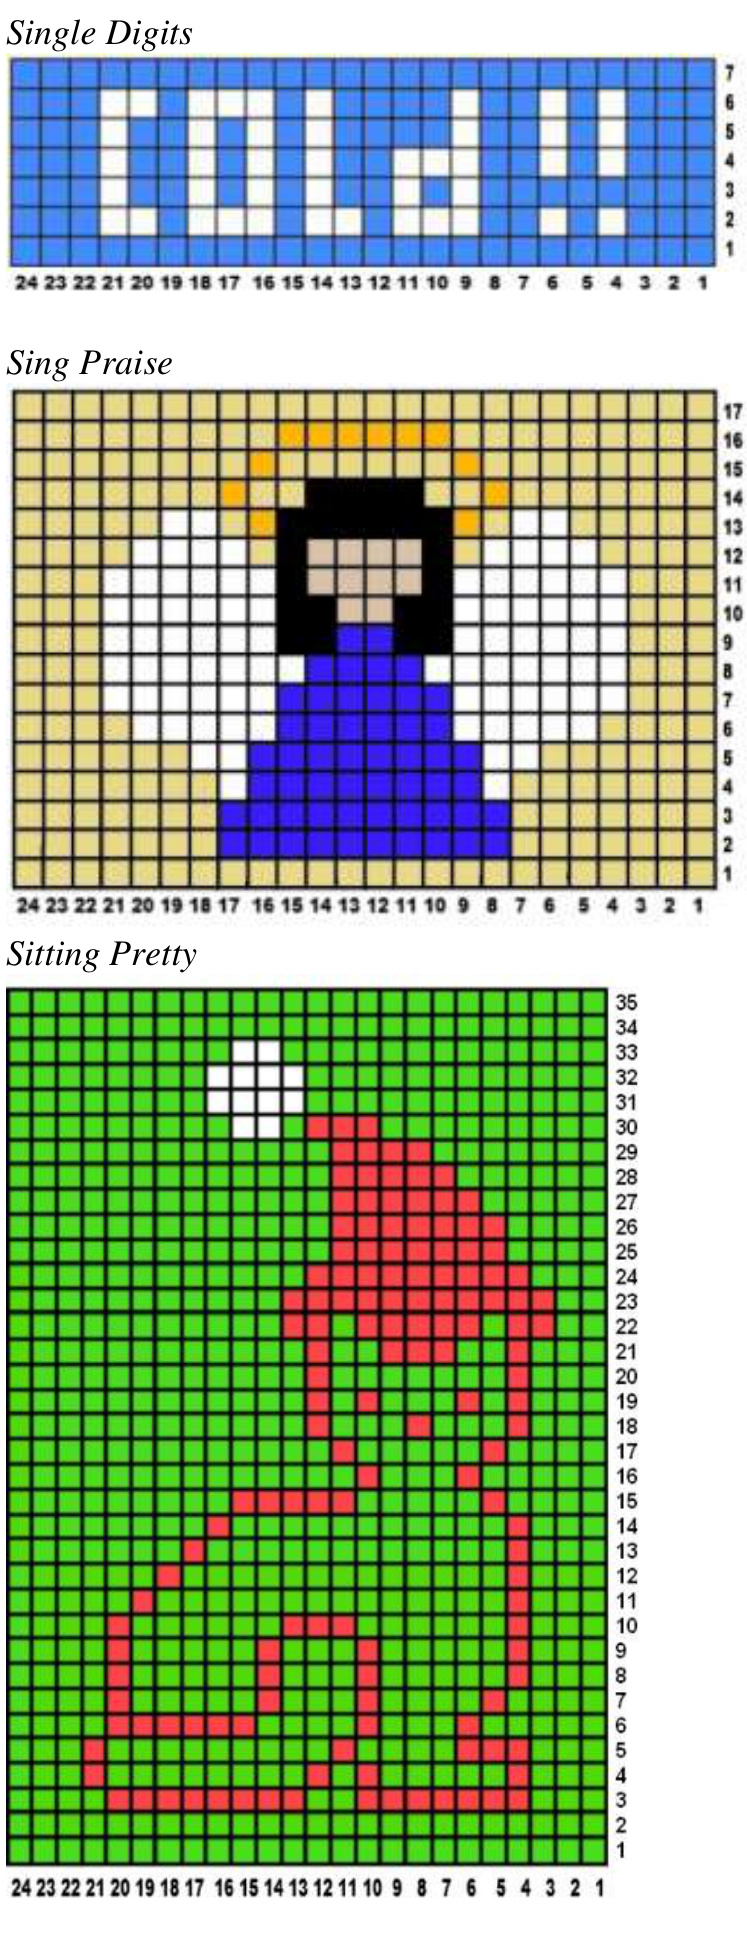
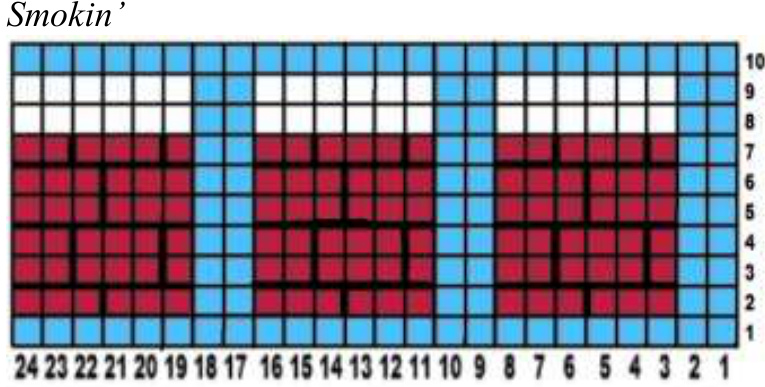
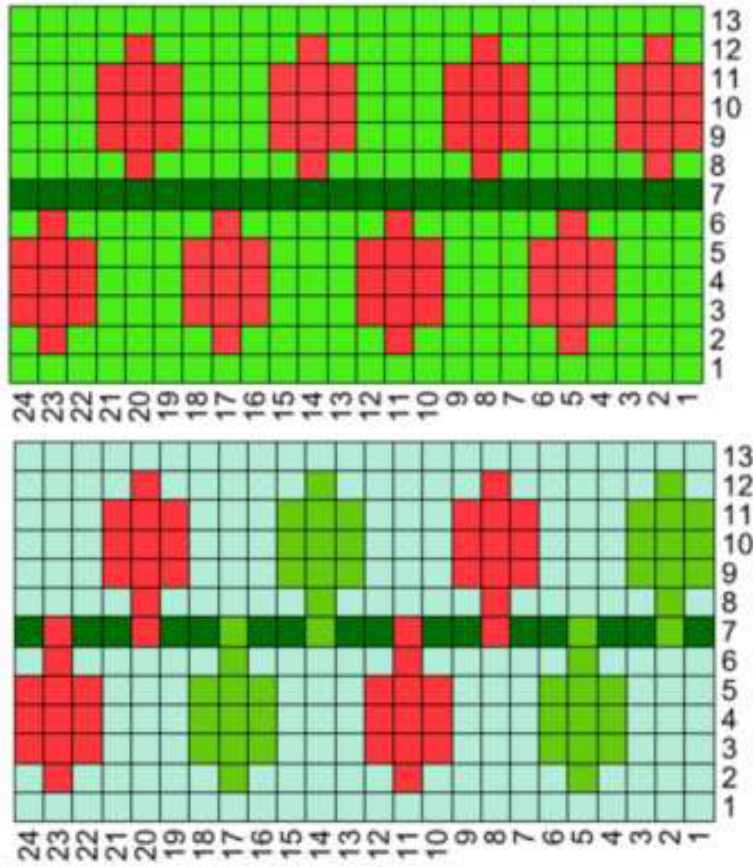
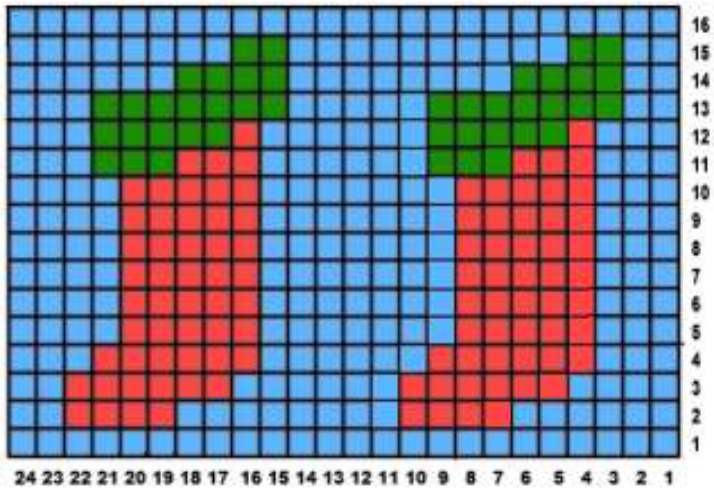
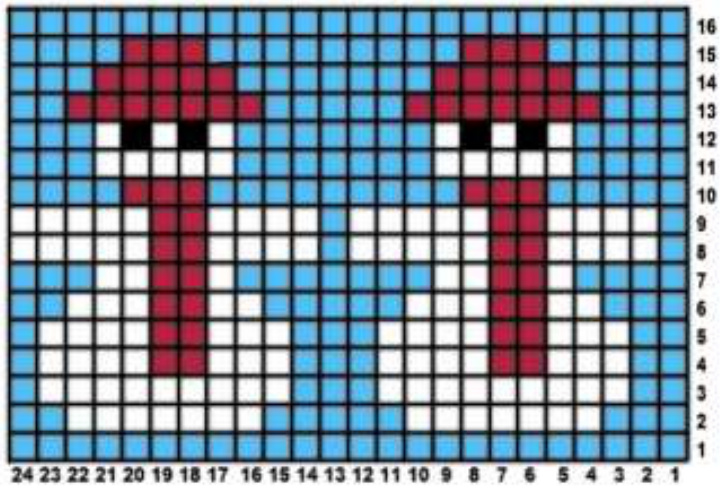
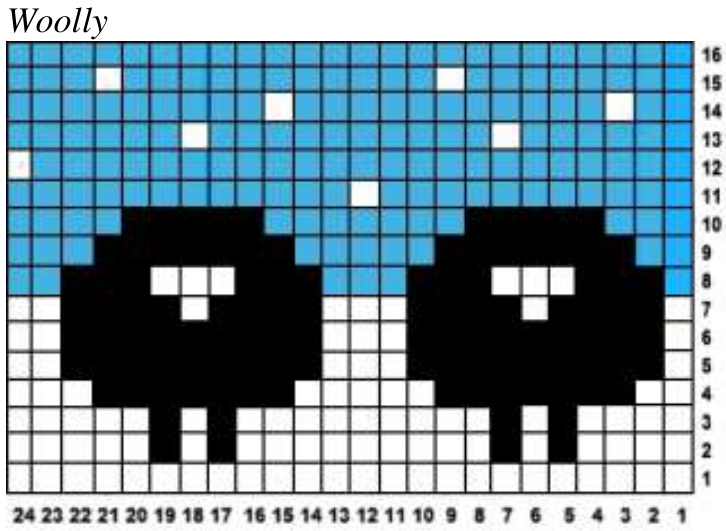
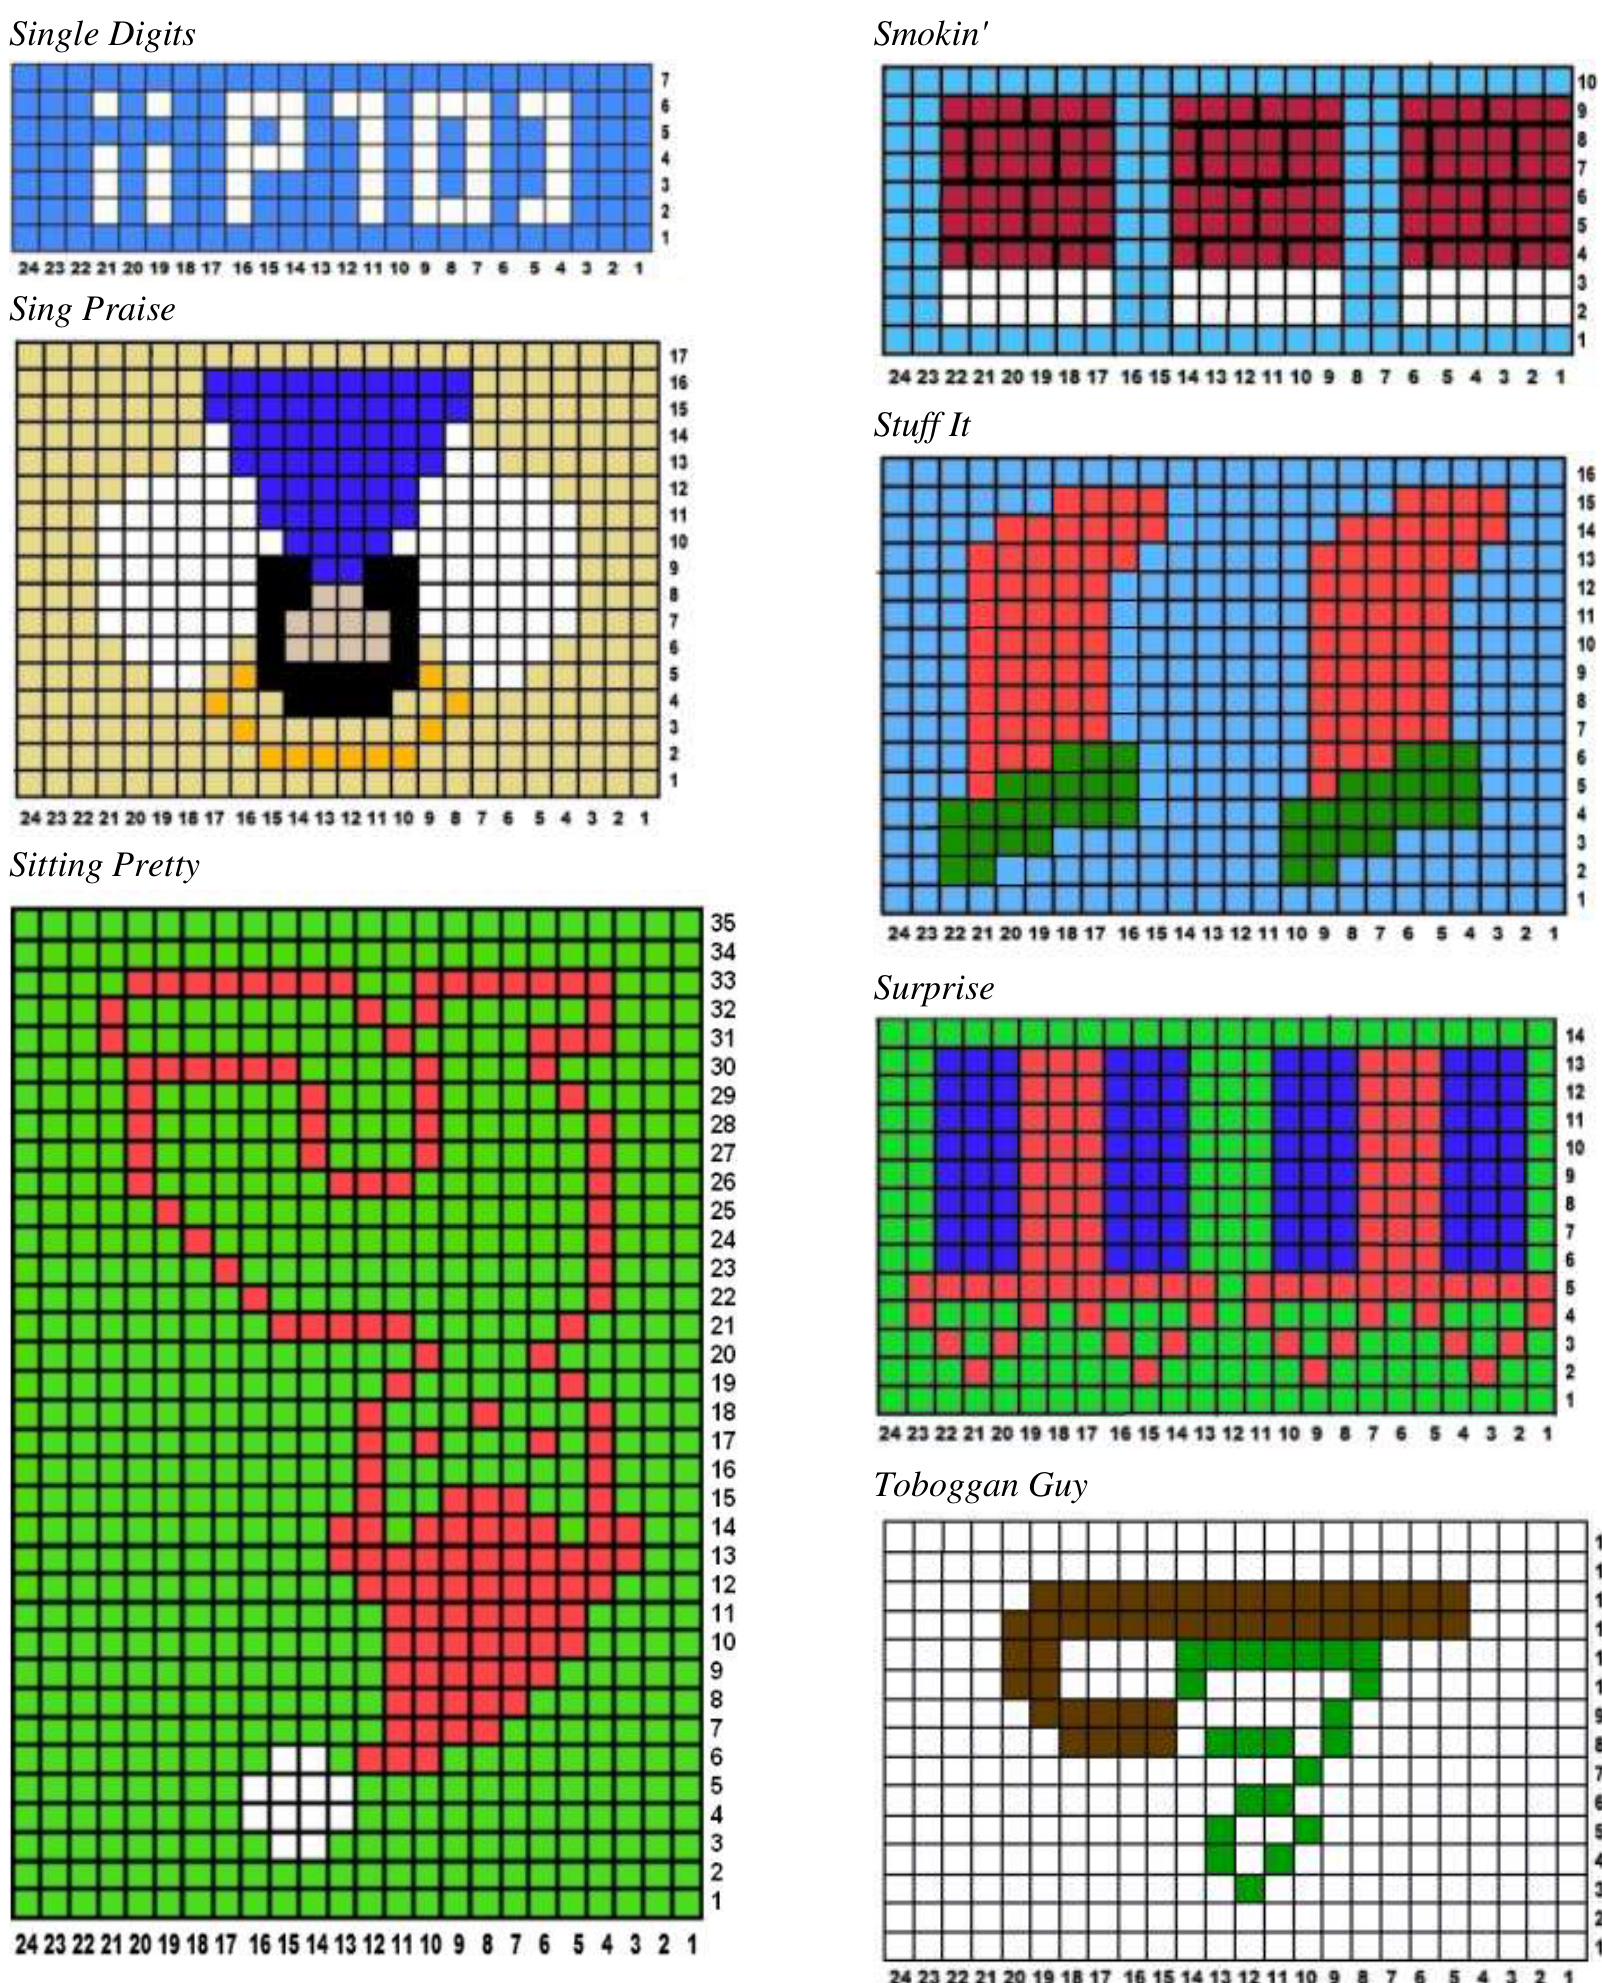
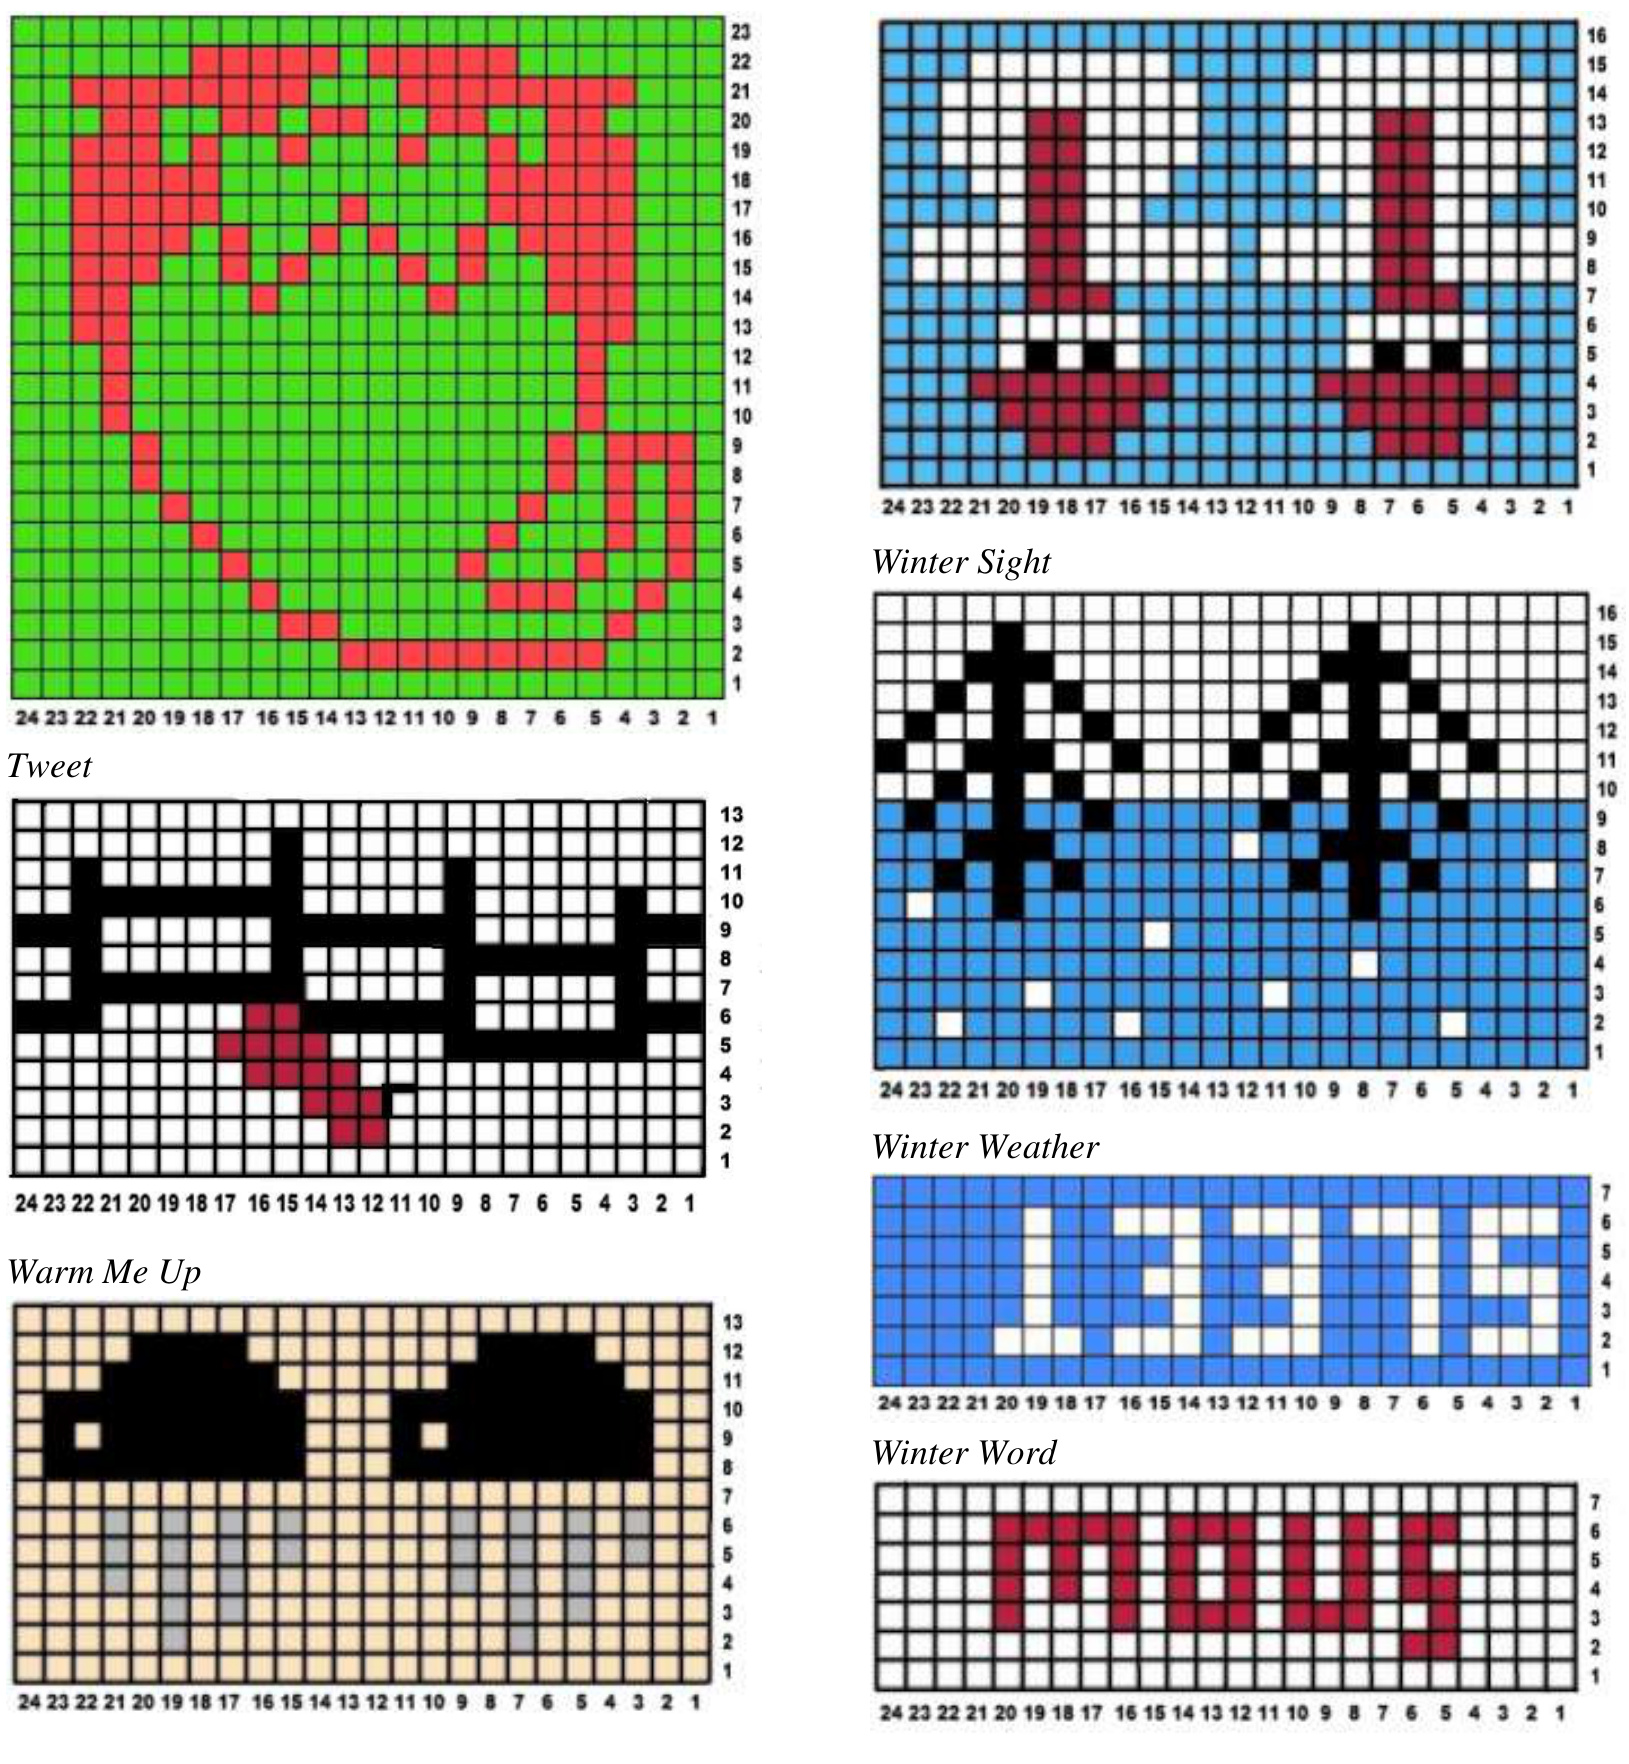
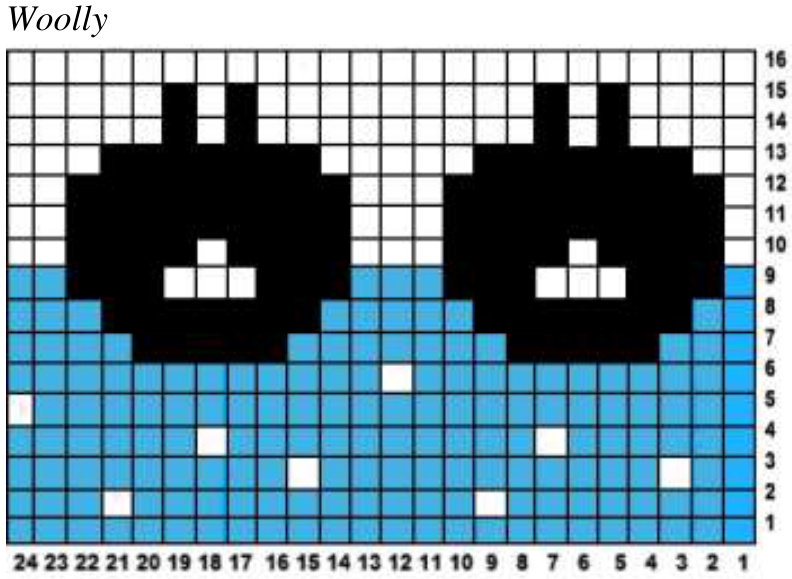
Pattern Motifs
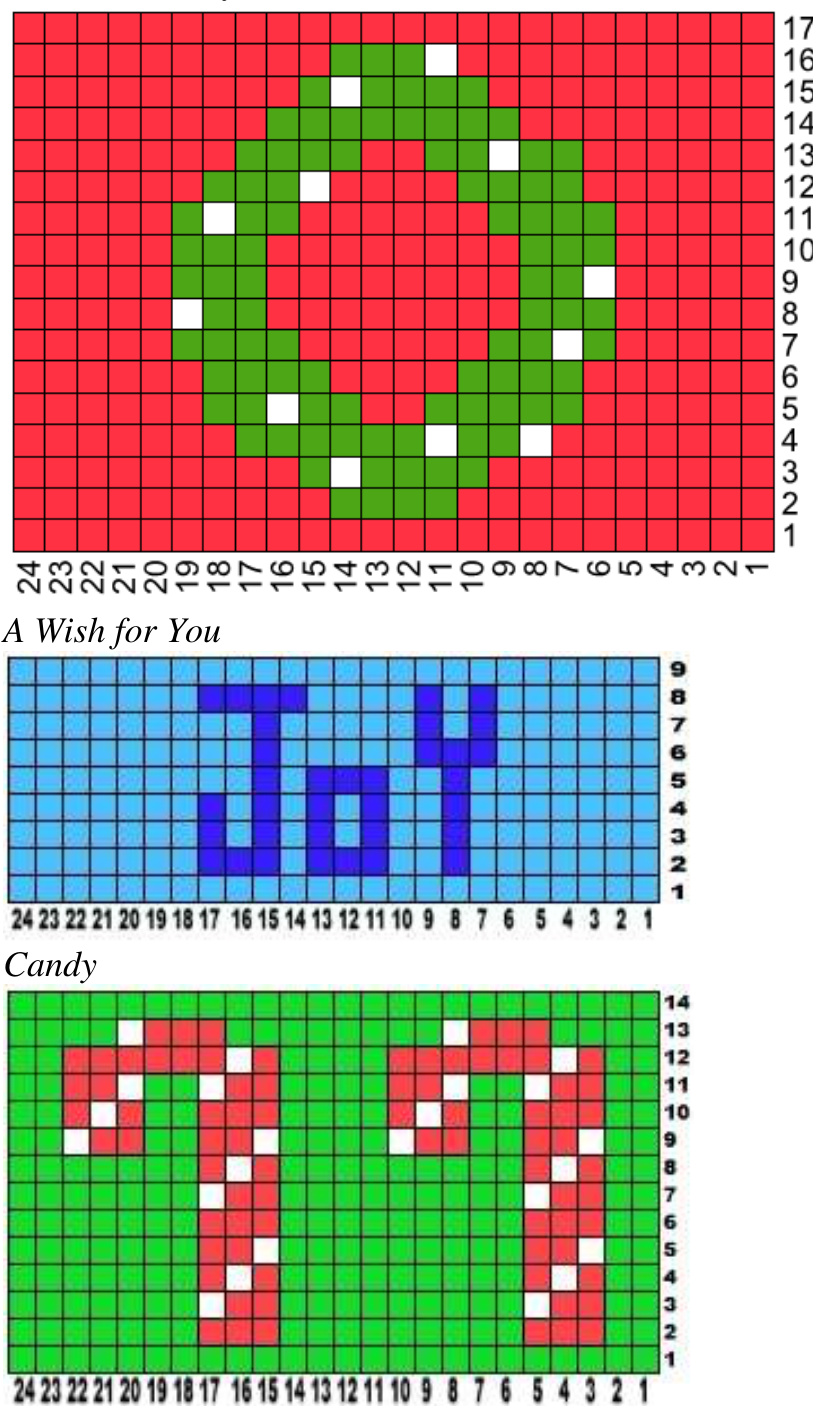
Some of the motifs and peeries are seasonal, some are winter-related, and some are holiday- themed motifs. With 52 motifs from which to choose, you will be able to design a limitless number of projects to your liking. The motifs appear in alphabetical order, and they are repeated reoriented for socks at the end of the list. A SignofWelcome Use beads or duplicate stitch the third color. Add a bow for your wreath, if desired
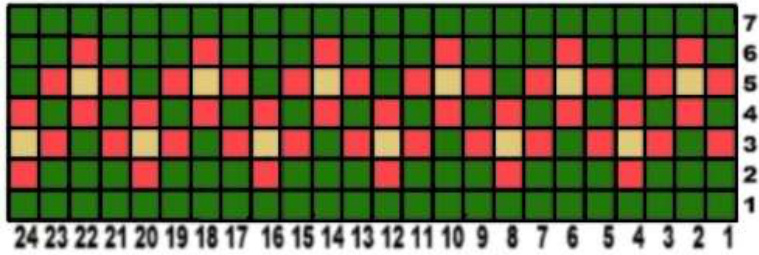
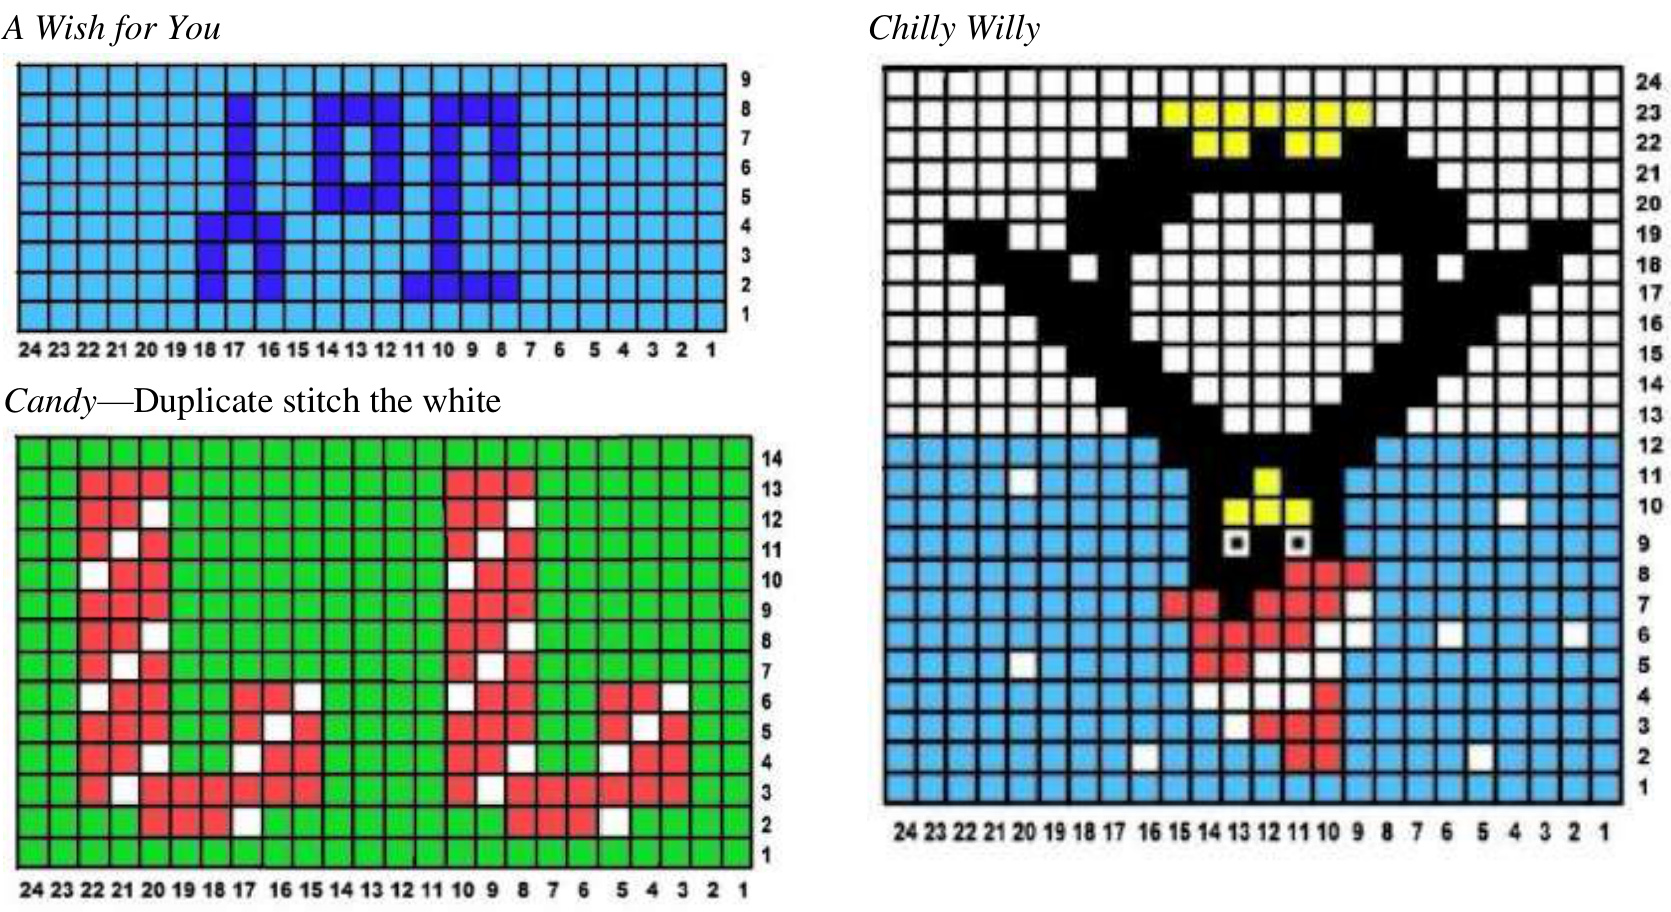
Chilly Willy
Duplicate stitch his eyes, or use beads, if desired.
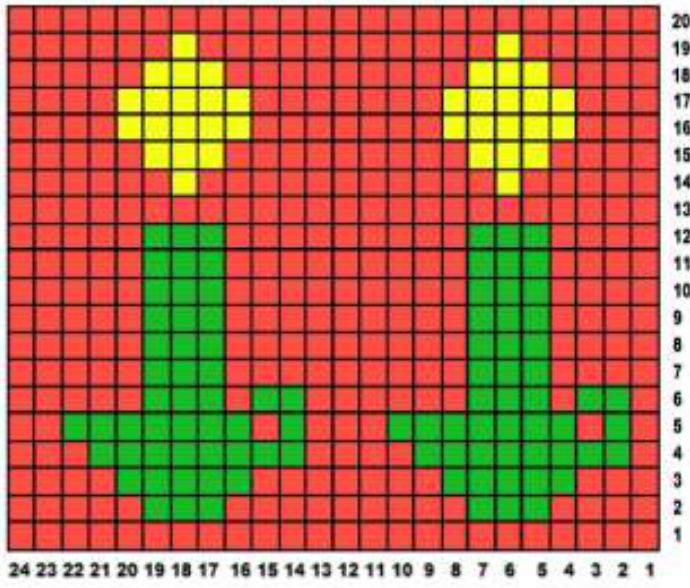
ChristmasFlowers/LittleFlowers Use beads or duplicate stitch the third color, if desired.
Let's Play
Don't Fall!

Flicker
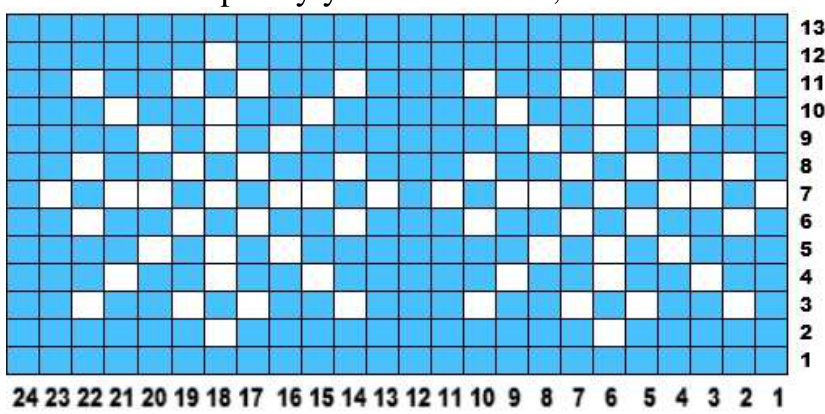
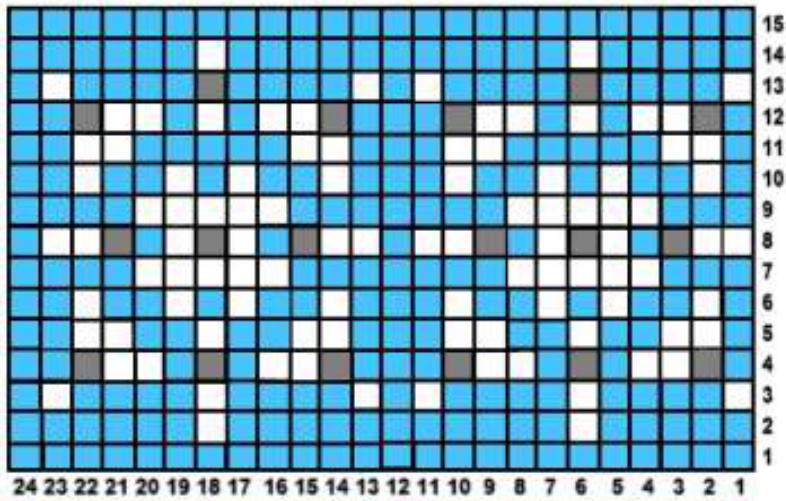
Flurries
Add beads or sparkly yarn for interest, if desired.
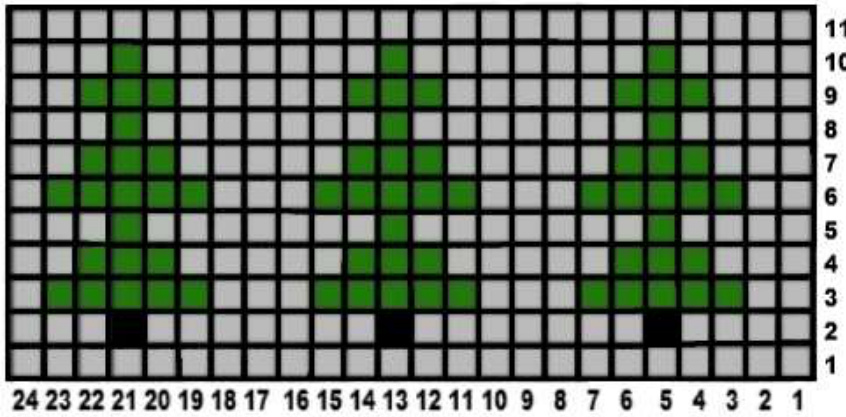
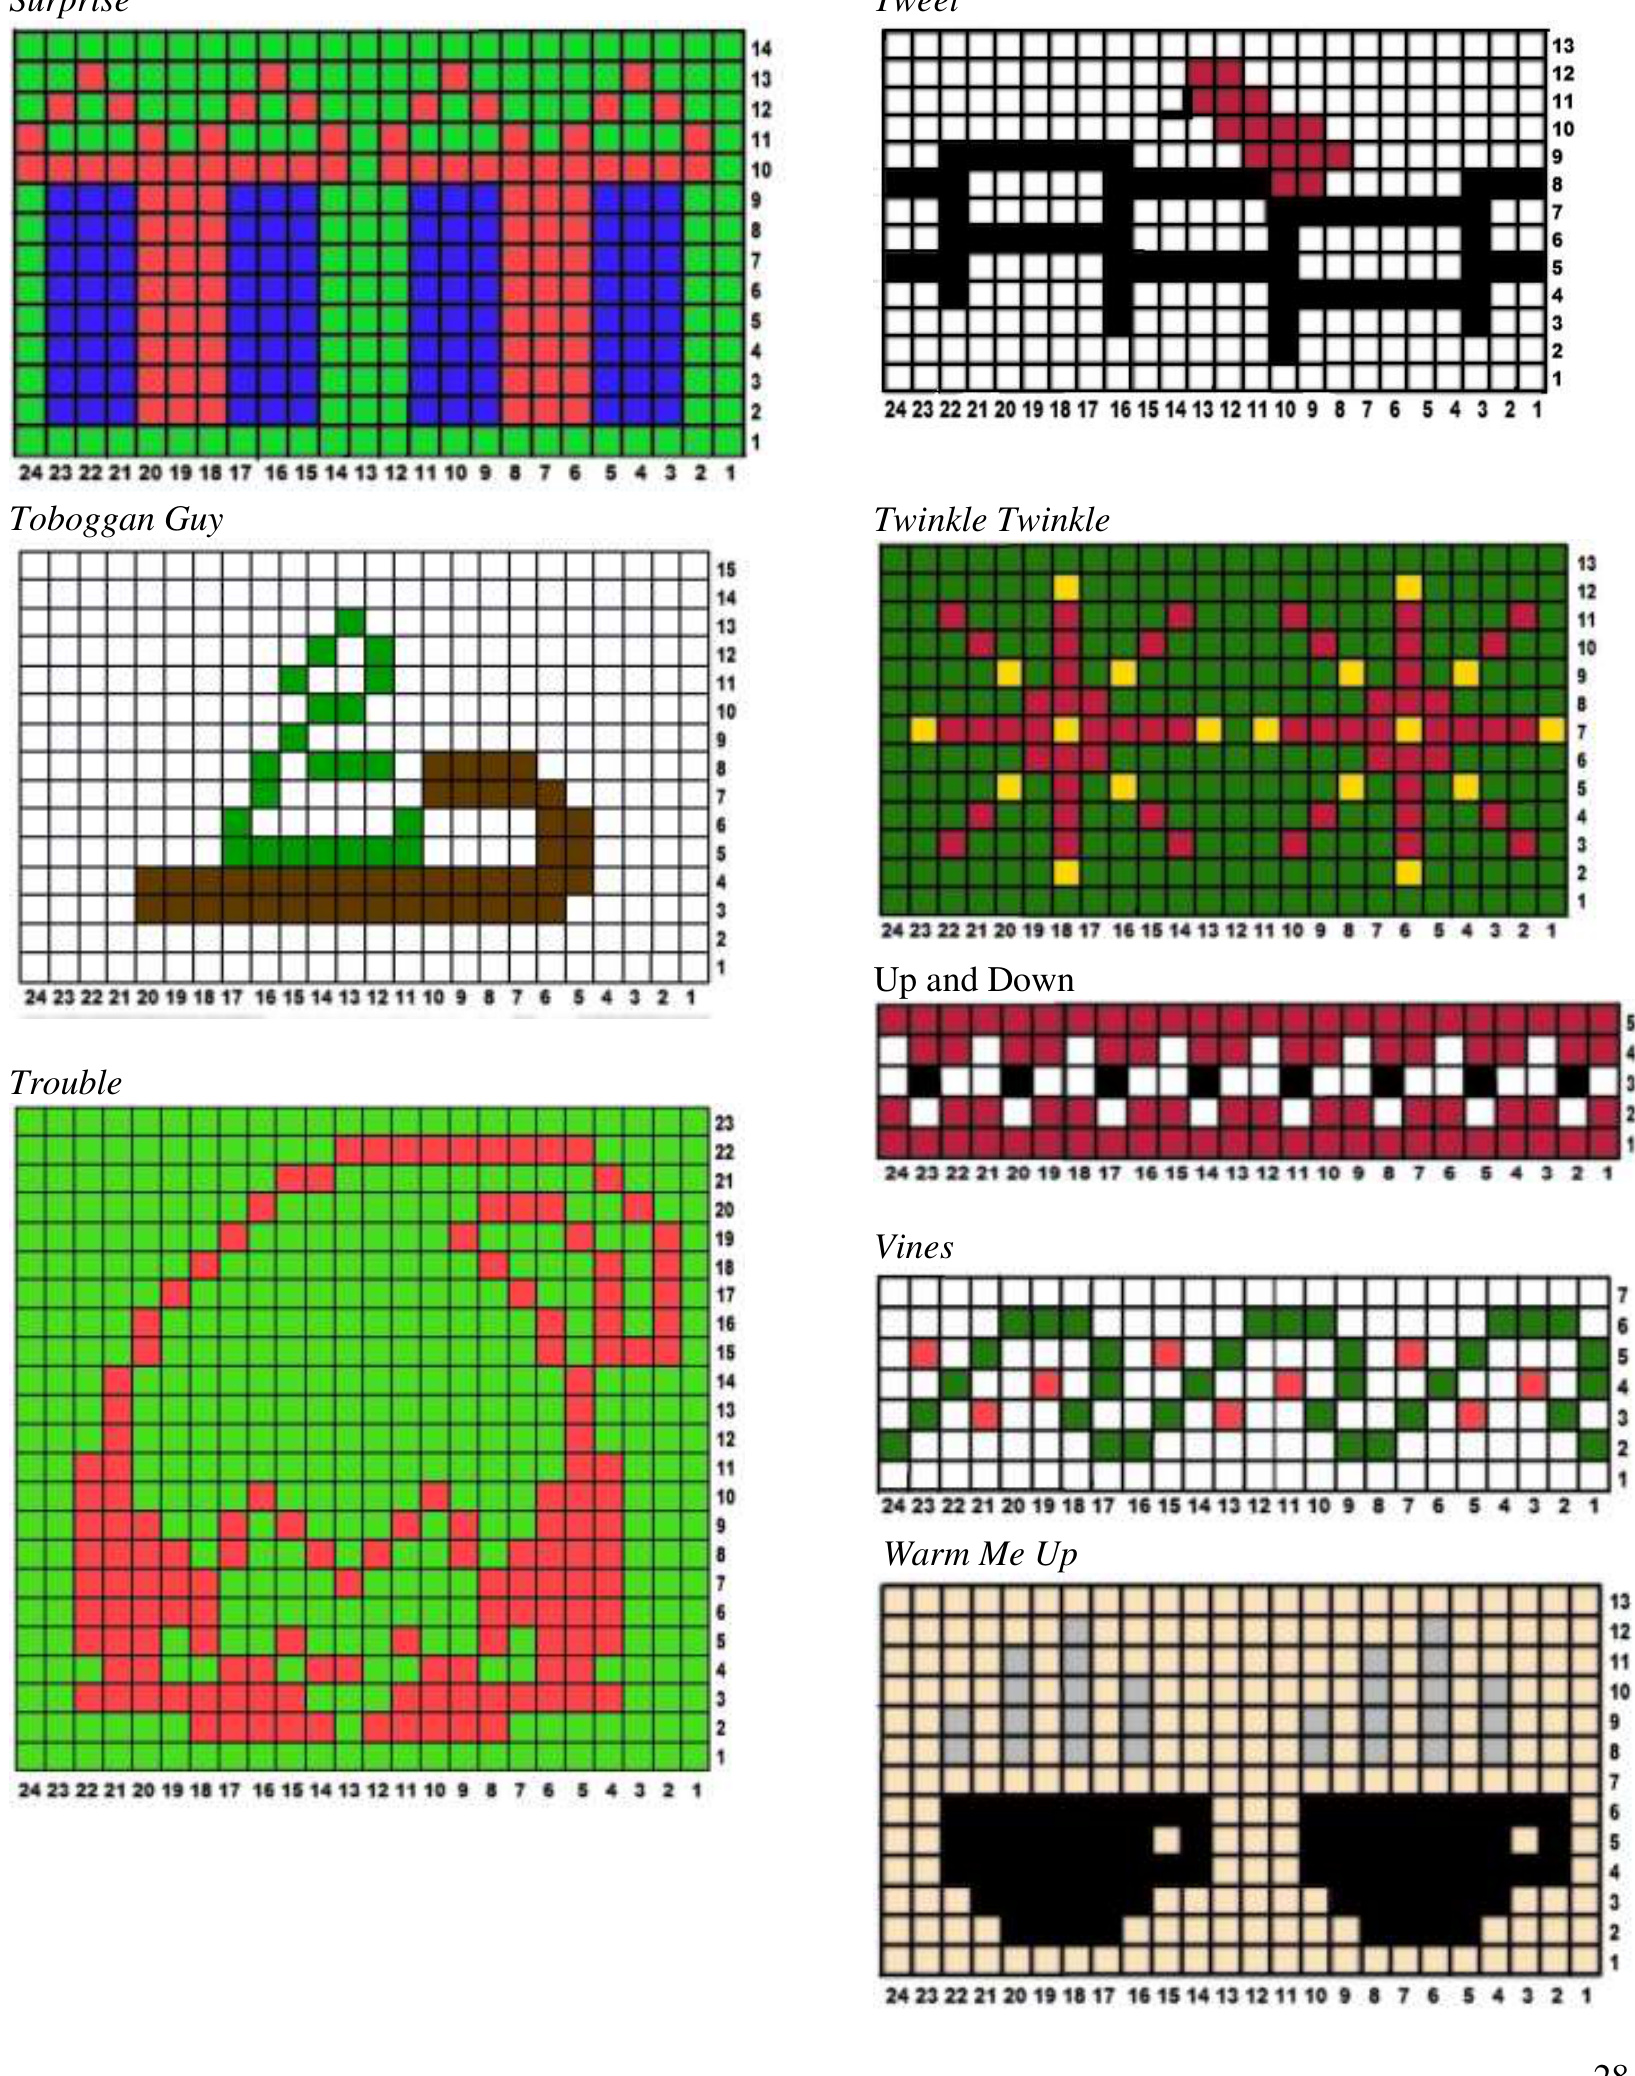
Forest
Frozen Dew
Add beads for sparkle, if desired.
Add beads or duplicate stitch the berries.

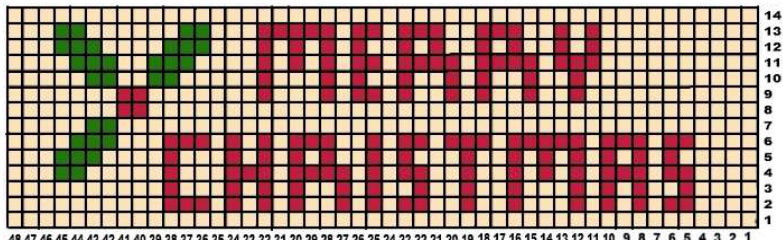
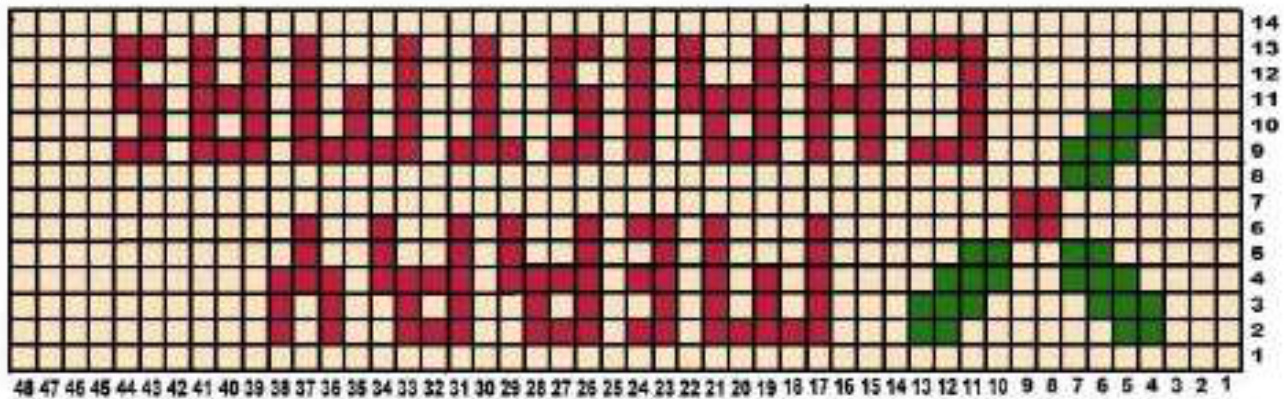
Note that this chart requires 48 sts, so you will want to center it properly in your project. See chart at end.
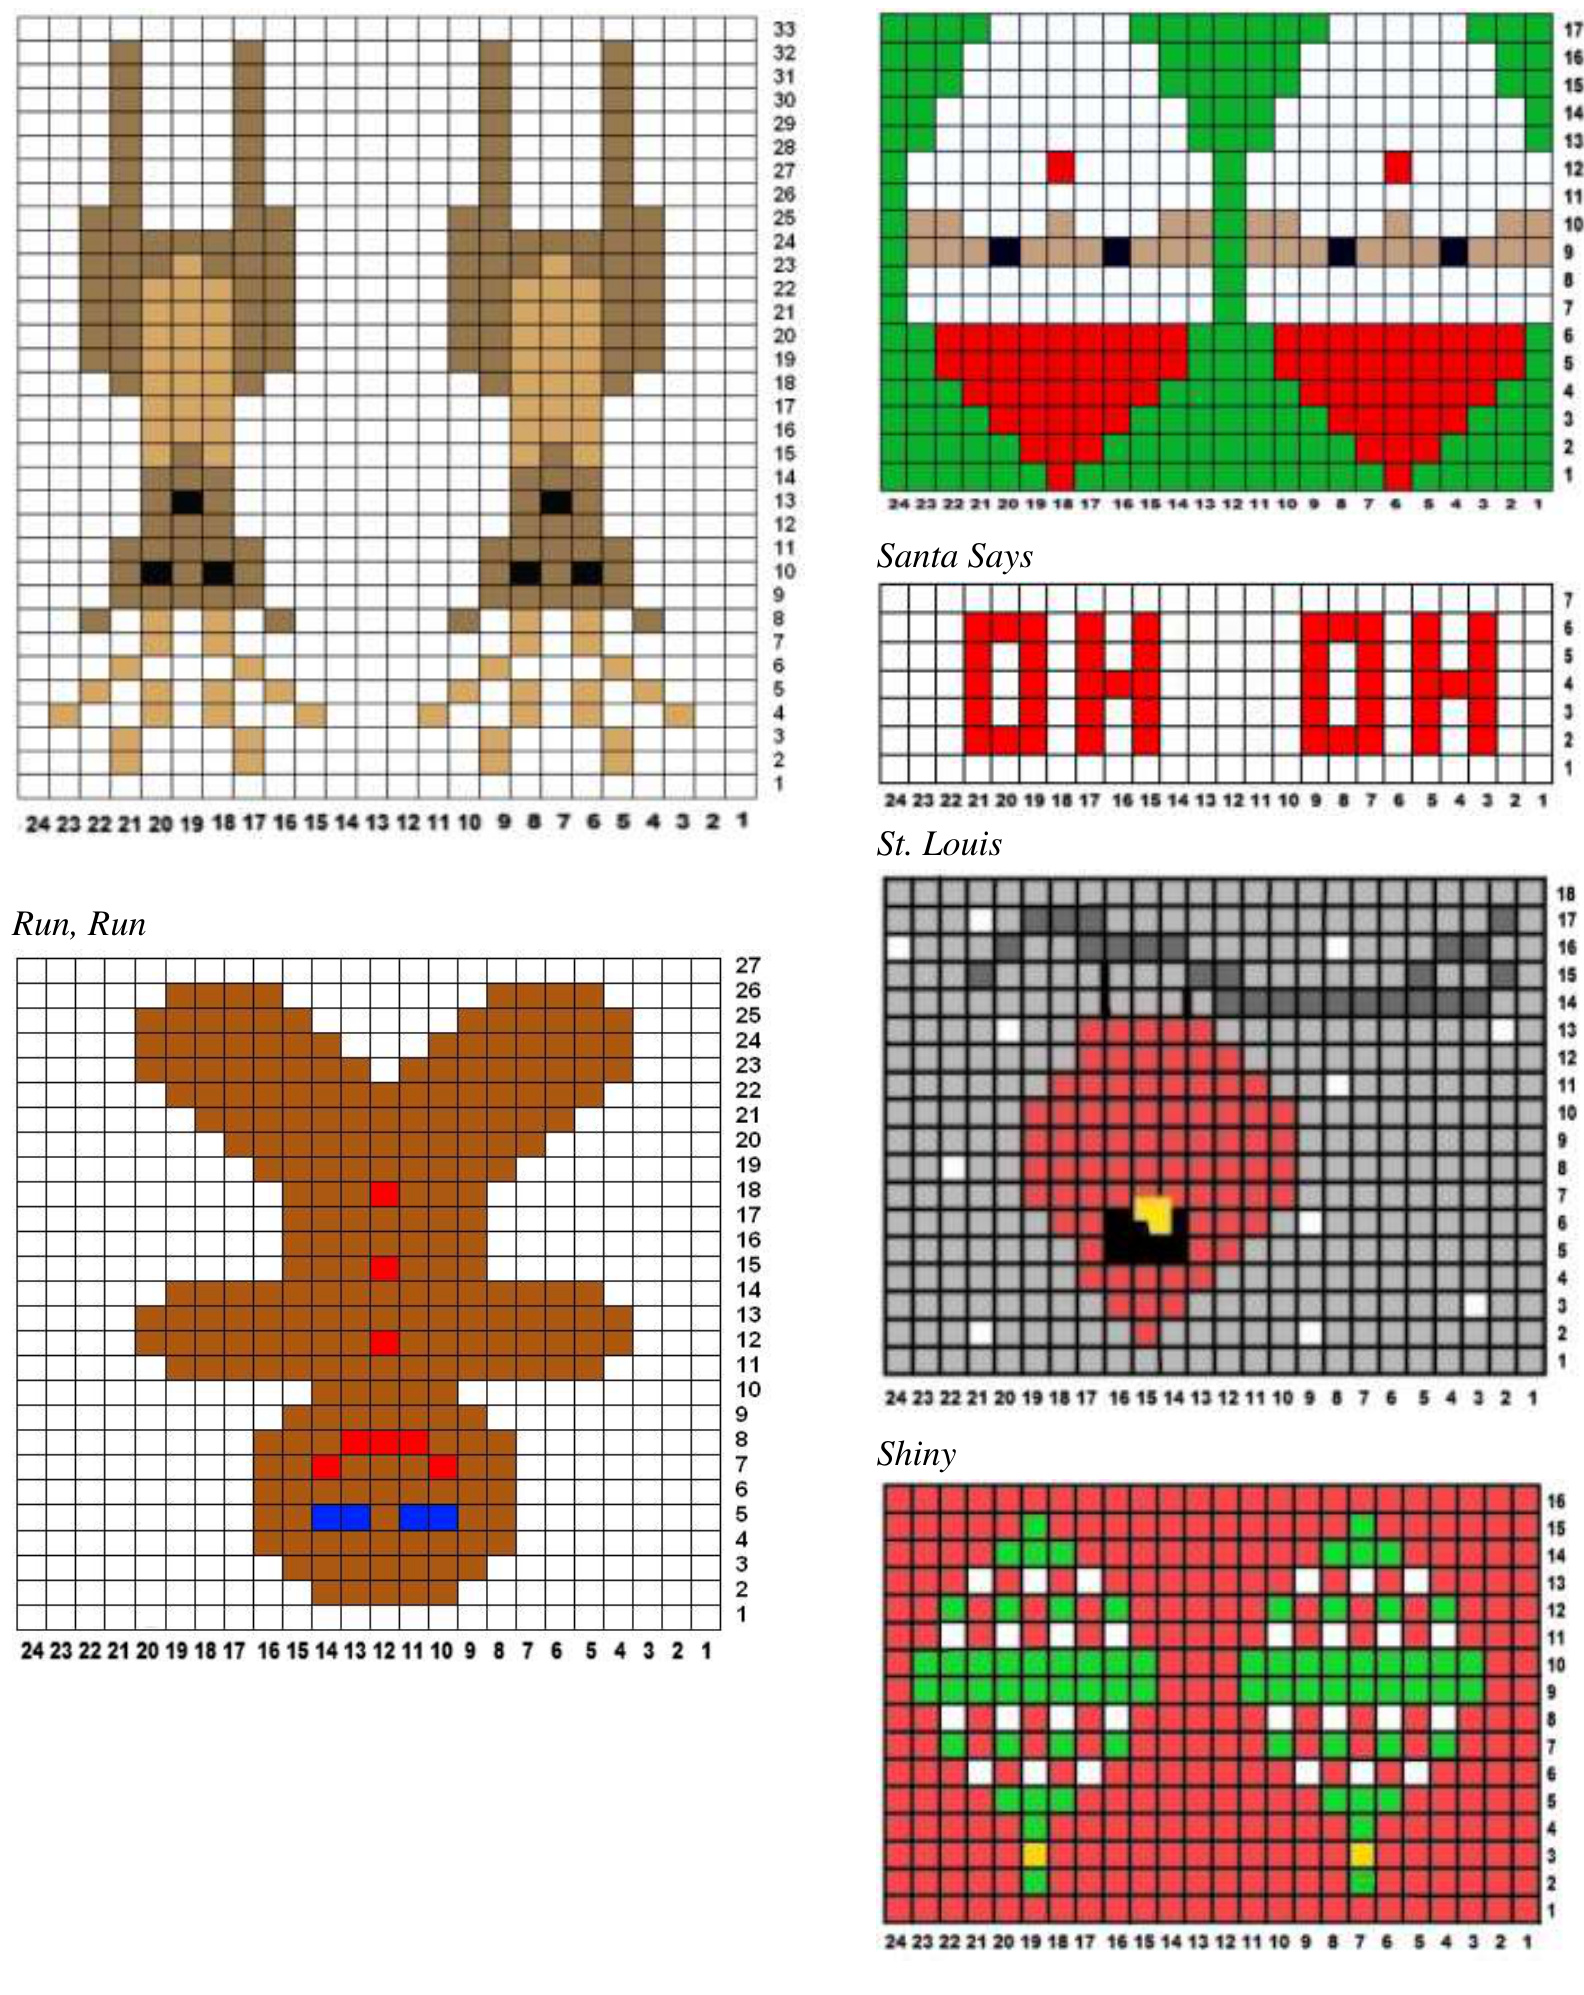
Holiday Sight
Decorate your tree with colorful beads for ornaments as you work.
I'm Cold

Knitted Caps

Leaves
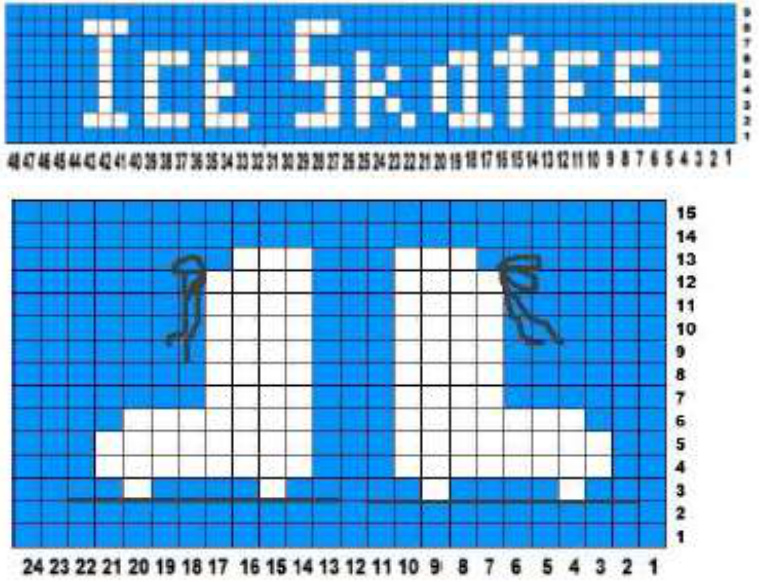
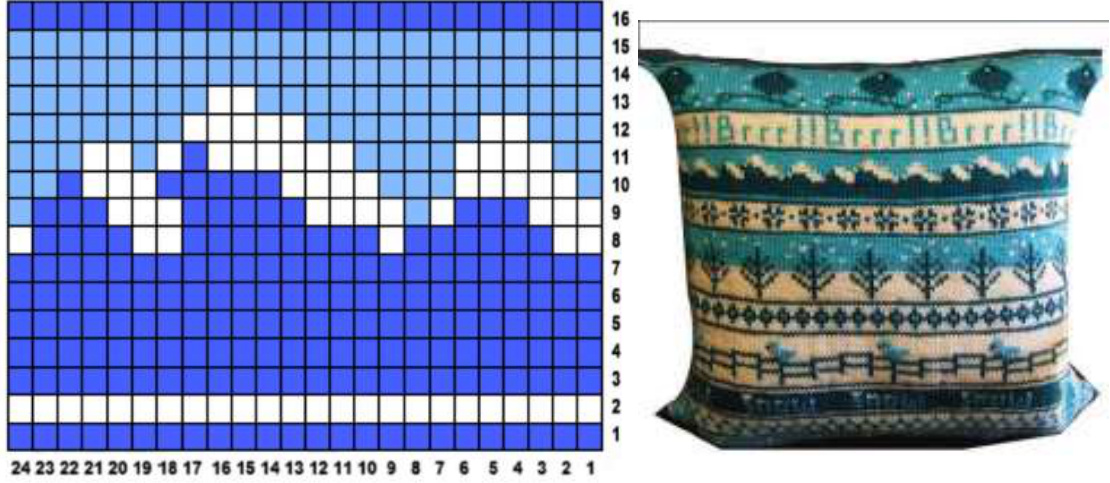
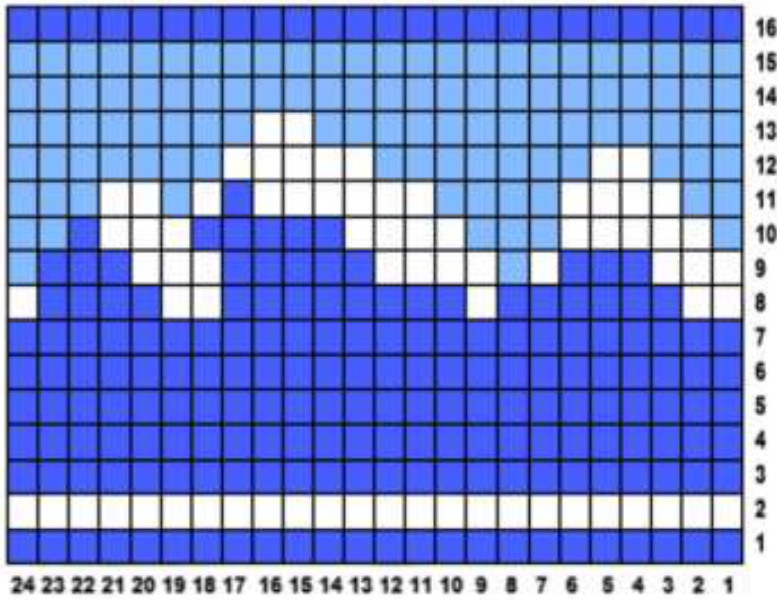
Mountains
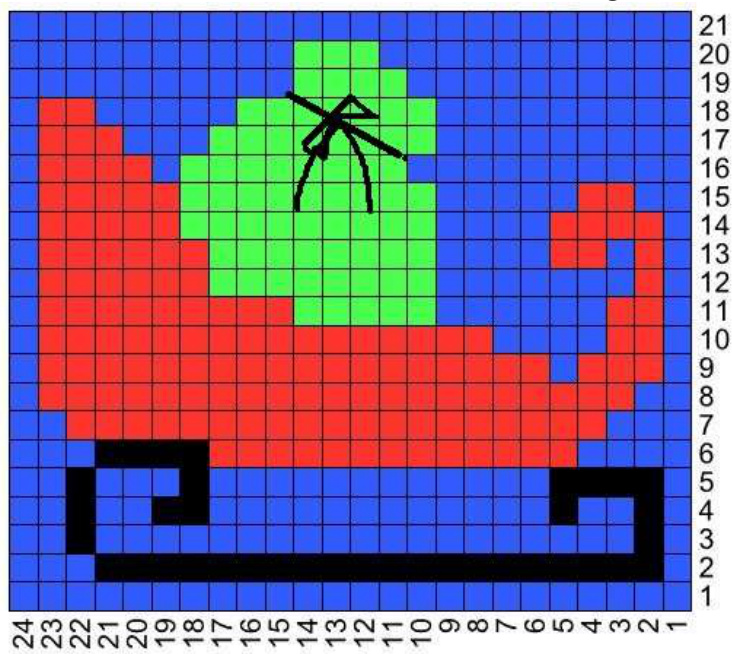
Add bows to skates by tying yarn after knitting is complete, if desired.

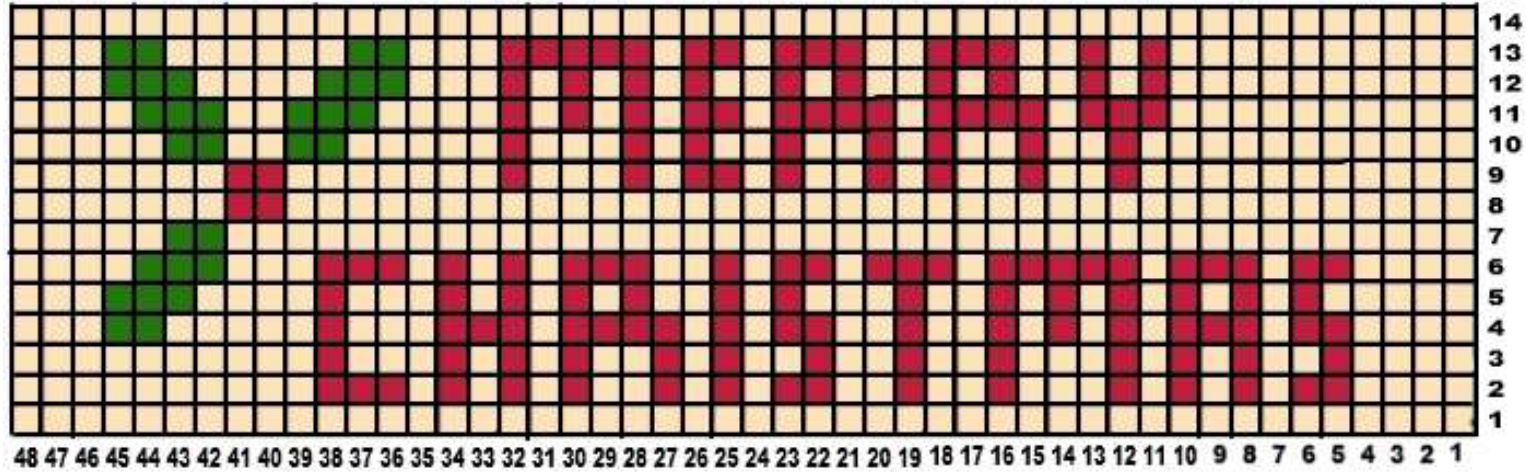
Add bow around Santa's sack after knitting
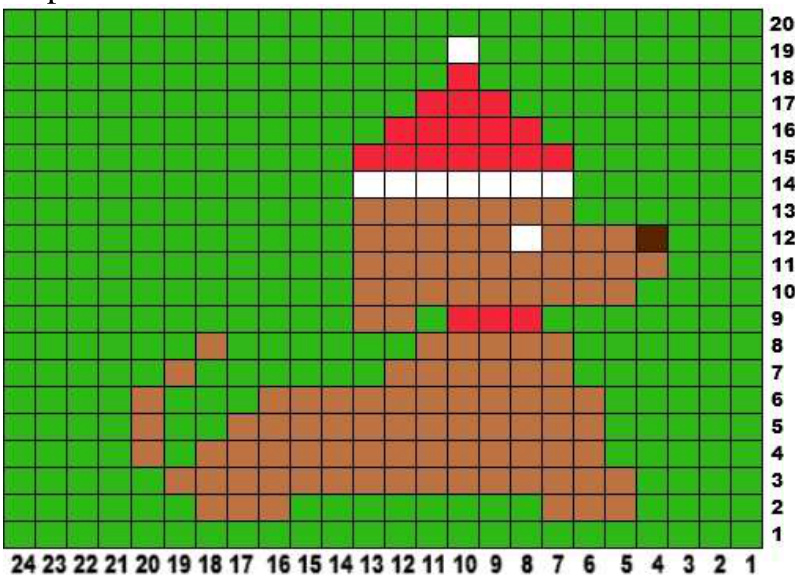
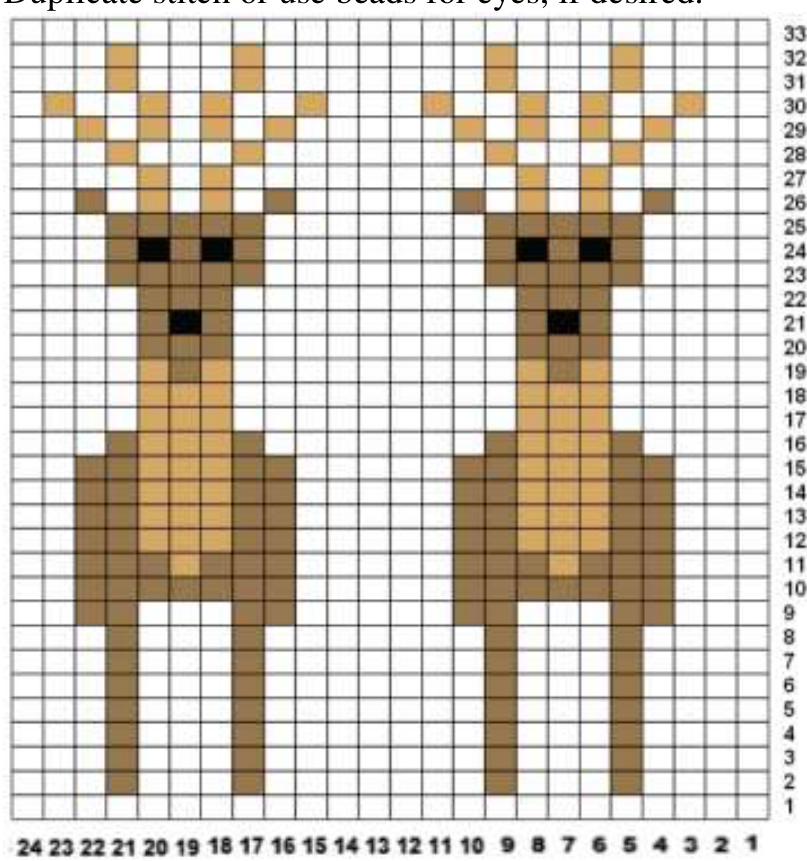
Reindeer
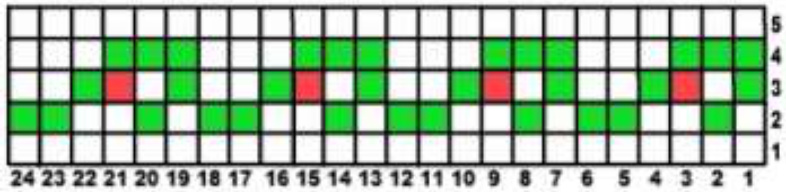
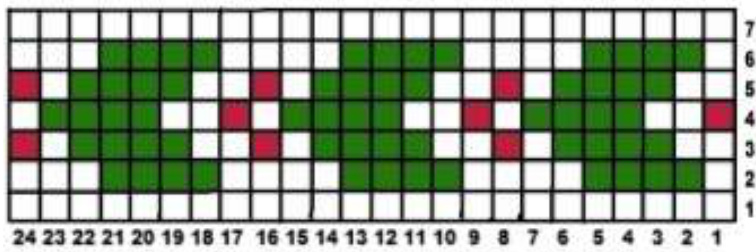
String of Lights
If you feel really adventurous, you may use two colors in each strand of lights for a total of 4 colors!
Stuff It
Winter Friends
Winter Sight
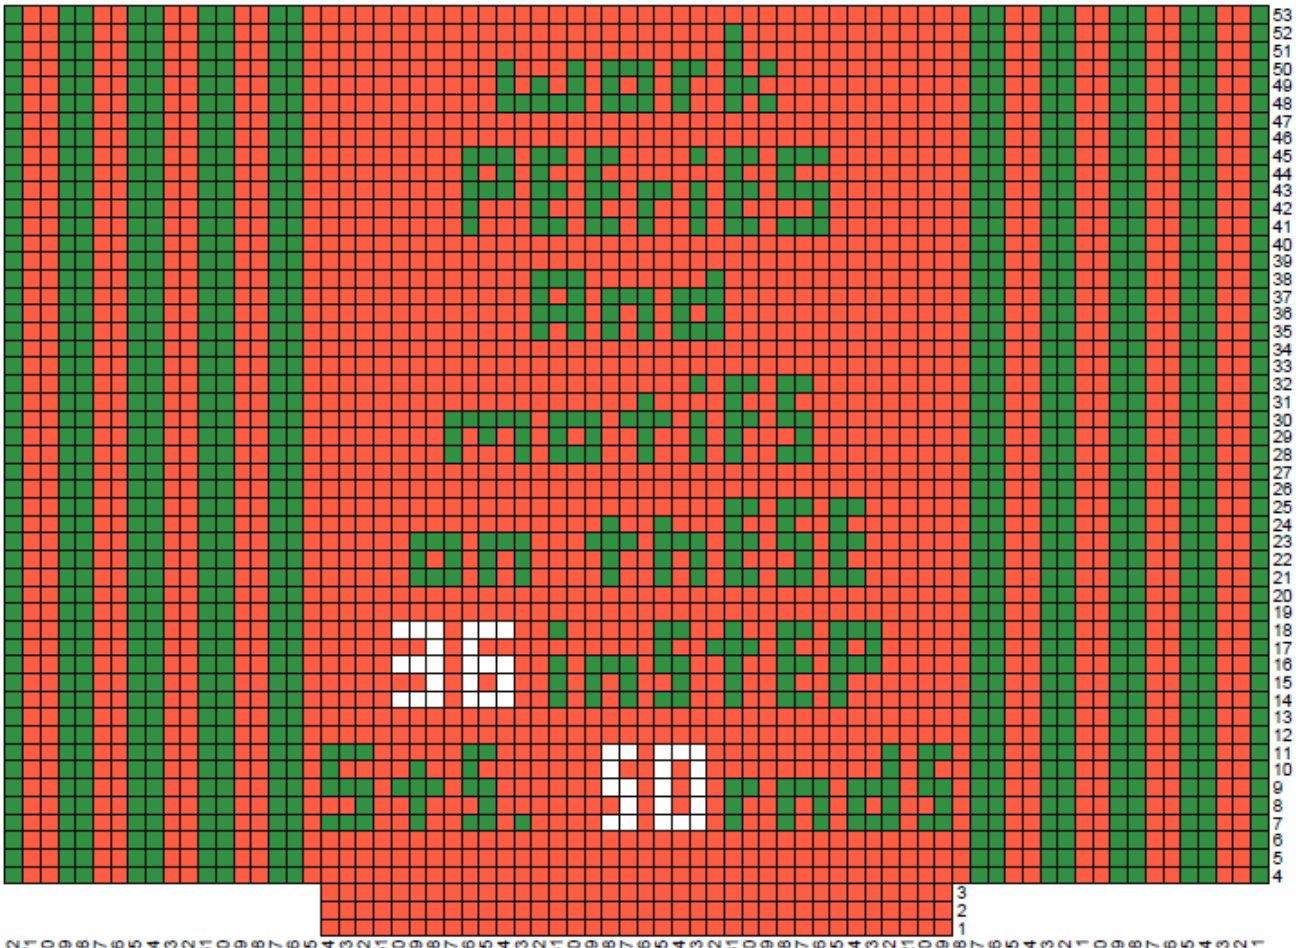
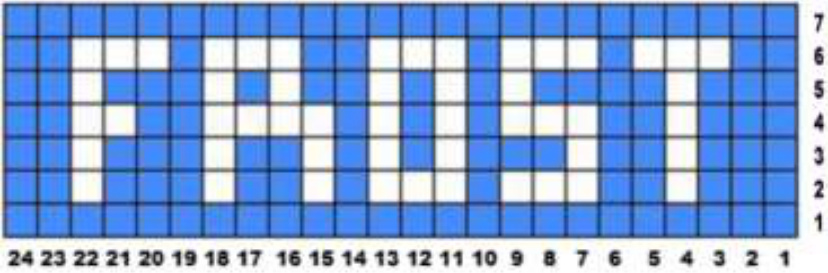
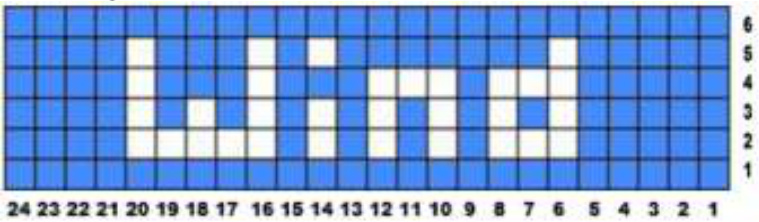
Winter Word
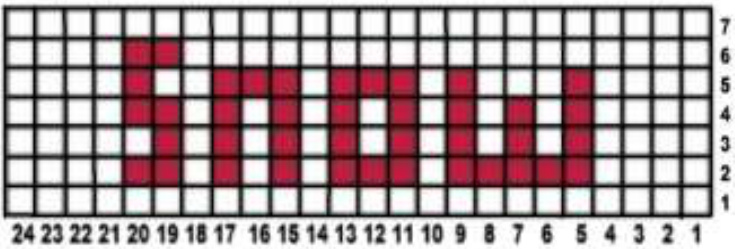
Note that this chart requires 48 sts, so you will want to center it properly in your project. See chart at end.
Reoriented Charts for Top-Down Socks
When working sock legs top-down, you need to read the chart upside down and reversed side-to-side so that, when the socks are worn, the design is right-side up. Below are the charts, reoriented for socks, where it matters. Some motifs, like the snowflakes, work either way and so are not repeated here.


Reindeer
Trouble
Winter Friends
Holiday Greeting Congratulations!You have chosen the special motif This desigm has twice the stitches of the other motifs.It will take up the same space as two()of anyother desigIf yourproject has anodd nmberofmotifs,you willneed to center this designby adding exa stitchestoeither sideForthemostatactiveprojecttakethetmebeforeyoustatkniing toplanexactlywhereyouwantyou motif(s)tobe. Beadsmay be used to givethe effect of holly bemes.
Copyright 2014 by Deborah Tomasello All rights reserved. This pattern or any portion thereof may not be reproduced or used in any manner whatsoever without the express written permission of the publisher. WARNING: Giving or accepting a free copy of this pattern to another, without permission of the designer, is stealing.
CHART YOUR DESIGN