InfiniCOWL
Introduction
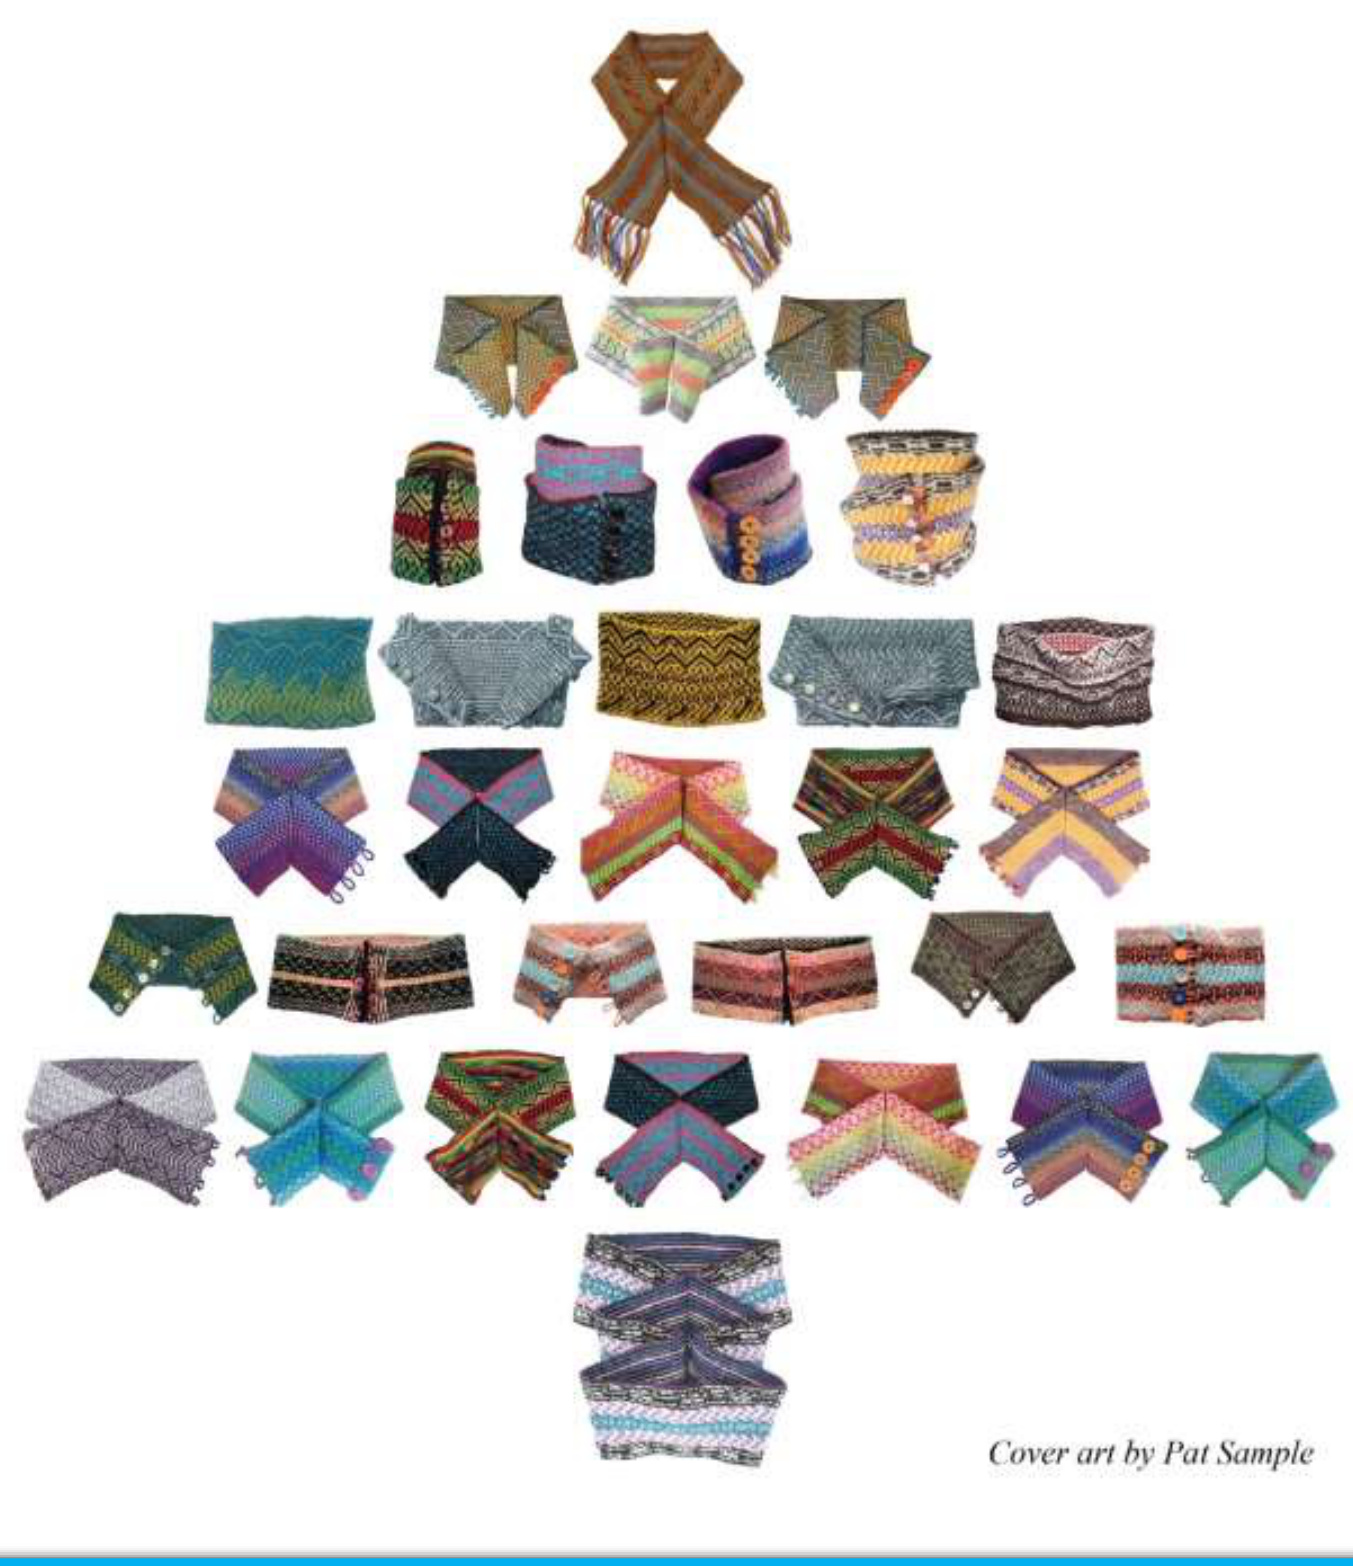
In one of our Spring 2014 mystery knit-alongs (MAL) in the Ravelry group, Colorworks By Debi, we made our InfiniTAMs. The pattern lists mix-n-match options for motifs that, when coupled with color choices, yields literally infinite design options. The MALers produced so many gorgeous, individual tams, I had to kake a YouTube video to show off their work. http://www.youtube.com/watch?v=2NfUM8ejfq8 You can find the pattern in my Ravelry store. Hope you give it a whirl! http://www.ravelry.com/patterns/library/infinitam We had so much fun with InfiniTAM, that we had to regroup and do this again, but this time with cowls. So, in August, the MAL project was InfiniCOWL, and my MALers did not disappoint! As you can see by the cover picture, artfully designed by Pat Sample, we had a great variety of shapes, sizes, colors and designs. I will have to do another video to give these works of art a proper showing! It seems these Infini-patterns are habit-forming for me as well as for all of you. We are planning InfiniCHRISTMAS and InfiniSOCKS in upcoming months. While you wait for those, enjoy knitting your unique cowl. Have a blast with it!
Thank You!
As she was for our InfiniTAM MAL in the Spring, HandmadeLove (HL) on Ravelry has been a constant support and an invaluable collaborator on this project, too. Not only did she set up workable guidelines and parameters for making this MAL run smoothly, but also she juggled enrollment, fielded questions and responses, organized a schedule for clue releases, made sure each participant received her desired clues on time, and she edited my textual boo-boos throughout. Seriously, these Infini projects would not run well at all without you, HL. Thank you. Pat Sample again designed a stunning cover for the pattern, combining our projects in a lovely, artful way. I wasn't sure she'd be able to do it because of the great variety of shapes and sizes. But, she did! And then some! Ingenious Pat. You are brilliant, and we thank you. As always, a huge thank you to all the knitters in the Colorworks by Debi group who loyally and enthusiastically knit my designs, sight unseen. For many of you, this was your first colorwork project, and you impressed us greatly. A couple of you decided to knit a cowl that coordinated with your tam. I wasn't so sure about the prospect since the motifs were all new and different. But you pulled it off! As always, you blew me away with your creativity. I mean it when I say you knitters inspire me and challenge me to improve my designs.
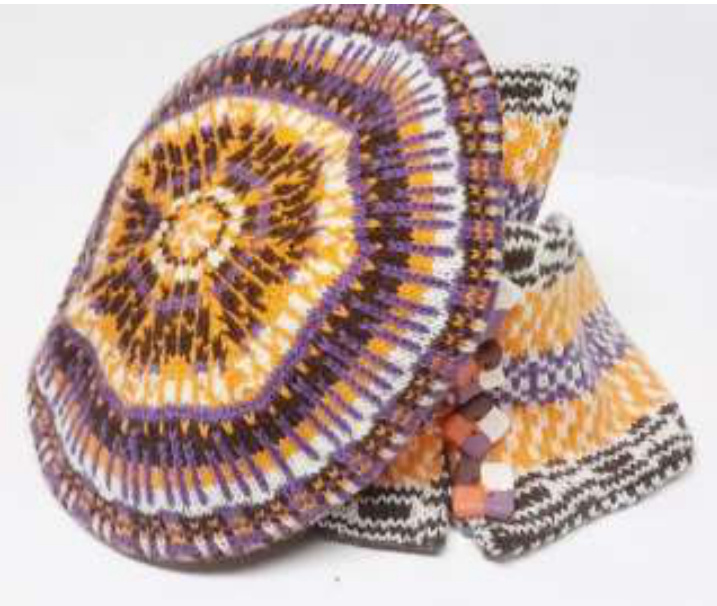
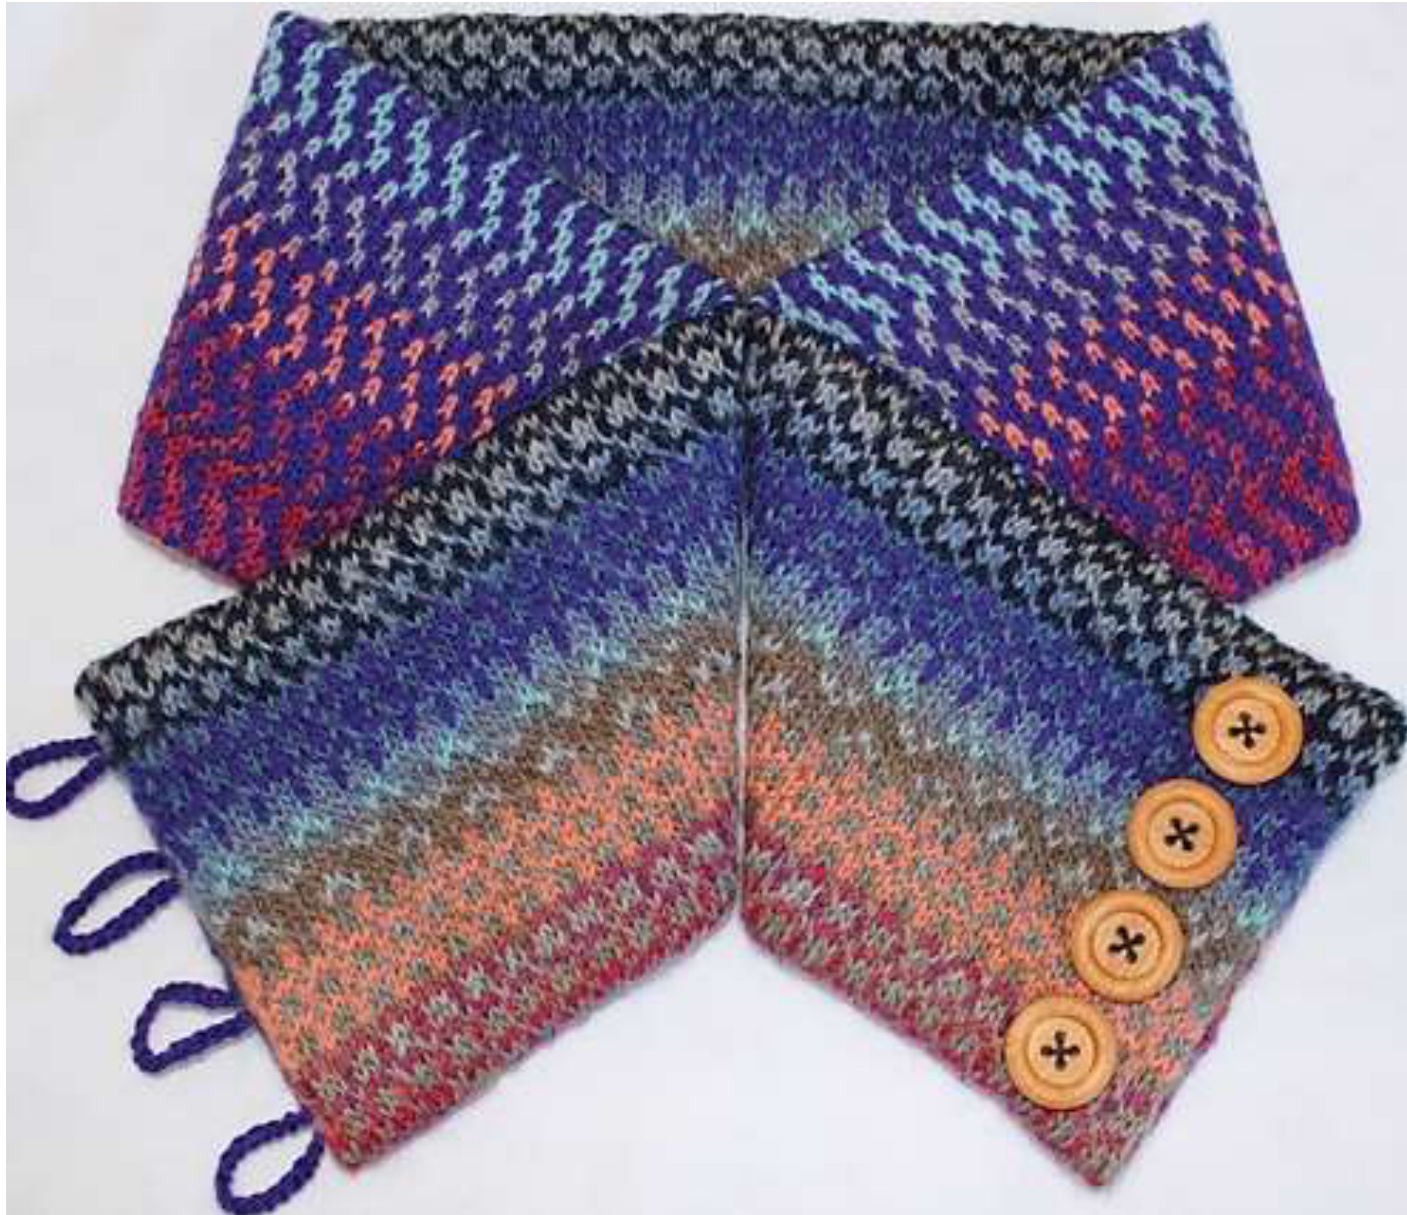
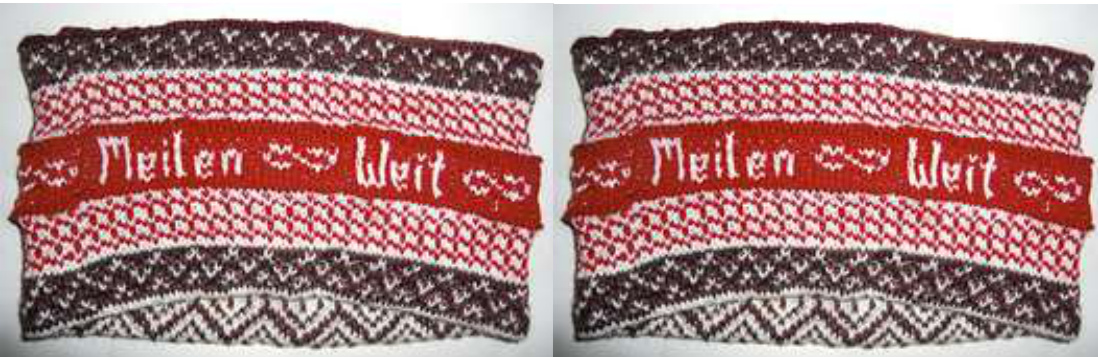
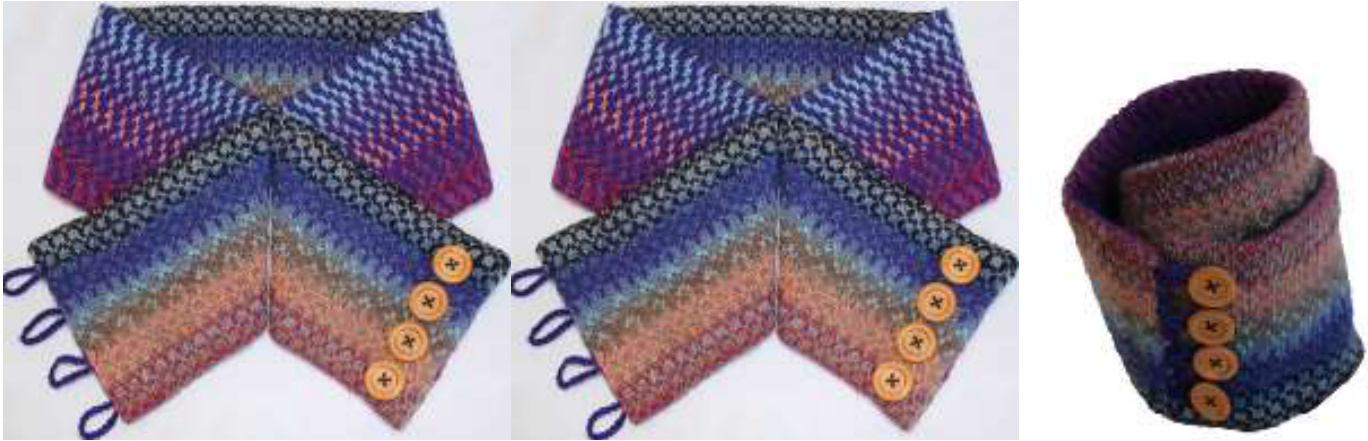
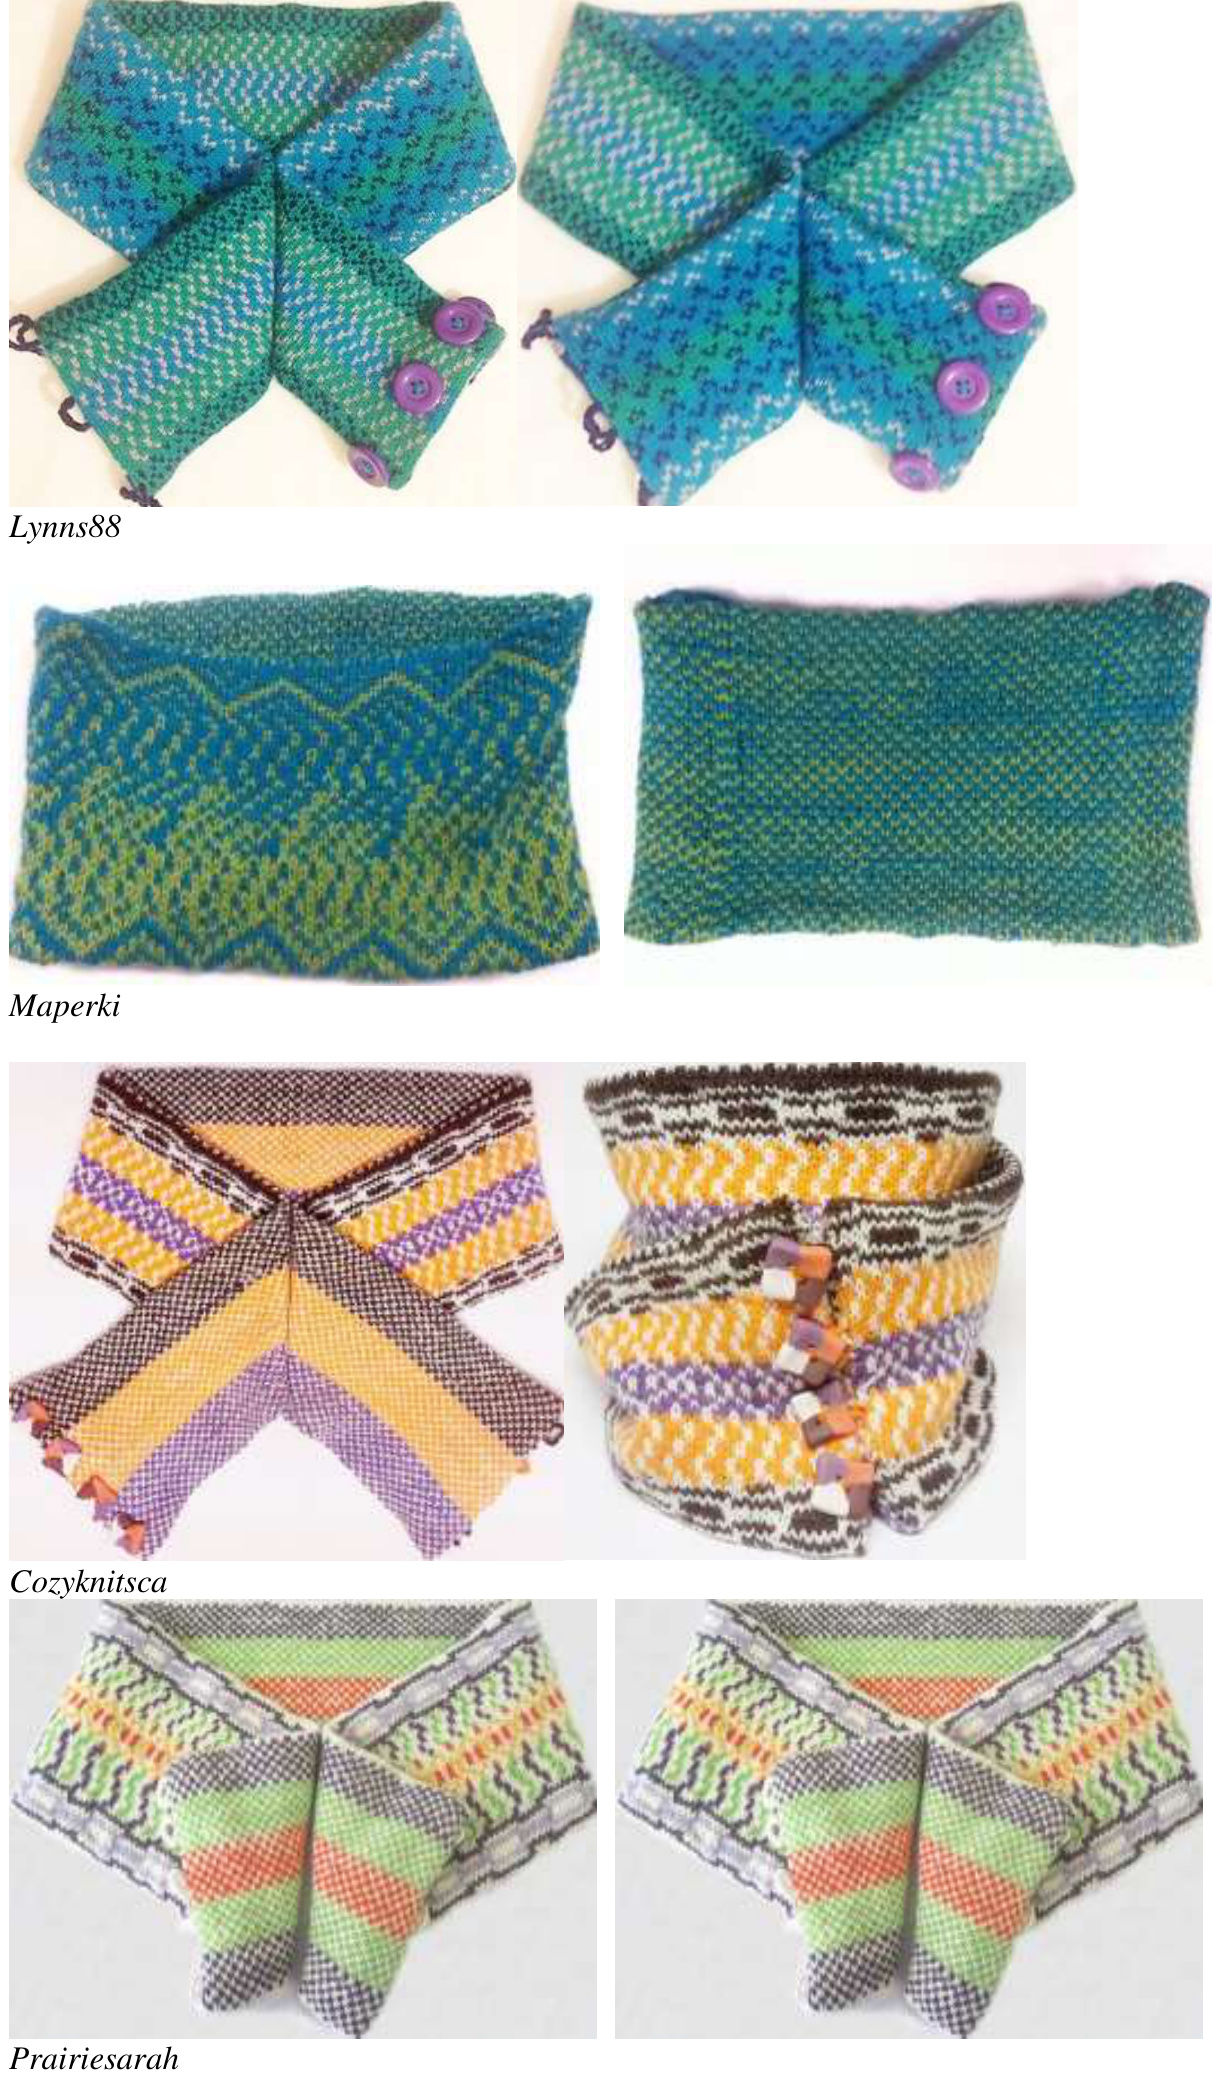
Pat Sample,(Cozyknitsca on Ravelry) Notice her handmadebuttons!!
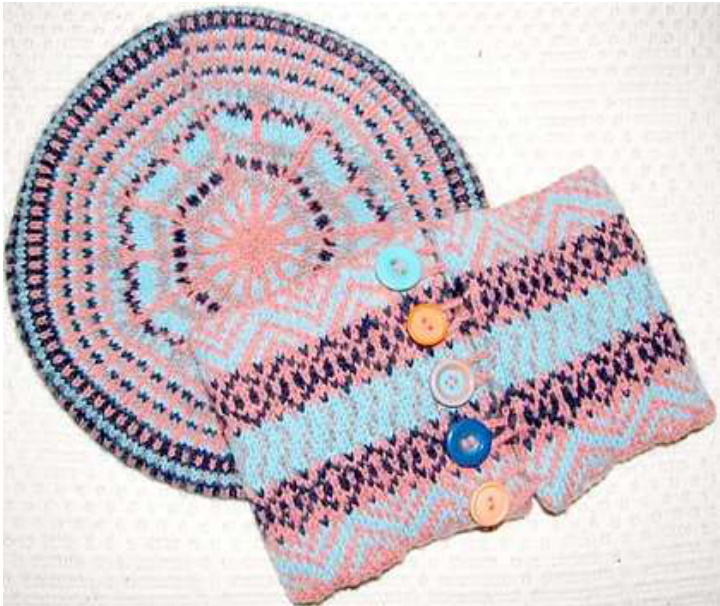
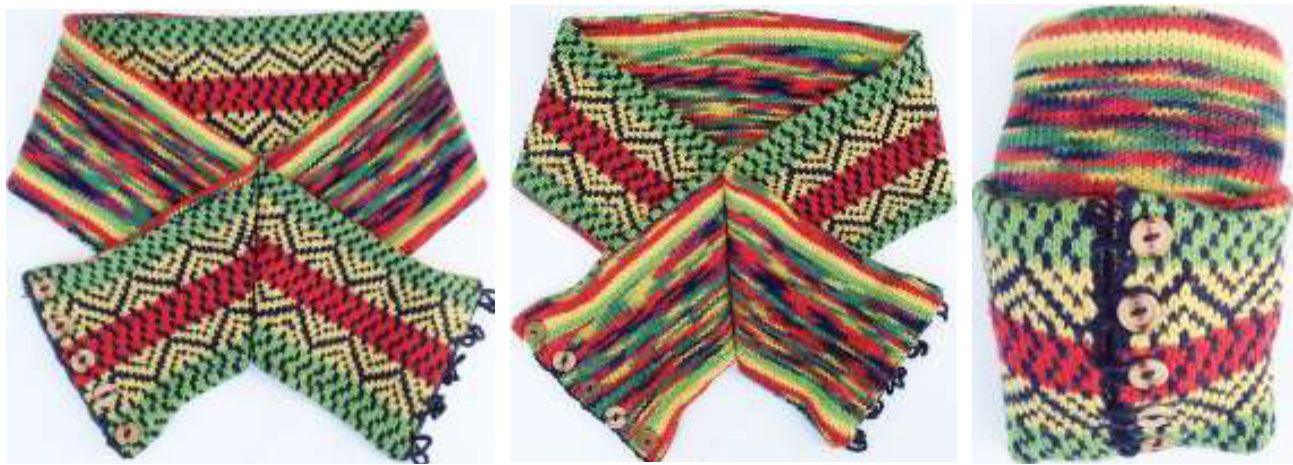
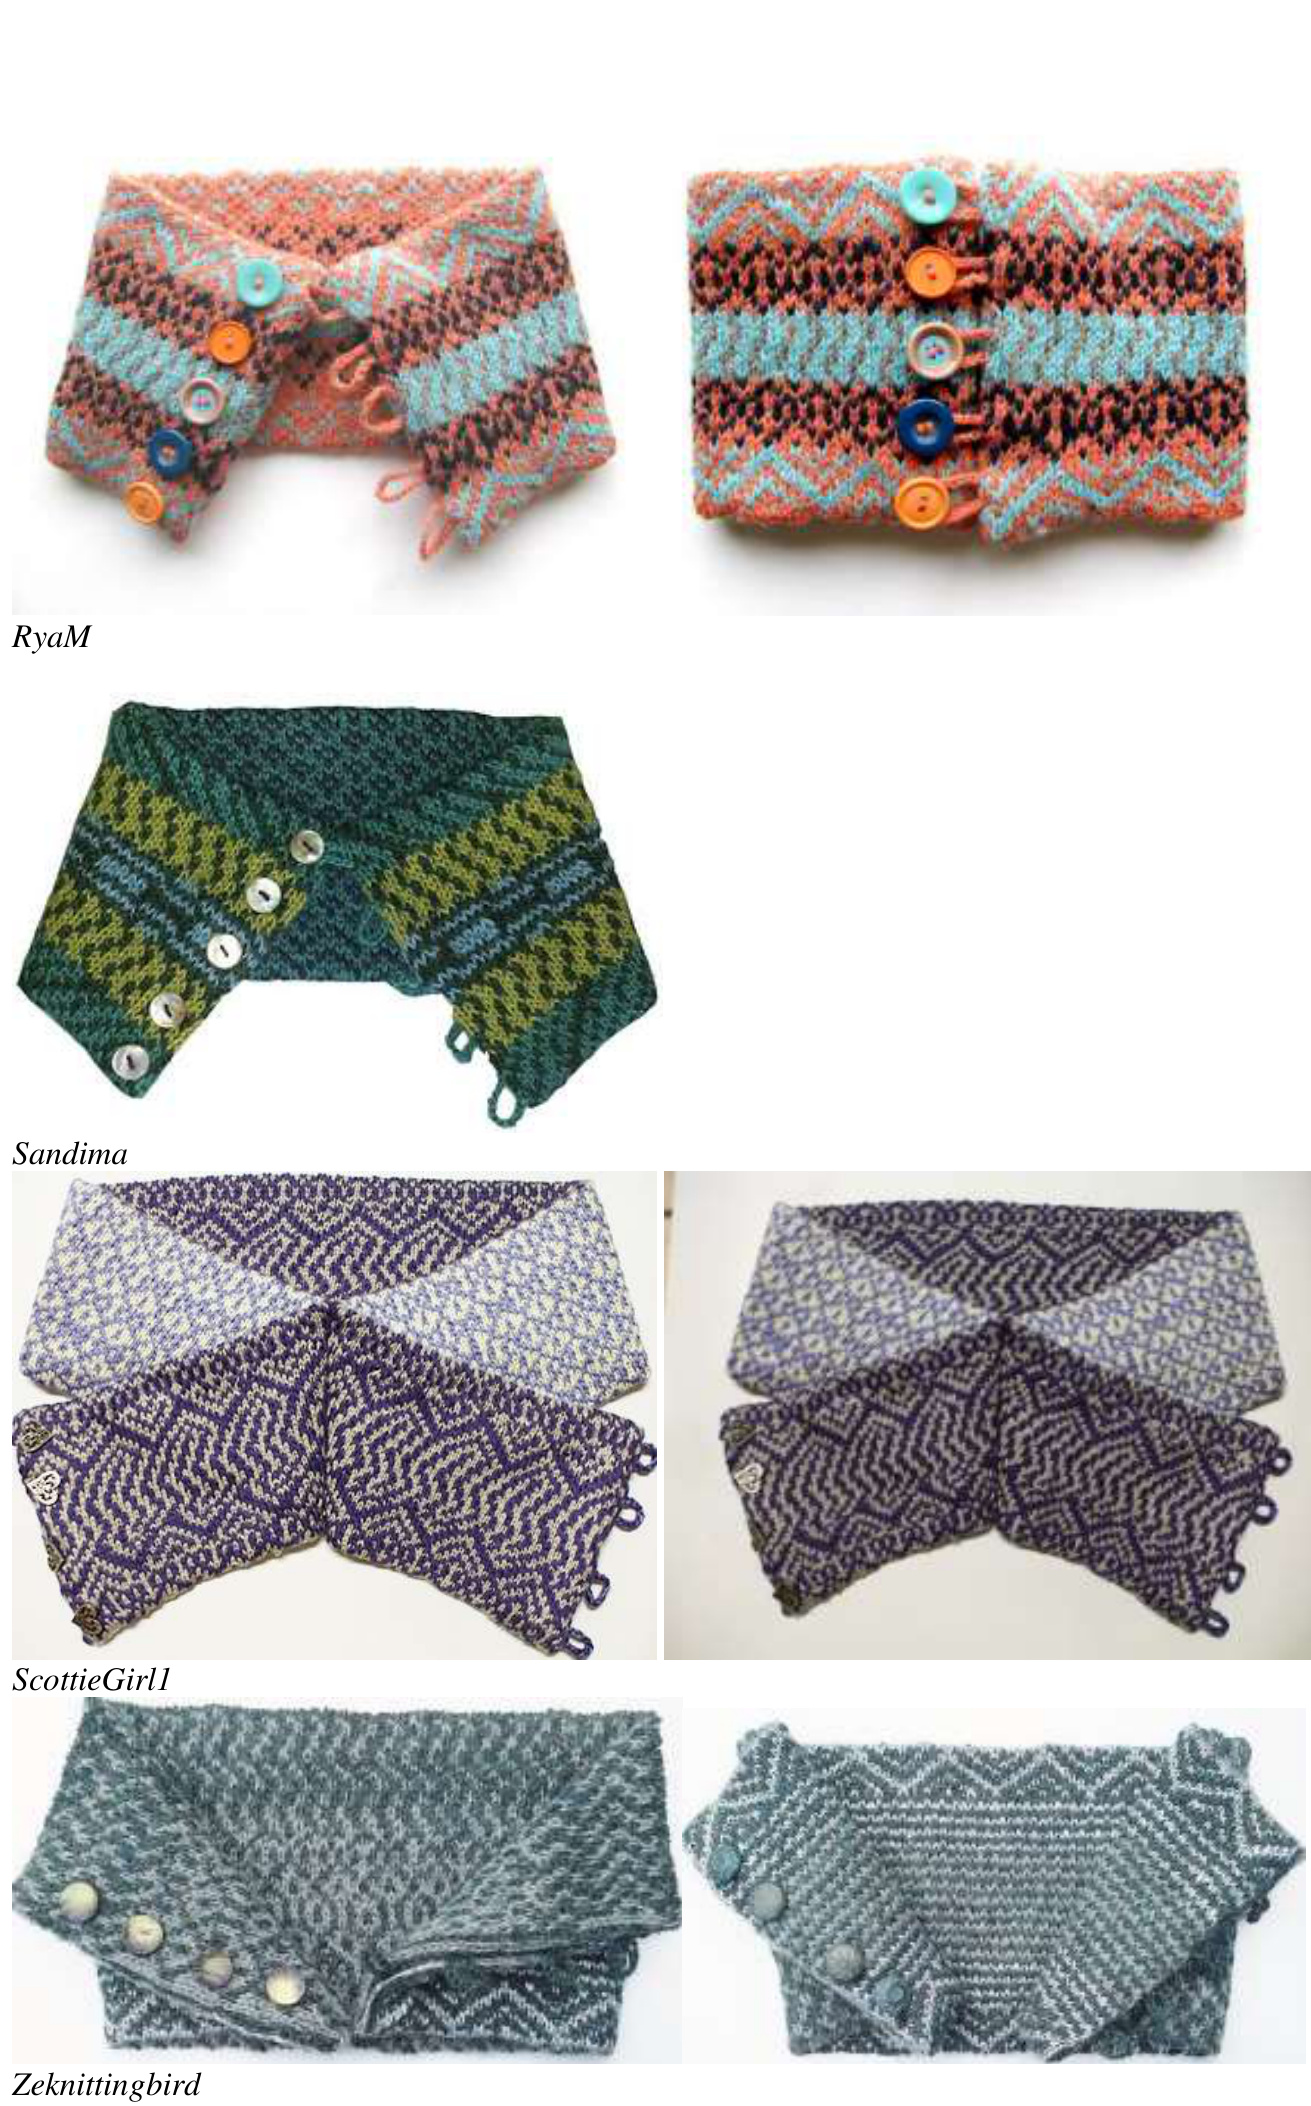
RyaM knitted a neckwarmer to match her tam.
About the Cowl
As with the InfiniTAM pattern, The motifs for the InfiniCOWLwere designed to be easily interchangeable—they all play well together. There are five motif choices for the front of the cowl, (A,B,C,D, and E) and these were chosen, individually, by the knitters. Some opted to choose all five, working them sequentially across the front, varying motif colors, or background colors, or both, or neither. Others opted to use two of the motifs and create a symmetrical arrangement, like ABABA, or ABBBA, etc. You can choose one motif, or two, or three, or four, or all five. The options are endless. As always, colors choices within a motif are your call, too. I recommend consistancy for balance, but who am I to say? This is your own, unique creation. The motifs are given names: Diamonds, Waves, Chevrons, Chains, and Slants. You have the benefit of seeing what each of the designs looks like before choosing. Our MALers chose based on the motif name only. Fun! You also have the option for cowl length. You can knit a short cowl: neckwarmer size, a medium-length cowl or an extra-long one that can be doubled around the neck before buttoning. Or, you can knit it as a reversible scarf, as cpainter chose to do. And, you have the option to steek. This allows the cowl to be opened and worn as a scarf, or buttoned closed and worn as a cowl, or twisted before buttoning for a moebius cowl that shows ff the patterns on both sides of the piece. Because it is two-sided, this makes for a doubly warm, super versitile cowl. It also means you can choose from five more back designs in addition to the front designs already provided. The back designs are named Small Vs, Stripes, Zigzags, Checkerboard, and Squares. You can see how, with this many options for design, plus the enormous options for color choices, the cowl possibilities are infinite.

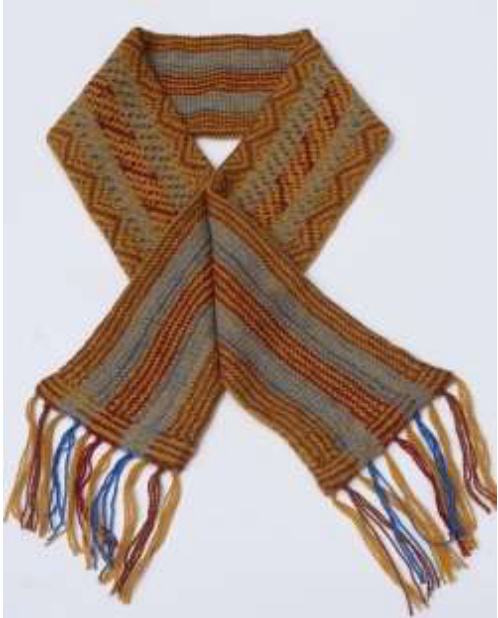
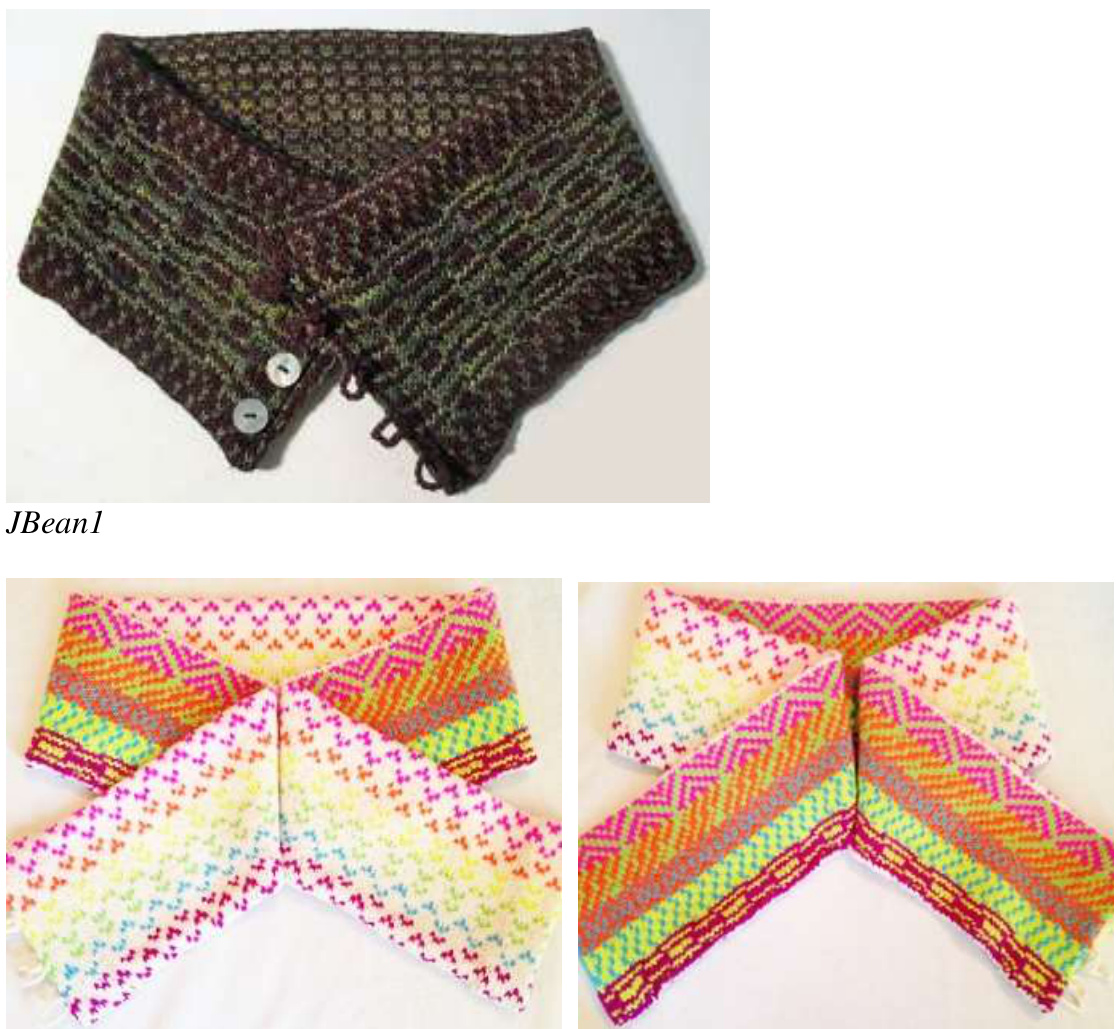
Cpainter opted to make hers a reversible scarf. Steeking so that shecould knit in theround,shecleverly madethesteek stitches part of the scarf design.
Steeking
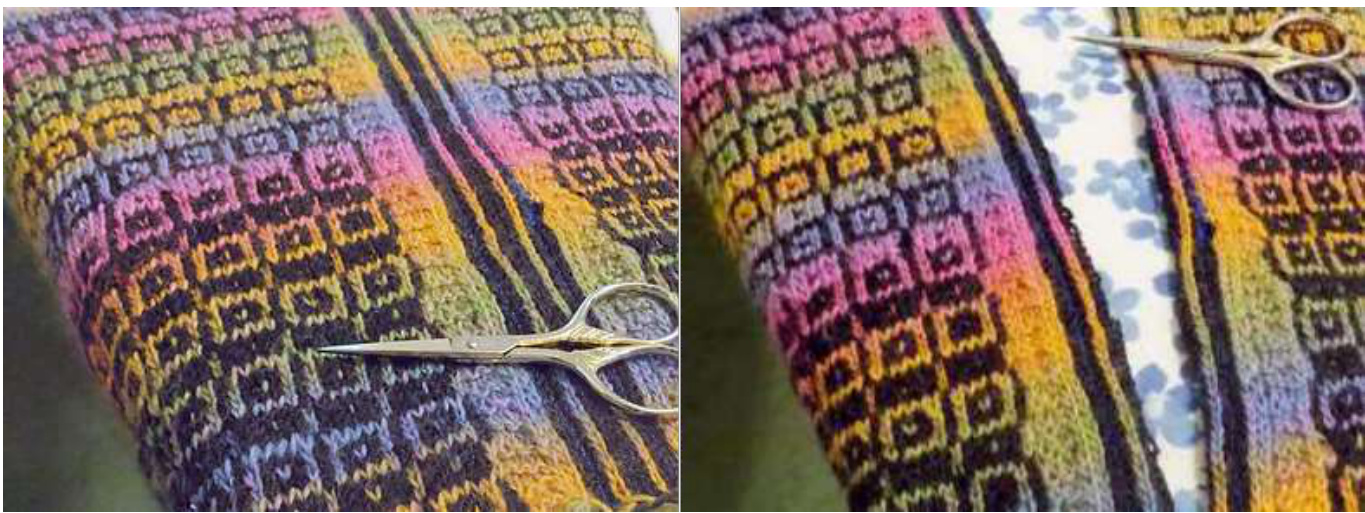
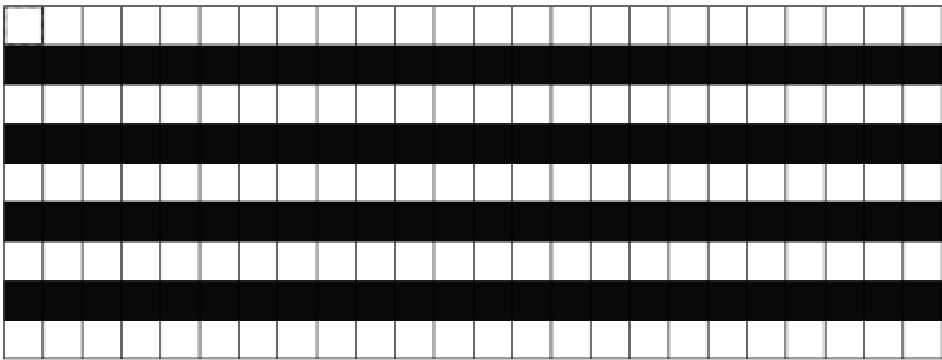
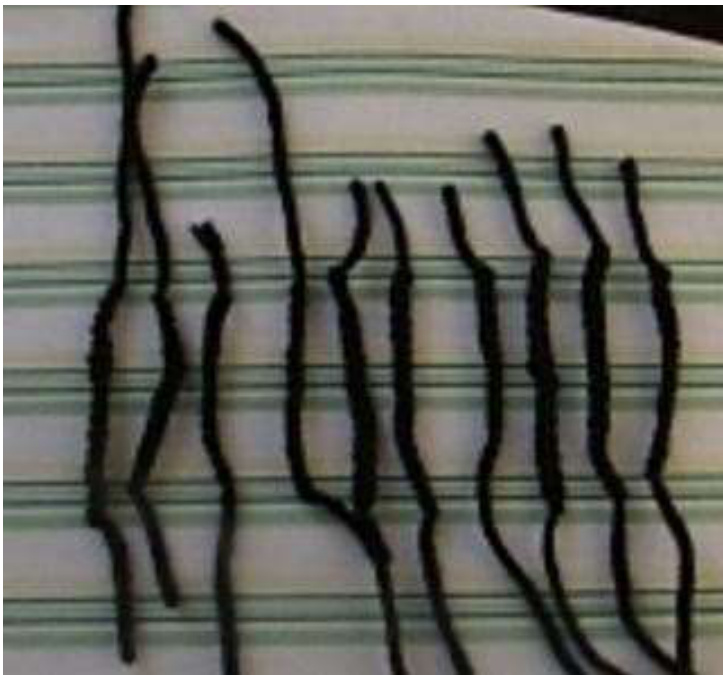
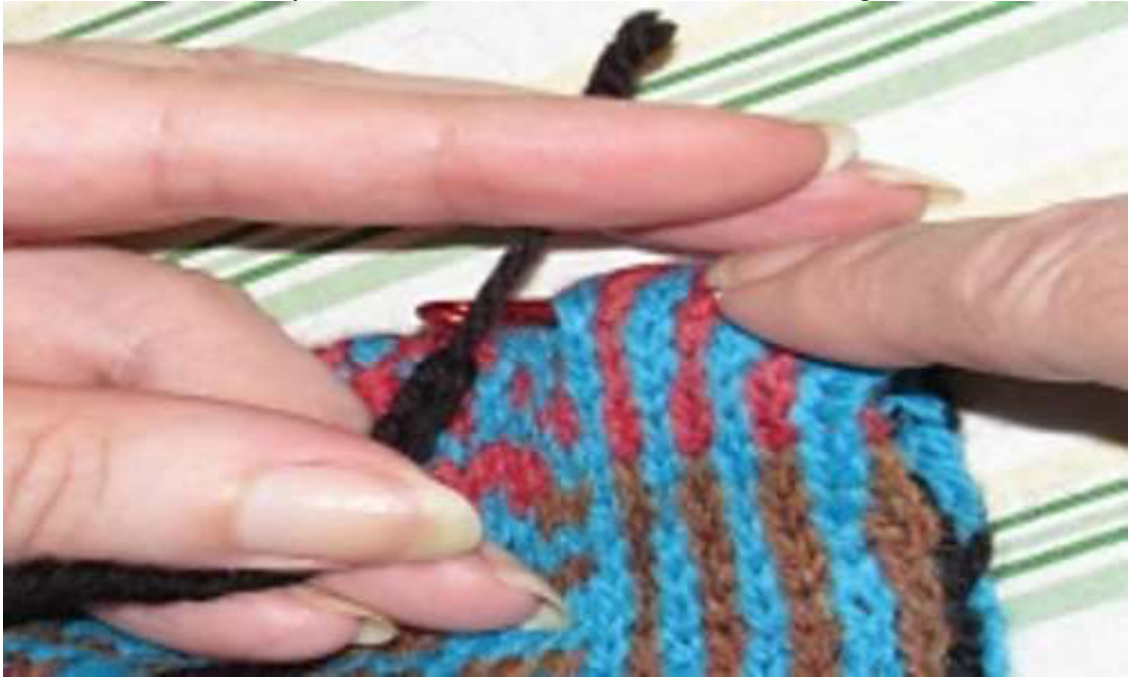
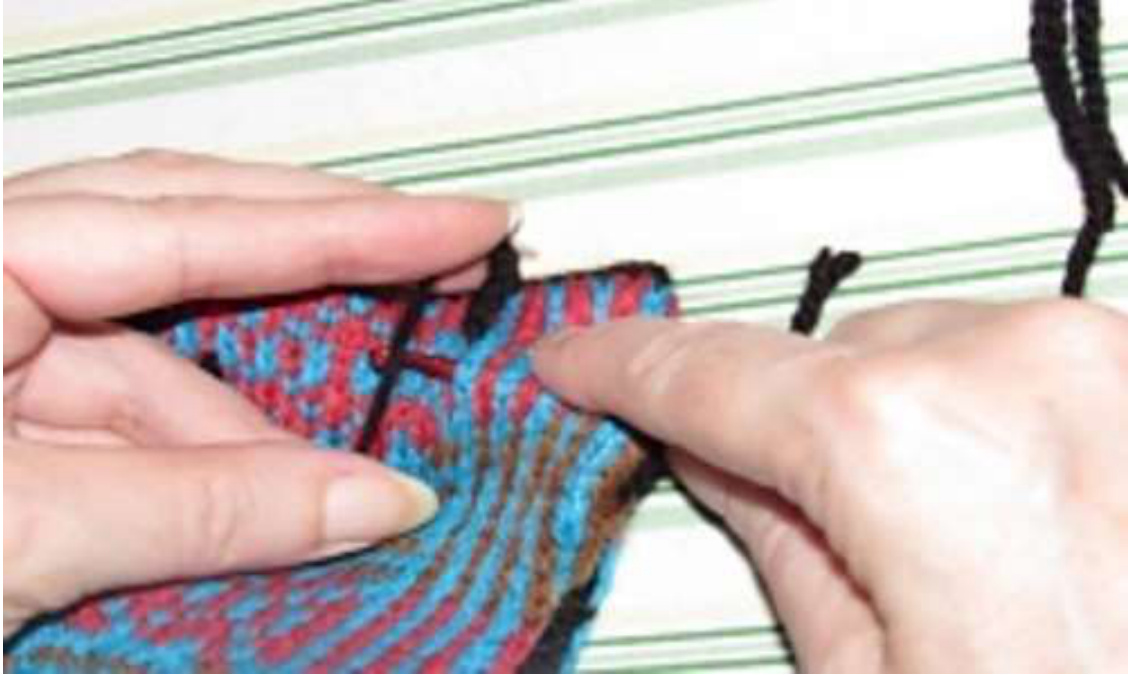
All of us shuddered when we first encountered the idea of steeking, and several were first-time steekers on the InfiniCOWL project. Once you do it, though, you will see that the benefits of steeks are well worth overcoming the dread of cutting into your knitting. Below is an excerpt from my book, Stranded Knitting in the 21st Century, that you might find helpful: Steeks are additional waste stitches (usually 10 to 12) added to a piece that allow the knitter to keep working in the round. (See Sample chart below) The steek stitches will be cut after the knitting is completed, allowing the piece to open up or lie flat. Steeks are the perfect innovation for knitters, like me, who don't want to purl or read a colorwork chart “backward.?" After the body of the piece is constructed, the steek stitches are cut (See photo below), and then they are tacked down to form a hem or facing. Are you horrified at the thought of cutting into your work? I heard a real horror story of a knitter who worked an entire colorwork sweater and then, when cutting her steek, cut through both layers of her sweater, completely ruining it. That's really terrible, but it isn't life or death, and it's about the worst thing that could happen. Lesson vicariously learned! If you are careful to separate your front and back (by placing the tube over an ironing board end, for example), you will eliminate the risk of cutting through both layers of your piece. Once you try steeking, you will see the advantages of wasting a few extra knitted stitches over working a piece flat and trying to keep track of the pattern on purl rows. What a perfect time to try out the technique. I bet you fall in love with it! photos courtesy of Thiagram on Ravelry
Sample Steek Chart
InfiniCOWLo: The Pattern by Deborah Tomasello
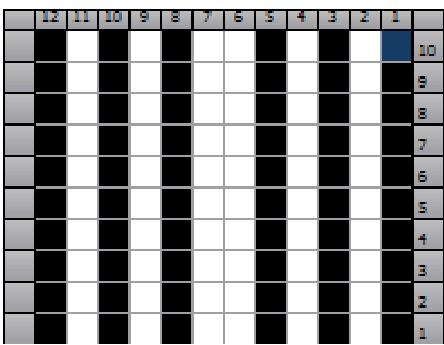
Cowl and photo by Inapina on Ravelry Achieve a great double-knit look without the work! This pattern scratches so many knitting itches! It is worked in the round, is versatile, and it employs an easy-to-follow colorwork design. And the design choices are yours! InfiniCOWL can be knitted any length, and because it has an option for a buttoned closure, it can be buttoned and worn as a cowl, twisted and then buttoned for a moebius cowl or left unbuttoned and worn as a scarf. If the longest version is knitted, it can be doubled around the neck before buttoning for a super-warm cowl to protect against the cold ofwinter. Description: InfiniCOWL is a “mix and match'” design that can be made in four different lengths. There are five interchangeable pattern choices for the front and five, single pattern choices for the back. When choosing the patterns for the front, you may use as many of the designs as you wish. You can choose to use only one design repeated five times, or five different designs each made once, or maybe you would like to create a repeating pattern of designs like ABABA, or perhaps you would prefer a central patern with a border like CDDDC. The choice is up to you. The front design choices are: Chevrons, Waves, Chains, Diamonds, and Slants. As you choose you combination, keep in mind that a balanced, symmetrical pattern is usually considered very appealing. However, if you like eclectic patterns, please feel free to pick highly contrasting designs. What is important is that the finish project will be something you will like. The back design is a single pattern choice repeated several times. The back design choices are: Zigzag, Little V's, Squares, Stripes, and Checkerboard. Or you can choose to use one of the front motifs for the back, as well. You will need at least two colors, but may use as many colors as you would like. This is a great opportunity to play with unusual color pairings or to use up the leftover yarn from other projects. As with the design combination, you may want to keep in mind the balance and symmetry of the overall pattern or, for a more eclectic look, use a “grab bag” approach. Choose a consistent background or foreground color and then gather a variety of contrasting yarns for the other part of the design. When you knit, simply use whatever contrasting color you grab without looking. As always, colors are the knitters’ choice! Sizes -TBD by knitter: Neck Warmer: 21 inches (very snug fit) Add sts in multiples of 24 for additional length. Short Cowl: 24 inches plus steek Add sts in multiples of 24 for additional length. Regular Cowl: 42.5 inches plus steek Add sts in multiples of 24 for additional length. Long Cowl: 48 inches plus steek Add sts in multiples of 24 for additional length. Materials: YARN: Approx. 200 g of fingering-weight yarn, comprising a minimum of two highly contrasting colors. (More for lonest cowl, and less for shortest cowl). NEEDLES: Neck Warmer - 16-inch #3 circular Short Cowl - 16-inch #3 circular Regular Cowl - 29-inch #3 circular Long Cowl - 29-inch #3 circular NOTIONS: The Short, Regular, and Long Cowls will require 10 1/2inch buttons. Small crochet hook for making button loops Stitch markers and tapestry needle Gauge: 28-32 stitches = approx. 4 inches (10cm) before blocking 24 stitches = approx. 4 inches (10cm) after blocking Note: With this project, exact gauge is not necessary. INSTRUCTIONS: Using your choice of background color, CO the desired number of stitches for the length you desire, as long as it is a multiple of 24. For neckwarmer, CO 144 sts; For short cowl CO 164 sts—144 plus 20 steek sts; For short cowl, CO 188 sts—168 plus 20 steek sts; For regular cowl, CO 284 sts——264 plus 20 steek sts; For long cowl, CO 308 sts- 288 plus 20 steek sts. Place one marker at the round beginning. Join to beginning being careful not to twist sts. Note: The first and last 10 stitches of each round are steek stitches. These will form the hem and button band once cut upon completion. \*Remember LEO when carrying yarns across the back of your work: Float Loosely, Evenly and Often. Each motif is knit for 8 rounds. You will knit five motifs for a total of 40 rounds for the front of your cowl. Begin and end each round with 10 steek sts, alternating colors per chart. Choose your chart, and begin, repeating the motif portion as often as you need to to arrive at the last ten sts of each round. Then knit the last 10 sts as steek sts. Steek sts: The red line represents beginning of the round, the 10 sts to the left of the line are the first 10 sts of each round, and the 10 sts to the right of the line are the final 10 sts of each round. The motif portion is worked in between.
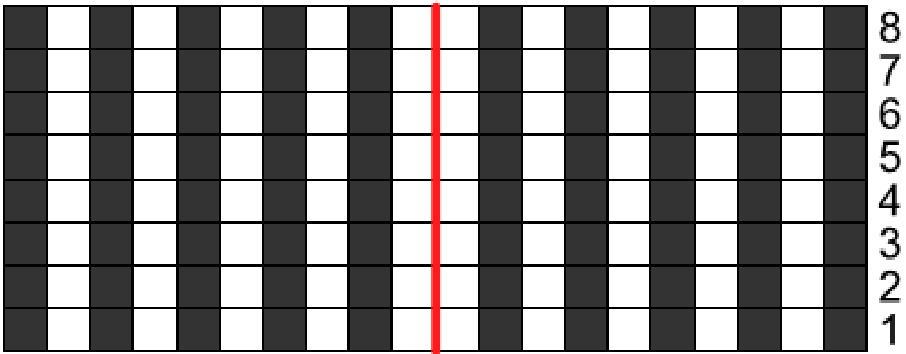
CHART A CHEVRONS
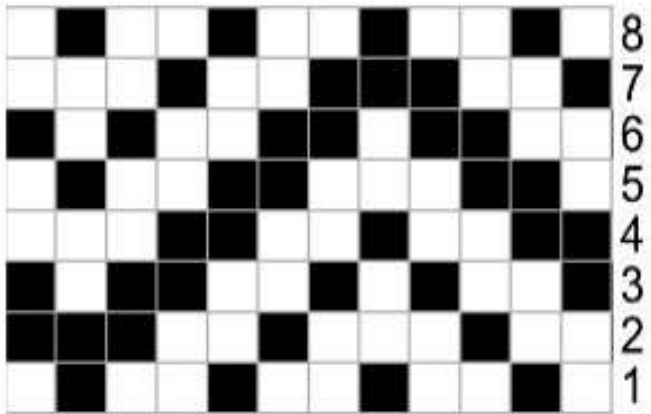
CHART B WAVES
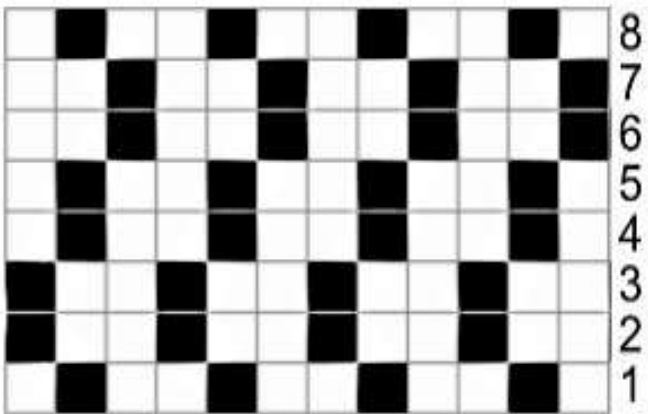
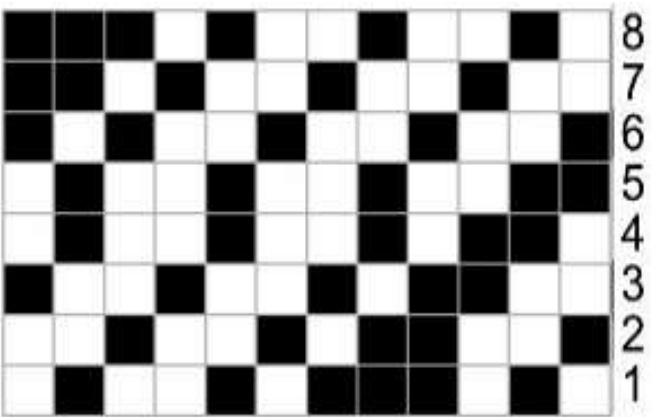
CHART C DIAMONDS
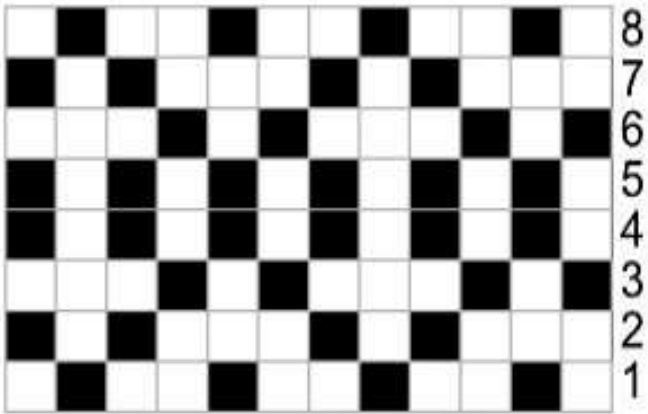
CHART D CHAINS
Now it's time to knit the 40 rounds that will comprise the back of your cowl. Choose to repeat one of the motifs you used on the front, or use one of the following options, designed for a less-complicated, yet coordinating, back. I recommend using only two colors here. Each chart is 9 rounds tall, so begin back by working 2 rounds using just the background color, then work 4 round repeats of the chart of your choice, followed by 2 more rounds of the background color for a total of 40 rounds. NOTE: When working rounds of solid color, there is no need to employ the second color for the Steeksts.
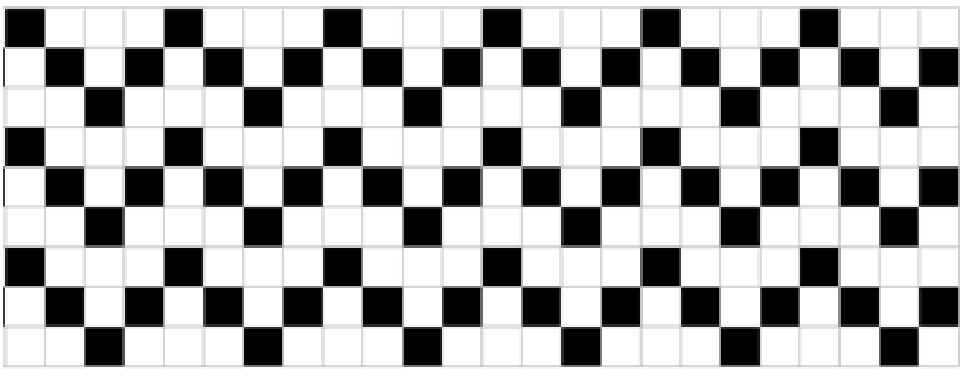
CHART AB Zigzag
CHART BB Little “Vs"
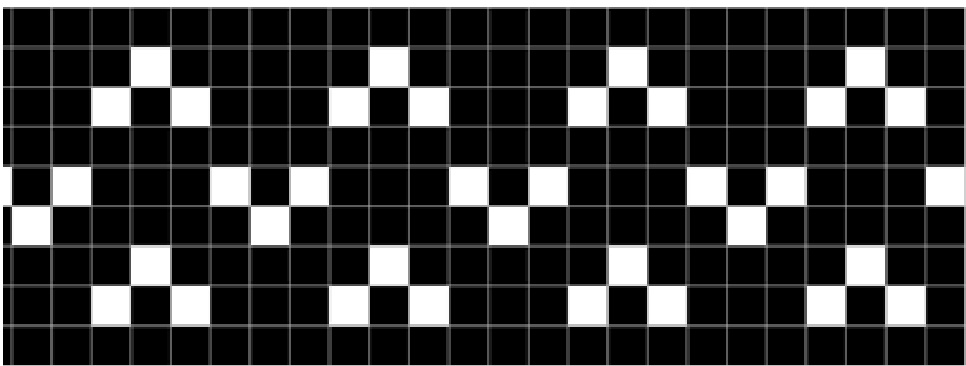
CHART CB Squares
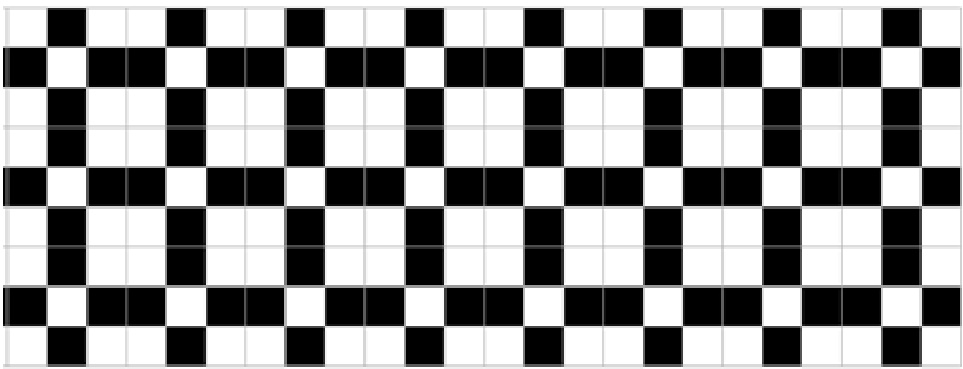
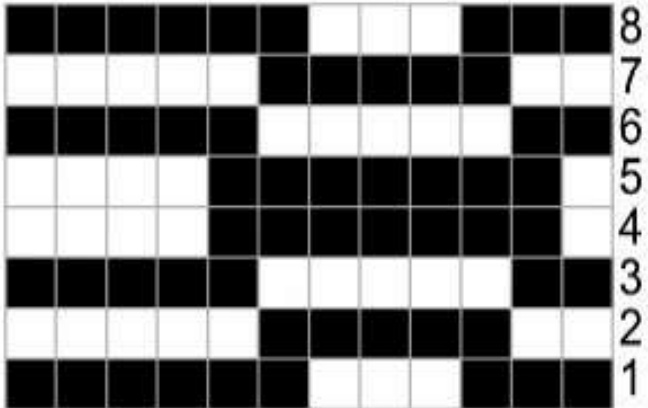
CHART DB Checkerboard
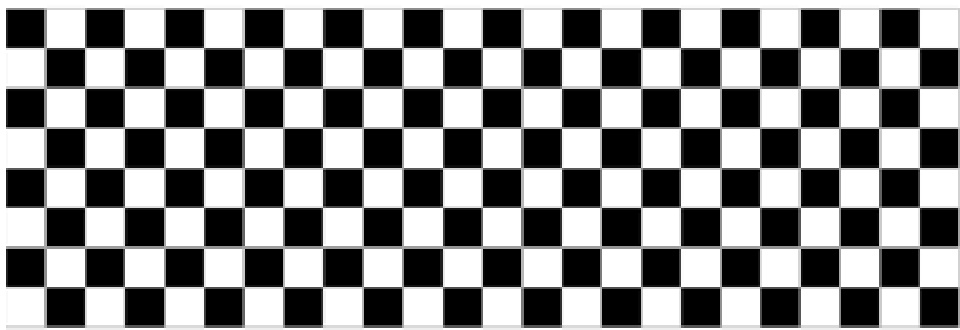
CHART EB Stripes
Finishing: If you are making the neck warmer, without steeks, BO loosely and close the seam by placing wrong sides together and using the mattress stitch. Be sure you have the neck warmer with the right sides facing out because this is a closed doughnut shape, and once the seam is even partially closed, there will be no way to flip it. Soak and block flat. After the neck warmer dries, it might be necessary to steam the edges so you have a crisp edge demarcating the front and back of the cowl. If you made any other size and steeked, there are 8 steps to finish your cowl 1) BO long edge 2) Sew the long edge 3) Cut steeks: Baste steeks to prevent raveling either before or after cutting steeks open 4) Steam press crisp edges. Soak and block flat. 5) Make button loops 6) Attach button loops 7) Tack steeks 8) Attach buttons 1) BO loosely. 2) Sew the long edge. You will need to close the long edge to make a tube. You should start and end your seam at the center of your steek section so you do not cut through the seam when you steek. Close the seam by placing right sides together and using the mattress stitch. Now you have a giant doughnut-shaped tube, and it's time to---drum roll---cut your steeks! 3) Cut steeks. You will be cutting down the center of the 20 steek stitches all the way around, taking care not to go through more than just one layer as you go. After you have cut all the way around, you will see you have a tube. Now turn your tube right-side-out. Baste steeks to prevent raveling. Move 2 or 3 columns in from the cut edge and run your basting stitch up that column of stitches. Repeat with the other cut edge. Or baste by hand.
Soak and block flat before proceeding.
4) Steam press so edges differentiating the front from the back are crisp. Using a damp cloth between the iron and your cowl, steam press the front and back flat so the long edges are crisp. Turn the basted steek edge under and steam press to hold. 5) Make button loops. Crochet 10 2-inch chains for button loops. If you do not crochet you can braid your yarns together, but it will not have as much stretch as the crocheted chain. You may need to make them a little longer so they will fit over your buttons.
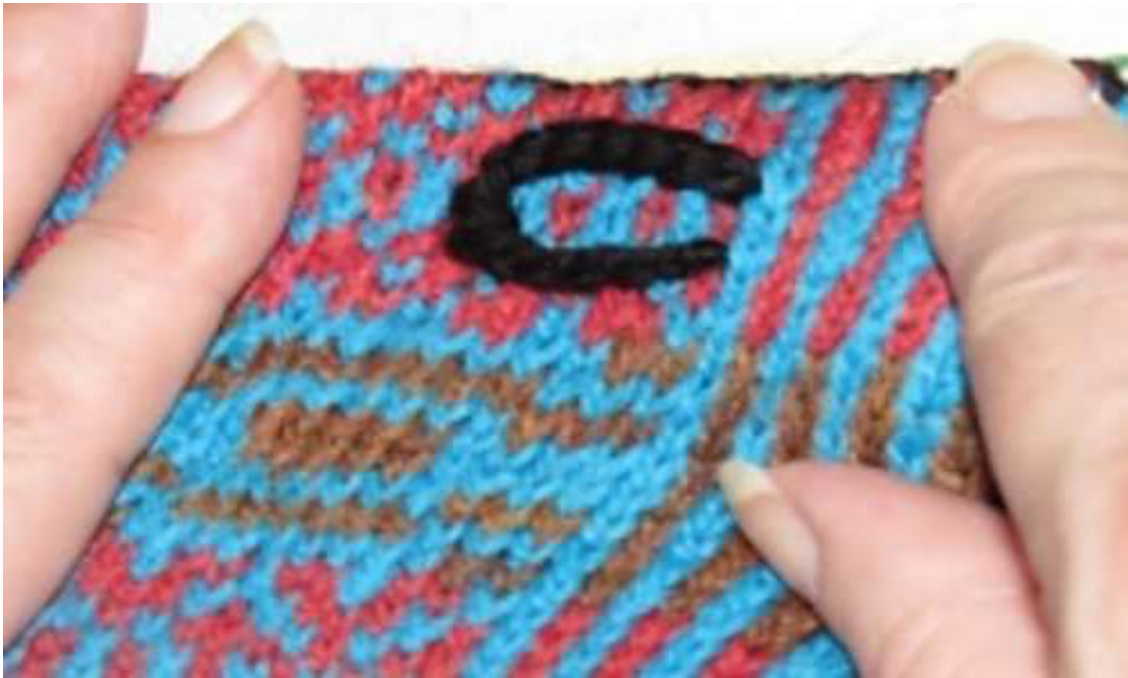
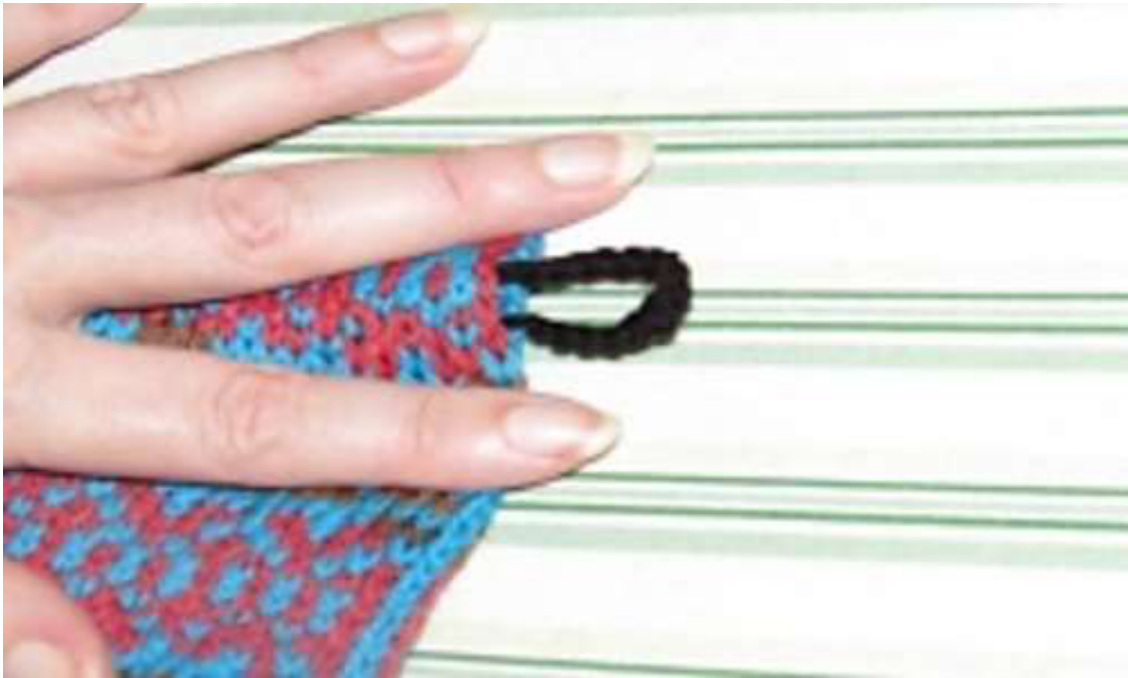
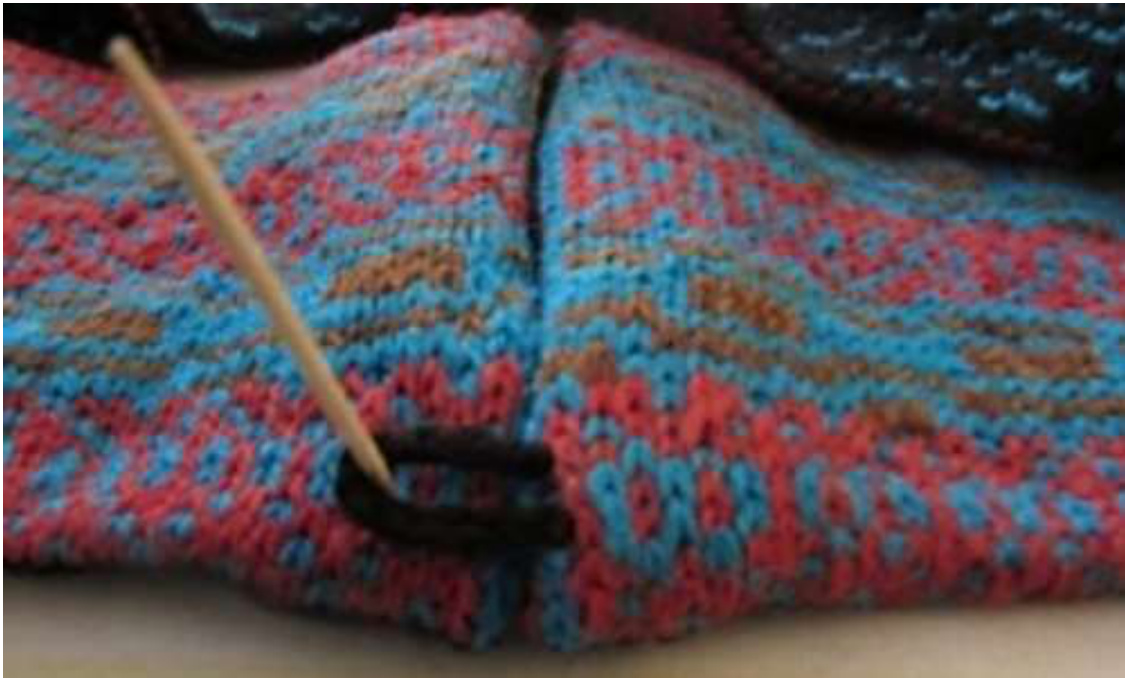
6) Attach button loops: Using a crochet hook, pull one end of the chain through the cowl, from front to back, exactly where the steek stitches meet the design stitches.
Move down 1 or 2 stitches and pull the other end to the back.
If using 10 buttons, place one loop in enter of each motif on the front, and match five loops on the back. When you like the placement of your loops, tie the ends together securely to hold them in place.
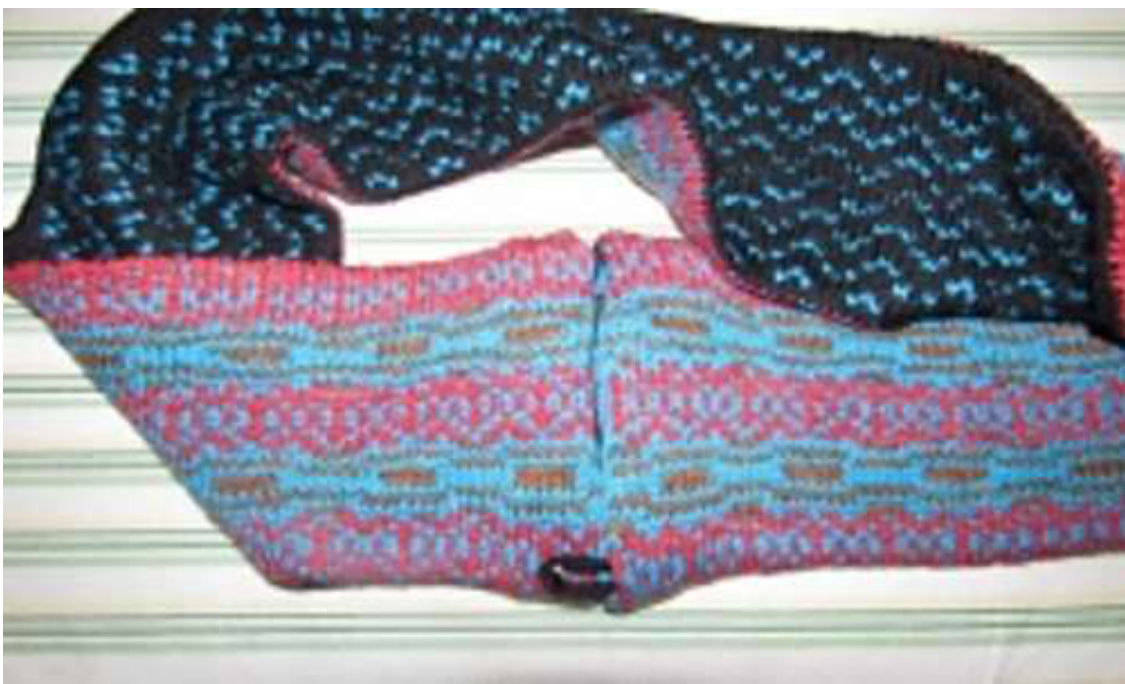
7) Tack steeks. Fold steek to the inside of the cowl and hem in place.
8) Attach buttons. To add buttons, butt edges of cowl together.
To make sure buttons are sewn in the position that will keep the edges tightly held together when buttoned, stretch loop and place a toothpick where the center of the button will be attached. Mark spot and attach buttons.
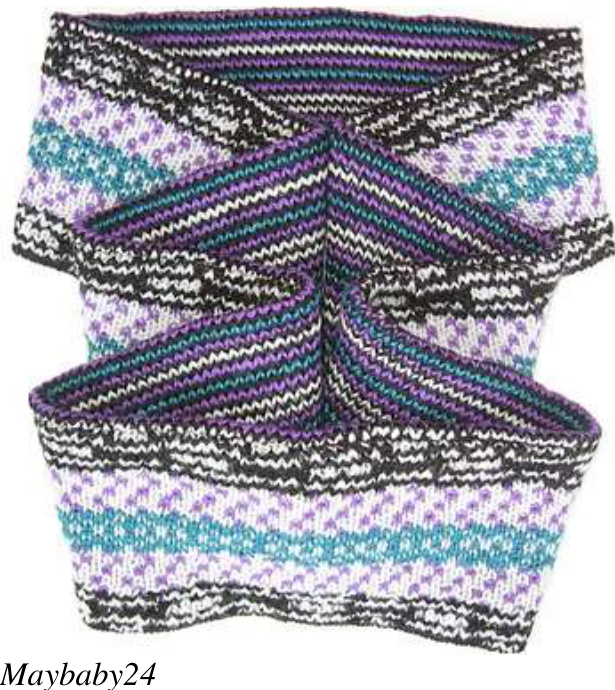
Congratulations on finishing your uniquely individual InfiniCOWL! And now, some of the wonderful cowls knitted during the August MAL:
Annaweigand
Fleurdelise
Deborah Tomasello
Inapina
Itsmeeval
Jardinrouge
Knitterlisa
Join us for other monthly KALs and MALs in the Colorworks by Debi group on Ravelry. http://www.ravelry.com/groups/colorworksbydebi-deborah-tomasello-designs Contact me with questions in the group or at CoeDeborah @ aol.com Like my Facebook page: https://www.facebook.com/pages/Colorworks-byDebi/207710882595789?ref=b0okmarks


