InfiniCATS C

InfiniCATS Introduction and Thank Yous
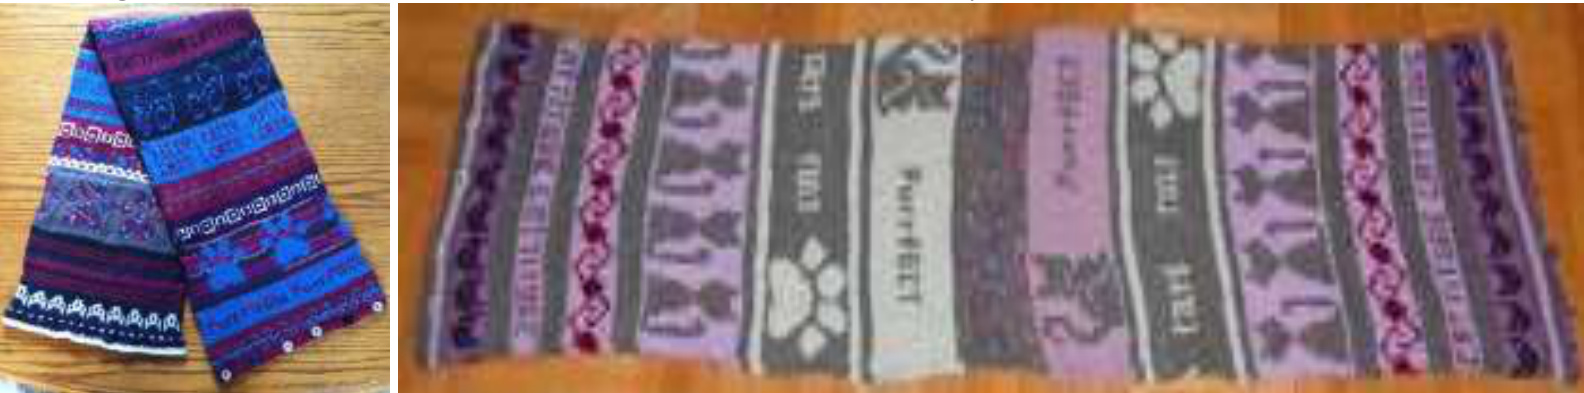
We have waited a long time for this one, and InfinicATS is finally here! In May, we worked the much anticipated InfiniCATS MKAL (mystery knit-along, for the uninitiated) in the Colorworks by Debi group on Ravelry. We offered a choice of projects including a hat, cowl/scarf, socks, pillow, and felted bag. Some of our talented participants were inspired to design their own motifs and peeries, and I have included some of these as well. In this mega-pattern, you will find instructions for all the project types, plus dozens of cat motifs, catrelated words, and peeries. You can mix and match as you choose, or you can use just one or two and repeat them throughout your project. As with all of the infiniPATTERNS, the combinations, especially once you add in color options, are virtually infinite. The InfiniPATTERNS are long. They contain so much information that they, by necessity, run for dozens of pages. It is my pleasure to include as much information as I can in each pattern. I like to include pictures of the projects worked during the time the KAL took place, and to that end, I have included as many as I could. Thank you to all the knitters, all those who made wonderful suggestions, and all who took a leap with their creativity, adding their own interpretations and personal touches. Thank you ShannonAgain, Zokrmom, and cozyknitsca for adding some great original designs. And, an additional special thank you to cozyknitsca (Pat Sample) for handling all of the administrative group work during my break. Pat is a designer in her own right, and she is doing another KAL over the summer in the CBD group, so I can continue my break. This is an immense help and puts my mind at ease. Thank you, Pat. And now, we are happy to share our InfiniCATS ideas, project pictures, and our general love for cats with all of you. We encourage you to embellish, get wild with color, and create your own masterpiece. We give you InfiniCATS!
Table of Contents
Introduction and Thank Yous 2 Color Dominance made Easy 4 Designers Among Us! 6 Abbreviations 7 Instructions for Hat (or stocking cap) 8 Instructions for Socks 13 Instructions for Pillow 16 Instructions for Cowl/Scar 18 Instructions for Felted Bag Pattern Motifs 23
Color Dominance made Easy
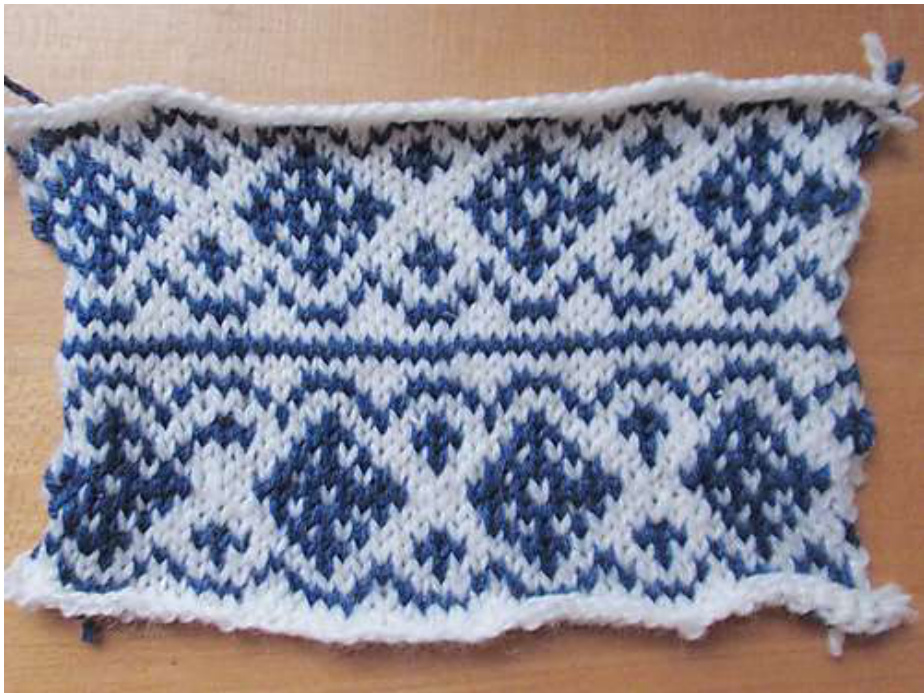
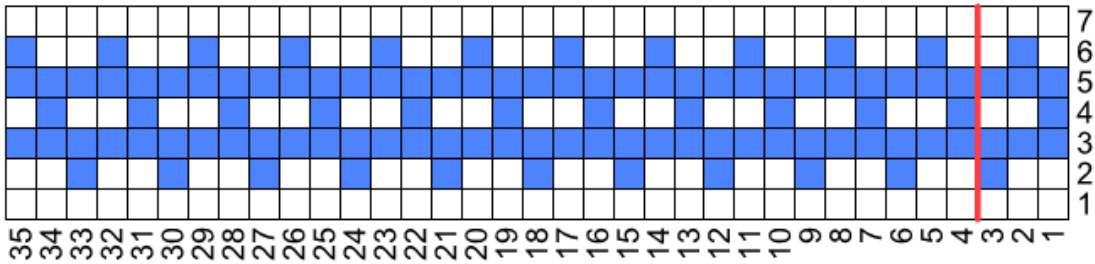
In the above swatch, I knitted the same motif across the piece, and then I repeated it. The only difference I made was the position in which I held my yarns. In the bottom half I held my yarns so that the blue was dominant on the front of the work, and the white receded into the background. On the top half, I knitted the same stitches but I held my yarns so that the white dominated and the blue receded. You see a definite difference in the appearance of the motifs when comparing the top and bottom halves of my swatch.
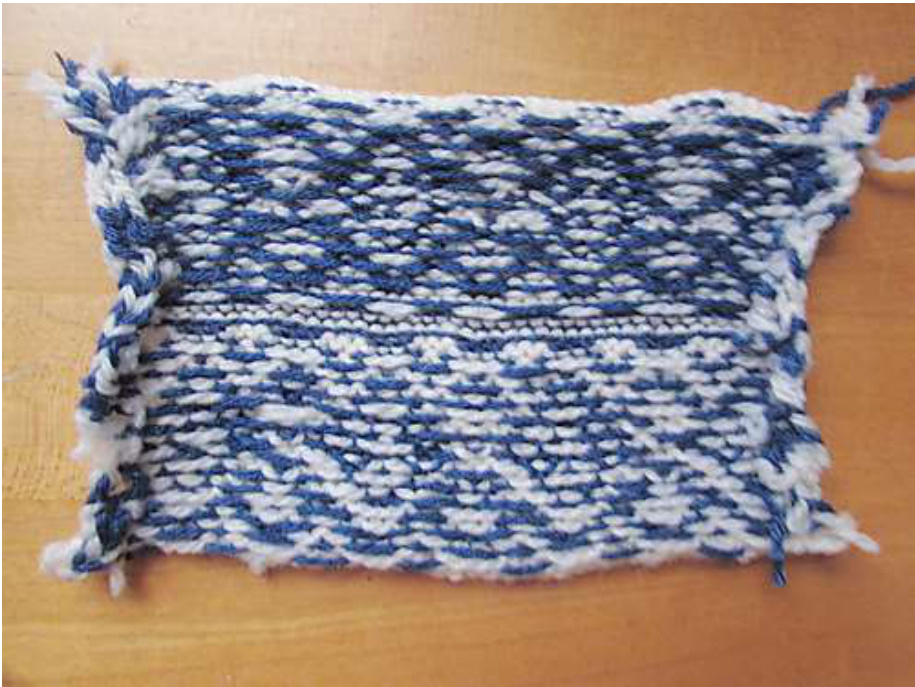
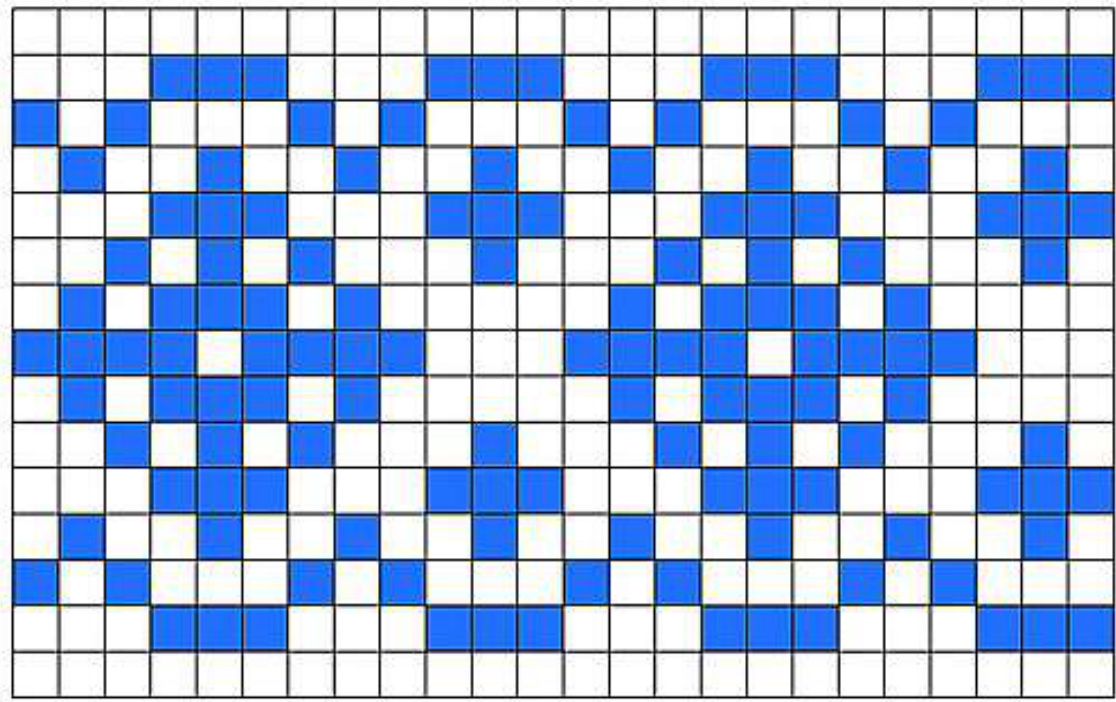
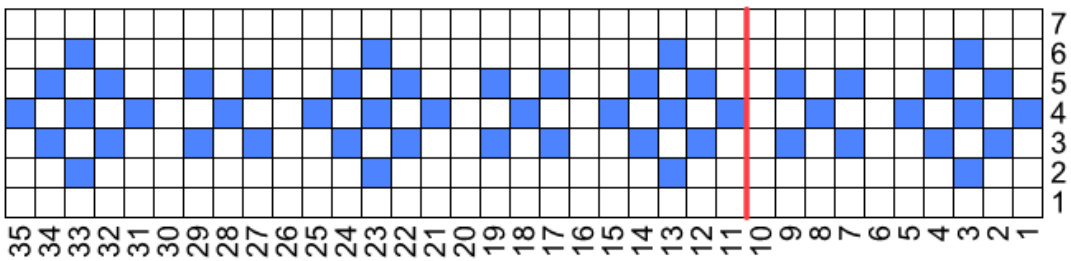
Viewing my swatch from the back, you notice that the color that dominated on the front recedes on the back, and the color that was recessive on the front dominates on the back. A color cannot be dominant both on the front and the back at the same time. So, how do you control for this? How does a color become dominant? I have read many explanations of color dominance, and frankly, they all leave me scratching my head. Terms are used like "over" and "under," which are nonsensical to me. Over where? Under where? Also, each knitter has her own yarn-holding method. So, we need an explanation that works no matter how we hold our yarns. First, it is important to point out that, whichever way you hold your yarns when stranding, you want to maintain the same position throughout the piece so that you catch your floats the same way, consistently. That said, here's how color dominance happens. (And it happens whether you like it or not!) The color that will dominate---or stand out—-on the front of your work is the color that consistently lies closer to your work as you go. In the above example, on the bottom half of the front of the piece, the blue is more prominent than it is on the top portion of the piece. This is because it lay closer to the piece as I was working the bottom half. How do we know this? Look at the back of the swatch. The bottom on the back shows more white relative to the top of the swatch. You see more white because the floating yarn, the white, is floating over, or around, the blue...it lies further from the piece, has farther to travel, than the blue. Because the white lies closer to you on the bottom half when viewing the back, it is more visible to you than is the blue. Because it is more visible - dominant—on the back, it cannot be, at the same time, the dominant color on the front. No matter how you choose to hold your yarns, one in each hand, both in the right hand, or between your toes as I do, the above rules apply. Try a swatch as I did. Try knitting with the yarns in one position and then switching them. Take note of the color that has to travel to float around the color that lies closer to the work. The one that has to travel to float around the close color is not the color that will dominate on the front of your swatch, but it is the color that will be most evident on the back. Try knitting this chart with two, highly-contrasting colors and DPNs so that you are working in the round. You will cut the swatch open when you complete it:
Designers Among Us!
As always, we were thrilled to see the clever, innovative use of color and motif combinations in everyone's projects. But we were especially thrilled to discover several had taken the plunge and designed their own motifs. And each designer kindly and willingly gave me permission to publish her designs in this pattern so you can use them, too! The design contributors are credited by their Ravelry names: ShannonAgain, Zokrmom and cozyknitsca. Each added her own ideas into the mix, and I have included their charts in the chart section of the pattern. But below, you can see examples of their ingenuity reflected in the pictures of their projects. Thank you,all!
sh and fish bones peerie chart is available in the chart section of this pattern
se hidden among the tessellated kitty faces? See Pat's design charted below.
Abbreviations
BO - bind off cO — cast on DPN — double-pointed needle Dec — decrease Inc — increase K -knit K2TOG — knit two stitches together M1 — knit in front loop and then again in the back loop of stitch MC - main color PM — place marker P一 purl Rnd — round SSK — slip one stitch, then slip the next. Insert left needle into the front loops of the slipped stitches and knit them together from this position
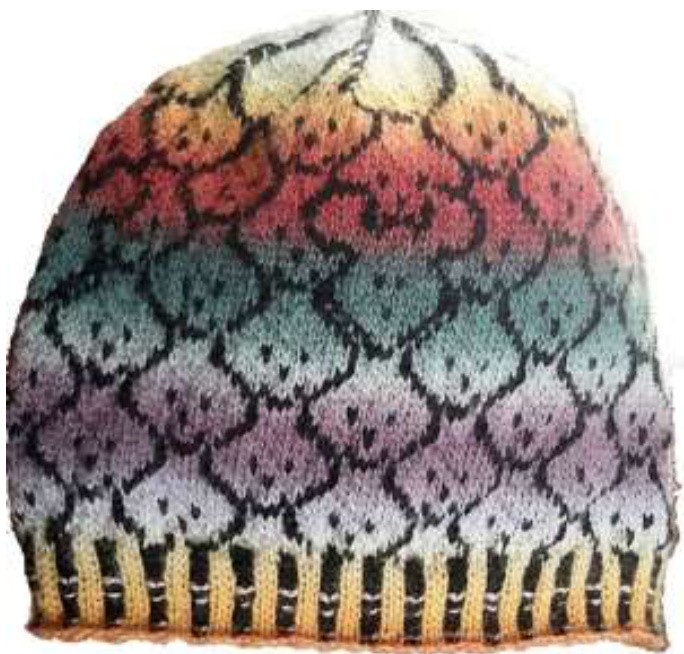
Instructions for Hat (with instructions to shape top for a stocking cap)
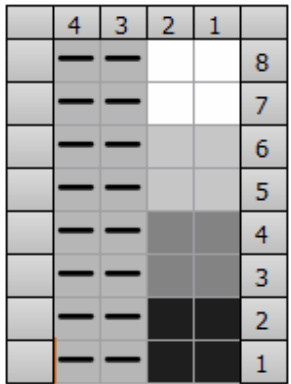
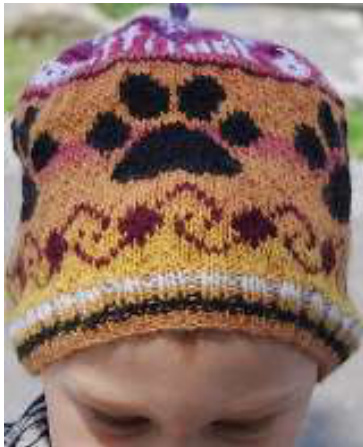
NOTE: Not all motifs will work evenly into the rounds. You will need to space them to make them fit. The body of the hat and stocking cap are worked the same way. The difference is in the shaping of the top, and separate top instructions are provided below. Size: Includes instructions for child (age 2-8 yrs), child (age 9-12 yrs), and teen and adult (head circumference of 21"-23") Materials: At least two colors highly contrasting fingering weight yard. 50g of each. One 16" #3 circular needle, and #3 DPNs Tapestryneedle Gauge:30-32sts per 4" STEP 1 - Choosing Colors Look at your design and decide which colors you want to use. You will want a minimum of two, highly contrasting colors, but you can use as many colors as you like. STEP 2 (OPTIONAL) - Changing the Size of Your Hat For teen/adult size, follow instructions in STEP 3. For child size (2-8 yrs) CO 120 sts and, after ribbing, increase evenly around to 136 sts. For child size ( 9-12 yrs) C0 136, and increase evenly around, after ribbing, to 144 sts. Work the number of rounds you desire before beginning top decreases. STEP 3 - Begin Knitting With a Size #3 16-inch circular needle or DPNs and one of the main colors, cast on 136 stitches. Join to work in the round, being careful not to twist. Place a marker to indicate the beginning of round. Work a 2x2 corrugated rib for 8 (6 rounds for child) rounds. The chart shows black, gray and white, but you may use any colors you would like, as long as it's at least 2 colors. A dash in square indicatesa purl stitch.
STEP 4 - Increase For adult size: On the first round after your ribbing, you will need to increase to 168 stitches as follows: K4, \*K4, M1\*, repeat from \* to \* until 4 sts remain, K4 (168 sts). After planning design (use grid provided below), continue as follows: Begin knitting your first design, working from the bottom up to the top of the chart. It might help to work out your design on graph paper, (provided below) so you know your motifs are placed evenly, or centered, before you begin. Work about 40 rounds, or more if you want a slouchy hat. (Fewer rounds for child sizes). Feel free to embellish with beads or anything else you'd like.
Top Decreases and Finishing Instructions
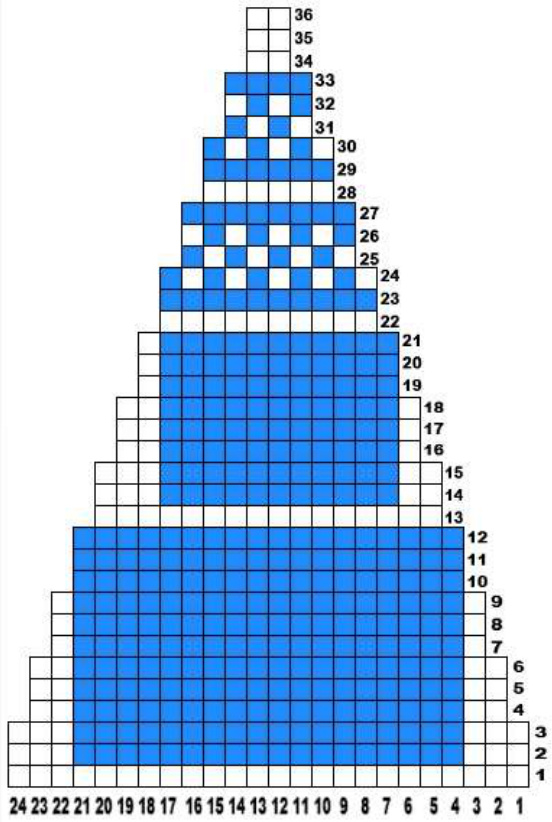
The following decrease charts are based on the adult size. For smaller sizes, use fewer wedges or fewer sts per wedge. I can help you, if you need me. Blue represents the area possible for a motif placement. Choose a motif that will fit in the blue area. Then, choose a peerie for the smaller sections closer to the top.
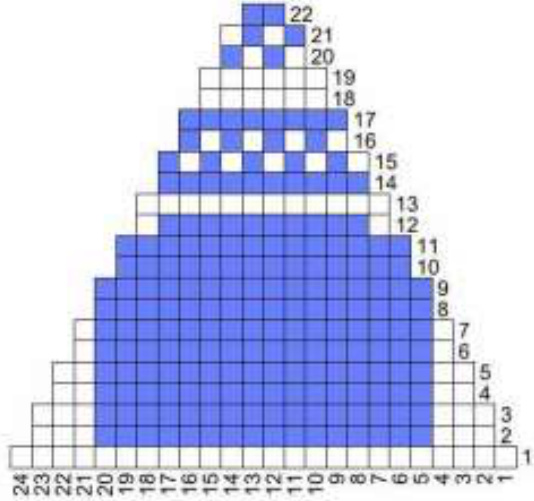
Ending with a Peerie/Band Blue represents possible areas for placement of knitter's choice of peerie(s).
Follow CHART (7 repeats per round) to desired size, decreasing as indicated and switching to DPNs when necessary. (Each decrease round has 2 decreases next to each other; k2tog for first decrease at beginning of chart repeat, and ssk for second each time at end of chart panel repeat.) After hat chart is complete, with 14 stitches onthe needles, k2tog around. 7 stitches will remain. Knit last seven stitches for 5 rounds. Cut the yarn leaving a tail several inches long. Thread a tapestry needle with the tail and run through the remaining stitches. Pull tightly and secure on the inside. Finishing: Tie and trim all yarn ends. Soak with color block and block to fit.
Top Decreases and Finishing Instructions for stocking car
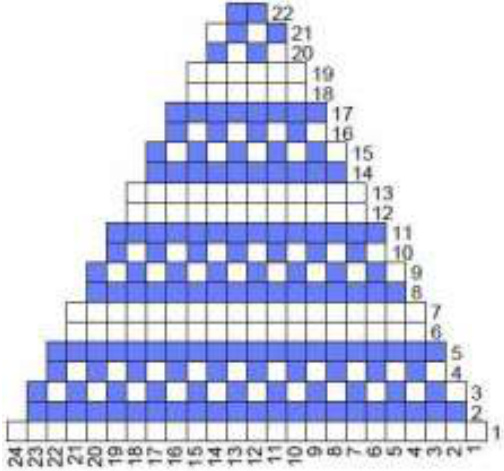
Ending with a Motif Blue represents the area possible for a motif placement. Choose a motif that will fit in the blue area. Then, chose a peerie for the smaller sections closer to the top.
Ending with a Custom Design
Below is a blank chart for you to use to design your own ending combination.
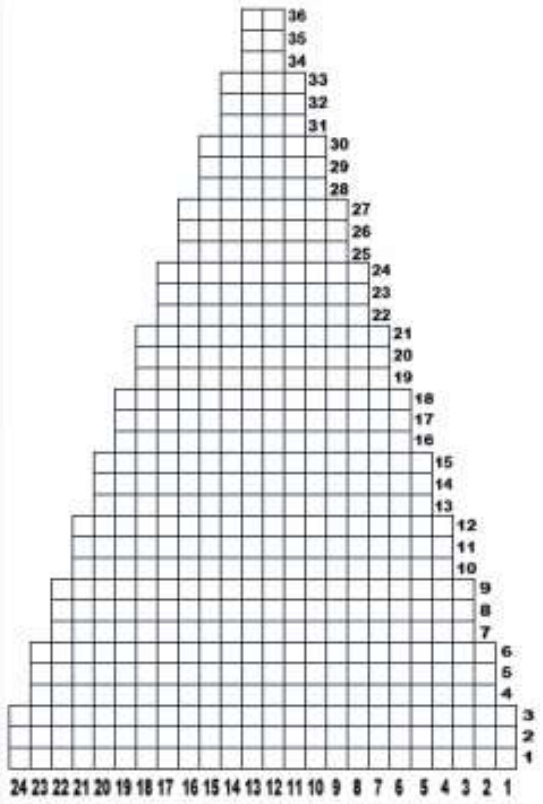
Follow CHART (7 repeats per round) to desired size, decreasing as indicated and switching to DPNs when necessary. (Each decrease round has 2 decreases next to each other; k2tog for first decrease at beginning of chart repeat, and ssk for second each time at end of chart panel repeat.) After hat chart is complete, with 14 stitches onthe needles, k2tog around. 7 stitches will remain. Knit last seven stitches for 5 rounds. Cut the yarn leaving a tail several inches long. Thread a tapestry needle with the tail and run through the remaining stitches. Pull tightly and secure on the inside. I yarn ends. Top with a tassel, if desired. Soak with color block and block to fi
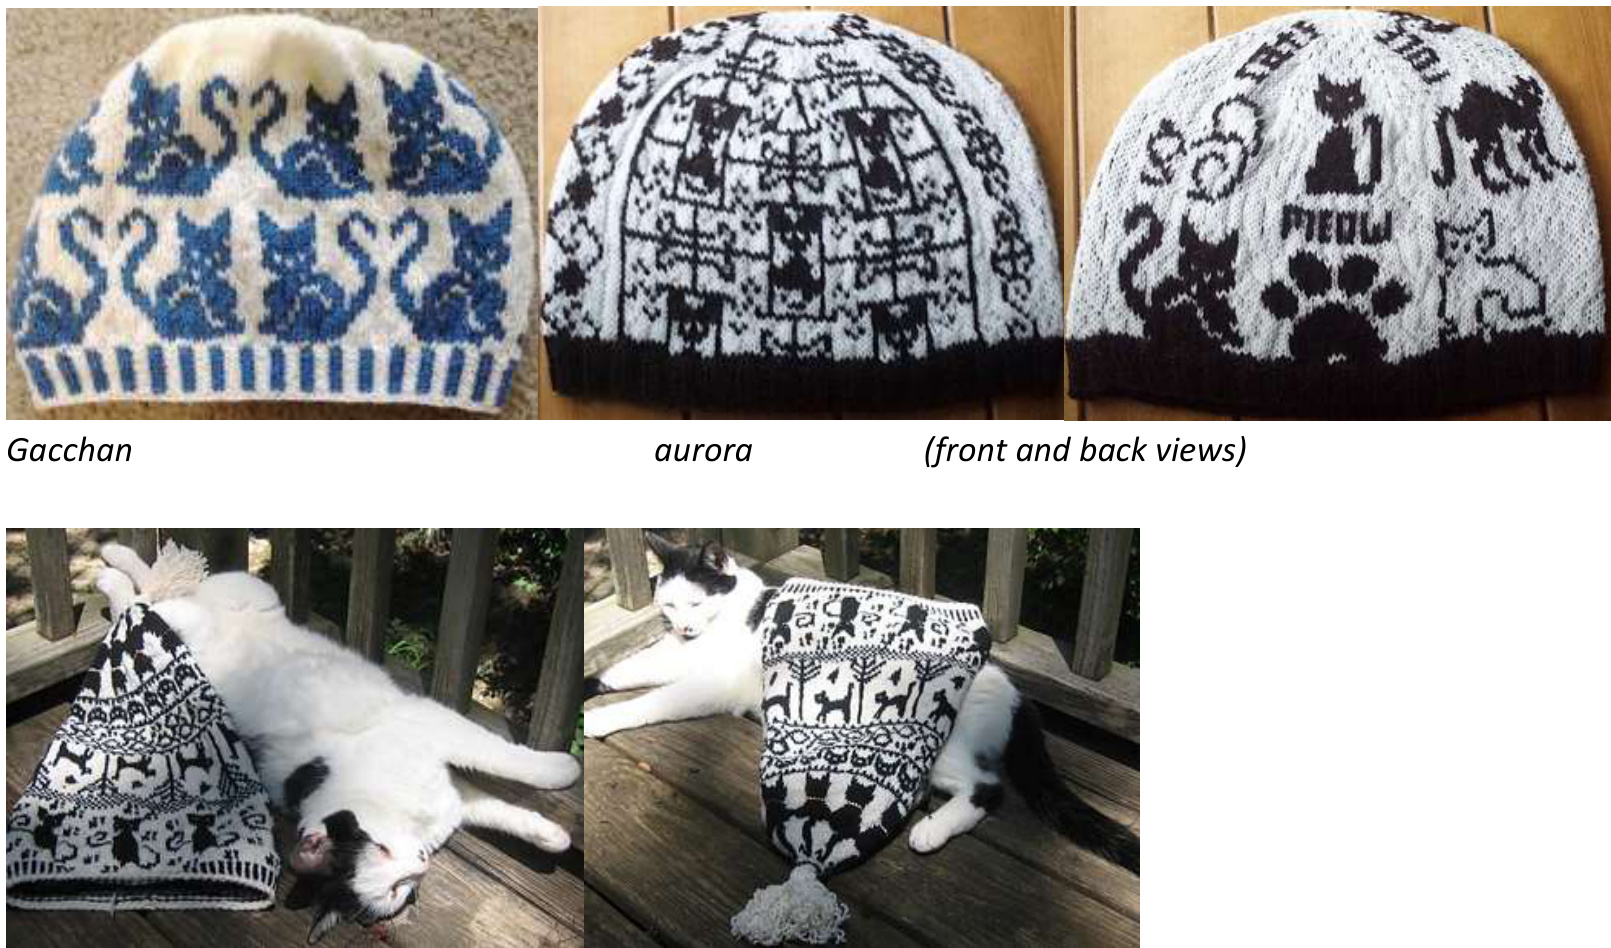
Mamofsteel and kitty approves!
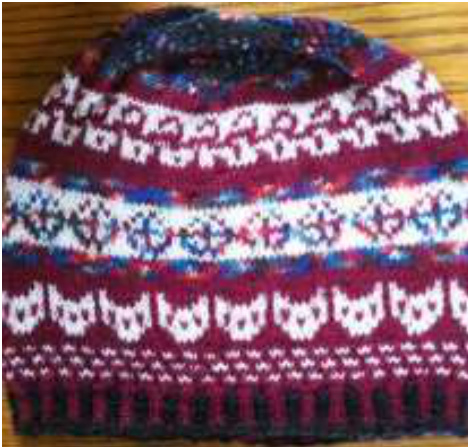
LindaKnitsME
cozyknitsca
Planning Grid
Instructions for Socks
Remember when knitting the leg portion of the socks to read your motif charts from ToP TO BOTTOM...or upside down so that they will appear right-side-up when socks are being worn. If using words, you must read them backward side, to side, as well. Size: Small-med...CO 64 sts Med-large...CO 72 sts. Materials: Approx. 400 yds of fingering weight wool. These should have a high contrast, and they should not be tonal or variegated. Five DPNs for socks: #3 for medium Tapestryneedle Gauge: 32 stitches = approx. 4" LEG With Size # 3 DPNs or a long circular needle cast on 64 or 72 stitches. Divide sts evenly over 4 needles. Join to work in theround, being careful not to twist. Place a marker to indicate the beginning of round (if using a circular needle). Work 16 rounds of 2x2 ribbing (2 knit, 2 purl). If using a single motif, you will want to center it. After planning design (use grid provided below), continue as follows: Begin knitting your first design, beginning with Round 1, working from the TOPto the BOTTOM of the chart or upside down, for the leg portion. Work about 50 rounds, fewer or more depending on how tall youw ant your sock to be. Feel free to embellish with beads or anything else you'd like. HEEL- My socks feature the Sweet Tomato Heel (STH).You may use the heel of your choice, but I recommend one that does not employ a flap or gussets to allow for an even design flow through the instep. For a tutorial on the STH, see this video: http://www.youtube.com/watch?v=IRc3309JUyc#t=15 Once you understand how to knit the STH, proceed using the STH heel instructions, knittingheel with the background color. Work three wedges on the 32 or 36sts on needles 1 and 4. Work wedges leaving 7or8 stitch pairs on each side (4 heel sts left unpaired between pairs). Knit according to pattern ofyour choice, or solid if you are between motifs, across the instep stitches between wedges. Follow the chart for the instep stitches (the sts you have on needles 2 and 3). After working the first half of wedge one, work across the instep per chart, if you are knitting a peerie or motif---if not, justknit the solid color you are using or the heel. If working a design across the instep between wedges and not just knitting the solid color, when knitting down the first row of the first wedge, floatthe other color down and leave so you have it ready to use when working across the instep sts. After creating all the st pairs, knit across the instep and then pick up your st pairs on the second halfof the wedge, alternating darker and lighter colors. When knitting row the first row of the second wedge, alternate colors, but leave the lighter color to be used on instep sts. Repeat until all 3 wedges are complete. See my YouTube tutorial here: https://www.youtube.com/watch?v=VeryKgB84M FOOT- After you have completed your heel, you will begin the foot. The foot will comprise approx. 50 rounds before starting the toe decreases. I recommend alternating colors on the sole of the foot (sts on needles 1 and 4) for a striped effect, working your motifs on the top of the foot (needles 2 and 3) only, but you can work your motifs all the way around the foot if you desire. Your foot stitches will be divided evenly, as they were for the sock leg, either 16 or18 stitches per 4 needles. Needles 1and 4 will be the sole of the sock, and they will be knitted in a 2 color stripe to keep the sock smooth and notbulky. Your motifs and/or peeires will be worked on the top half of the foot (needles 2 and 3). You may choosethe direction you want your motifs to be when doing the foot. They can continue in the same direction as withthe leg, or you can turn them around so they face you. Knitter's choice. If you choose peeries, or choose to repeat one peerie throughout, directionality will not be an issue. )E: Using one, solid color, or two colors in stripes, decrease for toe as follows Needle 1: K to last 3 sts of NEEDLE 1, K2TOG, K1 Needle 2: K1, K2TOG, knit remaining sts. Needle 3: K to last 3 stitches of NEEDLE 3, K2TOG, K1 Needle 4: K1, K2TOG, knit remaining sts. Repeat this until there are 7 or 8 stitches left on each needle. Place stitches from needles 4 and 1 onto one needle (16 or 18 stitches). Place stitches from needles 2 and 3 onto another needle (16 or 18 stitches) Graft the remaining stitches together using Kitchener stitch. Finishing: Tie and weave in or trim all yarn ends. Wash & block to fit. I suggest choosing 2-color motifs and peeires only for the top of the foot. You don't want the added bulk in your shoe that stranding 3 yarns would create. You can always embellish with embroidery or duplicate stitch after you've knitted the foot, if you want more color there.
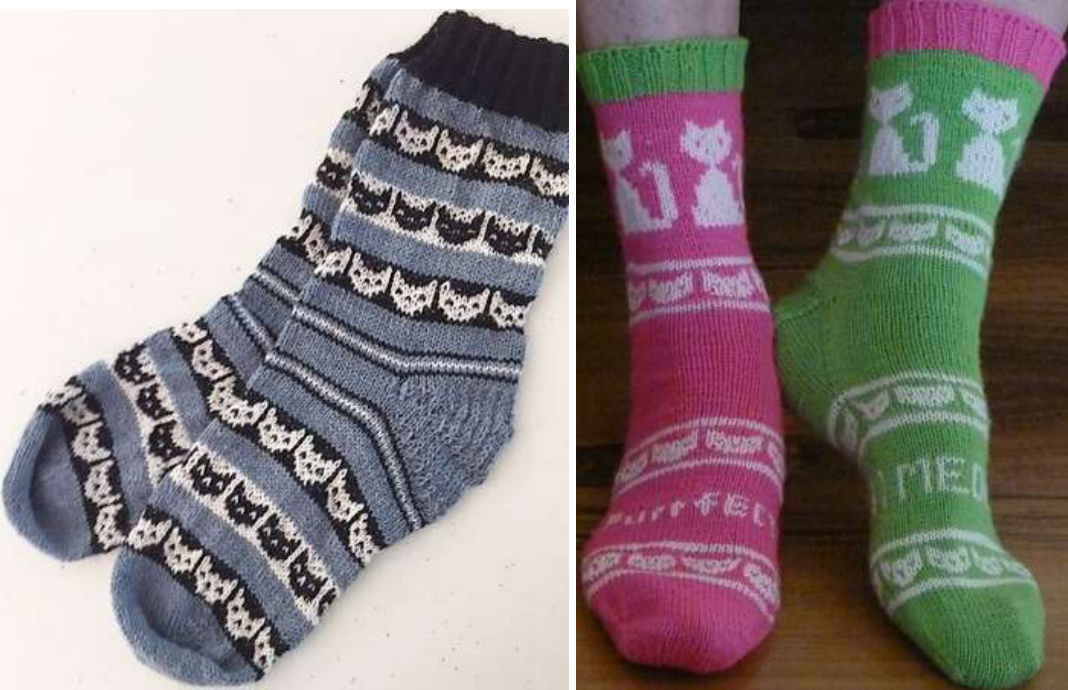
Pksmith50 luvin2knit
Planning Grid

Instructions for Pillow
Size: TBD by knitter. As written, you will have about a 15" x15" pillow. STEP 1- Choosing Colors and Motifs Look at your design and decide which colors you want to use. After planning design (use grid provided below), continue as follows: STEP 2 (OPTIONAL) - Changing the Size of Pillow The number of stitches is based on a 24-stitch pattern repeat. If you want to make your pillow smaller or larger, you need to decrease or increase your stitch count as desired and adjusting motifs as needed. This means you will need to figure how many stitches to subtract or add between repeats in order to distribute your designs evenly across the pillow.
STEP 3- Begin Knitting
With a Size #3 16-inch circular needle and one of your main colors, C0 240 stitches. Join to work in the round, taking care not to twist stitches. Place a marker at the beginning of the round, and place another after the 12oth stitch (the halfway point). Begin knitting your first design, starting with round 1, working from the bottom up to the top of the chart. Add motifs and peeries as you wish until your project is the height you desire. Feel free to embellish with beads or anything else you'd like. Finishing ldeas- There are no specific instructions for how to close your pillow, but there are options. You could simply sew it closed, possibly adding a braid or other trim. Another option would be to add a button band and buttons, so you could remove the cover for cleaning. Adding a zipper would also make the cover removable. A third removable option would be to continue knitting along just the front of the pillow cover until you have a strip of fabric that could be tucked down the backside of the pillow form. Snaps or hook-andloop tape could be added if desired. And, of course, there's always fringe!
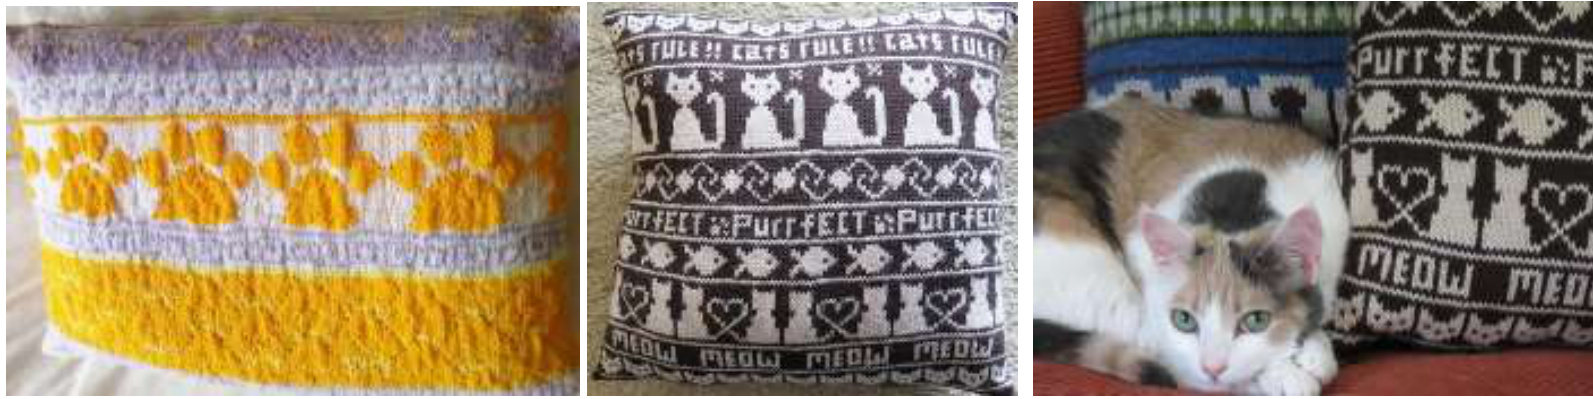
karen999... \* ...and a thumbs up from kitty! \* karen999 included motifs by other designers in her project. Nevyn Sandow's Kitty Love, and Mariann An's Who Ate the Fishes are free downloads, available on Ravelry.
| IAAARBAAAA AnnaWeigandPlanning | ||||||||||||||||||||||||||||||||||
| CrazierThanMyCat | ||||||||||||||||||||||||||||||||||
Instructions for Cowl/Scarf
Size: TBD by knitter. Materials: At least 2 colors fingering weight yarn (Amount depends on how big/long you want your cowl or scarf) #3 16-inch circular needle Stitch markers; buttons and tapestry needle, if desired This cowl is designed to be knit across the width, not as an open circle that goes over your head. The floats and ends will be inside the "tube" and the designs will be visible on both the back and the front. The ends will be connected by either a row of buttons and buttonholes or by sewing them together. The scarf is worked exactly the same way, but the ends are not joined or closed. You can add fringe for the scarf, if you desire. For some additional visual examples, see some of the InfiniCHRISTMAS and InfiniCOWL projects our grouphasmade. STEP 1- Choosing Colors and Motifs Look at your design and decide which colors and motifs you want to use. After planning design (use grid provided below), continue as follows: STEP 2 (OPTIONAL) - Changing the Size of Your Cowl If you want to make your cowl narrower or wider, you need to change the number of stitches, and you will need to figure out how many stitches to subtract or add between repeats to distribute your designs evenly around the cowl. I can help you with this, if you need me to.
STEP 3 - Begin Knitting
With a Size #3 16-inch circular needle and one of the main colors, cast on 144 stitches. Join to work in the round, taking care not,to twist stitches. Place a marker to indicate the beginning of round (start of front) and another after the 72nd stitch to mark the halfway point (start of back). Begin knitting your first design, beginning with Round 1 of your chart, working from the bottom up to the top of the chart. Feel free to embellish with beads or anything else you'd like.
LindaKnitsME capinter (also used buttons for closing)
Planning Grid

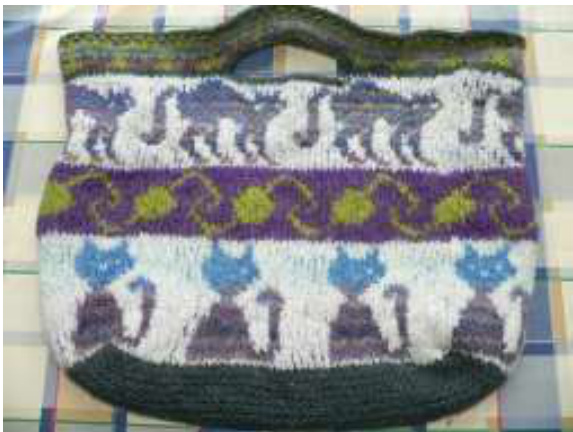
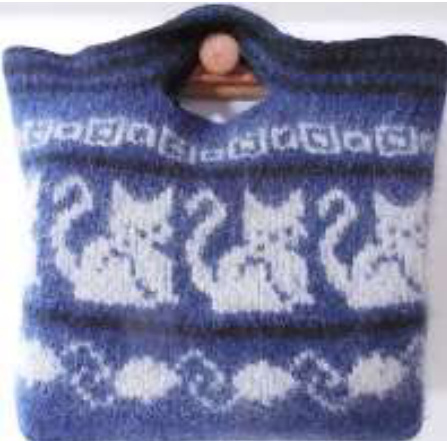
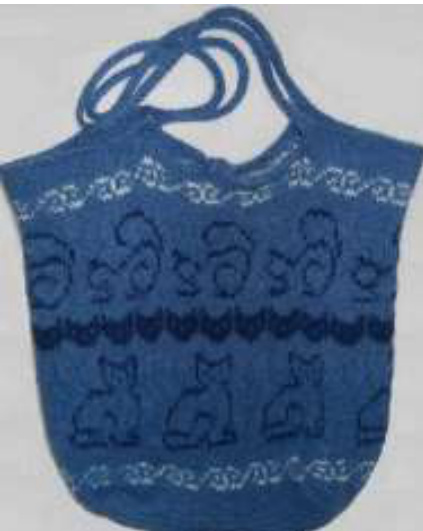
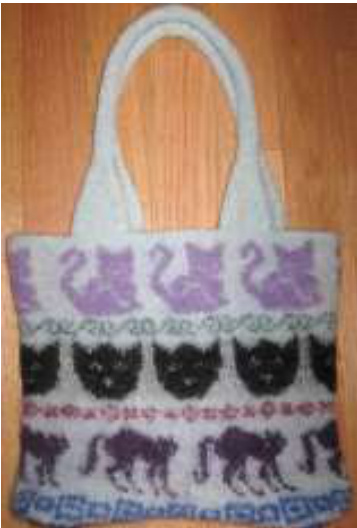
Instructions for Felted Bag
Size: TBD by knitter: Cover Project measures approx..4"x 13" x 12" after felting Materials: 350-400 yds worsted wool for design (Must use wool that will felt well) 550-600 yds worsted wool for background color (Must use wool that will felt well) One #10.529" circular needle Stitch Marker and tapestry needle Gauge: Gauge is not important here. CO 50 sts, using background color worsted yarn DOUBLED. Work back and forth in garter st 30 rows. This will be the bottomof the bag. Now, with one strand only on the next round, rather than turn to knit back, continue around, picking up and knitting 30 sts down the short side, turn 90 degrees, pick up and knit 50 CO sts, turn 90 degrees and pick up and knit the 30 sts on the last short side. Place marker for round beginning here. 160 sts total. From this point on, you will be knitting with 2 colors ONE STRAND EACH, in the round, on 160 sts. Feel free to embellish with beads or anything else you'd like. After planning design (use grid provided below), continue as follows: Add second color and follow the motif chart you have chosen. Feel free to embellish with beads or anything else you'd like. Work approx. 59 rounds (apprx. 24" tall). Be sure to float every stitch..you want a nice, tightlooking backside with no long floats..not even 2 sts. See my easy technique for frequent floats here: http://www.youtube.com/watch?v=iYxx7MrpJ-Q For handles: Round 60: Using background color K17, B021, K59, B021 K42. This will only work if you have 160 sts. Round 61: --K17, CO21, K59, CO21, K42. Round 62.: One round background color Rounds 63-69: Repeat Rounds 1-7 of chart Round 70 One round Kitty Color. BO loosely. Finishing: Tie and trim all yarn ends. Felt. Block to desired shape. Idea: enclose a cereal box in a plastic bag and insert into felted bag for a perfectly shaped project. Shoulder strap option courtesy of Thiagram on Ravelry (Thank you, Cynthia!) Using a single strand of yarn cast on 90 stitches. Using a double strand of yarn K 4 rows K5, BO4, K72, BO4, K5 (Measure button to stitches and cast off accordingly. Or, button can be sewn on without button hole if desired.) K5, CO4, K72, CO4, K5 K4rows BO with a single yarn and a larger needle to ensure a loose bind off.
Rheinnixe
corasdaughter
Cellogirl2
Charleen
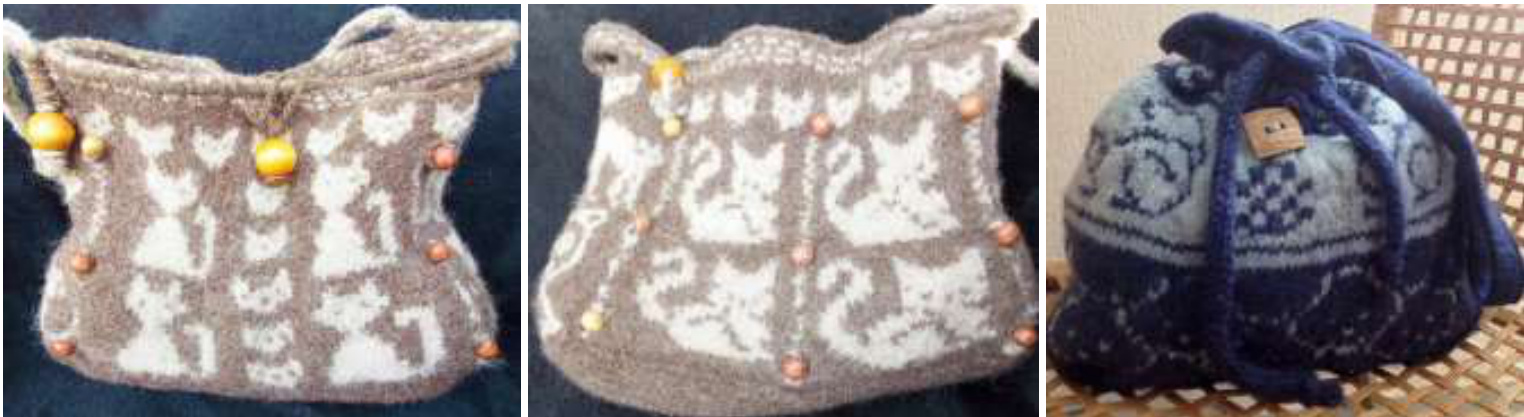
muddancer Thiagram RyaM (Two views) (Two views) Odilemat
Planning Grid:
Pattern Motifs
Below are motifs for you to use in your InfiniCATS project. I have included, cats, tessellations, words and peeries. I have also included those motifs designed by some of the KALers during the month. You can mix and match them any way you'd like, or you can choose only one or two and repeat them as desired. Before beginning your project, please review the information on color dominance in the goup thread.
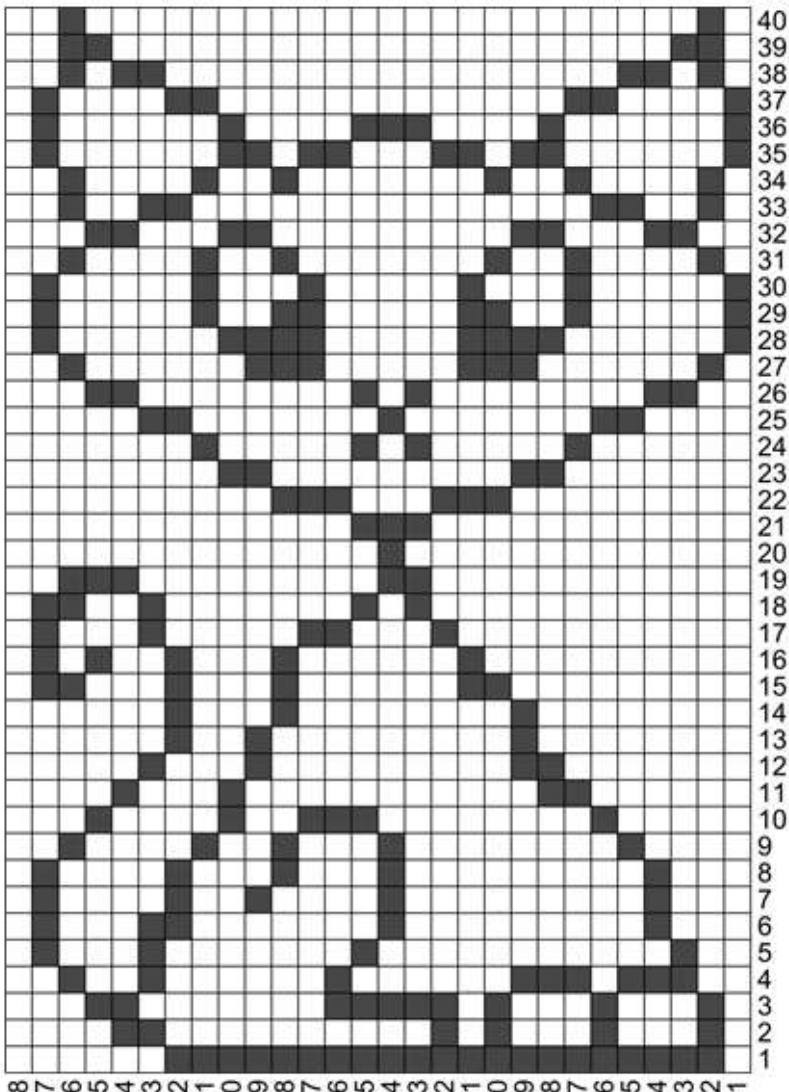
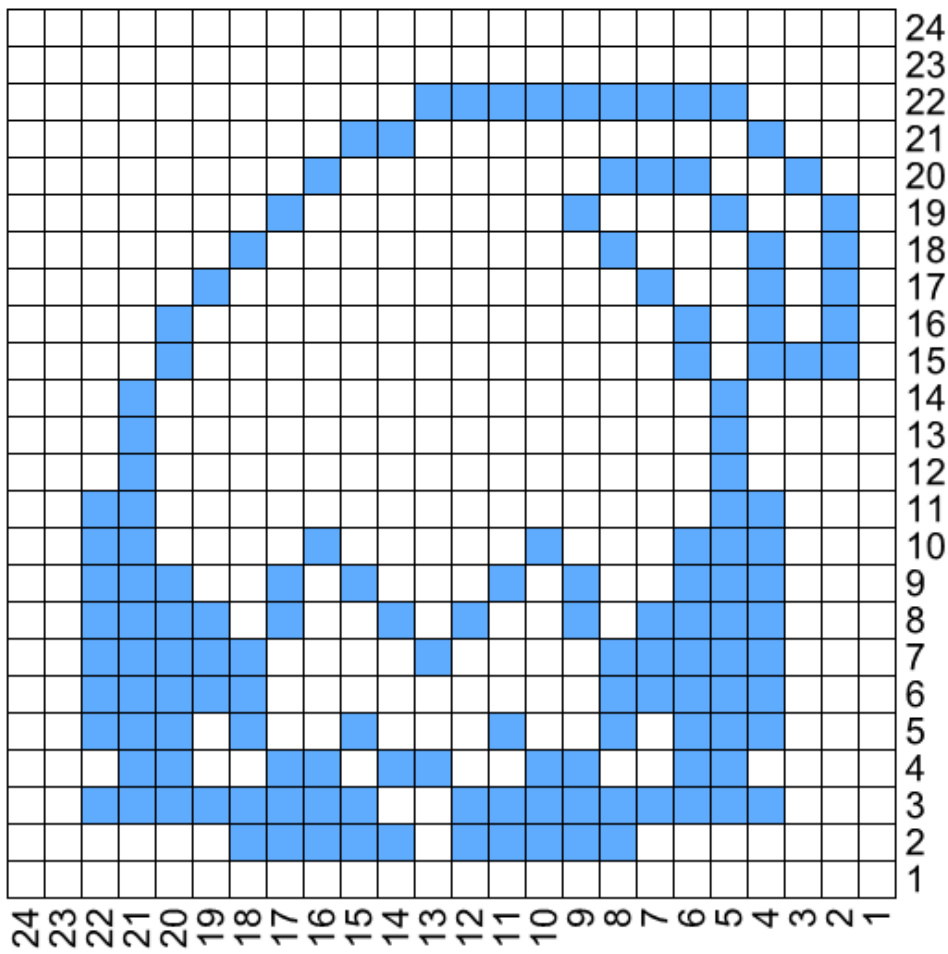
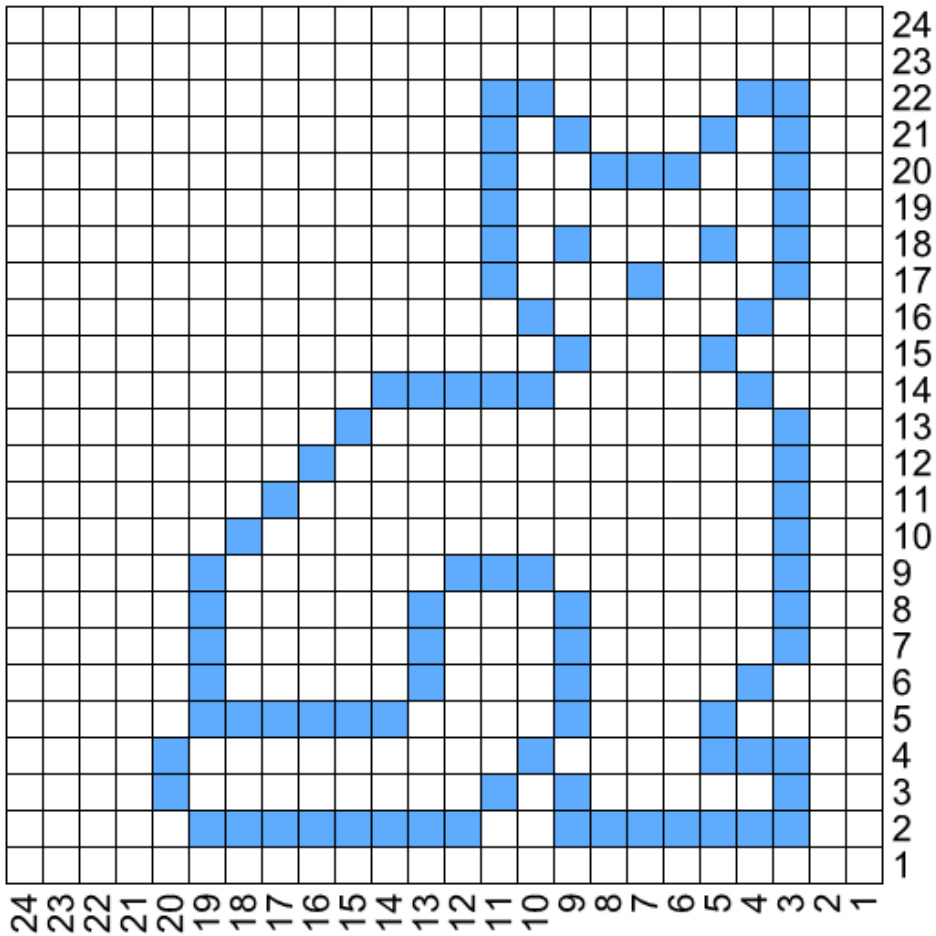
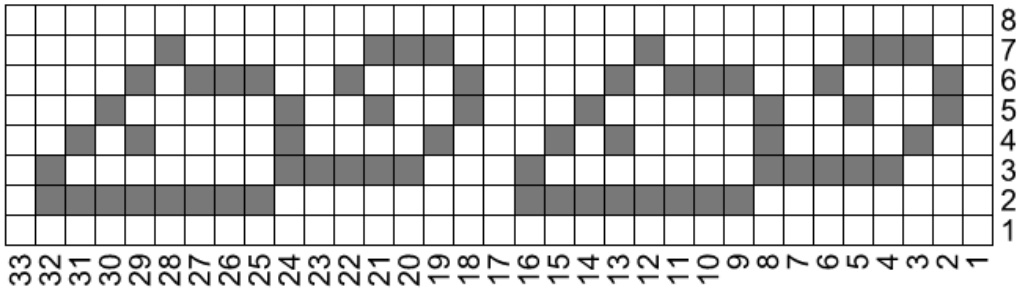
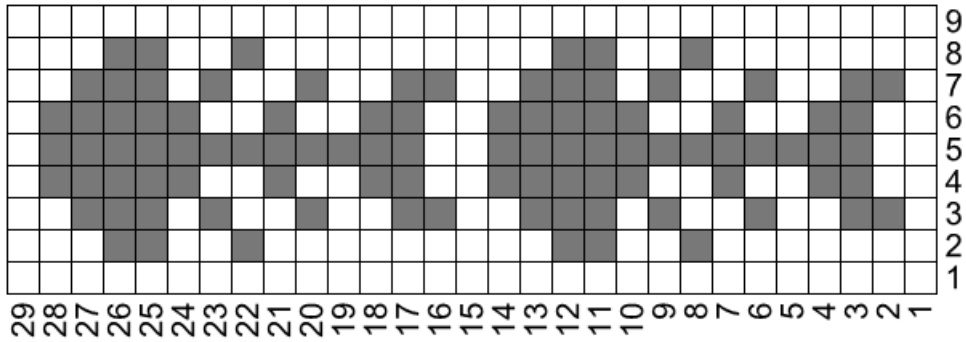
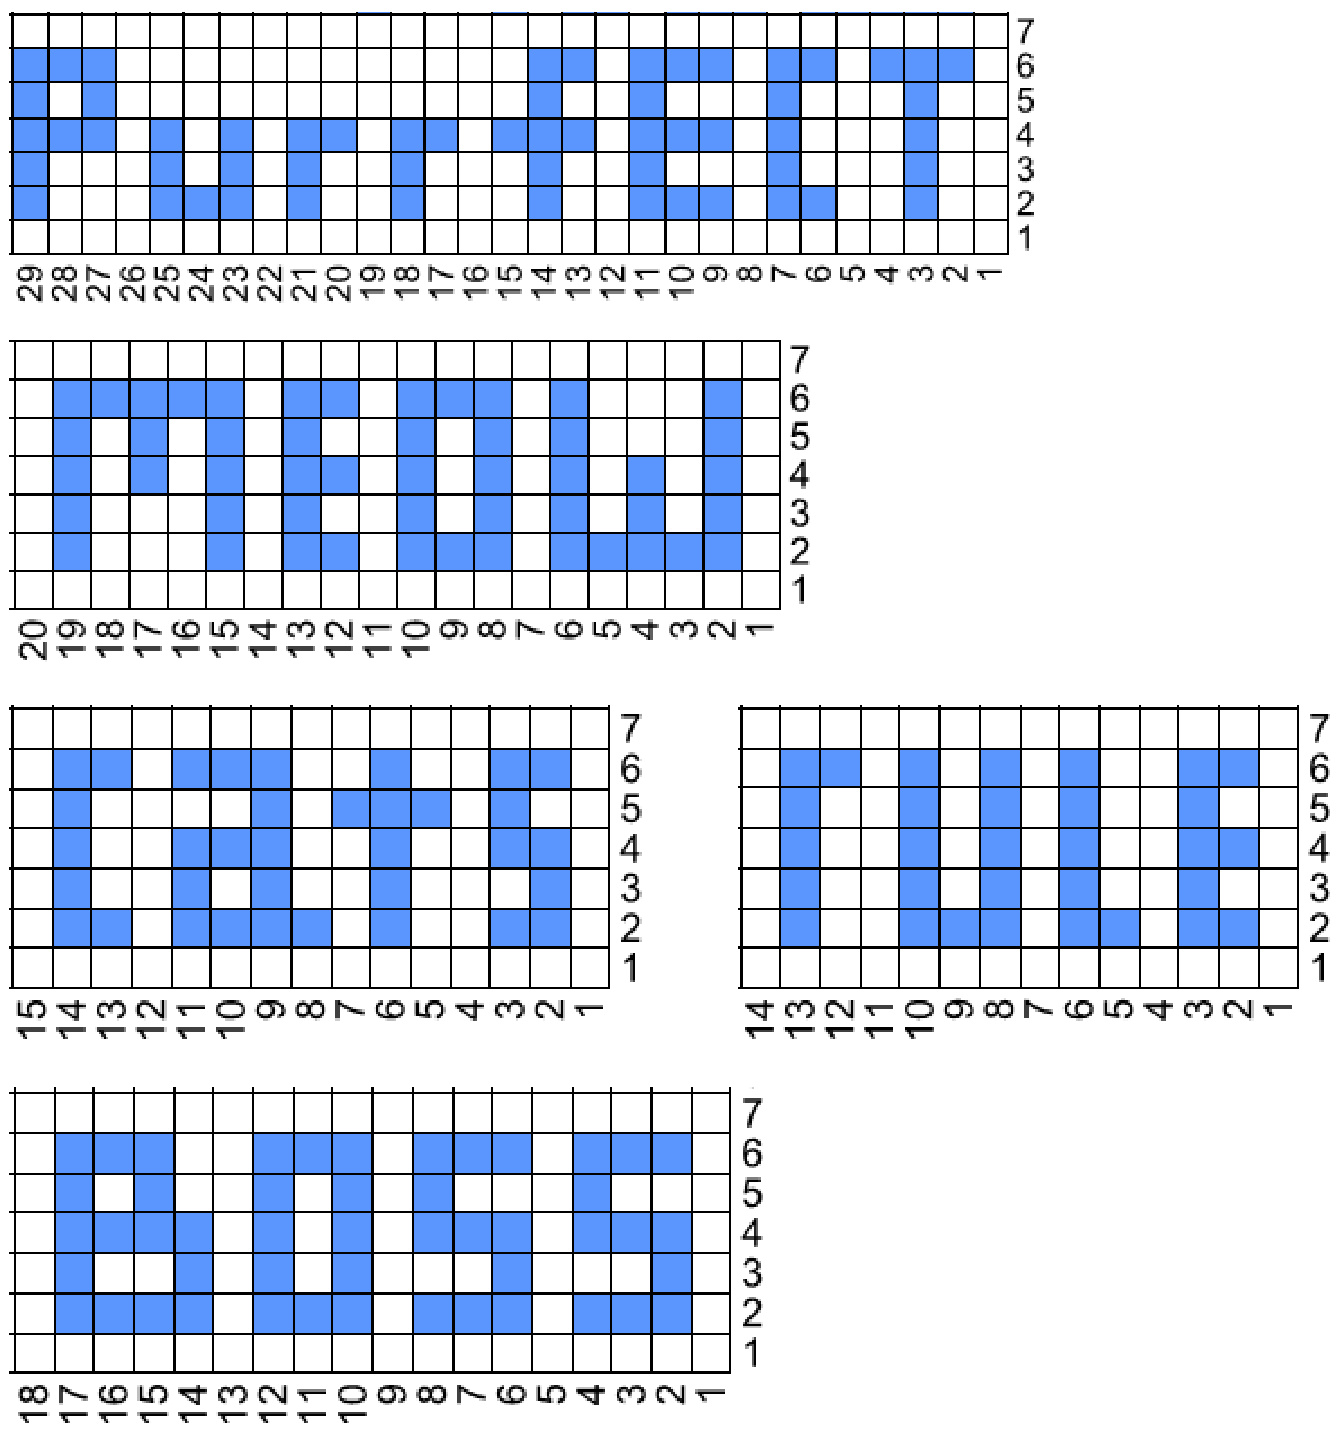
CAT MOTIFS
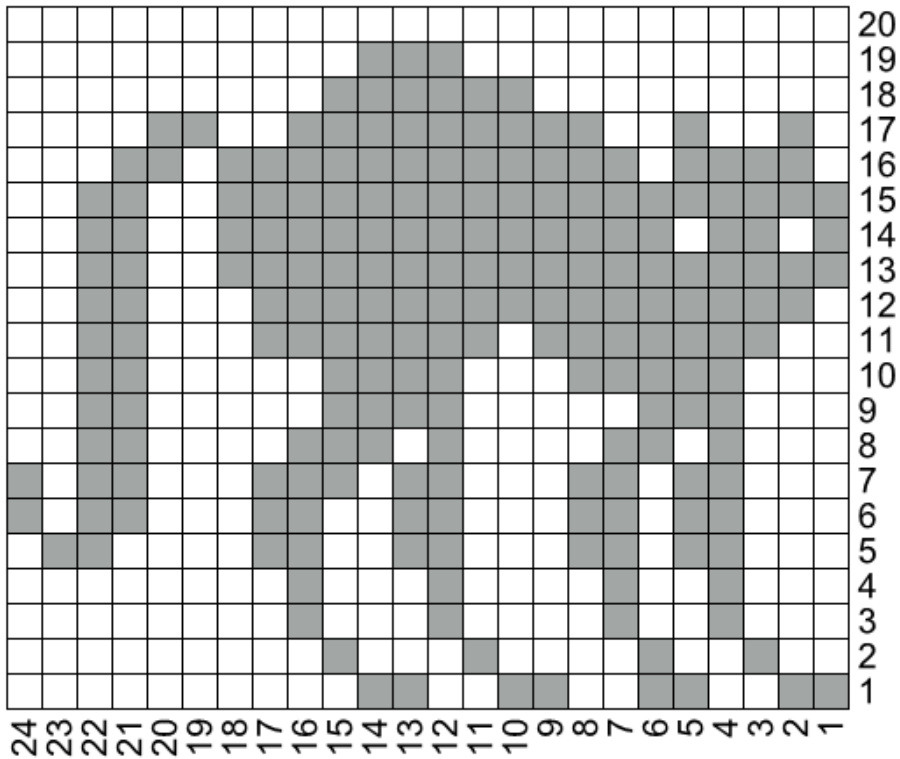
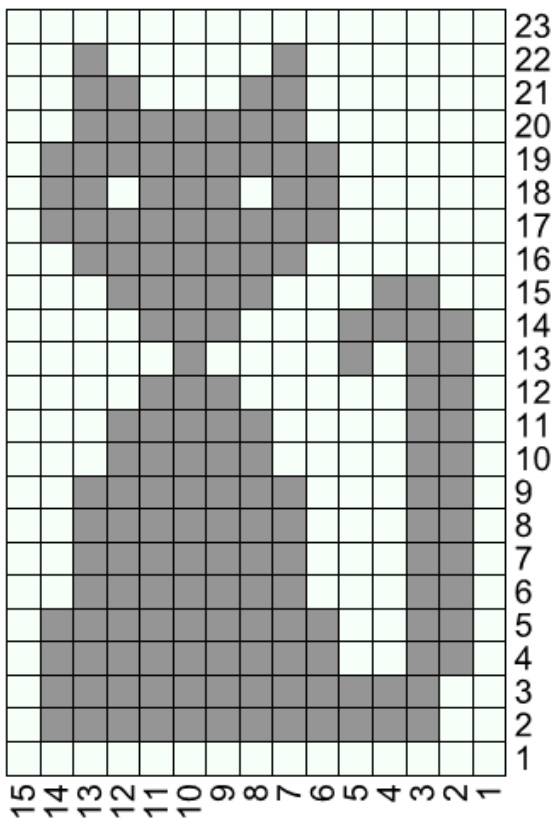
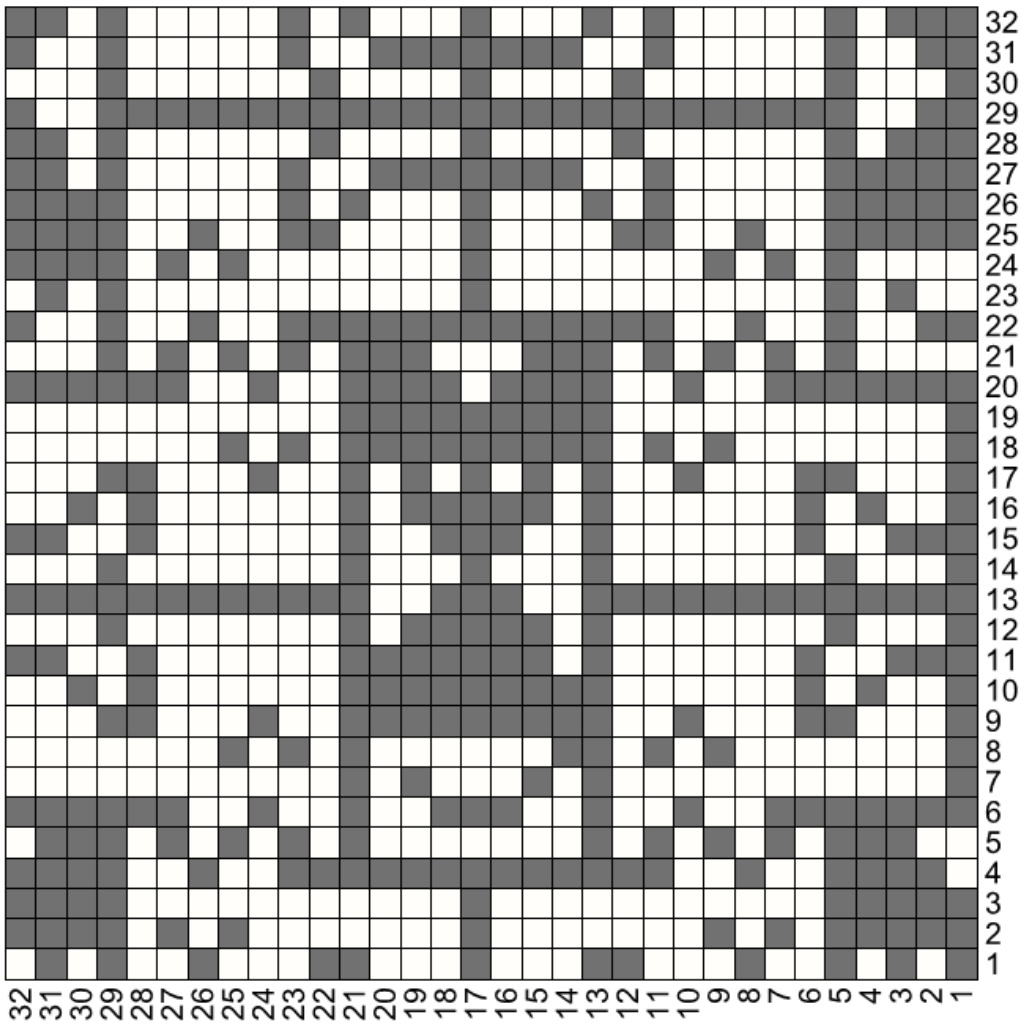
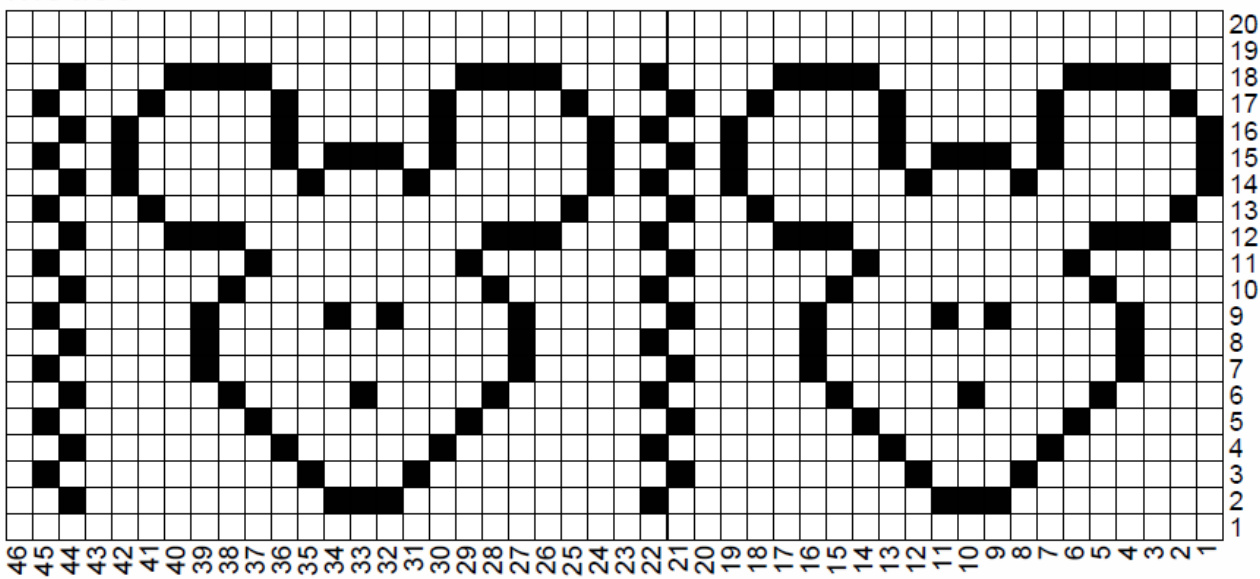
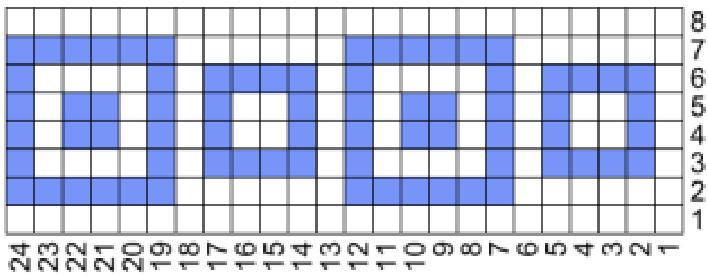
Please note that the number of sts used varies from motif to motif, and you will have to plan spacing and centering for your individual project. Please use your imagination and embellish with beads, add whiskers, nose,mouth, collar, kitty playing with toys or yarn or whatever you desire.
ATTACK CAT
InfiniKITTY
CAT and MOUSE ALL-OVER
KITTY KAT 2
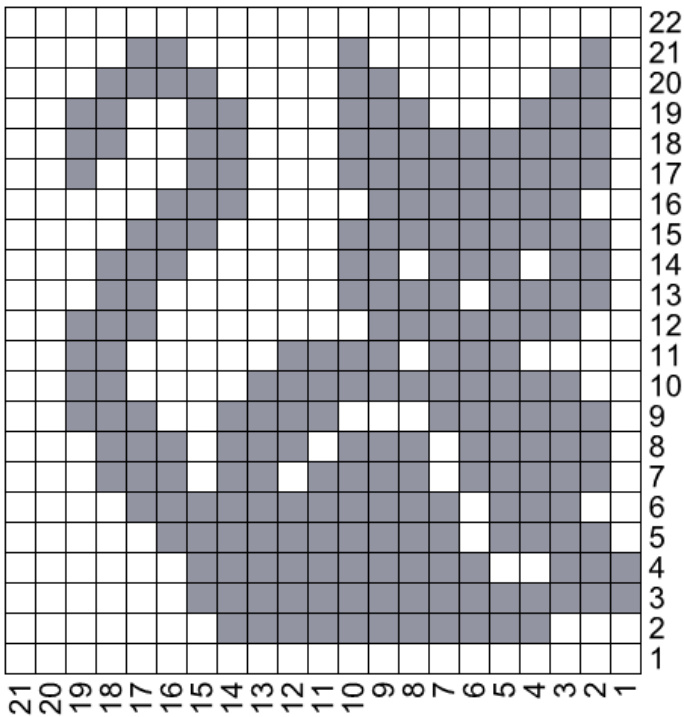
KITTY KAT
2222222221
TROUBLE
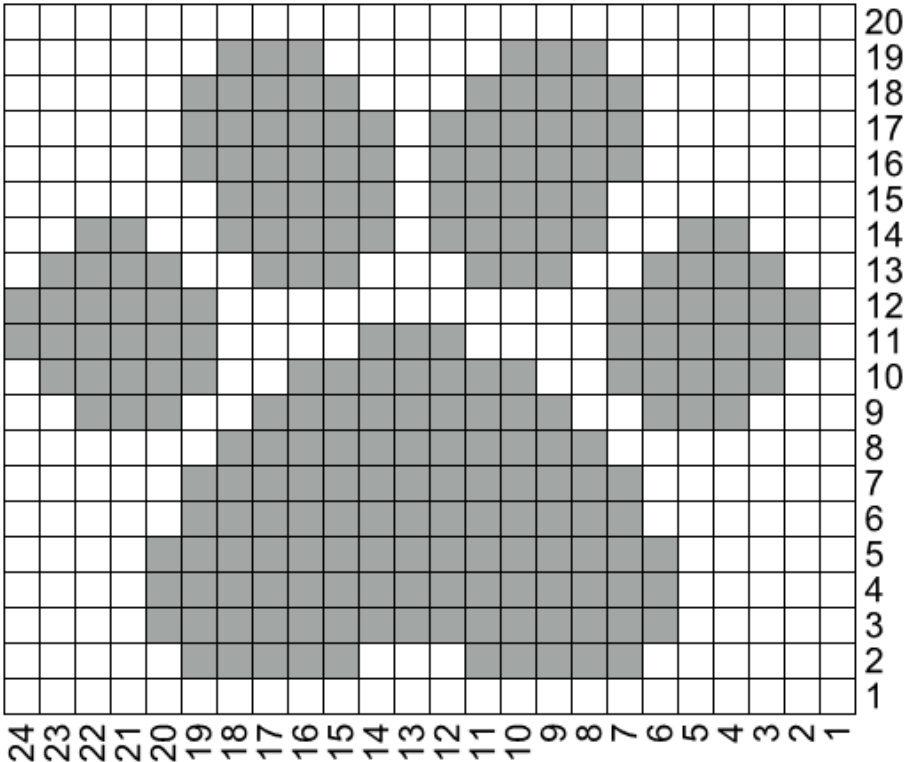
PAW
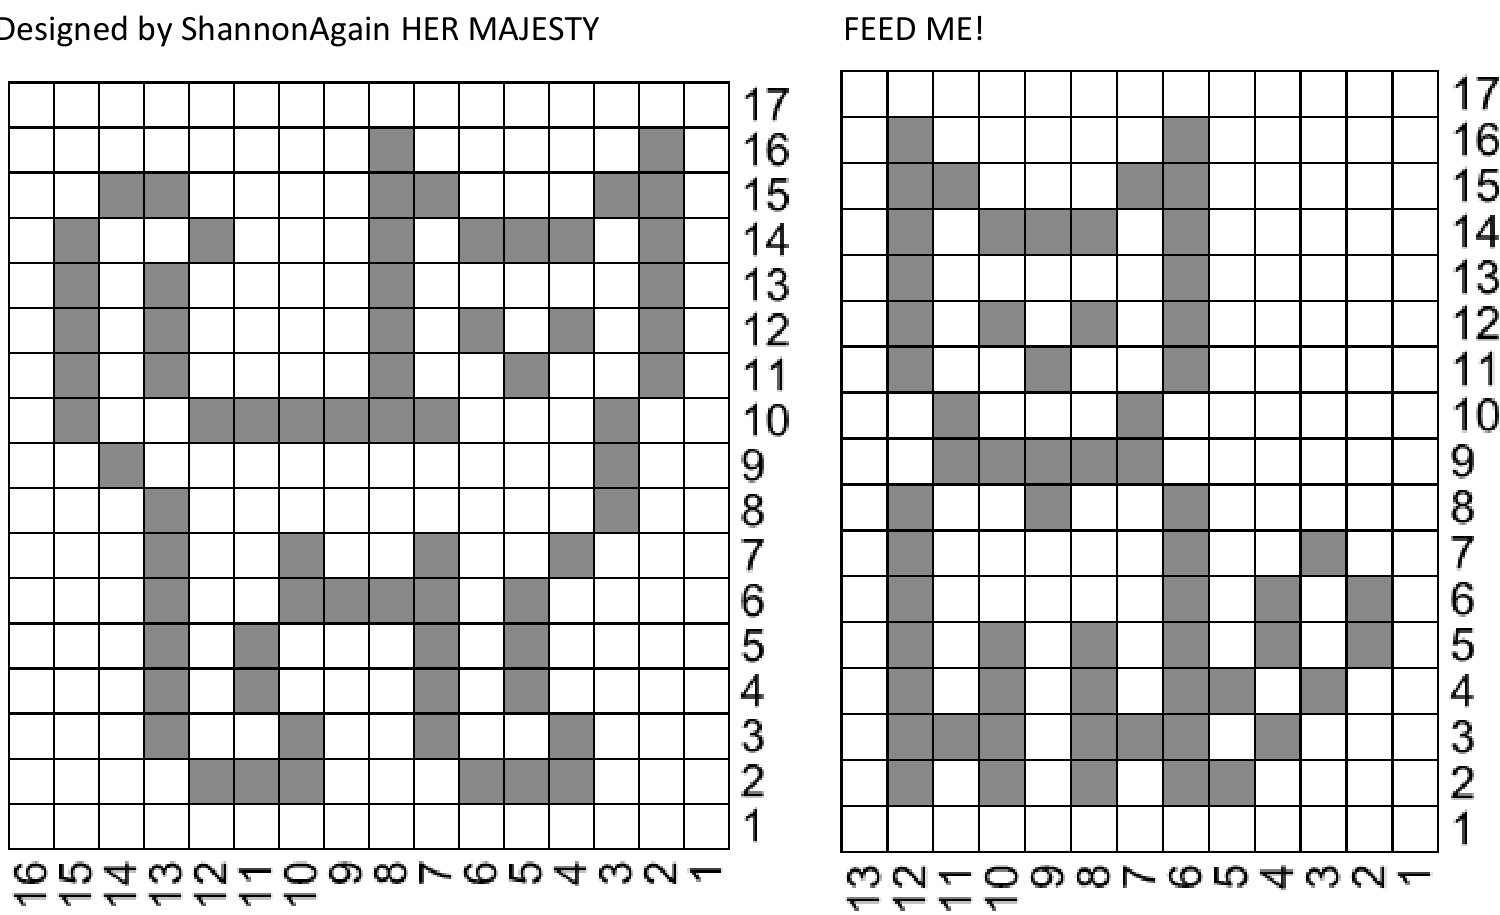
Designed by ShannonAgian POUNCE!
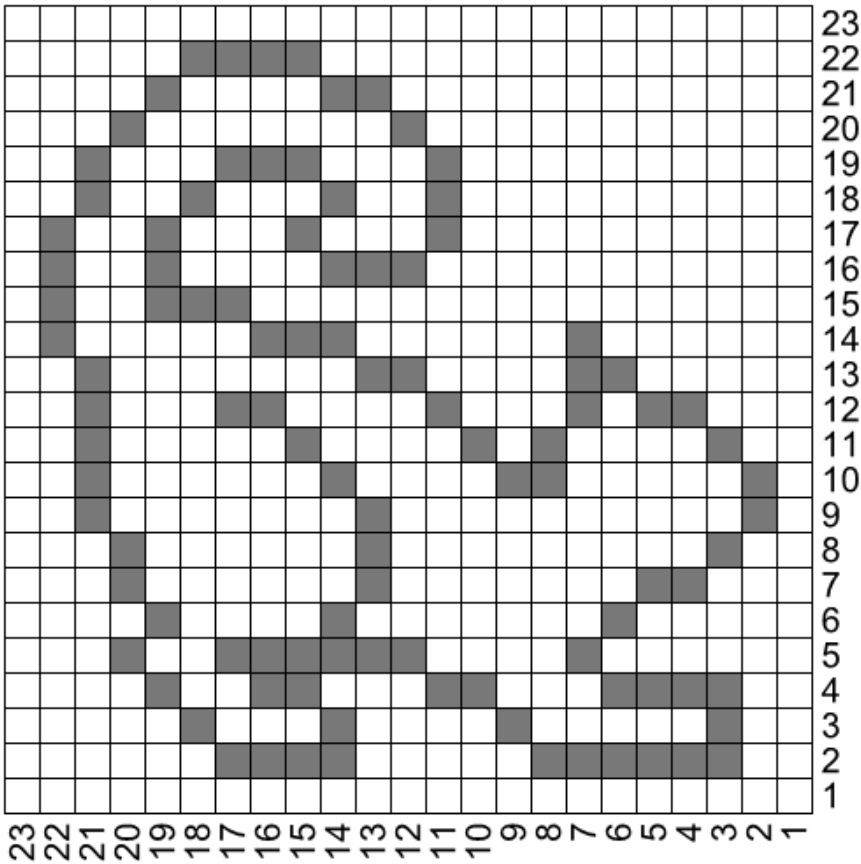

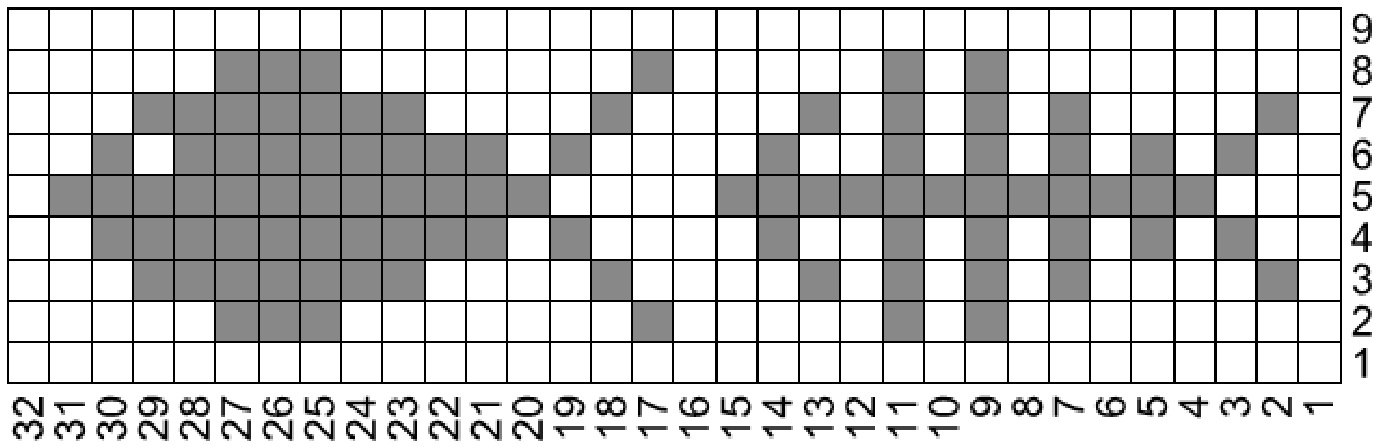
Cozyknitsca designed this mouse motif, and she hid it in her tesselated cats motif. See her hat project: mouse
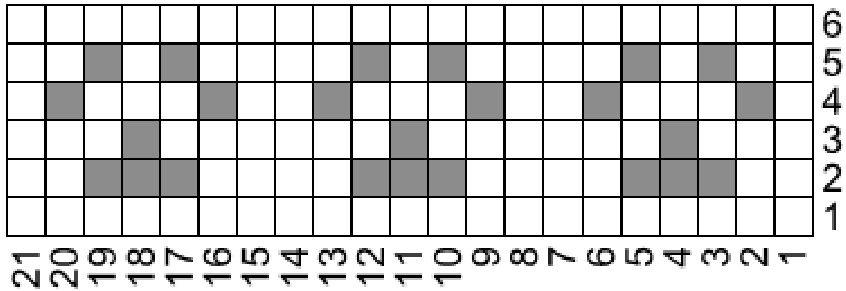
Zokrmom's Fish Peerie/Motif. She used it in her hat:
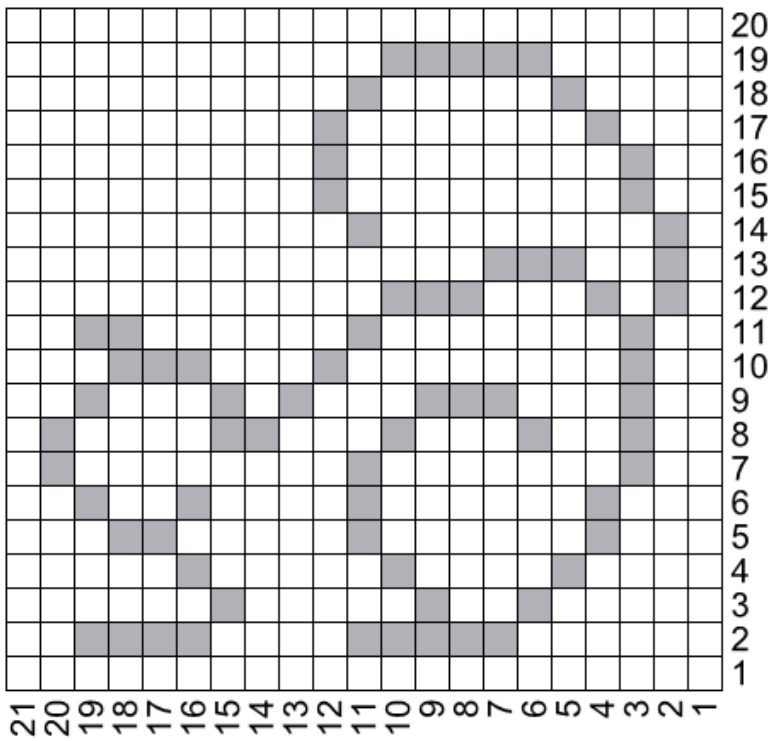
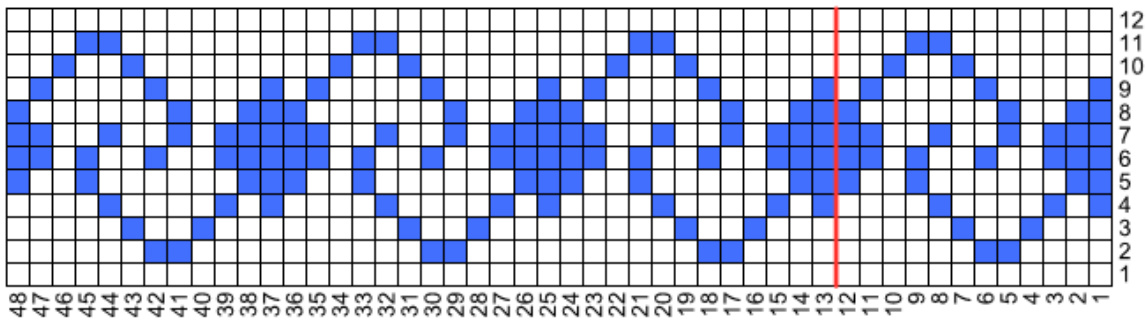
PEERIES
A peerie is a design element comprising smaller repeats and is used to separate larger motifs in colorwork, much like a fancy stripe. You can use the same peerie over and over or you can combine them. You can even knit a project entirely of peeries. Please note that the number of sts used varies from motif to motif, and you will have to plan spacing and centering for your individual project. Feel free to ask for help with this. Peeries are a good place to add color by using beads. To give you an idea of what the peerie will look like across your project, I have shown a larger sample of the peerie than just one repeat.
Wandering Yarn Ball (12-st repeat)
Cat Face (8-st repeat)
Kitty Kollar (12-st repeat)
Flying Bugs (10-st repeat)
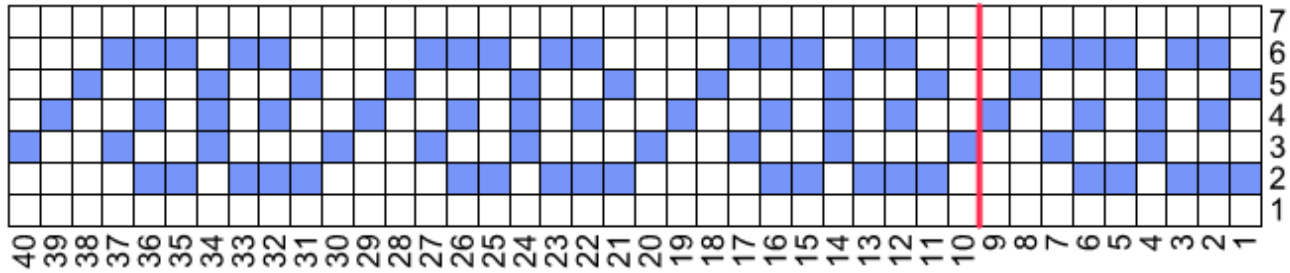
Tabby Tracks (6-st repeat)
Collar Bells (8-st repeat)
Catnip (10-st repeat)
Cat Walk (3-st repeat)
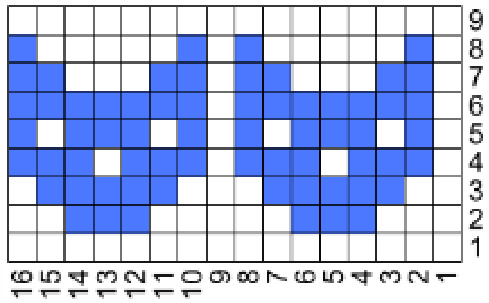
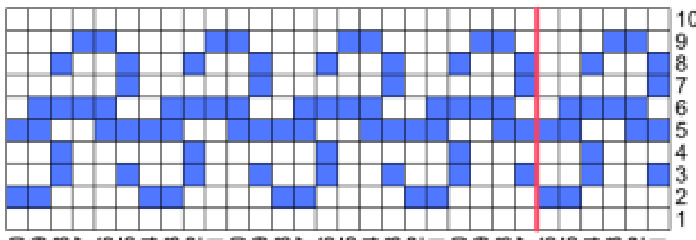
ShannonAgain Mouse Peeire ( 16- st repeat)
ShannonAgain Fish Bones Peerie (14-st repeat)
Zokrmom Mini-pawPrints (7-st repeat)
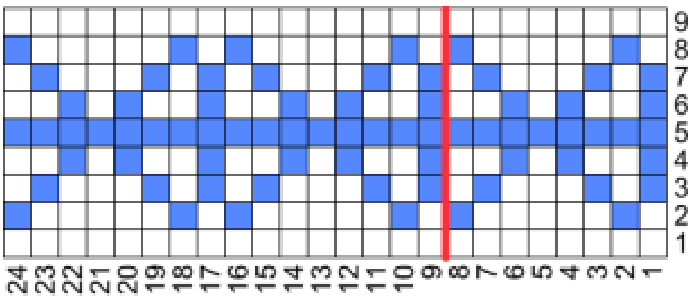
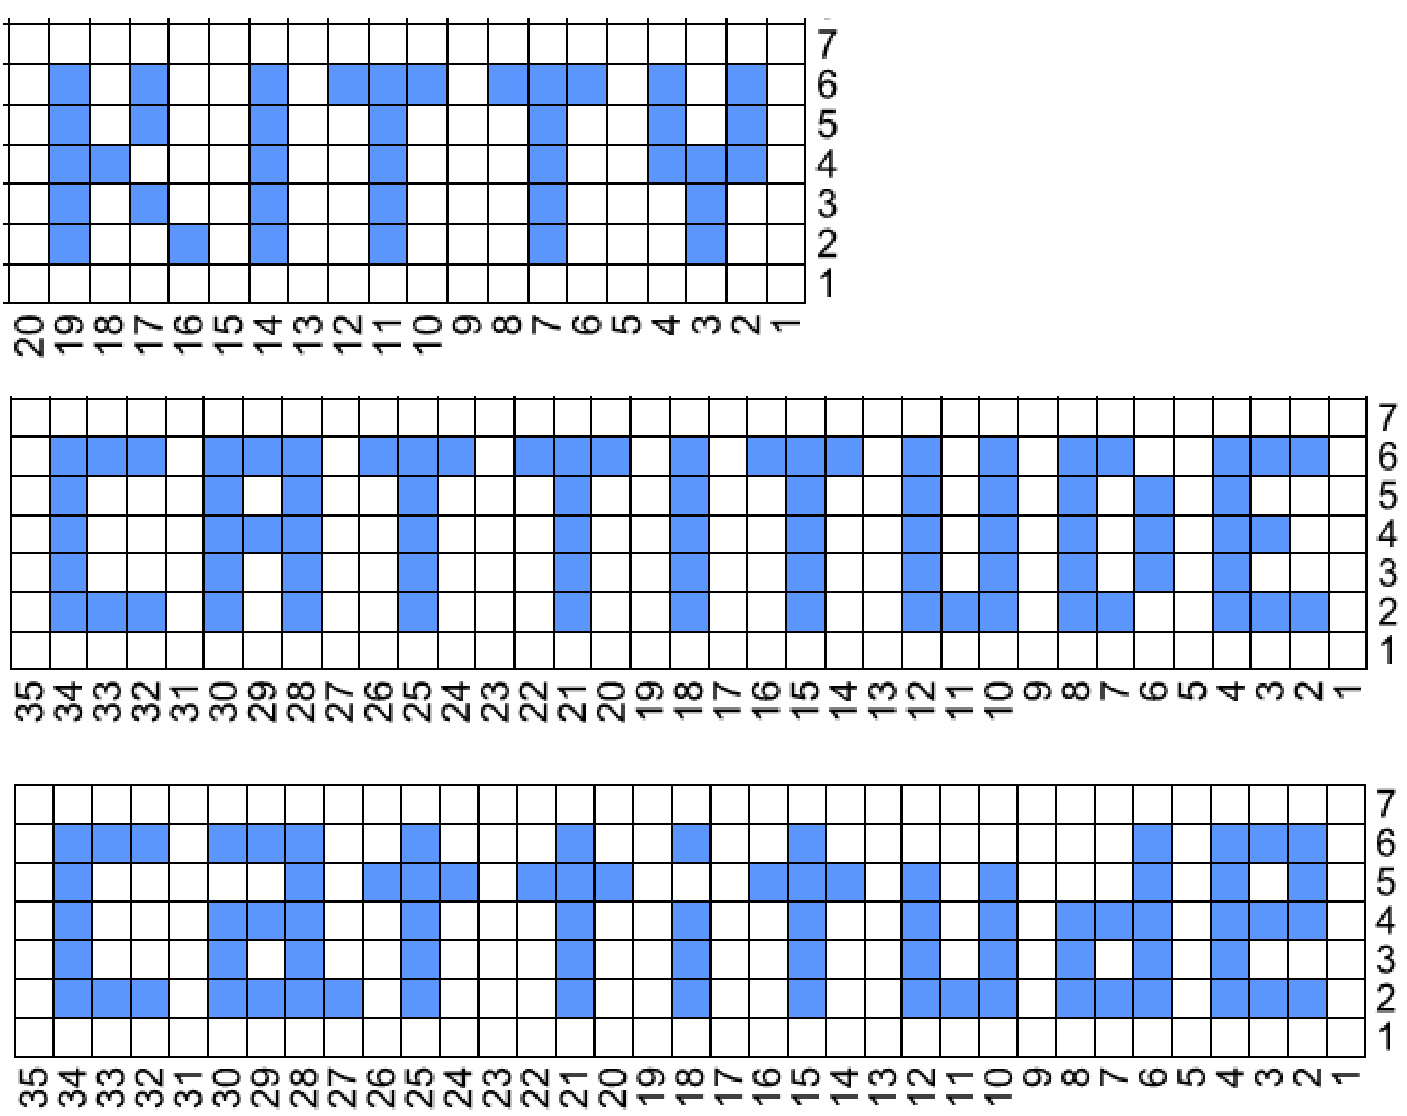
WORD MOTIFS
You can mix and match words and phrases, but please note that the number of sts used varies from word to word, and you will have to plan spacing and centering for your individual project. Rememeb to reverse letters and place them upside down when planning to use them on the leg portion of your sock so that they are rightreading when you put the sock on. This does not apply if you choose to knit your socks yoe-up.
Copyright @ 2015by Deborah Tomasello All rights reserved. This pattern or any portion thereof may not be reproduced or used in any manner whatsoever without the express written permission of the publisher. ng a free copy of this pattern, without permission of the designer, is stealing


