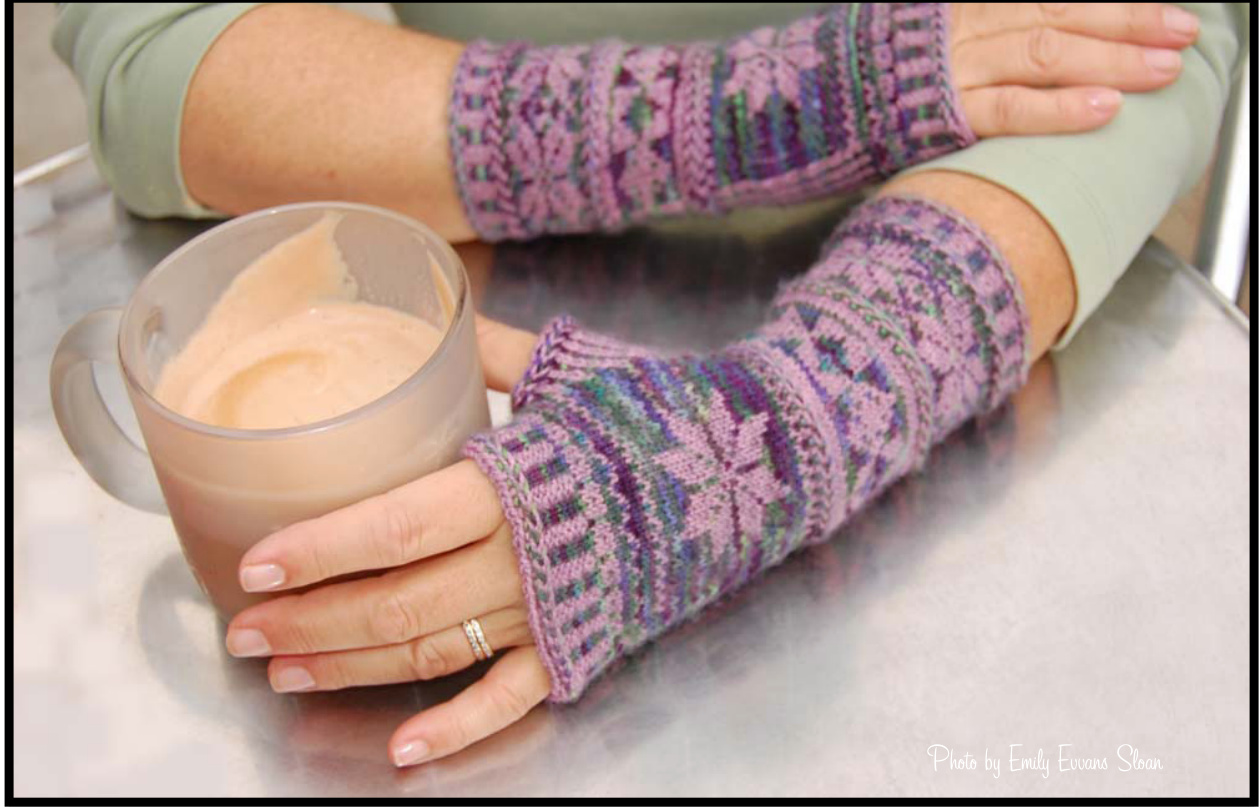
Try your artistic hand at these beautiful mitts. The secret recipe is to combine two hand dyed yarns; one is multi-hued... the other, a contrasting solid. You will love "painting" your own unique pair of hand warmers.
Mauelus Mhats
Finished Size
Size: Women's medium. Unblocked measurements: $6\,\%^{\,"}$ circumference, $8\;\%^{\;\;^{\ast}}$ long from cuff edge to top edge Blocked Measurements: $7~\%^{\ast}$ circumference, $8^{\ast}$ long from cuff edge to top edge \*See notes on Size, pg. 3.
Yarn
175 yards each of 2 colors of fingering weight merino Shown in Koigu KPM and Crafty in a Good Way Kona Sock
Needles and Notions
Set of 5, US 0 (2 mm) double pointed needles or size to obtain gauge. Tapestry needle Stitch markers Waste yarn Optional extra dpn for thumb gusset increasing Skill Intermediate Gauge Unblocked 10.25 sts/inch, Blocked 8.5 sts/inch Chart Key MC $=$ solid or semi-solid pattern color $\boxed{\bigcirc}\complement\complement=$ multi-color back ground
dloia gt started...
Neu go ge oe to an od he uedbloh yarns below before mouing on.
The Beginning Edge
CO 64 sts
Braided Cast On
Make a slipknot using two colors of yarn held together. Place the knot on your needle. Hold free ends out of your way. Color A is the yarn closer to the point of your needle. Color B is below Color A. \~Hold Color A around the front and then back of your thumb, with the tail hanging down the palm of your hand. \~Hold Color B around the front and then back of your index finger, with the tail hanging down the palm of your hand. \~Hold the tails out of your way using the other three fingers of your hand. \~\* Put the needle under and up through the palm side yarn coming from around your thumb, grab the front yarn going around your index finger and pullit through. \~Release the yarn from around your thumb and tug at both yarns to loosely snug the loop around the needle. \~We will now be switching yarn colors. Move Color B yarn OVER (in front of) Color A yarn. Place this Color B yarn over your thumb. \~Place the other yarn (Color A that was over the thumb) now over your finger. \~Always move the top yarn over the bottom yarn during this switch to create the braid.\* Repeat from \*to\* until 64 stitches are cast on. Your yarn will begin to twist after a few stitches are made, don't worry, this is normal, just ignore it, or stop periodically and let your needle hang to untwist the working yarns. Divide stitches as evenly as possible onto 3 dpns and join in the round, being careful not to twist the stitches.
Twined Herringbone Border
Round 1: k1 MC, k1 CC, repeat to end of round Rnd 2: Bring both yarns to the front of your work, $\star_{\mathsf{p}1}$ MC. Set yarn just worked down to the left and bring CC over, p1 $\mathsf{C C}^{\star}$ , rep from \* to \* to end of round. The working yarn will become very twisted after working this round; it will be untwisted as you work round 3. Rnd 3: $^{\star}\mathsf{P}\mathsf{1}$ MC, P1 CC, setting yarn just worked to the right and bringing the yarn to be worked under it\* , rep from \* to \* to end of round. Rnd 4: Knit 1 round in MC
Holding Your Yarns
If you look at the strands as they travel across the back of your work, you will see that one color travels above the other color. The yarn carried ABOVE will make the background stitches in your pattern. The strand that travels BELOW is the design or pattern stitch portion of your pattern. Experiment with tension holds that are comfortable for you and then continue to carry these strands in this manner. Two-Handed Method: Pattern Color in left hand over index finger. Background Color in right hand over index finger. Pick pattern color/Throw Background Color. One ball on right, one on left to avoid twisting. Right Handed, Throwing the Yarn: Background color over index finger and Pattern Color over middle finger. Lift index finger to wrap background color around the needle, then lit middle finger to wrap pattern color over the needle. Left Handed, Continental: both yarns in left hand. Background color over index finger and Pattern color over middle finger. Pick up desired color while knitting taking care to allow pattern color tc consistently travel below the background color.
Corrugated Rib
Rnds 5 - 10: K2 CC, P2 MC Rnd 11- 13: Repeat Rounds 1-3 of Twined Herringbone Pattern Rnd 14: Knit in CC.
The Purl Stitch
Purl Bumps in corrugated Rib stitch appear to be raised or "stand out" in irregular bumps. This is normal. There is a strand of the other color running behind the purl stitches. Appear ance will smooth out in the blocking process.
The Cuff
Divide stitches evenly over 4 dpns. 16 stitches on each needle will correspond to the 16-stitch pattern repeats given below. Rnds 15 - 30: Work rows 1-16 of Chart A.
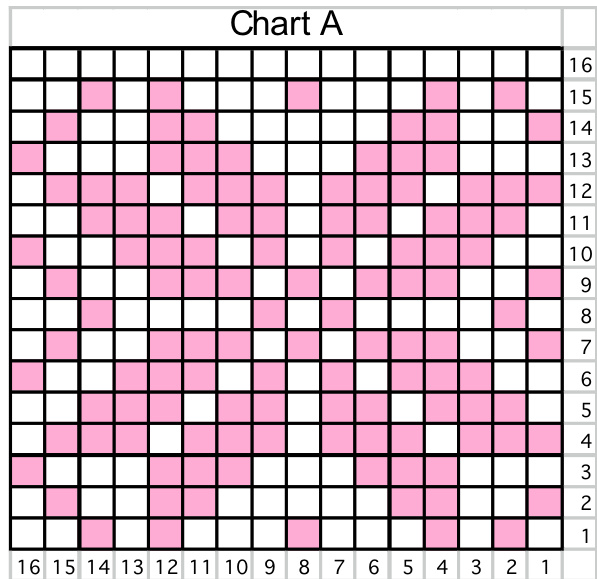
Iwined Herringbone pattern after completing Chart A:
Rnd 32: Bring both yarns to the front of your work, $\ast_{\mathsf{p1}}$ MC.Set yarn just worked down to the left and bring CC over, p1 CC \*rep. from \* to \* to end of round. The yarn wil become very twisted after working this round; it will be untwisted as you work the next round. Rnd 33: $\mathtt{*p1}$ MC, P1 CC, setting yarn just worked to the right and bringing the yarn to be worked under it\*, rep from \* to \* to end of round. Rnds 34-48: Work 4 repeats (one on each needle) of Rows 1-15 of Chart B, one time
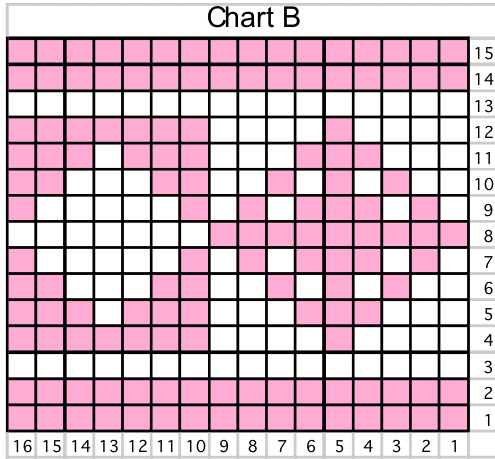
Iwined Herringbone pattern after completing Chart B:
Rnd 4y: K1 MC, K1 CC, repeat to end of round Rnd 50: Bring both yarns to the front of your work, $\ast_{\mathsf{p1}}$ MC. Set yarn just worked down to the left and bring CC over, p1 CC \*rep from \* to \* to end of round. The yarn will become very twisted after working this round; it will be untwisted as you work the next round. Rnd 51: $\mathtt{*p1}$ MC, P1 CC, setting yarn just worked to the right and bringing the yarn to be worked under it\*, rep from \* to \* to end of round. You may want to mark the beginning of round point, as the patterns will now be different for the back and the palm of your hand.
Floats & Weaving
Floats: the unused strand of color that is carried along the back of your work as you knit with the other color Weave the floats when you have a pattern that calls for more than three stitches of the same color in the row you are working. Weaving is the process of "trapping" the unused strand with the opposite color so it is secured at the back of your knitting. This shortens the length of the float. For Right-hand & Left-hand carry: If you are carrying the strands in your right hand only or left hand only, you wil stop and twist the strands before knitting the catching stitch. Be sure to continue carrying the pattern stitch strand below the background strand after performing this twist. For Two-handed carry: Knitting with left hand yarn/weaving in right hand float: Insert the right needle into the next stitch on left needle knitwise. Wrap floating yarn on right index finger around right needle ("as if"' you were going to knit with it, but don't pullit through). Next, place tip of needle under the left strand (from right to left) and wrap it around the needle as if to knit, but before drawing this yarn through to create the stitch, take the right hand yarn back round the needle so you do not pullit through. Now pull the yarn through that you are knitting with (left strand). Complete the “catch" of the float by knitting the next stitch in the left hand yarn in the usual way. Knitting with right hand yarn/weaving left strand float: Insert needle knitwise into 1st st on left hand needle and, at the same time, under the yarn that is on your left index finger. (working needle in under both strands of yarn at this point). Bring the right hand yarn around the tip to knit as usual AND hold the left hand strand tight and bring only the right hand stitch through. You have have lifted the left hand color over the right. Knit the next right hand stitch in the usual manner For both strands, the weave must alternate: knit, weave, knit.
Tension & Size
After you have knitted about 4 inches, check your unblocked gauge. At this point your work looks VERY small. This is, in part, the nature of Color stranding work. The knitting will "grow" horiZontally in the wet blocking process. However, make sure you are not pulling the floating strands to tightly. To avoid color work that is too tight, try this tip. When you are getting ready to work with the unused strand (the strand that is being carried across the back of your work) spread the stitches on your right needle to the right a bit. This will allow the carried strand to span the true ten-sion of the work
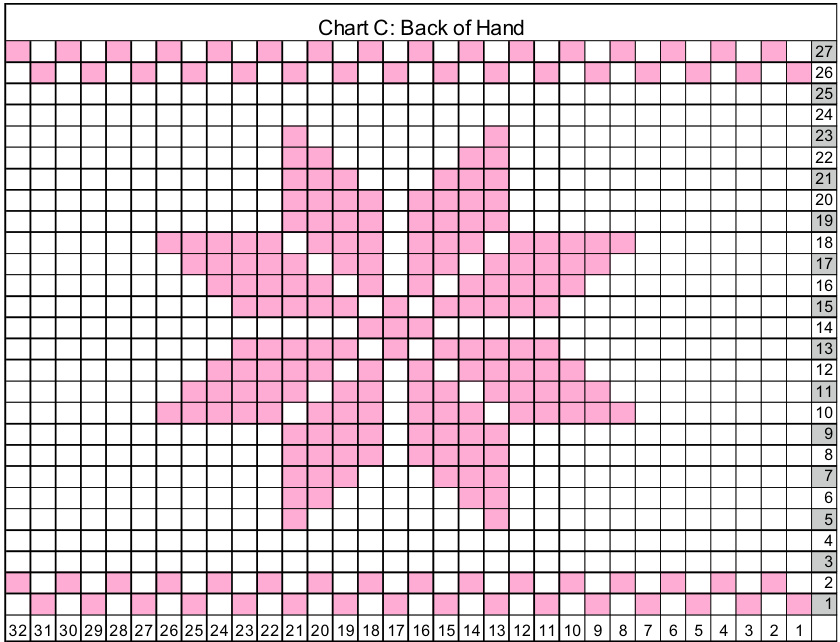
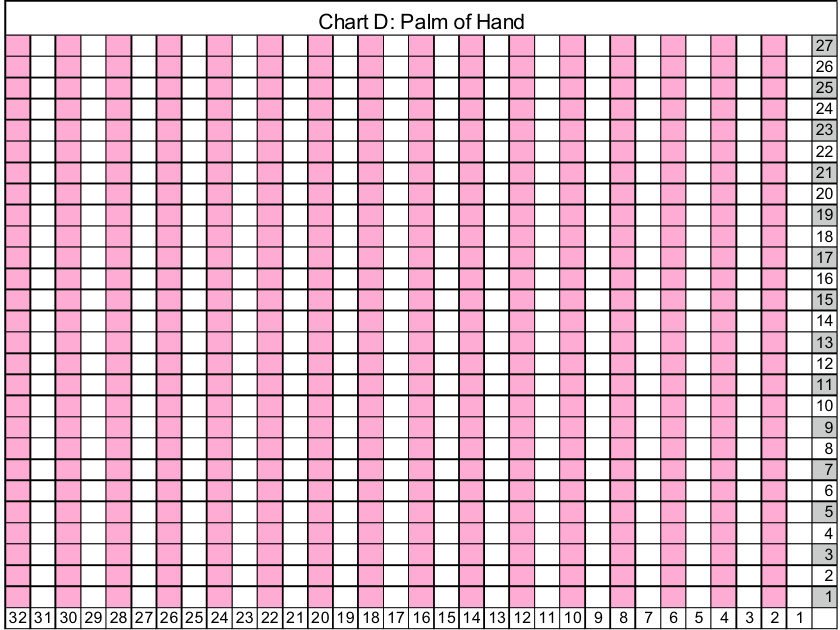
Palm & Back of Hand and Thumb Gusset Increases:
Instructions are given for right hand. For left hand, begin with Chart D for palm of hand, work thumb gusset increases and then work Chart C for back of hand. $\mathsf{M}\mathsf{1}=$ insert left needle from front to back through ladder running between stitches. You will see two strands. Pick up the strand coming from the stitch on your left hand needle. Knit through the back of this lifted strand. Rnd 1 (inc row): for right hand begin with row 1 of Chart C (Back of Hand). Work in pattern for 32 sts, place marker, M1 in MC, place marker, knit 1st stitch of Chart D (to hold the marker in place) then complete round using Chart D. $^{\star\star}\forall$ gusset stitch created between markers. These markers bracket the center stitch of the thumb gusset. You will be increasing after the 1st marker and before the 2nd marker on the following gusset increase rounds. Gusset increases occur every other round. Row 2 of both Charts C & D: Work even in pattern. (Gussets stitch is worked in MC) Row 3 (inc row): Work in pattern (Charts C) to first marker, slip marker, M1 in CC, knit gusset center stitch in MC, M1 in CC, slip second marker, work in pattern to end of round. $^{\star\star}3$ gusset stitches now between markers and Vertical Stripe pattern established. Chart row 4: Work even in pattern. Gusset pattern will be Vertical Stripes, alternating MC and CC. Chart row 5 (inc row): Work in pattern and repeat gusset increases as in row 1, alternating MC and CC to create a vertical stripe pattern. $^{\star\star}5$ gusset stitches between markers. Chart row 6: Work even in pattern. Chart row 7: Work in pattern and repeat gusset increases. $^{\star\star}7$ gusset stitches betweenmarkers Chart row 8: Work even in pattern Chart rows 9 - 27: Continue working Chart C (back of hand) for 1st 32 stitches. Continue gusset increase in Vertical Stripe pattern, then work Chart D (palm of hand) for last 32 stitches. (Remember to reverse charts for left hand). Continue gusset increases until there are 27 stitches between markers (this should be on Chart Row 27). An extra dpn helps hold the increases as they grow.
Next row (uncharted):
Work 1st 32 stitches in CC, remove gusset marker and place 27 gusset stitches on waste yarn. Cast on 4 sts (use backward loop “e" cast on). Join in the round by knitting remaining 32 sts in CC. - 68 sts on needles. Work one round even in CC only.
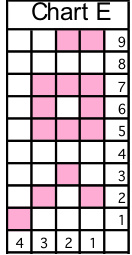
Next 9 rounds: Work 17 repeats of rows 1 - 9 of Chart E. After completing Chart E, work 7 rounds of $_{2\times2}$ Corrugated Rib: K2 CC, P2 MC repeat of end of round.
Top Edge: Twined Herringbone Border
Round 1: K1 MC, K1 CC, repeat to end of round Rnd 2: Bring both yarns to the front of your work, p1 MC. Set yarn just worked down to the left and bring CC over, p1 CC. The working yarn will become very twisted after working this round; it will be untwisted as you work round 3. Rnd 3: P1 MC, P1 CC, setting yarn just worked to the right and bringing the yarn to be worked under it. Bind off in CC
Right and Left Thumb:
Divide 27 held gusset sts as evenly on 3 dpn. With RS facing, join new yarn (MC) by picking up 1 st at center stitch cast on above thumb. Pick up another stitch (CC) in next cast on edge. Pick up one more stitch (MC) from back of hand side (from palm side on left glove) to eliminate any gap (3 stitches pick up so far). Knit 27 thumb sts, (in color corresponding with vertical stripe) then pick up and knit 1 st (MC) from edge of palm sts (from back of hand for left glove) to eliminate gap. Pick up last stitch (CC) in cast on edge $-32$ sts on needles. Join for working in the round and work as follows: Decrease round (CC): K1, ssk, knit to last 2 sts, K2tog -30 sts rem.
Twined Herringbone Border
Round 1: k1 MC, k1 CC, repeat to end of round Rnd 2: Bring both yarns to the front of your work, $\star_{\mathsf{p}1}$ MC. Set yarn just worked down to the left and bring CC over, p1 $\mathsf{C C}^{\star}$ , rep from \* to \* to end of round. The working yarn will become very twisted after working this round; it will be untwisted as you work round 3. Rnd 3: \*P1 MC, P1 CC, setting yarn just worked to the right and bringing the yarn to be worked under it\* , rep from \* to \* to end of round. Bind off in CC. Use ends to weave closed any gaps left around thumb base. Weave in all ends and wet-block.
Wet Blocking
Wet blocking is an important step in the color stranding process. Knitting tension can be more uneven with color stranded knitting. Even it you think the finished item looks decent, blocking can almost always improve the appearance of your knitting and adjust the size. Blocking involves wetting your knitting and then manipulating it into shape. Immerse your work in a basin of tepid water. Give it a couple of gentle squeezes and pats to get the wool to absorb the water. Allow it to sit for about 10 minutes. Remove knitting and allow excess water to drip out (avoid rough handling) and wrap it up in a thick, absorbent towel. Gently press the water out of the knitting the the towel. Remove the knitting from the towel and lay it flat. Arrange your knitting on your blocking surface (table top or padded surface free of of dyes). Manually arrange the knitting into the desired shape and size. Use pins or blocking wires to straighten edges. Allow knitting to dry. Avoid direct sunlight and heat). "Notes t Sely Section
ABBREVIATIONS
beg - beginning BO- bind off CC - contrast color (back ground color) CO- cast on dec - decrease dpn - double pointed needle(s) Inc - increase k2tog - knit 2 stitches to- gether (a right-slanting de crease) k or K - knit LH - left hand M1 - increase one stitch per pattern instructions MC - main color (pattern color) ndl - needle p or P- purl patt - pattern pm - place marker rem - remain, remaining rep - repeat RH - right hand rnd - round RS - right side sl - slip ssk - slip, slip, knit -(a left slanting decrease) st st - stockinette stitch st(s) - stitch(es) WS - wrong side yo - yarn over repeat instructions within brackets number of times stated () repeat instructions inside parentheses number of times stated Resources: Measuring your hand for gloves http://www.glove.org/glovemeasure.htm Estonian Knitting http://www.worldknit.com/howto/howtoknit/stitchesfabric/estonian.html Braided Cast On http://community.livejournal.com/knitting/7226803.html - cutid1 The Two-handed Fair Isle Technique by Philosopher's Wool: an online video tutorial http://www.philosopherswool.com/Pages/Streamingvideo.htm