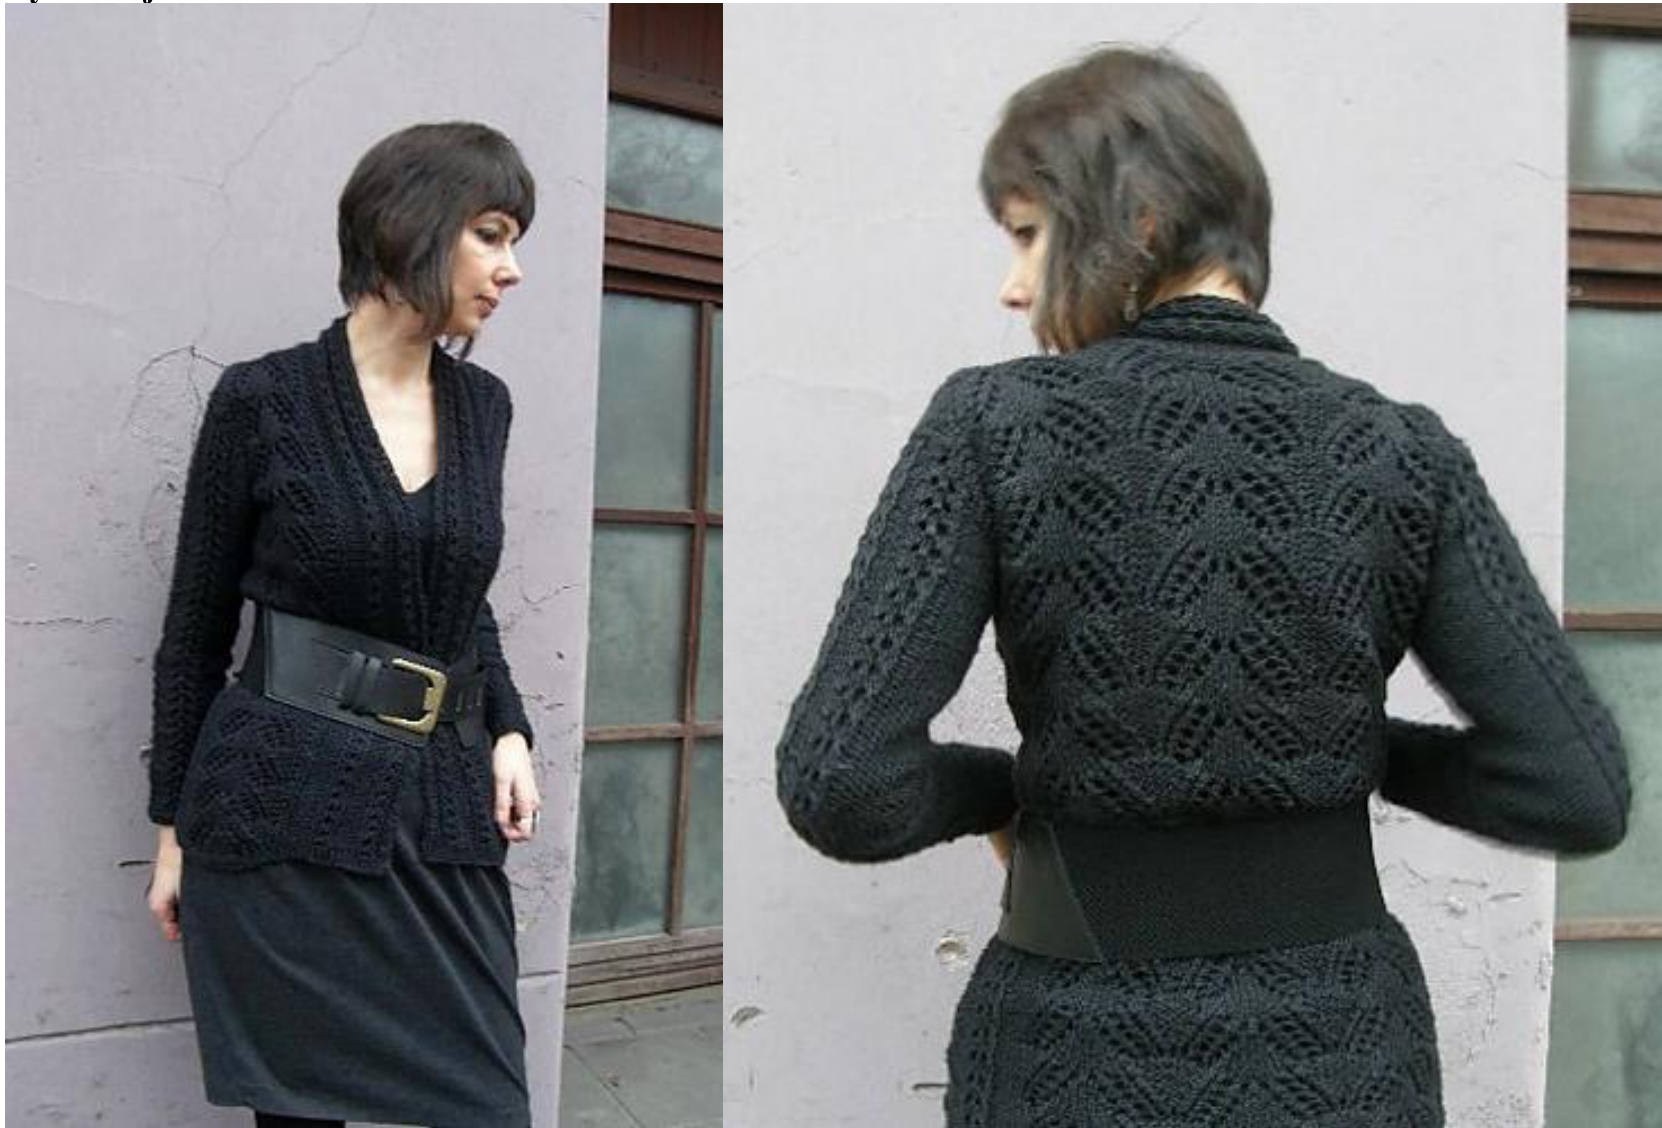
Cardigan with big lace pattern By Kuduja?
Yarn: Silvija by Albin Promotion (50 g/150 m, 70 % wool, 30 % silk) or Aade Long 8/3 (100 g/250 m, 100 % wool) or Sublime Yarns Cashmere Merino Silk Aran (50 g/86 m, merino 75 %, silk 20 %, cashmere 5 %). Silvija: Size S-M 320 g, Size L 400 g; Aade Long: Size S-M 310 g, Size L 360 g; Cashmere Merino Silk Aran: size S-M 550 g, size L 650 g. If you wish a coat-size cardigan, add another 100 g or so for any size. attern repeat (19 stitches x 10 rows) = 14 cm x 5 cm (washed but not stretcher
Finished measurements
| S-M | L | |
| Accrosss shoulder | 10.5 cm | 12.5 cm |
| Back neck to the end of armhole | 19.5 cm | 21.5 cm |
| Accross the back at end of armhole | 48 cm | 51 cm |
Figures for size L are given in the parenthesis. Sizes S and M differ only as far as collar and button bands are concerned; this will be indicated separately. You can go for a sort of mid-size, making size M with size L underarms using the size L chart.
Overall description
The cardigan is worked top down and it's seamless. Try on as you go! You start from the shoulder line with a provisional cast on and work the back piece from shoulders to armholes, doing some increases to shape armholes. Then you remove the provisional cast on except for the stitches of the neck (these will be used for the collar and button bands), using live stitches for the front pieces and work the front pieces from shoulders to armholes. Then you join the knitting, working first the stitches of the left front piece, casting on some stitches for underarms, knitting the back piece, casting on stitches for underarms and, finally, knitting the right front piece. There is no waist shaping (but you can add some if you wish). Knit to the desired length. Sleeves are worked topdown as well. Finally, you pick up stitches along the front pieces (starting form the right front piece, using the neck stitches and continuing to the left front piece) and knit the collar and button bands.
Step 1. Back piece
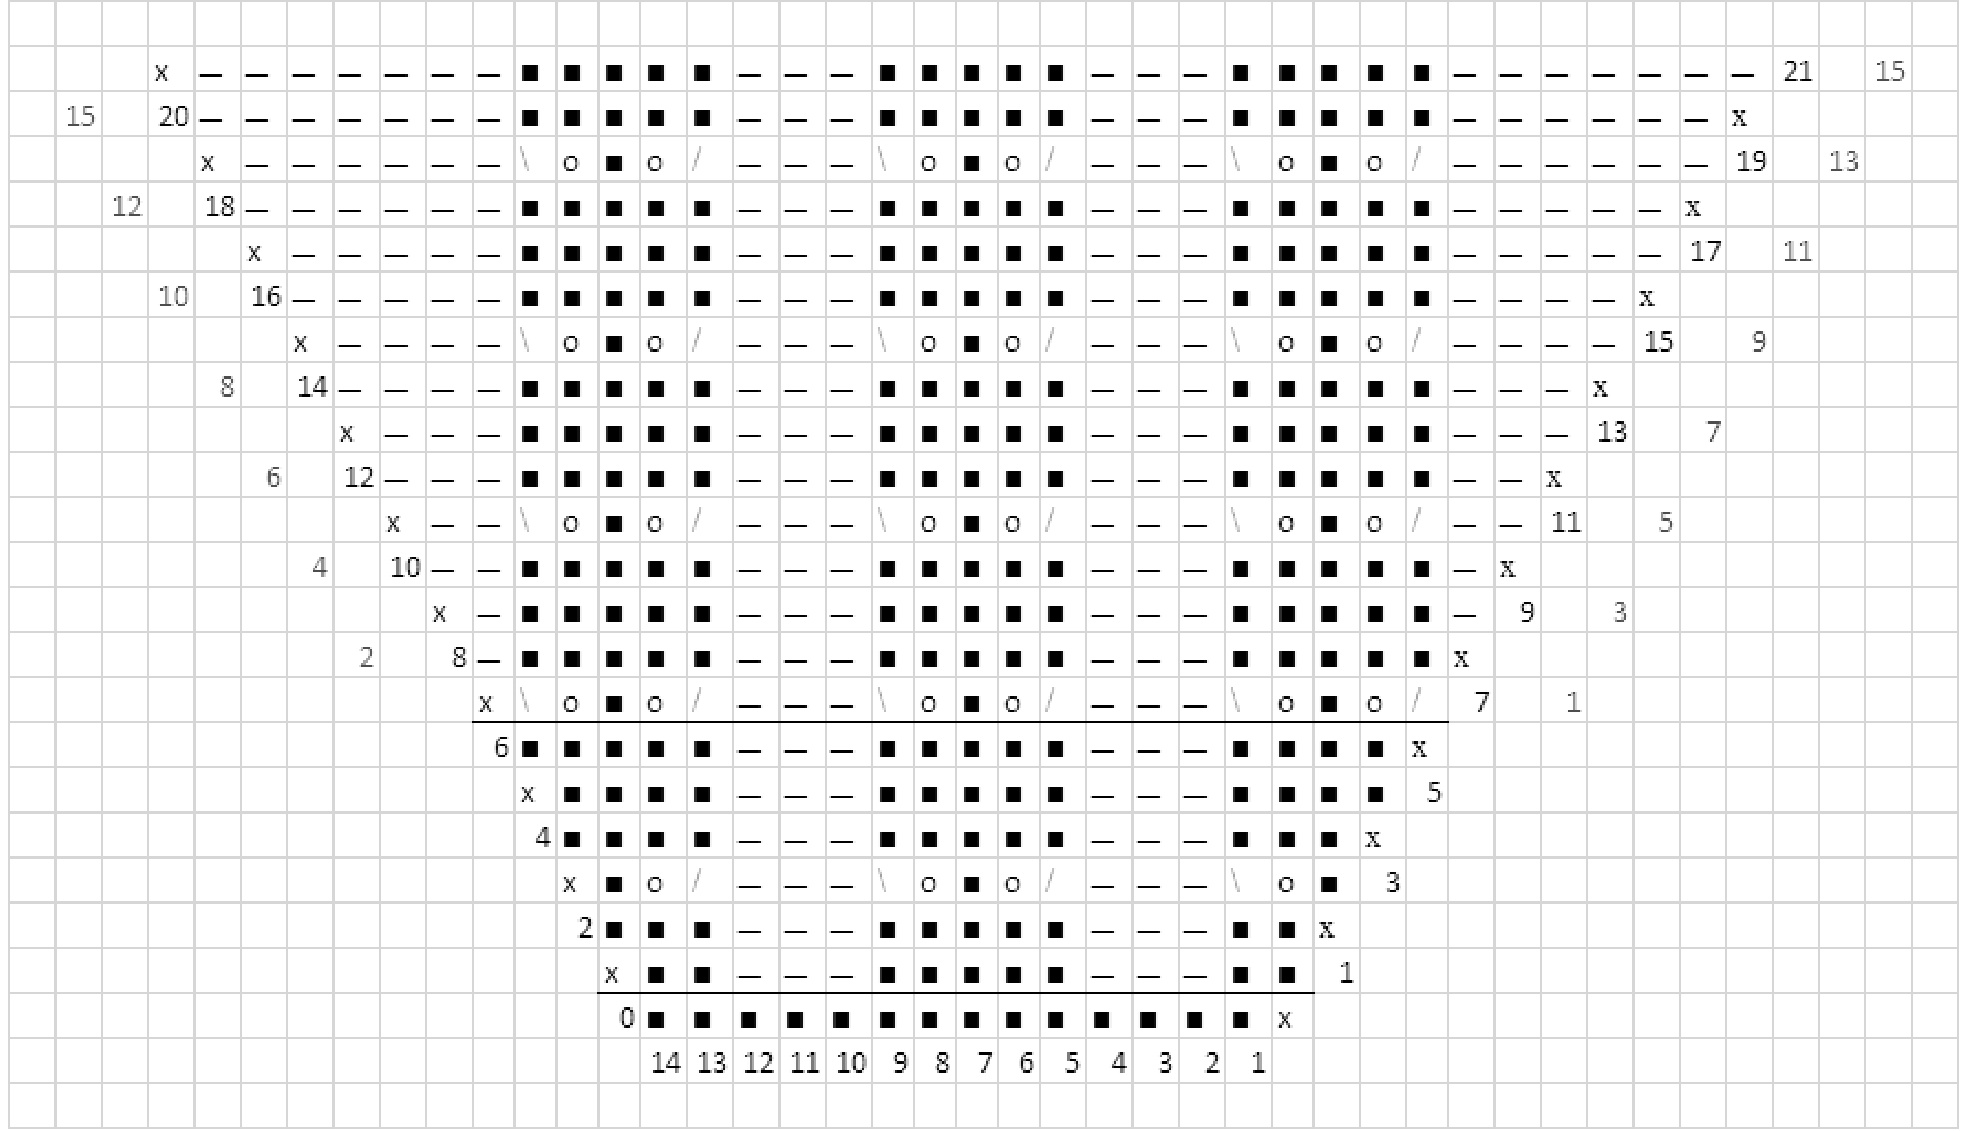
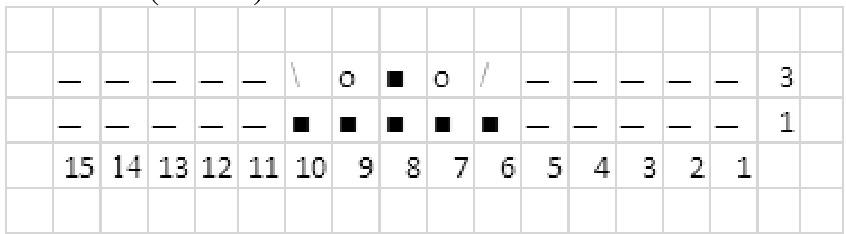
Cast on 61 (82) stitches on a piece of scrap yarn. You can use any type of provisional cast on you like or simply cast on with a scrap yarn and knit one row with that yarn. Later the provisional cast on will be removed. With the main yarn, knit 2 rows in garter stitch. Then distribute the stitches in the following way: 2(3) edge stitches (always in garter stitch), 3 (4) pattern repeats x 19 stitches, 2 (3) edge stitches. For the lace pattern see Chart 1. Knit in the pattern 3 _ pattern repeats and 2 rows of the next pattern repeat (3 full repeats and 6 rows of the next pattern repeat) in the height 16.5 (19) cm. Then make increases to form armholes as follows. In the 3rd row of the 4th pattern repeat (7th row of the 4th pattern repeat), add one edge stitch at each edge (stitch count 63 (84) stitches). In the 5th (9th) row of that pattern repeat, add once more one edge stitch at each edge (stitch count 65 (86) stitches). Now it is time to knit the frontpieces.
Step 2. Front pieces
Start with the right front piece. With the right side facing you, remove provisional cast on from 22 (33) stitches starting from the right end of the 'shoulder line'. Attach yarn and knit 2 rows in garter stitch.You see that because of increases and decreases in the stitch pattern the edge is not even but forms a wave. As the knitted fabric is stretchy, do not worry about this. However, if you want, before you get to the lowest point of the 'wave', you can make one stitch (put the yarn between two stitches on the needle and knit through the back loop), then knit 3 stitches together in the lowest point and again make 1 stitch in the described manner. After garter stitch rows, distribute the stitches in the following way: 2 (3) edge stitches, 1 pattern repeat (1 and a half, that is, one whole repeat and then the first 10 stitches of Chart 1), 1 edge stitch. Work in the pattern and make increases on the right edge of the work mirroring those in the back piece (in the beginning of the row). You have 24 (35) stitches. Left front piece: the mirror image of the right one. Remove provisional cast on and, right side facing you, attach yarn so that you start knitting from the right edge in the direction of the armhole. Make 2 rows in garter stitch. Distribute stitches as follows: 1 edge stitch, 1 pattern repeat (stitches 10-19 of Chart one and one whole repeat), 2 (3) edge stitches. The increases are worked in the same way except that they are situtated in the end of the row. Try on. The edges of the armholes do not have to meet under arms because when joining the work some stitches will be added. Still, make sure the length of the armhole is sufficient.
Step 3. Joining the pieces
Start from the left front piece. Work in the pattern to the end of the row, cast on 3 (5) stitches, break the yarn of the back piece, make a knot to prevent stitches from running, continue with the yarn you've been working with and work the back piece in the pattern, cast on 3 (5) stitches, work the stitches of the right front piece. Stitch count: 24 + 3 + 65 + 3 + 24 = 119 stitches (35 + 5 + 86 + 5 + 35 = 166 stitches). On wrong side, work the new stitches in garter stitch. Starting from the next right side row, work the former edge stitches forming underarms and the new stitches as shown in Chart 2a (Chart 2 b)
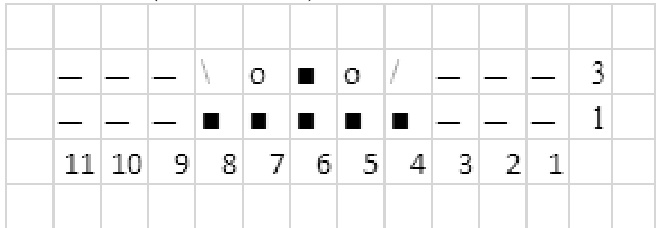
Chart 2 b (Size L)
Step 4. Knit the torso
of the cardigan is to your liking. Knit 6 rows in garter stitch, bind off loosely.
Step 5. Sleeves
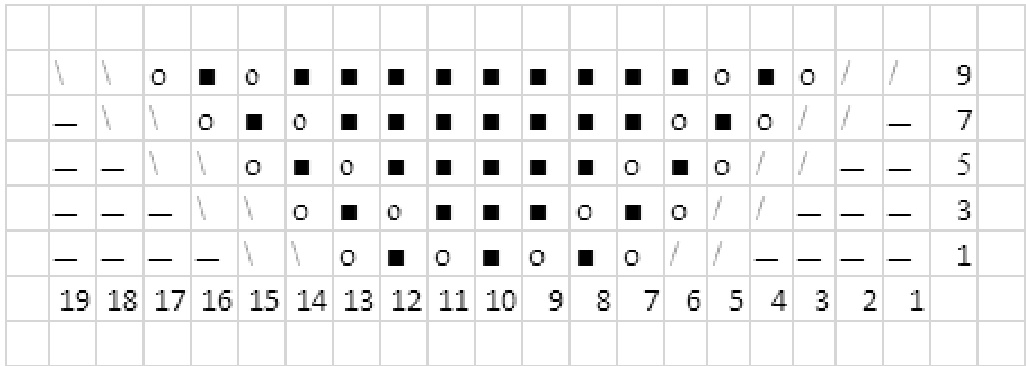
You will make the cap of the sleeve as usual, only that you start from top and you don't have to seam. Usually the cap consitutes one third of the armhole circumference. You will pick up a new stitch in the end of every row untill you have got to the underarm stitches. Then you will pick up underarm stitches all at once and work in round. Mark the top center of the armhole (it is the point where you had the provisional cast on). Right side facing you, attach yarn and pick up 14 (20 stitches) so that you have 7 (10) stitches before and 7 (10) stitches after the centre. Turn the work, knit one row and pick 1 stitch at the end of the row. You have 15 (21) stitches. Start working in Chart 3 at row 1 for sizes S and M and row 7 for size L (see the upper horizontal line). For your convinience, both right side and wrongs side rows are given. Wrong side rows are shown as they look from the right side (if you see a knit stitch, purl and vice versa). X marks the stich you pick up in the end of the row. For sizes S and M, the full chart is given. For size L, continue picking up stitches in the described manner (purl on right side, knit on wrong side). When you have picked up all stitches and reached underarms, pick up all underarm stitches at once, place a marker in the centre of the underarm to mark the beginning/end of the round. Work in pattern. Remember that when working in round, in even rows purl all purl stitches and knit all knit titches and yarnovers. Starting from the elbow, make some decreases in the following way: work one stitch after the marker, purl 2 together, work further untill you have 3 stitches before the marker, purl 2 together, purl the last stitch. Try on as you go and make decreases in the described manner at even pace (say, during every second pattern repeat in the height or similar). Usually, compared to the number of stitches you have when starting knitting in round, 12-14 stitches are decreased. Knit 6 rows in garter stitch. Bind off.
Step 6. Button bands and collar
Right side facing you, start picking up stitches from the bottom of the right front piece. Remove provisional cast on from the neck stitches, place them on the needle and knit them with the yarn you've been picking up stitches. Continue picking up stitches of the left front piece. The number of stitches should be even. Work 3 rows in garter stitch. Start the pattern as follows: \*Row 1-7: stockinette; rows 8-10: garter stich; row 11: yarnover, slip 1, knit 1, psso; rows 12-14: garter stitch\*. In the beginning and end of the row, work always 3 first and 3 last stitches in garter stitch. For size S, repeat from \* to \* 2 times, for sizes M and L, 3 times. Then knit 3 rows in stockinette, 3 rows of garter stitch. Bind off loosely.