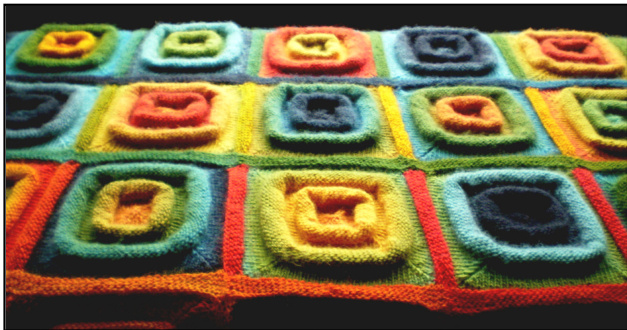
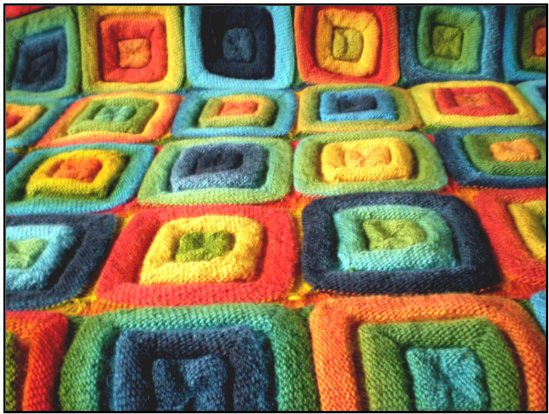
Squares On The Roll
These are squares with a mind of their own. They are knitted in the round, from the outside in, but the decreasing is interrupted and reverse stocking stitch used to create the rolls which give them their character. This is seriously tactile knitting and the finished squares are great fun to play with, they pull into mountain-like shapes and the resulting fabric is thick and warm. I have made my squares into a blanket but you could also use them for a scarf or a bag although a bag would need lining as these squares will stretch.
The Wool
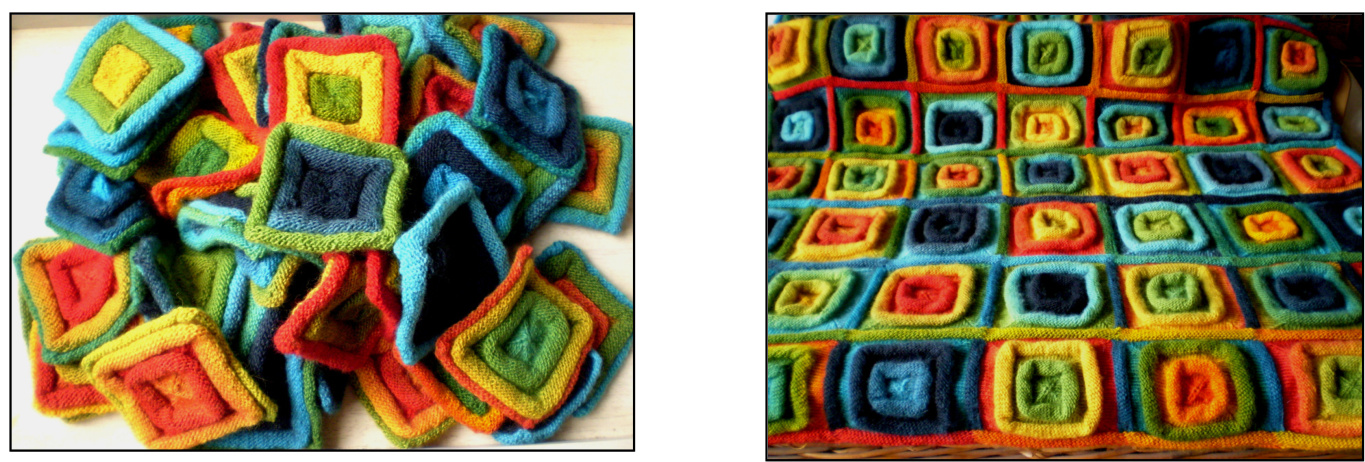
I was so excited by the wool that I used for this project that I thought it deserved a picture of its own.

It's called Zauberball and it is a 4 ply sock yarn with $420\mathrm{m}$ in a $100\mathrm{g}$ ball, $75\%$ wool and $25\%$ nylon. The colour I used is called Tropical Fish. This wool is lovely to knit with, it is soft and the colour changes are very gradual; there were also hardly any knots in all the balls I used. It does have a tendency to break when used for sewing up but that was the only problem I had with it. I used $700\mathrm{g}$ to make my blanket which measures about $96\mathrm{cm}\,/\,38^{\,\prime\prime2}$ , using 3.5mm / US size 4 needles. Each square took about $12\mathrm{g}$ of yarn. Do not be misled by the fact that this blanket is knitted in sock wool into thinking that it is a light and flimsy thing. This is a seriously heavy blanket and could well crush an unsuspecting baby (well, maybe not quite ...)
How to Knit a Square
I actually knitted mine on one long circular needle, using the magic loop method and marking the corners with stitch markers. It is much easier to explain the pattern (and also easier to photograph) if five double pointed needles are used so that is what I have done here. Those who prefer using one circular needle will easily be able to adapt the instructions. I found it helpful to use a row counter to keep track of the pattern as I went along. So .... Begin by casting on 120 sts using the long tail method. My 'tail was about two arms long if that's any help. Arrange 30 stitches on each of four needles, one for each side of the square, and you're all set.
Rounds 1 - 10
Round 1 and all odd numbered rounds: Knit.
Round 2 and all even numbered rounds:
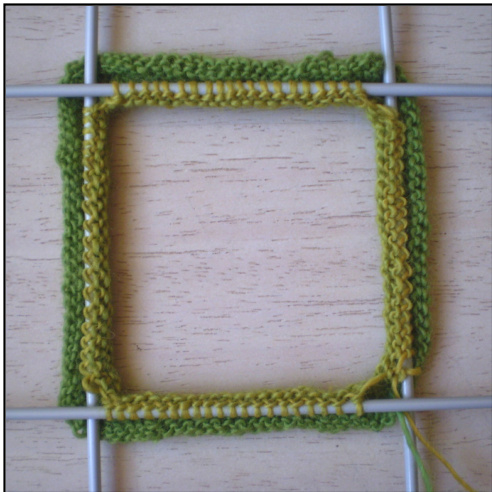
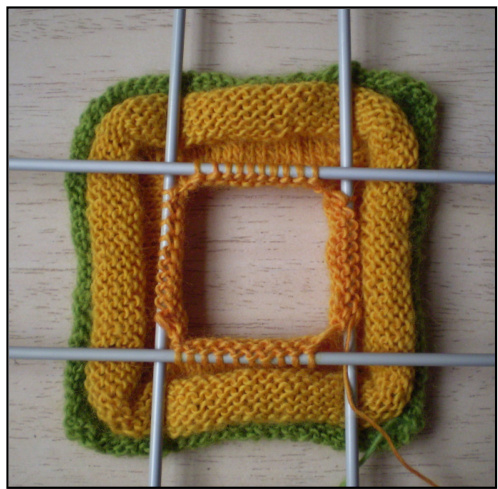
K2tog, knit to the last 2 sts on the needle, SSK. Repeat this for each of the four needles (2 sts decreased on each needle). After Round 10 you should have 20 sts on each needle and your square should look like this. Not very exciting but better is to come.
Rounds 11 - 19
Now to make the first roll.
Round 11:
Pf&b, Purl to the last stitch on the needle, Pf&b. Repeat this for each of the four needles ( 2 sts increased on each needle). Rounds 12 - 19: Purl.
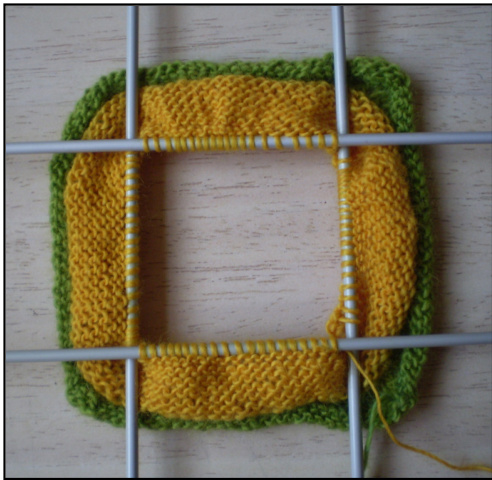
Now your square should look like this.
Rounds 20 - 30
Time to start decreasing again.
Round 20 and all even numbered rounds:
K2tog, knit to the last 2 sts on the needle, SSK. Repeat this for each of the four needles (2 sts decreased on each needle).
Round 21 and all odd numbered rounds: Knit.
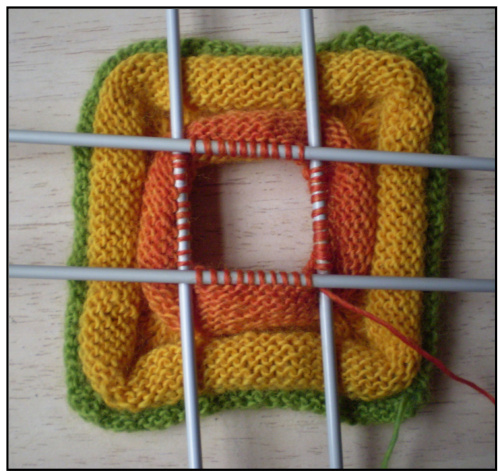
After Round 30 you should have 10 sts on each needle and your square should look like this. It's starting to take shape.
Rounds 31 - 39
This is worked in the same way as the first roll.
Round 31:
Pf&b, Purl to the last stitch on the needle, Pf&b. Repeat this for each of the four needles ( 2 sts increased on each needle).
Rounds 32 - 39: Purl.
Rounds 40 - 47
Nearly there now. Note that the last two rounds are both shaping rounds, without a plain round in between. This makes the centre of the square lie flat.
Round 40 and every other even numbered round:
K2tog, knit to the last 2 sts on the needle, SSK. Repeat this for each of the four needles (2 sts decreased on each needle).
Rounds 41, 43 and 45: Knit.
Round 47:
K2tog, SSK. Repeat this for each of the four needles. You now have only 2 sts on each of the needles. Cut the yarn and thread through these last 8 sts and fasten off.
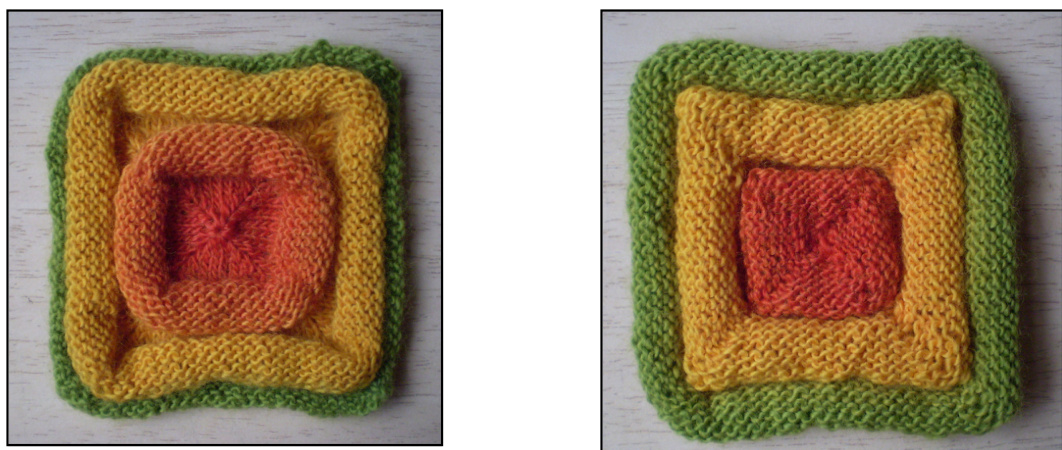
And look what's happened! The finished square has a different look on the other side. This came as a complete surprise to me when I knitted the first square. Isn't knitting exciting? Make as many squares as you have wool or patience for and then
Joining the Squares
I knitted 49 squares to make a blanket seven squares by seven and this is how I joined them. I decided to work with all my squares the same way up but you could of course alternate them or arrange them in whatever way you like. First I joined the squares into strips, picking up stitches along the side of one square, working a stocking stitch strip and then sewing the cast off edge to the next square. This is how I did it in detail. With the knit side of a square facing, pick up and knit 30 sts along one side. Beginning with a knit row, work 4 rows in stocking stitch. ? Cast off. I used a $4\;\mathrm{mm}$ needle for this to give a loose edge. When you cut the yarn leave a tail about twice the width of a square and use this to sew the joining strip to the next square. This is fiddly because of the squares curling so you might like to pin the pieces together with safety pins first .
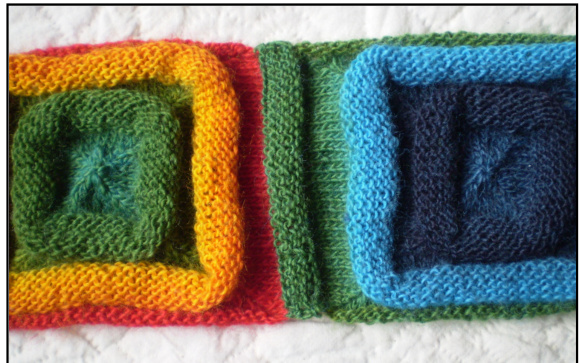
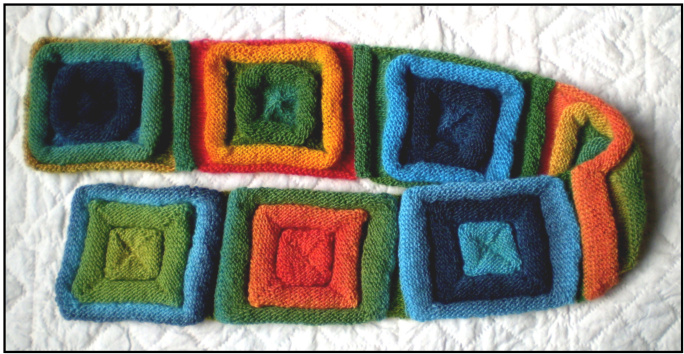
Seven squares joined. The start of a scarf perhaps? Joining the long strips of squares into a blanket caused me some difficulty. I began by picking up hundreds of stitches along the length but this messed up the colour changes in the yarn so I realised I needed to work in smaller units to preserve the overall effect. This would not apply if you were joining the squares using a solid colour so you might then want to work this section differently. However, with this yarn .. With the knit side of the square facing, work the joining strip for one square of the seven square strip at a time. Pick up and knit 30 sts along the top of a square and two sts across half of any joining strips. This will generally give you 34 sts but only 32 with the two end squares. Beginning with a knit row, work 4 rows in stocking stitch. ? Cast off. I used a $4\;\mathrm{mm}$ needle for this to give a loose edge. When you cut the yarn leave a tail about twice the width of a square and use this to sew the joining strip to the square in the row above. Again, you might like to pin the pieces together with safety pins first. You will also need to join the short edges of these strips. Working with the purl side of the strips facing, use mattress stitch to do this.
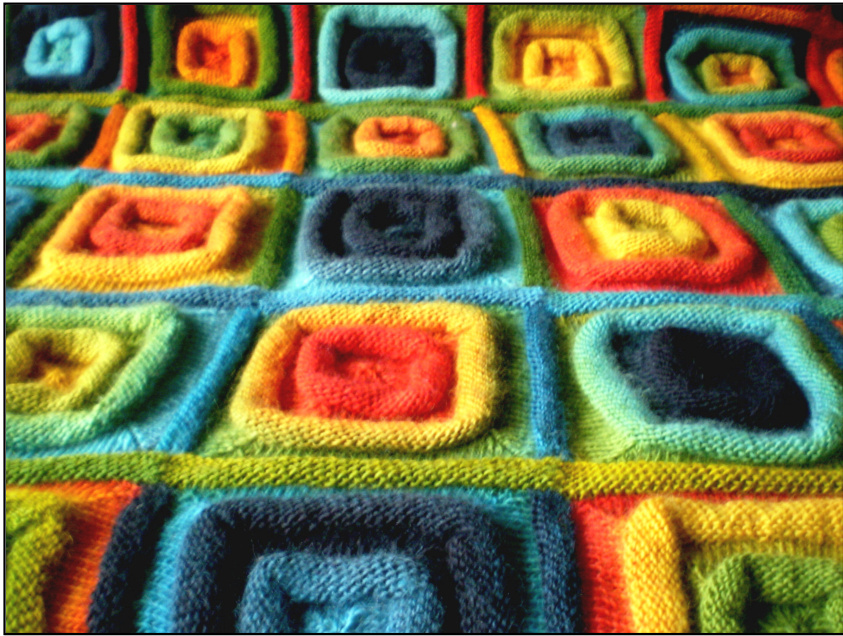
The Edging
This is worked in a similar way to the strips above but the stocking stitch strip needs to be wider in order to lie flat enough to be visible. As before, work with the knit side of the squares facing and work the edging for one square at a time. Pick up and knit 30 sts along the top of a square and two sts across half of any joining strips. Beginning with a knit row, work 7 rows in stocking stitch. Now, still beginning with a knit row, work 2 more rows in stocking stitch. This reverses the stocking stitch for the last few rows and helps to stop it curling too much. Cast off. I used a 4 mm needle for this to give a loose edge. You will only have the short edges to join now, using mattress stitch as before. Continue working round the edge of the blanket, one square at a time. At the start of the second, third and fourth sides you will need to include 4 sts picked up along the main part of the edging on the previous side. You will also need to do this on the last square of the fourth side, picking up 4 sts from the side of the edging on the first side. This may not make much sense but it probably will when you get to it!

Abbreviaitons
st/sts stitch/stitches K knit P purl K2tog knit 2 stitches together SSK slip, slip, knit (see below) Pf&b purl into the front and back of the stitch
slip, slip, knit
slip 2 sts knitwise (or knitwise followed by purlwise) one at a time, insert tip of left needle into sts from above, put yarn round right needle and knit both sts together.