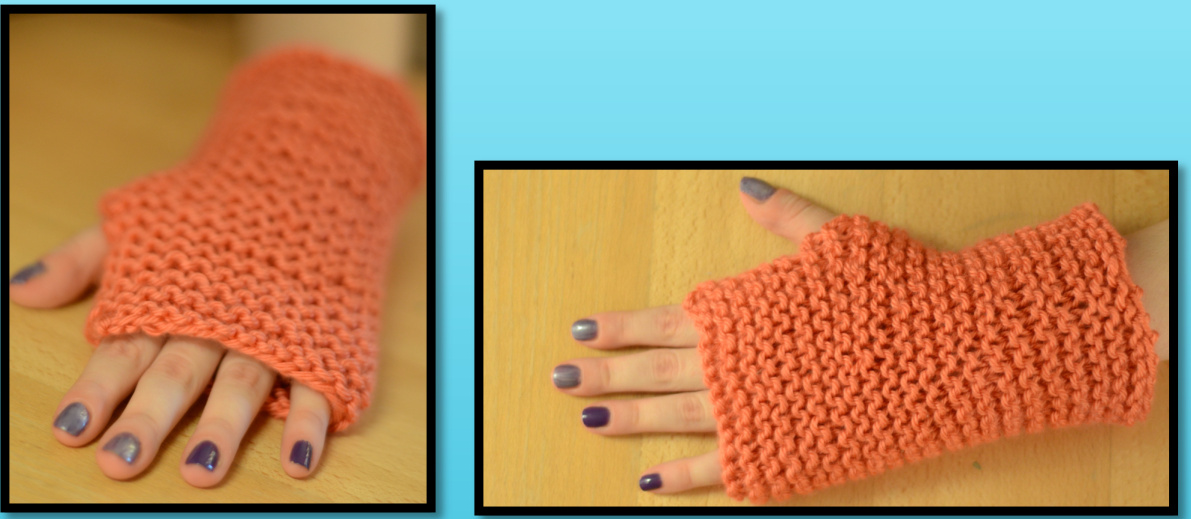
Easiest Possible Fingerless Gloves with Straight Needles
Do you:
1.Want to knit fingerless gloves 2. Have some worsted weight yarn (what you can find in most elementary school classrooms) And don't think you're ready to use those double-pointed needles?/only have straight needles?/ don't feel like knitting in the round right now? Don't Panic @ I've got you covered. I've been in the same situation, so I understand. Okay, so I'm going to list out the "Materials" that you'll need. Then we'll talk about how to figure out how many stitches you'll need in the "Gauging" section. Then just follow my instructions in the "Pattern" section.
Materials
1 skein of worsted weight yarn (Again, this is just the regular kind of craft yarn that you normally find. For more info on yarn weights go here: http://community.knitpicks.com/page/1984936:Page:8101) 1 pair of straight needles (Or a circular needle, which can be used to knit back and forth) V A needle that you can use to sew your gloves closed (I prefer a tapestry needle, ora large craft needle, but really any needle will do, as long as you can shove the yarn through the eye of the needle) 1 safety pin, or stitch marker (You're going to use this to mark where your thumb goes, so anything that can do that will work).
(!) Gauging
How many stitches will you need to cast on? In order to answer this question you'll need to do some very quick measuring: i. Holding your hand out flat, measure around your knuckles. Write your measurement below (pick inches or centimeters): Hand width= ii. Now we're going to get the gauge: a. Cast at least 20 stitches onto the needles that you plan to use (/ know knitting a before you actually start your knitting project feels backwards, but trust me this is part of it). b. Knit back and forth (only knit, no purling) for about 10 rows. C. Lay a ruler across your swatch (that's right, you just knit a swatch), and count how many inches or centimeters wide your swatch is. Divide the total # of stitches you have, and divide it by your total inches/centimeters. This number is your gauge. Write your gauge below: stitches per inches/cm. Now, we figure out how may stitches you'll cast on: Multiply your Hand Width number by your Gauge number EASY FINGERLESS GLOVES - Copyright @ 2013 Leah Goldstein. This pattern is for personal, noncommercial use only and may not be sold or reproduced. For more information or technical assistance contact leahgoldstein83@ gmail.com.

(lll) Pattern
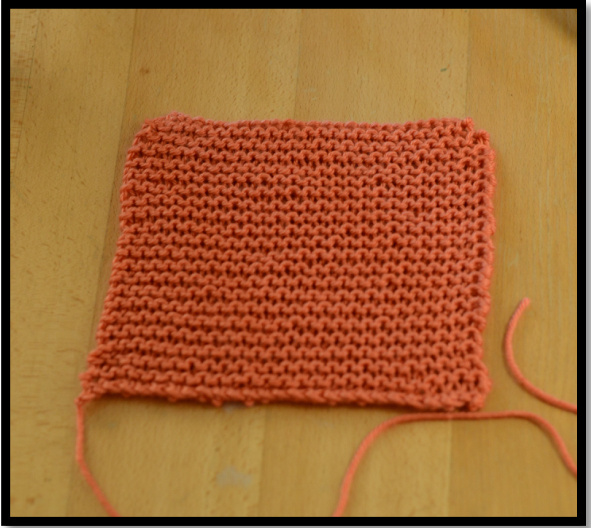
Now here comes the actual pattern! 1. Cast-on the number of stitches that you just figured out (for info on how to caston see here: http:/www.knittinghelp.com/videos/cast-on). 2. Knit back and forth in rows for as long as you would like your glove to be (l have petite hands, and I knit for about 7"). 3. Bind-off all of your stitches loosely (for info on how to bind-off loosely see here: https://www.youtube.com/watch?v=6uiYVjArmhw), and leave about a 12"/30cm yarn“tail." 4. Congratulations! You now have a rectangle (see photo below):
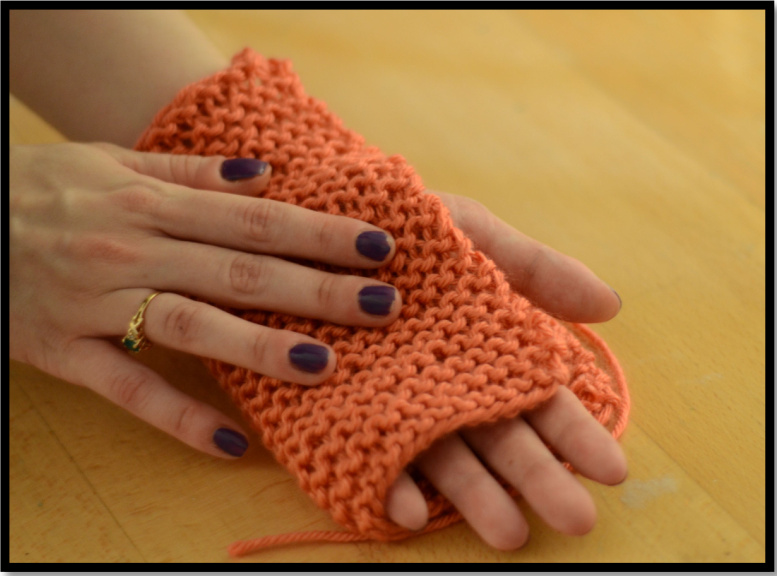
5. Now fold your rectangle in half width-wise around one of your hands, with the two edges on the thumb side (see photo below):
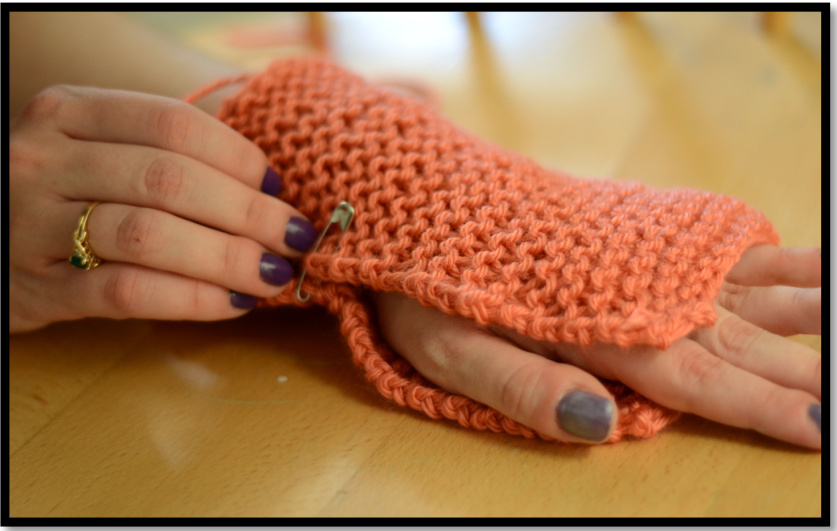
EASY FINGERLESS GLOVES - Copyright @ 2013 Leah Goldstein. This pattern is for personal, non-commercial use only and may not be sold or reproduced. For more information or technical assistance contact leahgoldstein83@gmail.com. 6. Using your safety pin or stitch marker, mark where the two edges of the fabric meet your thumb knuckle (see photo below):
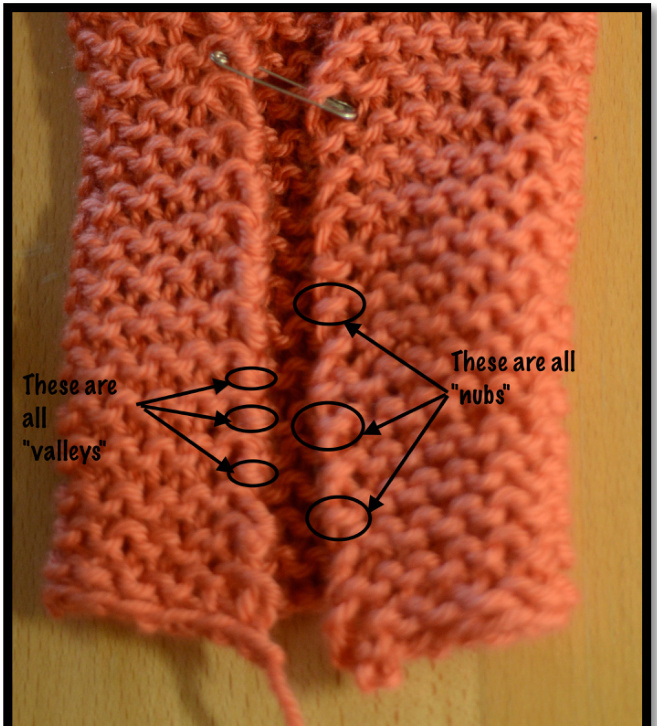
7. Now you're going to sew a seam up to your marker using a "selvedge nub seam." Essentially this seam allows the two fabric edges to butt up against each other (as opposed to a seam that is turned to the inside). i. You'll notice that along the edges of your fabric you have created little nubs and valleys (see photo below) we're going to sew the nubs to the valleys so that the fabric lays nice and flat.
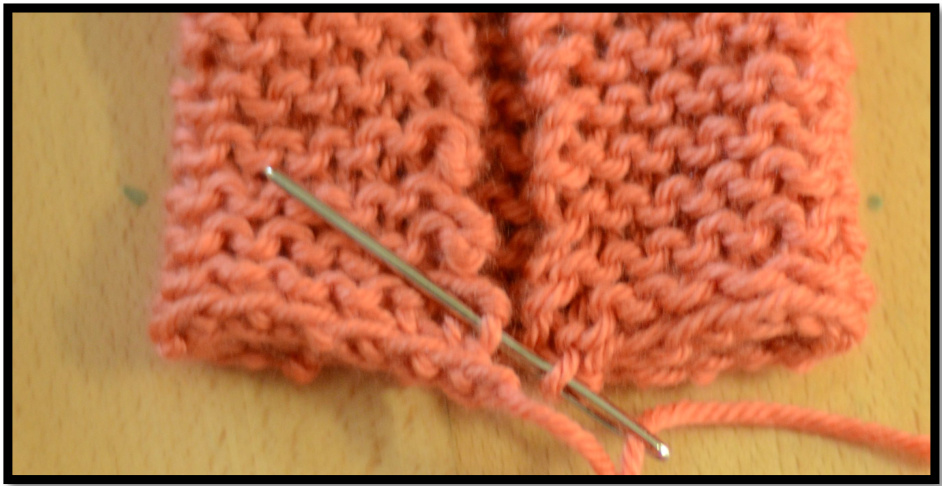
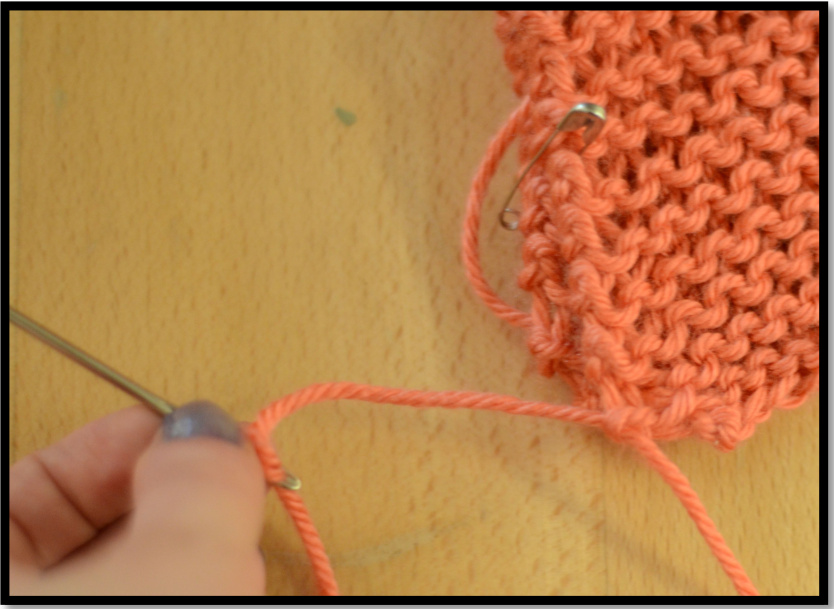
ii. You are going to thread your needle using the long tail that you left, and insert your needle straight up through the first nub on the right-hand fabric edge, then through the first valley on the left-hand fabric edge (see photobelow):
ii. Repeat step ii until you've reached your marker where the thumb-hole will begin. Thread your tail to the inside of the glove, and leave it there for weaving in later.
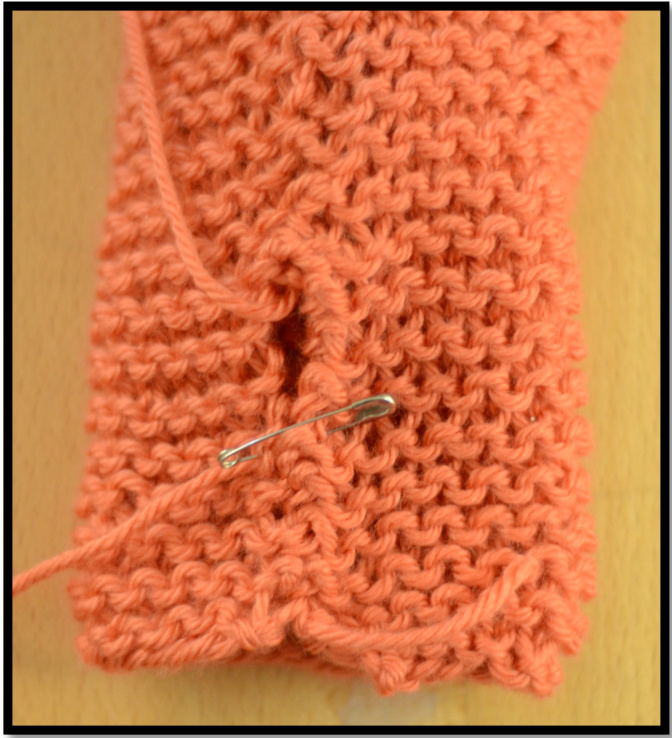
EASY FINGERLESS GLOVES - Copyright @ 2013 Leah Goldstein. This pattern is for personal, non-commercial use only and may not be sold or reproduced. For more information or technical assistance contact leahgoldstein83@gmail.com. 8. Now remove your safety pin, and place it about 1"/2.5cm from where you stopped seaming before (see photo below):
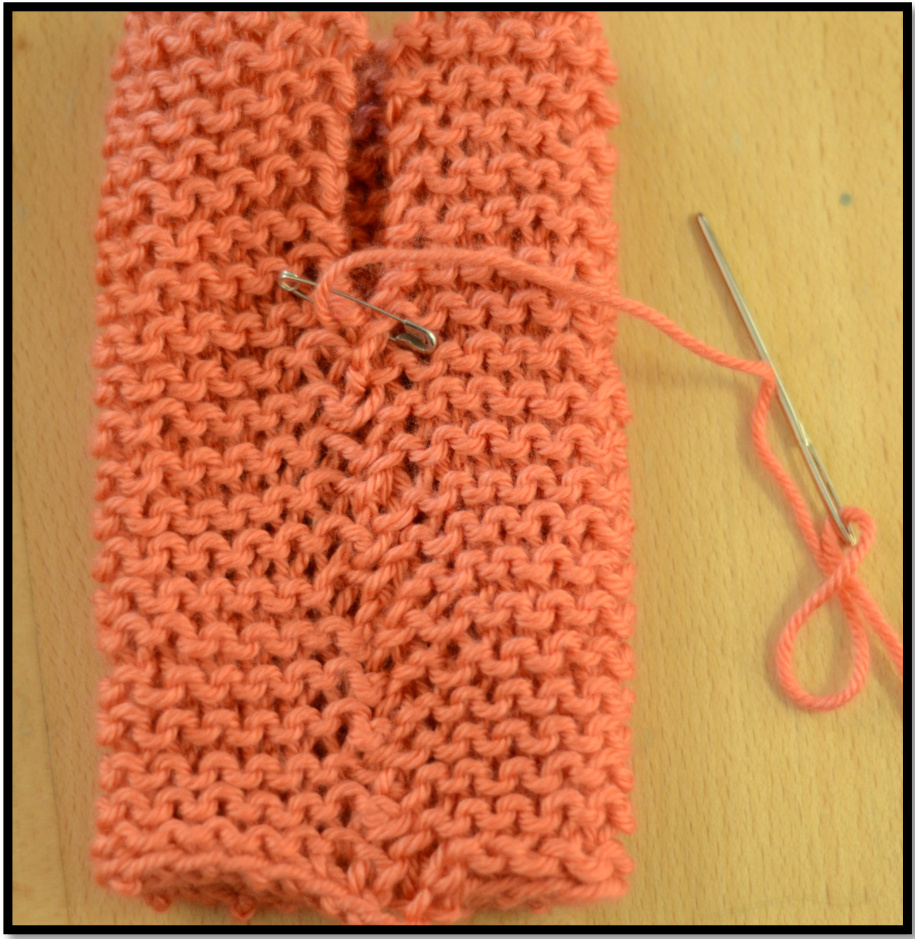
9. Join a new, short length of your yarn (probably about 12"/30cm) by weaving it into one of the un-seamed corners (see photos below):
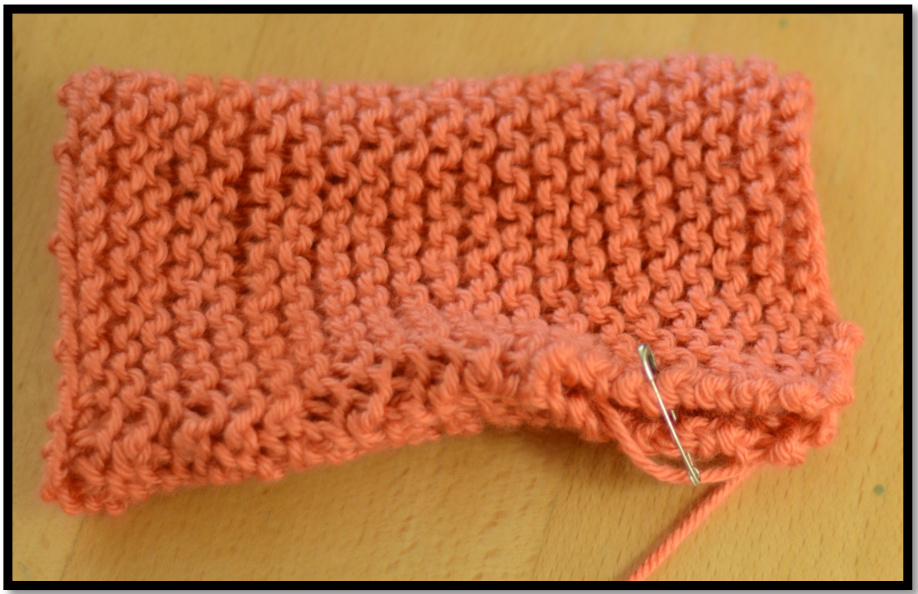
10. Starting at this edge, repeat the "selvedge nub seam" to the safety pin, then thread your tail to the inside of the glove, and leave it there for weaving in.
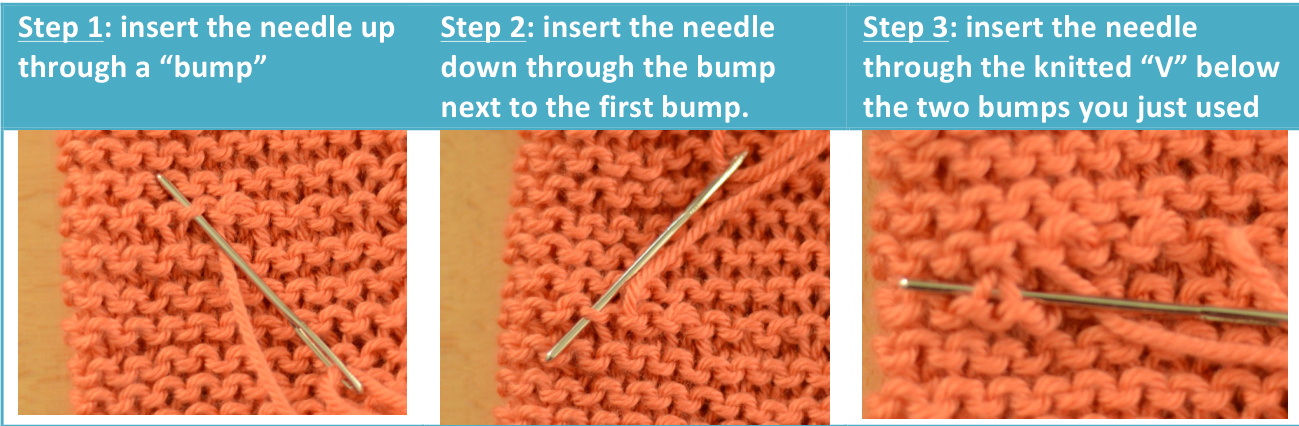
11. Now you're going to weave in the yarn ends by turning your glove inside-out, and weaving your ends through the garter bumps (see the photos below, and here for more info on weaving in the ends: http://knitty.com/ISSUEfall04/FEATfall04TT.html).
12. Repeat steps 1-11 to create the other glove. 13. Enjoy! EASY FINGERLESS GLOVES - Copyright @ 2013 Leah Goldstein. This pattern is for personal, non-commercial use only and may not be sold or reproduced. For more information or technical assistance contact leahgoldstein83@gmail.com.


