Learn to Knit Mitts
When I was 5, my mam taught me how to knit. Mostly because I pestered her to distraction while she was laboriously attempting to make things for my sister and I, and she found that giving me her leftover scraps of yarn, and a spare pair of needles, kept me out of her way for a while. She didn't teach me to knit anything in particular, or how to follow a pattern, she just cast on a few stitches, showed me the basic knit stitch, and left me to it. The result being that my very first knitting project is nothing more than a mismatched square of untidy garter stitch. This might be suitable for a 5 year old, but for an adult wishing to learn this craft, I believe that starting with an actual project provides a better incentive. Most people think that the easiest thing to make when learning to knit is a scarf. It's simple in construction, requires no fancy stitches, no increases, or decreases, you'd think it would be perfect. What they forget is that a useable scarf needs to be at least 1.5 metres long. That's a lot of knitting! Learning by making a scarf may be technically simple, but it introduces the new knitter to the frustration of long projects far too soon. So in order to avoid this, I've chosen a much smaller starting project to teach the basics with; a pair of fingerless mittens, or wrist-warmers. The design is such that several new skills are introduced gradually during the course of the pattern, so by the end of the project, you will have mastered most of what you will need to knit anything you like!
Before we start, I'm going to give you a little bit of information about needles and yarn, but if you're impatient, you can skip this bit and go straight to the actual pattern instructions, but be sure to check that you're using the correct size of needles, and weight of yarn, otherwise you could end up with very oddly sized mittens!
Needles, Yarn, and Gauge
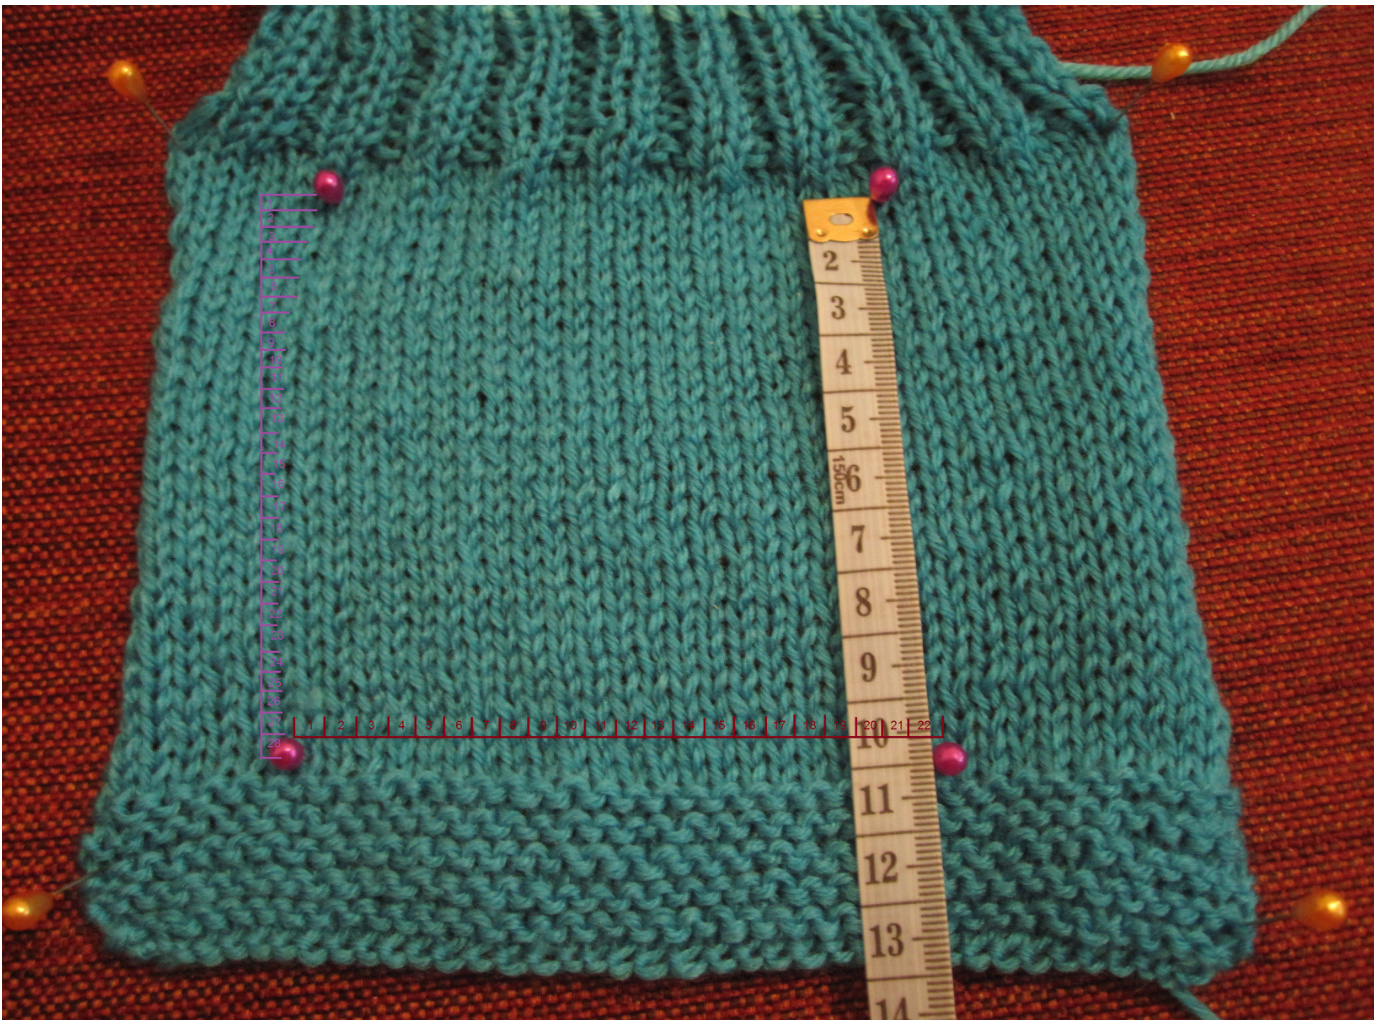
Choosing the correct needles and yarn for your project is a great part of the challenge in creating something beautiful and well-fitting. If you get this part wrong, then it doesn't matter how fancy your stitches are, the finished item won't be right. The main reason for this is gauge. Gauge (sometimes called tension, especially by older folk in the UK) is a measure of the number of stitches per inch of knitting. Usually the recommended gauge for a pattern will be given as the number of stitches per row, and number of rows knitted, in order to produce a 10cm (4") square. For our pattern the gauge is 22 stitches, and 28 rows per 10cm square.
In order to achieve this, I used 4mm needles, and doubleknit yarn. If I had used larger needles, then I would have ended up with far fewer stitches per inch, and the finished mitts would have been much too large, smaller needles would have resulted in too many stitches per inch, and mittens that were too small. If I'd used a heavier weight of yarn, then I would have ended up with slightly fewer stitches per inch, and also a much stiffer, less comfortable fabric. A lighter weight of yarn would produce slightly too many stitches per inch, and a very loose fabric that wouldn't be very warm. You may have noticed that I always use the term 'yarn' and not 'wool. When I grew up, we always called the yarn called 'wool', even though most of what my mam knitted with was actually acrylic, but as an experienced knitter I find it better to only call my yarn wool if it actually is made of wool! It matters because different fibres give the yarn different properties. Here are a few examples of commonly available fibres: Acrylic - good for knitting for children and pets, it's hard-wearing, easy to care for, can be machine washed, and holds its shape. Merino - a very soft, and fine wool from the merino sheep. Makes gorgeously soft, and very warm fabric, perfect for anything that needs to be close to sensitive skin, like your neck, but must be hand washed, and then laid flat to dry, or it can lose its shape, or even felt. Merino sheep mostly live in the Southern Hemisphere, so if you live in Europe, and you're concerned about your carbon footprint, then this may not be the yarn for you. BFL - wool from the BlueFaced Leicester sheep, which is a British breed with very soft wool. Not quite as soft as Merino, but an excellent alternative if you want to Buy British. Must be hand washed and dried flat. Cotton - a plant fibre that makes very strong yarn, but cotton yarn has no stretch to it at all. It's good for summer knits, because it's cool, and for the same reason it's spectacularly bad for winter knits! Can be machine washed, or bashed with rocks in the river if you want to! Silk - from the cocoons of the silk moth. We all know that silk is luxuriously soft and smooth, but like cotton, it doesn't stretch. It does have a gorgeous sheen to it that makes it ideal for delicate, detailed lacework. If you're concerned about the welfare of bugs, then choose tussah silk, as this is made using cocoons that have hatched. Mulberry silk is even smoother, but the silk worm is killed during the process. Can be machine washed, but only on a delicate cycle. Alpaca - the fleece of the alpaca, which is a type of llama. It's similar to wool in properties, but it's a bit of a 'Marmite' fibre! Some people find it even softer and more luxurious than merino, some people find it too flyway and hairy, one you really have to try for yourself. Must be hand washed and dried flat. Now about the “weight" of yarn. You might be wondering what I mean by that. Well, it's not the weight of the ball or skein! Most yarn comes in 50g or 100g balls or skeins, regardless of the “weight" of the yarn itself. This refers to the thickness of the yarn, which you might think of as the weight per metre, although of course it's not described in anything like as sensible a way as that! Here's what I mean: Cobweb/1-ply - very, very fine and thin yarn used for exceptionally delicate lacework. Laceweight/2-ply - fine and thin yarn, mostly used for lacework, occasionally used by crazy people to knit garments. Light-fingering/heavy-laceweight/3-ply - slightly thicker yarn, often used for lacework, but also used for baby garments, and socks. Fingering/4-ply - One of the most versatile weights of yarn, used for almost anything. Some yarns in this category will be called "sock yarn", these usually contain about 20% nylon and 80% wool, the nylon is to make the yarn more hard-wearing, and the wool makes for very warm socks. Sportweight - Not very common in the UK, but widely available in the US, this is a little heavier than 4-ply, but is another very versatile weight of yarn that can be used for almost anything. fairly thick yarn that is excellent for making jumpers, hats, scarves, mittens, and blankets. Worsted - Another that isn't widely available here in the UK, but is easy to find in the US. Just a little thicker than DK, and good for the same sorts of projects. Aran - Almost the same weight as Worsted, but perhaps a little thicker. Well known for being used in the making of those thick, cabled jumpers that are also known as "Fishermens Ganseys". Excellent for winter knits. Chunky/Bulky - Really thick yarn that knits up very quickly, good for winter accessories. Super-Bulky - Ludicrously thick yarn that knits up incredibly quickly, but you only get about 40m per ball! Almost pointless except for novelty knits. Art Yarns - Ridiculous concoctions with pompoms, ruffles, tinsel, and all kinds of frouffera. Used for making the suggested pattern on the ball-band, and absolutely nothing else! You will be tempted by these, don't bother unless you have small children and wish to let them cut it up and glue it to stuff. OK, I think that's enough information overload for now. Let's get to the pattern!
Learn to Knit Mitts Pattern
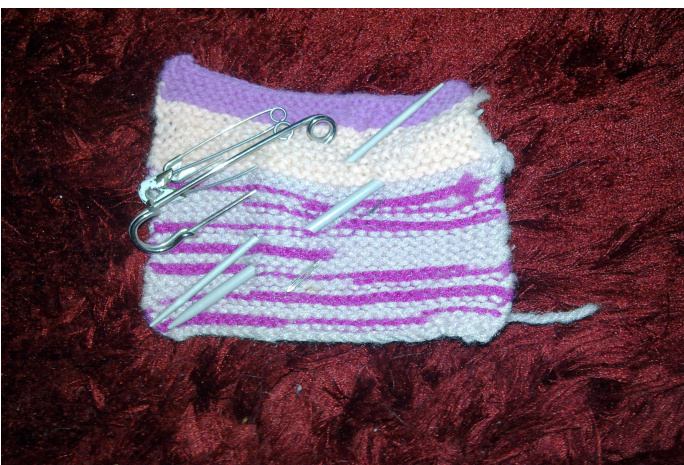
What you'll need: 1 pair of 4mm knitting needles 1 100g ball of doubleknit (DK) yarn 2 lockable stitch markers, or safety pins Tapestry needle The Internet, or an experienced knitter to help you What to do: First you'll need to Cast On 40 stitches. Now there are over 60 different ways to cast on, but each different cast on is best suited to a different type of project. For this project I'd like you to use the Long-Tail Cast On, which is one of the most versatile, as it produces a nice neat edge, that is also fairly stretchy. This makes it perfect for the cuffs of socks and gloves. If you're following this tutorial on your own, then use the link above to watch a You Tube feed called VeryPink Knits, and her guide to how to perform a long-tail cast on. If you're in my workshop, then Ill be demonstrating this for you, and there to help out of you need it. One of the most important things to remember when using the long-tail cast on, is to be sure that your "tail" is long enough for the number of stitches you're going to need. My rule is to allow 4 times as much yarn as the width of fabric you wish to create. So in this case, you want to create a piece of fabric that will fit around your wrist, for me that's 17cm (a little under 7"), so I need to start with at least 68cm (or 27") of yarn in my "tail". Alternatively, you could just wrap your yarn 4 times around your wrist, then tie your slip-knot there, it'll work just as well as measuring! What next? So now you have 40 stitches on your needle, it's time for the actual knitting! You're going to start off by knitting 10 rows of the basic Knit stitch. This is also known as Garter Stitch. When I learned the knit stitch, I was taught a little mantra that I said in my head over and over until I was sure I remembered - In, Over, Through, and Off. Meaning first put the right hand needle IN to the first stitch on the left hand needle[1]. Wrap the yarn OVER the point of the right hand needle. By moving the right hand needle, pull the new loop of yarn THROUGH the stitch on the left hand needle. Slip the stitch on the left hand needle OFF. You now have 1 stitch on the right hand needle, and 39 on the left hand needle. Repeat all the way along the row, then again for a total of 10 rows. Again, if you're doing this on your own, then I've provided a link to a video by New Stitch a Day showing how the knit stitch/garter stitch is performed. If you're in my workshop, then I'll go through this with you in person. In knitters shorthand, what you've done so far would be written like this: CO 40 using long-tail method Rows 1-10) K [1] - All instructions are written for right-handed knitting! If you're left-handed, and find that you can't manage right-handed, then for this stitch simply reverse the instructions for left and right. For other stitches you may need to search for specific videos about left-handed knitting, or find yourself a left-handed knitting mentor. This doesn't look like my shop-bought gloves.. No, that's because you've only knit the cuff of your mitten so far! Now you need to learn the Purl stitch. For the next 12 rows you will alternate 1 row of knit stitches, with 1 row of purl stitches. This is known as “Stocking Stitch" or "Stockinette", and it creates that lovely smooth fabric made up of rows of little 'V's on one side, and bobbly bits on the other side that most commercial knitted garments are made up of. Again, take a look at the video by New Stitch a Day for instructions on how to work the purl stitch, or Ill help you through this myself if you're in my workshop. Your knitting pattern for this section would be written as: Row 11) K Row12)P Rows 13-22) repeat rows 11 and 12 5 more times. Still a funny looking glove! Ah! The magic is in the sewing up! But next you're going to make a tiny change to your stockinette that will make a much neater thumb-hole. Continue working in stockinette for another 14 rows, but slip the first stitch of each row purl-wise, before continuing to work the remaining 39 stitches of each row as normal. This simply means that you put the working needle into the first stitch of the row as though you were about to perform a purl stitch, but don't work the stitch! Just push it directly onto the working needle, then knit, or purl the next stitch according to the pattern. It may help you later on if you place fixed stitch markers (safety pins will do if you don't have proper stitch markers) on your work when you start the slip-stitch edging, and again when you finish it. This is written as: Place fixed marker Row 23) Sl1,K39 Row 24) SI1, P39 Rows 25-36) repeat rows 23 and 24 6 more times Place fixed marker Doesn't look much like a thumb-hole to me, but what next? Be patient my Padawan! Next is another 10 rows of plain old stockinette, which I'm sure you're very proficient at by now. Written as: Row 37) K Row38)P Rows 39-46) repeat rows 37 and 38 4 more times. OK, I'm getting bored of stockinette now! Never knit a jumper then my dear! But never fear, the end is in sight! It's time to work the ribbed section that will be snug around your fingers. Ribbing is a useful way of creating a very stretchy fabric. It's excellent for cuffs, the brims of hats, and anything that you want to fit closely, but don't want to faff about with shaping. The best bit is that it's incredibly simple, and just consists of alternating between knit and purl stitches on the same row. We're going to work a 2&2 rib, which means 2 knit stitches, followed by 2 purl stitches. The only thing that you really need to remember when working ribbing, is to make sure that your yarn is in the right place before working each stitch. So when you're working a knit stitch, the yarn should be at the back of your work. When you're working a purl stitch, it should be at the front of your work. Knitting patterns won't usually tell you to do this, they will assume that you know! Check out the video by Bethintx1 if you need help getting your head around this. So the series of actions required to produce ribbing are as follows: Knit 2 stitches, move yarn to front of work, purl 2 stitches, move yarn to back of work, repeat from start. But the pattern will be written like this: Row 47) (K2, P2) repeat to end of row Rows 48 - 56) repeat row 47. Are we finished yet? Nearly! We just need to cast off, and sew up. As with casting on, there are many different ways to cast off, or Bind Off. We're going to use the most basic method, but we're going to cast off "In Pattern". So a standard knitted bind off is worked by knitting the first 2 stitches of the row as normal, then lifting the first stitch on the right hand needle over the second stitch, then dropping it off the needle so that you now have only 1 stitch on your right hand needle. You continue by knitting the next stitch, then lifting the previous stitch over that, etc. The only difference is that we continue to begin each stitch as a knit, or a purl stitch, as though we were still working 2&2 ribbing. The reason for this is that we don't want to ruin the lovely stretchy fabric that we've created by making an edge that won't stretch at all. When you have cast off the last stitch, cut your yarn, leaving a tail of about 30cm (12"), and pull that all the way through the last stitch. This now won't come undone. You should now have a roughly square swatch of knitting that looks something like the photo I used earlier to demonstrate gauge. Yay! I made a thing! It's clearly not a mitten though No, but it will be! Using the tail of yarn that you left when you cut the yarn at the end of your work, thread a tapestry needle. Fold your work in half with the wrong side facing out, and make sure that the ribbed section lines up with itself, and the garter stitch section lines up with itself. Carefully sew the 2 edges together until you reach the marker for the thumb-hole. If you didn't use a marker, then you will need to look closely at your work to determine where the slip-stitch edge begins. You can see in the example below how it will look; the knitted edge is sort of bobbly, but the slip-stitch edge has a chain-like finish. When you reach this point, sew back over your previous sewing for a few stitches to ensure that it won't come undone, then cut the yarn.
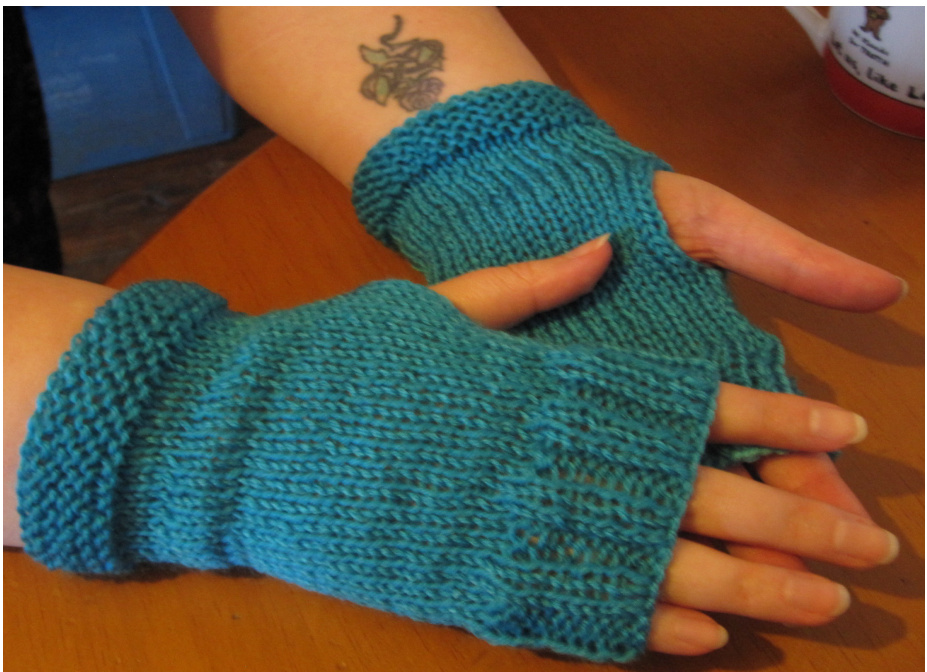
Using the remaining tail from your cast on, repeat this process starting at the garter stitch border, until you reach the other marker for the thumb-hole. ur work the right way out, and ta-da! One fingerless r Now you just need to repeat the entire process so that you have a pair ;) Just so that you don't feel too bad if you never get around to making the second mitten, there is a phenomenon among knitters known as “Second Sock Syndrome". This is when you are super excited about a new sock, or glove pattern, and you quickly finish the first sock, or glove, then several weeks, months, or even years later you still haven't finished its counterpart! You're just joining in on another part of the knitting experience! If you've enjoyed learning how to knit using this guide, and you'd like to learn more knitting skills in a similar fashion, then I will be producing a follow-up to this in which you will learn about increases, and decreases, while knitting a hat to match your new mitts. The complete pattern for these mitts, written in knitters shorthand, is included after this, along with a full list of all the instructional videos that I've recommended for each technique. Happy Knitting!
Shorthand Pattern
CO 40 using long-tail method Rows 1-10) K Row 11) K Row 12) P Rows 13-22) repeat rows 11 and 12 5 more times, place fixed marker on this row Row 23) Sl1, K39 Row 24) Sl1, P39 Rows 25-36) repeat rows 23 and 24 6 more times Row 37) K, place fixed marker on this row Row 38) P Rows 39-46) repeat rows 37 and 38 4 more times Row 47) (K2, P2) repeat to end of row Rows 48 - 56) repeat row 47 BO in pattern Sew up edges, leaving a gap between the 2 fixed markers.
Instructional Video Links
Long-Tail Cast On, by VeryPink Knits: www.youtube.com/watch?v=sN9cNEozOLc How to make a Slip-Knot, by Studio Knit: www.youtube.com/watch?v=EjSJfsudZnE Knit Stitch/Garter Stitch, by New Stitch a Day: www.youtube.com/watch?v=AKRAJEj7lcl Purl Stitch, by New Stitch a Day: www.youtube.com/watch?v=xvL4v yBs50 2&2 Ribbing, by Bethintx1: www.youtube.com/watch?v=t5FOjS-f6R8


