Sheepster
Designed by Nancy Anderson Skill Level: Intermediate Skills Required: circular knitting using either dpns or magic loop, knit, kfb,k2tog,pick up stitches, simple seaming, basic embroidery for face. Size: approx 11"' tall
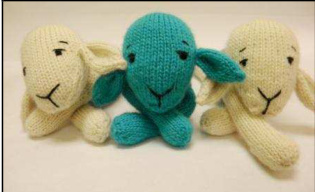
ModelinNoroSilkGarden
ModelinFinoLana del Artista Yarn Requirements: Head, legs & vest, (MC): Solid colored worsted weight yarn, approximately 110 yards. Torso & Beret, (CC): Variegated worsted weight yarn, approximately 65 yards Models were stitched In the following yarns; MC: Stitch Nation Full O'Sheep [100 % wool; 155 yds/142 meters per 3.5 ounce/100 gram ball]; #2205 Little Lamb & Aquamarine. CC: Noro Silk Garden [45% mohair, 45% silk, 10% wool; 110 yards] color #87. Desert Garden Hand spun in Deep Blue Sea colorway Desert Garden Farms Hand dyed art yarn in Tie Dye colorway. Rio De La Plata Yarns Fino Lana del Artista (DISCONTINUED).
Recommended Needles Sizes:
US 6 (4 mm), (4) US 6 dpns or 32"circular needles for head, body & limbs. US 10 (6 mm), (4) US 10 dpns or 32" circular needles for vest. Gauge: Gauge is not important for this project. Needles are smaller than recommended for yarn weight, in order to achieve tightly knit fabric & prevent stuffing from showing through. Notions: stitch marker, stitch holder, tapestry needle, yarn bobbin or cardboard cutout for use in vest portion, poly-fil or wool stuffing, plastic pellets and knee high hose for weight, black embroidery floss and needle, red felt & matching sewing thread & needle, sharp scissors, (5) 5/8" buttons, sewing thread to match vest.
Pattern Notes
Toy is worked in round on double point needles (dpn's) or circular needles using the magic loop technique. Body and head are worked in one piece; stitches for body are picked up along the back of the head. Limbs are worked separately and sewn on using yarn tail. Optional plastic pellets packet is inserted into body to provide weight. To make packet, place %4 cup pellets into toe of knee high hose. Tie an overhand knot and fold the remainder of the hose back over the packet just made. Tie securely using overhand knot. Trim excess hose. Stuff weighted packet in the bottom most portion of the sheep's body. Copyright Nancy Anderson, 2011. All right reserved. For personal use only. Contact designer at nanderson360@gmail.com
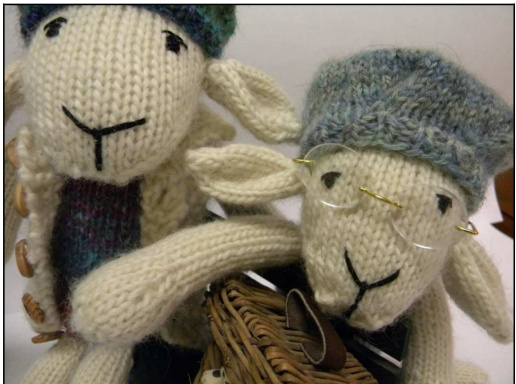
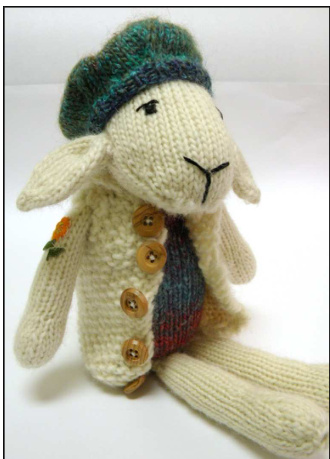
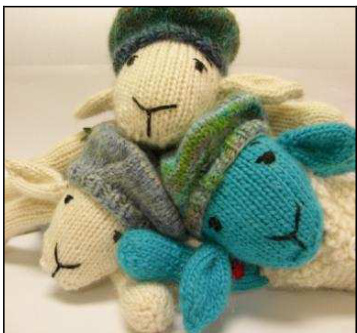
Purchased doll glasses,(model inDesert GardenFarms HandSpun)
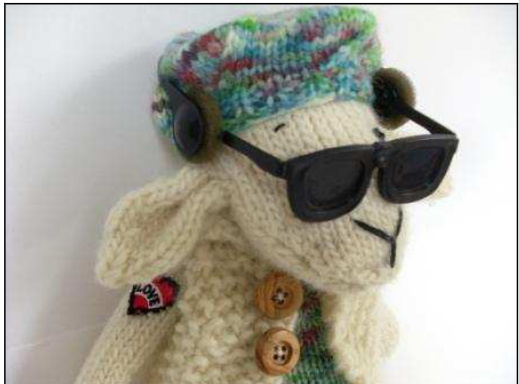
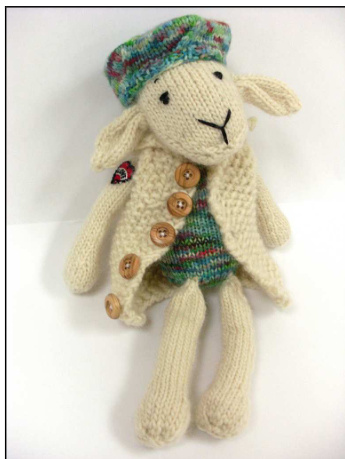
Purchased doll glasses & tattoo patch, (model in DG hand dyed in “Tie Dye'") When working on the vest separate balls of yarn are used. It is helpful to wind the small balls of yarn onto bobbins. Make simple yarn bobbin by cutting out a 3" x 2"' rectangle. Cut I/2”' slit in top edge of one side. This will be used for anchoring the yarn & thus preventing it from unwinding. To use, simply wind desired amount of yarn around the length of the rectangle. Anchor yarn after winding is completed by pulling yarn into the I”' slit. Tattoo is made from embroidered felt remnant and is attached by sewing using matching thread. Or small purchased patches, found in craft & sewing stores, may be used. Additional embellishments, such as doll glasses, make a nice addition. Check for these at chain craft stores & on Etsy. The facial features are done with embroidery floss and simple embroidery techniques, see schematic for details.
Abbreviations
BO =bind off CC = coordinating/accent color CO = cast on K = Knit Kfb = knit in front and back of st K 2 tog = Knit 2 together MC = main color P = purl Rnd = round St(s) = stitch(es) Tog = together
Stitches Used
1 x 1 rib = K 1, P 1 alternately around or across row. Kfb = increase made by knitting in the front and back of a stitch. K 2 tog = decrease made by knitting 2 stitches together Seed st = work K1, P1 as for 1 x 1 rib but for subsequent rounds/rows, knit the purl sts & purl the knit sts. Ears (make 2): Using MC & smaller needles, Cast on 10 sts, join being careful not to twist stitches. Rnd 1: (K1, Kfb) around: 15 sts. Rnd 2-11: Knit in ea st around: 15 sts. Rnd 12: (K 1, K 2 tog) around: 10 sts. Rnd 13: Knit in ea st around: 10 sts. Rnd 14: (K 1, K 2 tog) 3 times, K 1: 7 sts. Rnd 15: (K 1, K 2 tog) 2 times, K 1: 5 sts. Finish off, weaving yarn tail through live stitches. Do not stuff. Leave yarn tail for attaching to head.
Head
Using MC & smaller needles, Cast on 6 sts, join Copyright Nancy Anderson, 2011. All right reserved. For personal use only. Contact designer at nanderson360@gmail.com Rnd 1: Kfb in ea st around: 12 sts. Rnd 2: (K1, kfb) around: 18 sts. Rnd 3: (K2, kfb) around: 24 sts. Rnd 4: (K3, kfb) around: 30 sts. Rnd 5: (K4, kfb) around: 36 sts. Rnd 6: (K5, kfb) around: 42 sts. Rnd 7-16: Knit around. Rnd 17: K 2tog, K 17, (K 2 tog) twice, K 17, K 2 tog: 38 sts. Rnd 18: K 2tog, K 15, (K 2 tog) twice, K 15, K 2 tog: 34 sts. Rnd 19-23: Knit around. Rnd 24: K 2tog, K 13, (K 2 tog) twice, K 13, K 2 tog: 30 sts. Rnd 25: Knit around. Rnd 26: K 2tog, K 11, (K 2 tog) twice, K 11, K 2 tog: 26 sts. Rnd 27: K 2tog, K 9, (K 2 tog) twice, K 9, K 2 tog: 22 sts. Stuff head firmly, continue stuffing as rounds are completed. Rnd 28-30: Knit around. Rnd 31: K 2tog, K 7, (K 2 tog) twice, K 7, K 2 tog: 18 sts. Rnd 32: K 2tog, K 5, (K 2 tog) twice, K 5, K 2 tog: 14 sts. Rnd 33: K 2tog, K 3, (K 2 tog) twice, K 3, K 2 tog: 10 sts. Finish stuffing head and close opening using kitchener's stitch or simple whip stitch
Body
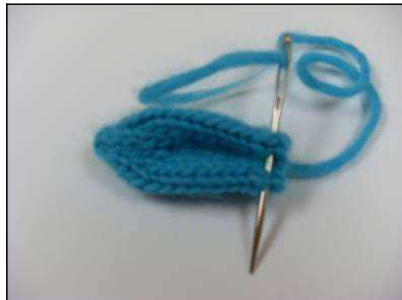
Using CC & smaller needles & working in about 2 ” from the top of the head, (see photo below for picking up sts), pick up 16 sts in a square configuration. Rnd 1-2: Knit in ea st around: 16 sts. Rnd 3: (K7, Kfb) twice: 18 sts. Rnd 4: (K2, Kfb) around: 24 sts. Rnd 5: Knit in ea st around: 24 sts. Rnd 6: (K 3, Kfb) around: 30 sts. Rnd 7: (K 4, Kfb) around: 36 sts. Rnd 8-38: K in ea st around: 36 sts. Rnd 39: (K 5, Kfb) around: 42 sts. Rnd 40: (K 6, Kfb) around: 48 sts. Rnd 41: K in ea st around: 48 sts. Rnd 42: (K 6, K 2 tog) around: 42 sts. Rnd 43: (K 5, K 2 tog) around: 36 sts. Rnd 44: (K 4, K 2 tog) around: 30 sts. Rnd 45: (K 3, K 2 tog) around: 24 sts. Stuff body firmly, continue stuffing as rounds are completed. Rnd 46: (K 1, K 2 tog) around: 16 sts. Rnd 47: (K 1, K 2 tog) 5 times, K 1: 11 sts. Finish stuffing and insert plastic pellet packet for weight. Weave yarn tail through live sts to close gap. Picking up stitches for body..
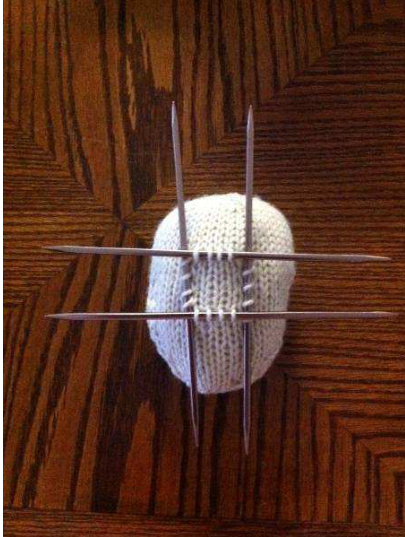
Photo used with permissionfromKimberlyKwon Copyright Nancy Anderson, 2011. All right reserved. For personal use only. Contact designer at nanderson360@gmail.com
Arms (make 2)
Using MC & smaller needles, CO 6 stitches, join to work in round. Rnd 1: Kfb in ea st around: 12 sts. Rnd 2: (K1, kfb) around: 18 sts. Rnd 3-7: K in ea st around: 18 sts. Rnd 8: (K 2 tog, K 6)twice, K 2 tog: 15 sts. Rnd 9-10: K in ea st around: 15 sts. Rnd 11: (K 2 tog, K 4)twice, K 2 tog, K 1: 12 sts. Rnd 12-31: K in ea st around: 12 sts. Stuff arm. Rnd 32: (K 1, K 2 tog) around: 8 sts. Bind off, leaving long tail for attaching to body. Legs (make 2) Using MC & smaller needles, CO 6 stitches, join to work in round. Work Rnds 1-11 as for arms. Rnd 12-36: K in ea st around: 12 sts. Stuff leg. Rnd 37: (K 1, K 2 tog) around: 8 sts. Bind off, leaving long tail for attaching to body.
Vest
Using MC & larger needles, CO 40 sts. Row 1-3: K 2, work in 1 x 1 rib for 36 sts, K 2: 40 sts. Row 4: K 2, work in seed st for 36 sts, K 2. Row 5: Make buttonhole; K 2, work in seed st for 34 st, K 2 tog, YO, K2. Buttonhole made. Row 6-12: rep row 4: 40 sts. Row 13: Rep row 5. Row 14-20: rep row 4: 40 sts. Row 21: Rep row 5. Row 22-28: rep row 4: 40 sts. Row 29: Rep row 5. Row 30: Beg armholes; divide sts into 3 groups (11, 18,11), leave un-worked sts on needles, working with 1"t 11 sts, K2, seed st for 7 sts, K 2: 11 sts. Row 31-36: K 2, seed st for 7 sts, K2: 11 sts. Row 37: K2, seed for 5, K 2 tog, YO, K 2. Buttonhole made. Place worked sts on stitch holder and proceed to middle section. Wind several yards of yarn on bobbin and break from skein, (this will be used to finish knitting the last rows of the vest and the collar).. Row 38: Attach yarn to first st of middle row, K2, seed st for 14 sts, K 2: 18 sts. Row 39-45: rep row 38, break off yarn but leave un-worked sts on needles & proceed with last section. Row 46-52: rep row 31 (K2, seed st for 7, K 2): 11 sts. Row 53: Place all 40 sts back on needles. Using yarn from previously wound bobbin; (K 3, K 2 tog) across: 32 sts. Row 54: (K 2, K 2 tog) across: 24 sts. Row 55-62: work in 1 x 1 ribbing, BO after last row. Weave & trim ends. Block as needed. Add buttons.
Beret
Using CC & smaller needles, CO 6 sts. Rnd 1: Kfb around: 12 sts. Rnd 2: (K1, kfb) around: 18 sts. Rnd 3: (K2, kfb) around: 24 sts. Rnd 4: (K3, kfb) around: 30 sts. Rnd 5: (K4, kfb) around: 36 sts. Rnd 6: (K5, kfb) around: 42 sts. Rnd 7: (K6, Kfb) around: 48 sts. Rnd 8: (K7, Kfb) around: 54 sts. Rnd 9: (K8, Kfb) around: 60 sts. Rnd 10: (K9, Kfb) around: 66 sts. Rnd 11: (K10, Kfb) around: 72 sts. Rnd 12-15 K in ea around. Rnd 16: (K 10, K 2 tog) around: 66 sts. Rnd 17: (K9, K2tog) around: 60 sts. Rnd 18: (K8, K 2tog) around: 54 sts. Rnd 19: (K7, K 2tog) around: 48 sts. Rnd 20: (K6, K 2tog) around: 42 sts. Rnd 21: (K 5, K 2tog) around: 36 sts. Rnd 22-24: Work in 1 x 1 rib: 36 sts. BO, weave & trim end. Block.
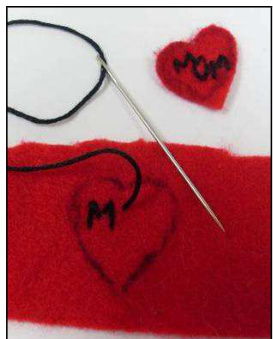
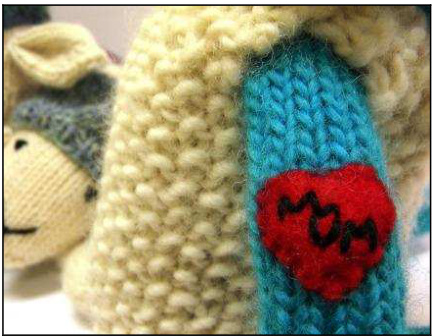
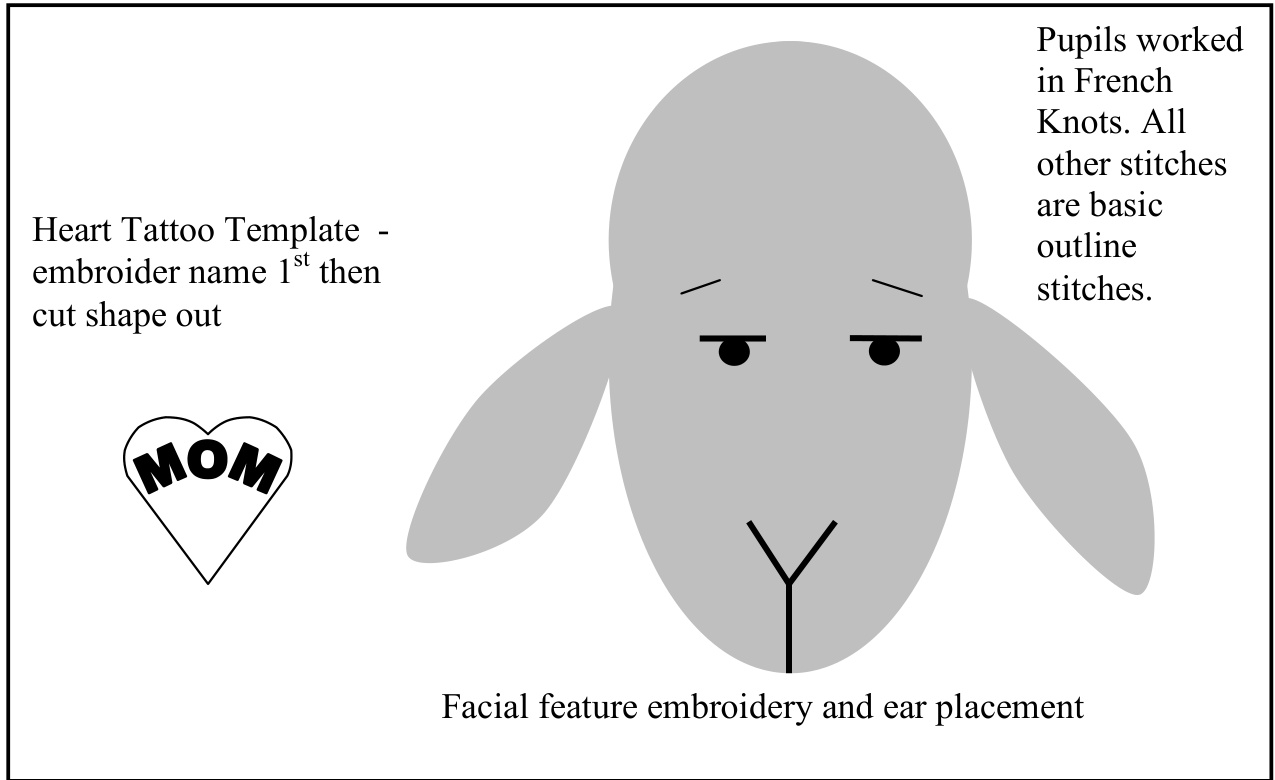
Mom Heart Tattoo
Using a small square remnant of red felt and the heart tattoo template found on last page, lightly sketch heart shape on to felt. Embroider “MOM within the outline of the heart using a basic outline stitch, (See photo). Finish off floss. Using sharp scissors, cut heart shape out. Set aside.
Finishing
Ears: Working from the cast on end, pinch the bottom of the ear together to form a fold. Using yarn tail and tapestry needle, placeastitchinthe fold to hold the shape.
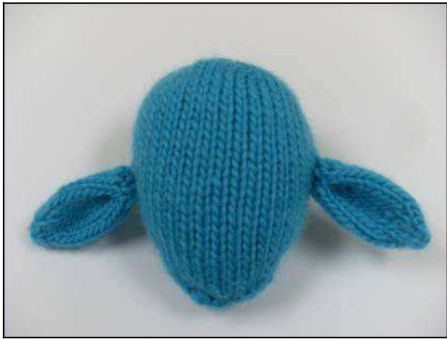
Place ear on side of head at about 1 /2" from top of head and attach by sewing using the remainderof the yarn tail. Knot securely, weaveand trimthe excess yarn. Using the photos as a reference, attachthearmsandlegstothe body by sewing with yarn tail. Place sheep on flat surface in sitting position. Attach legs to the lower front of his body so that he can sit.
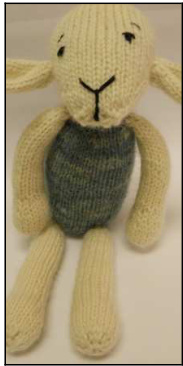
Face: Using diagram on next page embroider face with black floss and a sharp needle using a basic outline stitch. Pupils are made using French knot or satin embroidery stitches. Copyright Nancy Anderson, 2011. All right reserved. For personal use only. Contact designer at nanderson360@gmail.com
Sew tattoo to upper arm using matching thread and sharp hand sewing needle. Block beret and vest as needed and/or desired. Sew buttons on to vest.
Special thanks to the Kimberly Kwon(Ravelry user name kkhymn) for technical editing and to Ravelry members atwhittzend, Iknitcupcakes and Tipsyfox for all of their invaluable help test knitting this toy. Thank you for purchasing my pattern. I hope that you will enjoy knitting it as much as I enjoyed designing it. Please contact me with questions or concerns at the email address found in the footer of this document. And come visit me at yarnjulelpsontheveranda.com or on Ravelry where my user name is Missjulep. Finally, this is your pattern, you purchased it. What you do with the finished Sheepster is your own business. However, please do not reproduce or sell this pattern without my express permission.