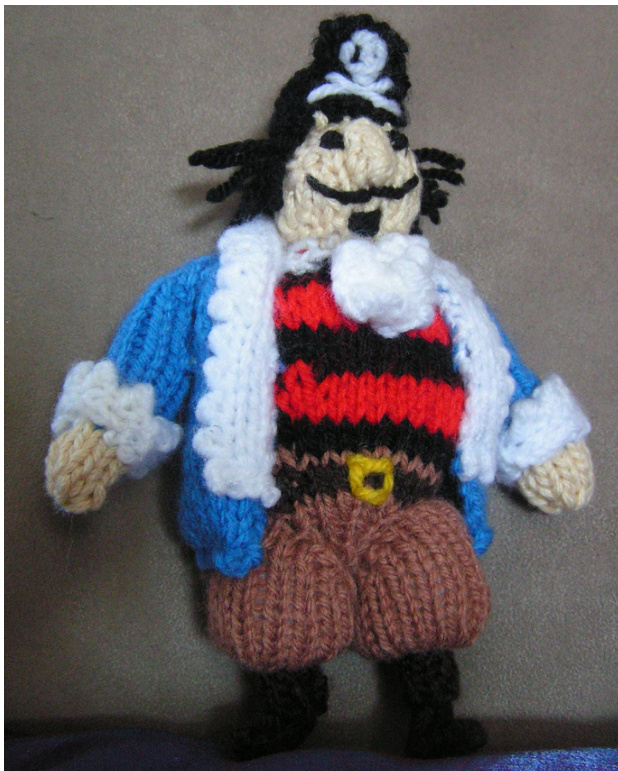
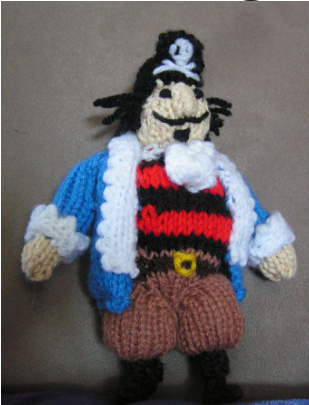
Knitting Pattern Captain Pugwash
Please note : This pattern is not endorsed, sponsored or affliated with the owners of the intellectual property relating to Captain Pugwash. Lindum Crafts makes no claims to the trademarks, copyrights and logos relating to Captain Pugwash. Any claims to copyright are purely for the patterns, diagrams and pictures which make up this pattern. This pattern is provided for non profit use only, free of charge from the Lindum Crafts website.
Techniques :
Icords
To knit an icord cast on the required number of stitches onto a double ended needle, and slide the cast on stitches along so that you are knitting from the tail end of the stitches. When you have knitted the stitches keep sliding the icord along the needle, so that you are always knitting from the tail end and creating a small loop. · Occasionally give a tug to the cast on end to help the icord develop.
Knitting in the round
Cast on as normal on one of the double ended needles and then evenly distribute the stitche: across three needles, i.e. for 6 stitches you would have 2 on each needle. Hold the needles to form a triangle making sure that the cast on edge faces the centre on each needle and that the wool between needles is not twisted. Start knitting using the first cast on stitch (the slip knot) using the free needle. Once you have knit all the stitches off of the left hand needle it will become the free needle, and you knit off of the next needle with it, and so on until you have completed a round of knitting. Tension is important in knitting in the round, as the tension of the wool holds the other two needles in place.
Materials required :
50g ball teal blue double knit wool 50g ball light brown double knit wool 50g ball dark brown double knit wool 1m yellow double knit wool 4x 4mm double pointed needles 50g ball flesh coloured double knit wool 50g ball red double knit wool 50g ball black double knit wool 50g ball white double knit wool Scissors Yarn ne Stuffing
This pattern has been supplied by Lindum Crafts and is for personal use only. All patterns, diagrams and photographs @ 2014 Philip Skipper Page1of 7
Terminology
c/o = cast on, K1M1 = knit one and make one from the same stitch, P1M1 = purl one and make one from the same stitch, c/of = cast off, K2tog = knit two stitches together, P2tog = purl two stitches together, K = knit (number after the K means knit that many stitches), P = purl (number after the P means purl that many stitches), Kco = Knit-on cast-on (number after the Kco means cast on that many stitches, to Knit-on cast-on make a knit stitch and then slip it back onto the left hand needle).
Knitting Instructions
Head and Torso (knit one of these)
1. c/o 4 in flesh coloured wool 2. icord 1 round 3. icord K1, K1M1, K1M1, K1 = 6 stitches 4. icord 1 round and distribute evenly across 3 needles and knit in the round for the rest of the pattern 5. K1M1 x 6 = 12 stitches 6. Knit 2 rounds 7. (K2, K1M1, K1) x 3 = 15 stitches 8. Knit 3 rounds 9.. Change to white 10. (K2tog, K1, K2tog) x 3 = 9 stitches 11. K1M1 x 9 = 18 stitches 12. Needle 1 (K1M1, K4 in black, K1M1). Needle 2 (K1M1, K1M1, K4). Needle 3 (K4, K1M1, K1M1). = 24 stitches 13. Needle 1 (K1M1, K1, K4 in black, K1, K1M1). Needle 2 K8. Needle 3 K8. = 26 stitches 14. Change to black 15. Needle 1 K10. Needle 2 (K1M1 x4, K4). Needle 3 (K4, K1M1 x4). = 34 stitches 16. Knit 1 round 17. Change to red 18. Knit 3 rounds 19. Change to black 20. Knit 3 rounds 21. Change to red 22. Knit 3 rounds 23. Change to black 24. Knit 2 rounds 25. Change to light brown 26. Knit 1 round 27. Change to dark brown 28. Knit 2 rounds 29. Change to light brown 30. Needle 1 (K3, K2tog) x2. Needle 2 (K1, K2tog) x4. Needle 3 (K2tog, K1) x4. =24 stitches 31. Knit 1 round 32. K2tog x 12 = 12 stitches 33. Knit 2 rounds 34. K2tog x6 = 6 stitches 35. Cut the wool with a 10 cm tail and using the yarn needle feed it through the stitches on the needles to cast off. Firmly stuff the body and head and then pull the wool tightly to close the end and then sew off.
Face (knit one of these)
Nose (knit one of these)
1. c/o 4 in flesh coloured wool 2. K4 3. P1M1, P2, P1M1 4. K6 5. P6 6. K1M1, K4, K1M1 7. P8 8. K1M1, K1M1, K4, K1M1, K1M1 9. P3, S1, P4, S1, P3 10. K4, S1, K2, S1, K4 11. c/of 1. c/o 3 in flesh coloured wool 2. icord 2 rounds 3. icord K2tog, K1 4. icord K2tog 5. Using the yarn needle pass the wool through the final stitch and pulling tight sew off.
Hat (knit one of these)
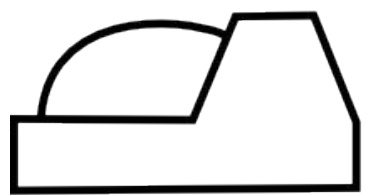
1. c/o 4 in black wool 2. icord 1 round 3. icord K1, K1M1, K1M1, K1 = 6 stitches 4. icord 1 round and distribute evenly across 3 needles and knit in the round until line 10 5. K1M1 x 6 = 12 stitches 6. Knit 2 rounds 7. (K2, K1M1, K1) x 3 = 15 stitches 8.Purl 2 rounds 9. c/of needles 1 and 2 and slip the final c/of stitch to needle 3 10. P6 11. K6 12. P2tog, P2, P2tog 13. K4 14. P4 15. K4 16. P2tog, P2tog 17. c/of 18. Fold the flap you have just made in half, wrong side to wrong side down the knitted in th round section, and sew down. 19. Fold the purled loop and flap up to give the shape shown below and embroider a skull and crossbones onto the flap in white wool.
This pattern has been supplied by Lindum Crafts and is for personal use only. All patterns, diagrams and photographs 2014 Philip Skipper Page3of 7
Legs (knit two of these)
1. c/o 10 in light brown 2. K10 3. P1M1, P8, P1M1 4. K12 5. P1M1, P10, P1M1 6. K14 7. P1M1, P12, P1M1 8. Distribute across 3 needles and knit in the round for the rest of the pattern, 5 on needles 1 and 2, 6 on needle 3. 9. Knit 5 rounds 10. Needle 1 (K2tog, K1, K2tog). Needle 2 (K2tog, K1, K2tog). Needle 3 (K2tog x 3). 11. (K1, K2tog) x 3 12. Cut the wool with a 10 cm tail and using the yarn needle feed it through the stitches on the needles to cast off but do not pull tight at this point.
Coat (knit one of these)
Coat sleeves and hands (knit two of these)
1. c/o 16 in teal blue 2. K16 3. P1M1, P14, P1M1 4. K18 5. P1M1 x 4, P10, P1M1 x 4 6. K26 7. P26 8. K26 9. P26 10. K26 11. P6, P1M1, P12, P1M1, P6 12. K28 13.P28 14. K28 15.P28 16. K28 17.P28 18. K28 19. P4, P1M1, P18, P1M1, P4 20. K30 21.P30 22. K30 23.P30 24. K30 25.P30 26. K30 27. c/of 1. c/o 4 in teal blue 2. K4 3. P1M1, P2, P1M1 4. K6 5. P6 6. Distribute evenly across 3 needles and knit in the round for the rest of the pattern 7. (K1M1, K1) x 3 8.Knit 12 rounds 9. Change to flesh coloured wool 10. Knit 4 rounds 11. (K2tog, K1) x 3 12. Cut the wool with a 10 cm tail and using the yarn needle feed it through the stitches on the needles to cast off but do not pull tight at this point.
Ruff (knit one of these)
1. c/o 5 in white 2. K5 3. P2, S1, P2 4. K1M1, K1, S1, K1, K1M1 5. P2tog, P1, S1, P1, P2tog 6. K2, S1, K2 7.P5 8. K2, S1, K2 9. P1M1, P1, S1, P1, P1M1 10. K2tog, K1, S1, K1, K2tog 11. P2, S1, P2 12. K5 13. Repeat lines 3-7 again 14. c/of allstitches doing K2tog, K1, K2tog. 15. Sew the c/of tail up through the middle of the ruff and back down and pull tight.
Decorative trims and boots
The decorative trims are knitted with a variant of picot point selvedge.
Cuffs (knit two of these)
1. c/o 3 in white 2. Kco 2, c/of 2, knit remainder 3.P3 4. repeat 2 & 3 six times 5. Kco 2, c/of 2, knit remainder 6. c/of purlwise and sew into a hoop. Collar trim (knit one of these) 1. c/o 3 in white 2. Kco 2, c/of 2, knit remainder 3. P3 4. Repeat 2 & 3 twenty four times 5. Kco 2, c/of all stitches. Boot bodies (knit two of these) Boot tops (knit two of these) 1. c/o 4 in brown 2. icord 10 rows 3. c/of 1. c/o 7 in brown 2. icord 3 rows 3. c/of To assemble the boots open out the boot top and pull the boot body into the gap level with the top. Sew the tops together. Fold the remainder of the boot body in half and sew across the fold to make the heel. Unfold and sew across the top side of the fold to neaten it.
Assembly
Legs
Line up the legs on each side so that the bottoms are parallel. The front of the torso has the four black stitches in the white collar. Using light brown wool, stitch the top half of one leg onto the body from approximately half way down the side, moving up the leg and over as shown by the dotted line.

The leg is sewn on to make a pocket which will be stuffed, so holding it in place by putting a finger inside helps keep the pocket open. Sew the leg so that the section knitted in the round comes under the body and is kept open, making the pocket, and then stitch round and back up to the top where you started sewing originally (arrowed in image). Repeat this for the second leg, double checking that it does line up and that the bottom of the leg is level with the first leg. Stuff the legs, making sure to push the stuffing all the way up each leg into the pockets, then pull the cast off ends tight and sew off.
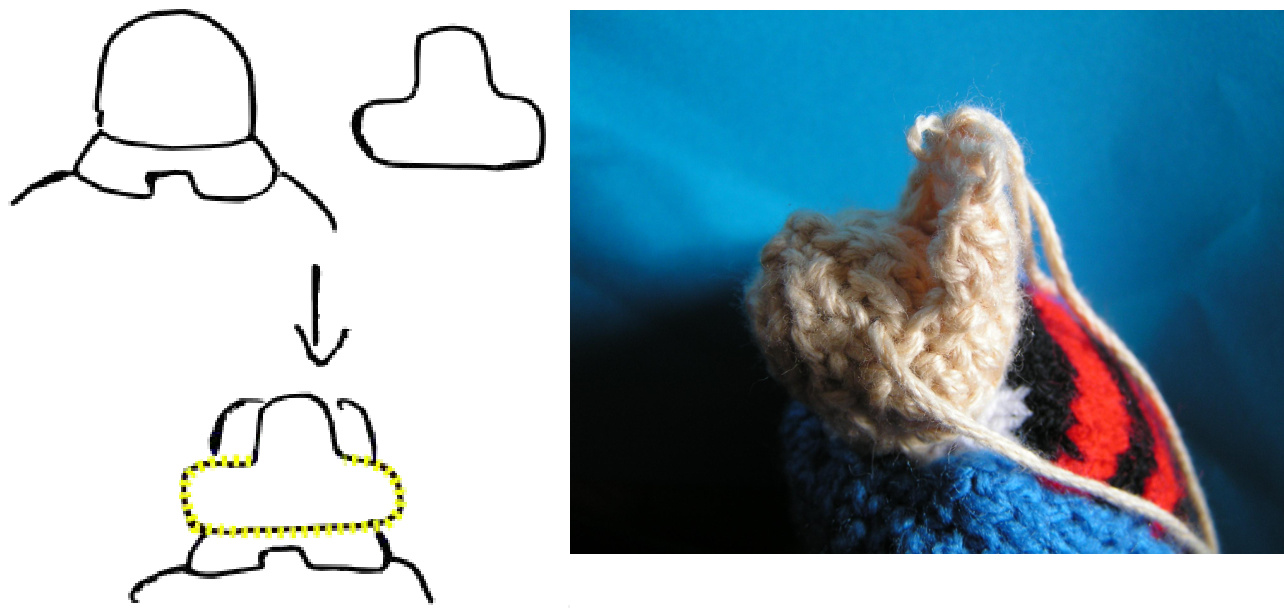
Face
Using flesh coloured wool sew the bottom half of the face onto the head as shown in the diagram below (yellow dashed lines show where to stitch). You should now have something that looks like the photograph.
Firmly stuff the lower half of the face and sew up the two sides loosely stuffing it then sew over the top to close it off.
Coat and arms
Sew the curved top of the coat round the shoulders hiding the white collar on the torso at the back and secure to the body and legs with a couple of stitches. Sew the arms on using blue wool in the same fashion as the legs, making the pocket and stuffing it before closing off the hand and sewing closed. Take the collar trim and drape it around the shoulders with the flat edge running parallel to the edge of the coat and line it up so the two ends are level, then sew the flat edge to the coat using white wool (see picture below). Slip the decorative cuffs over the hands so that the flat edge is lined up with the coat/hand join, and sew the flat edge to the arms using white wool (see picture below).
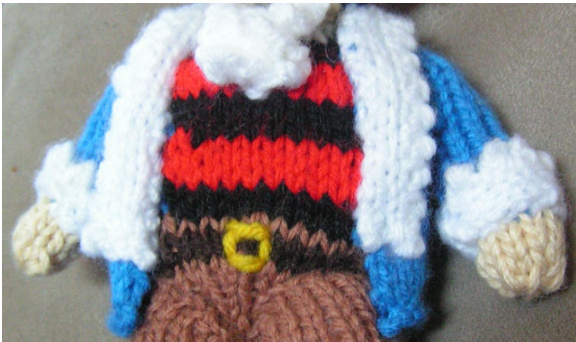
Next take the ruff and sew it to the body stitching down the centre in white wool as shown above. Using the yellow wool embroider on a belt buckle.
Adding hair and a hat.
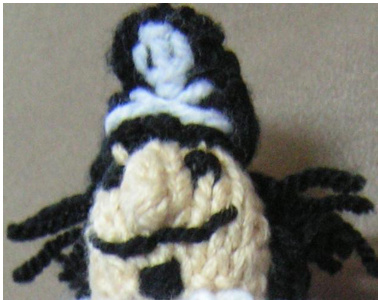
Hair is added by taking 6cm long pieces of black wool and sewing 3cm through the head and tying a knot to give two 3cm lengths. You will need about 30 of these so it's a little laborious but worth the effort. Once the hair is in place sew the hat on as shown below.
Face
Sew the nose centrally onto the face with the top of the nose just below the bottom of the hat. Embroider on the eyes, moustache and beard as shown in the picture above.
Boots
Last but not least sew the boots to the bottom of the trouser legs using a long piece of dark brown wool. When you have sewn all the way around the top of the boot take the tail of the wool up through the leg and out underneath the back of the coat, pull tight to draw the boot up slightly into the trouser leg then tie off. Ho, ho me hearties, your Captain Pugwash is now complete!