http://darktwist.com

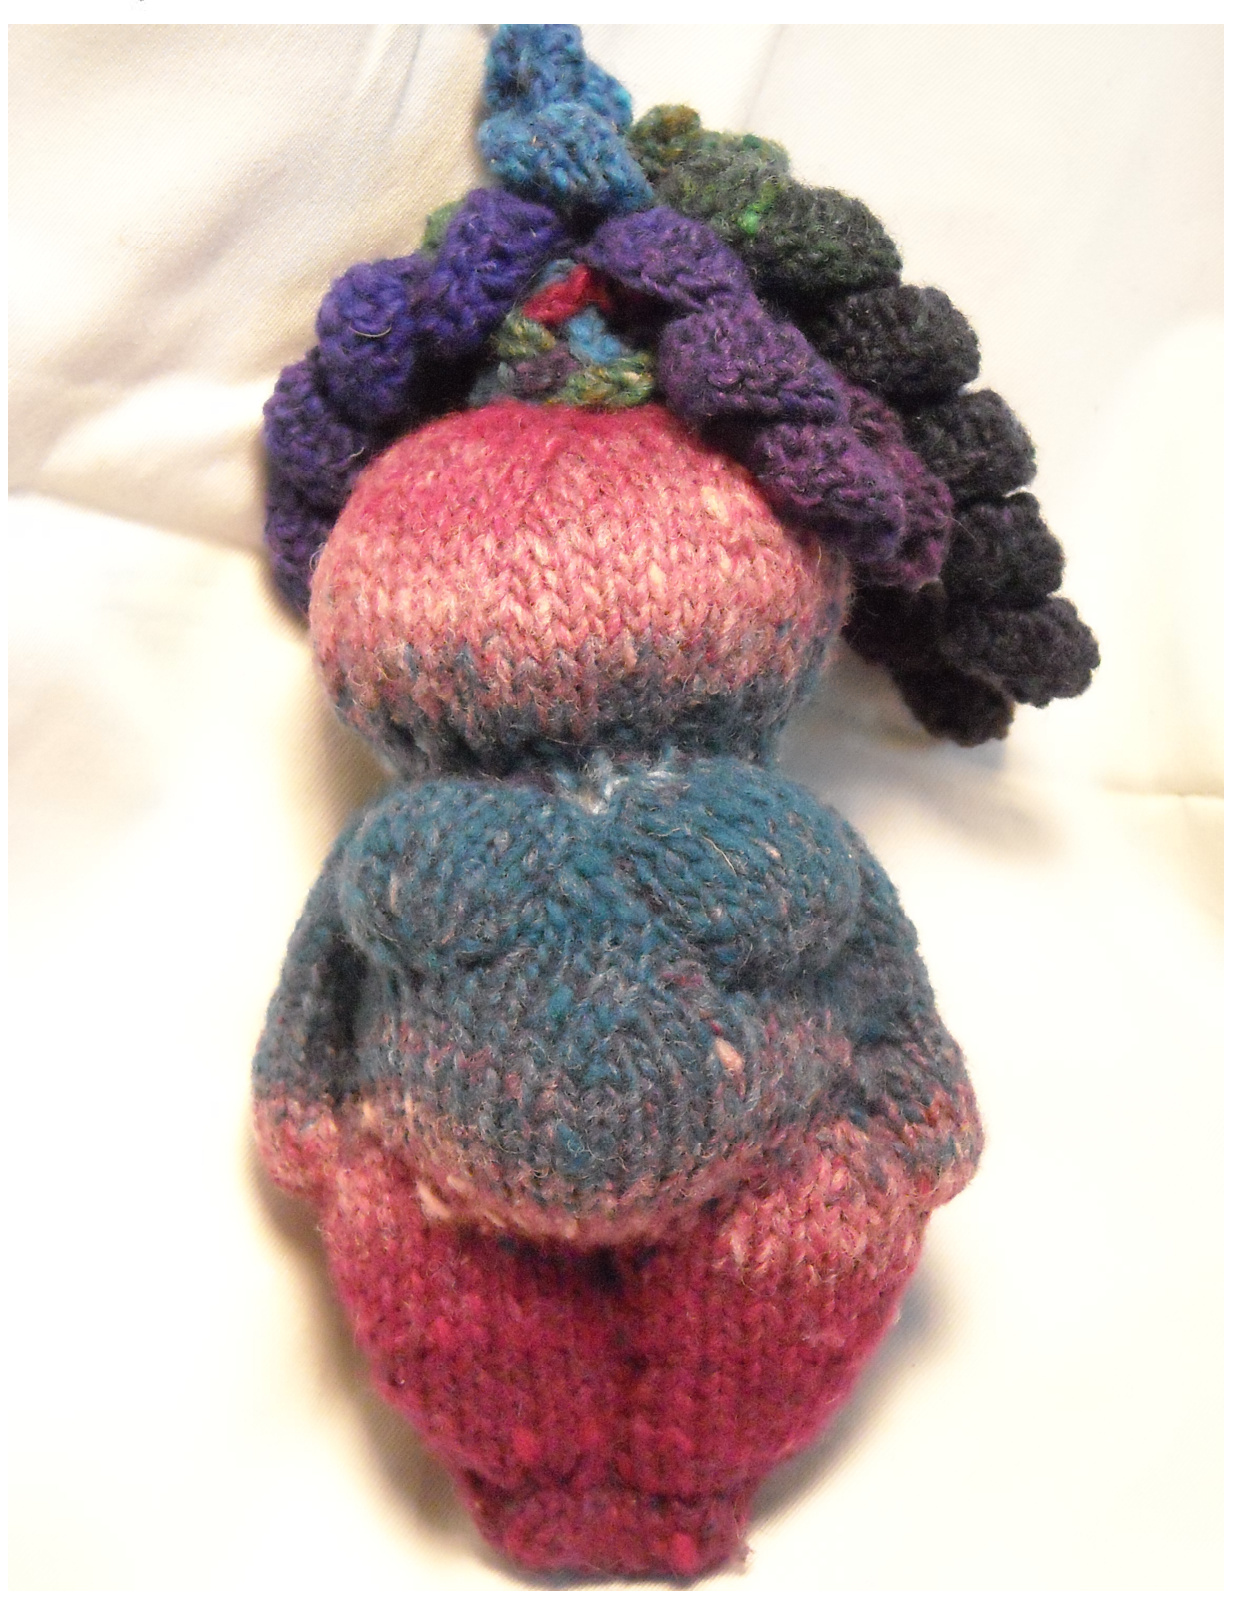
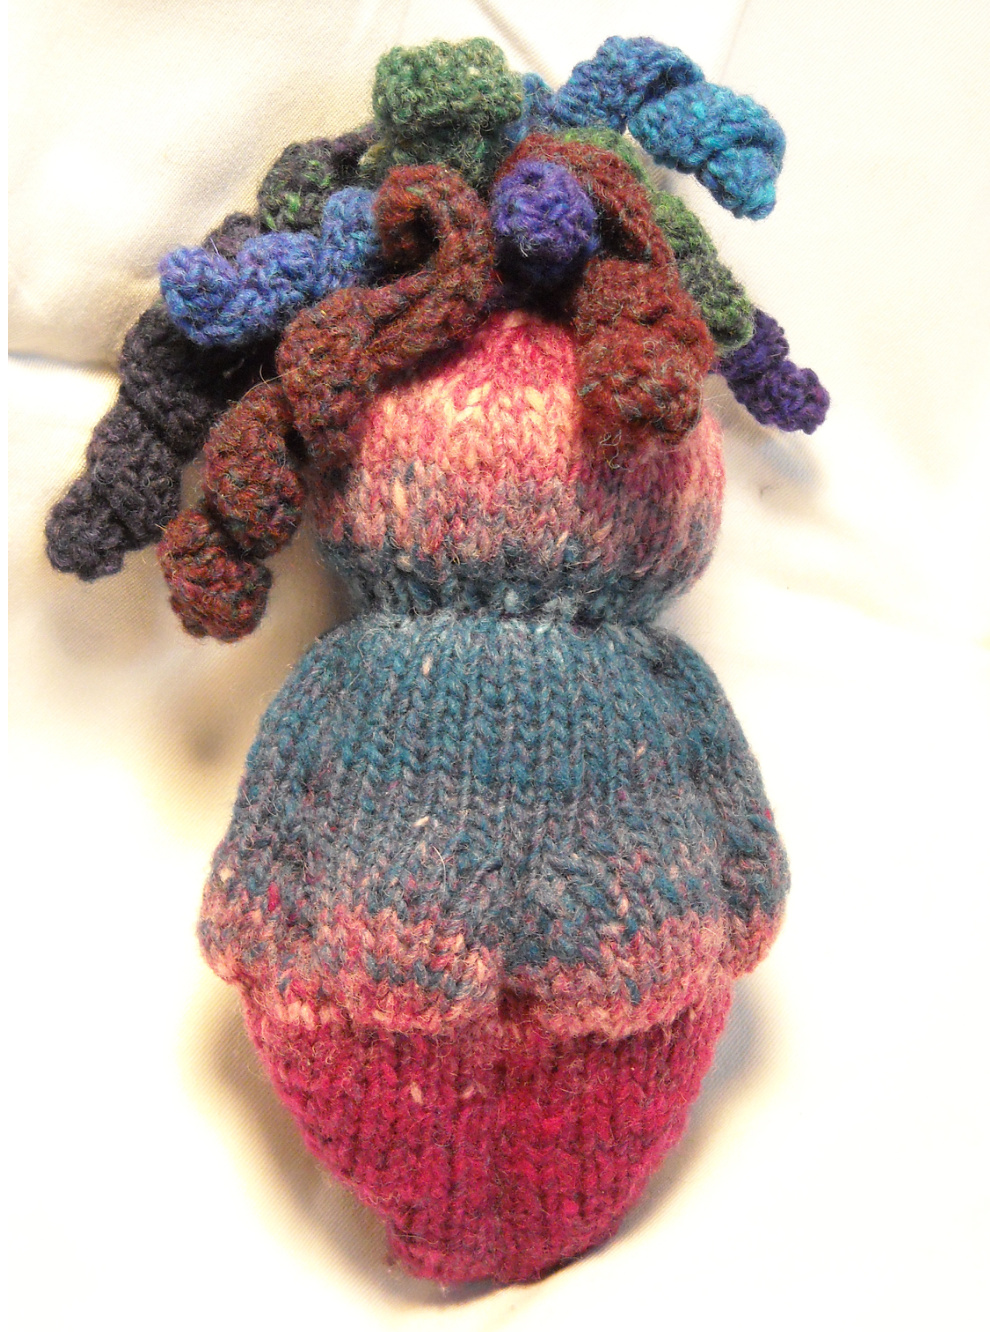
Venus de Merino
Description
Inspired by one of mankind's oldest works of art, the Venus of Willendorf, this little soft sculpture was my way of celebrating knitting in general and the glorious colors of Noro Kureyon in particular. Everyone needs a knitting goddess now and then. Size A petite $7^{\prime\prime}$ (not including hair)
Yarn
Noro Kureyon - I used odds and ends leftover from various projects, but all together it would be less than 1 ball. It would also be a great way to showcase handspun.
Needles
Size US 6 (4 mm): $32^{\prime\prime}$ circular
Notions
Yarn needle (or if you have one handy a longer doll needle), stuffing of whatever type you prefer (I used yarn ends and polyester for this example, but even roving would work), and a small gauge dpn for manipulating the stuffing through the knitted fabric.
Gauge
26 sts and $28\ \mathsf{r o w s}\,=\,4^{\prime\prime}\ [10\ \mathsf{c m}]$ in St st.
Abbreviations
A list of standard knitting abbreviations can be found at http://knittinghelp.com, as well as videos demonstrating any unfamiliar stitches. Some sewing terms that may not be familiar - Backstitch: Begin with a couple of stitches worked on the spot, then take a stitch and a space. Take the needle back over the space and bring it out the same distance in front of the thread. Running Stitch: Fasten the thread with a few backstitches and work small stitches by passing the needle over and under a few fabric threads and pulling through the fabric. Keep the stitches and spaces as even as possible.
Pattern Notes
Please read through the whole pattern before beginning. The knitted fabric should be relatively firm. Keep in mind you'll be stuffing, and then stretching when you sew in the body lines. There are no short rows in the pattern, the shapes are created solely through increases and decreases, and the final sculpting. Essentially this is a pattern that I knitted as I went. A lot of intuition went into the placement of shaping and sculpting, so this will be one of my wordier patterns. Feel free to skim over my editorial bits, but you might want to check them out just to get your own "feel" for the pattern.
Pattern
These directions will start at the toe and work up to the top of the head. Once the head is about 2/3 complete, it will be time to stuff the body. This will leave you wiggle room and a margin for reworking any of the stuffing. Also, the pattern is written for magic loop technique. Turkish cast on tutorials are aplenty, I would just search it with your favorite engine if you're not familiar with it. CO 16 (8 on each needle) using a Turkish cast on. Note: If you leave a relatively long tail, $8^{\prime\prime}$ or so, you can combine tasks by weaving in your end and then bringing it out to the right side of your work at the center and securing it with a backstitch. This gives you an anchor for stitching the seam to delineate her legs (and feet/toes if you're so inclined). I recommend securing the tail before starting the body shaping. Row 1: Knit Row 2: K1, kfb, k4, kfb, k1 (on each needle) Repeat rows 1-2 increasing the number of knit stitches between the increases until you reach a stitch total of 48. Basically, the same way you might start a toe-up sock. Knit 3 rows even. Now we're starting the shaping. If you're using handspun or something with varied color, you may want to take a look at what you've got knitted already and pick which side you want to be the front. Just knit across one needle to get turned around to the correct orientation for the needles, one half row won't make a difference in the overall figure. At this level will be the ends of her hands, the beginning of her belly and the foundation for her rear end. For the torso section, each row will be broken into 2 parts. Before the slash will be needle 1, after will be needle 2. Some of the abbreviations could have been compacted, but to make it easier to mark off shaping as you go, I've written them allin expanded form. Row 1: K24 / k6, kfb $_{x3}$ , k6, kfb x3, k6 (24/30) Row 2: Kfb x2, k9, kfb x2, k9, kfb x2 / kfb x2, k3, kfb, k7, kfb, k3, kfb, k6, kfb, k3, kfb x2 (30/38) Row 3: K12, kfb, k4, kfb, k12 / k6, kfb, k11, kfb, k1, kfb, k10, kfb, k6 (32/42) Row 4: k2, kfb, k8, kfb, k8, kfb, k8, kfb, k2 / k2, kfb, k18, k2tog, k16, kfb, k2 (36/43) Row 5: K11, kfb, k12, kfb, k11 / k19, k2tog, k1, k2tog, k19 (38/41) Row 6: K9, kfb, k18, kfb, k9 / K18, k2tog, k1, k2tog, k18 (40/39) Row 7:K5, ssk,k1,kfb, k22, kfb, k1, k2tog, k5 /k5, sk, k10, k2tog, k1, k2tog, k10, k2tog, k5 (40/35) Row 8: K4, ssk, k28, k2tog, k4 / k4, ssk, k9, k2tog, k1, k2tog, k9, k2tog, k4 (38/31) Row 9: Knit - it should be obvious by now which side is which, one bump versus two. Row 10: K3. ssk, kfb, k26, kfb, k2tog, k3 / k3, ssk, k9, k2tog, k10, k2tog, k3 (38/28) Row 11: Knit - we're done with shaping the rear end! Row 12: K2, ssk, k14, k2tog, k14, k2tog, k2 /k2, ssk, k20, k2tog, k2 (35/26) Row 13: Knit Row 14: K2, ssk, k6, kfb, k5, k2tog, k6, kfb, k6, k2tog, k2 / k2, ssk, k18, k2tog, k2 (34/24) Row 15: Knit Row 16: K2, ssk, k5, kfb x4, k3, k2tog, k4, kfb x4, k5, k2tog, k2 / k2, ssk, k16 , k2tog, k2 (39/22) Row 17: Knit Row 18: K2, ssk, k2, kfb, k7, kfb, k1, k2tog, k3, kfb, k7, kfb, k3, k2tog, k2 / k2, ssk x2, k10, k2tog x2, k2 (40/18) Row 19: Knit Row 20: K2, ssk, k1, kfb, k11, kfb, k3, kfb, k12, kfb, k1, k2tog, k2 / k2, ssk x2, k6, k2tog x2, k2 (42/14) Row 21: Knit Row 22: K2, ssk x2, k15, k2tog, k13, k2tog x2, k2 / k2, ssk, k6, k2tog, k2 (37/12) Row 23: k2, ssk, k12, ssk, k2tog, k13, k2tog, k2 / k12 (33/12) Row 24: k2, ssk, k10, ssk, k2tog, k11, k2tog, k2 / k12 (29/12) Row 25: k2, ssk, k8, ssk, k2tog, k9, k2tog, k2 / k12 (25/12) Row 25.5: k2, ssk, k6, ssk, k2tog, k7, k2tog, k2 / k12 (21/12) Row 26: k2, ssk, k4, ssk, k2tog, k5, k2tog, k2 / k12 (17/12) Row 27: k2, ssk, k2, ssk, k2tog, k3, k2tog, k2 / k12 (13/12) Once you've reduced down to 25 st total around, knit 3 rows even. This will be her neck. Head shaping: Row 1: Kfb around Row 2: Knit Row 3: \*Kfb, k12 repeat from \* around. (56 sts) Row 4-7: Knit even Now is a good time to go ahead and stuff the body. Make sure you stuff it relatively firmly with something of a cylindrical shape, and that you leave something of a gap where the leg seam is going to go, it just makes the stitching easier. 50 cent size balls of stuffing work well to accent the round rear end, then moving to the front, a $3^{\prime\prime}$ diameter sphere for the belly and more 50 cent size ( $1.5^{\prime\prime}$ or so) balls for her breasts. Row 8: $\ast\mathsf{K}6$ , k2tog rep from \* around Row 9: Knit Row 10: $^{*}\mathsf{K}\mathsf{5}$ , k2tog rep from \* around Row 11: Knit Row 12: $\ast\mathsf{K}4$ , k2tog rep from \* around Row 13: Knit Row 14: $^{*}\mathsf{K}3$ , k2tog rep from \* around Row 15: Knit Row 16: $\ast\mathsf{K}2$ , k2tog rep from \* around Row 17: Knit (21 sts) Stuff head. The original Venus had a somewhat low round shape rather than the modern oval we're used to. Break off your yarn (fairly long, you're going to use it for most of the stitching) use a yarn needle to draw it through the remaining stitches and pull up to close head.
Finishing
A line of stitching will run between her legs, inside each arm, under the belly, under each breast and butt cheek, and around the neck. One option that works well: leave a very long tail when you close the top of the head and once you've secured that area, run the needle down to the neck/shoulder join area and go around the neck using a running stitch. (you may want to circle the neck at both the top and bottom to define it a little more) Pull neck stitches tight and secure with back stitch. Now you should be back at the top of the shoulder. Stitch back and forth along the decrease lines to create the arm. Once you're a couple of rows away from the end of the hand, use a running stitch along the increases to pull up a rounded hand bulge at the end of the arm. Secure with a backstitch in the arm seam. If you have yarn left, don't cut it just yet, we can still use it in a minute. Secure a piece of yarn at the neck on the other side and repeat arm/hand shaping. Now you should have an odd looking tapered cylinder with a ball on top and some arms and dangly bits of yarn. Never fear, this is the magical part. Using one of the tails coming from your arm seams. Run the needle under the fabric until you reach the highest point of the rear end increases. Using a running stitch, follow that shaping, making two $"C"$ shapes. If needed, you can use the same piece to delineate each cheek by adding a few stitches in the center. Using your other tail from an arm seam (or securing a new piece). Starting at the place where the belly increases meet the arm decreases, with the running stitch follow the increases to make a larger rounded $^\mathrm{w}{\mathsf{C}}^{\prime\prime}$ shape up to the same spot on the other side, pull the stitches a little tight and you should see the belly pop out. Secure in the arm seam with a backstitch. Reversing across the body, run your stitches along the increases in the first breast in a smaller $"C"$ shape. Continue the line up to the neck, being sure to cross the neck stitch, then back down and repeat for the second breast. This area may need a little work. You may have to loosen or tighten your stitches to get both breasts and the cleavage to show properly. If things need fluffing, use your yarn needle or a small gauge dpn to reach within the body and scoop stuffing to the desired location. Remember that no woman is perfectly symmetrical, so don't be too hard on yourself if there is some slight variation. But by running this line of stitches up and down the cleavage, you cover any gaps left from the double decrease. Lastly, with the tail from your cast on, stitch back and forth up the center of the legs until you reach the belly. If you want to be anatomically correct, this is your chance, but I think she gets the point across without being that detailed. And finally - hair. There are many, many ways to make hair with yarn and many of them would look nice with this figure. Even braiding yarn and then stitching it down to mimic the original inspiration would work. Since I had so many color options and really wanted to highlight the yarn as well as the figure, I used simple crochet curls. Basically chain as many as you want, then turn and starting in the $2^{\mathsf{n d}}$ chain from the hook work 2 dc in each chain. Then I arranged the curls the way I liked, and used the cast on tails to stitch them together and to the top of her head. She also has a coronet of braids that circles the base of the curls and is secured both to the hair and the head. Leaf - #1 hook, sport weight yarn Chain 5, turn sl st in 2nd ch from hook, sc, hdc, dc, ch 2, turn sc in beginning ch, ch 2, dc in same space, hdc, sc, sl st (back down the leaf), break yarn and pull through loop. Weave in end being sure not to blunt the point of the leaf. Use beginning tail to attach. 5 petaled flower - First petal - Ch 3, dc in 1st ch, ch3, sc in 1st ch All other petals - Ch 2, dc in 1st ch, ch3, sc in 1st ch Weave in end, or use to make a decorative knot or place a bead in the center. Pull beginning tail tight and use to attach.
The End
Really any yarn will work for this pattern. You just need a fairly tight gauge. I initially made my prototype out of fingering acrylic on size 2 Us needles. It creates more of a pocket size Venus at about $5.5^{\prime\prime}$ in height. And remember stuffing is an art, work until it looks and feels right for your sculpture. Lastly, please share your experiences knitting this and post pictures!