SchKnit Happens Random Stranded Cap by Myra Wood
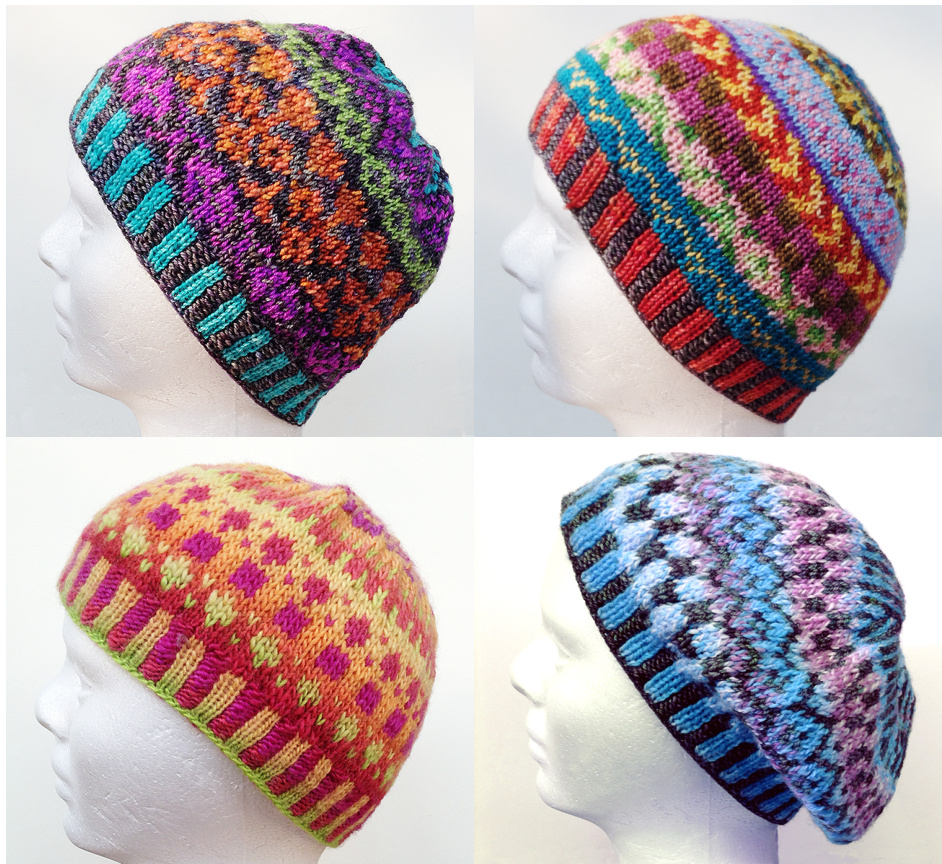
Another “recipe” for you to customize to your heart's content. Once the initial ribbing is done and the stitch count is increased, you're free to pick any stranded or Fair Isle stitch pattern you like that divides evenly into the total of 132 sts. Mix and match patterns, change colors as you wish or use just 2 colors throughout. It's totally up to you! Gauge: 26 sts x 36 rows= 4"/10 cm in stockinette
Materials
· Fingering or sock weight yarn: approx. 125-150 yards total. (Use as many small or partial balls as you like.) Here are a few of my current faves: (Any soft 1oo% merino wool fingering weight is my desert island pick) Koigu KPPPM Malabrigo Sock Knitpicks Chroma Miss Babs Yummy 2-ply Madelinetosh sock Shibui Sock Mrs Crosby Train Case You can use almost any fiber but keep softness in mind, nothing scratchy. I like something with a spring to it like a wool or acrylic blend that holds it shape better than plant fibers. · Size 3US/3.25mm, 16" circular needles The entire hat can be done with size 3 needles for a circumference of 21" and larger. If you want to make a smaller hat, 2o" or less, knit the ribbing with size 2US/2.5mm or 2.5US/2.75mm needles and then change to size 3US/3.25mm needles for the body for a slouchier look. Or you can stay with the smaller size throughout. I have a peanut-sized head of 2o" with hair and knit VERY loosely so I use smaller needles for the brim. · 1 stitch marker for beginning of round. More if desired to separate pattern repeats. · A good stranded pattern dictionary: 200 Fair Isle Motifs: A Knitter's Dictionary by Mary Jane Mucklestone Mastering Color Knitting by Melissa Leapman 150 Scandanavian Motifs by Mary Jane Mucklestone
Directions
Cast on l20 sts. I use a stretchy cast-on. It's simple once you get the hang of it and makes a really nice edge. It's listed on my tutorial page: http://myrawood.com/tutorials For the first few rounds I like to use the Magic Loop method of circular knitting since it's hard to knit the cast-on in the round with the 16" cable . You can always knit on DPNs if you're more comfortable. After a few rounds you'll be able to spread the stitches over the whole cable and work without the loop in the round. Note: Before you start knitting in the round, swap the first stitch on each needle. This makes a tighter join and it's also easier to move the second half of the stitches onto the needle from the cable. Also make sure the edge isn't twisted. All cast on stitches should have the bottom edge facing down. I have a tutorial on magic loop for circular knitting from the insideout on my home page. The only difference is you cast on all 120 stitches and split them between the 2 needles, trade the first two stitches and continue around as shown. http://myrawood.com/tutorials
Brim
I generally knit a 2X2 corrugated rib , (knit 2 with one color, purl 2 with another color), for the brim but you are welcome to do a basic 2x2 ribbing in one color if you prefer. After 1-1.5 inches of the brim I start the body. You can make the brim as deep as you want.
Body
On the next round, using one of the colors, \*knit 12, make 1. Repeat from \* 9 more times for a total of 132 sts. Choose any stitch pattern that cleanly divides into 132. Continue to knit the body using 2 different colors per round until the hat measures at least 4.5 inches from the cast-on edge. Leave all the tails to weave in at the end. For a slouchier hat, knit the body 5-6 inches. At this point you can try the hat on to see how it's progressing.
Crown
Time for the decreases! Every other round will be knit evenly without decreases. On the alternate round, you'll be knitting 1 less stitch before the decrease each round. You can continue to work in pattern or just knit stockinette for the crown. Decrease Round 1: \*Knit 1o, k 2 together. Repeat from \* around. On subsequent decrease rounds, knit 1 stitch less before the decrease (Next decrease rnd: k9, k2tog. Next decrease rnd: k8, k2tog, etc.) When 22 sts remain, k2 together all the way round, then knit 1 round. When 1l stitches remain. Knitl then knit 2 together all the way round. Cut a 6" tail, pull tight and thread a yarn needle. Weave in the tail and cut yarn. Weave in the original tail from the cast on.
Finishing
Stranded knitting requires weaving in tails at the end. I like to leave a 4 inch tail when changing colors and duplicate stitch the tails in at the very end. Stranded knitting does very well with blocking. By wet blocking the hat, the patterns tend to blend together better. Depending on the fiber, the hat may grow quite a bit when wet blocking it. My general approach is to fully soak the hat, squeeze out the water and pop it into the dryer on medium for 2O minutes. Then when it's still damp I use a Styrofoam wig head to set the shape and let it fully dry. You can dry it in the dryer for more or less time depending on the size desired.


