The moebius is one-sided and has only one edge. Using this moebius cast on technique, the work grows from the center to the outsides as the rounds are knit. The top is the bottom and the bottom is the top. The front is the back and the back is the front. The bind off is all the same tension, because it's all the same round of knitting. It's all twisted up and fun to knit! For more fun, I've added a simple twisted stitch to the classic pattern. For those of you who would prefer an infinity cowl, I've added a second version to the pattern. Enjoy!
Directions for Version #1 Moebius Cowl
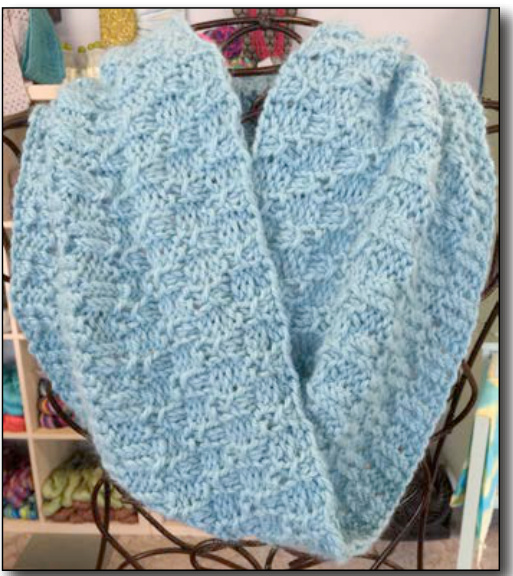
Twisted
Materials
Each version uses two hanks of Cloudborn Fibers, Baby Alpaca Bulky, Sky Blue 109 yards/hank. Gauge is 3 sts./in. 12sts./4in. For Version #1: Size 11 circular needles, 47" length. For Version #2: Size 11 circular needles, 24" length. Stitch Marker. Yarn needle. Instructions are included for both, Moebius (180 degree twist) and Infinity (no twist) styles. Each cowl is approximately is approximately 9" deep x 40" in circumference. The Moebius has a 180-deqree twist which is created at the special cast on, and join. Rounds of knitting grow from the center of the work to the outsides. MCO (Moebius cast on per following instructions) 120 stitches, PLACE MARKER, join. Note: This is the first knit stitch of the K2, P2 pattern of Round 1. Round 1: \*K2, P2, repeat from\* to the end of the round (EOR). See instructions of Step #11 in the moebius cast on directions below. Make sure to add a bit more tension to the first half round, working into the inverted Vs of the cast on. Round 2: \*K2, P2, repeat from \* to (E0R). Round 3: \*Slip 2 knit stitches knit wise, one at a time, to the right needle, pass the first stitch over the last slipped stitch and leave it on the left needle, slip the other stitch to the left needle, knit each stitch through the back leg, P2,repeatfrom \*toEoR. Rounds 4 and 5: \*K2, P2, repeat from \* to (EOR). Rounds 6 and 7: \*P2, K2, repeat from \* to (EOR). Round 8: \*p2, slip next 2 knit stitches knit wise, one at a time, to the right needle, pass the first stitch over the last slipped stitch and leave it on the left needle, slip the other stitch to the left needle, knit each stitch through the back leg, repeat from \* toEOR. Round 13: \*Slip 2 knit stitches knit wise, one at a time, to the right needle, pass the first stitch over the last slipped stitch and leave it on the left needle, slip the other stitch to the left needle, knit each stitch in the back leg, P2, repeat from \* to EOR. Round 18: \*P2, slip next 2 knit stitches knit wise, one at a time, to the right needle, pass the first stitch over the last slipped stitch and leave it on the left needle, slip the other stitch to the left needle, knit each stitch in the back leg, repeat from \* to EOR. Round 19: \*P2, K2, repeat from \* to (E0R).
Relaxed Bind Off
P2, bring yarn to the back, slip both stitches back to the left needle, knit them together through the back, K1, \*bring yarn to the back, slip both stitches back to the left needle, knit them together through the back, K1, bring yarn to the back, slip both stitches back to the left needle, knit them together through the back, P1, bring yarn to the back, slip both stitches back to the left needle, knit them together through the back, P1, bring yarn to the back, slip both stitches back to the left needle, knit them together through the back, K1 repeat from \* Notice the twisted stitch pattern only appears on the face of one half of the Moebius. But check out what happens when you lift thebottom up!
Moebius Cast On Information
There are a number of ways to learn the moebius cast on. Illustrated step-by-step instructions are included in Cat Bordhi's books, A Treasury of Magical Knitting and A Second Treasury of Magical Knitting. Both contain a wealth of information about and patterns for Moebius knitting. (She has graciously given permission to reference her ingenious Moebius cast-on technique.) These are step-by-step instructions for themoebius cast on: 1. Make a slip knot and slip it to the center of the 47" cable. Hold the knot on your cable with your left hand, allowing the needles to dangle. 2.With your right hand, take the LEFT needle and bring it towards you and up to make the cable into a loop. Allow the other needle to hang down. We won't need it until all the stitches are cast on. 3. Hold the slipknot, needle and looped cable in your right hand. Hold the needle half way to the tapered tip. 4. Tension the working yarn above the cable in your left hand. Think of the cable as a stationary object you will be wrapping the yarn around. You will be holding it in both hands to begin the cast on, which is a wrapping sequence. 5. Point the needle towards you and bring it under the cable, over the working yarn, and back up above the cable. Do a yarn over. 6. Repeat this sequence to cast on the appropriate amount of stitches. Each time you perform this “under the cable, yarn over" sequence, you are generating 2 stitches. Count only the stitches on the top of your needle. 7. Once you have the appropriate number of stitches cast on, spread the stitches around the needle and cables and up onto the other needle, so they form a circle. 8.Position the needles and stitches around them so that you can knit the stitches. This willtake some adjusting. 9.Set the work down on a table top with the tail on the left and, starting with the left side, position the needle above the cable, follow the path around the cables, making sure they are parallel allthe way around until you get near the right needle. 10. At this point the needle should be over the cable or the cable will be over the needle. Either way is ok. This should occur only once and will indicate the 180-degree twist. 11. PLACE MARKER. Knit into the slipknot to join the work. Pull the stitches together at the join to close gaps. K2, P2 into the "triangle" stitches or V's as they come to you. These are very different looking stitches made by the wrapping we did to cast on. The marker is crucial in moebius knitting. On the first round, it will let you know that you have done the twist correctly as you knit and it travels the path of the stitches onto the looped cable below your needle tips. When you see the marker on the cable below the needles, this is one half of the first round of moebius knitting. Once you see the marker at this point, continue the K2, P2 pattern until you can slip the marker from the left to right needle. This will be one complete round of moebius knitting.
Directions for Version #2
Infinity Cowl
Using the long tail method, cast on 120 stitches. Distribute the stitches evenly around the cable and needles, making sure they are not twisted. Place a marker on the right needle and join in the round, knitting the last cast on stitch to the first to connect. Round 1: \*K2, P2, repeat from\* to the end of the round (EOR). \* Round 2: \*P2, K2, repeat from\* to the end of the round (EOR). \* Round 3: \*Slip 2 knit stitches knit wise, one at a time, to the right needle, pass the first stitch over the last slipped stitch and leave it on the left needle, slip the other stitch to the left needle, knit each stitch in the back leg, P2, repeat from \* to EOR. Rounds 4 and 5: \*K2, P2, repeat from \* to (EOR). Rounds 6 and 7: \*P2, K2, repeat from \* to (EOR). Round 8: \*P2, slip next 2 knit stitches knit wise, one at a time, to the right needle, pass the first stitch over the last slipped stitch and leave it on the left needle, slip the other stitch to the left needle, knit each stitch through the back leg, repeat from \* to EOR. Rounds 9 and 10: \*P2, K2, repeat from \* to (E0R). Rounds 11 and 12: \*K2, P2, repeat from \* to (E0R). Round 13: Repeat Round 3. Rounds 14 and 15: \*K2, P2, repeat from \* to (E0R). Rounds 16 and 17: \*P2, K2, repeat from \* to (EOR). Round 18: Repeat Round 8. Rounds 19 and 20: \*P2, K2, repeat from \* to (EOR). Rounds 21- 39: Repeat Rounds 1-19. Relaxed bind off as described in Version #1. Blockingand Laundering Soak the cowl for fifteen minutes in lukewarm water with a small amount of non-rinsing wool wash. Squeeze out excess water. Lay it flat on a dry towel. Reposition the cowl often as it is drying. Please feel free to contact me with any questions: dianelaugustin@mac.com Designed and knit by Diane L. Augustin Copyright 2015. All Rights Reserved. Yarn Happy \* Bead Happy www.yarnhappybeadhappy.com www.yarnhappybeadhappy.etsy.com http://www.ravelry.com/designers/diane-l-augustin