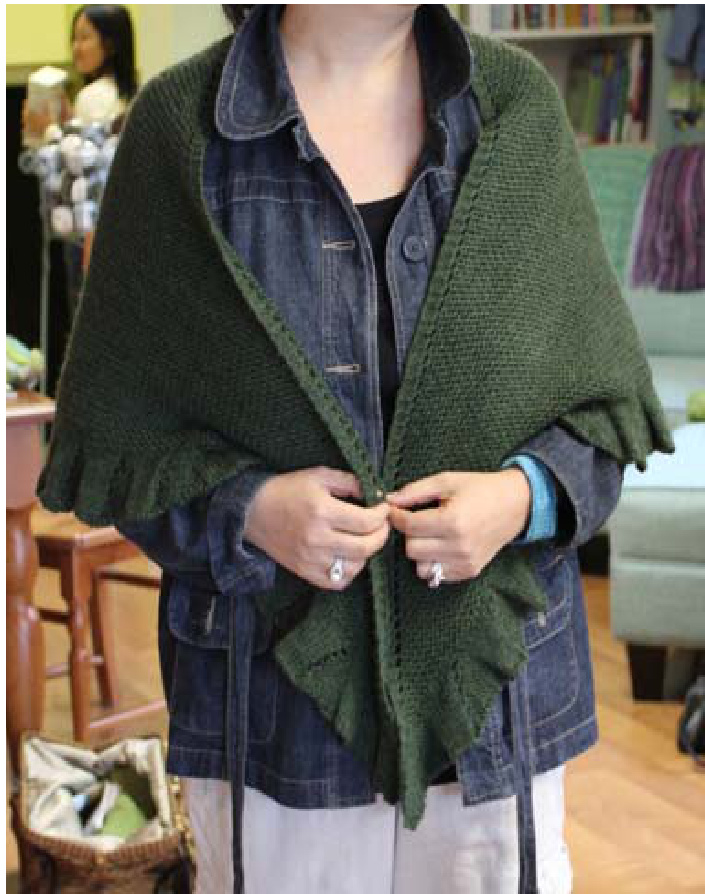
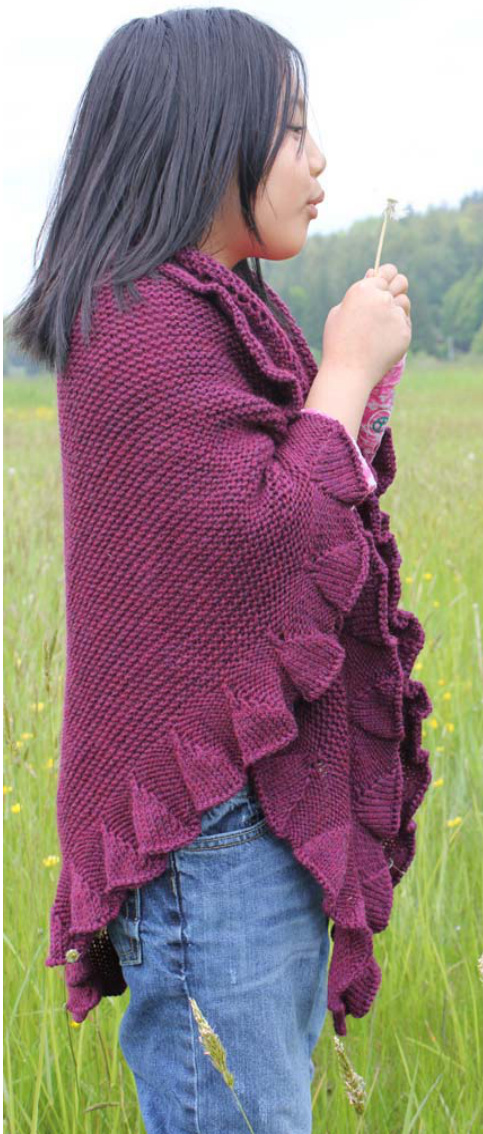
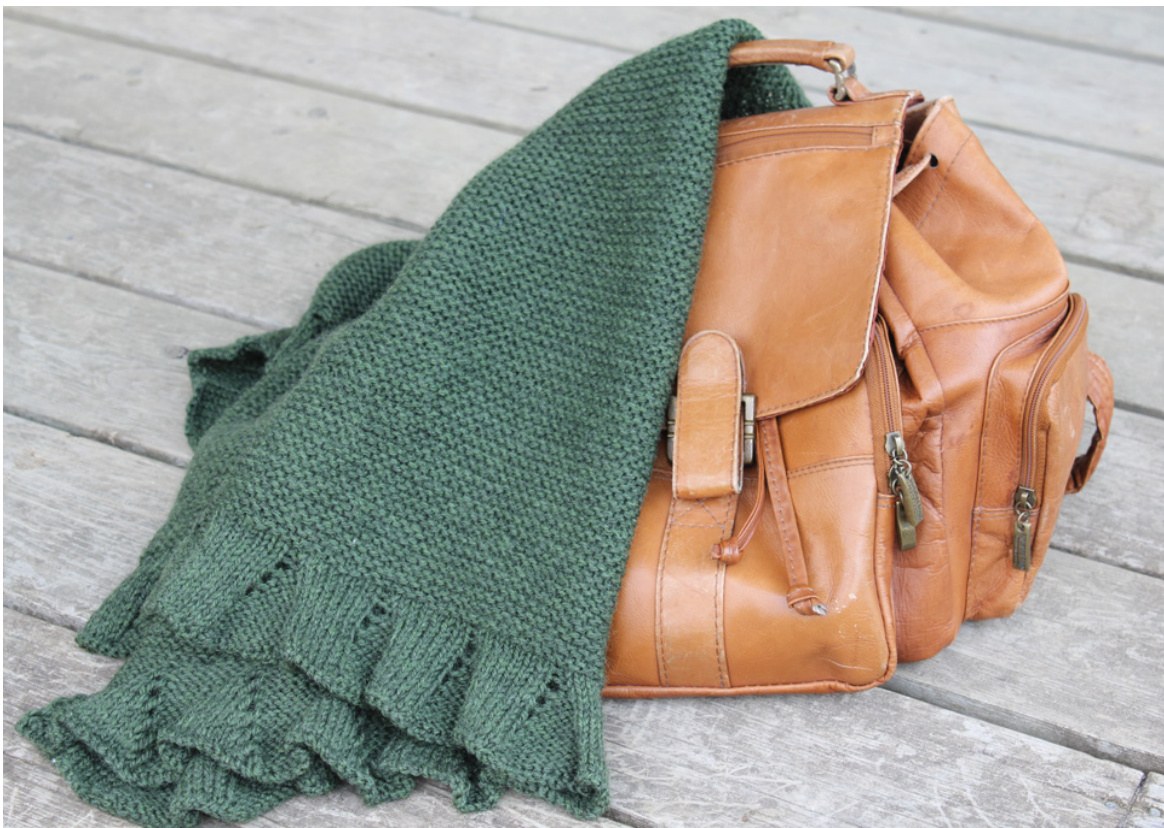
Milk Run Shawl by Cat Wong

(My inlerpretalion of Kate Miaaleton's Sreen Shanl) Completely reversible, this everyday shawl elevates jeans and a long sleeve t-shirt to casual elegance while grocery shopping with, or without, bodyguards in tow. Wrapped Danish-style, it transforms into a cozy rib warmer for stylishly walking the dog, or drapes beautifully about the shoulders when your castle feels a little chilly. Begun with a tab start, the shawl's garter stitch body creates texture and is warmly substantial. Increases are made using yarnovers and by knitting into the front/back of the stitch either side of center. The pleated ruffle around 2, or all 3, sides only looks complicated and takes just 14 rows to complete. Worsted weight yarn and relatively easy knitting make this a relaxing project for the experienced or novice knitter. Green Shawl: 70" wingspan, 30" depth Plum Shawl: 70" wingspan, 33" depth
Design noles:
-Using a different yarn weight will alter the final dimensions. -Why have I listed 7-8/10-11skeins for the Elann yarn? Everyone knits differently and I'd rather err on the side of caution! -You may wish to mark the shawl's right side while knitting---given the shawl's reversible nature. It can be hard to tell right from wrong. -For a seamless knit, use the spit splice method to join wool skeins. When done right, no one will be able to see the joins. Water can be used in place of spit, but where's the fun in that? -Read options at end of the pattern before you begin.
Malerial
2 ruffle: 7-8 skeins / 3-ruffle: 10 skeins of Elann Highland Wool shown in Fiddlehead Green (100% Highland Wool, 50g, 100m/109yds) Or 4 skeins Patons Classic Wool shown in Plum Heather (100% new wool, 100g, 205mm/223yds) 5 mm circular needle 30" or more in length 4 stitch markers Darning needle Blocking mats Stainless steel pins Tape measure Slitch Slosoary Knit: k Purl: p yo: (yarn over) bring yarn to front of work and knit next stitch. This creates a new stitch and a decorative hole. pm: (place marker) place marker on needle where/when instructed. sm: (slip marker) slip marker from one needle to next. kfb: (knit front & back) knit into the front and then the back of the same stitch. This creates a new stitch without making a hole. ktm: (knit to marker) knit all stitches to next marker. yfrn: (yarn to the front and around the needle) done before a purl stitch to create a new stitch. Bring yarn to front of work and wrap around right needle one complete time. Continue on as instructed. tbl: (through the back loop) stitch is worked through back of loop. kfbf: (knit front, back, & front) knit into the front, back, and front again of the same stitch. This creates 2 new stitches without making a hole. rf: (repeat from) repeat pattern from the \* as directed.
Sel-up
Cast on 3 stitches and knit 6 rows; do not turn work after 6th row. Pick up and knit the 3 bumps created on the long side's edge. Pick up and knit the 3 cast on loops along the bottom's edge. 9 stitches on needles
Body
Row 1(rs): k3, pm, yo, kfb, pm, k1, pm, kfb, yo, pm, k3 (13 sts) Row 2(ws): k3, sm, ktm, sm, k1, sm, ktm, sm, k3 Row 3: k3, sm, yo, k2, kfb, sm, k1, sm, kfb, k2, yo, sm, k3 (17) Row 4: k3, sm, ktm, sm, k1, sm, ktm, sm, k3 Continue increasing by 4 stitches on every right side row until there are 3-143-1-143-3 = 293 stitches on your needles. End with a ws row. Last row for shawl body: With rs facing, inc across row as set and at the same time inc 6 more stitches using kfb evenly across for 303 sts.
Plealed Border
Adapted from Knitting on the Edge by the Queen of Edge, Nicky Epstein, (published in 2004 by Sixth & Spring Books) this pleated ruffle is definitely feminine but not overly frilly. Have no fear, (stiff upper lip and all that), but yes, there will be 727 stitches on your needles, but only for the last 2 rows; the results belies the ease with which the pleats are created. Channel Elizabeth Zimmerman; she was always proud of her crowded circulars! Remove markers as you work the first row. Mistakes tend to happen at the beginning or end of a row especially when a project is nearing completion. Check your work every few repeats, it's easier than tinking back hundreds of stitches.
Rererwed Bola Bell Rufle (Multiples 8 plus 7) Row 1(ws): p7, \*k1, p7; rf \* to end Row 2 (rs): K7, \*p1, k7; rf \* to end Row 3: P7, \*yo, k1, yfrn, p7; rf \* to end Row 4: K7, \*p2, p1tbl, k7; rf \* to end Row 5: P7, \*yo, k3, yfrn, p7; rf \* to end Row 6: K7, \*p4, p1tbl, k7; rf \* to end Row 7: P7, \*yo, k5, yfrn, p7; rf \* to end Row 8: K7, \*p6, p1tbl, k7; rf \* to end Row 9: P7, \*yo, k7, yfrn, p7; rf \* to end Row 10: K7, \*p8, p1tbl, k7; rf \* to end Row 11: P7, \*yo, k9, yfrn, p7; rf \* to end Row 12: K7, \*p10, p1tbl, k7; rf \* to end Row 13: P7, \*yo, k11, yfrn, p7; rf \* to enc Row 14: K7, \*p12, p1tbl, k7; rf \* to end
Ginishing
Bind off as follows: knit 2 stitches together, slip stitch back onto left needle, k2tog. Continue in this fashion until 2 stitches remain. K2tog, pull yarn through last stitch and weave in ends. Soak shawl for at least 20 minutes in warmish water with a squirt of wool soak, baby shampoo, or dish soap. Gently squeeze water from shawl and blot in a large beach towel and/or use your washer's spin cycle to remove remaining excess water.
Blocking
Pin out the shawl's long edge to 70" (this includes the first and last pleat edges). Measuring along the spine, pull center to 30" (this includes the pleat). Starting at the top edge, pull out each pleat evenly and pin just above where the pleat begins. It is possible to block this shawl to a larger size--you decide how aggressive you'd like to be. Pat or pin pleats into place and allow to air dry completely. Brush hair until shiny, throw shawl around your shoulders and go shopping. Don't forget to buy milk and smile--you look fabulous!
Oplions
Pleats on 3 Sides
Work shawl as instructed above including bind off Pick up 175 stitches along the long edge of the shawl. With the wrong side facing, repeat the 14 rows of the Reversed Bold Bell Ruffle. Bind off and block using the methods described above.
No Open Work
If the open work, created when the shawl's body is being knit, is not your cup of tea, replace yo's with kfb's. Begin with the tab start as instructed above, but work the body as follows: Row 1(rs): k3, pm, kfbf, pm, k1, pm, kfbf, pm, k3 (13 sts) Row 2(ws): k3, sm, ktm, sm, k1, sm, ktm, sm, k3 Row 3: k3, sm, kfb, k1, kfb, sm, k1, sm, kfb, k1, kfb, sm, k3 (17 sts) Row 4: k3, sm, ktm, sm, k1, sm, ktm, sm, k3 Row 5: k3, sm, kfb, k to 1 st before marker, kfb, sm, k1, sm, kfb, k to 1 st before marker, kfb, sm, k3 (21 sts) Continue increasing 4 stitches on every rs row, until there are: 3-143-1-143-3 = 293 stitches on your needles. End with a ws row. Last row for shawl body: With right side facing, increase across row as set above and at the same time increase 6 more stitches using kfb evenly for 303 sts. Follow the pattern as instructed for the pleated edge from here on. No holes in my pleats, please! Knitting into the back of yo's creates a smaller hole, stitch, and causes the pleat to become more promir Reversed Bold Bell Ruffle (multiples of 8 plus 7) Row 1 (ws): p7, \*k1, p7; repeat from \* to end Row 2 (rs): K7, \*p1, k7; rep from \* to end Row 3: P7, \*yo, k1, yfrn, p7; rep from \* to end Row 4: K7, \*p1tbl, p1, p1tbl, k7; rep from \* to end Row 5: P7, \*yo, k3, yfrn, p7; rep from \* to end Row 6: K7, \*p1tbl, p3, p1tbl, k7; rep from \* to end Row 7: P7, \*yo, k5, yfrn, p7; rep from \* to end Row 8: K7, \*p1tbl, p5, p1tbl, k7; rep from \* to end Row 9: P7, \*yo, k7, yfrn, p7; rep from \* to end Row 10: K7, \*p1tbl, p7, p1tbl, k7; rep from \* to end Row 11: P7, \*yo, k9, yfrn, p7; rep from \* to end Row 12: K7, \*p1tbl, p9, p1tbl, k7; rep from \* to end Row 13: P7, \*yo, k11, yfrn, p7; rep from \* to end Row 14: K7, \*p1tbl, p11, p1tbl, k7; rep from \* to end
Customizing the size
This shawl easily adapts to any size you wish. However, the amount of stitches on your needles before beginning the edging must be divisible by 8 with 7 remaining in order for the pleated ruffle to turn out as pictured. When increasing stitches, it is important to increase the same amount on both sides of center and that the kfb increases be made on the right side of the work.


