Pattern:
Intermediate /Intermediaire /Intermedio
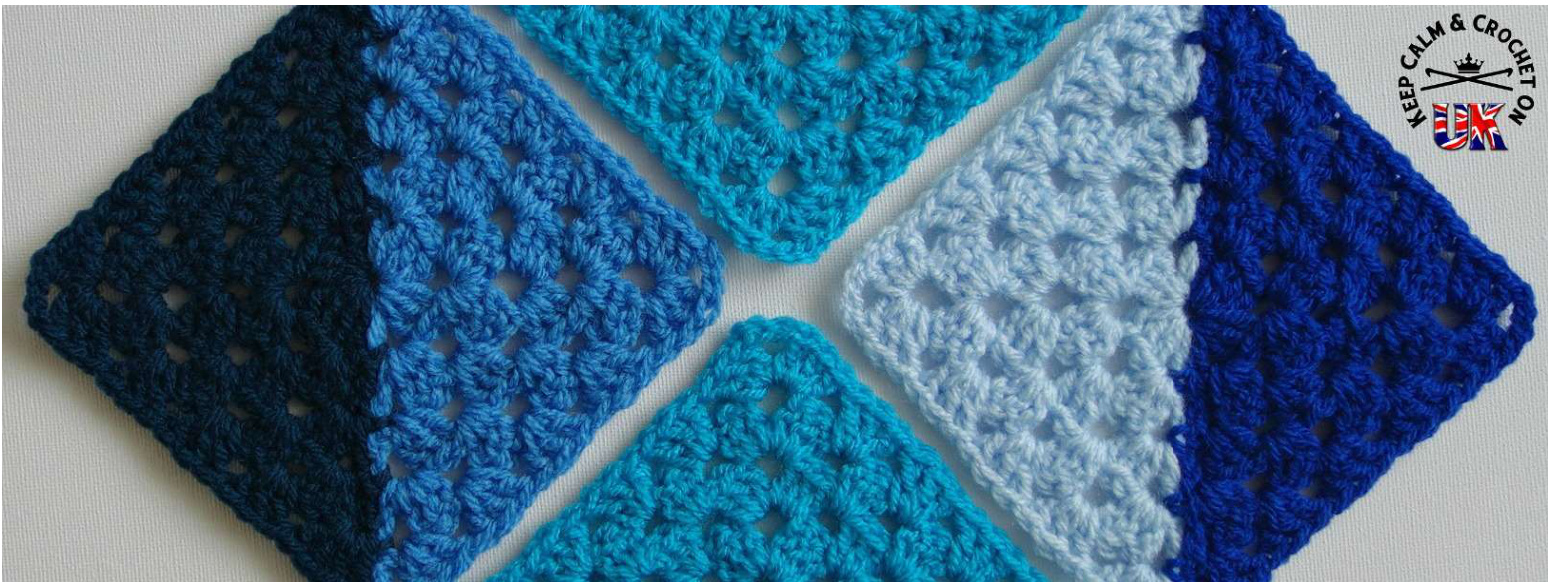
Half and Half Granny Square:
Notes:
Hook: UK 4 mm / US Size G Yarn: Double Knit / 8 ply / Weight #3 Yarn Amount required: Each square roughly uses up 33 yds (30 m / 10 g) / Total squares 330 yds (300 m / 100 g) Gauge in double knit / 8ply / yarn weight #3: 6 tr/dc sts or 2 clusters = 1.5 inches / 3.8 cm If your gauge is different to mine e.g. because you are using a bigger hook and heavier weight yarn all you will need to do is check your own gauge and stick to it - this should mean that the pattern should fit together at the end. Finished square size in double knit / 8ply / yarn weight #3: 5 x 5 inches / 12.7 x 12.7 cm Pattern uses English (UK) and American (US) crochet terms for a conversion chart click here.
Keep Calm and Crochet On UK
Abbreviations:
st(s) = stitch(es) sp(s) = space(s) sl st = slip stitch ch(s) = chain(s) tr/dc = UK treble / US double crochet [] = work anything in brackets into one space or stitch as specified Post = refers to either the tr/dc or ch 4 on the end of each rnd (used in the joining as you go section only).
Stitch Guidance:
UK Treble / US Double Crochet (tr/dc): Yarn over, insert hook in indicated st and pull up a loop (three loops on hook), yarn over, pull through two loops, yarn over, pull through remaining two loops on hook.
Pattern:
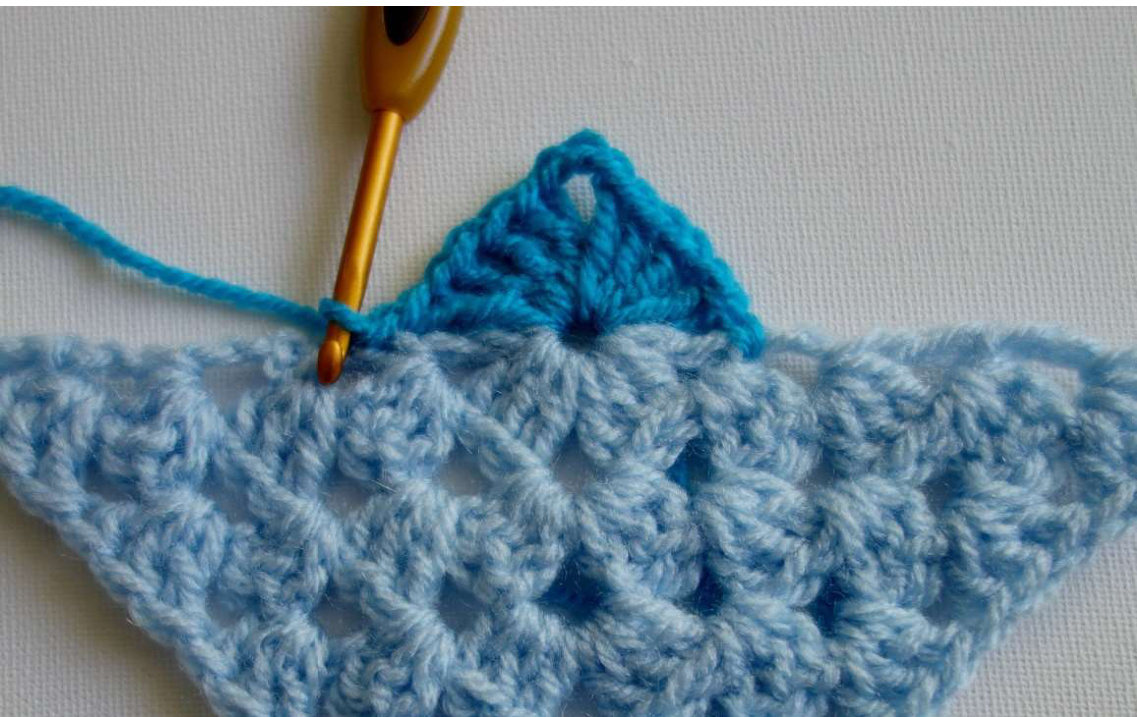
Note: The blocks are made up from two half granny squares (triangles), you can either make 20 triangles and join together to make 10 half and half blocks OR you can join each triangle half as you go, details below. Note 2: The Ch 4 at the beginning of each round counts as 1 tr/dc + ch 1 Note 3: Once you have completed each square I would suggest you weave in your ends and join your triangles together so that you don't have a major sewing job to do at the end of the groovyghan! Rnd 1: With YARN A, either ch 4 and sl st to form a ring OR start with a magic (adjustable ring). Ch 4, then work 3 tr/dc, 3 ch, 3 tr/dc, 1 ch, 1 tr /dc into the ring, turn (8 sts + 1 x 3 ch sp + 2 x 1 ch sp) Rnd 2: Ch 4, then in next ch 1 sp work 3 tr/dc, in the next ch 3 sp work [3 tr/dc, ch 3, 3 tr/dc], work 3 tr/dc in the last ch 1 sp, ch 1 then 1 tr/dc in the 3rd ch of beginning ch 4, turn (14 sts + 1 x 3 ch sp + 2 x 1 ch sp) Rnd 3: Ch 4, \* work 3 tr/dc in the next ch 1 sp, 3 tr/dc in the next sp, then work work [3 tr/dc, ch 3, 3 tr/dcJ in the next ch 3 sp, 3 tr/dc in the next sp, 3 tr/dc in the next ch 1 sp, ch 1 then 1 tr/dc in the 3rd ch of beginning ch 4, turn (20 sts + 1 x 3 ch sp + 2 x 1 ch sp)
Keep Calm and Crochet On UK
Rnd 4: Ch 4, \* work 3 tr/dc in the next ch 1 sp, 3 tr/dc in the next 2 sps, then work work [3 tr/dc, ch 3, 3 tr/dcJ in the next ch 3 sp, 3 tr/dc in the next 2 sps, 3 tr/dc in the next ch 1 sp, ch 1 then 1 tr/dc in the 3rd ch of beginning ch 4, turn (26 sts + 1 x 3 ch sp + 2 x 1 ch sp) Rnd 5: Ch 4, \* work 3 tr/dc in the next ch 1 sp, 3 tr/dc in the next 3 sps, then work work [3 tr/dc, ch 3, 3 tr/dcJ in the next ch 3 sp, 3 tr/dc in the next 3 sps, 3 tr/dc in the next ch 1 sp, ch 1 then 1 tr/dc in the 3rd ch of beginning ch 4, finish off and weave in ends (32 sts + 1 x 3 ch sp + 2 x 1 ch sp) This makes 1 half granny triangle; see note 1 for options from this point or continue onto part 2 to join as you go.
Joining as you go part 2:
Rnd 6: Have your granny triangle right side facing and with the longest edge facing upwards, you will start off working from right to left. With YARN B, sl st to the top of the last 1 tr/dc of rnd 1, then work [1 tr/dc, ch 1, 3 tr/dc, ch 3, 3 tr/dc, ch 1, 1 tr/dc] in the ch 4 or magic (adjustable) ring that you started with, then sl st to the top of the beginning ch 4 to join ( 8 sts + 1 x 3 ch sp + 2 x 1 ch sp)
Rnd 7: Ch 3, sl st around the end post of rnd 2, turn, ch 1, work 3 tr/dc in the next ch 1 sp, work [3 tr/dc, ch 3, 3 tr/dc] in the 3 ch sp, work 3 tr/dc in the last ch 1 sp, ch 1, 1 tr/dc in the top of the last tr/dc of previous rnd, sl st around the last post of rnd 2 to join (14 sts + 1 x 3 ch sp + 2 x 1 ch sp) Rnd 8: Ch 3, sl st around the end post of rnd 3, turn, ch 1, work 3 tr/dc in the next ch 1 sp, then work 3 tr/dc in the next sp, work [3 tr/dc, ch 3, 3 tr/dc] in the 3 ch sp, 3 tr/dc in the next sp, then work 3 tr/dc in the last ch 1 sp, ch 1, 1 tr/dc in the top of the last tr/dc of previous rnd, sl st around the last post of rnd 3 to join (20 sts + 1 x 3 ch sp + 2 x 1 ch sp) Rnd 9: Ch 3, sl st around the end post of rnd 4, turn, ch 1, work 3 tr/dc in the next ch 1 sp, then work 3 tr/dc in the next 2 sps, work [3 tr/dc, ch 3, 3 tr/dc] in the 3 ch sp, 3 tr/dc in the next 2 sps, then work 3 tr/dc in the last ch 1 sp, ch 1, 1 tr/dc in the top of the last tr/dc of previous rnd, sl st around the last post of rnd 4 to join (26 sts + 1 x 3 ch sp + 2 x 1 ch sp) Rnd 10: Ch 3, sl st around the end post of rnd 5, turn, ch 1, work 3 tr/dc in the next ch 1 sp, then work 3 tr/dc in the next 3 sps, work [3 tr/dc, ch 3, 3 tr/dc] in the 3 ch sp, 3 tr/dc in the next 3 sps, then work 3 tr/dc in the last ch 1 sp, ch 1, 1 tr/dc in the top of the last tr/dc of previous rnd, sl st around the last post of rnd 5 to join, finish off and weave in ends (32 sts + 1 x 3 ch sp + 2 x 1 ch sp) For a photo tutorial on this square please see the following link: https://keepcalmandcrochetonuk.wordpress.com/2016/04/o6/kcaco-ukgroovyghan-cal-2016-part-7/


