GARDEN FENCE SCARF
Description
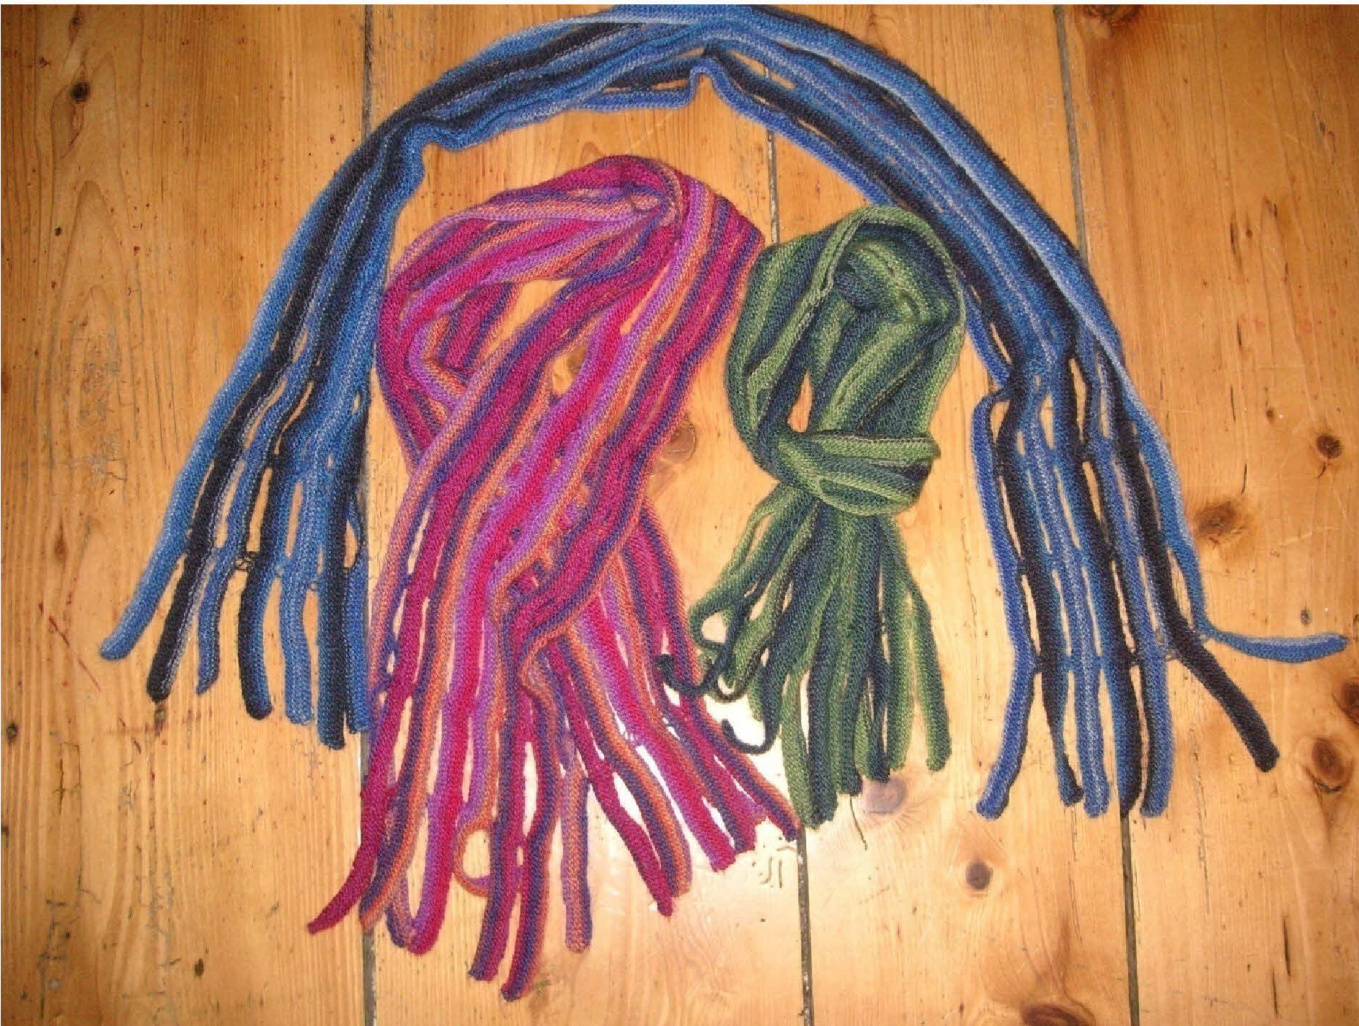
The ",GARDEN FENCE" scarf is knit lengthwise and made from long, narrow garter stitch strips connected by repeating 2 stitches here and there. Thus an airy but also warm scarf is obtained - just right for a very special ball of 4-ply yarn to be shown off! The entire scarf is knit in garter stitch and very easy for beginners, too.
Needles, Size, finished Project
Choose needles half a size or one size larger than the ones you usually have for your 4-ply yarn, so about half a size larger than suggested on the ball band of your yarn, and you will obtain a finedrapingscarf. Important: due to the special workwise please use the common straight knitting needles, about 30cm long with a knob on one end, made from your favorite material (wood, steel or whatever). With all other types of needles the pattern instruction FAILS!!
My example:
Sock yarn Rico Superba Poems, 100 g, 4ply/approx. 420 m, needles 3.5 mm / US 4. Thus a finished scarf with 7 strips is obtained, unblocked approx. 1.60 m long and approx. 14 cm wide after washing and drying flat.
GARDEN FENCE SCARF
Gauge/Swatch
In this pattern, gauge is not important; please refer to finished measures of my sock yarn example as a suggestion.
Techniques used
Knit stitches, cast on, cast off, place and slip stitch markers.
Abbreviation
st stitch/stitches PM place marker- they remain during the entire project and are removed in the last cast off row at the end only SM slip markers as they appear
Material
One ball of sock yarn 4ply/100 g/approx. 420 m with long color runs - this will make a special scarf as seen on my photo. Sock yarn with very short color runs makes a colorful but somewhat unruly scarf but there are no limits........... Nevertheless, please consider this whenchoosingyouryarn. The examples shown were all knit from Rico Superba Poems, the Schoppel Zauberball 4ply was also tested and found to yield the desired result with long, narrow color strips. 100g sock yarn 4ply /100 g/approx. 420 m with long color runs, e.g. my suggested yarns A pair of straight knitting needles with knob on one end in the suggested size, pleasedonotuseodertypesof needles! Stitch markers, about 20 pcs (e.g. small rubber rings) Bluntneedletoweaveinthethreads Kitchen scales for weighing the yarn at certain stages (digital scales preferred)
Instruction
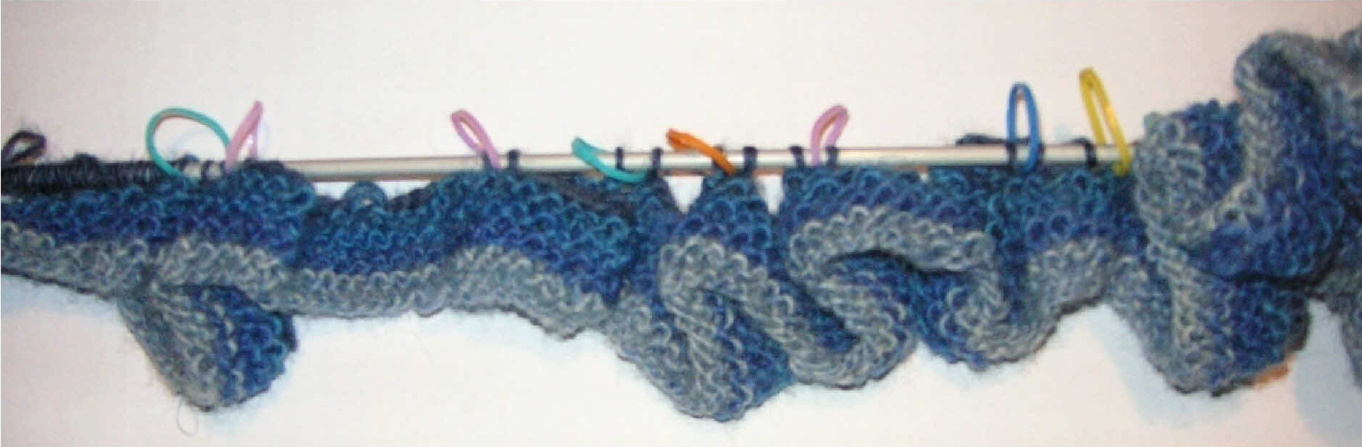
Cast on
Weigh your yarn ball and note theweight: g/oz. Cast on 30 st (for the fringe), PM Proceed and cast on 20 st (PM), proceed further by casting on 20 st and PM each, until a total of 17 markers are placed (first 30 st for the fringe and 16 segments with 20 st for the scarf body), then finally cast on 30 st for the other end fringe. Now the total BlG number of 380 st is cast on and we count 17 markers.

On we go!!
GARDEN FENCE SCARF
First and second Strip
The entire scarf is knit in rows (R) and in garter stitch. R1 knit all st, SM as they appear R2 knit all st, SM as they appear R3 knit all st, SM as they appear R4 knit all st, SM as they appear R5 knit all st, SM as they appear R6 knit all st, SM as they appear R7 knit all st, SM as they appear R8 cast off the first 29 st, knit the remaining st, SM as they appear R9 cast off 29 st, (SM, knit 1st, cast off 18 st), repeat instruction in 0 to last marker, SM and knit last st. To start the next strip, cast on 29 st then turn. Now weigh your yarn ball: the difference to the starting weight is the amount you used for one strip. Therefore by proceeding and weighing your remaining yarn ball you will see how many stripes in total you will be able to knit; so you will be sure whether there is enough yarn left to knit another last strip. On our needle we have the first completed strip, hanging on the few remaining st with a markerbetween 2 st each.On the left side of the picture, there are the 29 st cast on to start the second strip - looks weird, but you will see how it unfolds soon....
R10 knit until first marker (SM, knit 1st, cast on 18 st, knit 1 st) repeat instruction in 0 to last marker, SM and knit last st. Cast on 29 st then turn. Now we have the entire number of st for thesecondstrip on our needle. R11 knit all st, SM as they appear R12 knit all st, SM as they appear R13 knit all st, SM as they appear R14 knit all st, SM as they appear R15 knit all st, SM as they appear R16 knit all st, SM as they appear R18 cast off 29 st, (SM, knit 1st, cast off 18 st), repeat instruction in 0 to last marker, SM and knit last st. To start the next strip, cast on 29 st then turn. Now two strips are finished and the third is started by the cast on 29 st you made as last.
GARDEN FENCE SCARF
Additional Strips as desired
According to instruction, for each additional strip repeat R10-18. As your yarn ball is used up gradually, weigh as described to be on the safe side with your yarn amount for the last strip.
Last Strip
Again knit R10-17 as described, then cast off all st and remove markers as you go.
Make up
Darn in yarn ends and wash scarf if desired as given on ball band, otherwise dampen and leave to dry flat. Block slightly if desired.
Variations
"GARDEN FENCE" offers countless possibilities for your own ideas. You can knit more or wider strips or more 20 st segments, nevertheless segments larger than 20 st might not be suitable andwould make thescarf toowobbly. It is also a good project for using up your scraps, either weigh them before to determine how many strips they will yield or just go ahead and see what will become of them - be creative and daring, you will always end up with a beautiful striped scarf Copyright: please do not pass on, sell or distribute my pattern per email. Scarves made from this pattern may be sold or given for charity but please give me credit as designer. Now enjoy and happy knitting from Ursi of Strickgewano!! Pictures of your finished projects are so very welcome, please post on ravelry!For questions, please reach me anytime on ravelry (see pattern header for email).


