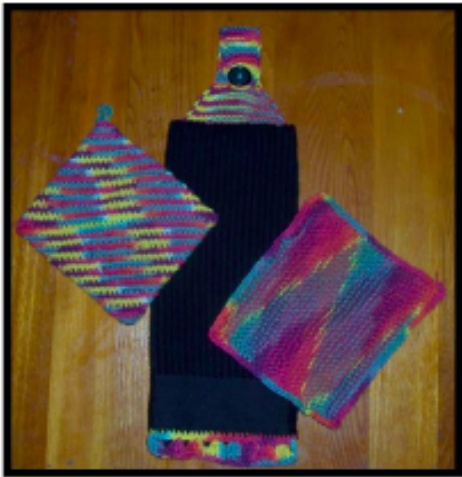
Knit Dishtowel Topper Knitting Pattern
I had seen a lot of crochet versions for towel toppers, but it was hard to find a knitting pattern so I made this one while knitting a towel, dishcloth, and potholder set for a friend. This isn't socks or sweaters, so toss the thought of the dreaded gauge swatch. Want to use a different yarn or needle size? Go for it. I used garter stitch because it gave a funky texture to this bright and festive yarn. You could use stockinette, or whatever works for you, just have fun with this quick and easy project.
supplies:
Peaches & Creme (or other cotton worsted) 2 oz ball (l used Fiesta Ombre) Pair of US Size 8 needles (5.0mm) Large yarn needle Dish towel
The How-to:
Fold the dish towel in thirds the long way, then in half. (Just like you'd fold it to put away, or how it comes when you buy them). Take a long length of yarn (about twice an arm's length) and double it over in half, threading the two ends through the eye of the needle.

Secure yarn at one end of towel as shown in photos below..
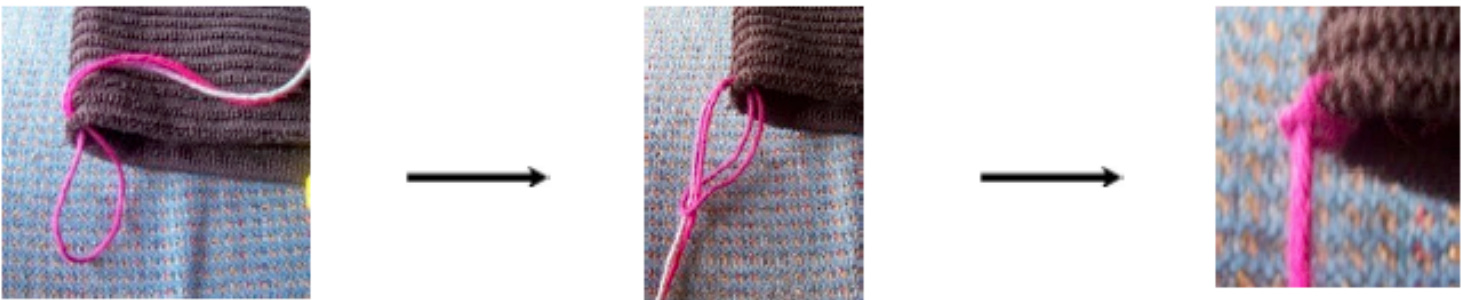
Sew across top of towel's folded edge with a backstitch. Make stitches about 1/4" long. My towel had 20 sts across. The amount of stitches will vary by how big your towel is and what size it is folded to, just make the amount of stitches an even number.

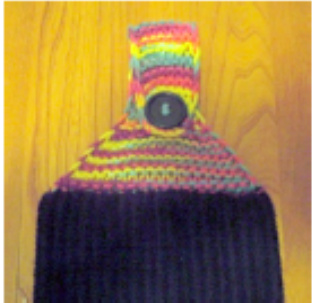
Pick up the stitches on one needle. Work in garter stitch for 1.5". (Before the last st of each row, bring the yarn forward and then slip the last st as if to purl. That just gives a nice and smooth edge to your knitting.)
Begin Decrease Row:
\*K1, K2tog, k across until 3 sts rem. k2tog, yarn forward and sl last st as if to purl. Turn. Rep \* to end until 8 sts remain. Velcro Version: Work in garter st with these 8 sts until work measures 8-8.5" from the start (unstretched). Then rep the Decrease Row until 4 sts rem. Bind off all sts, break yarn and secure. Attach velcro closure.
ButtonholeVersion:
Work pattern as above until you have 8 sts and your work measures 7 3/4" (19.5 cm) from start. Work buttonhole: Row 1: k3, bind of 2, k2, yarn forward and sl last st as if to purl Row 2: k2, yo 2, k2 Row 3: k across, sllast st as if to purl (8 sts) Row 4: k1, k2tog, k until 3 st rem, k2tog, sl last st as if to purl Rep Row 4 until 4 st rem. Bind off all sts. Secure. Attach a button of sufficient size to match.
uttonhole suggestion!An anonymous blog comment suggests this buttonhole version:
I have not tested this yet, let me know. Use it in place of the above Buttonhole Version. Row 1: K3, K2 more, bind off 1, K 1 more, bind off 1, K1, yarn forward (between needles), slip last stitch purl wise. Row 2:K3,YO2,K3 Row3:knit Row4:As Row4 above.
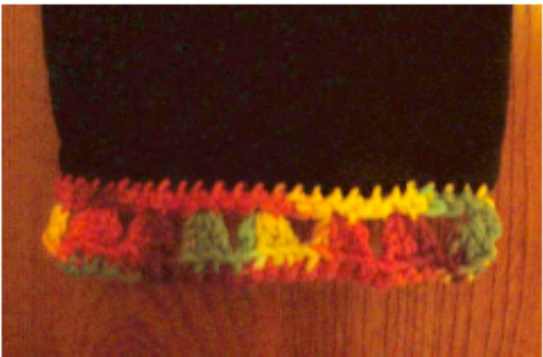
Optional Crochet Edging
Stitch loose loops along front edge of towel, about 1/4" apart. (Looser is better than too tight, you can always tighten it up later.) Work sc across, ch 2, turn. Work 3 dc in 1st st. ch 1. Work 3 dc in 3rd st. ch 1. Work 3 dc in 6th st. ch 1..continue across in this pattern. After last st, ch 1 turn. Sc across. Fasten off, break yarn, secure.
Leftovers Potholder: http://www.ravelry.com/designers/krista-salihah-schaaf-2 Mindless Dishcloth: Stitch loose loops along button front edge of towel, about 1/4" apart.(Looser is better than too tight, you can always tighten it up later.) Work sc across, ch 2, turn. Work 3 dc in 1st st. ch 1. Work 3 dc in 3rd st. ch 1. Work 3 dc in 6th st. ch 1...continue across in this pattern. After last st, ch 1 turn. Sc across. Fasten off, break yarn, secure. That's how easy it is and why it's called the Mindless Dishcloth. @2006. Krista Salihah Schaaf. Make these hats for yourself, as gifts, orto sell. This pattern is not to be sold. You can share this pattern with others as long as it is kept with this notice, link, and email: link: http://www.ravelry.com/designers/krista-salihah-schaaf-2 email:findingsalihah@gmail.com


