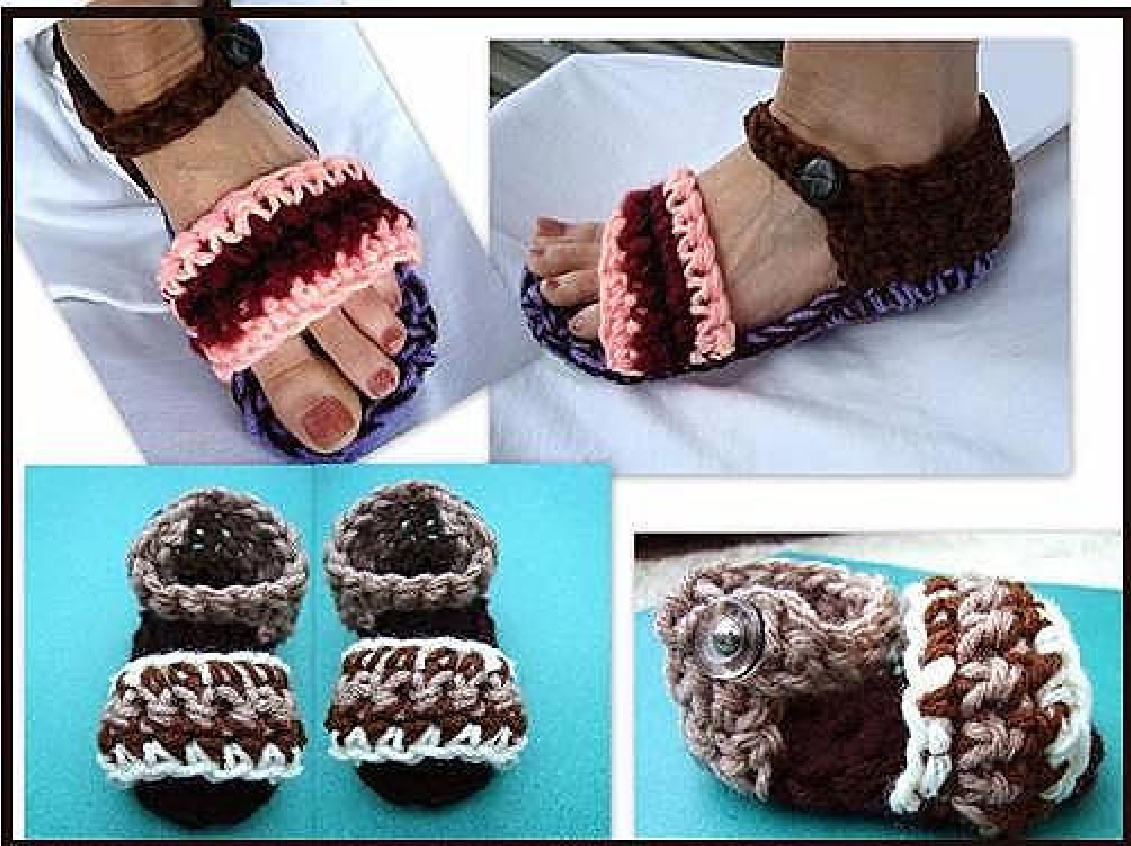
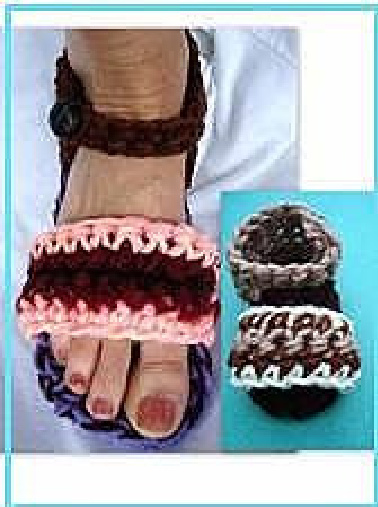
STRIPED STRAP SANDALS, NEWBORN TO ADULT by Emi Harrington, COPYRIGHT, 2012, M. E. Harrington You may sell your finished items. Permission is not granted to copy or distribute this pattern in any manner. This means you may not give it away for free, nor post it on any blogs or web sites without permission. MATERIALS: Worsted weight yarn, 5.5mm crochet hook, (6.5mm to make larger size) 6MM OR 6.5MM FOR ALL OTHER SIZES Yarn needle Buttons
INSTRUCTIONS: Gauge is not important in this design. See a video of this pattern here: http://www.youtube.com/watch?v=oHL1MilNEQY
NEWBORN TO12 MONTHS:
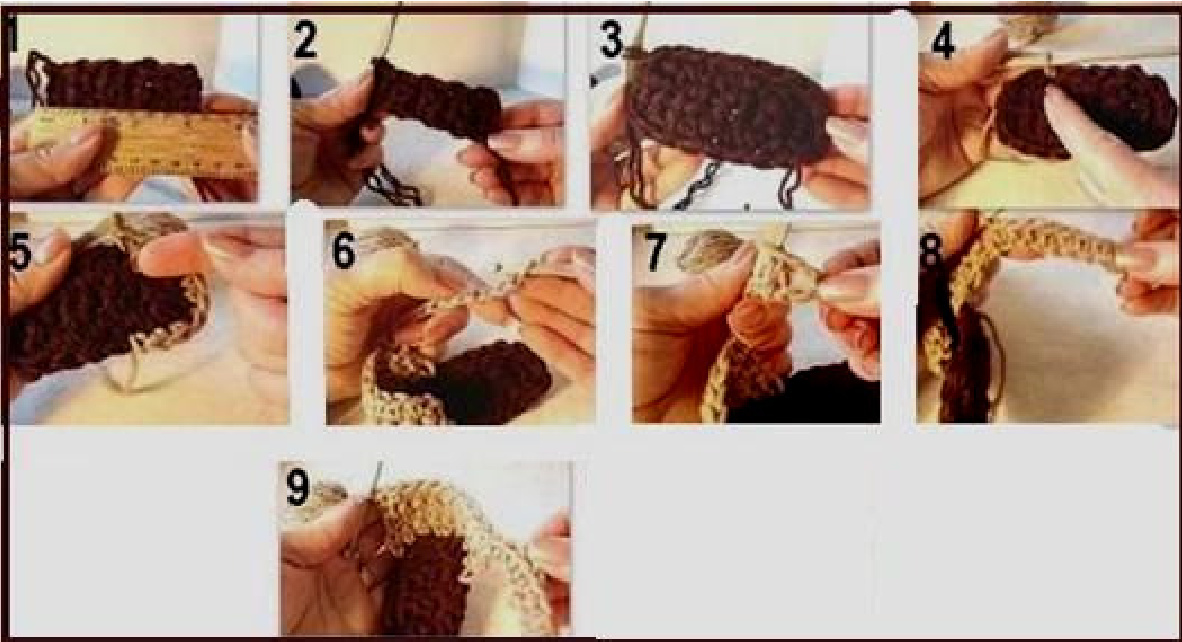
1. Make the sole: (This is my new, simplified sole pattern.) Working with 2 strands of yarn (so the sole will be rigid): Newborn: Chain 4 3 to 6 Months: Chain 4 6 to 12 Months: Chain 5 2. Single crochet in the 2"d stitch from the hook, and in each stitch of the chai \*Chain 1 and turn, single crochet across the row. Repeat from \* Newborn: until the work measures 3 14 inches 3 to 6 Months: until the work measures 3 %2 inches 6 to 12 Months: until the work measures 3 3%4 inches Seephoto 2. 3. \*Turn, single crochet in each stitch all around the rectangle, slip stitch to join. Newborn: fasten off and weave yarn ends into the finished work. 3 to 6 Months and 6 to 12 Months: repeat from \* for one more row, then fasten off. See photos 1, 2, and 3.
MAKE THE UPPER (back of the sandal):
Working with 1 strand of yarn. Attach yarn in any stitch along the side back of the sole. See photo 4, attach on either end, there is no front or back. Evenly single crochet around to the stitch opposite the one you began in, on the other side of the sole. See photo 5. (You may have to add stitches to evenly crochet around, because the sole is worked with 2 strands and the upper is worked with 1 strand. 8 stitches for newborn size were used in this sample.) \*Chain 1 and turn, single crochet across the row. Repeat from \* for 2 more rows. For 6 to 12 Months add one more additional row. At the end of the row, make the strap: Chain 11, photo 6, single crochet in the 5' stitch from the hook (buttonhole formed) photo 7, single crochet across the added chain stitches, photo 8, and all across the row on the main body of the sandal.Fasten off. Photo 9. NOTE: When making the sandal for the opposite foot, take care to begin on the opposite side of the so
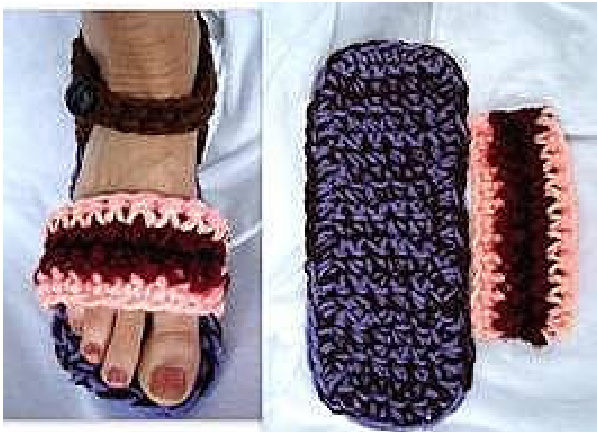
MAKE THE FRONT STRAP:
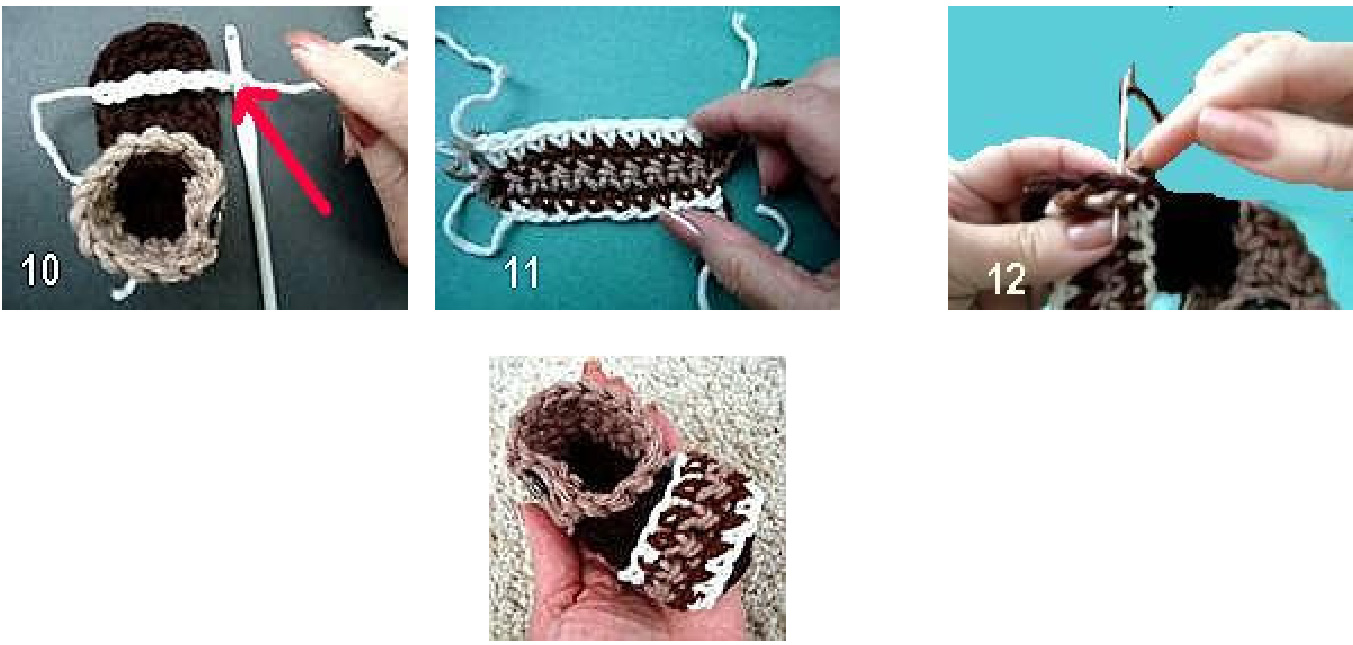
Chain a length that is approx. 3% of an inch longer than the sole is wide. Photo 10. Fasten off. \*Attach another color of yarn, single crochet across the row, fasten off. Repeat from \* for 3 more rows. Photo 11. (This design used ivory for the chain, then brown, beige, brown, and ivory for the last row.) Weave all the yarn ends into the finished strap. Sew the strap on each side of the bootie, using the same color yarn as the sole.Photo12. Sew a button on the opposite side.
AGE 1 TO ADULT:
1 to 3 Years: Chain 6 3 to 5 Years: Chain 7 5 to 8 Years: Chain 7 8 to 12 Years: Chain 8 ADULT: Chain 8 for a narrow foot, chain 9 for a wide foot, chain 10 for a very wide foot. (Hint: the chain should barely be seen when placed UNDER the front of the foot, under the ball of the toes.) 2. Single crochet in the 2nd stitch from the hook, and in each stitch of the chain. \*Chain 1 and turn, single crochet across the row. Repeat from \* until the rectangle measures: Age 1 to 2 yrs. 5 inches Age 2: 5 12 inches Age 3: 5 % inches Age 4: 6 inches Age 5: 6 14 inches Age 6: 6 12 inches Age 7: 6 3% inches Age 8: 7 inches Age 9: 7 14 inches Age 10: 7 12 inches Age 11: 7 3% inches Age 12: 8 inches Age 13: 8 14 inches Age 14: 8 12 inches
Women's
Size 5: 8 3% inches Size 6: 9 inches Size 7: 9 12 inches Size 8: 10 inches Size 9: 10 14 inches Size 10: 10 1/2 inches Size 11: 11 inches
3. \*Turn, single crochet in each stitch all around the rectangle. Slip stitch to join and fasten off
MAKE THE UPPER (back of the sandal): (working with 2 strands of yarn).
Attach yarn in any stitch along the side back of the sole. See photo 4, attach on either end as there is no front or back. Evenly single crochet around to the stitch opposite the one you began in, on the other side of the sole. See photo 5. \*Chain 1 and turn, single crochet across the row. Repeat from \* for 2 more rows. At the end of the row, make the strap: Chain 11, photo 6, single crochet in the 5" stitch from the hook (buttonhole formed) photo 7, single crochet across the added chain stitches, photo 8, and all across the row on the main body of the sandal. Fasten off. Photo 9. NOTE: When making the sandal for the opposite foot, take care to begin on the opposite side of the sole. \* The yarn end from the beginning of the back will indicate which side you began on, so start on the opposite side for the Otherfoot.
Make the strap:
Working with 2 strands of yarn:
Chain a length that is approx.: Age 1 to Age 4: 1 inch longer than the sole is wide. Age 4 to 8: 1 14 inch longer than the sole is wide. Age 8 to 12: 1 12 inch longer than the sole is wide. Adult: 1 3% inch longer than the sole is wide. For an extra thick foot, 2 inches longer than the sole is wide. Fasten off. \*Attach another color of yarn, single crochet across the row, fasten of. Repeat from \* for 3 more rows. (The adult sample used: Pink, wine, black, wine, pink.) Weave allthe yarn ends into the finished strap. Sew the strap on each side of the bootie with the same color yarn as the sole. Sew a button on the opposite side.


