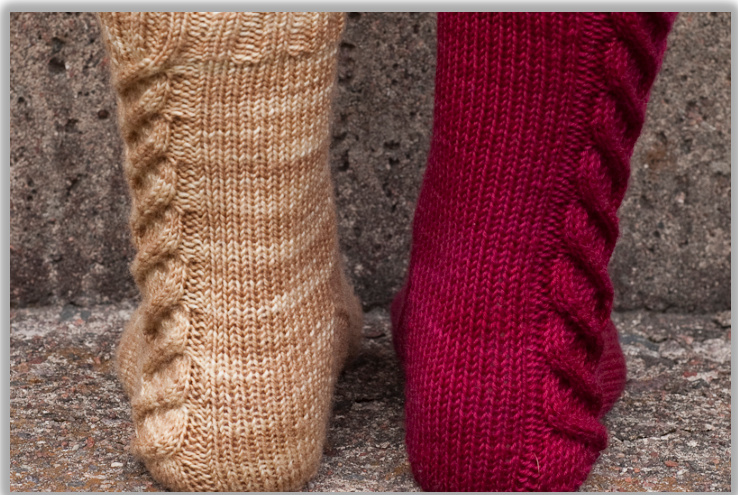
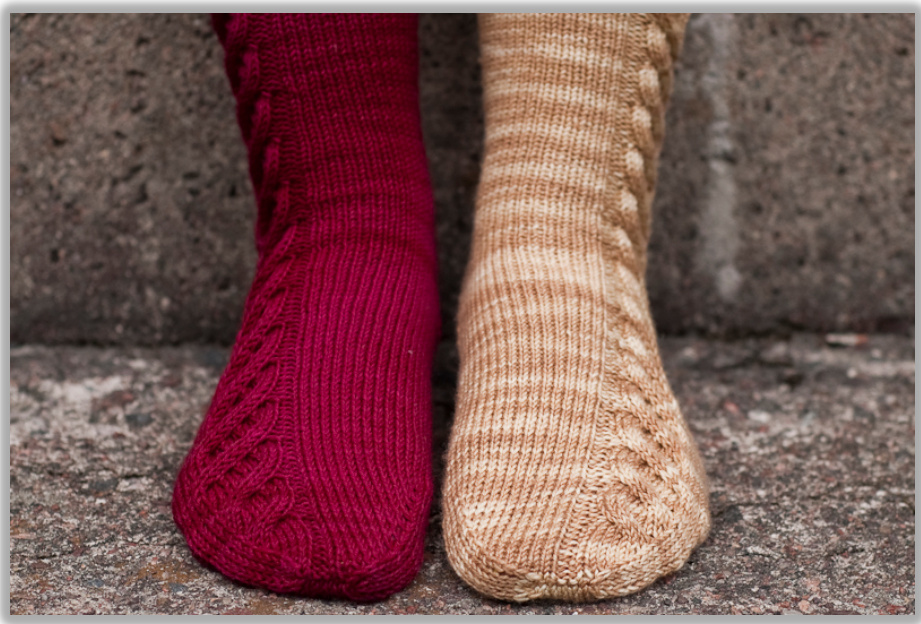
Galder
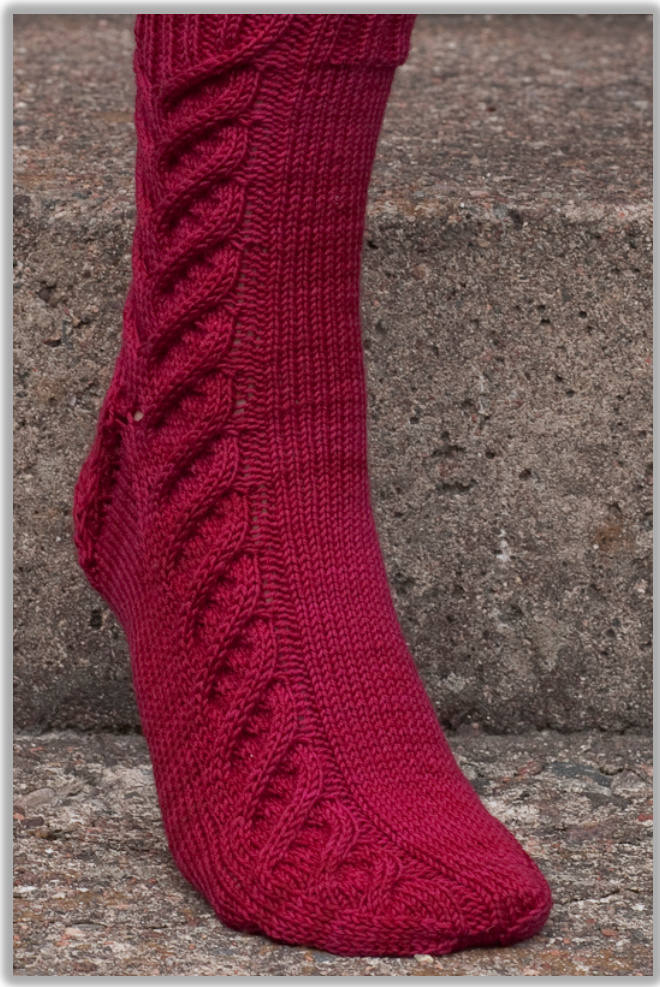
Galder, 'charm' or 'incantation' is Old English and relates to Old Norse galdr, from the verb galan, 'to sing'. The Oxford English Dictionary only lists two known usages of the word, one in Beowulf, the other dated cl1205. In a way, knitting these socks reminded me of flowing, rhythmical chanting or weaving a spell. The cable begins to take form in the cuff, travels down the leg, finally splitting into two smaller cables that meander all the way to the heel and the toe. The cables in these socks are modified versions of Ornamental Cable found in 101 Stitches to Knit (ed. by Erica Knight). The right and left socks are mirror images of each other.
SIZING ANDMATERIALS
Size
Woman's small/medium (apprx. Eur 36-39, UK 3-5) (To decrease or increase the size of the sock, changing the number of stitches in the stockinette stitch portion of the sock should work.)
You'll need
100 g fingering-weight sock yarn (I used Wollmeise Twin for the red socks, Cherry Tree Hill Supersock Select for the brown socks) 2,5 mm dpns Cable needle (optional)
INSTRUCTIONS
Cuff
CO 64 sts. Divide sts on 4 needles, 16 sts each. Work \*k2, p2\* ribbing for 12 rounds. From this point on, the right and left sock are given separate instructions.

LEFT SOCK
Leg
Reorganise sts so that there are 15-17-15-17 sts on the needles. Work Set-up chart: Rnd 1: K30, p2, knit Row 1 of Set-up chart, p2. Rnds 2-8: K30, p2, knit next row of Set-up chart, p2. Begin Chart 1: Rnd 1: K30, p2, knit Row 1 of Chart 1, p2. Rnds 2-8: K30, p2, knit next row of Chart 1, p2. Repeat Rounds 1-8 of Chart 1 for five times (or as many times as you want). End after Round 8.
Heel
Knit the sts from needle 1 to needle 4 = 32 sts. Think of the RS row just worked as Row 8 of Chart 2; the next WS row will be Row 1 of Chart 2. Continue knitting back and forth in established pattern as shown in Chart 2, always slipping the first st of row. The cabling will take place on RS rows. Repeat the chart 3 times (or as many times as needed). End after Round 1 = with a WS row. Heel turn Rnd 1: Sl 1, k17, skp, k1, turn. Rnd 2: Sl 1, p5, p2tog, p1, turn. Rnd 3: Sl 1, knit to 1 st before the gap, skp, k1, turn. Rnd 4: Sl 1, purl to 1 st before the gap, p2tog, p1, turn. Repeat Rounds 3-4 until all the heel sts have been worked = 18 heel sts.
Gusset
Needle 1: Knit the 18 heel sts. Pick up and knit 16 sts from the left side of the heel flap. Needles 2 and 3: Continue in pattern by knitting Chart 3, Row 1. Needle 4: Pick up and knit 16 sts from the right side of the heel flap from WS, "behind' the edge - this way, the possible holes are hidden by the cable. Knit the first 9 heel sts from needle 1 to needle 4. You now have 25-17-15-25 sts on the needles. Round 1: Needle 1: Knit to last 3 sts on needle 1, k2tog, k1 Needles 2 and 3: Follow Chart 3 as established Needle 4: K1, skp, knit to end Round 2: Knit. Repeat Rounds 1-2 until you have 16-17-15-16 sts on the needles = 64 sts.
Foot
ntinue in established pattern: Needle 1: Knit Needles 2 and 3: Continue Chart 3 as established Needle 4: Knit Continue until there are 7 pattern repeats in the foot (counting from the gusset) or as long as needed. End with Row 8 of Chart 1. Knit the sts on needle 1 once more. You are now at the new beginning of round - what was needle 2 is now assigned as needle 1. The top of foot is on needles 1-2, the sole on needles 3-4.
Toe
Round 1: Needles 1 and 2: Knit Row 1 of Toe Chart 1. Needles 3 and 4: Knit. Round 2: Needles 1 and 2: Knit next row of Toe Chart 1. Needle 3: K1, skp, knit to end. Needle 4: Knit to last 3 sts, k2tog, k1. Round 3: Needles 1 and 2: Knit next row of Toe Chart 1. Needles 3 and 4: Knit. Repeat Rounds 2-3 until there are 32 sts left (top 16, sole 16). Then repeat Round 2 until there are 16 sts left (top 8, sole 8). Move the sts on needle 2 to needle 1 and the sts on needle 4 to needle 3. Cut yarn, graft sts together and weave in ends.
RIGHT SOCK
Leg
Reorganize sts so that there are 15-17-15-17 sts on the needles. Begin Chart 1: Rnd 1: Knit Row 1 of Chart 1, p2, k30, p2. Rnds 2-8: Knit next row of Chart 1, p2, k30, p2. Repeat Rounds 1-8 for five times (or as many times as you want). End after Round 7.
Heel
Heel flap Knit the sts from needle 1 to needle 4, following Row 8 of Chart 1 = 32 sts. Continue knitting back and forth in established pattern as shown in Chart 3, starting from Row 1 of Chart 3. The cabling will take place on RS rows. Repeat the chart 3 times (or as many times as needed). End after Round 1 = with a WS row.
Heel turn
Rnd 1: Sl 1, k17, skp, k1, turn. Rnd 2: Sl 1, p5, p2tog, p1, turn. Rnd 3: Sl 1, knit to 1 st before the gap, skp, k1, turn. Rnd 4: Sl 1, purl to 1 st before the gap, p2tog, p1, turn. Repeat Rounds 3-4 until all the heel sts have been worked = 18 heel sts.
Gusset
Needle 1: Knit the 18 heel sts. Pick up and knit 16 sts from the left side of the heel flap from WS, "behind' the edge - this way, the possible holes are hidden by the cable. Needles 2 and 3: Continue in pattern by knitting Chart 2, Row 8. Needle 4: Pick up and knit 16 sts from the right side of the heel flap; knit the first 9 heel sts from needle 1 to needle 4. You now have 25-17-15-25 sts on the needles. Round 1: Needle 1: Knit to last 3 sts on needle 1, k2tog, k1 Needles 2 and 3: Follow Chart 2 as established, starting from Row 1. Needle 4: K1, skp, knit to end Round 2: Knit. Repeat Rounds 1-2 until you have 16 sts on all needles = 64 sts.
Foot
Continue in established pattern: Needle 1: Knit Needles 2 and 3: Continue Chart 2 as established Needle 4: Knit Continue until there are 7 pattern repeats in the foot (counting from the gusset) or as long as needed. End with Row 8 of Chart 2. Knit the sts on needle 1 once more. The beginning of round is now between needles 1 and 2, and what was needle 2 before is now assigned as needle 1. The top of foot is on needles 1-2, the sole on needles 3-4.
Toe
Round 1: Needles 1 and 2: Knit Row 1 of Toe Chart 2. Needles 3 and 4: Knit. Round 2: Needles 1 and 2: Knit next row of Toe Chart 2. Needle 3: K1, skp, knit to end. Needle 4: Knit to last 3 sts, k2tog, k1. Round 3: Needles 1 and 2: Knit next row of Toe Chart 2. Needles 3 and 4: Knit. Repeat Rounds 2-3 until there are 32 sts left (top 16, sole 16). Then repeat Round 2 until there are 16 sts left (top 8, sole 8). Move the sts on needle 2 to needle 1 and the sts on needle 4 to needle 3. Graft sts together and weave in ends.
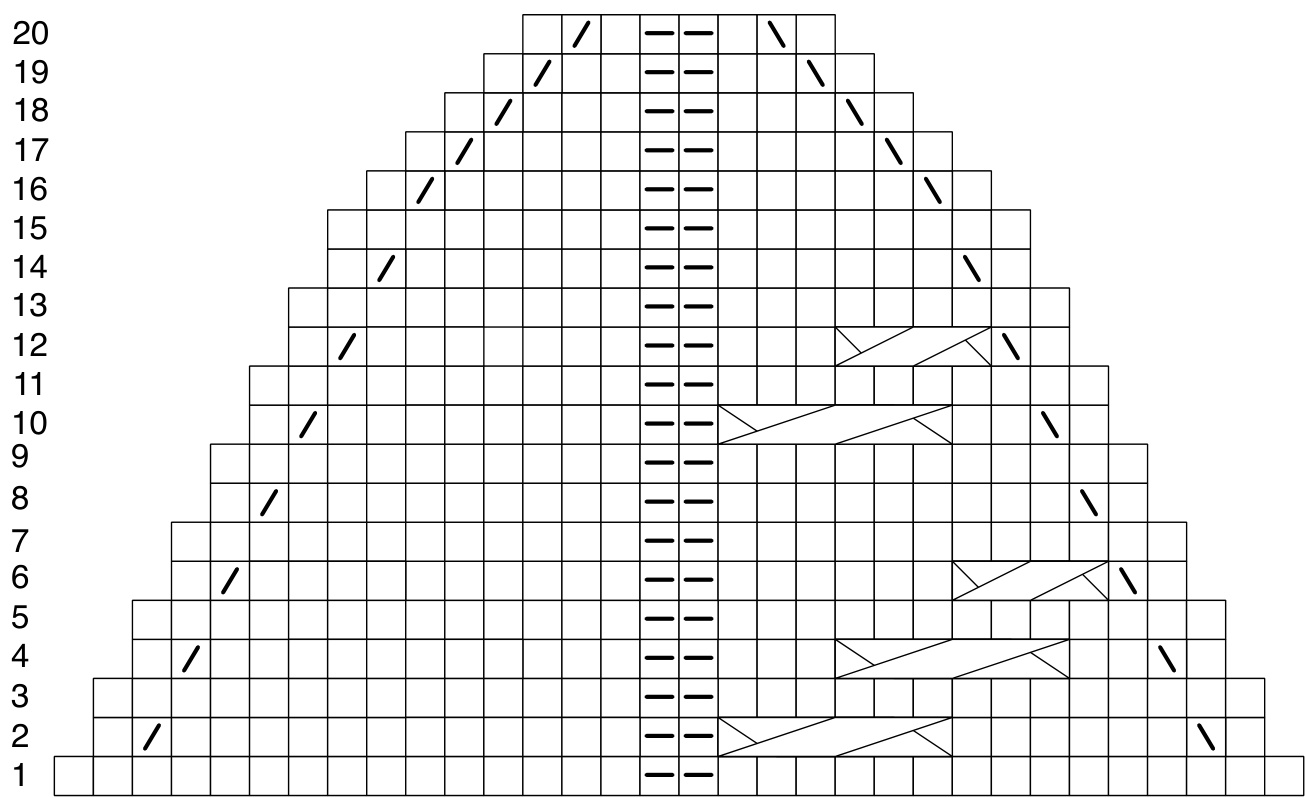
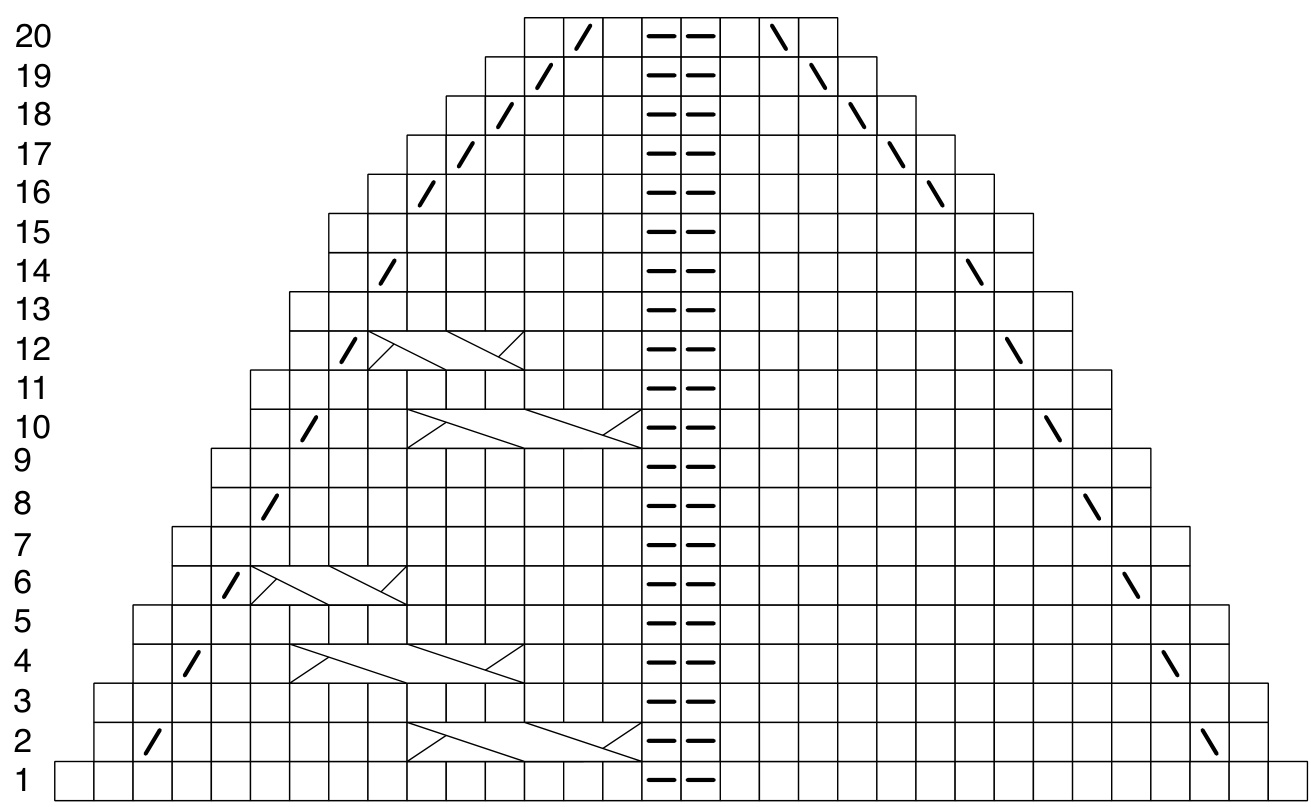
Guide to symbols

Cable guide
Cable 1 R 3: Cable 3 L 1: Cable 3 R 3: Cable 3 L 3: S1 1 st to cable needle and hold in back, k3 from left needle, k1 from cable needle Sl 3 sts to cable needle and hold in front, k1 from left needle, k3 from cable needle Sl 3 sts to cable needle and hold in back, k3 from left needle, k3 from cable needle Sl 3 sts to cable needle and hold in front, k3 from left needle, k3 from cable needle
Set-up chart
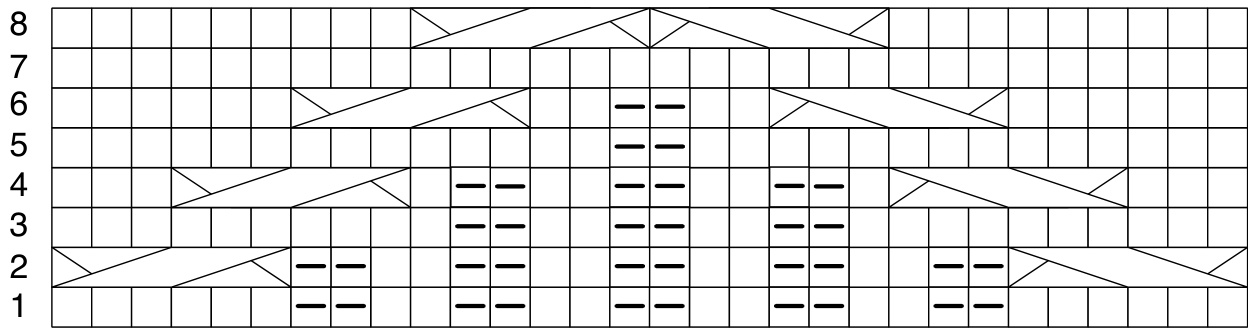
Chart 1
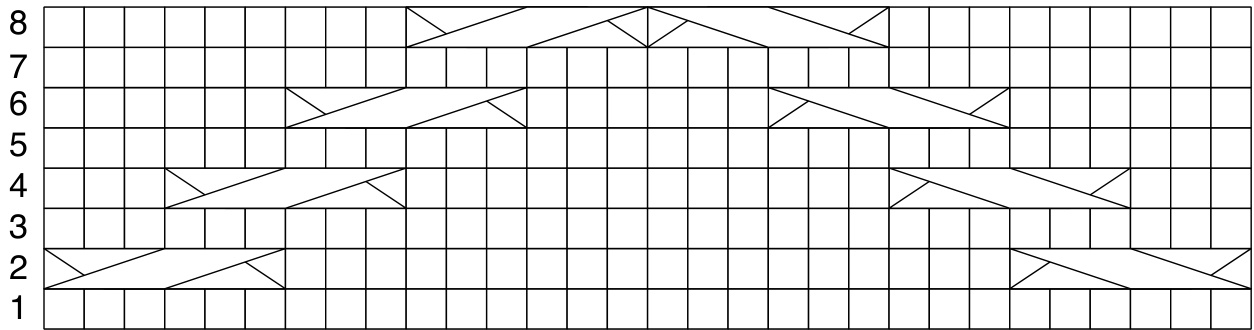
Chart 2
Chart 3
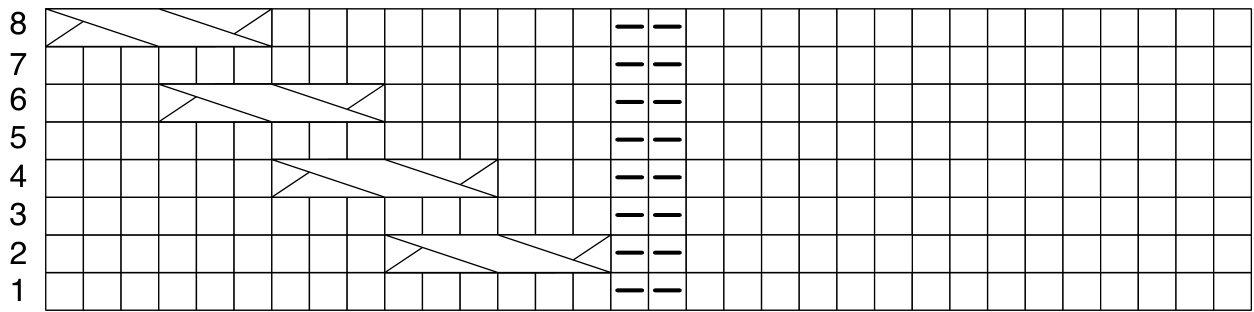
Toe chart 1 (left)
Toe chart 2 (right)