These socks are knit using the Magic Loop method, but you can use double pointed needles or two circular needles if you prefer. The socks are worked cuff down. There are no instructions for heel and toe included, because everybody has his own preferences and there is no specific heel or toe provided.
Material:
Lorna's Laces Shepherd Sock Solid or any other fingering 4 ply weight yarn Double pointed needles 2.5 mm (Us 1) or for Magic Loop circular needles 2.5 mm (US 1), 60 - 80 cm (23- 32 inches), 2 cable needles (cn) Gauge: 32 sts. x 42 rows = 10 x 10 cm (4 x 4 inch)
Meassurements:
Foot size: EU 36 - 43 (US women 6 - 11 1/2) From cuff to heel: 18 cm / 7 " (adjustable) Leg circumference: 20 cm / 8 "
Abbreviations:
Through the back of loop (ktbl)
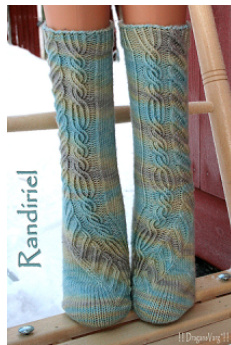
"Randiriel" is an elvish name and means "wanderer"
Knit stitch (k)
Knit into the back of the second stitch, but do not take the original stitch off the needle. Knit the first stitch, then remove them both from the left needle.
no stitch sl3 sts to first cable needle (cn), hold in FRONT sl1 to second cable needle, hold in BACK k1tbl, p1, k1tbl p1 from 2nd cable needle k1tbl, p1, k1tbl from 1st cable needle With left needle, lift strand between sts from the front, knit through the back loop.

Purl stitch (p)
Right twist
Knit both stitches (sts) together, but do not remove them from the left needle. Knit the first stitch again, and slide both sts off your needle. knit 2 sts together (k2tog) Purl 2 sts together (p2tog) sl1 as if to knit, slip next st as if to purl\* and knit them together through the back of loops (\*The sts lay flatter when done this way) With left needle, lift strand between sts from the back, knit through the front loop.
Left sock:
oin for working in the round and arrange as foll.: 16 + 16 + 15 + 21 sts. (Magic Loop 32 + 36 sts) Work Chart A-L from bottom right to top left once on needles 3 and 4 (Magic Loop nd.2) and at the same time work ribbing (kitbl, p1) for 10 rows on needles 1 and 2 (Magic Loop nd.1) After 10 rows of ribbing, change to stockinette stitch on needles 1 and 2 (Magic Loop nd. 1) keeping to the established pattern on needle 3 and 4 (Magic Loop nd.2) Work Chart B-L 10 times in total (or to desired length) In doing so, skip the orange marked cable every 5th repeat of the Chart and knit the stitches as they show up. (The cable of Chart A should be counted). Keep on working in stockinette stitch on needles 1 and 2 (Magic Loop nd.1) Foot: The heel should be worked on needles 1 and 2 (Magic Loop nd. 1)
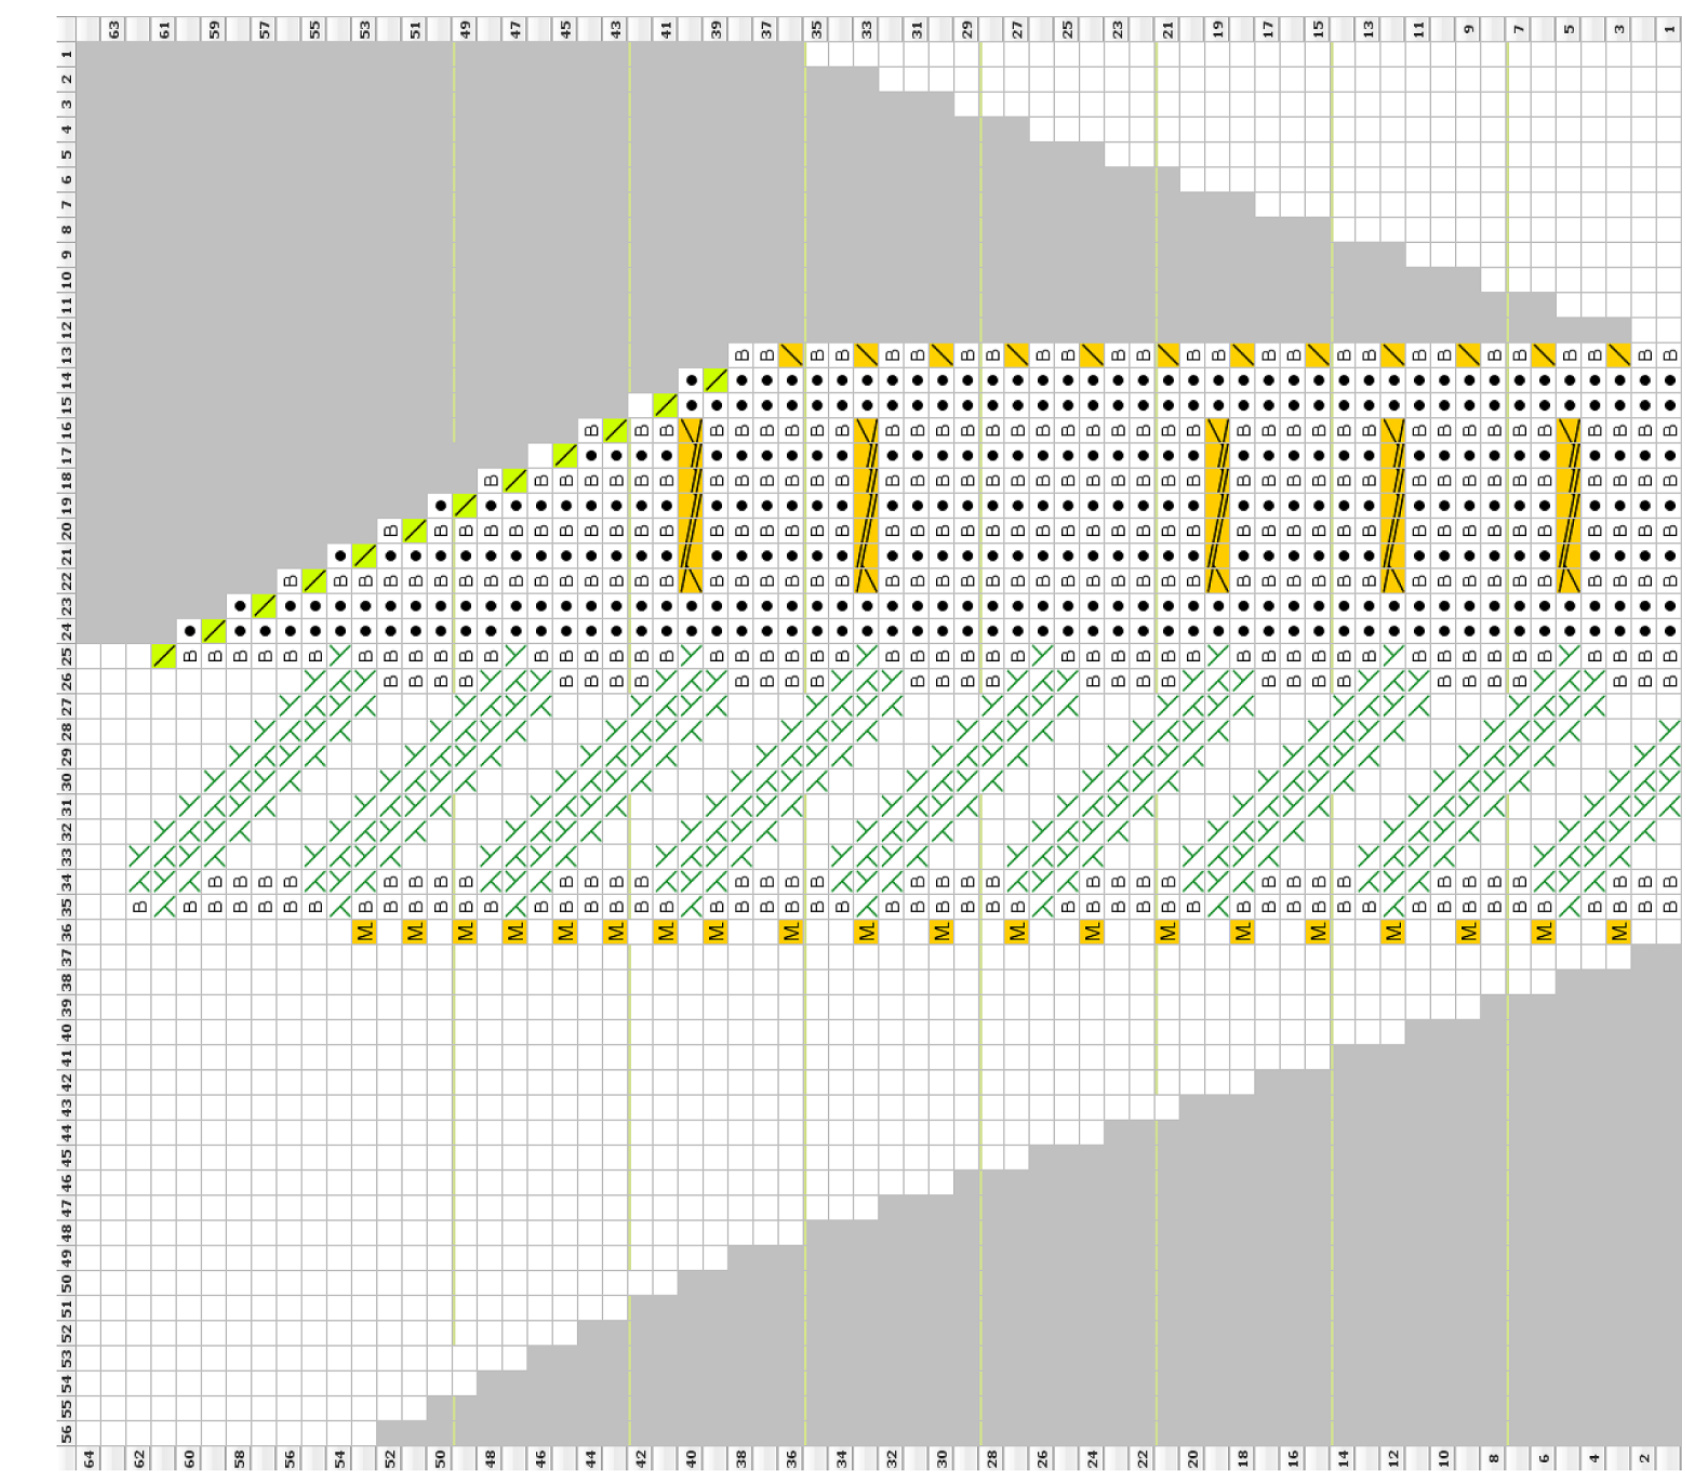
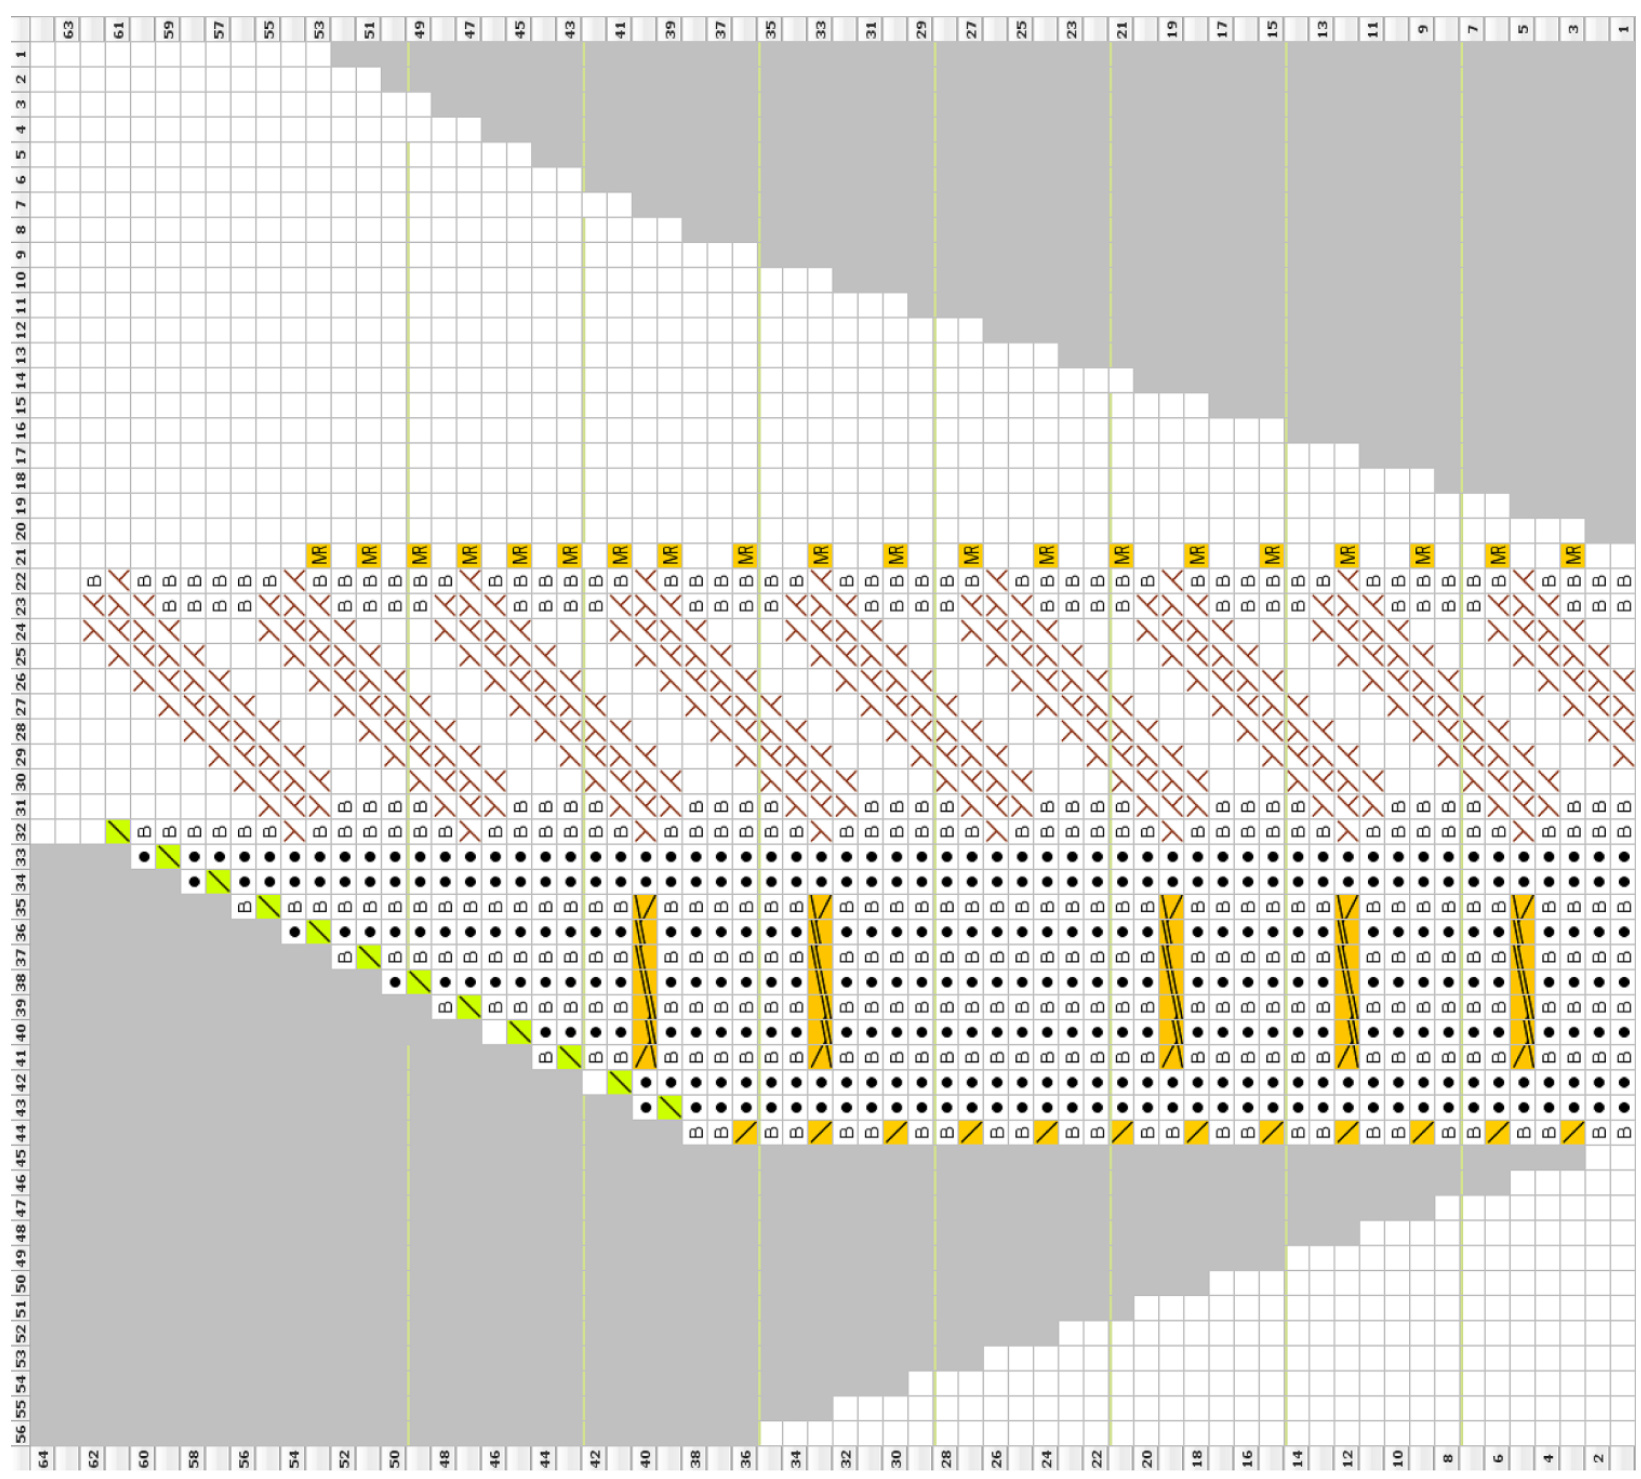
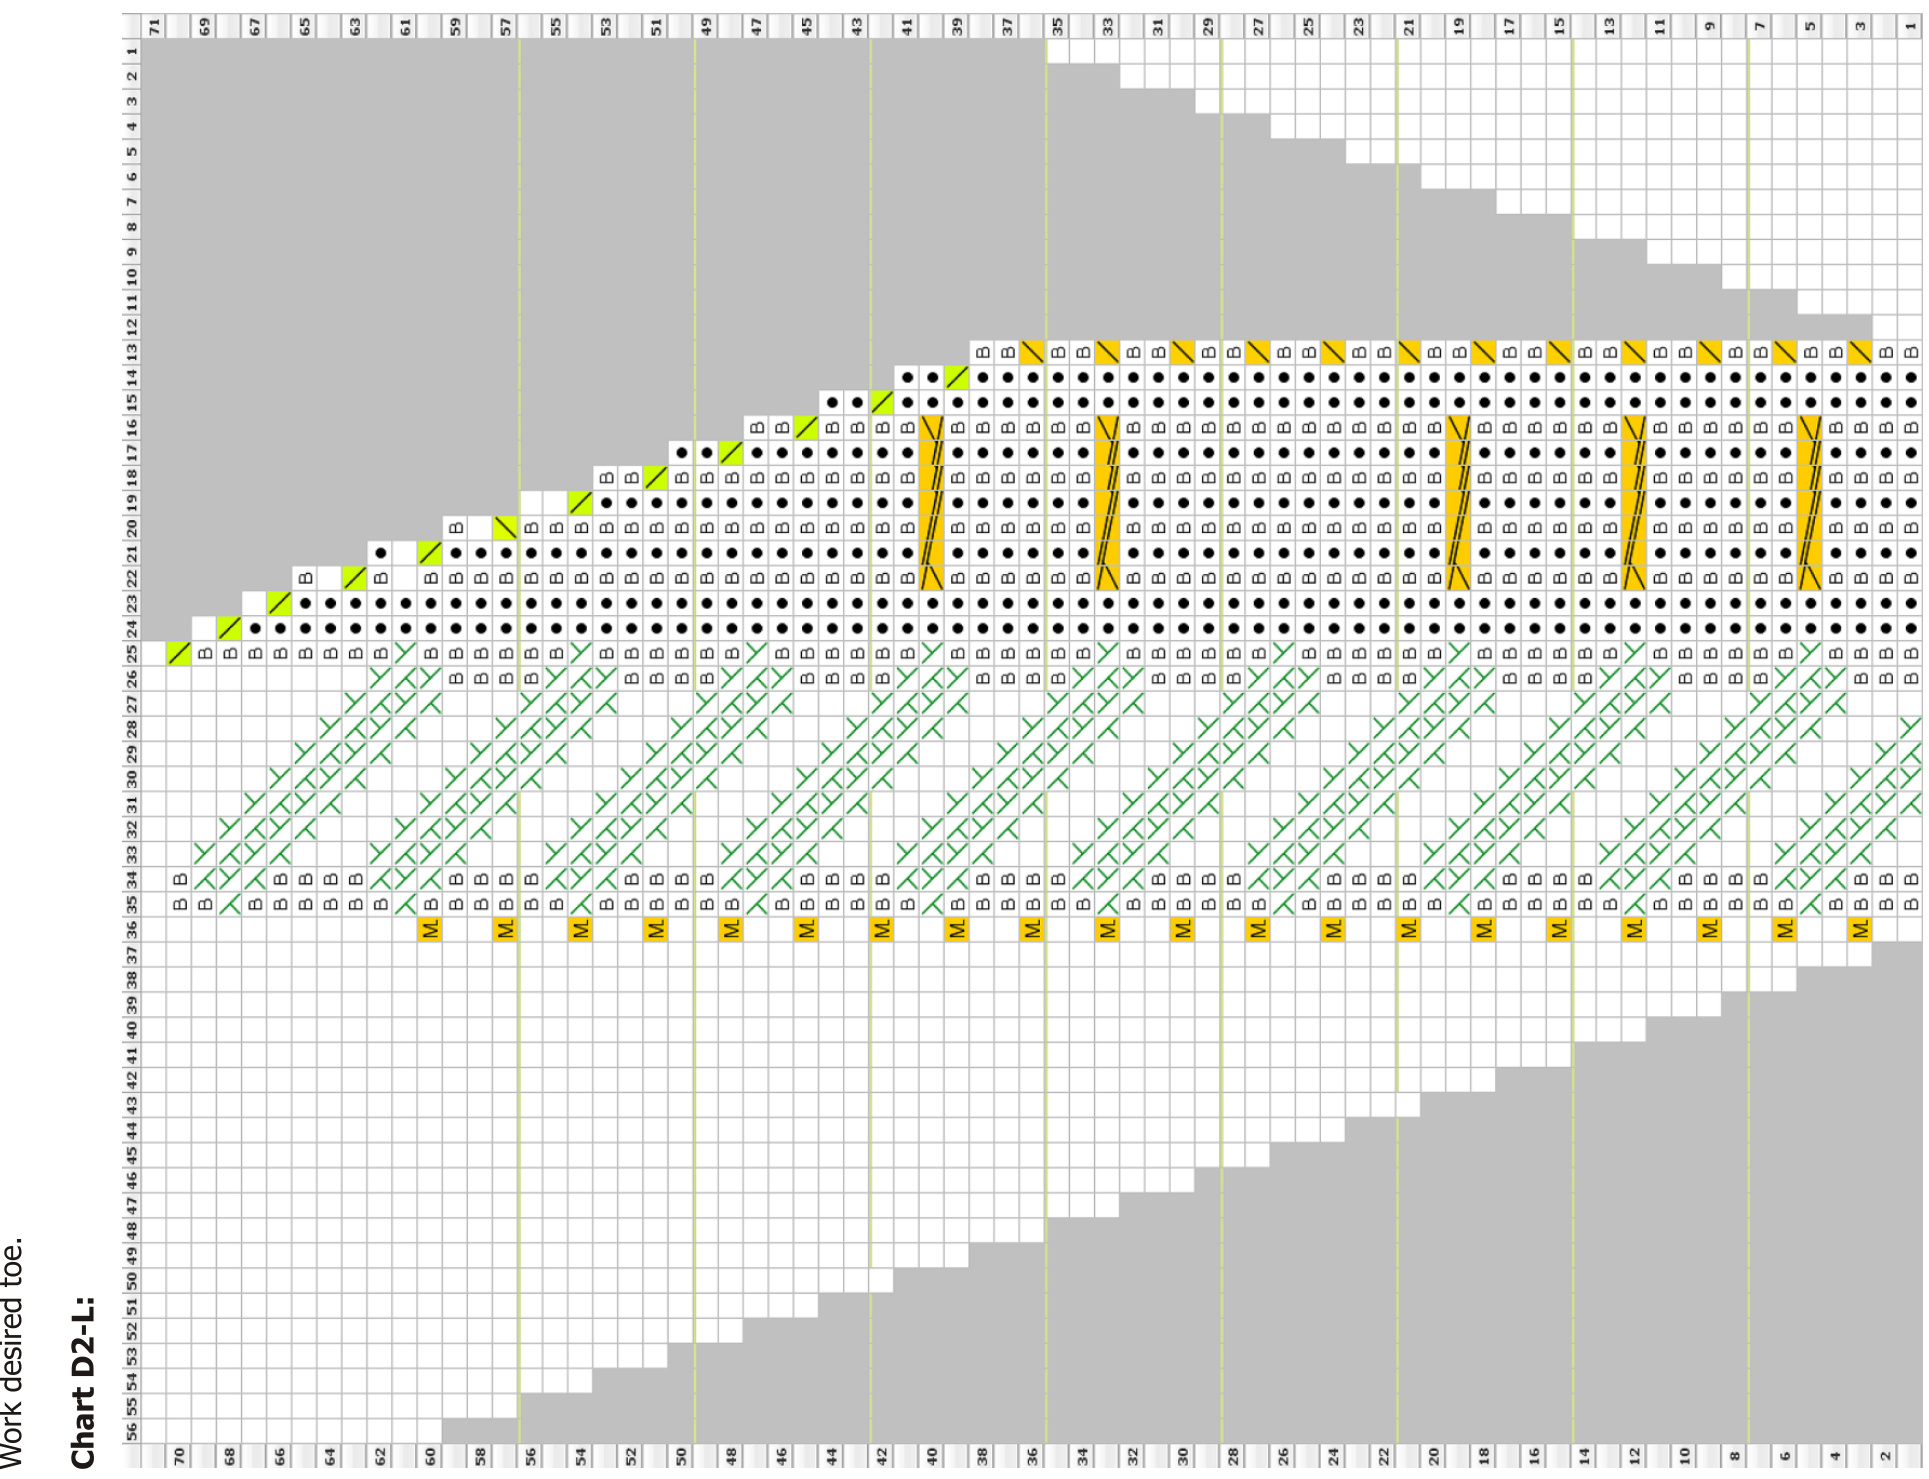
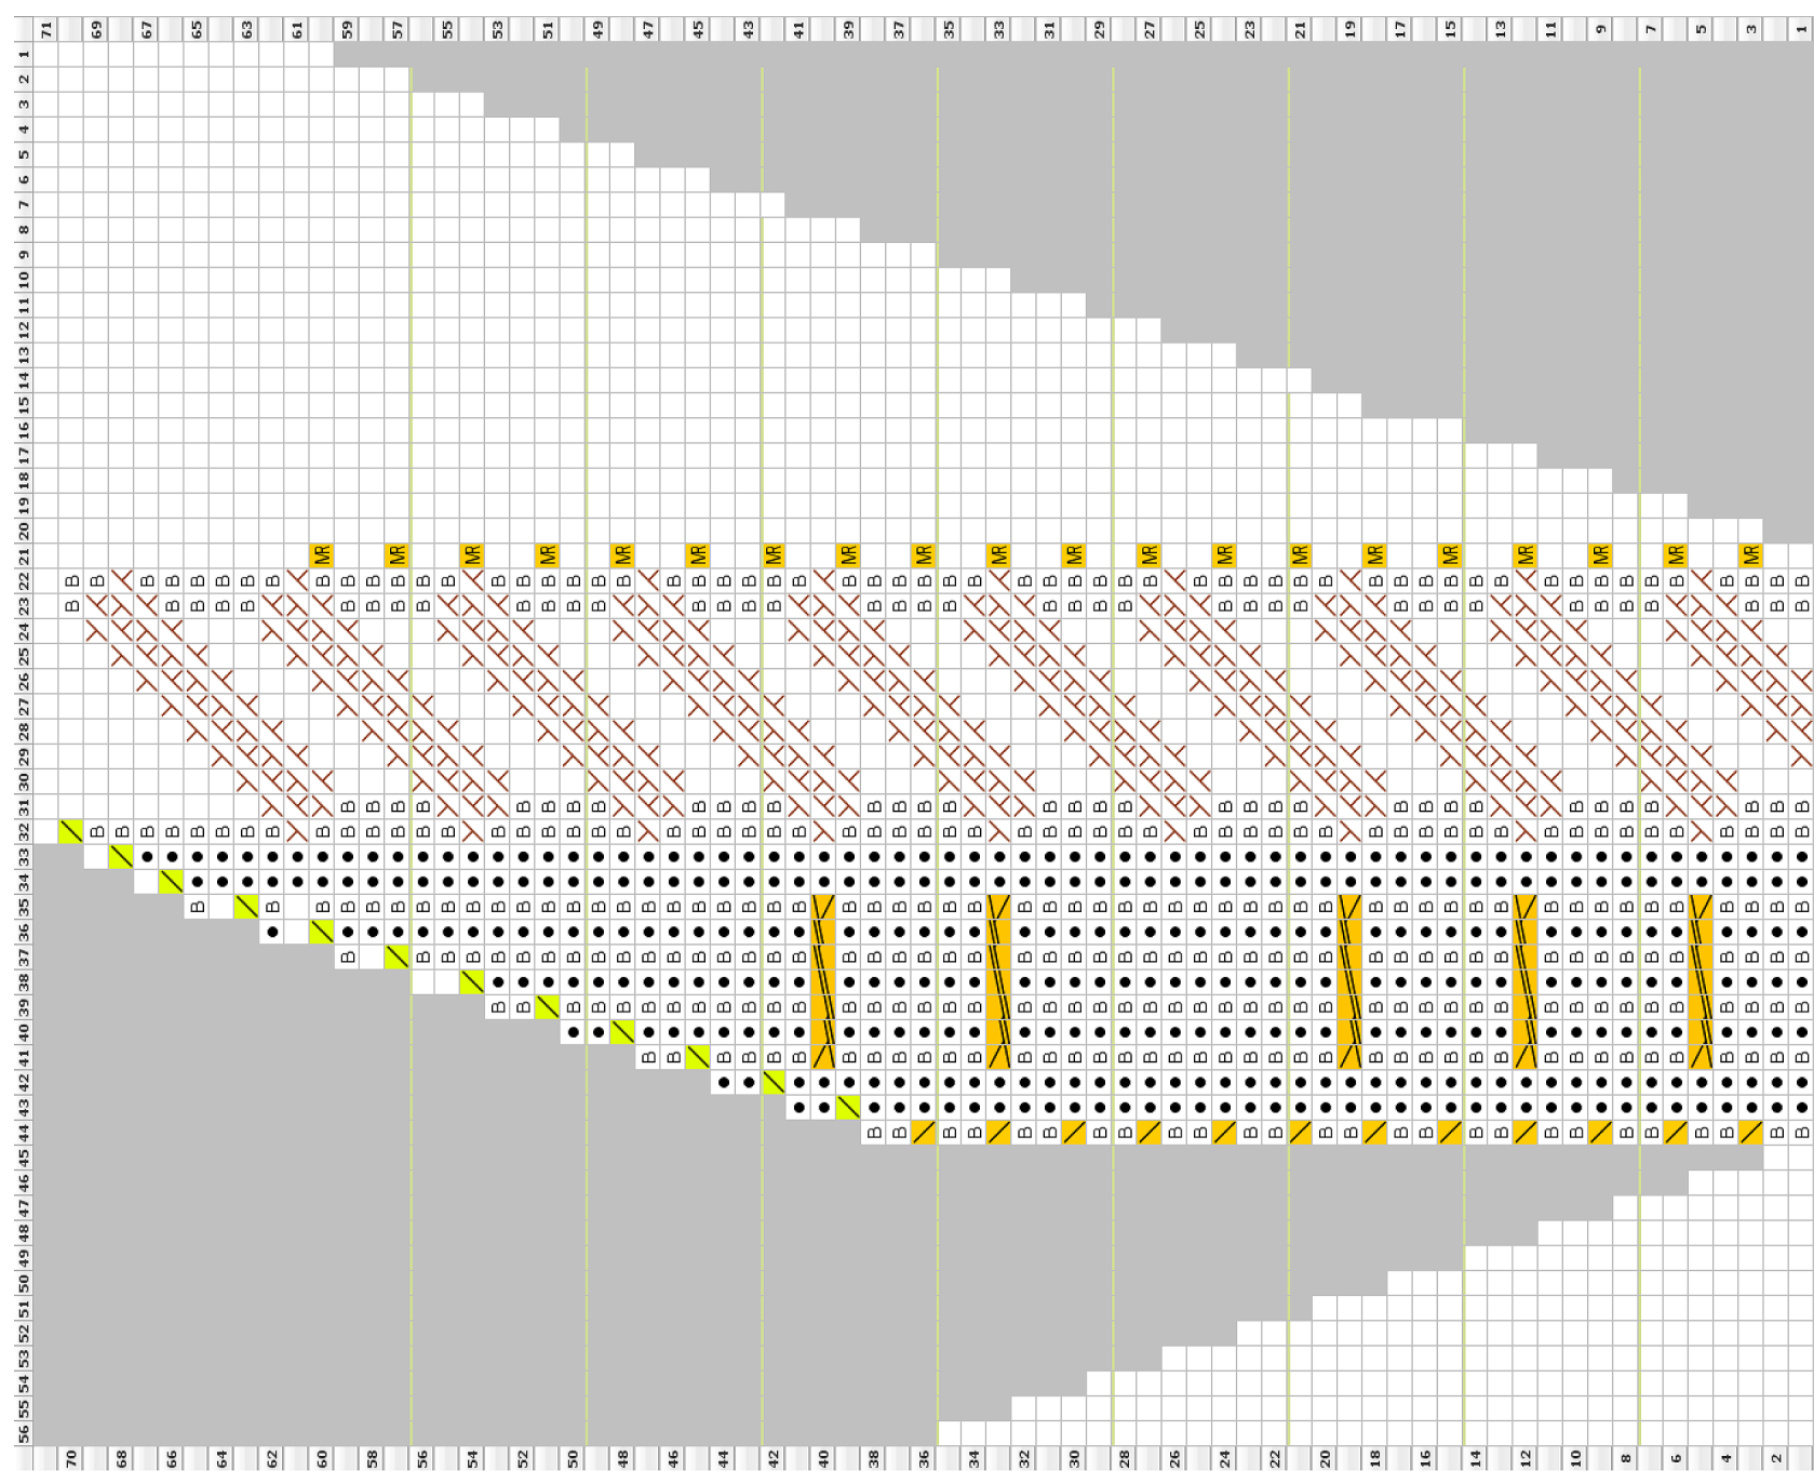
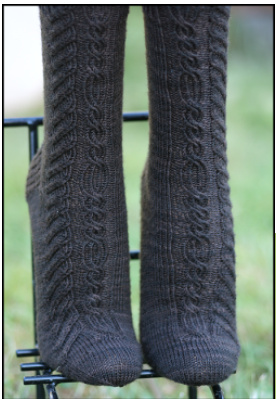
Version 1 - travelling cables: (Charts see pages 4 till 7) For US woman 6 work Chart D-L once. For US woman 7 - 11 V2 work Chart D2-L once and work in stockinette stitch until you reach the desired length. Version 2 - without travelling cables: (see picture on page 1, Charts page 3) : After working the desired heel, work Chart B-L until sock measures 2 cm ( 0.8 inches) less than the correct length to start of toe. In doing so, skip the orange marked cable every 5th repeat of the Chart and knit the stitches as they show up. Keep on working in stockinette stitch on needles 1 and 2 (Magic Loop nd.1) If sock measures 2 cm ( 0.8 inches) less than the correct length to start of toe work Chart C-L once. Work desired toe and half of the socks are done :-)
Right sock:
oin for working in the round and arrange as foll: 16 + 16 + 21 + 15 sts. (Magic Loop 32 + 36 sts) Ribbing & setup: Work Chart A-R from bottom right to top left once on needles 3 and 4 (Magic Loop nd.2) and at the same time work ribbing (kitbl, p1) for 10 rows on needles 1 and 2 (Magic Loop nd.1) After 10 rows of ribbing, change to stockinette stitch on needles 1 and 2 (Magic Loop nd. 1) keeping to the established pattern on needle 3 and 4 (Magic Loop nd.2) Cuff: Ith) In doing so, skip the orange marked cable every 5th repeat of the Chart and knit the stitches as nted). Keep on working in stockinette stitch on needles 1 and 2 (Magic Loop nd.1) Foot: The heel should be worked on needles 1 and 2 (Magic Loop nd. 1)

7 - 11 V2 work Chart D2-R once and work in stockinette stitch until you reach the desired length. Version 2 - without travelling cables: (see picture on page 1, Charts page 3) : After working the desired heel, work Chart B-R until sock measures 2 cm ( 0.8 inches) less than the correct length to start of toe. In doing so, skip the orange marked cable every 5th repeat of the Chart and knit the stitches as they show up. Keep on working in stockinette stitch on needles 1 and 2 (Magic Loop nd.1) If sock measures 2 cm ( 0.8 inches) less than the correct length to start of toe work Chart C-R once. Work desired toe and wear the socks :-)
Left sock:
Right sock:
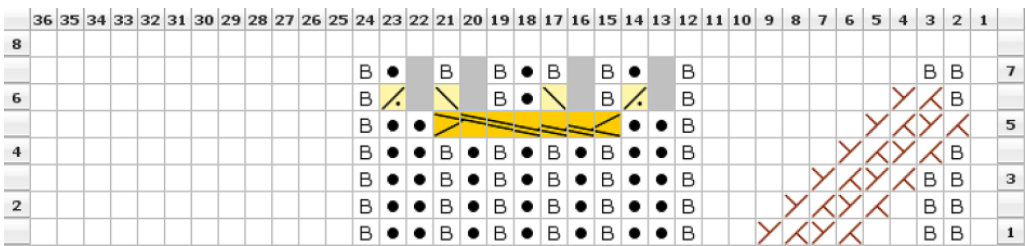
Chart A-L:
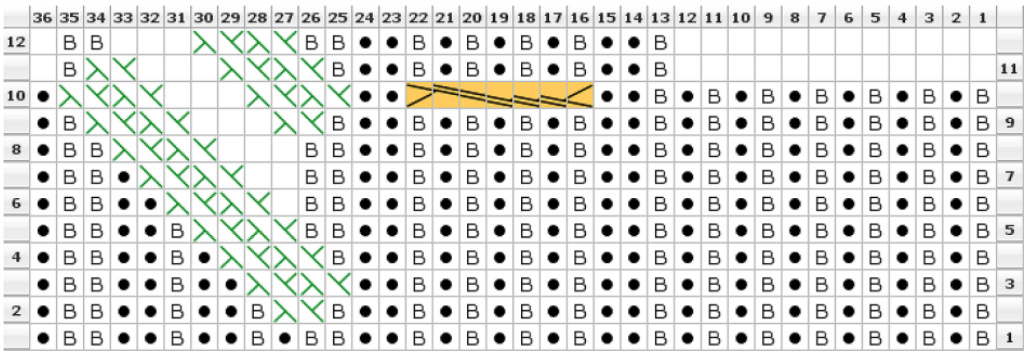
Chart A-R:
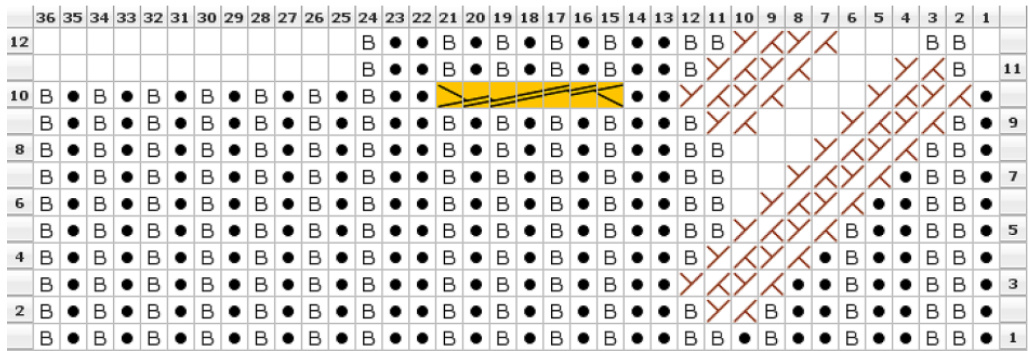
Chart B-L:
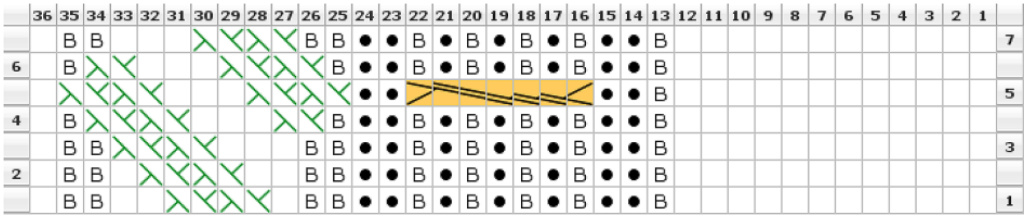
Chart B-R:
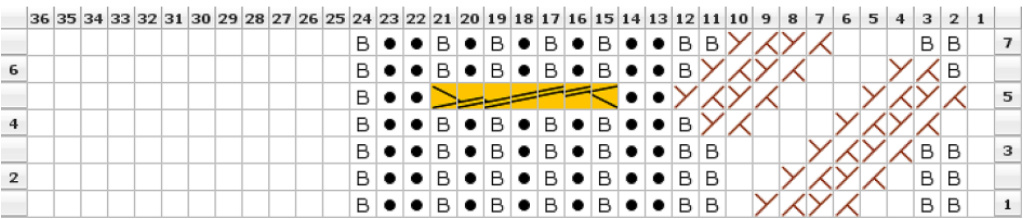
Chart C-L: (without travelling cables)
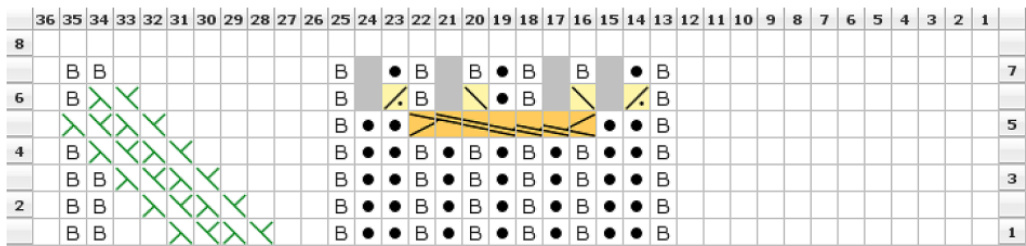
Chart C-R: (without travelling cables)
Notice of copyright
This pattern is copyrighted by me the designer, Alexandra Wiedmayer Purchasing the pattern does not remove the copyright protection of the pattern.You may reproduce the patern for your personal use only. You may make as many projects as you want from your purchased pattern for personal use only and may not use this pattern to make finished products for commercial use without written permissions from the designer. You MuST NOT sell or give away the pattern, or parts of it, or any finished products made from the pattern, to any third person, or share this patterns with anyone, without given permissions. Sharing this pattern for free is also a violation of copyright. This also includes the publication on websites, communities and in any other virtual world.