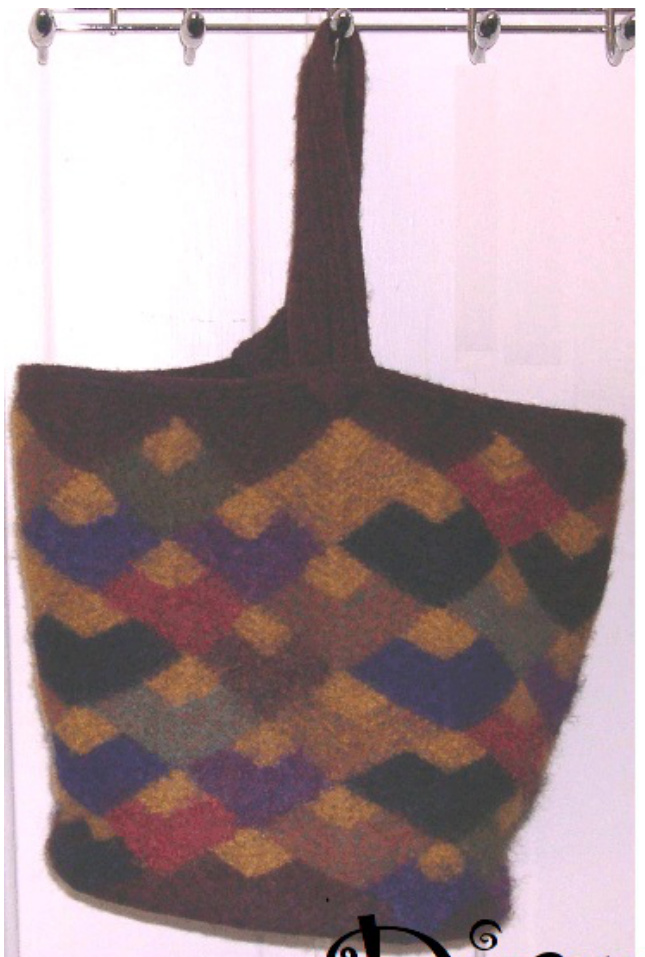
Felted Fun
Diamond
Tote Bucket
CreativeArtwarefortheMind,Body&Soul By Elizabeth Looatt Young
Diamond Tote Bucket
Materials:
Worsted weight yarn (See color chart for color way suggestions) Shown here: Cascade ^220 wool’ (220 yds) [201 meters]: 9408, 3 skeins; 4010; 2 skeins; 7811, 1 skein; 4008, 1 skein; 4006, 1 skein; 9446, 1 skein; 9445, 1 skein; 9459, 1 skein Size US 10.5 $(6.5\mathrm{mm})$ : double point needles and $24"$ (60cm) circular needles Stitch markers, scissors, tapestry needle
Color abbreviations:
mc - 9408 (brown); c1 - 4010 (gold); c2 - 9408 (brown); c3 - 7811 (grape); c4 - 4008 (ruby); c5 - 4006 (plum); c6 - 9446 (rust); c7 - 9445 (ochre); c8 - 9459 (sage); c9 - 4010 (gold)
Abbreviations:
PPu1 St -stitch sl - slip knitwise dd - (double decrease) slip 1 stitch knitwise to the right needle, knit 2 sts together, pass slipped stitchover ws - wrong side of work rs - right side of work dpn - double point needles sk - skein of yarn ssk - (slip, slip, knit) slip 2 st, knitwise separately to the right needle. Insert left needle from the left side into the fronts of the slipped stitches. Knit them together.
Knitting a diamond:
Are you ready? Let's get started! All diamonds are knit in garter stitch. With size US 10.5 (6.5 mm) dpn and c2 colored yarn, cast on 25 sts, using cable cast-on method. Row 1 (WS): Knit to the last stitch, p 1. Row 2 (RS) (Note: The yarn tail hangs at the right side): S1 1, k 10, dd, k 10, p 1. (23 sts). Row 3 and all wrong side rows: Sl 1, knit to the last stitch, purl last stitch. Row 4: Sl 1, k 9, dd, k 9, p 1. (21 sts). Row 6: Sl 1, k 8, dd, k 8, p 1. (19 sts). Row 8: Sl 1, k 7, dd, k 7,p 1. (17 sts). Row 10: Sl 1, k 6, dd, k 6, p 1. (15 sts). Row 12: Sl 1, k 5, dd, k 5, p 1. (13 sts or 7 ridges). Row 13: Sl 1, knit to last stitch, purl 1. Cut yarn, leaving a $6"$ tail to weave in. Change to c1 sk. Row 14: Sl 1, k 4, dd, k4, p 1. (11 sts). Row 16: Sl 1, k 3, dd, k 3, p 1. (9 sts). Row 18: Sl 1, k 2, dd, k 2, p 1. (7 sts). Row 20: Sl 1, k 1, dd, k 1, p 1. (5 sts). Row 22: Sl 1, dd, p 1. (3 sts). Row 23 (WS): Sl 1, k 1, p 1. Row 24: dd (double decrease). (1 st). Leave 6" (15cm) tail, cut yarn, place remaining st on safety pin. Weave in all ends. You now have completed one square! Using rows 1-24 outlined above knit 7 more diamonds for layer 1 in colors outlined below. All diamonds are knit with c1 yarn from rows 14 - 24. Do not join the diamonds as yet. Lay out first layer of diamonds with c1 tips facing up, using color chart below: Color chart for knitting diamonds (reads from the bottom up):
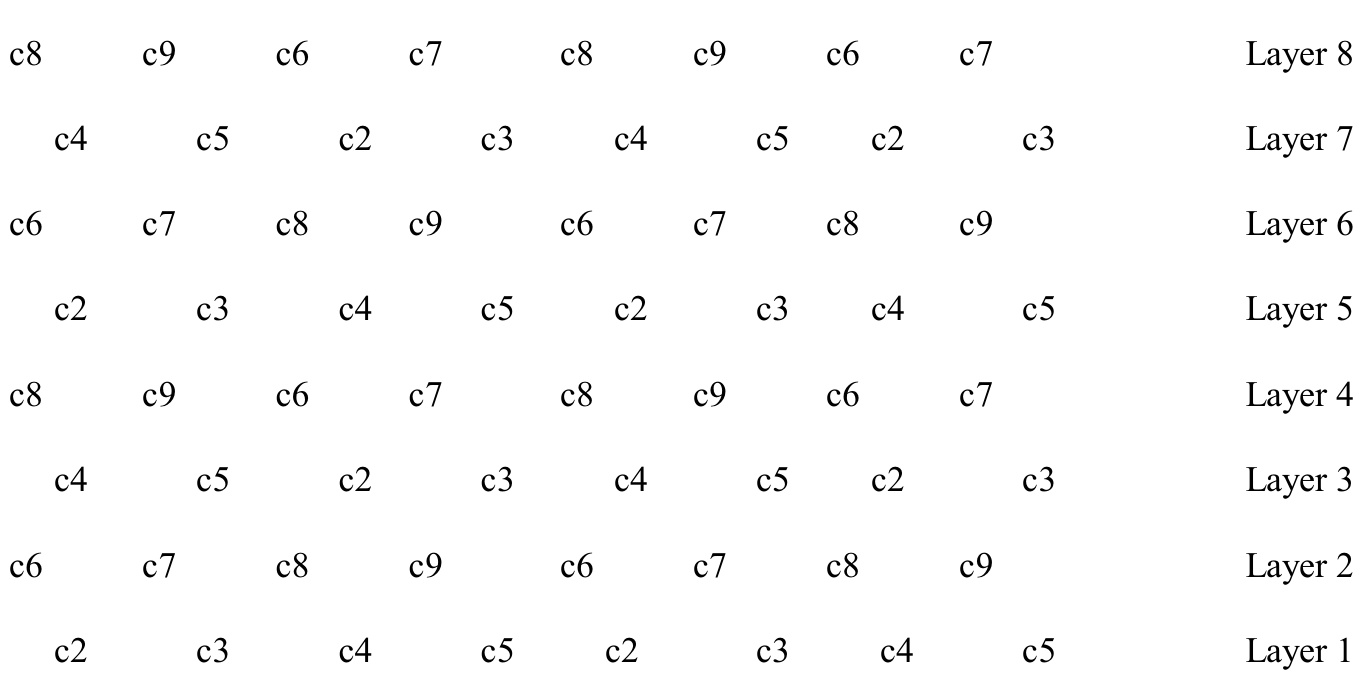
Second tier (joining the diamonds): Remove safety pin from c3 diamond on your far left and place your dpn in the loop. This is your first st. With c7 yarn pick up and knit 11 sts going in the direction the needle points (insert needle through both loops of each stitch) along left top side of c3 diamond (a total of 12 sts so far). Go “around the corner” at the little knot and pick up 1 st in cast on row stitch nearest the knot. For a visual picture refer to the illustration at the top of page 10 in Hoxbro's book. This isn't nearly as hard as it sounds and you will go “around the corner’ only on this first layer of knitting. Continue with your c7 yarn, pick up and knit 12 sts (insert needle through both loops of each stitch) along right top side of your c2 diamond. You now have a total of 25 sts on your needle. Knit rows 1-24 (outlined above) to complete your c7 diamond. Weave in all ends. Remove safety pin from c4 colored diamond and place your dpn in the loop. With your c8 colored yarn, knit a diamond (following the c7 diamond instructions above) to join c4 and c3 colored diamonds in layer below. Continue to knit second layer using color chart above. Join into a circle when knitting the last diamond. Knit bag body using color chart until all 8 layers arecomplete.
Knitting the bag bottom:
In this section we knit triangles to complete the bottom portion of our bag and then knit the base of the bag in a circular fashion. Are you still with me? Good, let's go! Turn your work over so the bottom of the bag is facing up. Change to mc yarn and with your dpn pick up 25 sts at the base of one of the diamonds (it doesn't matter which one as all triangles are knit individually before joining). To begin triangle, pick up and knit 12 sts along the cable cast-on row on the left side of a diamond, going in the direction the needle points, (insert needle through both loops of each stitch) pick up and knit 1 st in tier below, pick up and knit 12 sts along cable cast-on row on right side of adjoining diamond. Knit the following 1-12 rows: Row 1 (WS): Knit to last stitch, p 1. Row 2 (RS): S1 1, k 10, dd, k 9, p 1, turn work, leave last stitch unworked on needle. (23 sts) Row 3: Sl 1, k 19, p 1, turn work, leave last stitch unworked on needle. Row 4: Sl 1, k 8, dd, k 7, p 1, turn work, leave remaining stitches unworked. (21 sts) Row 5: Sl 1, k 15, p 1, turn work, leave remaining stitches unworked. Row 6: Sl 1, k 6, dd, k 5, p 1, turn work, leave remaining stitches unworked. (19 sts) Row 7: Sl 1, k 11, p 1, turn work, leave remaining stitches unworked. Row 8: Sl 1, k 4, dd, k 3, p 1, turn work, leave remaining stitches unworked. (17 sts) Row 9: Sl 1, k 7, p 1 stitch, turn work, leave remaining stitches unworked. Row 10: Sl 1, k 2, dd, k 1, p 1, turn work, leave remaining stitches unworked. (15 sts) Row 11: Sl 1, k 3, p 1, turn work, leave remaining stitches unworked. Row 12: Sl 1, dd. (13 sts). Leave a $6"$ tail, cut yarn, place 13 sts on a set of stitch holders. Repeat rows 1-12 all around bottom of bag, placing live sts on stitch holders as you go for a total of 104 sts. Place all sts on a size US 10.5 (6.5mm) $24"$ (60cm) circular needle, placing a st marker after every 13 sts (8 stitch markers). Weave in all ends.
Knitting the bag base:
The base of the bag is knit in garter stitch, which on circular needles entails purling one row and knitting the next. Change to dpn when sts no longer fit on circular needles. Rows 1-8: Knit (104 sts each row) Row 9: \*ssk, knit 11, repeat from \*. (96 sts) Rows 10-13: Knit. Row 14: \*ssk, knit 10, repeat from \*. (88 sts) Rows 15-17: knit Row 18: \*ssk, knit 9, repeat from \*. (80 sts) Rows 19-21: knit. Row 22: \*ssk, knit 8, repeat from \*. (72 sts) Rows 23-25: knit. Row 26: \*ssk, knit 7, repeat from \*. (64 sts) Row 27-28: knit. Row 29: \*ssk, knit 6, repeat from \*. (56 sts) Row 30-31: knit. Row 32: \*ssk, knit 5, repeat from \*. (48 sts) Row 33-34: knit. Row 35: \*ssk, knit 4, repeat from \*. (40 sts) Row 36-37: knit. Row 38: \*ssk, knit 3, repeat from \*. (32 sts) Row 39: knit. Row 40: \*ssk, knit 2, repeat from \*. (24 sts) Row 41: knit Row 42: \*ssk, knit 1, repeat from \*. (16 sts) Row 43: knit. Row 44: \*ssk, repeat from \*. (8 sts) Leave 6" tail, cut yarn and draw through remaining sts. Pull yarn through center to inside and weave in all ends.
Knitting the top section of bag:
We knit the bag's top section in triangles and finish with a 3 row I-cord band and strap. We're on the home stretch, so stick with me! Change to mc yarn and with your dpn pick up 25 sts at top of one of the diamonds (it doesn't matter which one as they are all knit individually before joining). To pick up the 25 sts, remove the safety pin and use the end stitch at the top of a diamond for your first st, pick up and knit 11 sts along top left side of a diamond (insert needle through both loops of each stitch), pick up and knit 1 st of the cc1 diamond in tier below, and pick up and knit 12 sts along top right side of adjoining diamond. Knit following 1-12 rows: Row 1 (WS): Knit to last stitch, p 1. Row 2 (RS): Sl 1, k 10, dd, k 9, p 1, turn work, leave last stitch unworked on needle. (23 sts) Row 3: Sl 1, k 19, p 1, turn work, leave last stitch unworked on needle. Row 4: Sl 1, k 8, dd, k 7, p 1, turn work, leave remaining stitches unworked. (21 sts) Row 5: Sl 1, k 15, p 1, turn work, leave remaining stitches unworked. Row 6: Sl 1, k 6, dd, k 5, p 1, turn work, leave remaining stitches unworked. (19 sts) Row 7: Sl 1, k 11, p 1, turn work, leave remaining stitches unworked. Row 8: Sl 1, k 4, dd, k 3, p 1, turn work, leave remaining stitches unworked. (17 sts) Row 9: S1 1, k 7, p 1 stitch, turn work, leave remaining stitches unworked. Row 10: Sl 1, k 2, dd, k 1, p 1, turn work, leave remaining stitches unworked. (15 sts) Row 11: Sl 1, k 3, p 1, turn work, leave remaining stitches unworked. Row 12: S1 1, dd. (13 sts). Leave a 6" tail, cut yarn, place 13 sts on a set of stitch holders. Repeat rows 1-12 all around top of bag for a total of 104 sts. Place all sts on circular needles.
Knitting the top band and strap of your bag in I-cord:
Continuing with mc, cast-on 3 sts at the beginning of next round. With a dpn, knit the first 2 cast-on sts. Knit into the backs of the third cast-on st and the first bag st at the same time to bind off one st. Return remaining three sts to left hand needle (circular needle containing bag sts). Repeat this sequence until 50 sts are bound off. Next we make a buttonhole slot for the strap. Knit next three I-cord sts. Slip the next two bag sts to the dpn. Slip the first of these sts over the second. Slip a third st from circular needle to dpn. Slip second st over this st. Continue until five sts are bound off. Return this st to circular needle. Return three I-cord sts to circular needle. Work 4 rows of I-cord on these three sts, without binding off any bag sts. Continue Icord bind off as detailed above. After last st of the bag is bound off, continue to work the 3 st Icordfor $45"$ (115cm) to complete the strap of bag. Leave these 3 sts on the dpn.
Knitting second and third row of bag:
With circular needle pick up and knit 104 sts along top edge of bag beginning with first st that was bound off working from right to left. Continuing with circular needle pick up and knit sts along the side of strap until all sts are picked up and you are back at the beginning. Join work, being very careful not to twist, bind off in 3 st I-cord with sts from dpn as outlined above. Do not make a buttonhole slot. This completes a second row of I-cord along the bag top. Make a third row of I-cord as for second row. When you finish the last st of strap, bind off all 3 sts and sew them to the bag edge. Fill in resulting gap between ending row and previous row with a darning or buttonhole stitch. You now have a very sturdy top edge and strap.
Fulling the bag:
NOTE: Keep your hands and loose garments well away from your washing machine while it is in operation. Turn off machine before reaching into it. Partially fill your washer with hot water. Add a small amount of mild detergent (I use Dawn dishwashing liquid). Place your bag in a zippered pillowcase (this project throws a LOT of lint), then into the washer. Set machine for its longest agitation cycle. Wearing kitchen gloves (the water is very hot!), check your project every few minutes or so to see if amount of fulling is to your liking. This bag fulls quicker than projects knit in stockinette stitch, so check often or you'll end up with a smaller bag! While checking, straighten strap and rearrange bag in pillowcase. If you want additional fulling after machine cycle, reset washer for another agitation cycle and continue checking until bag is to your liking (I had to run only one cycle for my bag). Remove pillowcase from washing machine and spin out water (allowing bag to spin in machine can permanently set in creases). Remove bag from pillowcase and thoroughly hand rinse your project under warm water. Gently squeeze out water (do not wring or twist). Place bag on a dry towel, roll up and press out as much water as possible. Unwrap towel. Stretch bag over a stock pot or bucket, molding it with your hands until everything looks right to you. (My project fulled too much, so I had to pull the bag over a smaller stock pot, then over a bucket to get it to the size I wanted!). Don't be afraid to pull the fulled fabric. Treat the fabric like dough as wet wool likes to be shaped and molded. After pulling the bag onto a form, straighten out the strap and allow the project to dry completely. Once bag is dry remove from form and cut a circular bottom out of cardboard or other suitable material. I recommend buying adhesive backed velcro from a fabric store to ensure a snug fit and no sagging bottom. Cut the loopy side (not wooly side) of velcro to fit cardboard bottom, remove adhesive backing and adhere to cardboard. Allow adhesive set for a few minutes, then push cardboard to bottom of bag, velcro side down. The loopy velcro will stick to the wooly wool. Voila! To carry your tote, slip strap through slot of bag and loop it through itself for a handle, or just pull strap through (without looping through again) for a shoulder strap.
COLOR CHART SUGGESTIONS
(cc) - Cascade “220 wool’ (220 yds) [201 meters] (ns) - Nature Spun ^Worsted' (245 yds) [224 meters] BROWN PURPLE mc 9408 - Brown (cc) 7811 - Grape (cc) c1 4010 - Gold (cc) 7811 - Grape (cc) c2 9408 - Brown (cc) 103 - Deep Sea (ns) c3 7811 - Grape (cc) N04 - Blue Knight (ns) c4 4008 - Ruby (cc) 9411 - Medium Green (cc) c5 4006 - Plum (cc) 121 - Tornado Teal (ns) c6 9446 - Rust (cc) 8393 - Navy (cc) c7 9445 - Ochre (cc) N25 - Enchanted Forest (ns) c8 9459 - Sage (cc) 9327 - Denim Blue (cc) c9 4010 - Gold (cc) N27 - Monument Green (ns)


