Knitalily Patterns

How to get started
It always helps to read any pattern completely before starting to kni..
Requirements:
4x 50 gram balls of Aran weight yarn (10ply or double knitting in UK/Nz/Australia). I used a cotton/acrylic yarn as the dress was made for spring/summer. The blue version pictured was knitted with Katia Mississippi yarn (not to be mistaken for Misssippi 3 which is much thinner. Katia Mississippi gives you approximately 95 metres of yarn per 50 grams. Size $3\%$ -4mm knitting needles, US size 4-5 or size required for correct tension. Stitch-holder; wool needle for sewing; rust-proof sewing pins and a steam iron for blocking your work. Size 3mm crochet hook. This sweet little dress is very versatile. Worn with leggings,overa little tee-shirt or even a pair of skinny or flared jeans-your little girl will lookbeautiful. "ltleoummer hohiday in Frane" For a warmer "pinafore" version you could use any Aran weight yarn. But please note the tension required for this dress: Tension: For a 10 x10 cm swatch you should achieve a tension of 18 stitches and 25 rows. If you get more stitches, Use larger needles; if you get less, use smaller needles. Please knit a tension swatch - it could save you from fitting into this dress yourself!
Stitches used:
Stocking stitch $=$ first row knit, next row purl, repeat. Note: I usually don't work the first stitch of a row; I just slip it onto the right needle. For a nice neat finish at the neckline, it would be a good idea for you to do the same. Crochet: slip stitch, chain.
Front of Dress
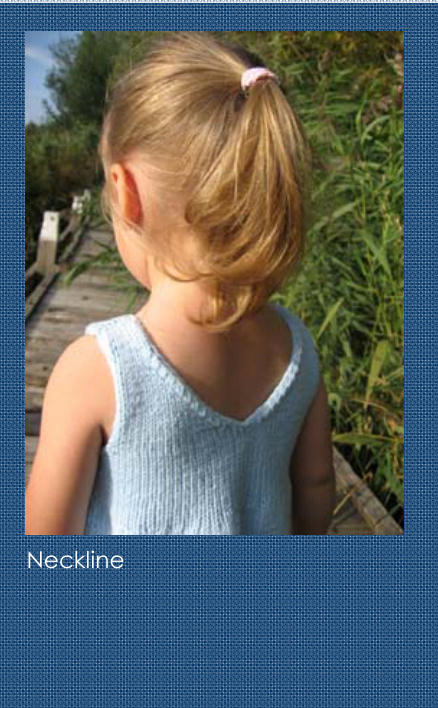
Cast on 80 stitches with needles required to achieve the correct tension. Work 32 centimeters of stocking stitch ending on wrong side (purl side). Then decrease 28 stitches evenly across next row,leaving you with 52 stitches. This decrease results in a subtle gathering of your fabric. Tip! Does your mind get a little boggled trying to decrease evenly? Try this: For every group of 10 stitches you need to decrease 3 stitches (takes you up to 24 stitches decreased) and then you only need to worry about the remaining 4 stitches which you can pop in at quarterly intervals. So, you now have 52 stitches... Continue in stocking stitch for another 4cm after your gathered row, ending on wrong side (be aware that at 7cm after the gathered row, you willsimultaneously be shaping the neckline). Armholes: at each end of every $2^{\mathsf{n d}}$ rowcastoff: $1\times3$ stitches; $1\times2$ stitches; and 3 x1 stitches (a total of 16 stitches)
Tip!
Do you know how to avoid the "stepped" or "jagged" edge when shaping armholes? Here is an example: Say you want to cast off stitches at each end of every $_{2n d}$ row: Cast off the first 3stitches, knit or pattern the rest of the row up til the last stitch. Leave the un-knitted stitch on the left needle and turn. Purl or knit the first stitch on the left needle. Slip the un-knitted stitch over this one. That's one stitch casted off. Cast off the remaining two stitches as you would normally. Work the rest of the row up tllthe last stitch. Turn. Knit or purl the first stitch on left needle, then slip the un-knitted stitch over this one. Cast off remaining stitches etc. Meanwhile, at 7cm affer the gathered row and ending on wrong side, begin the neckline. Divide work into two even halves (each half containing an equal amount of stitches) leaving second half on a stitch-holder to be worked later. But, for this second half, note down where you were up to with the armhole decreasing - or you wil probably forget. If your last row was a wrong side row you should now have a knitted row on your right hand needle with the rest of your work on a stitch-holder to the leff. To immediately start shaping the v-neck you now need to "un-knit" the last three stitches on your right needle placing then to be re-knit on your left. Then slip thefist of these three stitches onto yourright needle. Knit the next stitch. Slip the slipped stitch over the knitted stitch, knit one. To continue the neckline you will decrease I stitch every $2^{\mathsf{n d}}$ row as follows: Continuing in stocking-stitch, knit allstitches except the last 3 at the neckline; then slip 1 stitch, knit the next stitch, slip the slipped-stitch over the knitted stitch and then knit one. Repeat every $2^{\mathsf{n d}}$ row at the neckline. Important Note: For a tidy finish give every Ist stitch at the neckline a good yank. You don't want it loose or scruffy. You wil continue in this manner until you have 8 stitches remaining (and in the meantime all armhole decreases wilhave been made). Then you will work a further 10 rows, ending with a total dress length of 47cm. Cast these 8 stitches off and continue the other half of the neckline as follows: Rejoin yarn to neck edge, knit rest of the row. You are basically doing the same as the first side of the neckline only it will now be done on the "wrong" purl side. Purl up to the last 3 stitches at the neckline; then slip 1 stitch, purl the next stitch, slip the lipped-stitch over the purled stitch and then purl one. Repeat every $2^{\mathsf{n d}}$ row at the neckline. Remember to give every Ist stitch at the neckline a good yank. Again, repeat this until you have 8 stitches remaining. Work a further 10 rows. Cast off.

Back of Dress
The back of the dressis worked in precisely the same manner as the front.
Making up your dress
Blocking may not be your thing but it really does help you achieve a neat, softly flowing dress that sits really well.
How to block:
You need a space bigger than the dress.I usually put a big folded bath towel on my dinner table. Fillup your iron with plenty of water and let it warn up. Place either the front or back of the dress on the towel as neatly and as flat as you can. Then, with your sewing pins, pin it all around so it lies secure on the towel. Make sure it is not stretchingout anywhere. Then, without actually touching the iron to your work, let it hover very closely above it so that the steam really covers the whole surface. I do this once and then go over and do it again. Don't burn yourself! Let your work cool down and dry, remove the pins and you will have a neat and flat result. It sounds more time consuming than it actually is. Now for putting it together (you are almost there)! With right sides facing and using invisible a.k.a maress stitch, join the sides of your dress. I like to pin them together so that when I come to the end of the join, I don't have one half longer than the other. The mattress stitch is perfect because it is neat, practically invisible and not bulky. Now why would I explain how to do this stitch when someone has already done a perfect job of it (with photos included)?
http://www.knitty.com/IssUEspring04/mattress.html Thank you knitty.com!
Now join the shoulder bands, you can do this using a backstitch seam (normal sewing stitch) but this will give you a bulky ridge. I prefer to use the mattress stitch again or even graft the two ends together. You will barely be able to see the join.
Crochet Edging
When the dress is assembled, you can add a crochet edging to reall finish it off and to keep the shoulder straps lying flat. The crochet used in this pattern is very easy and with the help of almost any crochet website you wil have no frouble achieving this. For the armholes, work one row of slip stitching beginning in the armpits. Don't doit too tightly, or you willdistort the dress. Do the same in the entire neckine, putting the crochet hook through the loops that form the neckine edge.
Picot Edging for the bottom of the dress:
First make one round of slip stitching, then one row of picots: $^{*}\!2$ slip stitches, 3 chain stitches, 1 slip stitch into the first chain stitch;\* repeat from \* to \* ight around the dress. Note: if you find your picots are flaring outwards,it maybe helpful to skip over anunderlying slip stitch each time you make your 2 slip stitches, i.e. Ist slip stitch is worked into $2^{\mathrm{nd}}$ stitch from your needle.


