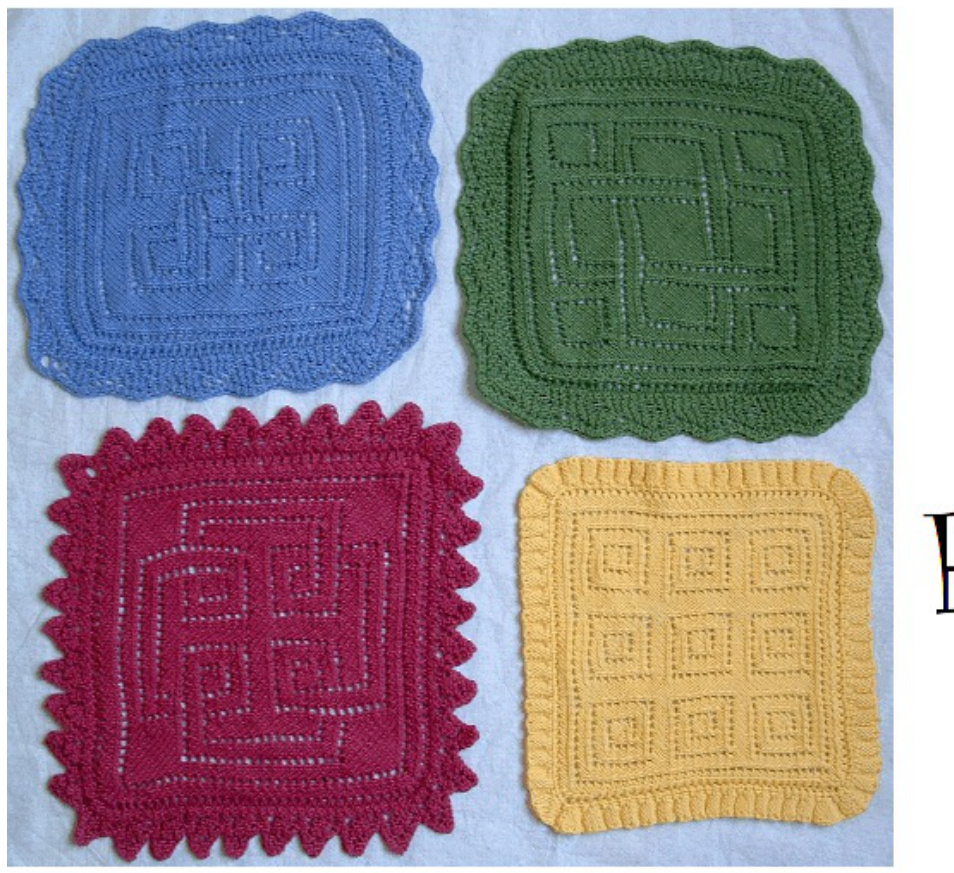
Lacey Fun
Lace Face Cloths

CreativeArtware for theMind,ody&Soul By Elizabeth Lovatt Young
LACE FACE CLOTHS
Yarn:
Fingering weight washable yarn Shown here: Dale ^Stork' (195 yds) [180 meters]: 1 skein 24" (60cm) strand tightly spun waste yarn Needles: Size US 1 $(2.25\mathrm{mm})$ double point needles and $24"$ $\left(60\mathrm{cm}\right)$ circular needles (or size to obtain gauge) Size F $(3.34\mathrm{mm})$ or G (4mm) crochet hook Gauge: 32 sts and $40\;\mathrm{rows}=4"\:(10\mathrm{cm)}$
Symbols and Abbreviations:
V - bind off (k2tog, pass st back to left needle, repeat) swt - slip, wrap, turn (slip the next stitch (purlwise) from left-hand needle to right needle and bring yarn forward. Put slipped stitch back on left needle and TURN your work, leaving everything else unworked. You have wrapped the stitch and are in position to work the next row. This technique is called short row shaping'. k2tog - knit two stitches together. k - knit p-purl
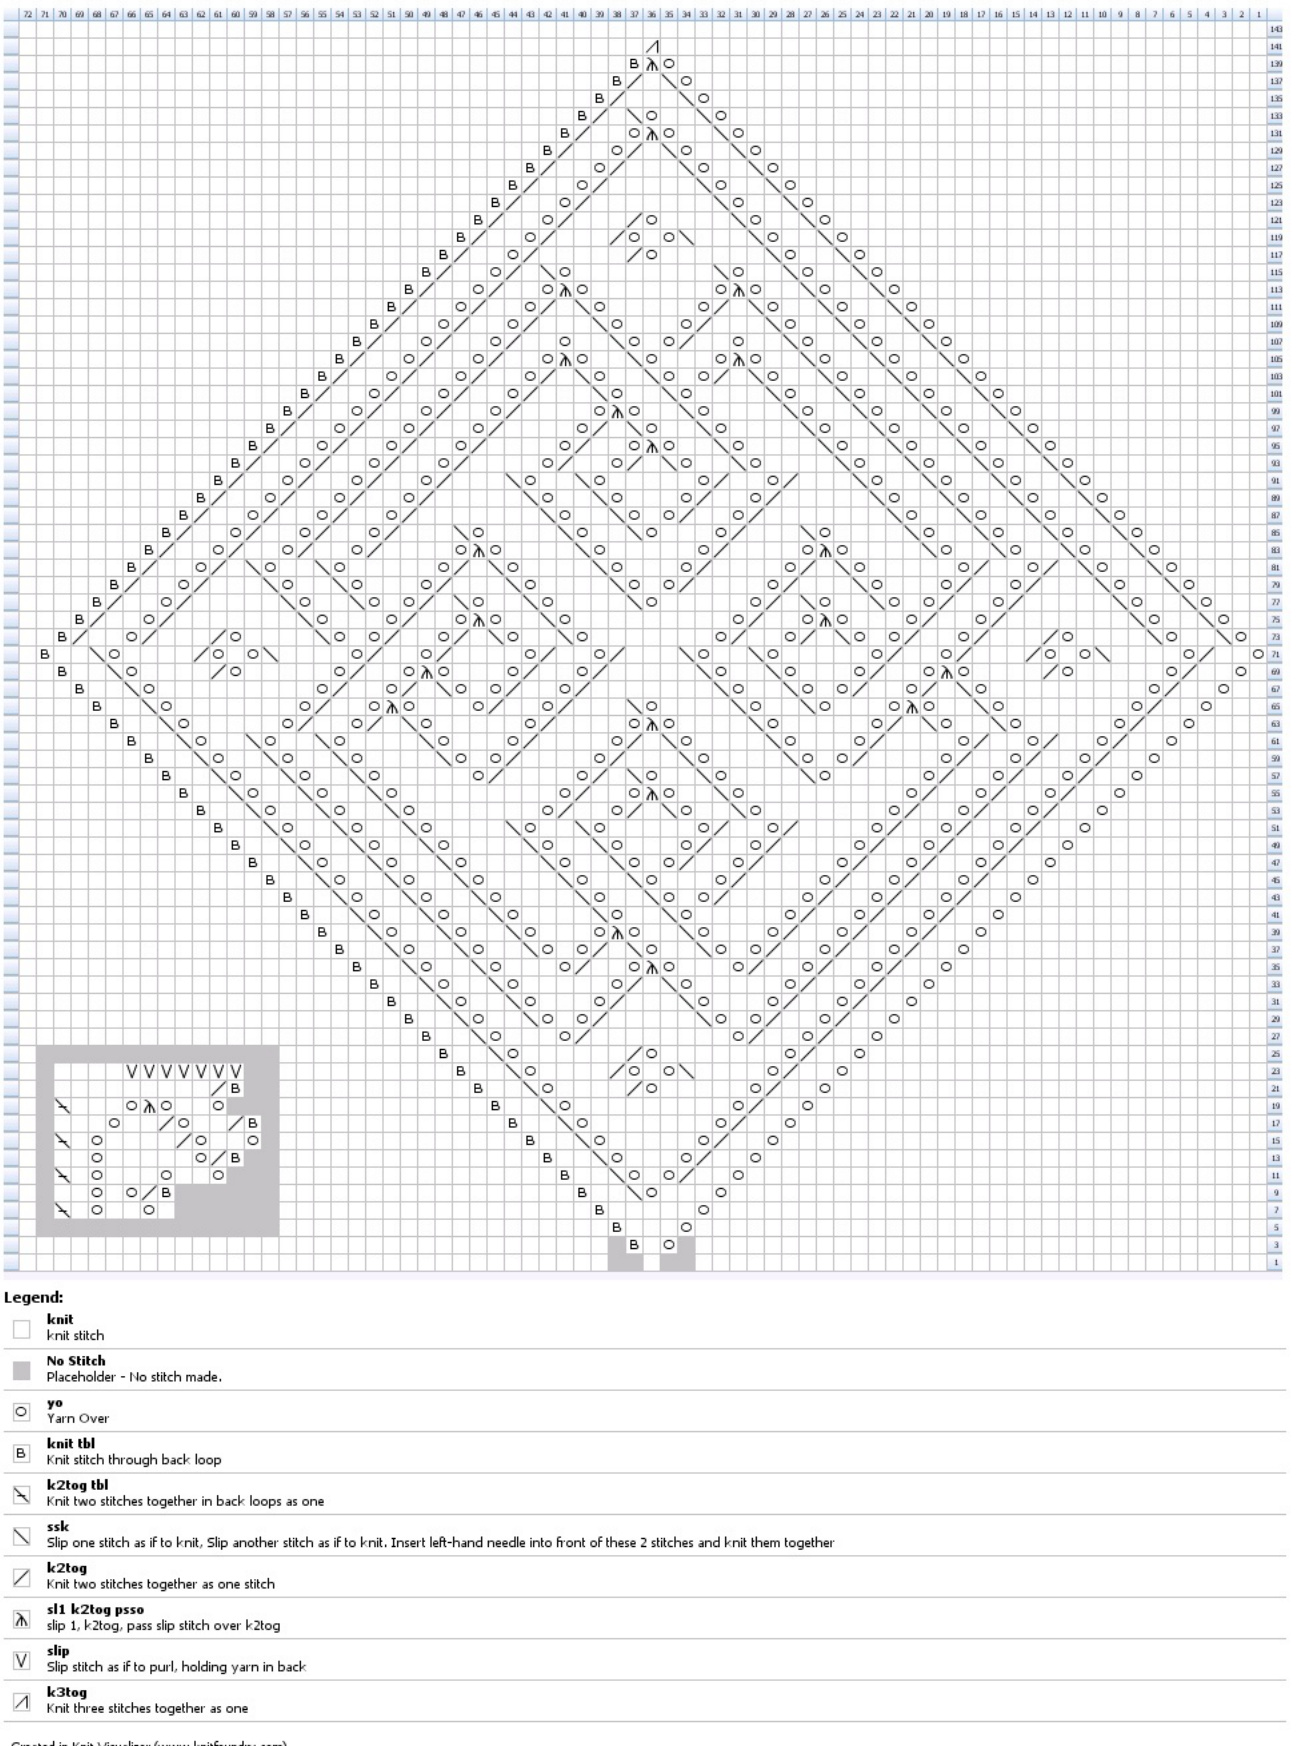
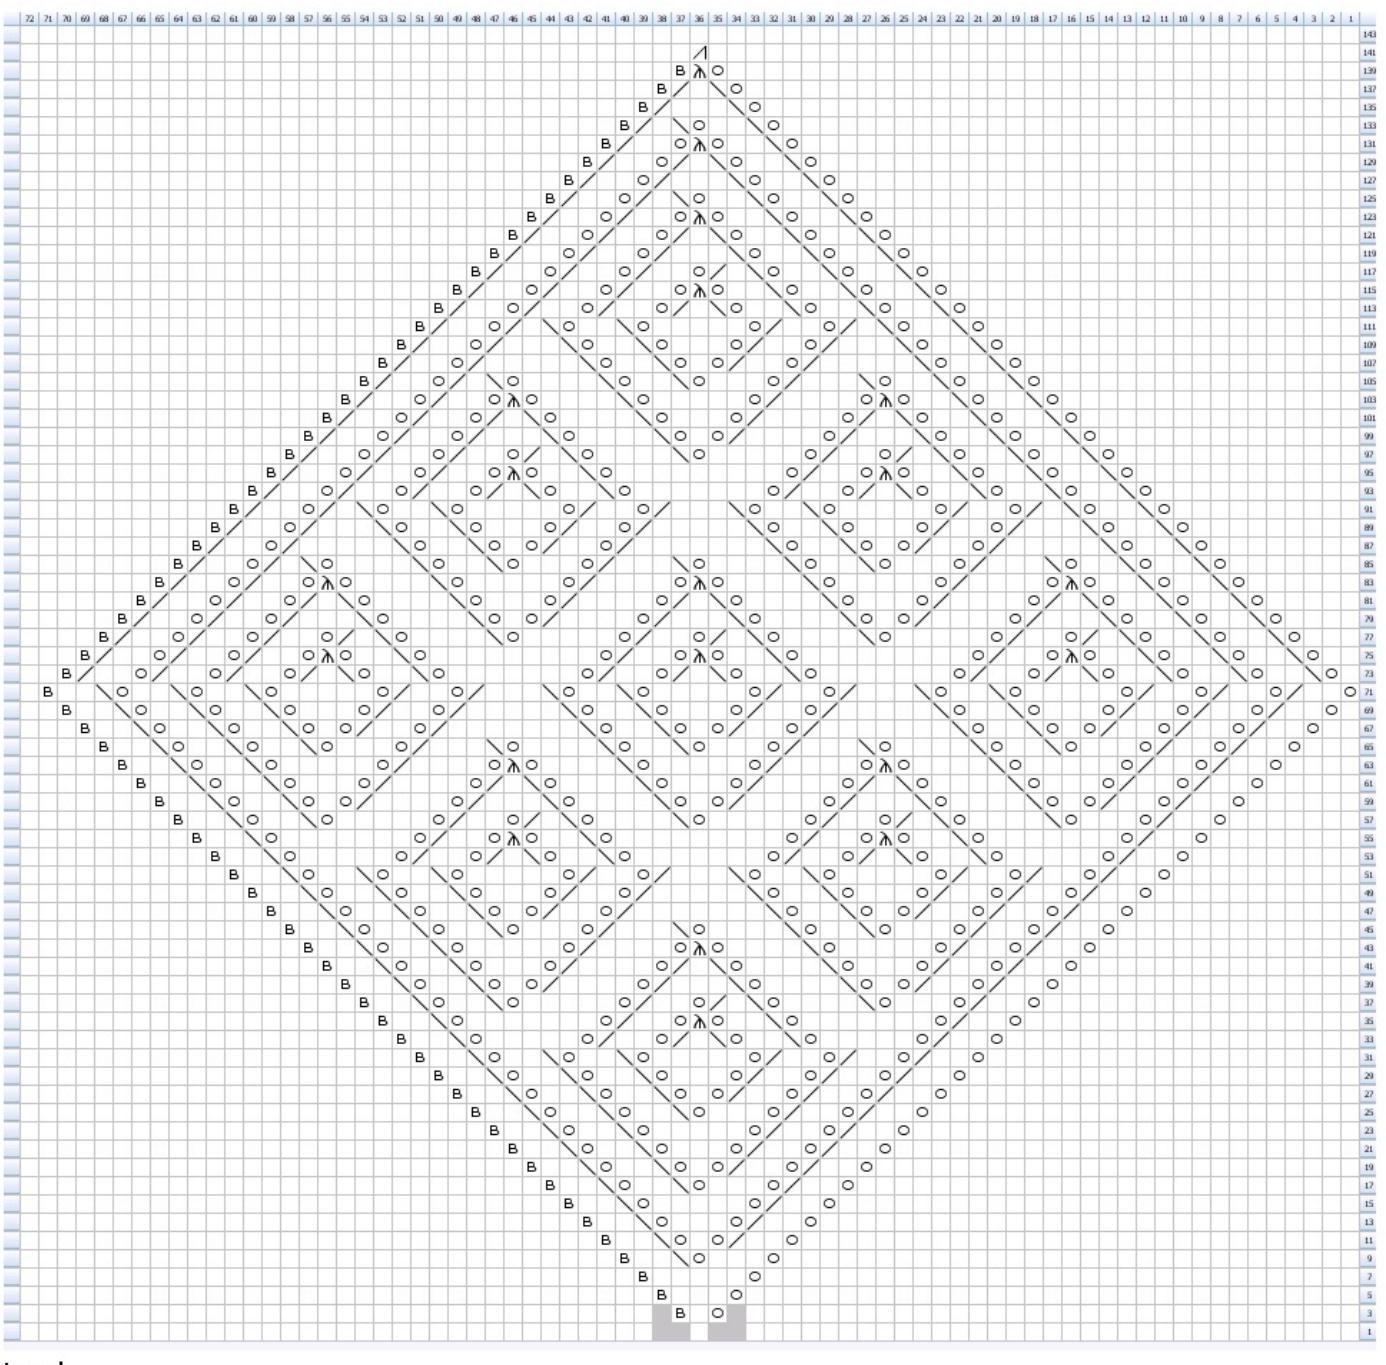
Lace body:
Note: Yarn over at the beginning of every row (right side and wrong side). The body of the lace cloth is worked in stockinette stitch (knit right side and purl wrong side rows) ending every right side row with a knit through the back loop to keep the ‘yo’ loops open (this may not be necessary if you “pick" the yarn with your left hand rather than “throwing” the yarn with your right hand) . The graphs for the body of lace shows only the right side of the pattern as the wrong side is simply purled back with no pattern work involved (except the ‘yo’ at the beginning. All lace body graphs are read from right to left and from bottom to top. With size 1 $(2.25\mathrm{mm})$ dpn cast on one stitch, turn your work (right side). Row two: Yarn over, purl one stitch, and turn your work (wrong side). Row three: Yarn over, knit to end, turn your work. You get the idea! Now just follow the charted graph. After you knit the middle row (the widest section of the diamond) you begin to decrease at the beginning and end of every row (starting on the wrong side row; row 72). Continue in pattern until all rows are complete (row 141). Work lace edging.
Lace edging
Note: The lace edgings are worked in garter stitch (knit every row) with pattern work on both sides. The graphs are read from bottom to top and the right side row (even numbers) are read from right to left while the wrong side rows (odd numbers) are read from left to right. The lace edgings do not line up with the lace pattern work in the main body and so do not require special instructions for turning corners. Join the edging to the lace with a k2tog-tbl (knit one st from lace body together with one st from lace edging, through the back of both loops. For lace edging #4 the ‘V’ symbol means ‘bind-off' , not slip. Do not break yarn. Transfer last stitch to size 1 $(2.25\mathrm{mm})$ 24" (60cm) circular needles. Pick up and knit one stitch per each yarnover along edging of lace body for a total of 138 sts. It's o.k. if your stitch count isn't exactly 138 sts as you can knit one row and increase or decrease to get the correct stitch count (but that's our little secret). Do not break yarn; with size F $(3.34\mathrm{mm})$ or G (4 mm) crochet hook and waste yarn cast on necessary number of stitches for lace edging using a provisional cast on technique (also called an invisible cast on). Follow established pattern until you are back where you started. Cut $20"$ (50.5cm) long tail and thread onto a blunt needle. Graft stitches together (directions as follows).
Lace edging #4:
Cast on 4 sts. Row 1: k1, p5, k2tog Row 2: p6, slip 1 as to purl Row 3: k5, swt. Row 4: p4, slip 1 as to purl Row 5: k5, p1, k2tog Row 6: p2, k4, slip 1 as to purl Row 7: k1, p4, swt Row 8: k4, slip 1 as to purl Repeat rows 1 - 8 until all sts are joined to lace.
Garter stitch grafting:
Remove provisional cast on waste yarn, carefully transferring stitches to a double point needle. You can transfer the second set of stitches to a double point needle or continue using the circular needle. Line up both needles, right sides facing you, and work from right to left. Set up row: bring tapestry needle through first stitch on front needle as if to purl and leave stitch on needle. Bring tapestry needle through first stitch on back needle as if to purl and leave stitch on needle. The set up row is complete. \*Bring tapestry needle through first stitch on front needle as if to knit and slip stitch off needle, then bring tapestry needle through next stitch on front needle as if to purl and leave stitch on needle. Bring tapestry needle through first stitch on back needle as if to knit and slip stitch off needle, then bring tapestry needle through next stitch as if to purl and leave on needle. Repeat from \*, keeping your tension similar to the knitted lace while grafting. Weave in ends. Good job!
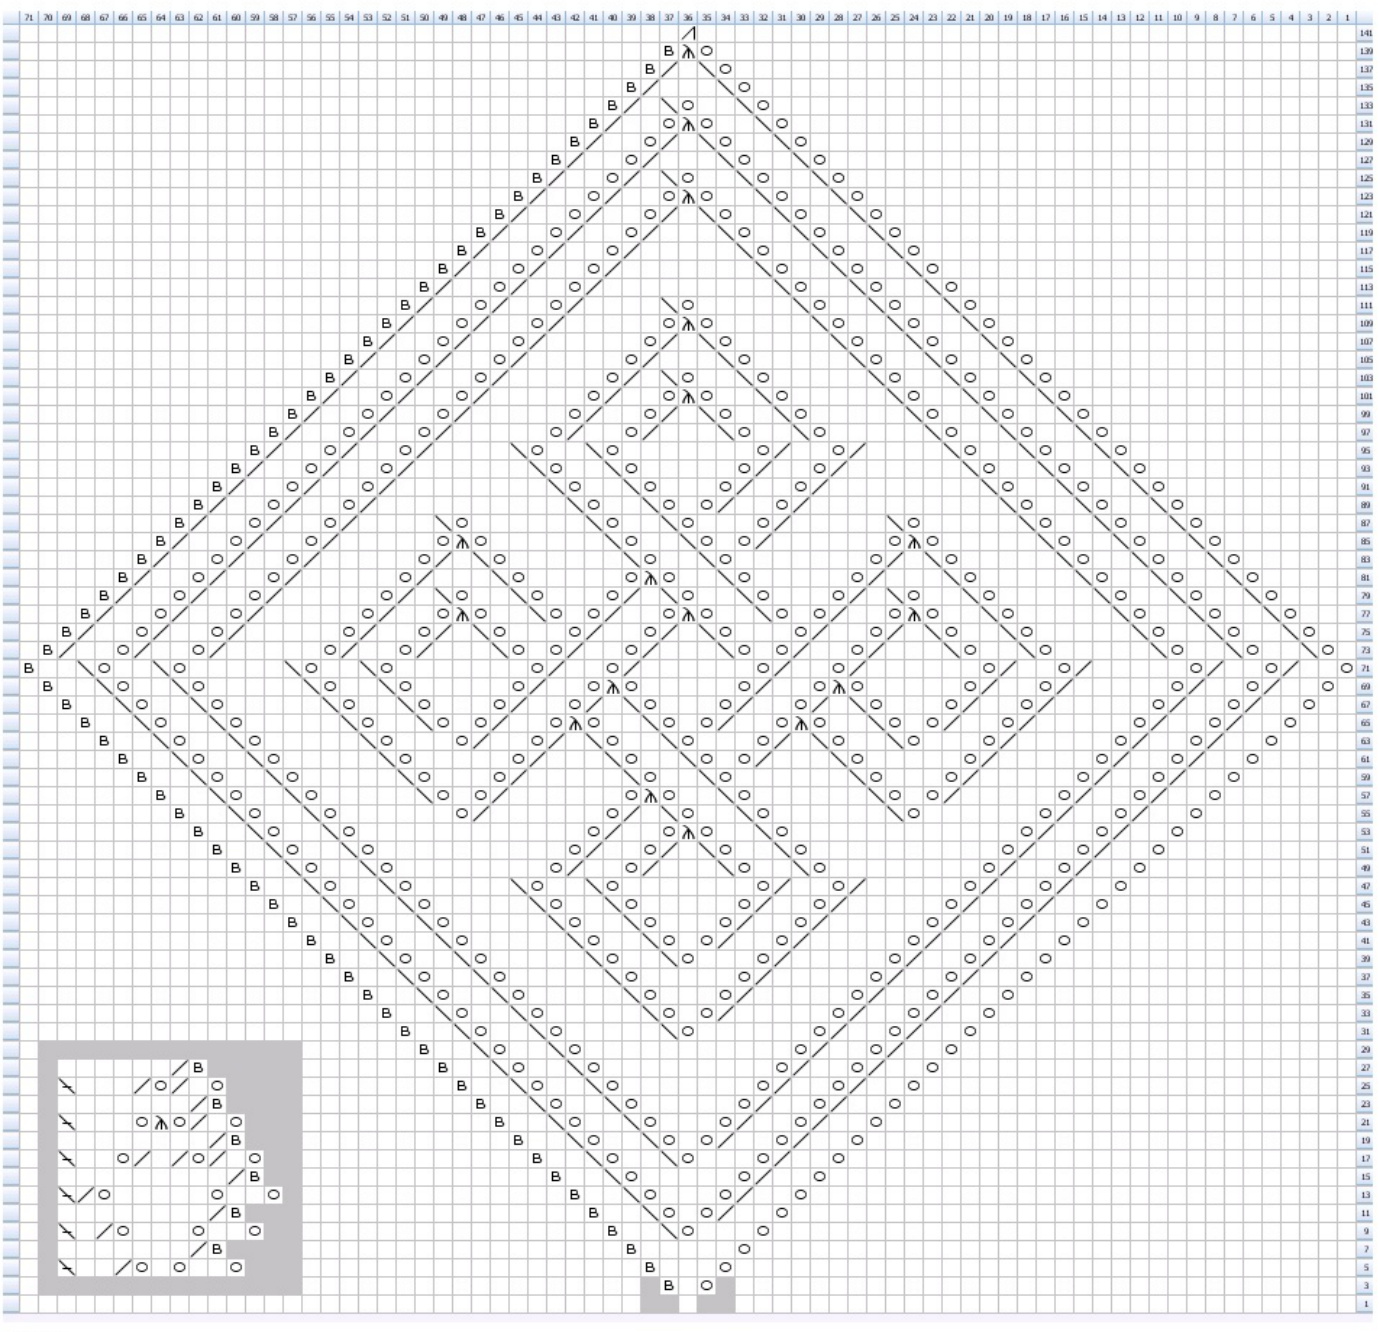
Created in Knit Visualizer (www.knitfoundry.com) Notes: Lace Facecloth #1 with lace edging #1. Cast on 8 sts for edging.
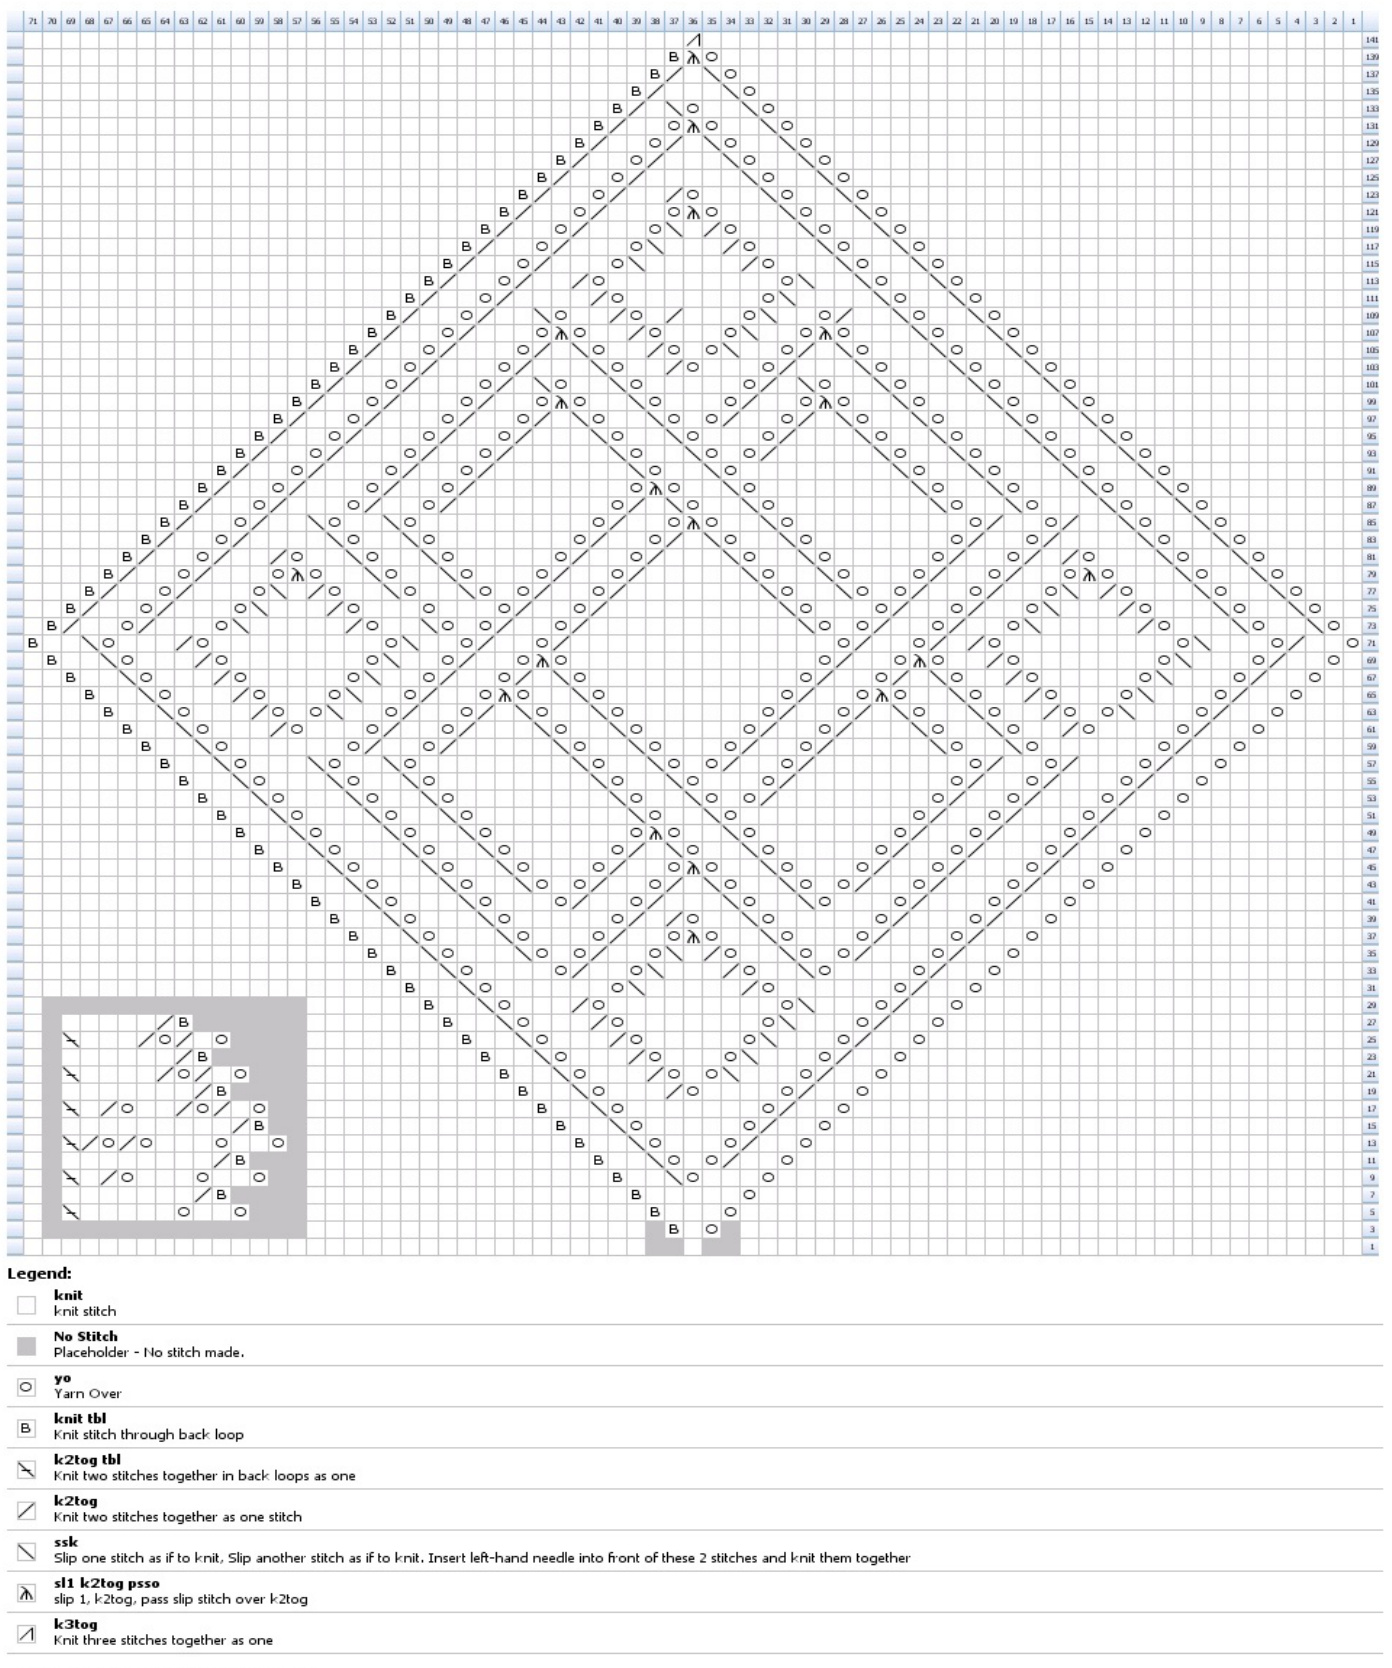
Notes: Facecloth #3 with lace edging #3. Cast on 4 sts for edging. Note: 'V' is symbol for 'bind off
No Stitch Placeholder - No stitch made. yo Yarn Over Created in Knit Visualizer (www.knitfoundry .com) Notes: lace facecloth #4


