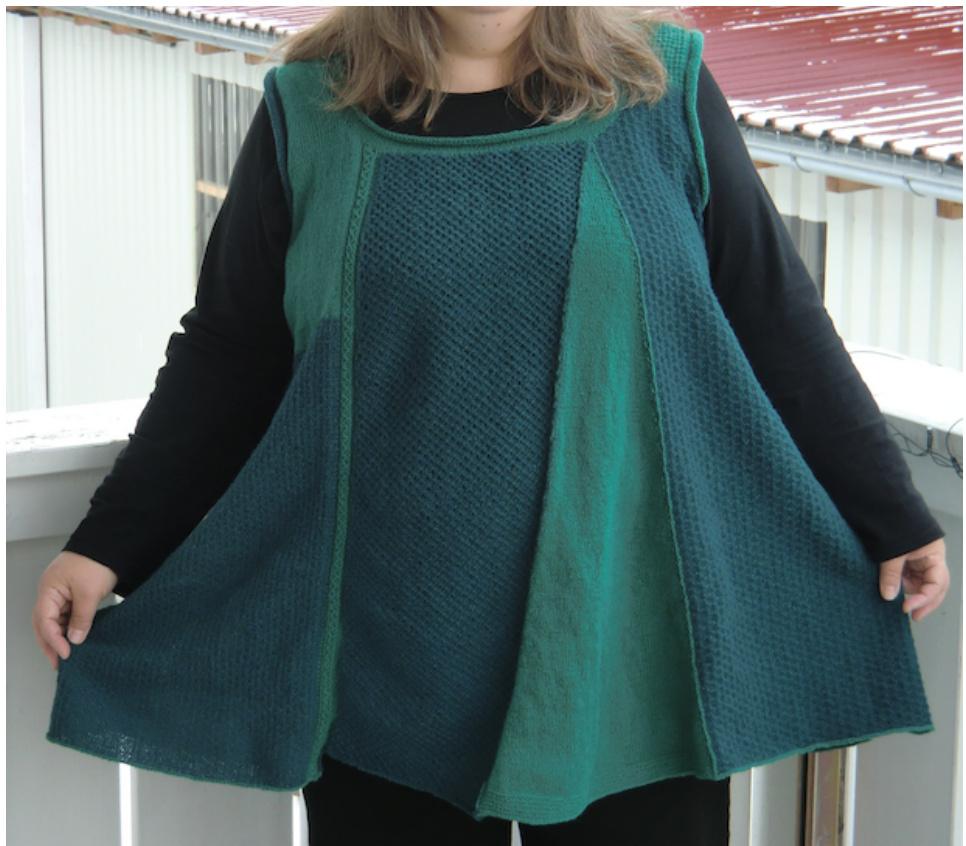
Petrunica
Hello dear Co-Twelve! We both know there can't be only elves in the world - but unfortunately most patterns are written for those tender creatures. That's why I took my knitting needles trying to find anything wearable for me ( and perhaps for you?) The Pattern hos got pretty extensive because I knitted my tunic in many different designs. But you'll see,that these designs are not difficult ond helping not to bore while knitting. Feel free to change the designs if you like Whole Tunic is knitted top-down. I like to stort with only few stitches and let the project grow slowly.
Yarn and Needles:
I knitted with New Zealand Lammeuld of Filcolana. I love the fantastic yardage of 600 m in 100 g. and the very fine feeling. In main colour I needed 300 g, second colour I needed about 70 g. Needle was 1 Circular Needle (60 cm) in 2,5 mm. You also will need some stitchmarkers, a cable needle ond a tapestry needle. For counting I used a row counter. 40 rows and 27 sitches = 10 x 10 cm
Designs:
Design A: Knit R l: k oll sts R 2: p all sts Desigh B: Small coble on 9 sts R 1 (Rs): P 2, k 1 tbl, put 2 sts on cable needle in back, k 1, k 2 sts from cable needle, k1 tbl, p 2 R 2 (Ws): k2, sl 1 (as to purl), p3,1 sl 1 (as to purl). k 2 B3: p 2, k 1 tbl, 1 st on coble needle in front, k 2, k 1 from coble needle, k 1 tbl, p 2 R4: repeat R 2 Muster B
Design C:
B l: k oll sts R 2: \*p l, k 1, p 2\* B 3: k oll sts B 4:\*o3,k 1\*
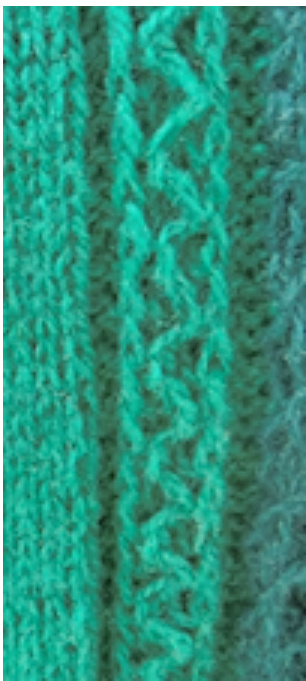
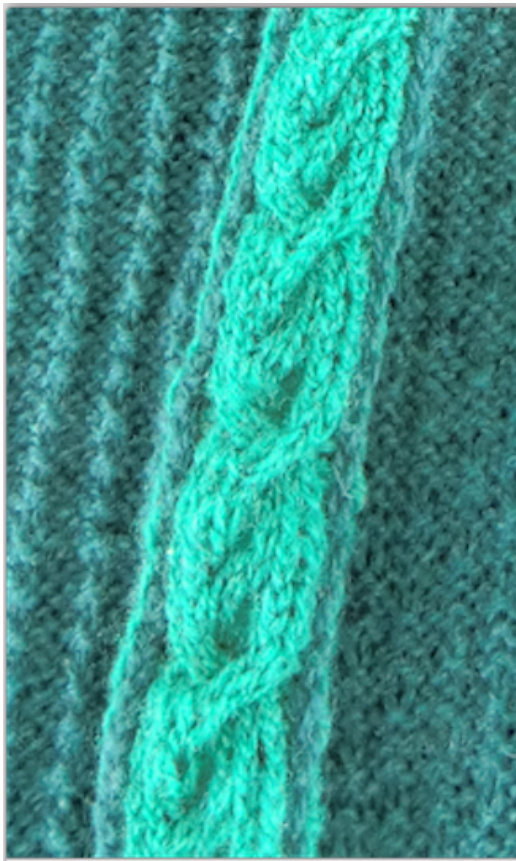
Design D: B l:p all sts B2:\*k 1, pl, k 2\* B3: p oll sts B 4:\*k3, p1\* Design E: B 1: \*p3, k l tbl\* R 2: k all sts Design F: Asymmetrical coble on 12 sts After costing on knit one row. In next row begin the design. B 1 (Ws): k 2, p 2 tbl tog, p 4, p 2 tbl tog, k2 B 2: p 2, k 2 tbl tog. k 4, 2k 2 tbl to9. p2 β 3: k 2, p 2 tbl tog, p4, p 2 tbl tog, k 2 B4: p 2i, k 2 tbl tog, put 2 sts on cable needle in front, k 2, k 2 from coble needle, k 2 tbl tog, p 2 β 5: k 2, p 2 tbl tog, p 4, p 2 tbl tog. k 2 B 6: p 2, k 2 tbl tog, k 4, k 2 tbl tog, p 2 R 7: k 2, p 2 tbl tog, p 4, p 2 tbl tog, k 2 B 8: p 2, k 2 tbl tog, k 4, k 2 tbl tog. p 2 R 9: k 2, p 2 tbl tog. p 4 p 2 tbl tog, k 2 R 10: p 2, put 4 sts on cable needle in back, k 2, bring cable needle in front, k 2 from cable needle, p 2, k 2 from cable needle, p 2 This cable seems to be very complicated, but is not too difficult.. Don't be afraid. Just try! The picture shows the cable from design E. In the left you can see a little bit of design E, in the right design D
Design G:
R 1: \*uo, k 2, pull the first st over the second st (bind off 1 st) \* R 2: p all sts and yos
Design H:
Bl: p oll sts B 2: \*k l, p 2, k 1\* B3: p oll sts B 4: \*k 4, p 2\*
Design J:
R 1: \*k 2 tog, Yo 2 times, ssk,\* B2: p 1, \*p 1, p 1 tbl, yarn in back, sl 2 as to purl, bring yarn in front, put both sts back to left needle, yarn in back again, put both sts back to right needle (without knitting), yarn back in front.\* Now both sts are twistet around with working yarn. R 3: k 2, \*k 2 tog, Yo 2 times, ssk\* B 4: \*yarn in back, sl 2 os to purl, bring yarn in front, put both sts back to left needle, yarn in back again, put both sts back to right needle (without knitting), yan bock in front, p 1, p 1 tbl\*
Abkurzungen:
st/sts stitch/stitches R row k knit P purl tbl through back loop sl slip \* \* repeat from \* to \* tog knit 2 st together YO yarn over Rs Right side Ws Wrong side SSk slip 2 sts os to k, put both sts back to left needle, k them tog This is a little drawing to show the order, how to knit. The letters are the designs, the numbers are the colors. I take green as number 1 and petrol as number 2 Where you can see the little arrow is where I began to knit. Alwaus top down..
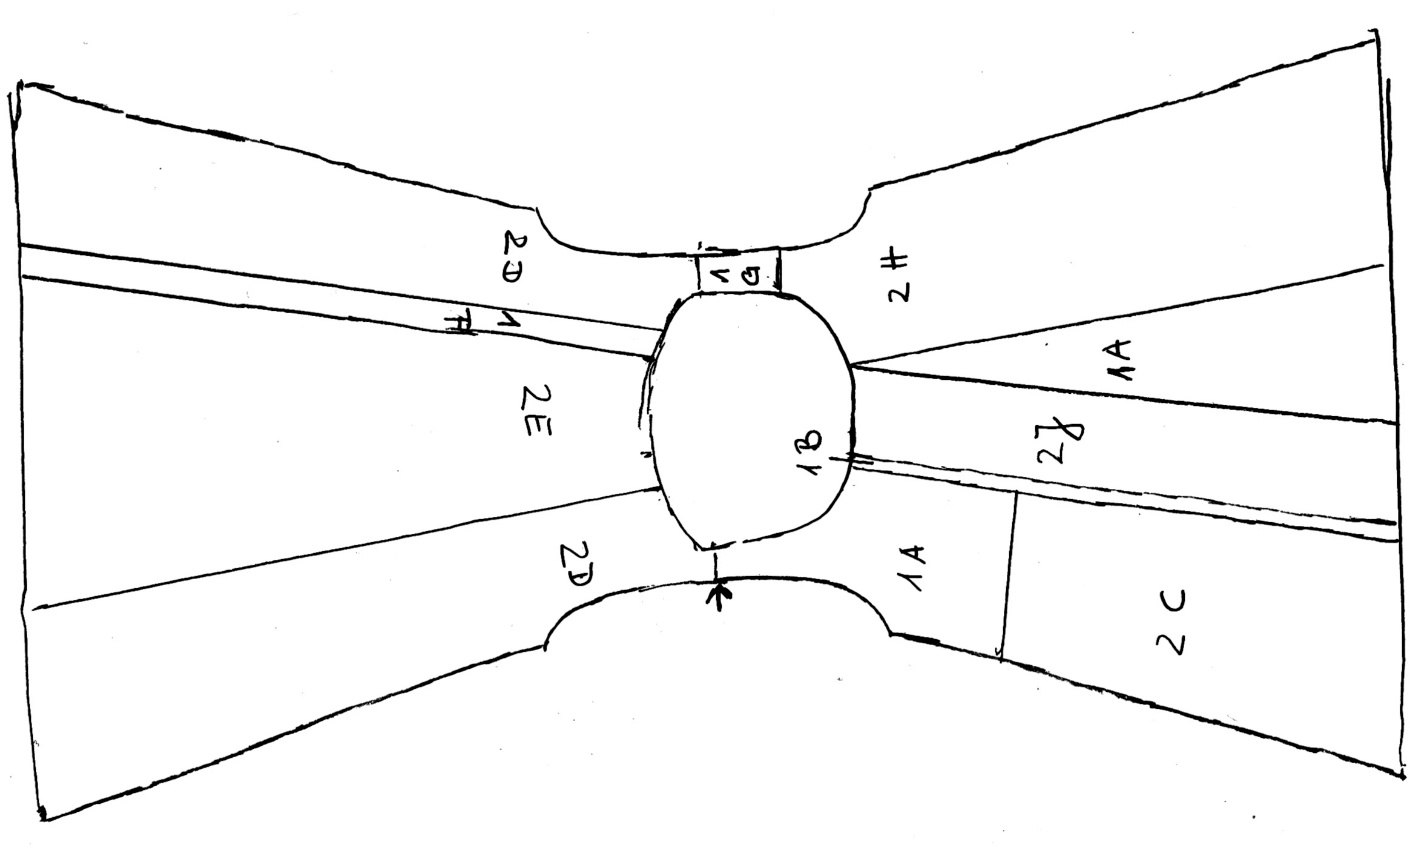
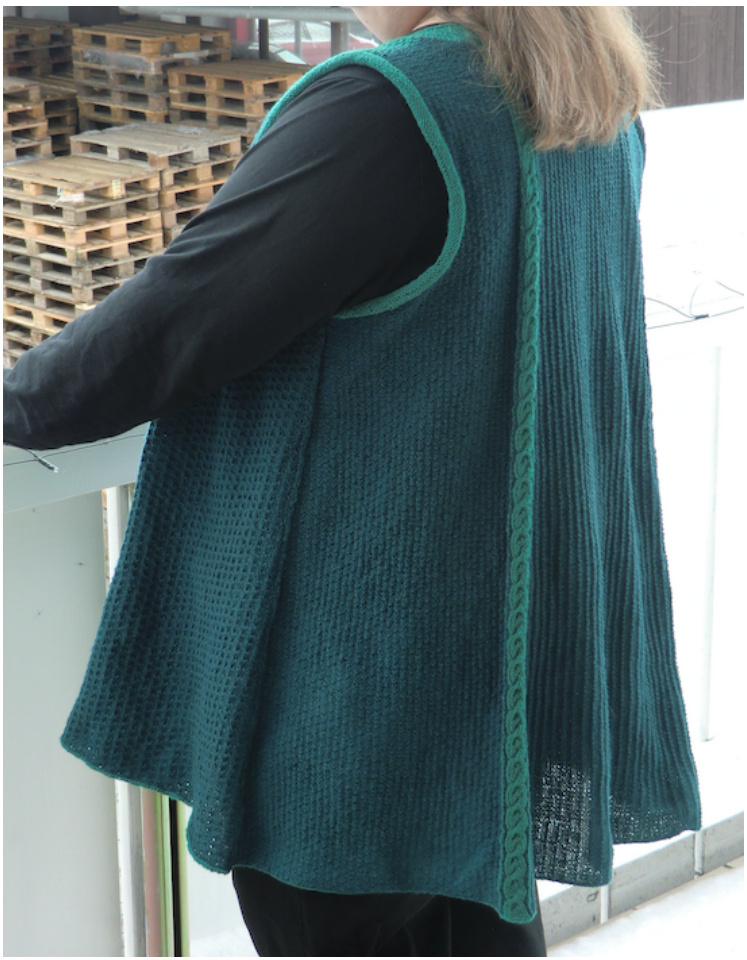
Finally let's start! What I really like is always to knit only with few stitches. Neorly like knitting scorfes ;) Begin on right shoulder casting on 20 st in color 1 (here: green) and design A. You con see this in the drawing above. After 50 rows begin at both sides with increases for armhole and neck.
Armhole:
Increase always at the end of the row of purl sts: 1x1, 2x0, 1x1, 2x0, 1xl,1x0, 1xl,4x2, 3x3, 1x5, 1x9 st. Neck in front: Increase at all rows of knit sts: 4x1, 1x2, 3x3 sts.Just cast on these increases. The last 9 sts at neck stort with design B. I knitted it with changing color in every row. If you don't like you can also knit it os a long tall coble ribbon to seam it loter to Scorf 1 . To get the tunic fit increose after ending of armhole in every 10. row 1 st until you reach the length you prefer. These increases are only at your side seam, don't increase at both sides of scarf 1. After 33 cm I changed color and worked on in design C to the end. Bind off I knitted again in Color 1.
Scorf" 2:
Go back to your cast on of scorf 1 and knit 2O sts out of your first stitches. Knit in Color 2, design D for 4 rows. Then increase for the Neck 1x1, 1x6, 1x9 sts. After this go on to r 50 and begin with increases for armhole. Do same increases as in front(Scarf 1), just mirrored. After finishing the increases for armhole knit to your desired length. Don't forget to increose in every 10. r 1 st. Binding off in Color 1. Now you've got a very long scarf Scorf 3: Now we reach the first middle sarf. I knitted completely in design E and Color 2 with a cast on of 65 sts.The only thing you have to take care for are increases. 1 increased in every 8. row 1 st on right and left side. Bind off in Color 1. is only the asymmetrical cable. Cast on 12 sts and work design F until reaching desired lengh. No increases ;) This one is a little bit taller than scarf 2 because we took a few sts of the width for scorf 4. thats why we don't need so many sts for the neck. So start with a cost on of 20 sts in color 2. For the neck (in back) cost on 1xl st (Row 6) and 1x6 sts (row 8). That it was. The arm hole is alwaus the same. Knit it like in scarf 1. Don't forget the increases in every 10. row beneoth the side seam. I binded off in color 1.
Scorf" 6:
Now you've got 2/3 of the whole tunic. Great! Knit 20 sts out of the cost on of scarf 5 (shoulder) in color 1. The increases are are same as in scarf 1, mirrored again. Don't make same mistake than me and forget to mirror the increases ;) Work 18 cm in design G. Change to color 2 and go on in design H to your desired length. Ohhh - remeber to increase along the side seam (every 10. row!) To get not bored you may increase in this scarf. What a surprise ;) Scarf 7 and 8 are in summary the same than scarf 3. I worked scarf 7 in a triangle. Cast on 3 sts in design A and color 1. Increase 1 st in every 8. row on the left and right side.. Go on until reching your lengh. This was first time I didn't bind of in contrasted color. Last but not least
"Scarf" 8:
Cast on 78 sts in color 2. 1 know, that are a few more sts als in the back, but design J tnds to tighten (but only in width), so it needs the additional number of Sts. Scarf 8 is worked as parallelogram. so you have to decrease on left and increase on right side. I increased/decreosed in every 8. row 1 st. So I got same number of sts during the whole scarf. That's important to get the width. Bind off in color 2. This last scarf toxed my patience very hard. The design needs a little time and I wanted to get ready. Finally seam all the scarves like you can see in the drawing above. I knitted along the neck and left arm holes 15 r in the round with color 1 and bind off. For the right arm hole I used color 2. Weave in ends and block your new tuni Dear Twelve, now have much fun knitting and wearing my Petrunika. Yours Anni (Twelve)
This pattern and its design, text, graphics and the selection and arrangement thereof and all material in this document is, unless clearly indicated to the contrary, subject to the copuright ownership of anniya. You're not allowed to sell it, but to lend it to someone else, or make copies of it only for private use. If there are any mistakes or ideas please mail me at


