Winter Blechy Hat By Victoria Horsham
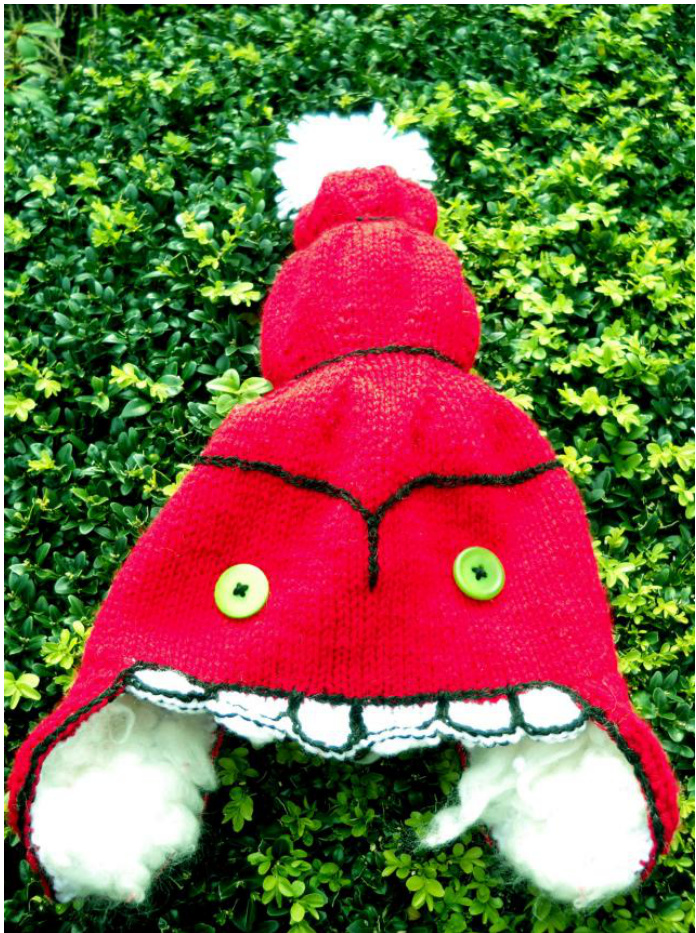
Inspired by the popular internet children's game, Neopets, this pattern is intended to resemble the Winter Blechy Hat - a red hat players can dress their pets in in-game. The Blechy is a small, red worm-like creature with a segmented body and a large mouth, found ingame. Hat includes several different techniques such as short rows, thrums, provisional cast-on and a minimal amount of surface decoration in crochet. For those who don't crochet,don't worry - I'm seemingly incapable of creating a decent single chain, yet managed this just fine. And if in doubt, the same effect can be achieved by embroidering in chain stitch. The design uses one skein of red yarn and about half a skein of white, as well as some white merino fibre for thrums and black tapestry wool for the embroidered/crochet details.
Supplies
One 100g skein Jarol Rambler Baby Aran in red One 100g skein Jarol Rambler Baby Aran in white 20-30g white merino fibre for thrums small amounts of black aran wool for decoration two large, green buttons scrap yarn for provisional cast-on set of 4.5mm double-point needles 1 4.5mm circular needle
Stitch Abbreviations
co - cast on c/o -cast off k - knit k2tog - knit two stitches together (decrease) k1f+b - knit one stitch front-and-back (increase) k1t - knit one thrum (knit using a piece of merino instead of yarn, to create a thrum) w/t - wrap and turn (short rows)
Useful Information
This pattern uses a number of different techniques which new knitters may be unfamiliar with. However, the pattern itself is not difficult and is worth attempting, even if you're new to it. Some tutorials that you may find useful are: Provisional Cast-on tutorial Short Rows tutorial Thrums tutorial The pattern is knit in parts - the earflaps first, followed by the thrummed inner earflaps and teth as a single piece, and finally these are joined together and the rest of the hat is knit from these. It might sound confusing, but it'll make more sense as you go.

Pattern
To knit the earflaps:
Using the red yarn, cast-on 20 stitches using provisional cast-on. Knit 16 rows in stockinette stitch. K1 k2tog k14 k2tog k1 p to end k1 k2tog k12 k2tog k1 p to end k1 k2tog k10 k2tog k1 p to end k1 k2tog k1 k2tog k2 k2tog k1 k2tog k1 p to end k1 (k2tog)x4 k1 p to end cast off Repeat for the second earflap.
To knit the inner earflap and teeth:
Using the white yarn, cast-on 70 stitches using provisional cast-on. k1 row p1row k20 and slide onto spare needle to work later. At this point, we are going to knit the “teeth” using short rows. Correctly finishing the wrapped stitches should prevent any unsightly holes from appearing but, if they do, don't worry. The crochet or embroidered details added later will hide these. Complete short rows as follows: k5 w/t p4 w/t k3 w/t p2 w/t k3, turn work, p5, turn work, cast off 5 repeat unti 20 st remain, then k20 The 20 stitches currently on the needle will become one of the thrummed inner earflaps. Complete the first earflap as follows. knit 13 rows in stockingette, starting with a pearl row, adding thrums every third or fourth stitch (excluding the first and last stitch of a row) as you work on knit rows only: k1 kt k3 kt k3 kt k3 k1 k3 kt k2 p1 row k3 kt k3 kt k3 kt k3 kt k4 p1 row repeat Continue adding thrums in the same pattern as you work the following decreases: k1 k2tog k14 k2tog k1 p to end k1 k2tog k12 k2tog k1 p to end k1 k2tog k10 k2tog k1 p to end k1 k2tog k1 k2tog k2 k2tog k1 k2tog kl p to end k1 (k2tog)x4 k1 p to end cast off The thrums will be pointing in the wrong direction. Gently brush them with your fingerss down towards the cast-off edge, then gently muss them about to very-slightly felt the surface and secure the thrums more firmly. Repeat the thrummed earflap on the other 20 stitches.
To assemble the pieces for the hat:
All three pieces have been knit using provisional cast-on. This makes it easy to combine them. Take one red earflap and run a double-point needle through the stitches at the cast-on edge, then discard the waste yarn. Do the same with the other red earflap on a second double-point needle. Run a circular needle through the stitches at the cast-on edge of the white piece. Now you will join the red earflaps to the white ones by doing k2tog. Hold one of the DPNs at the same time as you hold the circular needle, so that the red earflap is sitting over the white one. For the next 20 stitches, k2tog, taking 1 stitch from the red flap and one from the white. At this point the red and white earflaps should be joined together. Knit the 30 stitches that make up the teeth. Take the remaining red earflap and k2tog this and the remaining white earflap as before. Cast on 20 more stitches and join in the round.
To Knit the hat:
Knit until piece measures 4 inches at the back. We want the floppy tail part of the hat to sit back a little, so we're going to shape the front of the hat a little using short rows to push the tail back. Short rows. k70 w+t p69 w+t k68 w+t p67 w+t k to end. k8, k2tog to end (81 st) k1 row k7 k2tog to end (72st) k1 row k6 k2tog to end (63st) k1 row k5 k2tog to end (54st) k1 row k4 k2tog to end (45st) k1 row k4 k1ftb to end (54st) k1 row k5 k1ftb to end (63st) k1 row k6 k1ftb to end (72st) k1 row Knit 11 rows k7 k2tog to end (72st) k1 row k6 k2tog to end (63st) k1 row k5 k2tog to end (54st) k1 row k4 k2tog to end (45st) k1 row k3 k2tog to end (36 st) k1 row k3 k1ftb to end (45st) k1 row k4 k1ftb to end (54st) k1 row k5 k1ftb to end (63st) k1 row k4 rows k5 k2tog to end (54st) k1 row k4 k2tog to end (45st) k1 row k3 k2tog to end (36 st) k1 row k2 k2tog to end (27st) k1 row k1 k2tog to end (18 st) k1 row k2tog to end (9st) run yarn through stitches, remove from needles and pull yarn tight to close end. By now you should see a hat that pretty much looks like the finished design. At this point, we're down to decorations. First, use some red yarn to stitch the red and white earflaps together along their edges. Next, make a yarn bobble using some of the remaining white yarn, and attach this to the tip of the hat. Using a knitter's sewing needle, embroider black details in chain stitch as follows: One black outline along the entire red bottom hem. One black outline detailing the teeth and separating them. A black ring around each pinch-point in the tail, to emphasise the shape, A black line marking the face (see photo below for reference) Finally, sew large, green button eyes to the hat.


