Seona
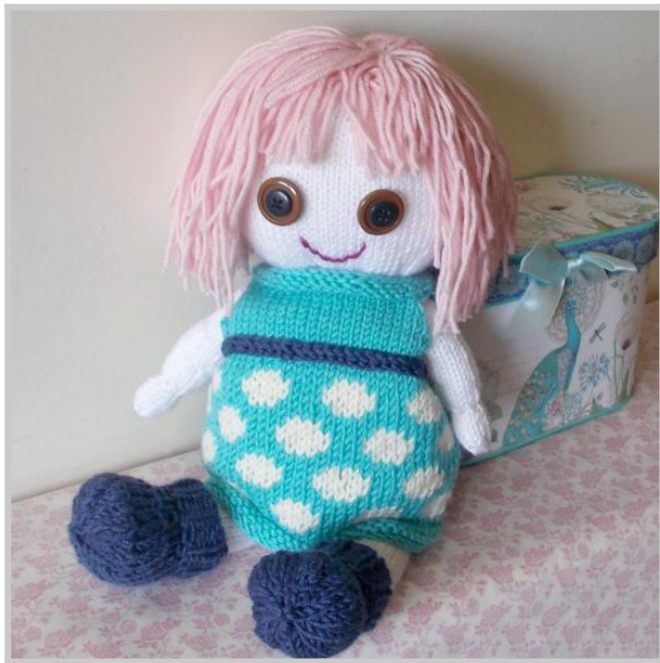
Pink-haired Seona wears boots and a stylish polka dot dress.
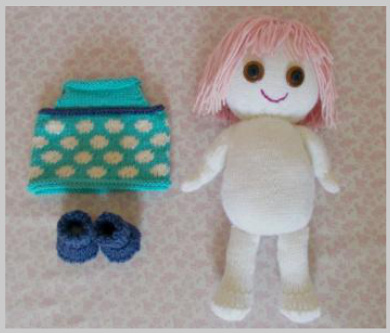
Her outfit is completely removable. The eyes are each made from two different sized buttons and the mouth embroidered on. All the pieces are worked in the round, with a few small sections worked flat. The legs, arms and head are sewn onto the body. Skills Required: Working in the round/flat colour chart reading, sewing pieces together.
Yarn
DK weight yarn. Yarn shown is Sublime Baby Cashmere Merino DK Body colour: 163 metres/178 yards Hair colour: 82 metres/89 yards Dress main colour (MC): 58 metres/64 yards Dress contrast colour (CC): 35 metres/38 yards Boot/sash trim colour: 36 metres/40 yards Mouth colour: scrap amount
Needles/Supplies
Size 3.75 mm (US size 5) Size 4 mm (US size 6) Stitch markers (3) Stitch holders (2) Tapestry needle Crochet hook: 2.5 mm (B/C) for latching the hair Two 2 cm (13/4 inch) buttons in outer eye colour. Two 1 cm (1/2 inch) buttons in black for pupils Toy stuffing
Gauge
24 sts x 32 rows in 10 x 10 cm (4 x 4 inches) in stockinette/stocking stitch using 3.75 mm (US 5) needles (or size needed to obtain gauge)
Finished Size
Approximately 23 cm (9 inches) tall, seated (see last page for all other measurements)
Abbreviations
k: knit p: purl kfb: knit into the front and back of the stitch (increase) m1: lift strand lying between sts and knit into it (increase) ssk: slip two sts, one at a time, as if to knit, knit the two together through the back loops k2tog: knit two sts together (decrease) CO: cast on, using your preferred method BO: bind/cast off st(s): stitch(es) rnd(s): round(s) pm: place marker
BODY
With body colour, and smaller needles, cast on 3 sts, and work the following set up rows: Row 2: kfb to end of rnd (6) Next, join to work in the round. You will now be working in rounds, not rows. Place marker for start of round. Knit for one round.
Increase Body
Rnd 1: kfb to end of rnd (12) Rnd 2: kfb to end of rnd (24) Rnd 3: knit Rnd 4: (k1, kfb) to end of rnd (36) Rnd 5: knit Rnd 6: (k2, kfb) to end of rnd (48) Rnd 7: knit Rnd 8: (k3, kfb) to end of rnd (60) Rnd 9: knit Rnd 1o: (k4, kfb) to end of rnd (72) Rnds 11-34: knit these 24 rnds
Decreases for Shoulders
Rnd 35: k18, pm, k36, pm, k to end of round Rnd 36: \*k to 8 sts before marker, ssk, once, k to end of round (68) Rnd 37: \*k to 7 sts before marker, ssk, k to marker, k5, k2tog, repeat from \* once, k to end of round (64) Rnd 38: \*k to 6 sts before marker, ssk, How that is done: Rnd 39: \*k to 5 sts before marker, ssk, once, k to end of round (56) Rnd 4o: \*k to 4 sts before marker, ssk, once, k to end of round (52) Rnd 41: \*k to 3 sts before marker, ssk, k to marker, k1, k2tog, repeat from \* once, k to end of round (48) Rnd 42: \*k to 2 sts before marker, ssk. remove marker, k2tog, repeat from once, k to end of round (44) Rnd 43: k10, ssk, k20, ssk, k to end of rnd (42) Shape Top & Stuff Body (the body is stuffed while still on the needles, before closing up) Rnd 44: knit Rnd 45: k2 tog to end of round (21) STUFF Rnd 46: knit to end of round Rnd 47: k2tog to last st, k1 (11) TOPUPSTUFFING Thread yarn through remaining 11 sts, draw up and fasten off, to close up body.
HEAD
(the head will be stuffed while still on the needles, before closing up) Work as for body until the end of rnd 4 Rnd 5: purl Continue as for body, starting from rnd 6 to the end of rnd 10.
Decrease Head
Rnd 1: (k1o, k2tog) 6 times (66) Rnd 2 and all even numbered rounds: knit Rnd 3: (k9, k2tg) 6 times (60) Rnd 5: (k8, k2tog) 6 times (54) Rnd 7: (k7, k2tog) 6 times (48) Rnd 9: (k6, k2tog) 6 times (42) Rnd 11: (k5, k2tog) 6 times (36) Rnd 13: (k4, k2tog) 6 times (30) Rnd 14: knit STUFF Rnd 15: k2tog to end of rnd (15) Rnd 16: k2tog to last st, k1 (7) TOPUPSTUFFING Thread yarn through remaining 7 sts, draw up & fasten off to close up head.
ARM (make 2)
With body colour and smaller needles, cast on 1 stitch.
Shape Shoulder
(Shoulder is first worked in rows, then joined to work in the round for the arm) Row 1: kfb and f again (3) Row 2: purl Row 3: (k1, m1) to last st, k1 (5) Row 4: purl Row 5: (k1, m1) to last st, k1 (9) Row 6: purl Row 7: k1, m1, k to last st, m1, k1 (11) Row 8: purl Row 9: k1, m1, k to last st, m1, k1 (13) Row 10: CO 3, p to end of row (16) Row 11: CO 3, k to end of row (19)
Work Arm
Join to work in the round. You will now be working in rounds not rows. Place marker for start of round. Rnds 1-4: knit Rnd 5: k1, k2tog, k to last 3 sts, ssk, k1 (17) Rnd 6: knit Rnd 7: k1, k2tog, k to last 3 sts, ssk, k1 (15) Rnd 8: knit Rnd 9: k1, k2tog, k to last 3 sts, ssk, k1 (13) Rnds 10-13: knit these 4 rnds
Shape Hand
Rnd 14: k2tog to last st, k1 (7) Rnd 15: knit Rnd 16: k2, (m1, k1) to last st, k1 (11) Rnds 17-21: knit these 5 rounds Rnd 22: k2tog to last st, k1 (6) Thread yarn through remaining 6 sts, draw up and fasten off to close the end of the hand.
LEG (make 2)
With body colour and smaller needles, cast on 18 sts. Join to work in the round, place marker for start of round. Knit for 22 rnds. Rnd 23: k6, kfb 6 times, k to end of rnd (24) Rnds 24-27: knit these 4 rnds Rnd 28: k6, kfb 12 times, k to end of rnd (36) Rnds 29-31: knit these 3 rnds Rnd 32: k2tog to end of rnd (18) Rnd 33: k2 tog to end of rnd (9) Rnd 34: k2tog to last st, k1 (5) Thread yarn through remaining 5 sts, draw up and fasten off.
BOOT (make 2)
With boot colour and larger needles, cast on 18sts. Join to work in the round, place marker for start of round.
Ribbed Cuff
Rnds 1-8: (k1, p1) to end of rnd Rnds 9: knit Rnds 10-17: (k1, p1) to end of rnd Next: knit for 2 rounds For the rest of the boot work as for leg, starting with rnd 23 of leg, to end. Turn over ribbed cuff of finished boot, at the knit round.
DRESS
With dress MC and larger needles, cast on 72 sts. Join to work in the round, place marker for start of round. Rnd 1: k to end of rnd Rnds 2&3: purl Rnd 4-23: work Dress Chart (p.4), twice, knitting all sts.
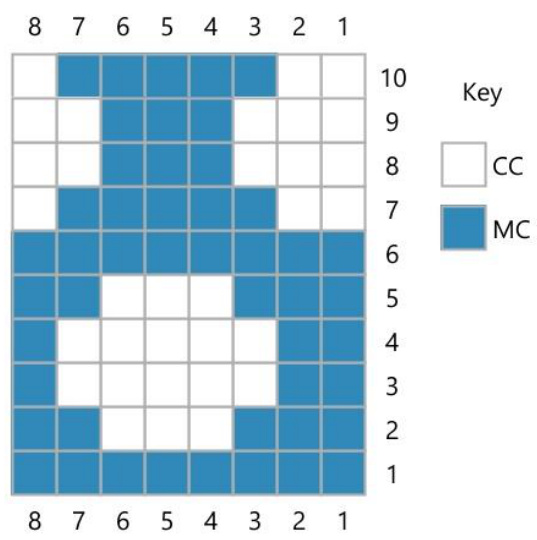
Dress Chart (repeat around) Rnds 24&25: Working from this point on in MC only, knit these 2 rnds.
Work armholes & divide front and back
Rnd 26: k15, B0 6 sts (1 st on working needle after this BO gap), k29, BO 6 sts. After finishing the second BO group, the dress is divided into front and back, 30 sts for each piece. You will now be working back and forth in rows, not rounds, starting with the back of the dress. Remove the start of round marker when reached. Row 1: k to last 2 sts of back, k2tog, turn to continue working along the remaining 29 sts of the back. Place the 30 sts of the front on a holder. These will be worked later. Row 2: p to last 2 sts, p2tog (28) Row 3: ssk, k to last 2 sts, k2tog (26) Row 4: purl Row 5: ssk, k to last 2 sts, k2tog (24) Row 6: purl Row 7: ssk, k to last 2 sts, k2tog (22) Row 8: purl Row 9: ssk, k to last 2 sts, k2tog (20) Row 10: purl Place the 20 sts of the back that have just been worked on to a second holder. Cut yarn, leaving a tail to weave in at the end. Place the 30 sts of the front from the first holder onto the needles and reattach working yarn with right side of work facing.
Shape front
Row 1: ssk, k to last to sts, k2tog (28) Row 2: purl Work rows 1 & 2, four times more, until 20 sts remain.
Join for Neck
(The neck will be worked in the round) Next, knit across the 20 sts of the front that are on the needles, then knit across the 20 sts of the back from the holder. Join to work in the round, place marker for start of round (40 sts) Purl for 3 rnds. Bind off all sts.
Dress Sash Trim
Using boot colour and larger needles, cast on 7o sts. Next row: bind off all sts. Using the same colour yarn as the sash trim, sew the trim on to the dress. The sash trim is sewn on through the middle of the trim piece with a running stitch. Sew the sash trim just above the top of the colourwork dress pattern, stitch it to the bottom of each armhole and join the trim ends at the centre back of the dress.
MAKING UP
e small hole that remains at the base of the body and the head. Weave in ends
Sew Arms to Body
Stuff the arm & hand sections of the arms lightly, keeping the tube open. Sew the triangle-shaped shoulder section at the top of each arm to the triangle shape formed by the decreases on the main body.
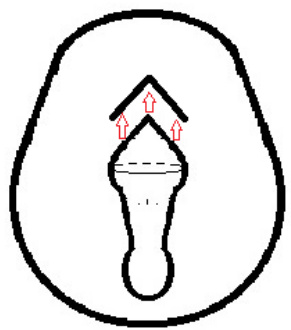
Add a little stuffing under the shoulder triangle before finishing by stitching the underarm (shown by dotted line) to the main body.
Draw-in Underarms
(contrasting yarn in pink for illustration only)
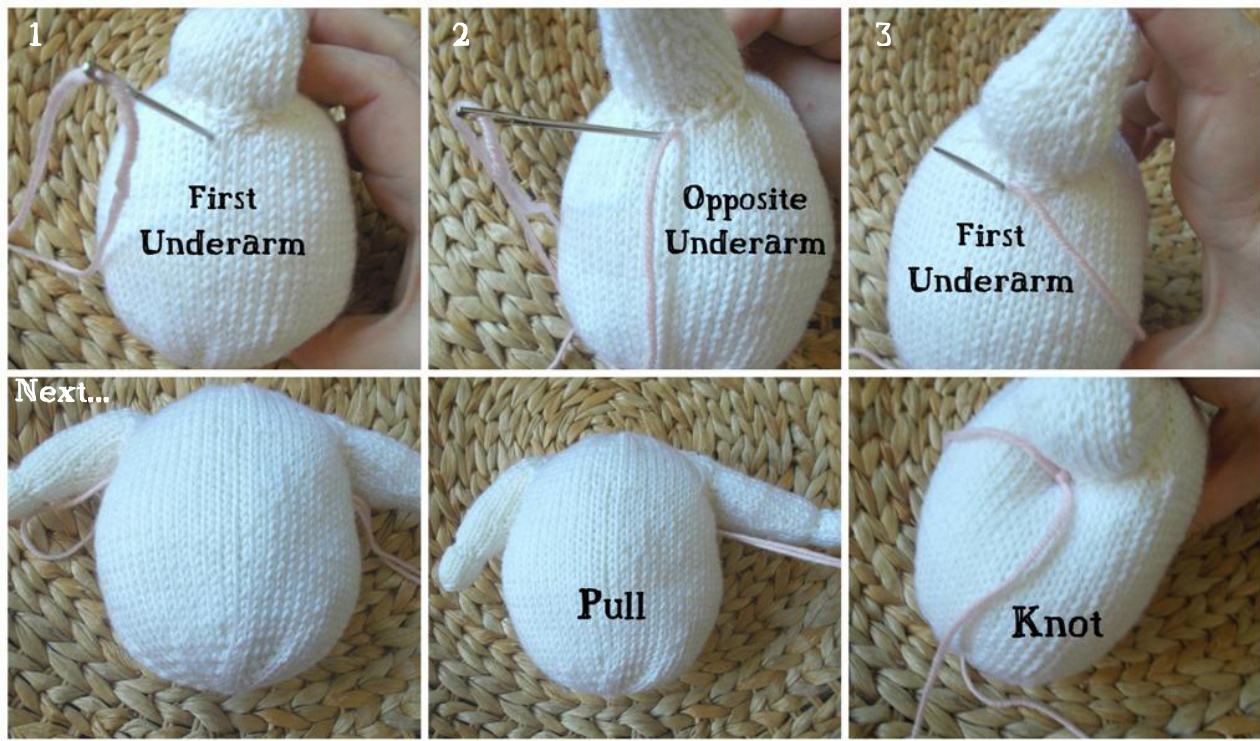
1. Thread the tapestry needle with a long length of yarn to match the main body. Insert the needle into the body, at one of the underarms (first underarm), centred under where the arm has been sewn. 2. Thread the needle right through body and out again at the corresponding point at the opposite underarm. 3. Insert the needle into the body again, a stitch away from where the needle emerged, and thread right through the body to come at the corresponding point at the first underarm (again with a stitch between where the yarn went in and where it comes out). Next: pull the loose yarn at the first underarm tightly, to draw the loop of yarn at the opposite underarm into the body and shape the underarm areas. When you are happy with the amount of shaping, tie offthe yarn in a secure knot, and thread the ends into the body where they will not be visible.
Sew Head to Body
Centre the head in place on the top of the body. Stitch the head securely in place to the body, at the purl round on the head. The purl round is there to guide you for initial positioning and stitching of the head to the body. Once the head is sewn in place, add extra stitches as needed or sew further out if you wish to, to secure further and stop the head wobbling too much.
Stuff/Sew Legs to Body
Sexilsfmlyatotmdreslyatthtosvestlsd legscandangledownw Row 2: Sc (flo) in 1" sc, \*ch 1, sc (flo) in next sc. Repeat from \* to end. Ch 1, turn.
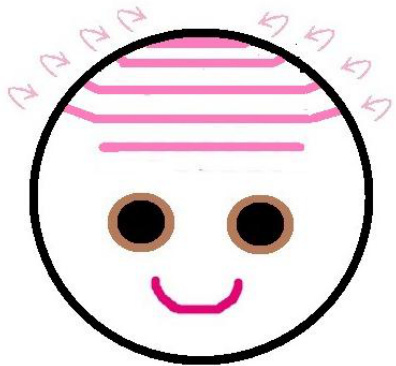
Eyes
For the eyes, use two large buttons in outer eye colour (brown shown) and two smaller buttons in black (for the pupils). Sew the buttons together through their holes and then sew onto the head. re positioned approximately halfway down the head and 2.5 cm (1 inch) apar
Mouth
Embroider a smiling mouth shape below the eyes, using dark pink yarn. Each end of the smile is positioned approximately three stitches below the eye, under the inside edge of the smaller button of each eye.
Hair
The hair is made up of many strands of hair colour latched on to the head, one strand at a time, using the knotting method. To start, cut strands of yarn double the length of the desired final hair length, plus 2.5 cm (1 inch) for knotting and trimming. The knotting method is explained below.
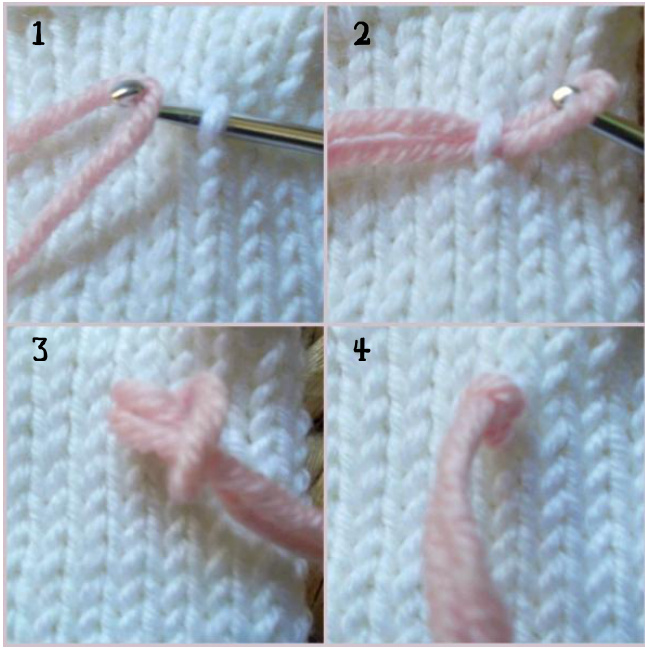
Hair Knotting
1. Use a small crochet hook to draw a folded strand of yarn (folded in half) through one leg of a stitch. 2. This makes a loop running through the stitch. 3. Feed the yarn tails through the loop. 4. Pull tight to knot.
Attach the strands working in tiers of rows running around the head, plus one partial row at the front to make the fringe (bangs) fuller. Refer to the diagram below for approximate hair row placement. Once all the rows are done, add as many extra strands as you wish, where desired, to fill in any sparse areas.
Once all the hair is attached, style and trim the hair around the head to the desired length. To finish, trim the fringe (bangs) to desired length above the eyes.
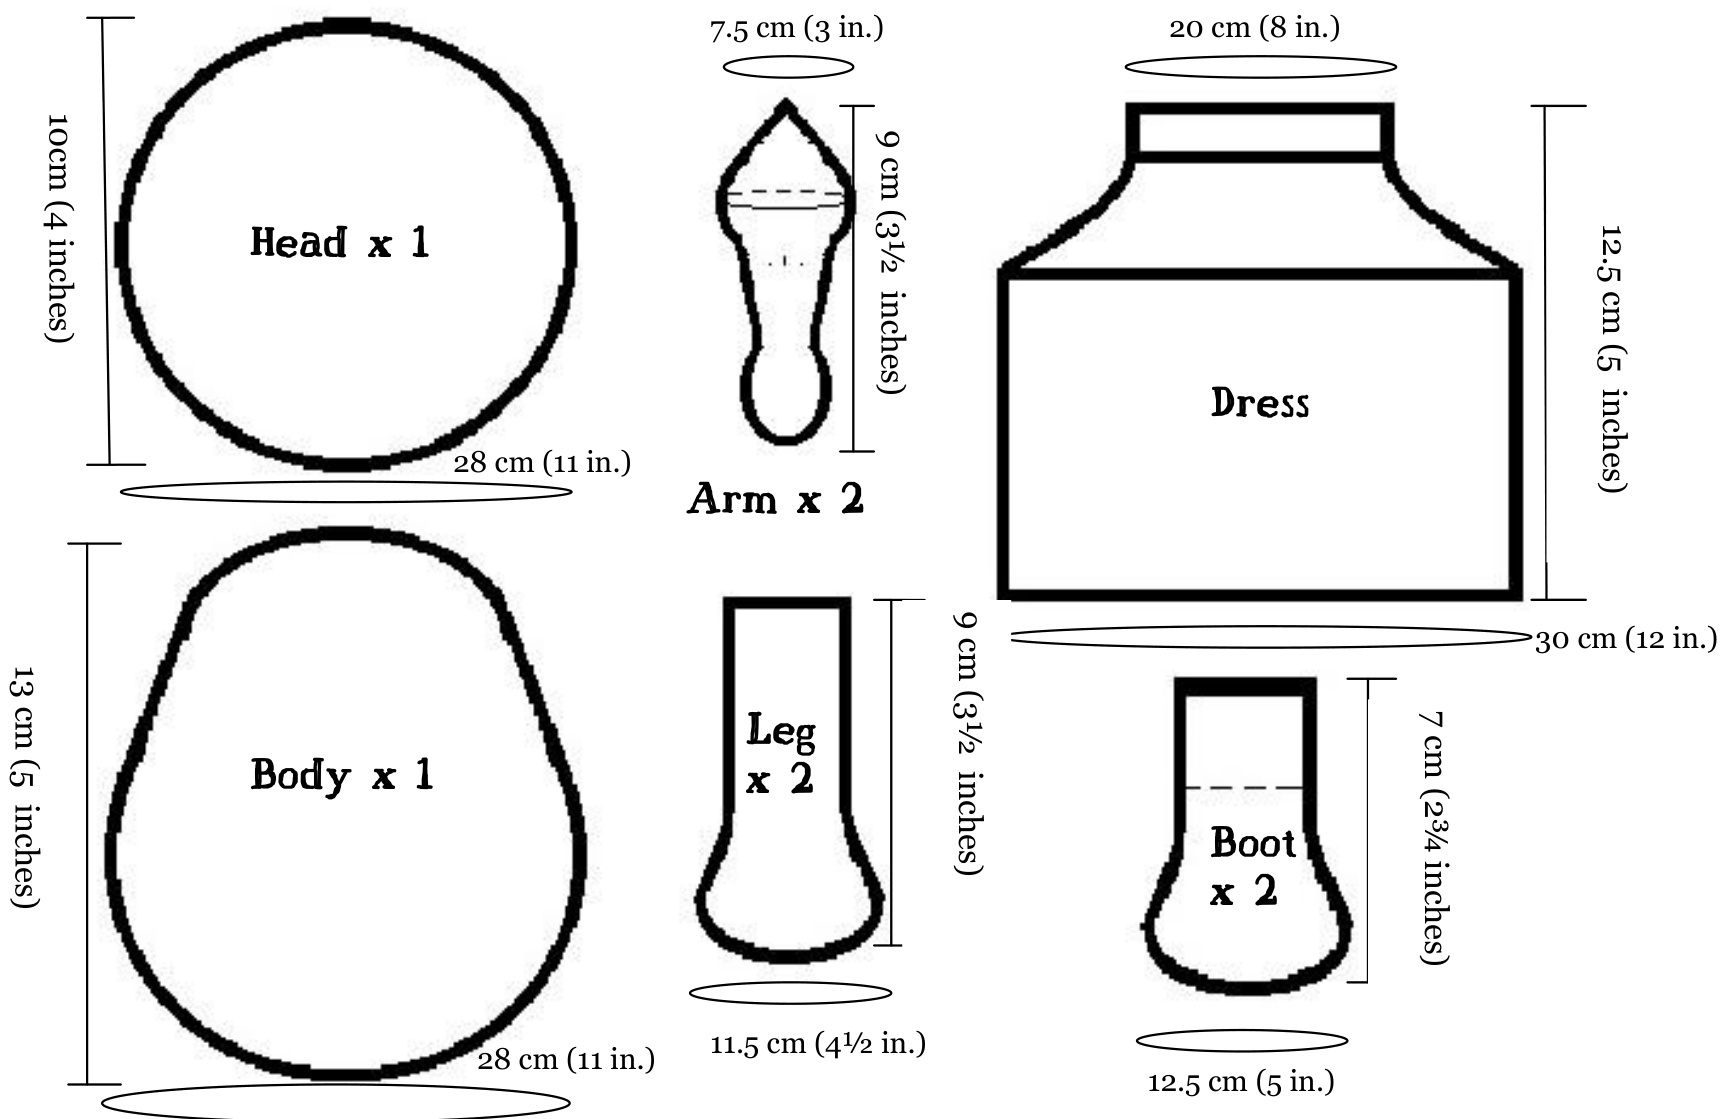
Finished Dimensions
et dimensions of each part, when stuffed, and finished dimensions of clothin
Copyright @ Ellen Kapusniak 2015 For pattern support email: elien@knittipoliti.com


