Design-Your-Own Blythe Doll Dress Recipe
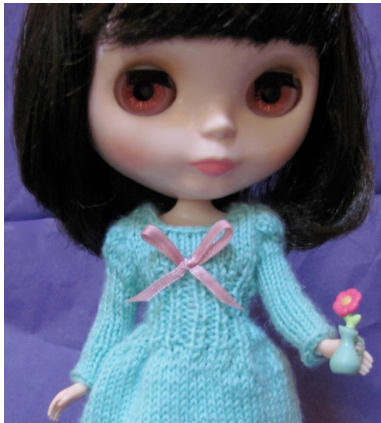
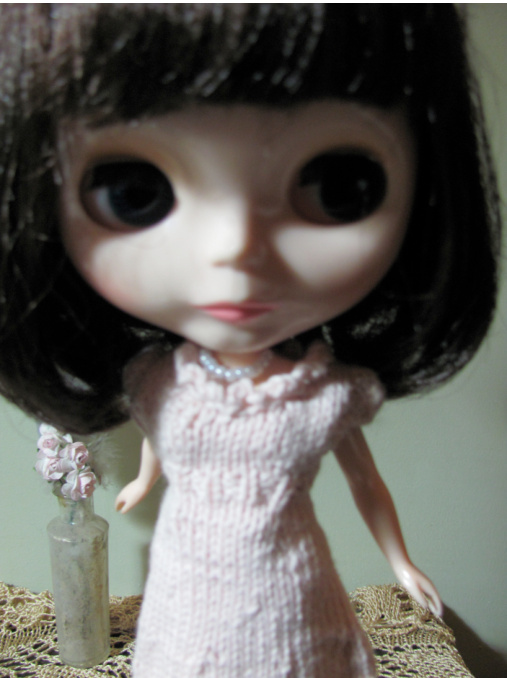
A long time ago knitting patterns were often called recipes and I like the analogy because a cooking recipe is something I follow precisely only once - then I adapt and improve the recipe and make it my own. This recipe is intended for use in a similar way - you can follow the pattern as given, or mix & match the different options, or use this as a guide for your own adaptations. The dress is for Blythe dolls with a standard body; it is worked from the hem up and knitted in the round wherever possible. All options have a high waistline and fitted bodice with the same neckline - though different treatments can result in very different styles.
You need: 4ply / sock weight yarn approximately /2 oz - 30 gr. \*The original Jane Austin' dress was knitted in an organic cotton yarn, all the others are wool or wool with 20% nylon. Set of DPNs 2.5mm / US size 1/2 / UK size 13 \* the skirt can be worked on slightly larger needles Stitch Markers. 2 or 3 very small snap-studs. Your design ideas . Gauge: on 2.5mm needles and stocking stitch 3sts = 1cm / 7.5sts = 1 inch \*gauge not important for skirt.
Skirt fullness & Hem Options
‘Baby Doll' [BD] - 2.5mms / US size 1%2 cast on 60 ‘Jane Austin’ [JA] - 2.5mms / US size 1%2 cast on 54 \*Joan Holloway in MadMen' [MM] - 2.5mms / US size 1%2 cast on 40 ‘The Princess’ [TP] - 2.75mms / US size 2 cast on 62 Join in the round without twisting. Place Marker [PM]at Centre Back. \* larger needles make the skirt more voluminous. If you have planned a pattern (lace stitch, fair-isle etc) calculate the number of stitches in the cast on from the pattern repeat i.e. the Hearts are a 12st repeat so I needed to cast on a number divisible by 12. \* I've a habit, when working in the round, of casting on one extra stitch and then, when joining in the round, I work a k2tog with the first & last stitches. This makes a relatively neat join.
Design-Your-Own Blythe Doll Dress Template
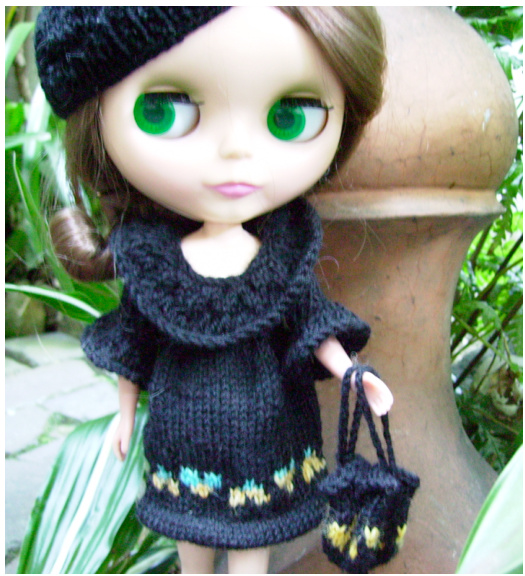
BD & TP have a turned hem - MM has a turned picot hem. LiatMGat gives some good YouTube demos at: http://www.youtube.com/user/LiatMGat#p/u/4/u5WrK8NC0fw (for plain hem) http://www.youtube.com/user/LiatMGat#p/u/5/aYWoqwPZXkM (for picot) Work 5 rounds before turning up - work (yo k2tog) around on the 3'd round for picot hem. Chart for the BD hearts pattern:
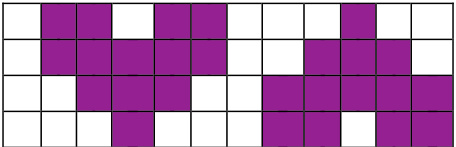
I used a variegated yarn for the contrast hearts.
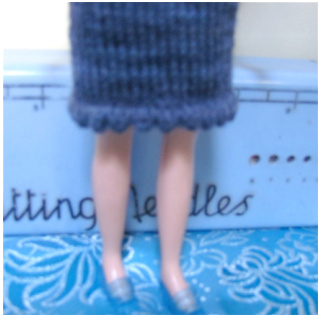
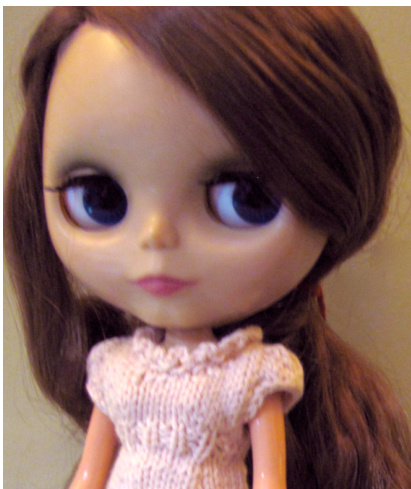
The Jane Austin? dress has a lace pattern that gives a wavy edge - it was worked as follows: Rnds 1, 2 & 3 : k all Rnd 4 : \* (p2tog)x3, (k1, yo)x6, (p2tog)x3 repeat from \* around. Work rounds 1 to 4 again, then work 4 plain k rounds before working Rnd 4 again - then 5 plain k rounds before working Rnd 4 again - then 6 plain k rounds before working Rnd 4 again.
Skirt Length Options
There is a back opening - a split and underlap which starts at the hips - so calculate the skirt length to your doll's hips ... BD is 5cm / 2" long, TP is 6cm / 2.3", MM is 6.5cm / 2%2", JA is 8cm / 3.8" (measured from the top of a wave!) \* you could make a very short skirt for a little baby-doll style top
Split & Underlap - for ALL Dresses
Split at the Centre Back and start working back & forth. Cast on an extra 3sts (for the underlap) on the Left Side. Henceforth those 3sts will always be worked in Stocking St - and the edge stitch on the Right Side will be worked in Garter (k every row).
Decreases into Waist Options
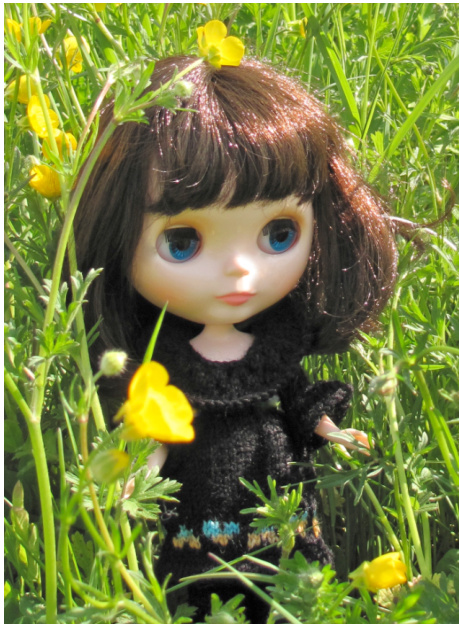
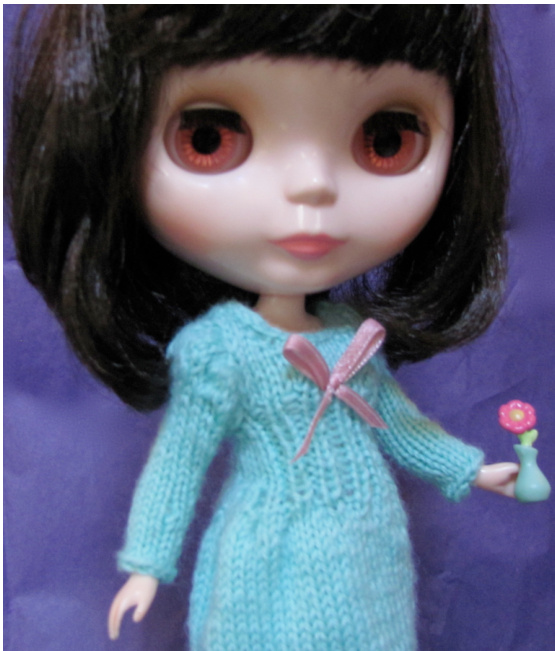
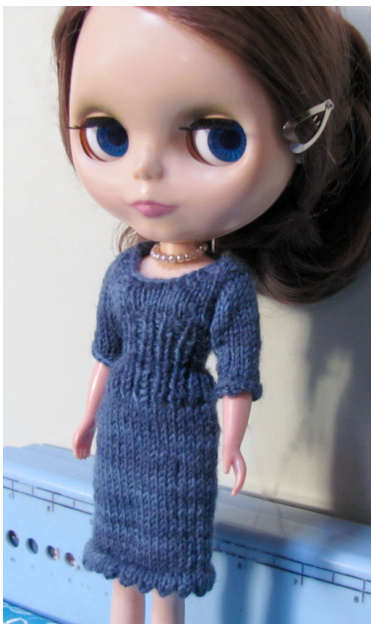
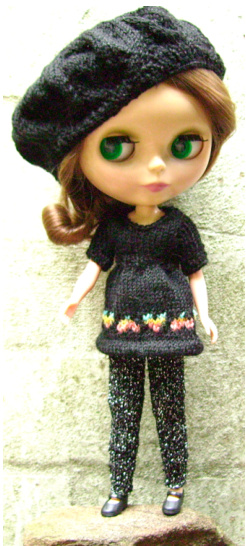
The BD decreases quickly into a high waistline. The JA tapers into a slightly higher waistline. TP decreases quickly into a ribbed ^corset' section that goes from the hips to just under the bust. The MM has the same ‘corset' section but the skirt is tighter so there is only a little decreasing. The BD was worked as follows from the Split & Underlap: Continue working in Stocking St until work = 7cm / 2.75" from cast on. Dec next knit row : k3 (underlap), k2tog around 2. @ 2011 Lyndell / Fashioned by Lyndell Please do not copy or distribute any part of this pattern without atribution. If you use this pattern and post the result (on Ravelry or a Blog etc) an attribution would be appreciated. Waist 1 : (k1, p1)x6, k2tog (p1, k1)x2 p1, k2tog, (p1, k1) rib to last 3sts, p3 {28+3sts} Waist 2&3 : Stocking st the 3sts of underlap, always k 1"t at the other edge and work k1, p1 rib between. Increase for Bust : 4 (right side) Make 1 = M1 : k11, M1, (k3, M1)x4, k8 {33+3} 2 (wrong side) : k1 p to end. The JA was worked as follows from the Split & Underlap: Dec next row (wrong side) : k1, p4, p2tog (p4, p2tog)x7, p8 46+3sts) Work straight for 4 rows Dec next row (right side) : k7, k2tog, k5, k2tog (side) k4, sl1 k1 psso, k8, k2tog, k4, sl1 k1 psso (side) k5, sl1 k1 psso, k4 {40+3sts} Work straight for 3 rows Dec next row : k6, k2tog, k4, k2tog (side) k3, sl1 k1 psso, k8, k2tog, k3, sl1 k1 psso (side) k4, sl1 k1 psso, k3 {34+3sts} Work straight for 3 rows Dec next row : k5, k2tog, k3, k2tog (side) k2, sl1 k1 psso, k8, k2tog, k2, sl1 k1 psso (side) k3, sl1 kl psso, k2 {28+3sts} Check the length - the split should now be about 3cm / 1.25" long - if shorter work a few rows without shaping. Next right side row : k3 then work p1, k1 rib to end Next : k2, p1 k1 to the 3stitch underlap - p3. TP Dress was worked as follows from the Split & Underlap: Next right side row go to 2.5mm needles and decrease as follows: Dec 1 : k4 \* k2tog, k2 repeat from \* to last stitch k1 {47+3 stitches} Now go to k1, p1 rib except for the 3stitch underlap (in Stocking St) and the 1stitch selvedge (in Garter) 2 : k2 (p1, k2tog)x3, p1 Place Marker [PM] \*or change to another DPN k1 (p1, k2tog)x2, (p1, k1)x2, PM, (p1, k1)x2, p1, (k2tog, p1)x2, k1, PM, p1, k1 (p1, k2tog)x3, p4 {37+3} Work as set without shaping for 2 rows 5 : k3, p2tog, k1, p1, k1, (k2tog)x4, (p1, k1)x5, p1, (k2tog)x4, (k1, p1)x2, k1 {28+3} arrange markers (or needles) on the wrong side row after 7th, 14th & 22nd stitches. Follow the altered rib pattern for 7 rows. Increase for Bust :
1 (right side) work all Make 1 [M1] purlwise : k4 (p1, k1)x3, M1, k1, PM, M1, k1, M1 (k1,p1)x6, k1, M1, k1, PM, k1, M1, cont as set to end of row {33+3} 2 (wrong side) : work as set. The MM Dress was worked as follows from the Split & Underlap: Go to k1, p1 rib except for the 3stitch underlap (in Stocking St) and the 1stitch selvedge (in Garter) 1 (right side) : k4 (p1, k1)x3, p1, k2tog, Place Marker [PM] \*or change to another DPN (p1, k1)x5, PM (p1, k1)x5, PM, p2tog, (k1, p1)x2, k2tog, p1, k1 {37+3} Work as set without shaping for 3 rows. Then work as given for the Princess dress from Row5above.
Bodice - for ALL Dresses except the JA (which was a smaller bodice)
The front of this bodice is worked with short rows and picked up stitches. It requires some attention to detail but I think is worth the effort as it results in a nicely fitted bodice with a nice neckline with a minimum of sewing up. All these options start with 33+3 stitches.

Divide for Underarms: Right Side row : k10, cast off 3, k 13 \*counting the last st of the cast off off 3, k7. Now work on the 7sts for the Right Hand Back - Right Hand Back : work straight in Stocking St (with 1"t selvedge in Garter) for 8 rows. Neck - next row (wrong side) : Cast off 3, p to end then cast off. Front : Rejoin yarn for the Front with right side facing. 1: k3, M1, k4, M1, k3, M1, k3 {16sts} work 2 rows stocking stitch without shaping. Then shape neck through short rowing : wrong side facing : p5 wrap + turn [w+t] k5. p4, w+t, k4. p3, w+t, k3. p2, w+t, k1, M1, k1 On those 3 stitches work the side of the neckline : p3 turn without a wrap, k3 and cast off 2 sts (for the shoulder) Carefully pick up 2sts down the last part - the side of the neckline \*pick up close to the edge of the work. Also, when working into stitches that were picked up I like to work into the back-of-the-stitch - this minimises holes. Carefully pick up 2sts down the last part - the side of the neckline but this time don't use your free yarn - carefully pick up loops on the edge of the knitting and place them on the LH needle. Now Cast Off all the Front stitches neatly \*I like a cast-off with a chain edge and worked as follows: k2, \*on RH needle pass 1"t st over the 2"d st, k1 and repeat from \* until only 1 st is left, break off yarn and thread through that stitch. Left Hand Back : Rejoin yarn at the underarm and work straight on the 10 stitches for 7 rows. Neck - next row (right side) : Cast off 6, k to end then cast off.
Design-Your-Own Blythe Doll Dress Template
The JA Bodice
To make this bodice a little shorter work the division for the armholes in the same row as the increases for the bust. 1 right side : k10, cast off 2, k3 \*counting the last st of the cast off, (M1, k2)x2, M1, k3, cast off 2, k7
Continue as given for the other options
All Options - Sew Shoulders
Neatly sew up the shoulders paying particular attention to the neck edge. These shoulders are meant to sit slightly to the back of the body rather than sitting on top of the shoulder. Costume makers call this a ^period shoulder’ because shoulder seams were usually placed to the back of the garment before the early decades of the 2o" C. I've used this shoulder here because on a tiny doll, a seam on top of the shoulder can look messy and it adds bulk.
Sleeve Options
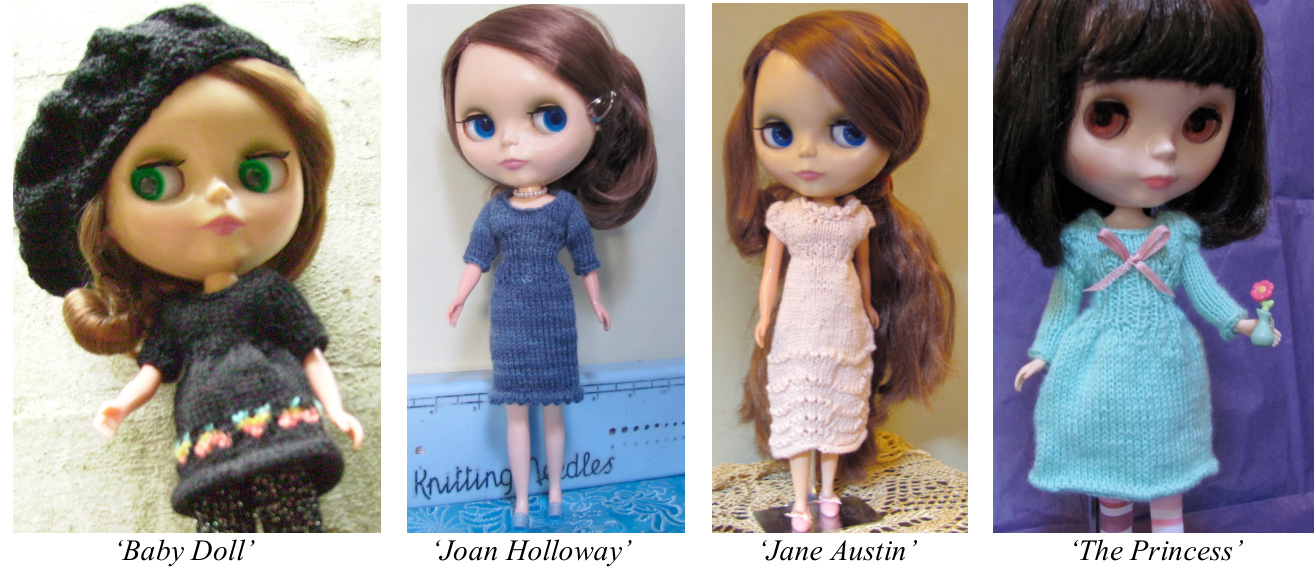
The BD has above elbow sleeves worked in k1, p1 rib for snugness. The MM has simple 3/ length sleeves (they used to call this ‘Bracelet Length' because it is just the right length for showing off some nice bracelets). The JA has little puff sleeves made using short rows and TP has those puffs at the top of a long straight sleeve.
Straight Stocking Stitch Sleeves - MM
Rejoin yarn at the underarm and neatly pick up 21sts around the armhole - pick up more stitches to the top (shoulder) than in the underarm where the stitches can be quite sparse. Work in Rounds. 1 : knit all \*I find that working through the back of the loop of picked-up stitches helps to close any gaps 2 + 3 : k2tog, k to last 2 sts, k2tog {17sts} 4 : k all 5 : k to last 2 sts, k2tog {16sts} 6 + 7 : k all 8 : k to last 2 sts, k2tog {15sts} work 3 rounds straight 12 : k to last 2 sts, k2tog {14sts} work 2 rounds straight 15 : k2tog, k to last 2 sts, k2tog {12sts} work 2 more rounds straight then cast off neatly.
Tight Ribbed Sleeves - BD
Rejoin yarn at the underarm and neatly pick up 20sts around the armhole - pick up more stitches to the top (shoulder) than in the underarm where the stitches can be quite sparse. Work in Rounds. 1 : k1, pl around \*I find that working through the back of the loop of picked-up stitches helps to close anygaps
@ 2011 Lyndell / Fashioned by Lyndell Please do not copy or distribute any part of this pattern without attribution. If you use this pattern and post the result (on Ravelry or a Blog etc) an attribution would be appreciated.
Design-Your-Own Blythe Doll Dress Template
2 : p2tog, rib as set to last 2 sts, k2tog {18sts} 3 : p1, k1 around 4 : k2tog, rib as set to last 2 sts, p2tog {16sts} next 4 rounds : k1, p1 around 9 : p2tog, rib as set to last 2 sts, k2tog {14sts} next 2 rounds : p1, k1 around 12 : k2tog, rib as set to last 2 sts, p2tog {12sts} work 2 more rounds k1, p1 then cast off neatly.
Puff Sleeves - JA
Rejoin yarn at the underarm and neatly pick up 28sts around the armhole - concentrate the stitches at the top (shoulder) - in the underarm the stitches can be quite sparse. 1 : k6, yo (k2, yo) x8 k1 wrap + turn [w+t] \*those yo's could be worked as M1 2: purl 27, w+t 3 : k21, w+t 4 : p 15 w+t 5 : (k1, k2tog)x7, k3 to complete round. Then cast off all neatly.
Puff then Straight Sleeves - The Princess
Work as for the Puffed Sleeves above then continue as follows : 6 : k3 (k2tog, k1)x6, k8 7 : k1 (k2tog)x11, k1, k2tog {13sts} 8 : k6, k2tog, k to end {12sts} work 9 rounds straight 18 : k2tog, k to end {11sts} continue straight until sleeve is 5cm long from the underarm then Cast Off neatly.
Frill Options
A neck frill & sleeve frills shown here on the Baby Doll dress.
Neck Frill
With dress completed and with right side facing rejoin yarn at neck edge 3sts from the edge of the Underlap (the underlap needs to be frill free). Neatly pink-up 26 stitches evenly around the neck, just under the edge. 1 right side : k all \*1 find that working through the back of the loop of picked-up stitches helps to close any gaps 2 and all alt rows : k1, p to last stitch, k1 3 : (k2, M1) to last 2 sts, k2 {38sts} 5 : k using a larger needle \* I used needles 2 sizes larger 7 : k using an even larger needle 8 : as row 2 then cast off neatly
Design-Your-Own Blythe Doll Dress Template
Sleeve Frills
Originals worked on the Ribbed Sleeve; follow the pattern for the ribbed sleeve till round 9 completed and you have 14 stitches. Work 3 rounds straight, then starting at the underarm 13 : k2, M1 (k1, M1)x10, k2 {25sts} 14 : k straight 15 : k using a larger needle \* I used needles 2 sizes larger 16 : k straight 17 : k using an even larger needle 18 : k straight Then cast off neatly.
The Jane Austin Dress Neck Frill
The JA has a crochet frill. Very simple : 3 x chain stitch then a single crochet to catch it to the dress. I apologise if that terminology is wrong -- crochet terms differ in the US to the UK; in Australia we usually use the UK versions but I get completely confused. It really is a very simple frill and a little trial & error will get you the frill you desire.
Finishing for all Dresses
Stitch the end of the Underlap to the underside of the right-hand skirt. Sew in any ends. Sew on snap-studs. Add trim/s if desired. 7. @ 2011 Lyndell / Fashioned by Lyndell Please do not copy or distribute any part of this pattern without attribution. If you use this pattern and post the result (on Ravelry or a Blog etc) an attribution would be appreciated.