A Third Year of Wee Tiny Socks
Patterns from the third year of the Wee Tiny Sock Club
Contents
Wee Tiny Space Sock June) Planetary bobbles and bumps p.3
Wee Tiny Roller Skate Sock (July) Four wheels, real lace up skate construction, and wee tiny pompons p.5 Wee Tiny Watermelon Sock (August) Knit sideways with short row shaping and seed beads p.9
Wee Tiny Owl Sock (September) Partially knit flat, button eyes p.11

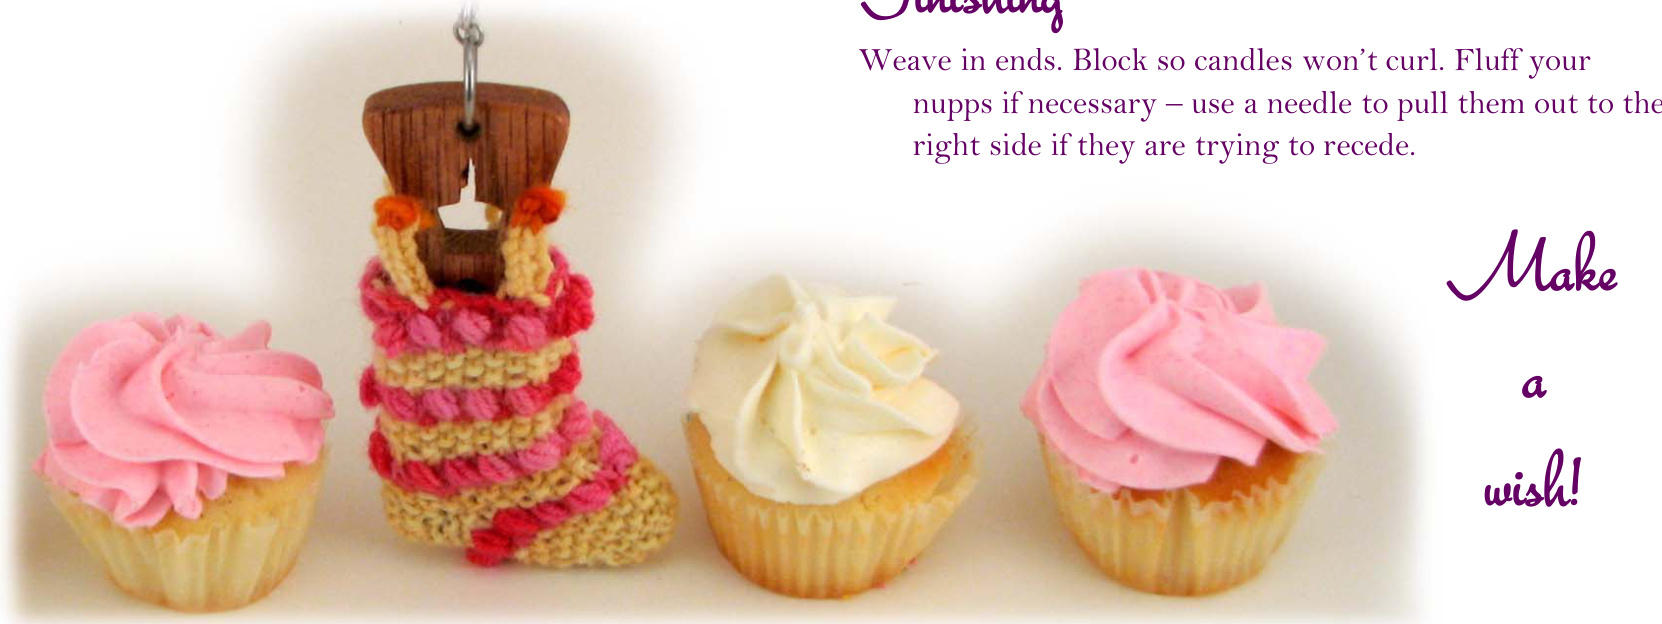
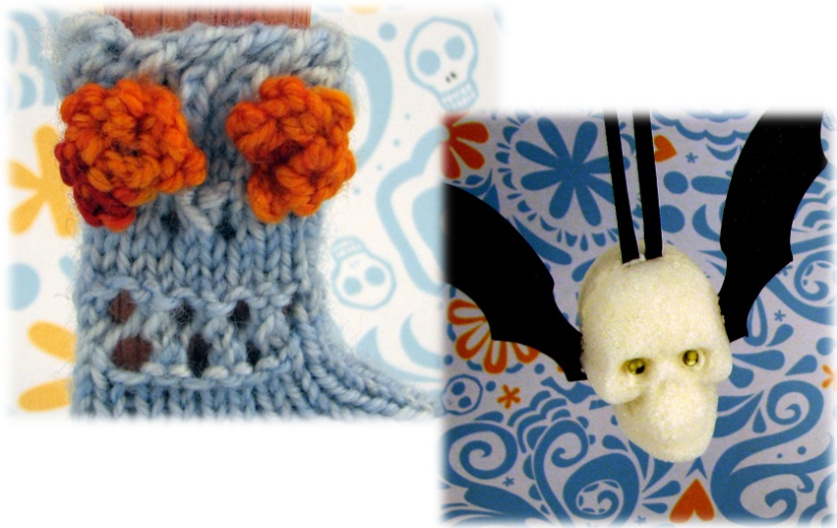
Wee Tiny Birthday Sock (October) Candles knit into the cast on, nupps and seed stitch add texture p.13 Wee Tiny Day of the Dead Sock (November) Rose eyes knit separately, lacey skull face p.15
Wee Tiny Quilter's Sock (December) U Modular knit squares form the leg, with cuff and foot knit in the round p.17
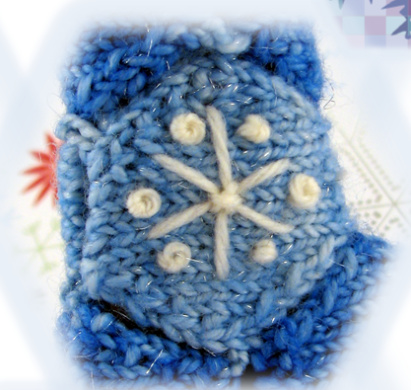
Wee Tiny Snowflake Sock (January)
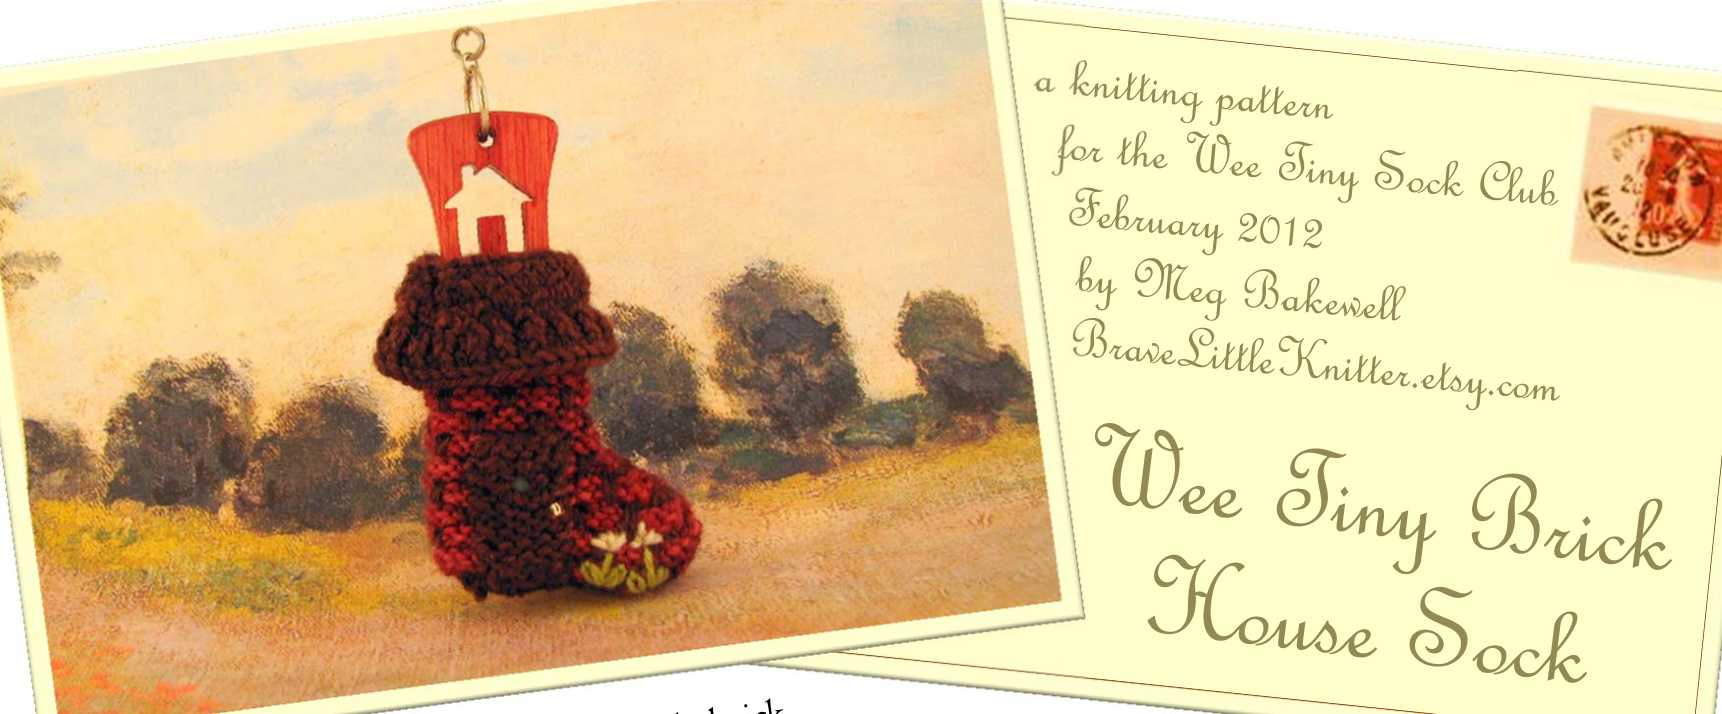
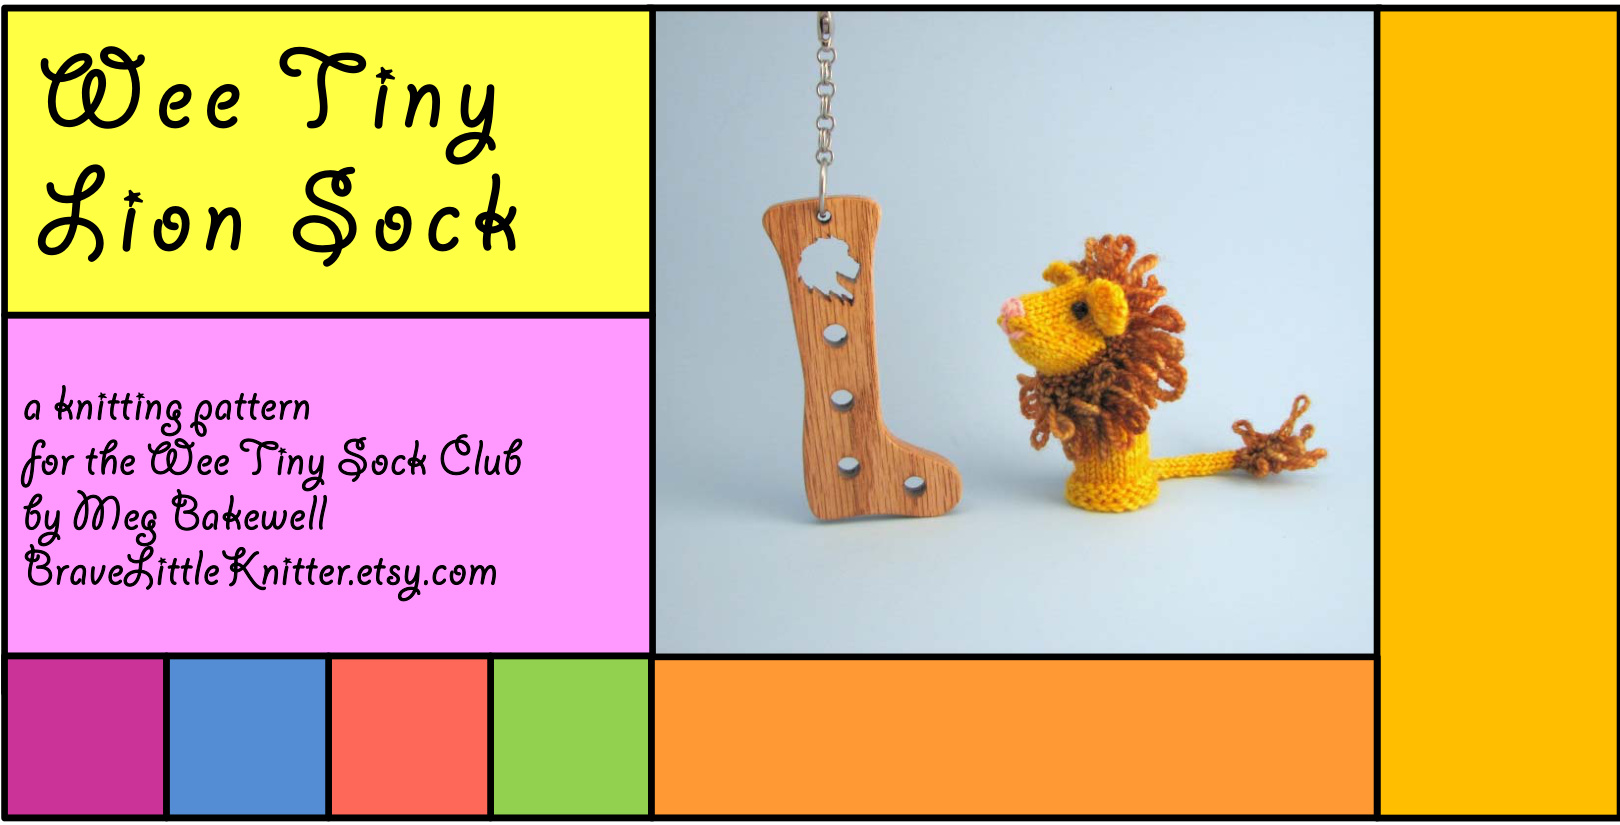
Wee geometric shapes, embroidered with snowflakes, puzzle together p.19 Wee Tiny Brick House Sock (February) Knit flat from the roof down, slipped stitch colorwork & embroidered details p. 21 Wee Tiny Lion Sock (March) Loop stitch mane and i-cord tail make a friendly lion p.24 Wee Tiny Jellyfish Sock (April Laceweight mohair and fingering weight wool, tentacles of two kinds p.27

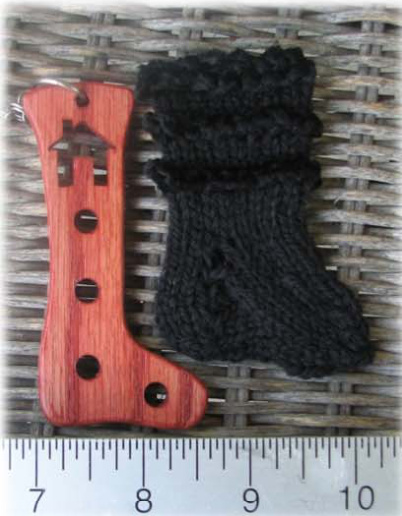
Wee Tiny Graduation Sock (May)
Felted wool with velvet stripes, and a wee hat with tassel p.29 Top-down construction ↑ Toe-up construction Alternative construction The entire contents of this e-book and the knitted designs to which it refers are subject to copyright. Without the express permission of Margaret Bakewell you may not distribute or sellelectronic or paper copies of this pattern in any way. You may not sell any items produced using the directions in these patterns.
Uee Tiny S2ace Soch
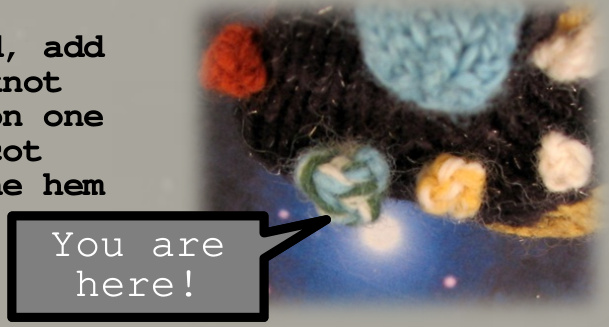
April .12, 1981 - July 21, 2011: During this period, 355 men and women blasted off this planet aboard U.S.. space shuttles Columbia, Challenger, Discovery, Endeavor,. and Atlantis,. traveling a cumulative total of.over 537 million miies on·134 missions..As .a star-gazing,. Tang-drinking kid, seeing the shuttle launch, even on TV, was 'a thrill and an inspiration. The Wee Tiny Space' sock and Wee Tiny Shuttle Blocker celebrate this era of science and discovery, and all the people who took part. The sock features eight planets, which. may \~ 1ook like a challenging endeavor, but' you'll discover that they follow just .2 patterns: the terrestrial planets are afterthought bobbles, and the gas giants are little sock toes that never grew up to become socks.
Materials
Main color (MC): Dream in Color Starry MC: Black Parade/black, 12 yards ontrast colors (CC): KnitPicks Palette CCl: Semolina/yellow, 4 yards CC2: Cream/white, 5 yds CC3: Sky/blue, 3 yds CC4: Grass/green, 1 yd CC5: Masala/rust, 2 yds Set of 4 US size 1(2.25 mm) DPNsTapestry needle for weaving in ends and sewing on gas giants
AsbreviaEions
Kfb Knit through the front and then the back leg of the stitch (l st increased) K2tog Knit 2 together S1 Slip the st, purlwise unless otherwise indicated W&T Wrap and turn On a knit row: Bring the working yarn to the front, slip the next st purlwise, bring the yarn to the back again, turn work, slip the first st purlwise. On a purl row: Bring the working yarn to the back, slip the next st purlwise, bring the yarn to the front again, turn work, slip the first st purlwise. YO Yarn over.

Becin Pattern
Using Cc1, cast on 4 sts. Slide these 4 sts to the opposite end of the needle, and pull working yarn across the back as for i-cord. Kfb 4 times. 8 sts on the needle. Divide sts among 3 needles. Join for knitting in the round. Round 1, 3, 5, 7: K all sts. Round 2: (Kfb, kl) four times. (12 sts) Round 4: (Kfb, k2) four times. (16 sts) Round 6: (Kfb, k3) four times. (20 sts) Round 8: (Sll, kl) to end of round. Round 9: (Sll, k3) to end of round. Round 10-18: K all sts.
Short Row Heel + Lec
Arrange the first 10 sts of the round on needle 1. Divide the remaining 10 between needles 2 and 3. Row 1-2: K9, w&t, p8, w&t. Row 3-4: K7, w&t, p6, w&t. Row 5-6: K5, w&t, p4, w&t. Row 7-8: K3, w&t, p2, w&t. Row 9-10: K3, w&t, p4, w&t. Row 11-12: K5, w&t, p6, w&t Row 13-14: K7, w&t, p8, w&t. Continuing knit all sts until leg portion measures 1-1/2 inches from the top of the heel section, about 22 rows. Next round: (K2tog, yo) to end of round. Knit 3 more rounds, and without binding off, break MC yarn leaving a 6-8" tail. Transfer all sts from the needles to a piece of waste yarn. Turn the sock inside out, and using the yarn tail, sew one st at a time to the inside of the sock. At this point, weave in ends from the CCl used in the toe and for MC. It would be hard to do this later when all the planets have been added.
Terrestrial planets
There are 4 terrestrial planets, Mercury, Venus, Earth, and Mars. They are all worked in the same way, but using different yarn combinations. For Mercury, the littlest one and closest to the Sun, use a single strand of white. For Venus, the second planet, use a strand of white and a strand of yellow held together. For Earth, use 3 strands held together, one each of white, blue, and green. For Mars, the fourth and final terrestrial planet, use 2 strands of rust held together. Using the combination of yarn listed above for each planet, cast on 2 sts. Row l: Kfb, kl. Row 2: P3. Row 3: K2tog, kl Break yarn and thread through remaining 2 sts. Tie cast on and bind off tails together, and using a tapestry needle, pull all tails through the sock in the location indicated in the photos. Turn the sock inside out and tie the tails for each planet in an overhand knot, sliding it up to inside of the sock. Trim the tails to %" or so. Alternatively, you could weave in all those ends, but there are a lot of ends!
Gas Giants
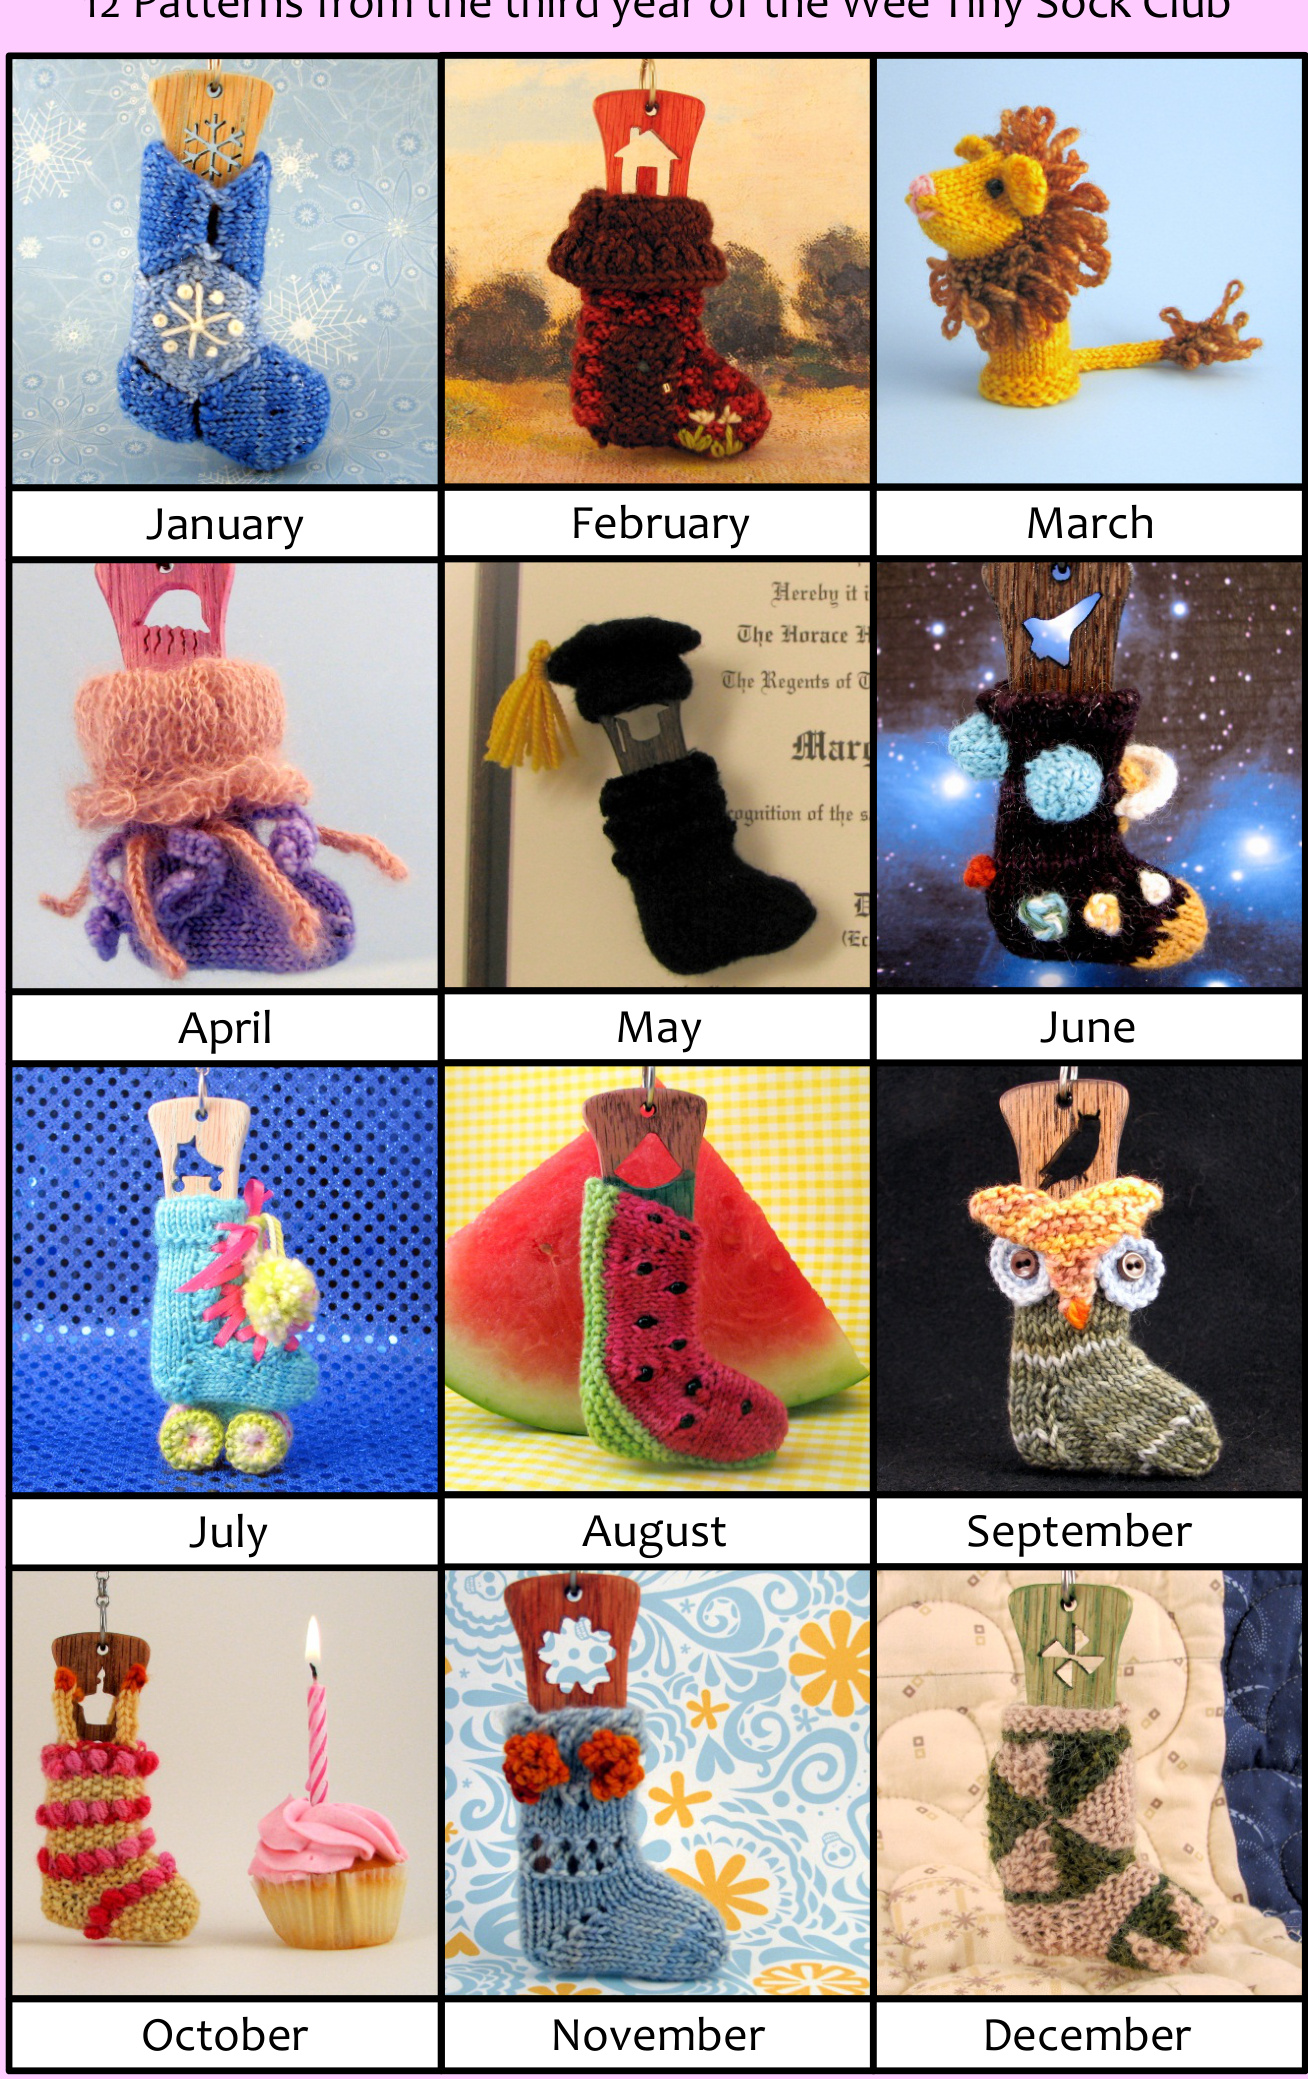
There are four gas giant planets, Jupiter, Saturn, Uranus, and Neptune. Again, they are all worked in the same way, but with different yarn combinations. For Jupiter, 1 strand each of rust and white held together. For Saturn, 2 strands of yellow held together. For both Uranus and Neptune, 1 strand of blue. For gas giants, begin the same way as for the toe of the sock, up to Round 2. Then, knit 2 more rounds, and bind off all sts purlwise. Thread cast on tail inside of the planet - this can be used as stuffing. Add a little more yarn, or trim if necessary, to get the right amount of stuffing. Using the bind off tails, sew Jupiter and Saturn to the sock in the positions shown in the photos. Next make Saturn's ring: Using 2 strands of white held together, cast on 2 sts and work in i-cord for about 2-1/2 inches - hold it over Saturn to make sure it is the right length. Break yarn and thread through the 2 sts to bind off. Using cast on and bind off tails, sew ring into place and weave tails in on the inside of the sock. Now, sew on Uranus and Neptune as shown in the photos. If desired, add a French knot in white on one of the picot tips of the hem for our favorite ex-planet.

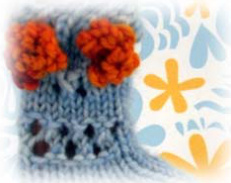
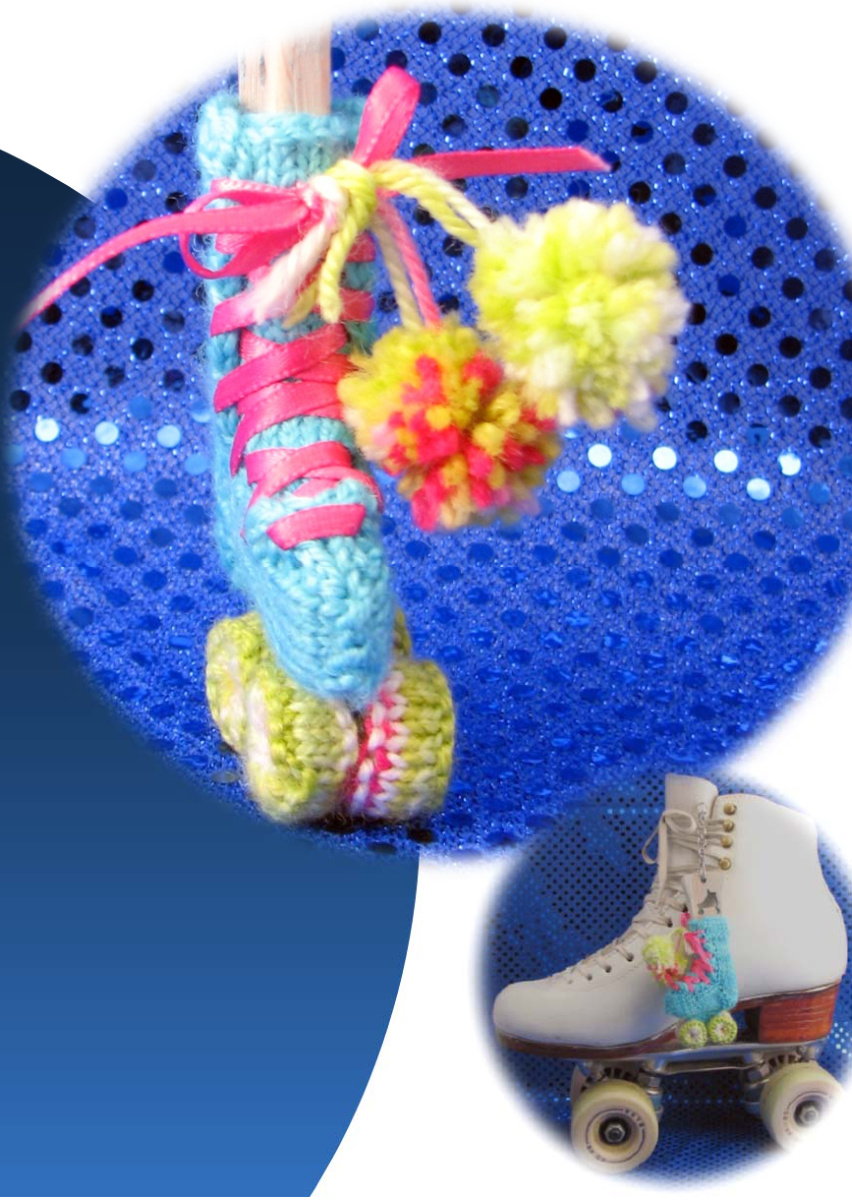
My first pair of roller skates were the metal adjustable over-the-shoe type. I spent many happy hours rolling around the neighborhood and, on rainy days, the basement in them. My sister and I have birthdays just two days apart, and one year, I was maybe 9, my aunt - the coolest aunt ever - got my sister and I matching white skates, and Garfield skate bags, and best of all, the skates had pom-pons! Mine were aqua, my sister's pink. They were, like, totally awesome! We had a roller skating birthday party and everything! After I outgrew those skates, I skated in rentals (brown with orange wheels, of course) many times. Now my daughter is a competitive skater, so I've probably spent nearly as many hours at the rink watching her practice jumps and spins as I have skating myself. For my skater girl, this wee tiny sock laces up the front with a narrow ribbon. Four wheels knit separately are attached to the bottom. A nod to my birthday skates, miniature pom-pons are the finishing touch!
Materials
Abbreviations
Sweet Georgia Tough Love Sock Yarn MC: Summer Skin (turquoise), 14 yards CC: Snapdragon (green/pink variegated), 7 yards A small amount of stuffing material 24 inches of 1/8"/3mm wide hot pink ribbon Less than 1 yard of sewing thread, optional Set of 4 US size 1 (2.25 mm) DPNs Tapestry needle for weaving in ends and threading laces pattern and photos @ 2011 cMeg Bakewell for personal use only Kfb Knit through the front and then the back leg of the stitch (1 st increased) K2tog Knit 2 together M1 Make a sts by picking up the strand running betweenthe2stsintherowbelowfromback to front with the left needle and knitting it. RS/ws Right side/wrong side SSK Slip the next 2 sts knitwise, then knit them together through the back loop. SI Slip the st, purlwise unless otherwise indicated W&T Wrapandturn On a knit row: Bring the working yarn to the front, slip the next st purlwise, bring the yarn to the back again, turn work, slip the first st purlwise. On a purl row: Bring the working yarn to the back, slip the next st purlwise, bring the yarn to the front again, turn work, slip the first st purlwise.
Begin Pattern
Using provisional cast on, cast on 16. Do not join. Row 1: SI1, k15. Row 2: SI 1, p15. Row 3-6: Repeat Rows 1-2 twice more. Row 7: (RS) SI 1, p15. Row 8-13: Continue in stockinette, slipping the first st of each row, starting with a ws/purl row and ending with a Rs/knit row. Undo the provisional cast on and place resulting 15 sts on another needle. Row 14: (wS) Knit 1 st from each needle together, all across this row. This creates a hem, with a row of purl sts showing on the right side of the work. Row 15: sl 1, k1, p1, k3, p1, k2, p1, k3, p1, k2. Row 16: Sl1, p15. Repeat Rows 15-16 until work measures between 112"/4cm from row 7 (the hem folding row), ending with row 16.
dteel flap
Row 1: Sl 1, k1, p1, k3, p1, k2, p1, k3. Transfer last 3 sts to a st holder. (13 sts on the needle) Row 2: Sl 1, p9. Transfer last 3 sts to a st holder. (10 sts on the needle) Row 3: SI 1, k2, p1, k2, p1, k3. Row 4: SI 1,P 9. Rows5-7:RepeatRows3-4oncemore,and then Row3again. Hteel Jurn (in garter stitch) SI 1, k8, W&T, k5, W&T, k3, W&T, k4, W&T, k5, W&T, k6, W&T, k7, W&T, k8, sI1.
Susset
Set up: Pick up and knit 4 sts from edge of heel flap, transfer 3 sts from st holder to needle, p1, k2. Next row: Sl 1, p16, pick up 4 sts from other edge of heel flap, transfer 3 sts from st holder, p3. (24 sts on the needle) Row 1: Sl1, k1, p1, k1, ssk, k12, k2tog, k1, p1, k2. (22 sts remain) Rows 2-10 even: Sl 1, p to end. Row 3: Sl1, k1, p1, k1, ssk, k10, k2tog, k1, p1, k2. (20 sts remain) Row 5: Sl1, k1, p1, k1, ssk, k8, k2tog, k1, p1, k2. (18 sts remain) Row 7: Sl1, k1, p1, k1, ssk, k6, k2tog, k1, p1, k2. (16 sts remain) Row 9: Sl1, k1, p1, m1, k10, m1, p1, k2. (18 sts) Row 11: Sl1, k1, p1, m1, k12, m1, p1, k2. (20 sts)
Joe
Join for knitting in the round. Rounds 1, 3, 5: K all sts. Round 2: SSK, p1, k5, k2tog, SSK, k5, p1, k2tog. (16 sts) Round 4: SSK, p1, k3, k2tog, SSK, k3, p1, k2tog. (12 sts) Round 6: SSK, p1, k1, k2tog, SSK, k1, p1, k2tog. (8 sts) Arrange remaining 8 sts on 2 needles and use a 3 needle bind off to close toe. The bind off will be vertical, as opposed to the normal horizontal closure of a sock. The vertical bind off mimics the vertical seam on the toe of a skate.
Jongue
Turn sock ("skate") inside out and pick up 4 sts centered on the top of the toe, 2 rows below the point where you joined for knitting in the round. Purl these sts. Row 1: Kfb, k1, Kfb, k1. (6 sts) Row 2 and all remaining WS rows: Sl1, p to end. Row 3: Kfb, k3, Kfb, k1. (8 sts) Row 5: Kfb, k5, Kfb, k1. (10 sts) Row 7: Kfb, k7, Kfb, k1. (12 sts) Continue in stockinette, slipping the first st of each row, until tongue measures 1.75"/4.5cm from pick up row. Bind off all sts.
rucks (aka the Razt the wheels attach to)
Along center of the bottom of the sock, starting at the edge of the garter st heel turn and working toward the toe, pick up and knit 9 sts. Knit 6 rows and bind Off all sts.
Wheels (make 4)
If you are working in a variegated yarn and want your wheels to have similar color patterning to each other, make a note of where in the color sequence you start your cast on for the first wheel, and start at the same point for each of the other wheels. Cast on 4 sts. On 2 of the four wheels, leave at least an 8 inch tail on the cast on. Round 1: (work as i-cord) Kfb 4 times (8 sts) Rearrange sts on 3 needles for knitting in the round Round 2: Kfb eight times (16 sts) Round 3: K all sts. Round 4: P all sts. Round 5-8: K all sts. Round 9: P all sts.
Wheels. continued
Round 10: K all sts. Round 11: K2tog eight times. (8 sts) Add a small amount of stuffing to the wheel. It will seem to puff out on the cast on side, but don't worry about that now. Round 12: K2tog four times. (4 sts) Break yarn leaving a 6 inch tail and thread through remaining 4 sts. Push the stuffing in if it is trying to sneak out, and pull tight. Using a tapestry needle, pull the yarn end through the center (axle line) of the wheel and out the other side. Pull tight and go back and forth between the two sides several times. This process will flatten the wheel out. For the wheels with a longer cast on tail, leave it unwoven - for the others, weave it in. When all four wheels are done, line up the front pair of wheels so that the center of each wheel is just overlapping the lower front corner of the "trucks", one on each side. Use the long cast on tail to sew through one wheel's center, through the truck, through the other wheel's center, and out the other side. Sew back and forth through the wheel centers several times to securely attach them to the skate. Repeat for the rear wheel pair. Weave in remaining ends.
Laces
The skate are laced up using a 24"/60cm length of 1/8"/3mm ribbon. The purl sts at the border of the upper portion of the boot act as a guide for spacing the laces. It's easier to do the lacing on a sock blocker, for even tension. So, put the sock on a blocker, and begin by threading one end of the ribbon on a tapestry needle.
Laces, csntinued
Insert the ribbon 2 sts to the right of the center line, 2 rows toward the toe from the tongue opening. Be careful to only go through the "boot" part of the skate, not the tongue. Thread the other end of the ribbon on the needle and insert it 2 sts to the opposite side of the center line, also 2 rows down from the opening. Continue to lace the skate, alternating between sides, bring the ribbon up from the inside of the skate to the Outside, and skipping 3 purl sts in the border between each pass. When you reach the top hem region, Come out from the inside for the final time about midway up the hem section. Tie a bow.
cPom-pons
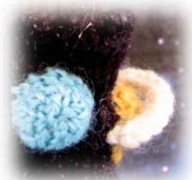
The following are standard pom-pon making directions - if you've made them before, you know what to do! Otherwise, read on... First, make a pom-pon maker: Cut two 34"/2cm circles (about the diameter of an American or Canadian penny) Out of lightweight cardboard - I used a cereal box. Punch or cut a V4"/1.2cm hole in the middle of each circle (a hole punch is the right ize). Next, make the pom-pons: Cut a 2 yard/2 meter length of CC yarn, and fold it in half. Thread the doubled yarn on a tapestry needle. Put the 2 cardboard circles together. If there is a smooth/shiny side to the cardboard, face that side in. Pull the yarn through the center hole, leaving a tail of about 4 inches. Wrap the yarn around the outside of the circle and pulli snugly back through the center. Continue wrapping the yarn around until there is only about 4 inches let. The entire cardboard should be covered with yarn now. Pinch the circle between your thumb and forefinger and, using a small sharp pair of scissors, cut the strands along the outer edge of the circle. Once you get started you can get the blade of the scissors between the 2 cardboard circles and it will be easier to cut. Cut all the way around the outer edge of the circle. Slip a double strand of sewing thread or single strand of yarn between the 2 cardboard circles and tie a couple of knots tight around the middle. Pull the cardboard circles off and flufup your pom-pon. Trim any uneven strands. Trim off one of the long tails - leave the other for attaching to the skate. Make a second pom-pon in the same way. Attach both of them by tying their tails to the bow at the top of the skate's laces.

Competitive figure skating on 8 wheels

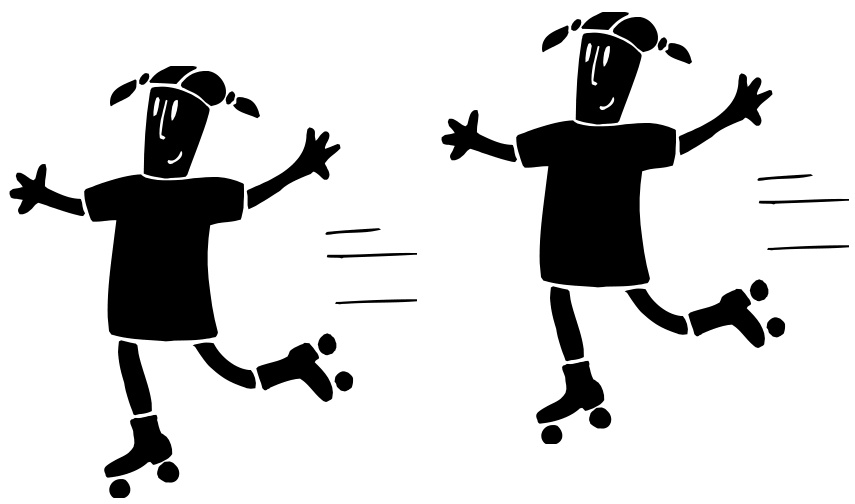
The USA Roller Sports Figure National Championships take place each year in July. Skaters of all ages from around the country come together. Those age 14 and up can earn a spot on the United States national team and go to the World Figure Championships, which are held each fall in countries around the world - this year, Brazil. Skating meets start early - skaters are usually warming up before the sun rises. Events include figures, dance, and freeskate. Figures events involve tracing a pattern painted on the rink floor with precision. Switching from forward to backward, from inner edge to outer edge, they follow the circles on the floor, always trying to "split the line" - that is, keep the painted line right between the wheels of their skates. Dance events can be solo or pairs. Skaters in rhinestone-covered costumes whirl around the rink doing waltzes and tangos and foxtrots. Freeskate is my daughter's favorite - just like their counterparts on ice, skaters execute spins and jumps in a routine set to music of their choice. This year at nationals in Fort Wayne, Indiana, Rachel placed in the top ten in three figure events, and 14th in her freeskate event. She is now working on perfecting her double jumps to prepare for her meets this year. I never would have guessed that Saturday skating class could lead to this!
Wee Tiny Watermelon SOck
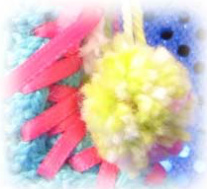
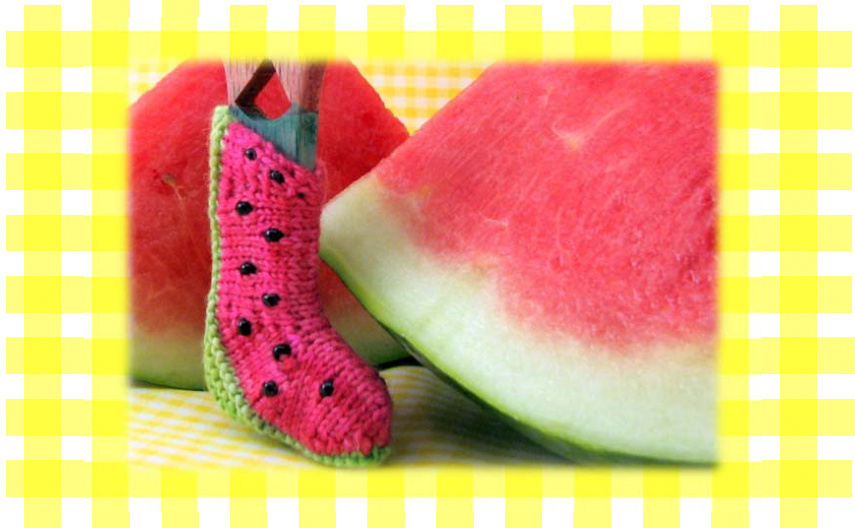
A knitting pattern for the Wee Tiny Sock Club August 2011 by Meg Bakewell The summer months bring fabulous color and flavor to the table - sunny yellow corn on the cob, fresh crisp green beans, berries in blue and red and deepest purple, and melons in soft orange and pale green and the sweet, juicy pink of a watermelon. This miniature watermelon sock is knit sideways, starting with a provisional cast-on that runs along the top of the foot from cuff to toe. Despite the provisional cast-on, I'm sure many a knitter will be happy to hear there is no grafting involved! Rather, after knitting the two sides down from the provisional cast-on, both starting in pink and ending in the green rind, the two halves are joined at the rind with a three-needle bind-off. Black beads slip into place like the seeds of a good old-fashioned “"nonSeedless" variety watermelon, but can be omitted if you prefer a seedless look.
Materials
Three Irish Girls Springvale Sock 100% Superwash Merino MC: Cosmo (pink), 10 yards CC: Mojito (green), 7 yards 20 size 6 black beads Set of 3 US size 1 (2.25 mm) DPNs Tapestry needle Beading needle Crochet hook for provisional cast-on, if desired
Abbreviations
KFB Knit into the front and back of the next st, 1 st increased. PB Place bead - simply slide a bead up to the needle. PM Place marker SI Slip the next st purlwise. SM Slip marker W&T Wrap and Turn. Provisional cast-on: Any provisional cast-on you like will work. My current favorite is demonstrated in a great youtube video, here: http://tinyurl.com/69eb8g
Begin pattern
Using beading needle, place 20 beads on MC yarn. Using provisional cast on and MC, CO 22. Row 1: k9, pm, k2, pm, k9, pm, k2. Row 2: Sll, p to 1 st before end, w&t. Row 3: k8, sm, kfb twice, sm, k9, sm, kfb, k to end. (25 sts 9/4/9/3) Row 4: Sll, p to 2 sts before end, w&t. Row 5: K7, SM, kfb, PB, k2, kfb, SM, k1, PB, k5, PB, k3, SM, kfb, PB, k2. (28 stS 9/6/9/4) Row 6: Sll, p to 3 sts before end, w&t. Row 7: K6, SM, kfb, k4, kfb, SM, k9, SM, kfb, k to end. (31 sts 9/8/9/5) Row 8: Sll, p to 4 sts before end, w&t. RoW 9: K4, PB, k1, SM, kfb, k4, PB, k2, kfb, SM, k3, PB, k5, PB, k1, SM, kfb, k2, PB, k2. (34 sts 9/10/9/6) Row 10: Sll, p to 5 sts before end, w&t. Row 11: K4, sM, kfb, k8, kfb, sM, k9, sM, kfb, k t0 end. (37 sts 9/12/9/7) Row 12: Sll, p to end. Break MC.
Rind
Join Cc. Rows 13-14: K all sts. Row 15: (remove markers as you come to them in this row) K20, w&t, k10, w&t, k9, w&t, k8, w&t, k7, w&t, k6, w&t, k to end. Break Cc. Leave the live sts on the needle.
Side Two
Remove provisional cast on and put the ss on another needle. There should be 21 sts from the cast on. Row 1: Using MC, sl1, k1, pm, k9, pm, k2, pm, k6, kfb, k1. (22 sts 2/9/2/9) Row 2-12 even: P to end. Row 3: Sl1, kfb, sm, k9, sm, kfb twice, sm, k8 (1 st on left hand needle), w&t. (25 sts 3/9/4/9) Row 5: SI1, k1, PB, kfb, SM, k3, PB, k5, PB, k1, SM, kfb, k2, PB, kfb, SM, k3, PB, k4 (2 sts on left hand needle), w&t. (28 sts 4/9/6/9) Row 7: SI1, k2, kfb, sM, k9, sM, kfb, k4, kfb, sm, k6 (3 sts on left hand needle), w&t. (31 sts 5/9/8/9) Row 9: SI1, k1, PB, k2, kfb, SM, k1, PB, k5, PB, k3, SM, kfb, PB, k5, PB, kfb, SM, k5 (4 sts on left hand needle), w&t. (34 sts 6/9/10/9) Row 11: Sl1, k4, kfb, sm, k9, sm, kfb, k8, kfb, sm, k5 (5 sts on left hand needle), w&t. (37 sts 7/9/12/9) After row 12 (purl row), break Mc and join CC.
Rind Side Two
Row 13-14: K all sts. Row 15: K27, w&t, k10, w&t, k10, w&t, k9, W&t, k8, w&t, k7, w&t, k6, w&t, k to end.
Finishing
Using a 3-needle bind-off, bind off all live CC sts from both needles. Weave in ends, using one of the Mc ends to close up the small hole at the toe. Push beads through to the right side if they are trying to pop onto the purl side. Bon Appetit!

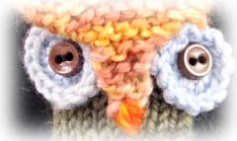
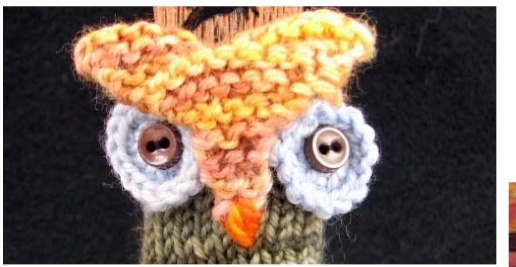
WEE TINY OWL SOCK

MATERIALS
PAGEWOOD FARMS ALYESKA MERINO/CASHMERE/NYLON mAIn COLOr (mC) OLIVE (GREEN) 10 YARDS CONTRAST COLOR (CC1) IndIan COrn (GOld) 6 YARDS THE SANGUINE GRYPHON BUGGA! MERINO/CASHMERE/NYLON CONTRAST COLOR (CC2) BOMBER WORM (LIGHT BLUE)3 YARDS CONTrAST COLOr (cC3) ORANGE ASSASSIN BUG (ORANGE) 1/2 YARD SET OF 4 US 2/2.75mM DPNs STITCH MARKER TAPESTRY NEEDLE 2 SMALL(1/4" / 65MM) BUTTONS SEWING NEEDLE AND THREAD A KNITTING PATTERN FOR THE WEE TINY SOCK CLUB SEPTEMBER2O11 BYMEGBAKEWELL IMAGES OF THE WISE OLD OWL ARE EVERYWHERE-IN BEATRIX POTTER'S "THE TALE OF SQUIRREL Nutkin" and A.A. MILNE'S HUNDRED ACRE WOOD, AT ATHENA's HAND AND MERLIN'S, TOO,DELIVERINGMAILAT HOGWARTS, AND EVEN COUNTINGTHELICKSTO GETTOTHECENTEROFA TOOTSIEPOP.WHOOOO WANTSTOKNITANOWL SoCK? I DO!
ABBREVIATIONS
K2TOG KNIT 2 TOGETHER. KFB KNIT INTO THE FRONT AND BACK OF THE NEXT ST. SL SLIP THE ST PURLWISE. SK2P SLIP 1 ST KNITWSIE, K2TOG, PASS THE SLIPPED ST OVER THE KNIT ST. SSK SLIP THE NEXT 2 STS InDIVIdUALly, KnITWISE, ThEn KnIt ThEm TOGETHER THROUGH THE BACK LOOPS.

PATTERNANDPHOTOSO2O11MEGBAKEWELL FOR PERSONALUSE ONLY
BEGIN PATTERN
UsinG Cc1, cO 2. ROws 1-2: K2. ROW 3:KFB, K1.(3 STs) ROwS 4-7: K3. ROWS 8-13: KFB, K TO END. (9 STS AFTER ROW 13) ROW 14: K2, W&T, K TO EnD. ROW 15: KFB, K2, W&T, K TO END. ROw 16: KFB, K4, W&T, K TO End. ROw 17: Ssk, k3, w&T, k to End. ROw 18: SSK, K1, W&T, K TO End. ROW 19: K9. ROWS 2O-24: REPEAT ROWS 14-18. ROw 25:K9. BREAK CC1. TURN WORK AROUND ASIFTO KNIT THE NEXT ROW, SO WORKING YARN IS ON THE RIGHT.PUSHTHE WORKTOLEFT SIDE OFTHE NEEDLE. ON THE SAME NEEDLE, CO 9 USING MC. ROw 26: K ACrOSS All 18 sTs uSInG mC. ROW 27: K18. THIS IS THE RIGHT SIDE OF THE WORK/OUTSIDE OFTHE SOCK.DIVIDE EVENLY AMONG 3 DPNS AND JOIN FOR KNITTING IN THEROUND.PLACEMARKER FOR BEGINNING OF ROUND. CONTINUE WITH MC KNITTING IN THEROUNDUNTILWORKMEASURES 1.5"/3.8Cm FROm MC CAST ON.
HEEL
SET UP: STARTING AT THE BEGINNING OF ROUND, KNIT 4 STS. ARRANGE THE NEXT 9 STS ON ONE NEEDLE,AND DIVIDE THE REST OFTHE STS BETWEEN NEEDLES 2 AND 3. BEGIN HEEL FLAP. ROW 1: SL1, K8. ROW 2: SL 1, P8. ROWS 3-8: REPEAT ROWS 2-3 THREE MORE TIMES. HEEL TURN: SL1, K5,W&T, P3,W&T, K3, PICK UP WRAP ON THE NEXT ST, & KNIT THE ST, WRAP, & NEXT ST TOGETHEr, W&T, P4, PICK UP The WRAP On ThE NEXT ST, ANd PUrL THE ST, ITS WRAP,& NEXT ST TOGETHER, W&T, K4,SLIP THE NEXT ST, PICK UPWRAP ON THE FOLLOWING ST, KNITTHE SLIPPED ST,THE WRAPPEDST&THEWRAPTOGETHER.
FOOT
HEELFLAPANDONEMOREINTHECORNERBETWEEN HEEL FLAP AND INSTEP STS.(6 STS INREMA TOTAL ALONG THE GUSSET EDGE) K ACROSS 9 INSTEP STS, CONSOLIDATING THESE ONTO ONE NEEDLE ASYOUGO. PICK UP & KNIT ONE STIN THE CORNER BETWEEN HEEL FLAP AND INSTEP STS AND5MORE ALONG THE EDGE OF THE HEELFLAP.

FOOT, CONTInUEd
PICKUPTHEWRAP ON THE FIRST HEELSTAND KNITITTOGETHERWITHTHESTITWRAPSAND THE NEXT ONE.K TWO MORE HEEL STS.THERE SHOULD BE 26 STS ON THE NEEDLES, DISTRIBUTED 8/9/9 ON NEEDLES 1/2/3. BOTTOM OF SOLE IS BEGINNING OF ROUND. ROUND 1:K5, K2TOG, K11, SSK, K6.(24 STs) ROUND 2 & REMAINING EVEN ROUNDS: K ALL STS. ROUNd 3:K4, K2TOG, K11,SSK, K5.(22 STs) ROUNd 5: K3, k2TOG, K11, SSK, K4. (2O sTs) ROUNd 7:K2, K2TOG, K11, SSK, K3.(18 STs) ROUNd 9:K1,K2TOG, K2,SSK, K3,K2TOG, K2, SSK, K2. (14 STS) ROUnd 11: K2TOG, K2, SsK, K1, k2TOG, K2, SsK, K1. (1O STS) ROUnd 13:K3, SK2P, K2, SK2p.(6 sTs) KnIT A FINAL EVEN ROUNd 14, ThEN BREAK MC ANDTHREADTHROUGHREMAINING6STS.
EYES (MAKE 2)
USING CC2, CAST ON 4 STS. SLIDE THESE 4 STS TO THE OPPOSITE END OFTHE NEEDLE,AND PULL WORKING YARN ACROSS THE BACK AS FOR ICORD. KFB 4 TImES. 8 STS ON THE NEEDLE. DIVIDESTSAMONG3NEEDLES.JOINFORKNITTING IN THE ROUND. ROUND 1: K ALL STS. ROUND 2: KFB EIGHTTIMES (16 STS) ROUND 3: K ALL STS. BIND OFF ALL STS.
FINISHING
WEAVE In All EndS. USInG SEWinG ThrEAD, ATTACH A SMALL BUTTON TO THE CENTER OF EACH KNITTEDEYE CIRCLE,ANDTHENATTACH THE EYE CIRCLE TO THE SOCK AS SHOWN.FOLD THECC1SECTIONDOWNASSHOWN TODOUBLE CHECK PLACEMENT OF THE EYE CIRCLES. IF THEREISA VISIBLE DEMARCATION ATTHE BEGINNING/ENDOFTHE ROUND ON THE EYE CIRCLE, YOU CAN HIDE IT BY PLACING IT WHEREIT WILL HIDDEN BY THE OVERLAPPING CC1 SECTION. FINALLY, FOLD OVER CC1 SECTION AS SHOWN IN THE PHOTO, AND USING 4-5STRAIGHTSTSWITHCC3,TACKITDOWN TO

According to a study of birth dates in the United States, the most common birthday in the country is October 5. Fall is definitely birthday season in my family, with three October and two September birthdays between me and my sister, brother, dad, and daughter. So this month, let us knit cake - four layers of fluffy pink buttercream nupps alternate with four layers of delicious vanilla seed stich cake. Four flaming candles are worked into the cast on. A happy birthday to you, and on the other 364 days of the year, a very merry unbirthday, too!
Materials
Lorna's Laces Shepherd Sock 80% Superwash Wool / 20% Nylon Main Color (MC): Magnificent Mile (vanilla), 12 yards Contrast Color (CC1): Lincoln Park Zoo (pink), 12 yards The Sanguine Gryphon Bugga! Merino/Cashmere/Nylon superwash Contrast Color (CC2): Orange Assassin Bug (orange), less than 1 yard Set of 4 US size 1 (2.25 mm) DPNs Tapestry needle Size D/3mm crochet hook (optional) pattern and photos ? 2011 Meg Bakewell for personal use only
Abroviations
K2tog Knit 2 together SSK Slip, slip, knit W&T Wrap and turn YO Yarn over Nupp Using crochet hook in place of the right hand needle, working very loosely, K1, YO, k1, YO, k1 all into the same st (5 loops on the crochet hook), YO crochet hook one more time and draw the YO through the 5 loops on the crochet hook. Slip the st from the crochet hook to the right hand needle. This method and another that does not require a crochet hook are demonstrated in this video: http:/ /bit.ly/blkJwT The four candles at the top of the sock are worked as you cast on. Using a knitted cast on and CC1, cast on 2. \*Drop CC1, but do not break it. Switch to MC and cast on 7 more. Drop MC but do not break it. Switch to CC2 and cast on 2 more. Continuing with CC2, bind off 1. (Bind off 1 = knit 2, pass the first over the second.) Break CC2. Switch back to MC, which is waiting where you left it, and bind off 7 more. (The second CC2 st and 6 MC sts are bound off. 1 MC st remains on the right hand needle now.) The next st on the left hand needle should be a CC1 stitch. Slip this st to the right hand needle, pass the last remaining MC st over the CC1 st, and slip the CC1 st back to the left needle. Do not break MC. Pick CC1 back up again, cast on 5 more sts, twisting CC1 and MC every other st so there are no long stands of MC across the back of the work.\* Repeat from \* to \* 3 more times, casting on only 3 more st: in CC1 at the end of the last repeat. (20 sts on the needle) Do not break MC - carry it on the inside of the work. MC will be used again in just a few rows. Knit 1 row in CC1. Join for knitting in the round. Round 1: Using CC1, k all sts. Round 2: (Sl 1, nupp) around. Round 3: K all sts. Round 4: Using MC, (sl1, k1) around. Round 5: (K1, P1) around. Round 6: (P1, K1) around. Rounds 7-9: Repeat round 5, 6, then 5 again. Rounds 10-18: Repeat rounds 1-9. Rounds 19-24: Repeat rounds 1-6.
Short Row Heel
Arrange next 9 sts on one needle for the heel. (K1, pl) four times, w&t, (P1, k1) three times, pl, w&t, (P1, k1) three times, w&t, (K1, p1) twice, kl, w&t, (K1, p1) twice, w&t, P1, kl, pl, w&t, P1, kl, w&t, K1, w&t, K1, pl, w&t, P1, kl, pl, w&t, (P1, k1) twice, w&t, (K1, p1) twice, kl,w&t, (K1, pl) three times, w&t, (P1, k1) three times, p1, w&t, P1, (K1, p1) nine times (working across heel flap sts plus 11 held sts).
Fot
Round 1: (P1, k1) around. Round 2: (K1, p1) around. Round 3-11: Repeat rounds 1-9 from leg portion. Round 12: (P1, k1) around. Round 13: (K1, p1) around.
Coe
Round 1: (P1, p2tog, [k1, p1] twice, p2tog, k1) twice. Round 2: (K1, p2tog, k1, p1, k2tog, p1) twice. Round 3: (P1, k2tog, p2tog, k1) twice. Round 4: (k2tog, p2tog) twice. Break MC and run through 4 remaining sts.
Finishing
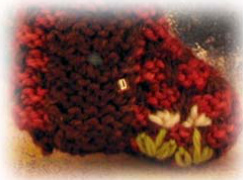
WeeThy Soex Cl% %g M Bakw管rr Dia de los Muertos or Day of the Dead is celebrated in Mexico and other parts of the world at the beginning of November. Families create altars (called ofrendas) and decorate them with marigolds and other bright flowers, candles and incense, and the favorite foods and drinks of loved ones who have passed away. These colorful altars are a way to celebrate, honor, and connect with the dead. Another tradition of Day of the Dead is the sugar skull or Calaveras de Azucar. Molded from sugar and decorated with colorful icing, foil, and flowers, the sugar skulls inspired this wee tiny sock. Marigold flowers are knit separately for the eyes. The nose and lopsided smile are made with yarn overs. I hope you'll knit with good memories in honor of your departed loved ones.
The Sanguine Gryphon Bugga! Merino/Cashmere/Nylon superwash
Main Color (MC): Bomber Worm/light blue, 12 yards Contrast Color (CC): Orange Assassin Bug/bright orange, 5 yards Tapestry needle pattern and photos 2011MegBakewell forpersonal use only Sugar skull pictured above is from http://dembones.etsy.com
EOR End of round
K2tog Knit 2 together SK2P Slip one st purlwise, k2tog, pass the slipped st over the k2tog SSK Slip, slip, knit W&T Wrap and turn YO Yarn over
Using MC, cast on 20. Distribute among 3 DPNS (10/5/5 sts on needles 1/2/3) and join for knitting in the round.
Rounds 1-5: (YO, k2tog) to end. Rounds 6-7: K all sts. Round 8: K2tog, YO, k5, YO, SSK, k to EOR. Rounds 9-10: K all sts. Round 11: K3, P3, K to EOR. Rounds 12-13: K3, sl1, k1, sl1, k to EOR. Round 14: K3, YO, Sk2p, YO, k to EOR. Rounds 15-16: K all sts. Round 17: K1, p8, k to EOR Round 18: (K2tog, YO) four times, k to EOR. Round 19: K all sts. Round 2o: (K2tog, YO) three times, k to EOR. Round 21: K1, p6, k to EOR. Rounds 22-24: K all sts.
ShW
Set-up: K15 (5 sts before EOR). This is the new beginning of round. Rearrange sts if desired (10/5/5 on needles 1/2/3). K9, W&T, P8, W&T, K7, W&T, P6, W&T, K5, W&T, P4, W&T, K3, W&T, P2, W&T, K3, W&T, P4, W&T, K5, W&T, P6, W&T, K7, W&T, p8, W&T, K to EOR.
Rounds 1-8: K all sts.
Round 9: (SSK, k6, k2tog) twice. (16 sts remain) Round 1o: K all sts. Round 11: (SSK, k4, k2tog) twice. (12 sts remain) Round 12: K all sts. Round 13: (SSK, k2, k2tog) twice. (8 sts remain) Break yarn leaving a 1o" tail. Graft the toe closed.

Using CC, cast on 5. Flowers are knit flat - do not join.
Row 1: K all sts. Row 2: P all sts. Bind off all sts using a one stitch picot bind-off as follows: Slip the st on the right needle to the left needle. \* Repeat from \* to \* until only one st remains. Repeat one more time, except you cannot do a cable caston with only one stitch, so use a knitted cast-on instead. Each repeat forms a tiny petal. The fifth petal will not line up quite the same as the others - use the cast on tail to stitch it into line. Then, fold the flower so that the first and fifth petals can be sewn together along their outside edges, purl side to the center, forming a round flower. Note: A good tutorial on the picot bind-off, including how to do the cable cast-on is available from Knitty: http://knitty.com/ISSUEfallo6/FEATfallo6TT.html
Weave in MC ends. Pull the bind-off and cast-on tails of one flower through a YO in the eye location. (Using a crochet hook makes it easy.) Pull the flower snugly toward the inside of the sock so the cast-on row pops through to the inside. Weave the CC ends in while at the same time running them through the cast-on row, thus securing the flower in place. Repeat for the second flower eye.

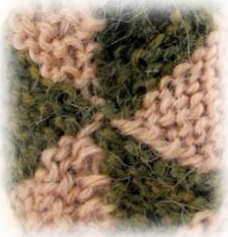
Wee Tiny Quilter's Sock
Aknittin8 pattem for the Wee Tiny Sock Club December 2011 by Meg Bakewell

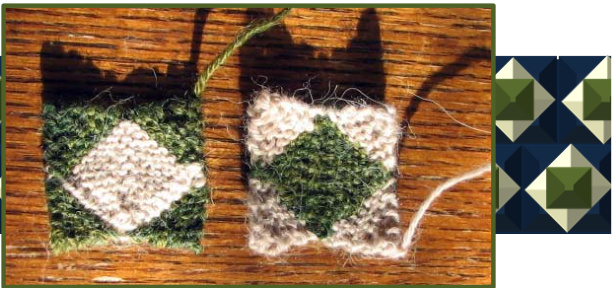
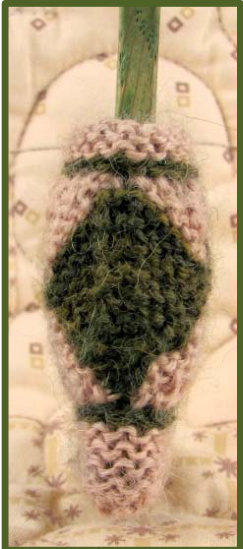
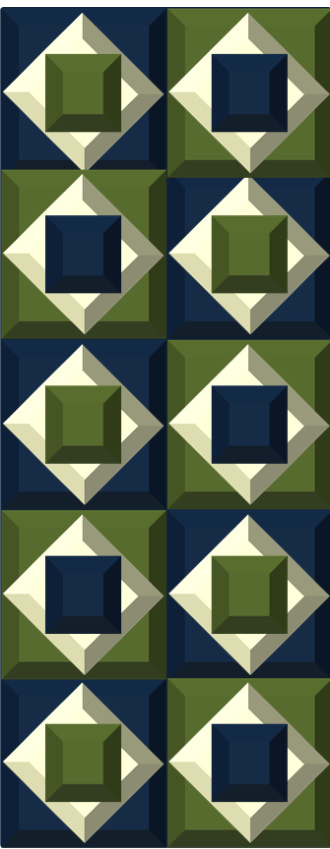
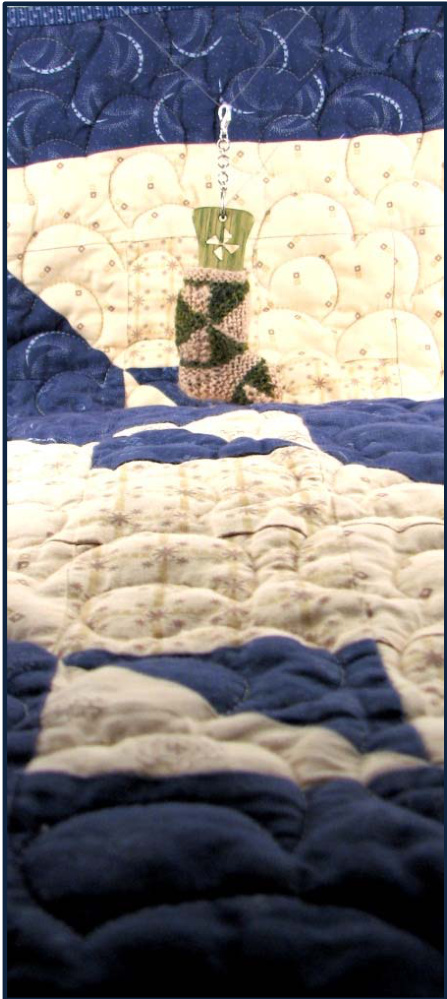
Most of us knitters have other crafts in our lives. Our needles may mingle with hooks and our yarn stashes may share space with paper stacks or fat quarters. This little sock is 100% good old knitted garter stitch, but takes a design cue from quilters. First, two“square -in-a-square" blocks are knit usin8 mitered square and modular knitting techniques. These are seamed together to form the leg of the sock. Then, stitches are picked up from the top to knit the cuffin the round, and from the bottom to knit the heel and foot. As with quilting, the arrangement of the blocks makes a big dlifference in the final appearance. When the seam is aligned with the side of the sock as shown, a pinwheel motif appears that doesn't exist in either of the individual squares.
Materials
Abbreviations
Misti Alpaca Tonos Carnaval Sock Yarn 50% Alpaca, 30% Merino, 10% Silk, 10% Nylon Main Color (MC) Sand Dune - 15 yards Contrast Color (CC) Rosemary Green - 10 yards K2to8 Knit 2 together. Kfb Knit into the front and back of the next st. PM Place marker S1 Slip the st purlwise. SM Slip marker SSK Slip the next 2 sts individually, knitwise, then knit them together through the back loops. W&t Wrap and turn. Set of 4 US 1/2.25mm DPNs Stitch marker Tapestry needle Gauge is about 8 sts/16rows = 1 inch

pattern and photos ? 2012 Meg Bakewell for personal use only
Begin Pattern
Using MC, cast on 3. Mitered Square: Row I: Kfb, PM, kfb, k1. (5 sts) Row 2 (RS): Sl1, k to end. Row 3 (WS): Sl1, K to 1 st before marker, kfb, SM, kfb, k to endl. (7 sts) Rows 4-13: Repeat rows 2-3 five more times. (17 sts after row 13)Break MC. First Triangle: Row 14: Using CC, k8. Knit into the next st, but do not drop the old st off the needle. There should be 9 CC sts and 9 MC sts on the needles. Rows 15-21 will be worked over the CC sts. You can leave the 9 MC sts on a separate needle to save them for later. Row 15-20: Sl1, k to 2 sts before the end, ssk.(3 sts remain after row20) Row 21: Sl 1, ssk. (2 sts) Row 22: Ssk. Break CC and fasten off remaining st. Second Triangle: Using CC, k across 9 held MC sts with RS facing. Then repeat Rows 15-22 to complete a second corner. Third Triangle: Using CC again, pick up 9 sts along one of the 2 remaining sides of the MC square. The slipped sts along the edge are easy to pick up. Make sure to pick up one st close to each corner so the CC triangle will span the entire side. With RS facing, knit these 9 sts. Repeat rows 15-22 again to form the third CC triangle. Fourth Triangle: Along the fourth and final side of the MC square, a8ain, pick up the 9 sts and complete the final CC triangle as for the third one. When breaking CC on this last triangle, leave a tail about 6-8 inches long which will be used to seam this square to the next one. Second square: Make another square like the one you just finished, but switching MC and CC throughout. Weave in all ends except the last two that were designated for seaming. Now you have 2 squares like the photo at the bottom of the first page. Finishing the leg: Hold the 2 squares WS together and seam along one side by running the yarn through the slipped sts on the sides, alternating between the two squares. Seam the opposite side, so you now have a tube. Weave in ends. Along one edge of the tube (doesn't matter which), using CC, pick up and knit 20 sts, 5 on each of four DPNs. Continuing in the round, purl one round. Break CC. Knit one round in MC. Purl one round, knit one more round, then bind off purlwise. Using CC, pick up and knit 20 sts on the opposite side of the tube, starting at the point where the seam is. Purl one round in CC. Switch to MC. Knit one round and purl one round.
Short Row Heel
K19, WT, K8, WT, K7, WT, K6, WT, K5, WT, K4, WT,K3, WT,K2,WT, K3, WT, K4, WT, K5, WT, K6, WT, K7, WT, K8, W&T, K9. (You should be at the end of round.) Foot Rounds 1, 3, 5, 7: P all sts. Round 2, 4, 6: K all sts. Round 8: Switch to CC (don't break MC). Knit all sts. Round 9: Purl all sts using CC. Note: Rounds 10-17 are worked in stranded colorwork. Even rounds are knit, odd rounds are purled. On purl rows, when switching colors, bring the unused color to the back. Bring it to the front again to purl each time. Round 10: (K4 CC, K1 MC) around. Round 11: (P4 CC, P1MC) around. Round 12: (K3 CC, K2 MC) around. Round 13: (P3 CC, P2 MC) around. Round 14: (K2 CC, K3 MC) around. Round 15: (P2 CC, P3 MC) around. Round 16: (K1CC, K4MC) around. Round 17: (P1CC, P4 MC) around. Break CC and continue in MC. Round 18: K2tog. (10 sts) Round 19. P all sts. Round 20: Repeat round 18.
Break MC, and thread through remaining 5 sts. Weave in all ends.
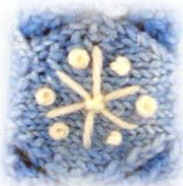
A knitting pattern for the Wee Tiny Sock Club January 2012 by Meg Bakewell
Ktee Tiny Snowflake SoCb
Revival by Steve Crow Snow is a mind falling, a continuous breath of climbs, loops, spirals, dips into the earth like white fireflies wanting to land, finding a wind between houses, diving like moths into their own light so that one wonders if snow is a wing's long memory across winter. Snowball by Shel Silverstein I made myself a snow ball as perfect as could be. Ithought I'd keep it as a pet and let it sleep with me. I made it some pajamas and a pillow for it's head. Then, last night it ran away. But first -- it wet the bed.
Abbreviations
K2tog Knit 2 together. Kfb Knit into the front and back of the next st. SSK Slip the next 2 sts individually, knitwise, then knit them together through the back loops. EOR End of round
pattern & photos 2012 Meg Bakewell for personal use only
Materials
Spinning Fates Aurora 75% SW Merino wool, 20% Nylon, 5% Stellina MC: Winter Wishes (bright blue), about 25 yards CC1: Frozen Pond (pale blue), about 10 yards CC2: white fingering weight yarn, optional, a couple yards Set of 4 US 1/2.25mm DPNs or long circular for magic loop. Tapestry needle
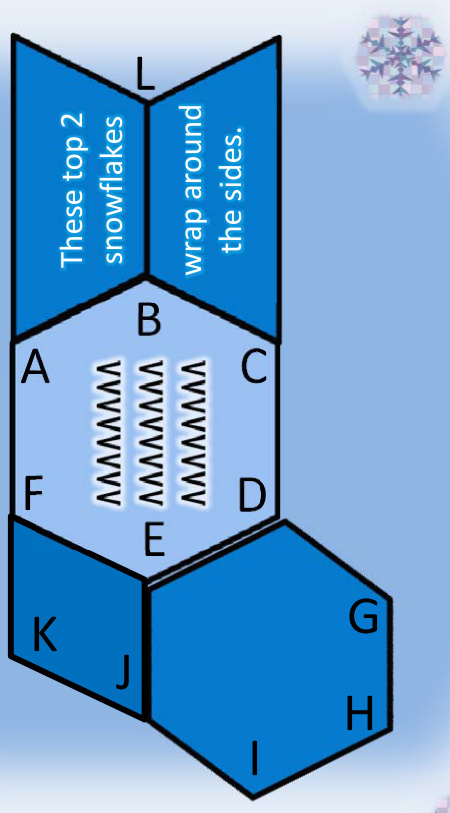
1. Snowflabes Make 4 in MC, 2 in CC1.
Using Judy's Magic Cast On, cast on 12 sts (6 on each of 2 needles). Arrange sts 6/3/3 on 3 DPNs or 6/6 for magic loop Round I: K all sts. Round 2: Kfb, k to 2 sts before end of needle 1, kfb, kl, kfb, kto 2 sts before EOR, kfb, kl. (16 sts) Rounds 3-8: Repeat rounds 1-2 three more times.(28 sts after round 8) Round 9: K all sts. Round 10: Ssk, kto last 2 sts of needle 1, k2tog, ssk, k to 2 sts before EOR, k2tog. Rounds 11-16: Repeat round 9-10 three more times. (12 sts after round 16) Graft the hexagon closed and hide the tail inside.
3. Assembly
If desired, embroider a snowflake on one or more of the hexagons before assembling using CC2 (see photo). Cut a short piece of yarn, about 5" long. Thread it on a tapestry needle and use it to tie the two CCl hexagons together at corner A. Be sure to go through a couple strands on each hexagon. Note the direction of the knitting as indicated by the “V's" on the diagram and as seen in photo. Tie a square knot and leave the ends for now. Repeat for these two hexes at corners C, D, and F. Next, tie on the toe hexagons at corners D and E. You can use the yarn tails at corner D for both front and back of the toe, but for corner E you will need to use two more pieces, one for the front and one for the back. Next, Tie the toe hexes to each other at G, H, and I. Continue assembly as indicated by letters in the diagram. When done, hide all yarn tails inside the hexagons.
2. Parallelograms Make 2 in MC.
Cast on and complete Round I as for Snowflakes. Round 2: Kfb, kto 2 sts before end of first needle, k2tog, ssk, k to 2 sts before the end of round, kfb, kl. Rounds 3-8: Repeat rounds 1-2 three more times. Note:You will always have 12 sts at the end of each round. If you are using DPNs, you will need to adjust the sts on needles 2 and 3 by knitting one st from needle 3 ontoneedle 2after thessk decrease in evenrounds in order to maintain the proper 6/3/3 distribution of sts. Graft the parallelogram closed and hide the tail inside.
Malerials
Squoosh Fiberarts MCN Sock 80% Merino/10% Cashmere /10% Nylon MC: Stout (dark brown) \~15 yards P. CC: Copper Rose (brick red) ~ II yards P Small amounts of green and white for embroidery P1 Small piece of pale blue felt (\~1/4" x I" or 0.6cm x 2.5cm) One small gold bead (6mm) SS I stitch marker SS Gauge is 10 sts and 20 rows = I" (2.5cm) in brick pattern st Two size US1/2.25mm DPNs or size to obtain gauge, or a circular needle. Note: Although the sock is knit flat, straight needles will not work because the pattern requires being able to knit from both ends of the needle. Y pattern ? 2012 Meg Bakewell for personal use only
Pbbrerialions
Knit one through the back loop Knit 2 together Knit into the front and back of the next st Lift bar - insert right hand needle from back to front into the strand running between the two sts in the row below, like a make one. Purl one through the back loop Purl2 together Pass Bar Over - slip the lifted bar over the intervening sts and off the needle. Slip, Slip, Knit - slip each of the next two sts knitwise, then knit them together through the back loop. Slip, Slip, Purl - slip each of the next two sts knitwise onto the right hand needle, then pass them back to the left handle needle without changing their orientation on the needle. Purl these two sts together through the back loop. Yarn over In the main part of the sock, you must carry the working yarn across the wrong side of the work when slipping sts. You don't need to do anything special if you are knitting on a right side row or purling on a wrong side row. If you are knitting on a wrong side row, bring yarn to the front/WS , slip the st, then bring yarn to the back/RS to continue knitting. This is written YF, slI, YB in the pattern. If you are purling on a right side row, bring the yarn to the back/WS, slip the st, and bring the yarn to the front/RS to continue purling. This is written YB, slI, YF.
Begin patlern Using MC, cast on 34. Row I: (RS) K17, pm, k to end. Row 2: PI, pfb, pI3, pfb, pI, SM, pI, pfb, pI3, pfb, pl. (38 sts) Note: Up to row 45, when switching betwen MC and CC, do not break the old color yarn. It's never more than 3 rows before you come back to it, so it can just be carred up the edge. Note: As you work the CC rows, the slipped sts are always MC sts (except where the first st of the row is sliped).This is easyto seein the chart, andmakes it simple as you knit to know if you are on track with the pattern. Row 3: Switch to CC1. KI, kfb, (slI, k3) three times, slI, k2, kfb, kI, SM, kI, kfb, k2, (slI, k3) three times,sll,kfb, k1. (42 sts) Reminder: in row 4, you are knitting on aWS row, so you need to remember to carry the yarn on the wrong side when slipping sts. See abbreviations for more details. Row 4: SI1, k2, (YF, slI, YB, k3) four times, k2, remove marker, YO, k5, (YF, sllI, YB, k3) four times. (43 sts) Row 5: SI1, p2, (YB, sll, YF, p3) four times, p2, pItbl (this is the YO st from row 4), p5, (YB, sll, YF, p3) four times. Note: When you switch to MC from here through row 45, MC will be at the opposite end of the work from where the previous row finished up. Push the sts to the other end of your DPN or circular needle so that you can pick up working with MC where it is. On the chart, the arrows next to each row indicate the direction of work. Row 6: Switch to MC. K all sts. Row 7: Switch to CC. P5, (slI, p3) nine times, p2. Row 8: SIlI, p4, (slI, p3) nine times, p2. Row 9: SI1, k4, (slI, k3) nine times, k2. Row IO: Switch to MC. P all sts. Row II: Switch to CC. KI, sk, k4, (sll, k3) eight times, k1, k2tog, k1. (41 sts) Row I2: S11, k2tog, k3, (YF, slI, YB, k3) eight times, k2tog, k1. (39 sts) Row I3:S,pog, ,YB, sl,Y,p en tme, YB sl,Y, p, . (37 sts) Row I4: Switch to MC. K all sts. Row 15: Switch to CC. PI, p2tog, p3, (slI, p3) seven times, ssp, pI. (35 sts) Row I16: SlI, p2tog, p2, (slI,p3) sixtimes, sl1, p2, p2tog, pl. (3 sts) Row I7:S, ktog, k, (sll, k3) six times, slI, kl, k2tog, k1.(3I sts) Row I8: Switch to MC. P all sts. Row I9: Switch to CC. KI, ssk, k2, (sll1, k3) five times, slI, k2, k2tog, k1. (29 sts) Row 20: Sl1, k2tog, k1, (YF,sllI, YB, k3) five times, YF, slI, YB, kI, k2tog, kI. (27 sts) Row 21: S1I, p2tog, (YB, slI, YF, p3) five times, YB, slI, YF, p2tog, p1. (25 sts) Row 22: Switch to MC. K all sts. Row 23: Switch to CC. P4, (slI, p3) five times, pI. Row 24: SIlI, p3, (slI, p3) five times, pI. Row 25: (Sl1, k3) six times, k1. Row 26: Switch to MC. P all sts. Row 27: Switch to CC. K2, (sll, k3) five times, slI, k2. Row 28: Sl1, kI, (YF, slI, YB, k3) five times, YF, slI, YB, k2. Row 29: SlI, pI, (YB, slI, YF, p3) five times, YB, slI, YF, p2. Rows 30-45: Repeat rows 22-29 two more times. Break MC. Rows 46, 48, 50: S11, (kItbl, p1) to end. Rows 47 and 49: Sl1, (pI, kI) to end. Break CC. Row 5I: With WS facing and using MC, kI2, pm, kI3. Row 52: (turning row) K all sts. Note: Because the roof/cuff will be folded over when the house/sock is complete, from this point forward, the right side of the work switches - what was the wrong side is now the right side. Odd rows are right side and even rows are wrong side. Row 53, 55, 57, 59: (New RS) Kfb, k to I st before the marker, kfb, sm, kfb, k to 2 sts before end, kfb, k1. (29 sts) Row 54: P2, (LB, p2, PBO, p2) three times, pI, sm, p3, (LB, p2, PBO, p2) two times, LB, p2, PBO, pI. Row 56: PI, (LB, p2, PBO, p2) four times, sm, p2, (LB, p2, PBO, p2) three times, p2. Row 58: P4, (LB, p2, PBO, p2) eight times, pI. (Slip the marker when you come to it.) Row 60: P3, (LB, p2, PBO, p2) four times, LB, p2, PBO, remove marker, p4, (LB, p2, PBO, p2) four times. Row 6I: (KItbl, p1), kItbl. Row 62: (P1, kItbl), pI. Row 63: Repeat row 61. Bind off purlwise and leave a 20" / 50cm tail for seaming.
Door
Using MC and leaving about I2" /30cm extra tail for sewing door onto sock, cast on 5. Knit all rows (garter st) until work measures 5/8" (1.6cm). Next row: K3, kI, pass previous st over (binding off one st), k1. Next row: KI, kItbl, yo, kItbl, kI. Next row: KI, kItbl, kI, kItbl kI. Continue knitting until work measures I-1 /8" (2.9cm). Bind off leaving about I0" /25cm tail.
Ginishing
Weave tail toward the yarn over “window" in the door. Whip stitch around the edges of the window and weave in the end. Sew the gold bead to the door in the location for a door knob. Cut the blue felt to size so that it can be placed behind the door and the edges do not show. With the felt between the door and the sock, sew the door in place on the right side of the sock. Align the bottom of the door with the bottom of the first CC row on the sock. In other words, the first two MC rows extend below the door. Embroider two flowers next to the door (see photo). I used straight sts for the flowers and stems, and lazy daisy stitch for the leaves. Weave in all ends except the bind off tail from the roof. Using the bind off tail from the roof, seam the sock. Use mattres st. Beginning with the roof area, you will stitch with wrong sides of the roof together. When you reach the brick portion, turn the roof inside out so that you can continue stitching with the wrong sides of the brick portion together. Weave in ends and cuff over roof. Home sweet home!

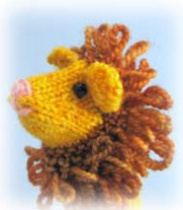
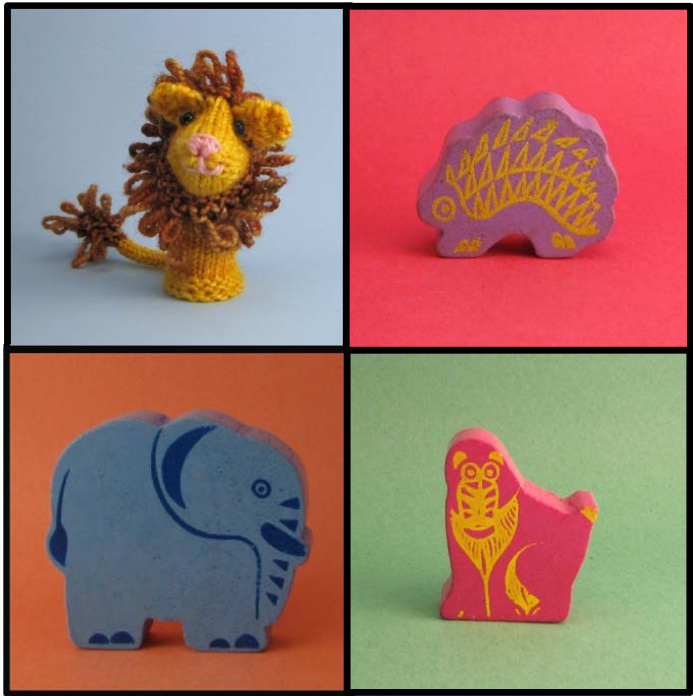
Thislionisa littel-ut nt atallferouselos sus anwillwers, nittianemrieytt an chocolate cakeTheeeTinySheeg isRisFF,antogetherthey are gening a cafe Bakery featuring cake an tea,lots f comy ol armchairs, anagueget show for chilren onunayafterneons. thinkit willBe aRit!
materials
adelinetosh Tosh Sock fO% 0merine main color (0mC): Chamomile, about f yards Contrast color (CC): Ginger, about f2 yards About f inches of gink fingering weight yarn for nese Two black size & teads for eyes f bit of brown or Black sewing threa8 to attach beads et ef2 U size f (2.25 mm) D%s Tapestry needle for weaving in ends Sewing needle for sewing on beads
Abbreviations
K&tog Knit & together P&tog Ourl 2 together g1 Slip the st. purlwise unless otherwise indicated Sligthe next 2 sts individually knitwise, then knit them together though the back loops. JBI Through the backh loog. Jurn work. @eTCrag and turn On a knit row: Bring the working yarn to the front, slig the next st purlwise, bring the yarn to the back again, turn work, slip the first st purlwise. On a gurl row: Bring the workingyarn to the back,slijg the next st purlwise, bring the yarn to the front again. turn work, slip the first st purlwise.
Begin Oattern: Tail
Using CC, cast on 5. Begin working as for i-cord. Round 1: K all sts. Round 2: Work all sts in loop st. (See notes) Round 3-4: Repeat rounds 1-2. Round 5: K4, k2tog. (4 sts remain) Break CC, join MC. Round 6: Continuing as for i-cord, k all sts. Continue knitting all sts in i-cord until work measures 2" from cast on, about 15 rows in MC.
Body
Bring yarn across the back as for i-cord and cast on 16 more sts to the right of the tail. (20 sts) Knit one row flat. Join for knitting in the round, being careful not to twist. Round 1: P all sts. Round 2: K all sts. Round 3: P all sts. Round 4: K all sts. Continue knitting all sts in the round until work measures 1.25 inches from Body section cast on, about 14 rounds from round 4. Knit 3 sts of the next round. Rearrange sts so the next 6 sts are on Needle 1, the following 4 sts are on Needle 2, and the remaining 10 sts are on Needle 3. Tail should be centered on Needle 3. Break MC. Join CC.

mane
Round 1: K4, k2tog, k8, k2tog, k4. (18 sts remain) Round 2: Work all sts in loop st. Round 3: K all sts. Round 4: Work all sts in loop st.
eel Flap eel Turn
Rearrange sts so that the last 9 sts of round 14 are on one needle. These 9 sts will be used for the heel flap. Divide the other 9 sts between 2 additional needles. Turn work so you are ready to work across the heel flap sts. Row 1: Sl 1, p 8. Row 2: Sl 1, work next 7 sts as for row 2 of leg, k1. Rows 3-6: Repeat rows 1-2 two more times. Row 7: Repeat row 1. Row 8: Sl 1, work 6 sts in loop st, W&T. Row 9: P5, W&T. Row 10: Work 4 sts in loop st, p3.
Gusset
Pick up and knit 4 sts along edge of heel flap, k9, pick up and knit 4 sts along the other side of the heel flap, k4. This is the bottom of the heel and the new beginning of round. Rearrange sts so there are 9 on needle 1, 9 on needle 2, and 8 on needle 3.
Gusset, continued
Bars (make 2)
Round 1: Purl all sts. Break CC yarn and switch back to MC. Round 2: K all sts. Round 3: K to last 3 sts of needle 1, k2tog, k11, SSK, k to end of round. Rounds 4-9: Repeat rounds 2-3 three more times. (18 sts remain after round 9) Round 10: K all sts. Round 11: K to last 2 sts of needle 1, k2tog, ssk, k to last 2 sts of needle 2, k2tog, ssk, k to end of round. (14 sts remain) Round 12: K all sts. Rounds 13-14: Repeat round 11. (6 sts remain after round 14) Break yarn and thread through remaining 6 sts. Using CC and leaving a 6-8" tail to sew ear to head, cast on 5. Row 1: K all sts. Rows 2-4: Sl 1, k4. Row 5: Sl 1, k2tog, k2. Row 6: Sl 1, k2tog, k1. Row 7: Sl 1, k1, pass the slipped st over the knit st, bind off remaining sts.
Finishing
Weave in bind off tail of ears toward the center of the ears to make a nice rounded edge. The cast on edge is the side of the ear that will be sewn to the head. Sew the cast on edge of the ear to the head at the interface between MC and CC, using photo as a guide to placement. Be careful not to sew the sock shut while you are doing this! Repeat for the other ear. Sew a bead just in front of each ear for eyes. Optionally, embroider a nose (inverted triangle, pink) and mouth on the toe of the sock. Weave in remaining ends. \*Purl into the front of the first st, then, without dropping it off the needle, make a loop (see Note 1 below), and purl into the back leg of the st, then drop the st off the left hand needle. Insert the left needle into the back of the 2 sts just created, purl them together (p2tog, see Note 2 below).\* Repeat from \* to \*
hotes about the oog Stitch
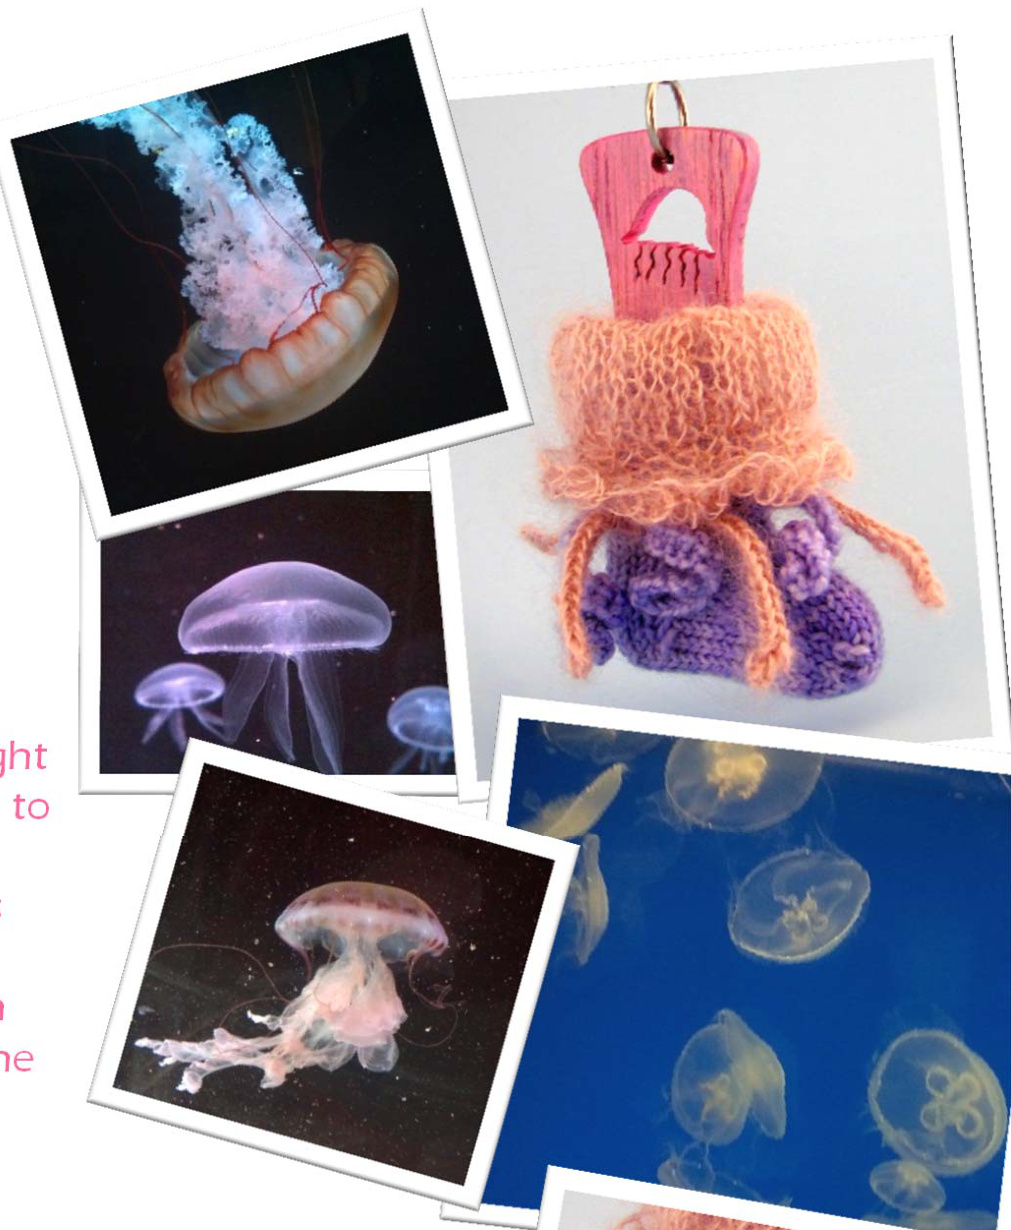
Note 1: In round 2 of the loopy stitch used for the body of the sheep, you will purl into the front and then the back leg of each st. Between these two purls, you need to “"make a loop". There are at least a couple different ways to do it. I'm a thrower, so for me, holding the yarn in my right hand, it's comfortable to wrap the yarn under my left thumb, and then back up over the top of my thumb to the left-hand needle to form the second purl st. It also works to simply form a loop of yarn, hold it down with your thumb, and then make the second purl st. You may find a different technique that works for your style of knitting. In any case, your loops should be about %" long. The kit includes a generous amount of yarn, but if your loops are too loopy, it may not be enough! @ Note 2: Purling the 2 sts together locks the extra loop in place so it won't be pulled out, so until the p2tog is complete, be careful not to pull too hard on the sts. You may (or may not!) find it helpful to hold the loop with your thumb until the p2tog is done. When the p2tog is done, you can give the loop a quick tug to tighten it up. The tightened loop should be about %2 inch long. Another way to tighten the loops is to insert a tapestry needle in the loop and pull out. I prefer to tighten each loop as I go along, but you could also wait ‘til the end of a needle or a round and do them all at once. Fragile Ephemeral Graceful Deadly Transparent Colorful Ancient Mesmerizing Delicate Mysterious Lace weight mohair and fingering weight wool combine to capture the delicate ruffles and waving tentacles of an amazing marine creature. MC: ShibuiKnits SockYarn in Periwinkle, 15yards CC: ShibuiKnits Silk Cloud in Blush, 17 yards
set of four US size 3 DPNs, preferably made of wood or other lightweight material set of five US size 1 DPNs 1 stitch marker KZtog: Knit 2 together Kfb: Knit into the front and back of the st PZtog: Purl 2 together Sl: Slip the st purlwise SSK: Slip, slip, knit TW: Turn work YO: Yarn over Pattern and images @ Meg Bakewell For personal use only
PATTARI
Using larger needles and CC, cast on 48. Arrange 24/12/12 on Needles 1/2/3 and join for knitting in the round without twisting. Round 1: K all sts. Round 2: (K1, k2tog) around. (32 sts remain) Round 3: K all sts. Round 4: K2tog around. (16 sts remain) Rounds 5-6: (K1, p1) around. Round 7: (Kfb, k1) around. (24 sts) Round 8: K all sts. Round 9: (Kfb, k1) around. (36 sts) Round 10-12: K all sts. Round 13: (K4, YO, k2tog, k3) four times. Round 14: K all sts. Round 15: Repeat round 13. Round 16: (K2, ssk, k1, k2tog, k2) four times. (28 sts) Round 17: (K2, sl1, k2tog, pass the slipped st over, k2) four times (20 sts, arranged 10/5/5 on needles 1/2/3) Round 18: K all sts. Round 19: P all sts. Break CC. Turn the work inside out by pushing the sock through the needles. Purl side should be outward. Switch to MC, and Switch to the smaller needles at this point, using size 1 for the right hand needle and replacing all the larger needles by the time you complete the first MC round. Begin working in the opposite direction you were going relative to the work, so you are starting with the former needle 1, which has 5 sts on it. Round 1: K all sts. Rounds 2-4: (K1, p1) around. Round 5: K all sts. Continue knitting in the round until the MC portion measures 1", \~10-12 rounds. Curly tentacle round: Cast on 20 sts at the start of needle 1 at the start of the next round. Immediately bind off these 20 sts, and k4 (The first of the 4 is the first st that was originally on the needle, and the last of the 20 cast on sts is bound off by slipping it over the first of the four knit sts - in other words, you will have 4 sts on your right hand needle at this point.) Start with a new free needle - cast on 20, bind off 20, k4. Slip the four sts on the right hand needle to the first needle. Start with a new free needle - cast on 20, bind off 20, k4. Start with a new free needle - cast on 20, bind off 20, k4. Slip the four sts on the right hand needle to the second needle. Start with a new free needle - cast on 20, bind off 20, k4. You should have reached the end of round now, and sts are distributed 8/8/4 on needles 1/2/3. K 3 rounds.
HeeL PLap ANDTURI
Rearrange next 10 sts on Needle 1, and the remaining 10 sts 5 each on needles 2 and 3. Heel flap will be worked in rows on needle 1. Row 1: Sl 1, k 9. Row 2: Sl1, p9. Rows 3-9: Repeat rows 1-2, ending with row 1. Row 10: Sl1, p5, p2tog, p1, tw. Row 11: Sl1, k3, k2tog, k1, tw. Row 12: Sl1, p4, p2tog, tw. Row 13: Sl1, k4, k2tog.
CUSSATT AND POOT
Continuing with Needle 1, pick up and knit 6 sts along edge of heel flap. Using needle2, k10 sts across instep. With Needle 3, pick up and knit 6 sts along other edge of the heel flap, and knit 3 sts from needle 1 onto needle 3. You are at the center of the sole and new beginning of round. Round 1: K to last 2 sts of needle 1, k2tog, k10, ssk, k to end of round. Round 2: K all sts. Round 3-8: Repeat rounds 1-2 three more times. Rounds 9-12: K all sts. Round 13: K to last 2 sts of needle 1, k2tog, ssk, k to last 2 sts of needle 2, k2tog, ssk, k to end of round. Round 14: K all sts. Rounds 15-16: Repeat Round 13. (8 sts remain after round 16). K 2 sts from needle 1 onto needle 3. 4 sts on each of 2 needles, graft the toe closed.

Between 2 of the curly tentacles, pick up 2 sts using size 1 needles. With two strands of CC held together, knit these two picked up sts and continue in i-cord until the icord measures about 1.25". K2tog, break CC and fasten off. Repeat four more times, in between each pair of curly tentacles. The curly tentacles may need slight encouragement to curly - simply twist them gently in the clockwise direction and they will form spiral curls. Weave in ends. Fold cap of the jelly fish over like a cuff, so the ruffle/cast on edge rests just over the tentacle round. SWIm, JELLgPISH! As an undergrad at the University of Michigan, I went to a concert at Hill Auditorium. I don't remember what band was playing, but one moment from that evening is with me still. Searching for my balcony seat, I glanced down at the stage, with its robin-egg blue ceiling and coppery organ pipes gleaming. A memory from a decade earlier flooded my mind, of the day my dad graduated with his PhD, and my mom and I watched from the balcony as he walked across the very go may same stage below me. Until the concert at Hill, that graduation memory was a mere fragment, with no mooring to a familiar place, no attachment to daily life, but from that day forward, I held the memory close. In college, I was studying biology, and planning my own path to a PhD. Life being what it is, fifteen years rushed by - work, marriage, kids - before I found my way to grad school, working in a lab right across the street from Hill. Each April, I watched from the lab window as the new PhDs streamed out of Hill, their colorful hoods shimmering in the sun like butterfly wings. I remembered my dad's big day and prayed that I'd make it through to mine. It was a tough path, hard in ways I could never have imagined at eight or eighteen, but that memory helped me keep going. When I finally took the walk across that stage at Hill, the sweetest part was knowing that my husband and children, and my dad, were all up in the balcony, making memories. ale, isaisewstahtgI Bated at ArmArbor,fficlig you the joy of hard-earned success, shared with people you love.
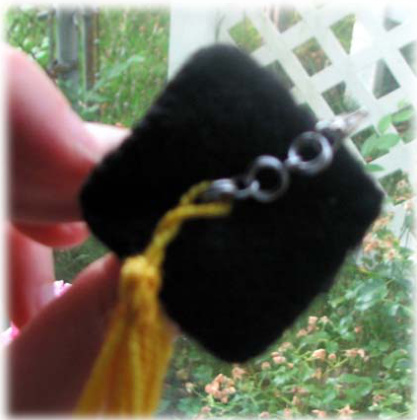
The Mee Timp Branuation Sork
a knitting pattern for a mee felted sotk and matching hat designed and mritten bp Mleg Bakemell im rerognition of the exrellent knitters of the Wee Tinp Sotk Club Requiring tmenty pards AlC, Knitirks Nalette in blark and fine pards CC1, Aluenth Touth Ale in hlark and one pard CC2, Tosh Sork in hright goln; Worked using a set of four G& si3e 3 Mouble ointed Aeedles at a Bauge of six stitches and nine roms per inch in stockinette using fAlC; And benefitting greatlp from the assistanre of one stitch marker. Mated at lpmouth, AHlichigan, this Spring tmo thousand and tmelne.

Begin pattern
Using CC1, cast on 18 and join for knitting in the round without twisting. Round 1: Continuing with CC1, p all sts. Rounds 2-4: Using MC, k all sts. Note: Do not break CC, just carry it along on the inside of the work. Round 5: Switch to CC1. K all sts. Round 6: P all sts. Rounds 7-11: Repeat rounds 2-6 one more time. Break CC1 after round 11. Rounds 12-14: Using MC, k all sts.
Jeel Jflap and Turn
Arrange sts so that the next 9 sts are on one needle (Needle 1), and the remaining 9 sts are on another needle (Needle 2). Heel flap will be worked back and forth in rows on the 9 sts on Needle 1. Row 1: S1 1, k8. Row 2: S1 1, p8. Rows 3-11: Repeats rows 1-2, ending with a knit row. Row 12: Sl 1, p4, p2tog, p1, tw. Row 13: Sl 1, k2, ssk, k1, tw. Row 14: Sl 1, p3, p2tog. (You should be at the end of the row.) Row 15: Sl 1, k3, ssk. (You should be at the end of the row. 5 sts remain on Needle 1.)
Busset
Continuing with Needle 1, pick up and knit 6 sts along the edge of the heel flap. Knit the 9 sts on needle 2. With another needle (Needle 3), pick up and knit 6 sts along the other edge of the heel flap, and knit 2 sts from Needle 1. You are at the center of the sole, and the new beginning of the round. 26 sts total, arranged 9/9/8 on Needles 1/2/3. Round 1: K to last 3 sts on Needle 1, k2tog, k1, k 9 sts on Needle 2, k1, ssk, k to end of Needle 3. (24 sts remain after Round 1) Rounds 2-4: Repeat round 1 three more times. (18 sts remain after round 4) Round 5: K2, k2tog, k2, ssk, k3, k2tog, k2, ssk, k1. (14 sts remain, arranged 4/7/3 on Needles 1/2/3) Rounds 6-10: K all sts. Round 11: K1, k2tog, k2, ssk, k1, k2tog, k2, ssk. (10 sts remain, arranged 3/5/2 on Needles 1/2/3) Round 12: K2tog, k2, skpo, k2, ssk. Note: The final ssk requires using one st fromNeedle1.
finishing
Knit the last st from Needle 1 onto Needle 3. You should now have 3 sts on Needle 2 and 3 sts on Needle 2. Graft these together. Weave in ends.
at
Using MC, cast on 3. Row 1 (RS): Kfb, PM, kfb, k1. (5 sts) Row 2 and all even rows (WS): K all sts. Note: I find it helpful to put a marker of some kind on the wrong side, like a reclosable stitch marker or a safety pin or a little piece of contrasting yarn, so I can easily see which rows are the “just knit" rows. Even though the rows are short, odds are one of my kids has asked me a question or I had to let the dog out or the phone rang or...well, you get the picture, so I've already forgotten what I just did before I get to the next row, and especially with black yarn it's harder for me to seethoselittleKFBs. Row 3: K to 1 st before marker, kfb, sm, kfb, k to end. Rows 4-17: Repeat rows 2-3 seven more times. (21 sts after Row 17) Bind off all sts. You should have a mitered square approximately 2’”’ across. Note the diagonal line running across the square. Pick up 7 sts just to the side of the diagonal on one dpn, centered within the diagonal. This is fairly easy to do if you look for the raised “purl bumps” along the diagonal - you can pretty much slide your needle right under them. Pick up 7 sts on another needle on the other side of the diagonal. Now you have 7 sts on each of two needles and both needles are parallel to the diagonal line of increases on your square. Divide the sts on one of the needles between 2 needles, s0 you have 7/4/3 sts on Needles 1/2/3. Begin knitting in the round with MC. Round 1: K all sts. Round 2: (Kfb, k4, kfb, k1) twice. (18 sts) Rounds 3-5: K all sts. Rounds 6-7: (K1, p1) around. Bind off all sts. Weave in ends.
Jfelting
Throw the hat and the sock in the washer with a load of laundry, using a hot wash temperature and a cold rinse. The black yarn may lose a bit of dye, so don't put them in with your snowy whites. For me, one normal wash brought the sock down to the right size for the blocker - it loses about 30% if its size. Your results may vary - you can try checking half way through the wash if you have a top loader, or setting it for a short wash if you have a front loader. Run it through again if need be to get it down to the right size for the blocker.
Blocking
Put the sock on the blocker and smooth out any wrinkled introduced in the washer. To block the hat, pin it top side down on a foam blocking board, a corkboard or even a taut pillow or mattress, squaring up the shape and flattening the top. Let it dry. Cut a small hole in the top center of the hat - you can slip one blade of a sharp pair of scissors into the cap portion of the hat and out through the top, creating a hole just large enough to slip the chain of the blocker through so you can pull the hat down on the top of the blocker. When the wool is well felted, there is no concern about unraveling when you cut a hole.
Tassel
Thread one end of the CC2 yarn on a tapestry needle. Leaing a tail of about 10", wrap the CC2 yarn ten times around two fingers held together. Break CC2. Slip the loops off your fingers and pinch them so they stay aligned and in place. About 14 from the end the loops, wrap the tail yarn tightly around the loops about 6-8 times. Bring the needle through the wrapped section from bottom to top (the needle is traveling parallel to the finger loops, and through the middle of the tight wraps. Pull tight and bring it through the tight wraps bottom to top once more. To create a hanging loop at the top of the tassel, bring the tail yarn back down through the tight wraps from the top, leaving a 3%4" loop at the top. Bring the needle through the tight wraps from top to bottom once more, tightly to secure the loop. You can run the needle back and forth through the wrap portion a couple more times to secure the tail if need be. Finally, cut open the loops at the bottom of the tassel and trim the ends to make them even. Attach the tassel to the hat by simply slipping it over the chain, or if preferred, stitch the hanging loop to the top center of the hat using MC yarn.


