Bricolage
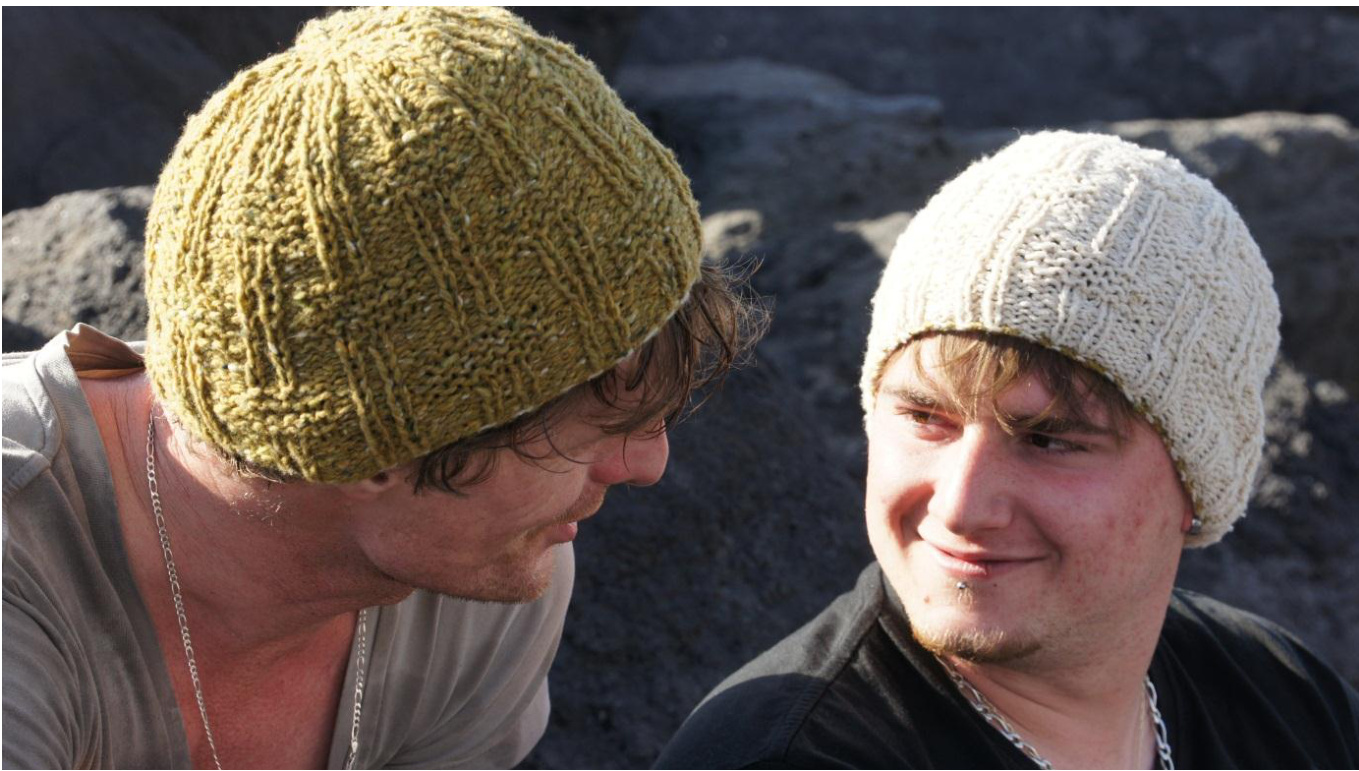
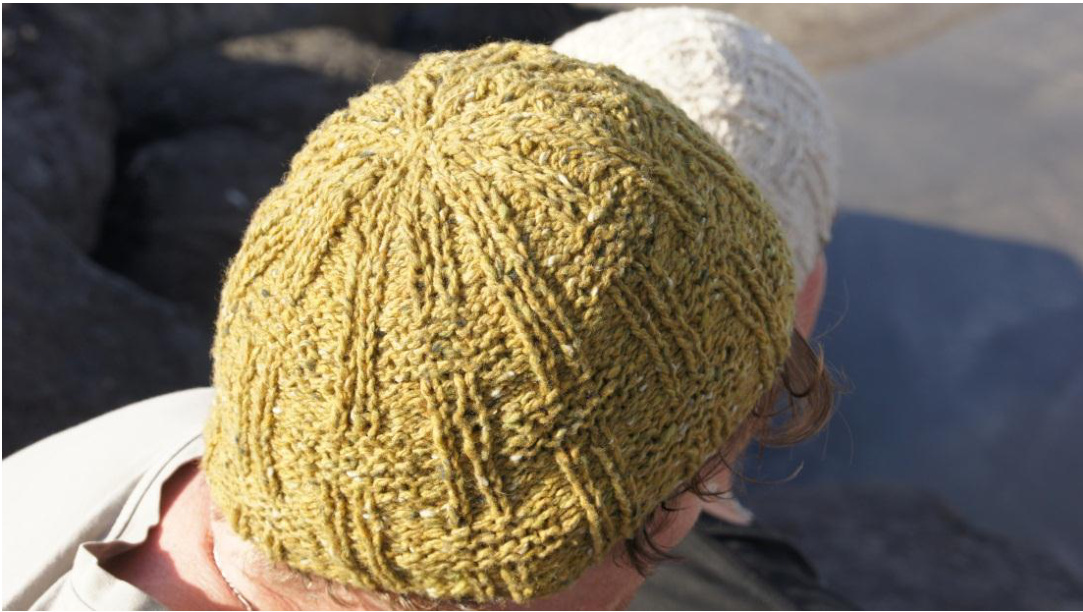
Do you often get disappointed when you ask a guy in your life what hat you should knit him? You hope for an interesting and inspiring knit. He answers something like: "Just a simple rib hat please, nothing fancy." If that's the case, Bricolage may be the hat that makes you both happy. It's a sort of rib hat (his wish) but not just a simple one (your wish). The stitch pattern is interesting but not very difficult. What keeps you going is how the stitch pattern changes every 8 rounds. In fact, knitting this hat is a bit like building bricks. DesignedbyThelmaEgberts Photos: Theo Egberts. Models: Radbout and Raphael. SIZE One (men's size)
FINISHED MEASUREMENTS
Circumference: 50 cm (unstretched) Height till crown: 13.5 cm Total height: 21 cm
MATERIALS
Bronze hat: [MC] Phildar Taiga [80% wool, 20% nylon; 110 yd/101 m per 50g skein]; color: Bronze 0107 [1] skein [CC] Phildar Taiga [80% wool, 20% nylon; 110 yd/101 m per 50g skein]; color: Beige 0100 [bit of left over yarn)
Beige hat: [MC] Phildar Taiga [80% wool, 20% nylon; 110 yd/101 m per 50g skein]; color: Beige 0100 [1] skein [CC] Phildar Taiga [80% wool, 20% nylon; 110 yd/101 m per 50g skein]; color: Bronze 0107 [bit of left over yarn) 1 set 3.5 mm/US 4 double pointed needles or circulars 1 set 4 mm/US 6 double pointed needles or circulars 1 stitch marker
GAUGE
14 sts/38 rows = 10 cm (4") in pattern stitch. (See TIP at end of pattern)
PATTERN NOTES
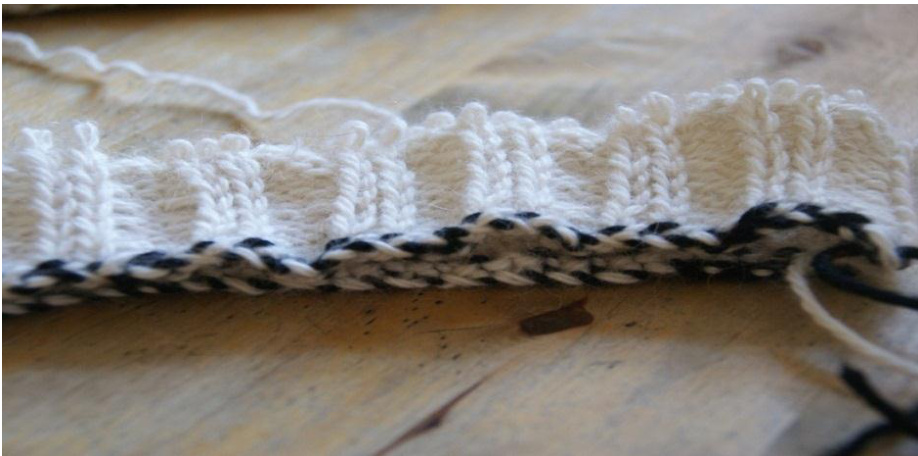
You start this hat with a two colored braided cast on, based on the long tail cast on, using two strands of yarn in contrasting colors. Tutorials on the braided cast on you can find here: -http://knitting.livejournal.com/7226803.html -http://www.youtube.com/watch?v=wyuvXmYzCLo The stitch pattern for this hat includes 12 stitches and 24 rows. The only sts that are used are k (knit), p (purl), s1kw (slip 1 stitch knitwise) and ktbl (knit through back loop).
PATTERN
CO 84 sts with MC and CC and needle size 3,5 mm (US 4) using braided cast on. Divide sts over 3 DPNs (28 sts on each) or 4 DPNs (21 sts on each) whichever you prefer. Connect in the round, being careful not to twist. Place marker to state beginning of round. Cut CC and knit one round with MC. Rnd 1, 3, 5, 7, : p3, s1kw, p1, s1kw, repeat till marker. Rnd 2, 4, 6, 8,: p3, ktbl, p1, ktbl, repeat till marker Switch to 4 mm (Us 6) needles. Rnd 9, 11, 13, 15: p1, k7, p1, s1kw, p1, s1kw, repeat till marker Rnd 10, 12, 14, 16: p9, ktbl, p1, ktbl Rnd 17 - 24: work like rnd 1 - 8 Rnd 25, 27, 29, 31: k2 \* p1, s1kw, p1, s1kw, p1, k7 repeat from\* until last 10 sts and knit p1, s1kw, p1, s1kw, p1, k5. Rnd 26, 28, 30, 32: p3 \*ktbl, p1, ktbl, p9, repeat from\* until last 9 sts and work ktbl, p1, ktbl, p6 Rnd 33 - 48: work like round 1 - 16
TIP from a test knitter:
If your gauge swap is too big in height, you can skip the last 8 rounds (41-48/9-16) and knit an alternative crown. Work round 57 - 62 as follows: Round 57: k2, s1, p1, s1, k5 Round 58: P2tog, ktbl, p1, ktbl, p5 Round 59: k1, s1, p1, s1, k5 Round 60: p1, ktbl, p1, ktbl, p5 Round 61: k1, s1, p1, s1, k5 Round 62: p1, ktbl, p1, ktbl, p2tog, p3
Crown
Repeat instructions till marker Rnd 49: p3, s1kw, p1, s1kw Rnd 50: p1, p2tog, ktbl, p1, ktbl, p3, ktbl, p1, ktbl Rnd 51. p2, s1kw, p1, s1kw, p3, s1kw, p1, s1kw Rnd 52. p2, ktbl, p1, ktbl, p3, ktbl, p1, ktbl Rnd 53: p2, s1kw, p1, s1kw, p3, s1kw, p1, s1kw Rnd 54: p2, ktbl, p1, ktbl, p1, p2tog, ktbl, p1, ktbl Rnd 55: p2, s1kw, p1, s1kw Rnd 56: p2, ktbl, p1, ktbl Rnd 57: p2, s1kw, p1, s1kw Rnd 58: p2tog, ktbl, p1, ktbl, p2, ktbl, p1, ktbl Rnd 59: p1, s1kw, p1, s1kw, p2, s1kw, p1, s1kw Rnd 60: p1, ktbl, p1, ktbl, p2, ktbl, p1, ktbl Rnd 61: p1, s1kw, p1, s1kw, p2, s1kw, p1, s1kw Rnd 62: p1, ktbl, p1, ktbl, p2tog, ktbl, p1, ktbl Rnd 63: p1, slkw Rnd 64: p1, k2tog tbl, ktbl Rnd 65: \*p1, k2, till marker Rnd 66: \*p1, k2tog, till marker Rnd 67: \*p1, k1 till marker Rnd 68: \*p2tog, k2tog till marker Rnd 69: \*k2tog till marker
FINISHING
Cut tread, pull yarn trough sts, pull tight and secure.

Legend
k(knit) p(pur1) sk (slip one knitwise) ktbl (knit through the back loop) A design by Thelma Egberts @


