TOTALLY DIY : DYE & KNIT SOCKS
TUTORIEL TEINTURE POUR LAINE A RAYURES ET TRICOT CHAUSSETTES DYEINGTUTORIALFORSTRIPPEDYARNKNITTINGSOCKSPATTERN Envie de concilier α folie passagere et/ou obsession du moment > a tricoter des chaussettes et envie irrepressible de teinture avec le beau temps arrivant, voici un petit tuto de teinture sur laine. Mon tout premier, pourquoi faire un tuto ? Bonne question ! Desire to reconcile α temporary madness and / or moment obsession" to knit socks and uncontrollable desire for dye with the arriving good weather, here's a tutorial for dyeing wool. My very first, why to make a tutorial ? Good question ! En naviguant sur le net et notamment / et surtout sur Pinterest, j'ai pu voir plein de bonnes idees, d'appareils tous les plus exotiques les uns que les autres et qui a premiere vue semblent a portee de bourses de tous... mais finalement on change vite d'avis en arrivant dans le magasin de bricolage quand il faut sortir 5o pour des bouts de pvc ! Repartie decue et bredouille, je cherche desesperement quelque chose qui soit pratique et qui ne me coute pas un bras. Alors j'ai bien pense aux dossiers de chaises, aux portes de placards, a l'etendoir a linge pour faire mes mini-écheveaux mais ce n'est pas si pratique que cela, pour moi en tout cas qui a deux mains gauches ! By navigating on the net in particular / and especially on Pinterest, I was able to see full of good ideas, devices any most exotic some that the others and who at first sight seem within reach of stock exchanges of all but finally we fast have a change of mind by arriving in the DiY store when it is necessary to bring out 5o for ends of pvc ! Disappointed and empty-handed repartee, I look desperately for something which is practical and which does not cost an arm and a leg to me. Then I thought well of chair backs, near cupboards, clothes line to make my mini-skeins but it is not so practical as it, for me in any case who is very clumsy. Et puis il est apparu, alors que je ne m'y attendais pas : le bout de carton ! Ce fut comme une evidence, une revelation ! And then it appeared, while I did not expect it : the cardboard end! It was as an obvious fact,arevelation! J'ai donc utilise mes quelques neurones encore presents et avec des calculs tres savants, j'ai essaye de reflechir pour donner un aspect de rayures a la laine. I thus used my some still present neurons and with very learned calculations, I tried to think to give an aspect of stripes to the yarn. I1 n'y a rien d'extraordinaire mais ayant trouve peu (ou pas) de tutos en francais pour cette technique, je me dis que celui-ci pourra peut-etre bien en aider quelques un(e)s d'entre vous qui ne maitriserai pas tout a fait l'anglais. There is having found nothing extraordinary but little (or not) of tutorial in French for this technique, i say to myself that this one can help maybe well some one of you who shall notmastercompletelyEnglish.
Bonne teinture et bon tricot !
Good dye and good knitting ! : : je ne suis ni photographe ni experte teinturiere ni tricoteuse emerite am neither a photographer nor expert dyer nor highly skilled knitter .
MATERIEL/MATERIAL
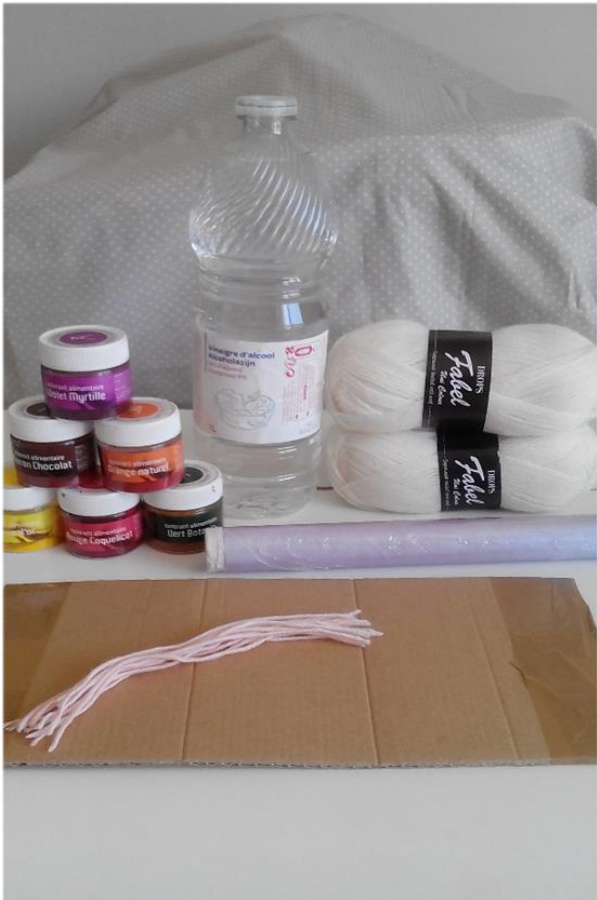
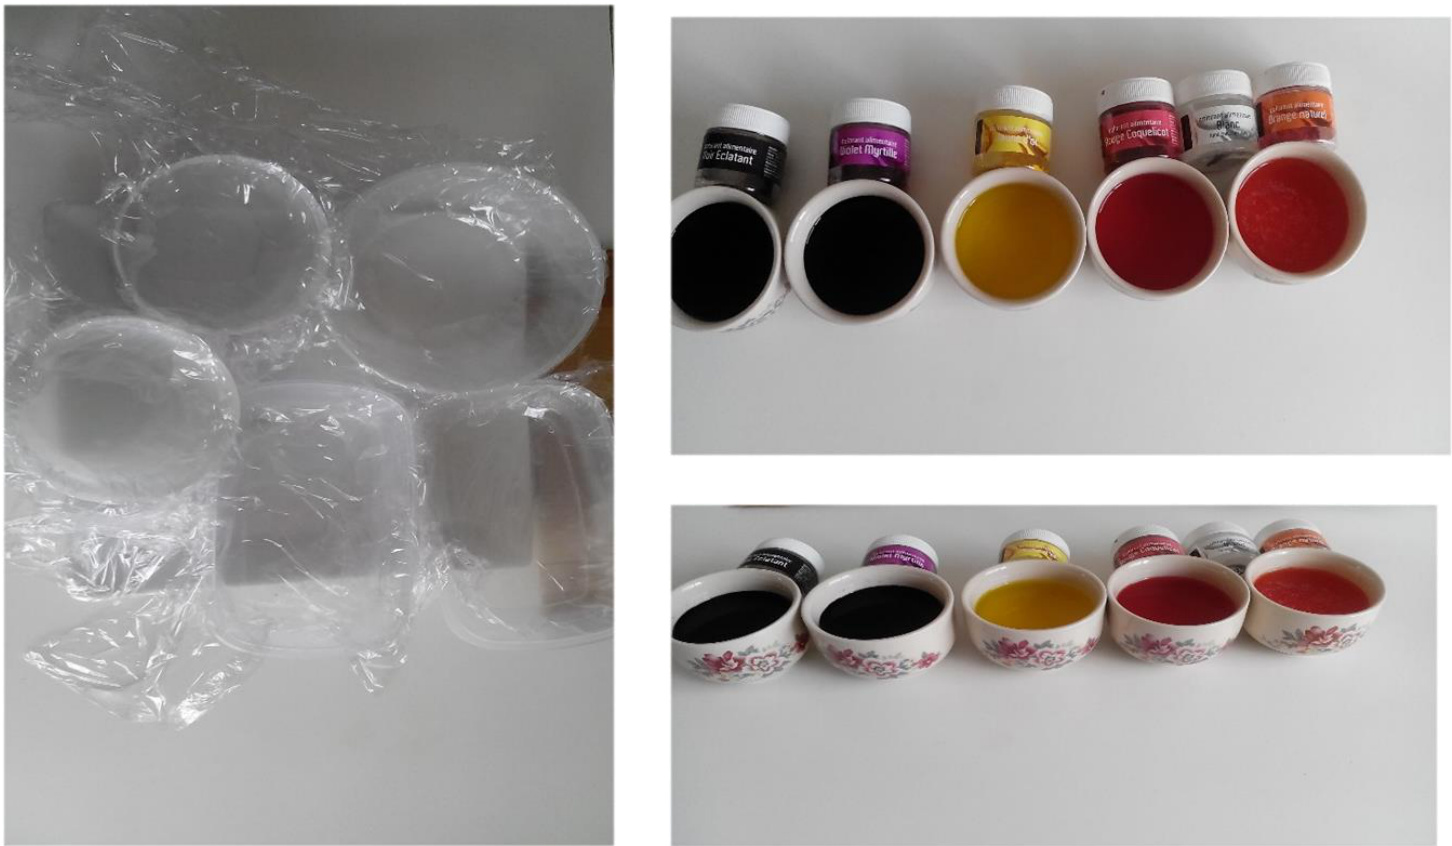
· Laine a chaussettes (Drops Fabel écrue) : 2 pelotes /yarnsockszballs · Bouts de laine / scrapped yarn . Un morceau de carton de 3o cm de hauteur x 15 cm de largeur / a piece of cardboard of 12 x 6 inches .Vinaigre blanc / spirit vinegar Colorants alimentaires / dyeing - coloring food Gants en plastique / rubber gloves · Papier film alimentaire / paper clingfilm · Recipients en plastique / plastic jars
PREPARATION DES MINI-ECHEVEAUX / PREPARATION OF THEMINI-SKEINS
'ai scotche les bouts du carton pour eviter que la laine de s'y accroche).
(Small information: i scotch-taped the ends of the cardboard to avoid that the yarn of hangs onto it).
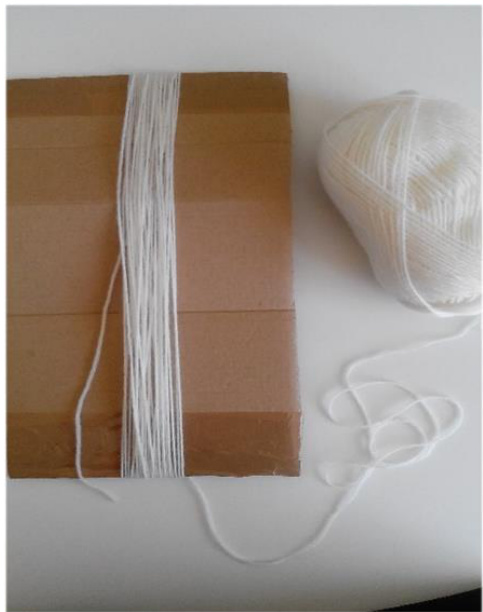
1. Tenir le fil de la pelote et le carton en position verticale.
Hold the thread of the ball and the cardboard in vertical position. Enrouler le fil autour du carton selon la longueur de rayure desiree (ici environ 30 tours de cartons). Roll up the thread around the cardboard according to the length of stripe desired (here approximately 3o cardboard rounds).
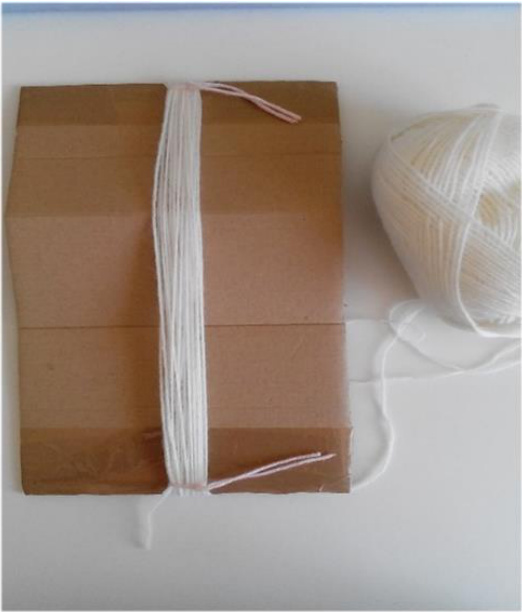
Nouer les extremites avec un petit morceau de laines. Je vous conseille
Knot the extremities with scrapped yarn. I recommend you to : De ne pas trop les serrer a 1'echeveau car il y aurait une demarcation apres avoir teint. Of not tighten them not too much in the skein because there would be a demarcationhaving dyed. De les preparer a l'avance car il y en a un certain nombre ! J'ai du en utiliser une vingtaine pour une seule pelote. To prepare them in advance because there are so much ?I had to use about twenty for a single ball.
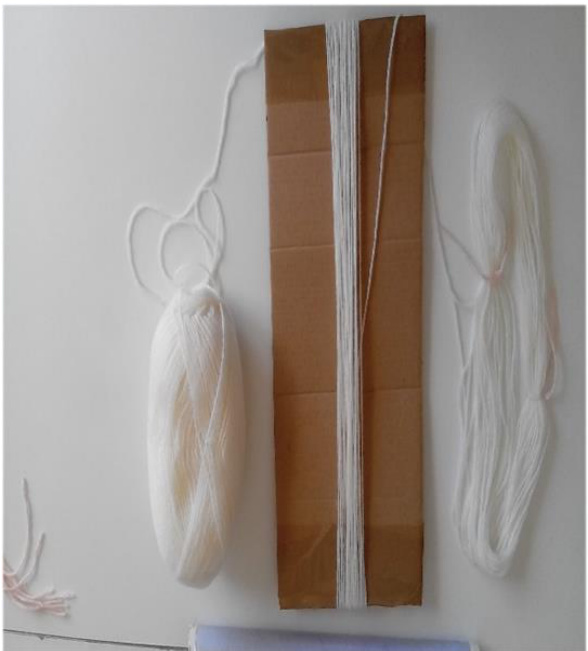
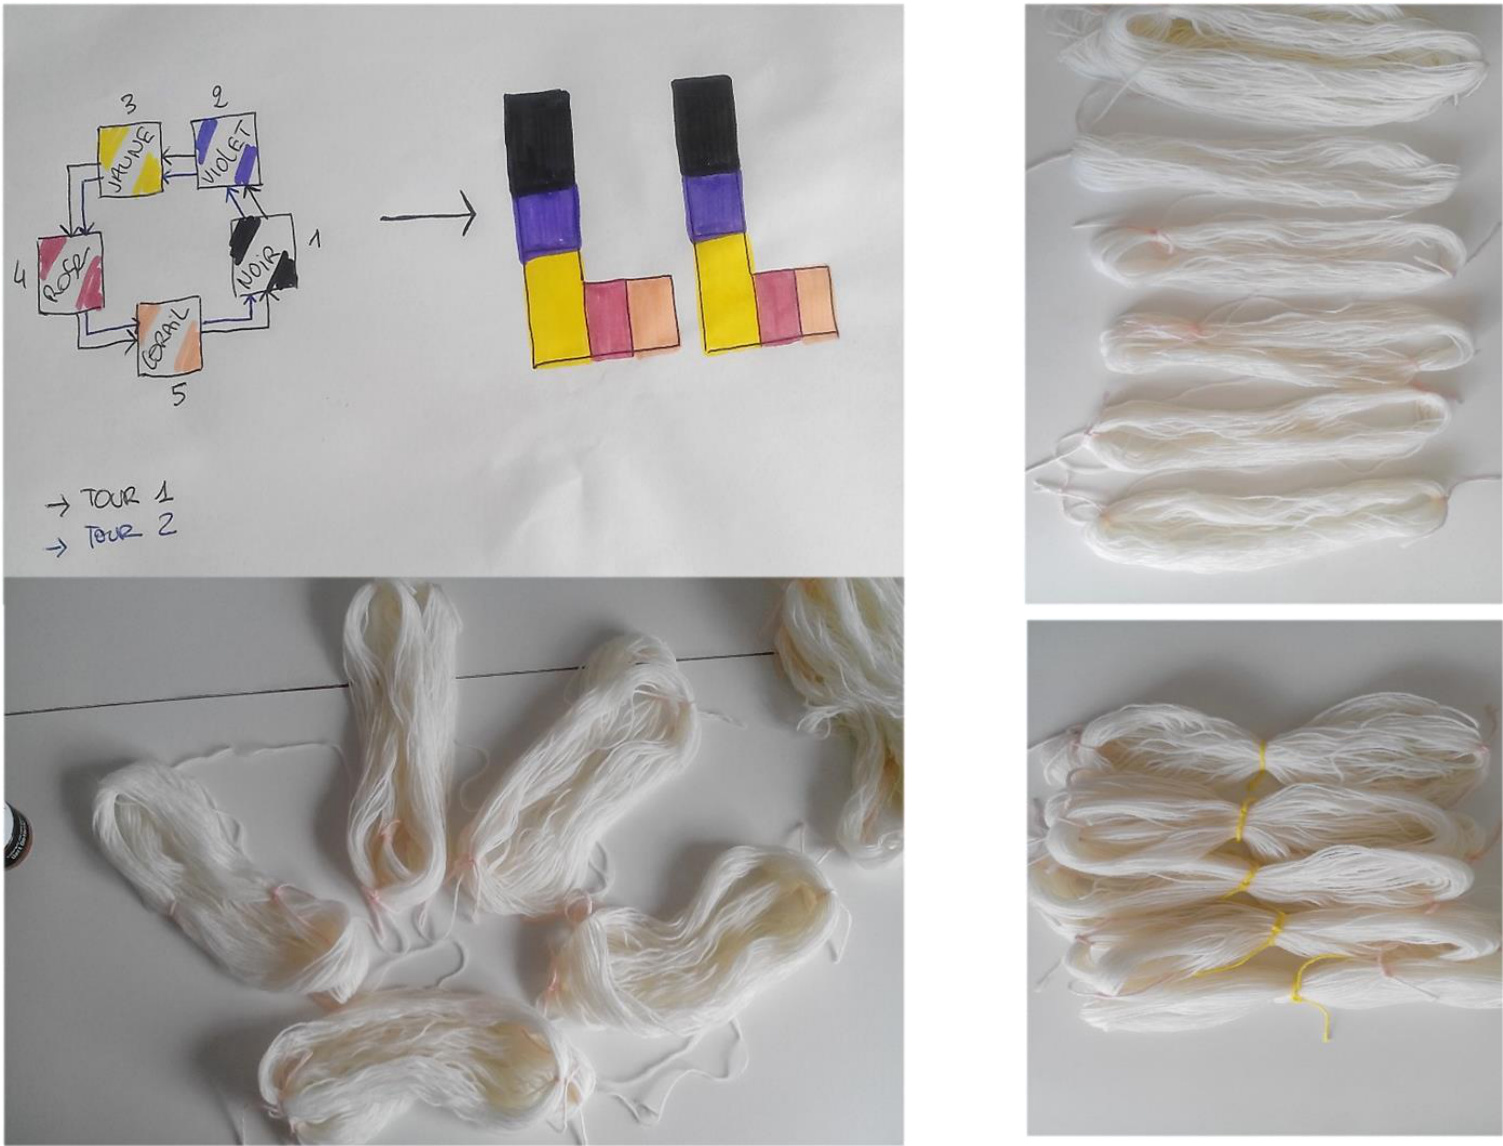
3. Separer les mini-echeveaux selon le nombre voulu de rayures et de couleurs. L'image suivant vous montre Il'idee que j'ai en tete.
Separate mini-skeins according to the deliberate number of stripes and colors. The image according to you shows the idea which I have in mind. Faire attention de ne pas emmeler les fils reliant chaque écheveau .. Be careful not to tangle threads binding every skein . Et faire des tours avec les echeveaux si vous voulez des rayures qui se suivent, selon l'ordre de couleurs defini. And make rounds with skeins if you want stripes which follow each other, according to the defined order of colors. Pour ne pas tout emmeler pour le trempage, une fois les ( tours ) termines, j'ai noue les écheveaux qui vont ensemble pour chaque couleur, et ai fait de meme pour I'ensemble des mes écheveaux de mon 2eme tour. Not to tangle everything for the soaking, once the ended "turns", 1 knotted the skeins which go together for every color, and did the same for the set of my skeins of my 2nd tour.
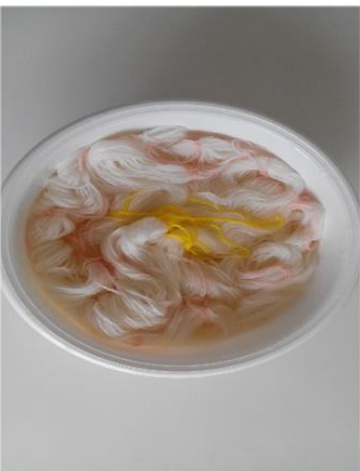
4. Faire tremper votre laine dans l'eau (a temperature ambiante :) et le vinaigre blanc pour que la teinture se fixe bien. Soak the yarn in the water (at room temperature!) and the spirit vinegar so that the dye settleswell. 5. Pendant ce temps, j'ai preparé les pots en plastique pour pouvoir faire chauffer au micro-onde. J'ai trouve plus simple de mettre le papier film a meme le pot et ensuite les echeveaux dedans pour éviter les bavures de couleurs entre elles. Meanwhile, I prepared the plastic jars to be able to make warm in microwave. I found easier to put the paper movie straight from the jar and then skeins inside to avoidthesmudges of colorsbetweenthem. Et egalement prepare les teintures. And also prepared the dyes.
6. Une fois les écheveaux trempes, les mettre dans les pots. Faire attention aux fils les reliant ! et verser la teinture (dans les pots !). Once the tempered skeins, to put them in jars. Be careful on the threads binding them! And pour the dye (in jars !).
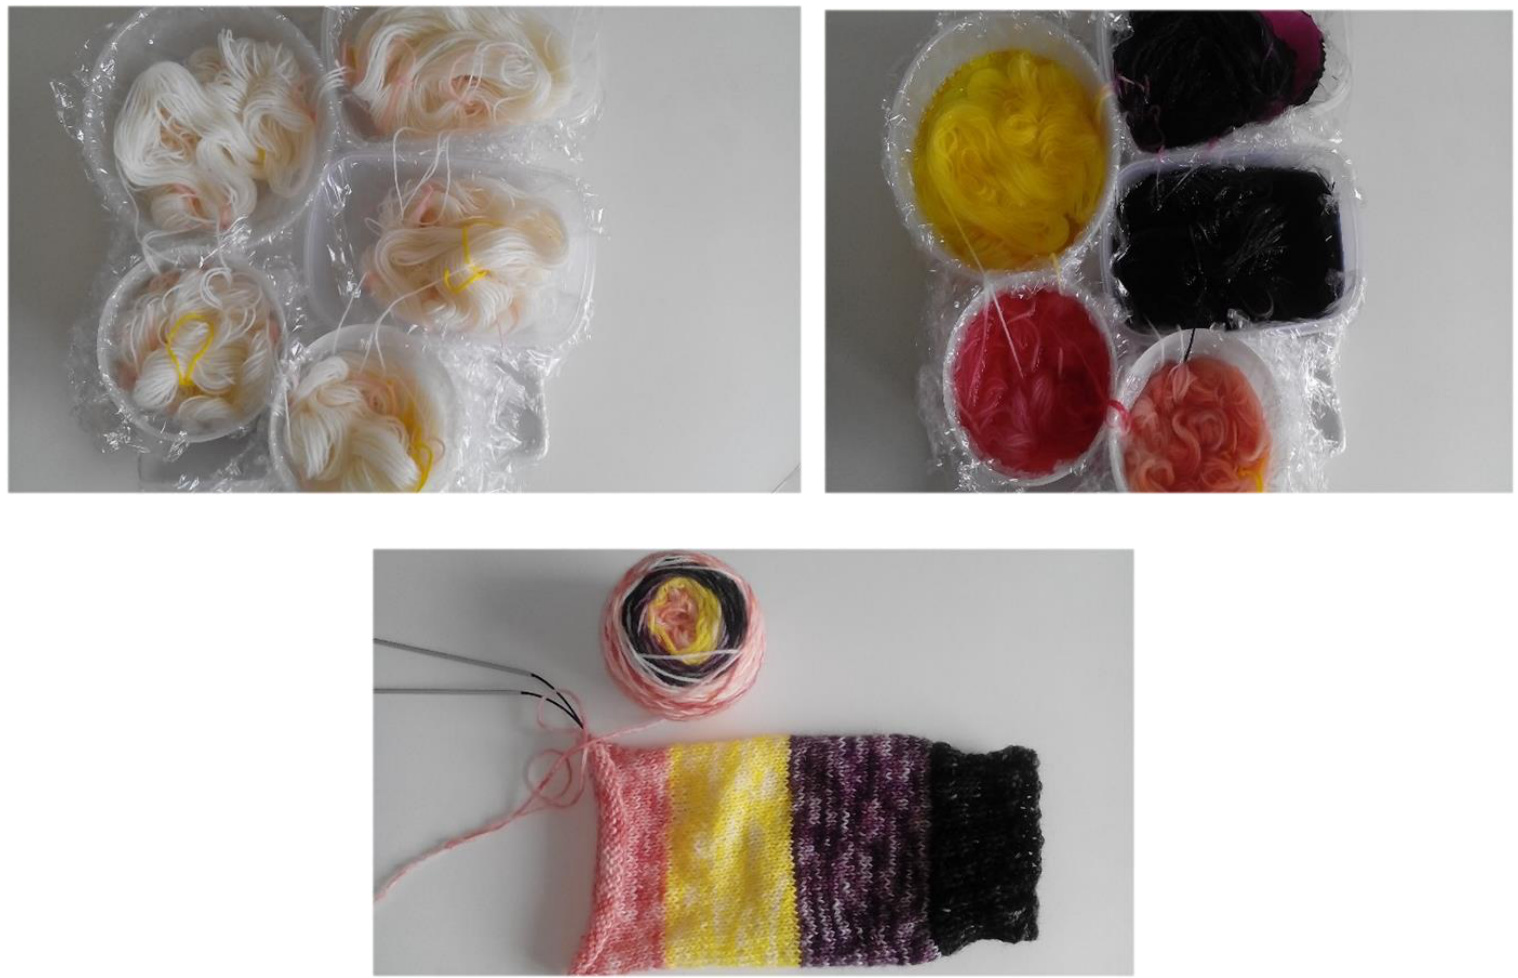
KNIT SOCKS
Very basic socks, easy to knit even for the beginners of socks !
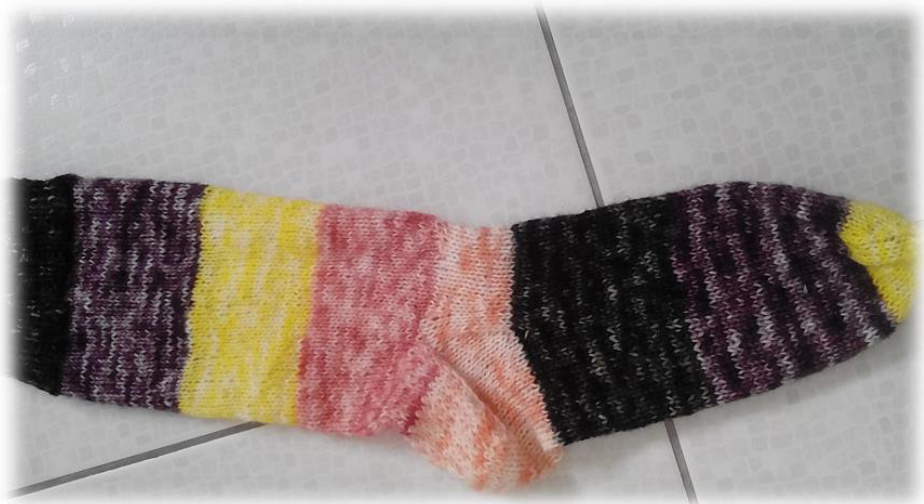
Size : FR 39/40 - US 7.5 / 8 Needles : 2 circular needles 2.5 mm / US 1 1/2 Yarn : Drops Fabel, 50 g = 250 m Gauge : 23 st x 32 r / 23 m x 32 rg Tapestry needle
ABBREVIATIONS
K = knit P = purl KzToG = knit 2 stitches together P2ToG = purl 2 stitches together ST = stitch(es) Stockinette stitch on 2 circular needles : Knit all stitches in all rounds
PATTERN
. Cast on 60 stitches, needles 2.5 mm, join in round in 2 needles. Be careful not to twist the stitches. . \*K2-P2\* for one strip (approximately 20 rounds). . Continue in stockinette stitch for 3 strips (approximately 8 inches - 19/20 cm).
DIVIDE FOR HEEL
Next strip : distribute 10 decreases on the next 2 rounds => 50 st. Continue just on the last worked needle on the 25 stitches. Hold the other stitches. And work like this on about 25 rows : R1 : \*slip 1 - P\* to end R2 : \*slip 1 - K1\* to end
TURN HEEL
R1 : Slip 1 - K16 - K2T0G - turn R2 : Slip 1 - P8 - P2T0G - turn R3 : Slip 1 - K8 - K2T0G - turn Repeat rows 2 and 3 until remain 16 stitches, ending with a “"K" row.
GUSSET
. Needle I : pick up 14 stitches along the edge of the heel flap. Needle 2 : Knit across the stitches of instep / and then pick up 14 stitches along the other edge of the heel flap. Now, divide stitches in egal number on the two needles, and reposition stitches so as to have on the needle I : the top of the foot / and on the needle 2 : the sole of the foot.
FOOT
Round / Row 1 : Needle 1 : K1 - K2T0G - K to last 3 stitches - K2T0G - K1 Needle 2 : K Round / Row 2 : K (on needles I and 2). Repeat rounds 1 and 2 until remain 50 stitches. Continue knitting in stockinette stitch until you arrive to the top of the little finger foot.
TOE
Round / Row 1 : Needle 1 : K1 - K2T0G -- K to last 3 stitches -- K2T0G - K1 Needle 2 : K1 -- K2T0G -- K to last 3 stitches -- K2T0G - K1 · Round / Row 2: K Repeat rounds 1 and 2 until remain 16 stitches (8 st on needle 1 / 8 st on needle 2). Verify decreases from time to time so that toe is not too short. In which case, adapt the decreases.
FINISHING
. Cut yarn on about 8 inches (approximately 20 cm). Thread tail on tapestry needle. . Graft the last stitches together. ·Weave in ends. Please note that the pattern is not tested: Feel free to send a message on Ravelry if you have any questions or comments. I hope that youwill appreciate this tuto!


