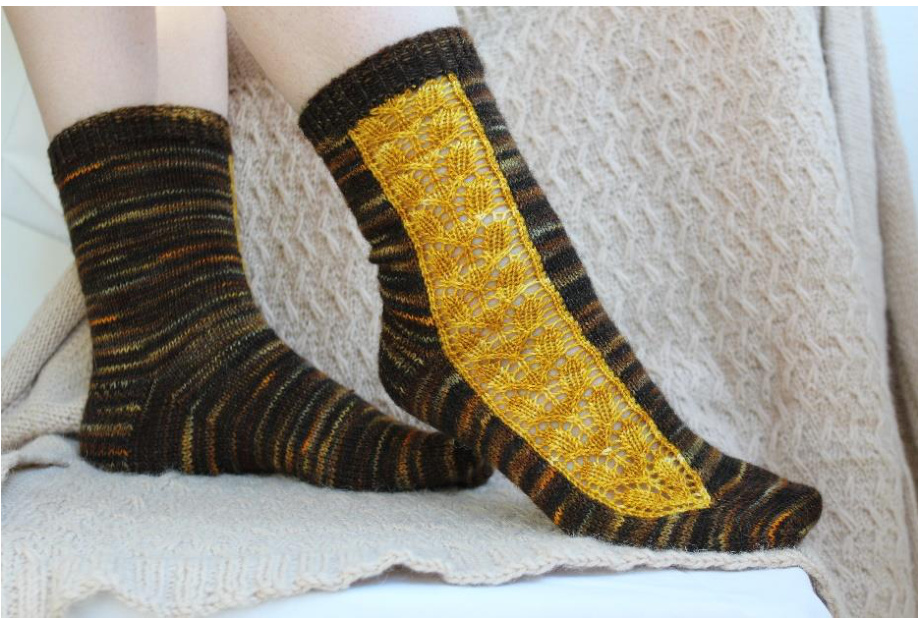
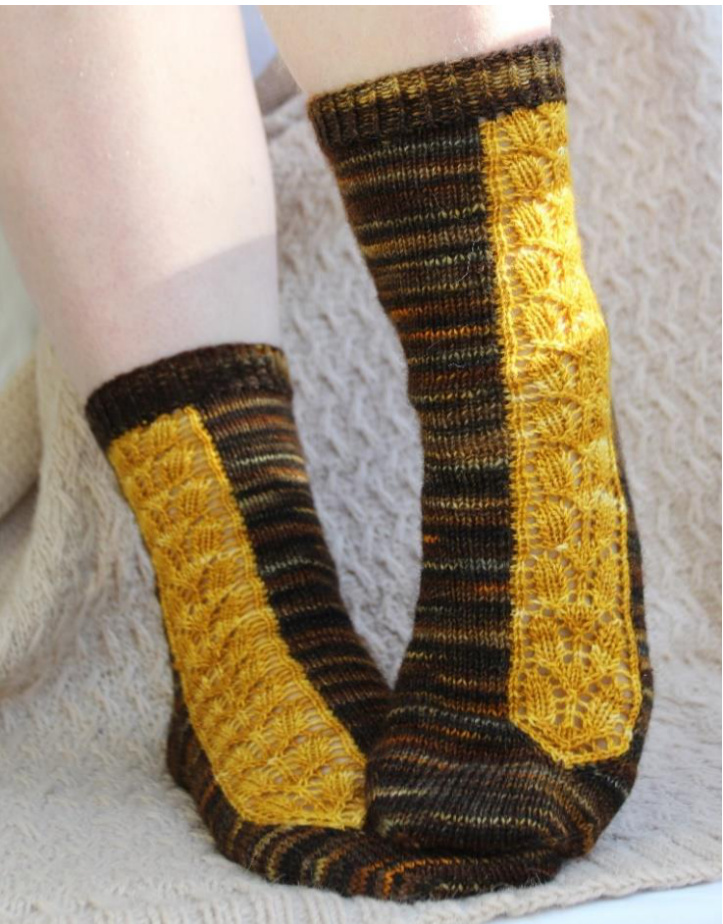
Uillzini - Jarthenocissus
Pattern:Tiina Kuu Photos: Tiina Rammo Villiviini sock pattern was originally designed for Kierot Puikot 2015 (the knitting retreat of Savonia, Finland). Only cuffs and toes are worked in the round; the rest of the sock incorporates technique called intarsia in the round.
Yarn and yardage
Main color (Mc): any fingering weight sock yarn (for example 75 % wool, 25 % nylon; 420 m / 100 g), less than 100 g Contrast color (cc): any fingering weight sock yarn (for example 75 % wool, 25 % nylon; 420 m / 100 g), less than 20 g
Needles
80 cm / 32" circular needle 2.25 mm / Us1(or suitable to obtain gauge)
ns can be used as well but the instructions are given for magic Gauge 32 sts and 42 rows = 10 cm / 4" in stockinette Size Small (Medium, Large) Total stitch count can be adjusted without limits. Note that if the stitch count differs from the ones given in the instructions, you have to adjust the pattern to suit the new stitch count.
Before you start
Read the instructions carefully before starting. Front of the sock including the CC lace panel is worked on needle 1 whereas back of the leg, heel and sole are worked on needle 2. It is recommended to work one sock at a time. Please note that the charts are read from right to left on the right side rows (odd rows) and from left to right on the wrong side rows (even rows). Some of the techniques used are described in Techniques chapter at the end of the instructions. Intarsia in the round may sound complicated but it is nothing but knitting back and forth, alternating RS (knit) and Ws (purl) rows by turning the work frequently and binding the color blocks as described in the instructions. Trust the pattern, work exactly as described one thing at a time and you'll succeed!
Snstruclions
Right foot sock Cuff With MC cast on 60 (66, 72) sts. Distribute sts as follows: 31 (33, 37) sts onto needle 1 and 29 (33, 35) sts onto needle 2. Join to work in the round and place marker at the beginning of the round if desired. Work k1tbl, p1 ribbing for 12 rounds or as long as the cuff is of desired length. Knit one more round.
Leg - intarsia in the round
With MC k2. Switch to CC and work chart A row 1. Turn work and work chart A row 2. Please note that the even rows of the charts are read from left to right. Bind MC and CC yarns (see Tehchniques: Binding colors in intarsia) and p2 in MC. Do not turn. With MC purl sts on needle 2. Purl also the MC sts on needle 1. Wrap and turn as follows: Slip the CC yarn over from left hand needle onto right hand needle with MC in back. Bring MC in front and slip CC yarn over back onto left hand needle. Turn work and knit MC sts on needles 1 and 2 with MC. MC yarn is now at the beginning of the round and you've just worked two rows of intarsia in theround. Work as established repeating chart A rows 3-12 altogether six times or as long as the leg is of desired length. Please remember to bind MC and CC every time you change the color at the right edge of the lace panel (on RS rows) / left edge (on WS rows). On the other edge binding of the colors is achieved by wrapping the CC yarn over with MC on the WS row.
Heel
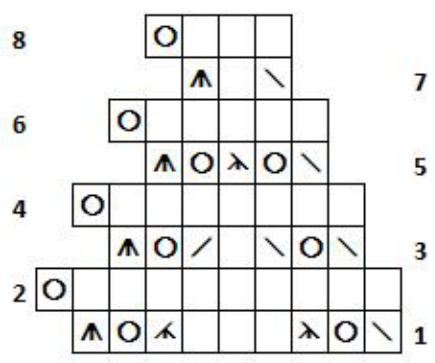
Heel is worked back and forth in MC over the 29 (33, 35) sts on needle 2, starting at the beginning of the round. Turn work and start with wS row as follows: row 1 (Ws): \*sl1 wyif, p1\*, repeat \* - \* until 1 st remains, p1, turn row 2 (RS): sl1 wyib, k28 (k32, k34), turn Repeat rows 1 and 2 until heel flap consists of 30 (32, 34) rows. Work round heel turn as follows: row 1 (WS): sl1 wyif, p16 (p18, p19), p2tog, p1, turn row 2 (RS): sl1 wyib, k6, ssk, k1, turn row 3 (WS): sl1 wyif, p7, p2tog, p1, turn row 4 (RS): sl1 wyib, k8, ssk, k1, turn Work as established until all side stitches have been decreased and you have just worked a RS row. Please note that in sizes S and M there are no knit/purl stitches left to work after the decreases on the last two decreaserows. Pick up 15 (16, 17) sts along the left edge of the heel flap and one more stitch between the heel flap and needle 1. Knit the picked stitches onto needle 2. Knit MC stitches on needle 1 with MC. Switch to CC (remember to bind the yarns) and work the next odd row of chart A with CC. Turn work and work the next even row of chart A with CC. Switch to MC and purl the MC stitches on needle 1. Continue with MC and purl the stitches on needle 2. Pick up 15 (16, 17) sts along the right edge of the heel flap and one more stitch between the heel flap and needle 1. Purl the picked stitches onto needle 2. Purl the MC sts on needle 1, wrap and turn and knit until the end of needle 1. Work gusset decreases on needle 2 on the RS rows as follows: ssk, knit until 2 sts remain on needle 2, k2tog. On the WS rows purl the sts on needle 2. Continue as established repeating chart A rows 3-12 with CC and decreasing as described on needle 2 until 29 (33, 35) sts remain on needle 2. Thereafter knit sts on needle 2 on the RS rows and purl on the WS rows. Repeat chart A rows 3-12 four times after the leg and then rows 3-8 once more. If your foot is long or your row gauge is significantly tighter than recommended, you can repeat chart A rows for example five times, after which rows 3-8 must be worked once more. When you are at the beginning of the round (start of needle 1) and you have just knitted sts on needle 2 and worked chart A row 8, start the set up for finishing the lace panel as described: Knit the first st on needle 1 with MC. Make a right twisting knit stitch increase (see Techniques) and k1. Switch to CC and work chart A row 9, turn work. Work chart A row 10 and switch to MC, p3. Purl sts on needle 2. Purl sts on needle 1 until 1 MC st remains before the CC lace panel. Make a left twisting purl stitch increase (see Techniques) and p1, wrap and turn. Knit sts on needles 1 and 2 with MC. K2, make a right twisting knit stitch increase, k1. Switch to CC and work chart B row 1. Turn work and work chart B row 2. Switch to MC and p4. Purl sts on needle 2 and on needle 1 until 1 MC st remains until CC lace panel. Make a left twisting purl stitch increase, p1, wrap and turn. Knit sts on needle 1 and 2. Continue as established making right twisting knit stitch increases on RS and left twisting purl stitch increases on WS one MC stitch away from CC lace panel. At the same time work according to chart B with CC until you've worked chart B row 8 and you've just knitted stitches on needle 2 (i.e. you're at the beginning of the round). Cut CC and continue working in the round with MC only. Knit stitches on needle 1 with MC until 1 MC st remain before CC stitches. Make a right twisting knit stitch increase and k1. Slip 2 CC stitches onto right hand needle as if to knit them together. With the next 2 sts on the left hand needle work ssk and pass the slipped stitches over (= centered triple decrease). K1 and make a left twisting knit stitch increase (see Techniques). Knit until the end of the round. At this point make sure that you have altogether 60 (66, 72) sts. Redistribute stitches on needles 1 and 2 so that there are 30 (33, 36) sts on both needles. Make sure that you do not change the beginning of the round when redistributing stitches. Knit stockinette in the round until work measures approximately 4 cm / 1,5 " shorter than the desired final length. Toe row 1: On needle 1 work k1, ssk, knit until 3 sts remain, k2tog, k1. Repeat on needle 2. row2:knit Repeat rows 1 and 2 altogether 5 (6, 6) times and then row 1 altogether 5 (5, 6) times. If you prefer a longer wedge toe, you can repeat rows 1-2 altogether 10 (11, 12) times. Note that in this case you may need to start toe decreases earlier than 4 cm / 1,5" short of final length. Cut yarn and graft the sts on needles 1 and 2. Left foot sock Work otherwise as the right foot sock but place the CC lace panel (charts A and B) two MC stitches away from the left end of needle 1 as follows: Work ribbing and one knit round as in the right foot sock. With MC k16 (k18, k22). Switch to CC and work chart A row 1. Turn work and work chart A row 2. Switch to MC and purl until the end of needle 1. Do not turn but purl the sts on needle 2. P2 on needle 1, wrap and turn. Knit sts on needle 1 and 2. Continue as established working the heel and gusset as described in the right foot sock instructions. During the decreases on CC lace panel work the MC increases one MC stitch away from the CC lace panel borders.
Finishing
Weave in ends and block if desired.
Techniques
Wrap and turn: Slip CC yarn over from left hand needle onto right hand needle with MC in back. Bring MC in front and slip CC yarn over back onto left hand needle. Turn work. MC is now wrapped around CC yarn over. Right twisting knit stitch increase: With the left hand needle lift the yarn bar between the stitches from back to front and knit through the front loop. Left twisting purl stitch increase: With the left hand needle lift the yarn bar between the stitches from front to back and purl through the back loop. Left twisting knit stitch increase: With the left hand leedle lift the yarn bar between the stitches from front to beck and knit through the back loop. Binding colors in intarsia: https://www.youtube.com/watch?v=rhZwpgysm58
Chart A
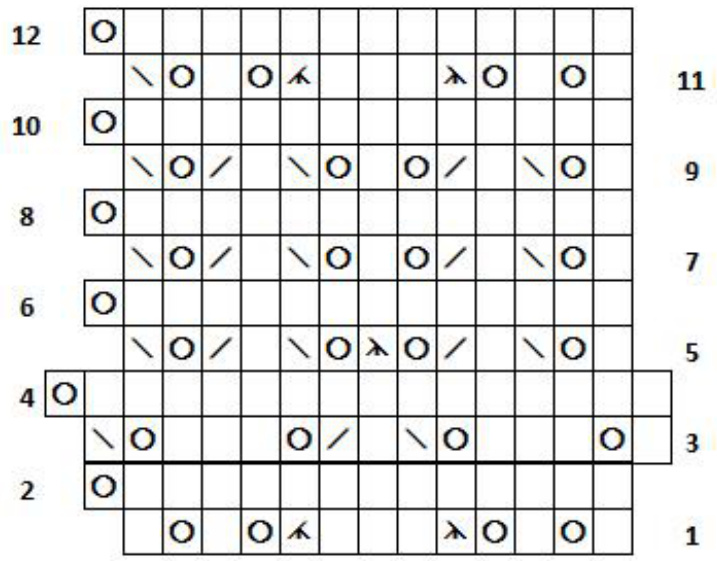
Chart key
RS:knit/wS:purl yarnover slip, slip, knit knit 2together slip1,knit2together,passthe slippedstitchover knit3together Slip1stand 2ndststogetherasif toknit.Knit 1. Pass 2 slipped stitches together over theknit stitch.
Abbreviations
MC - main color CC - contrast color st(s) - stitch(es) k -knit ktbl - knit through the back loop p-purl k2tog - knit 2 sts together p2tog - purl 2 sts together ssk - slip, slip, knit wyif - with yarn held in front wyib - with yarn held in back