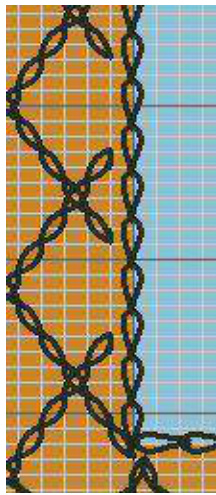
Sebrina Sebright and Chicks Pillow
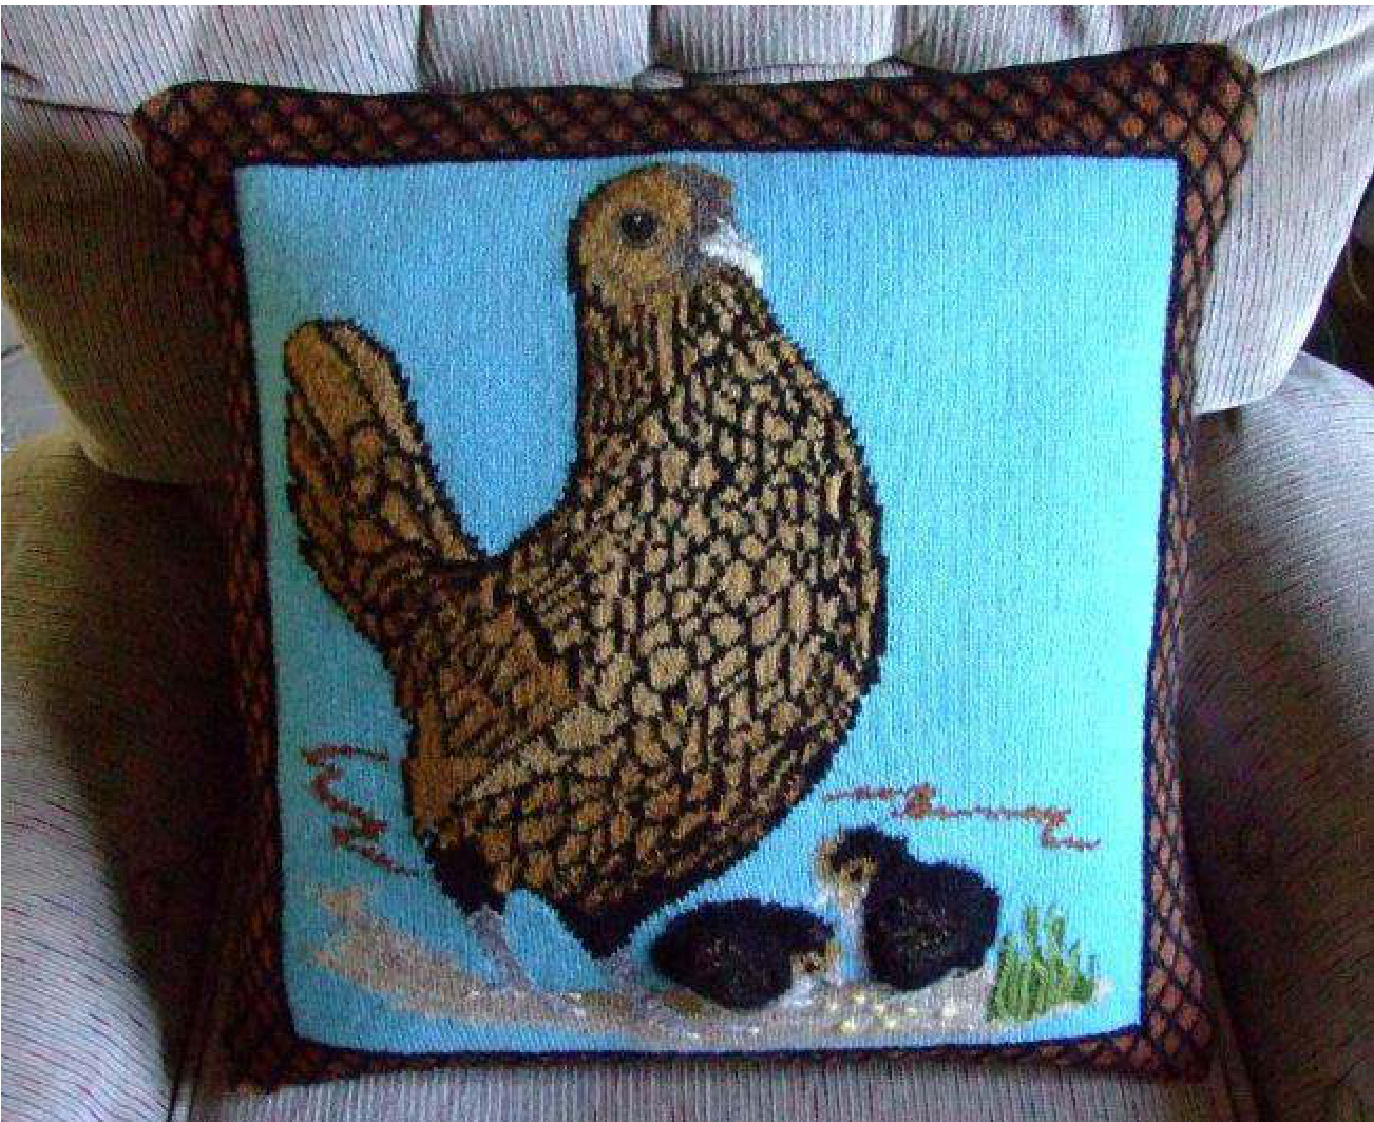
Created by Judith A Helms 2012 J's Designer Pillows www.idahostixand strings.com
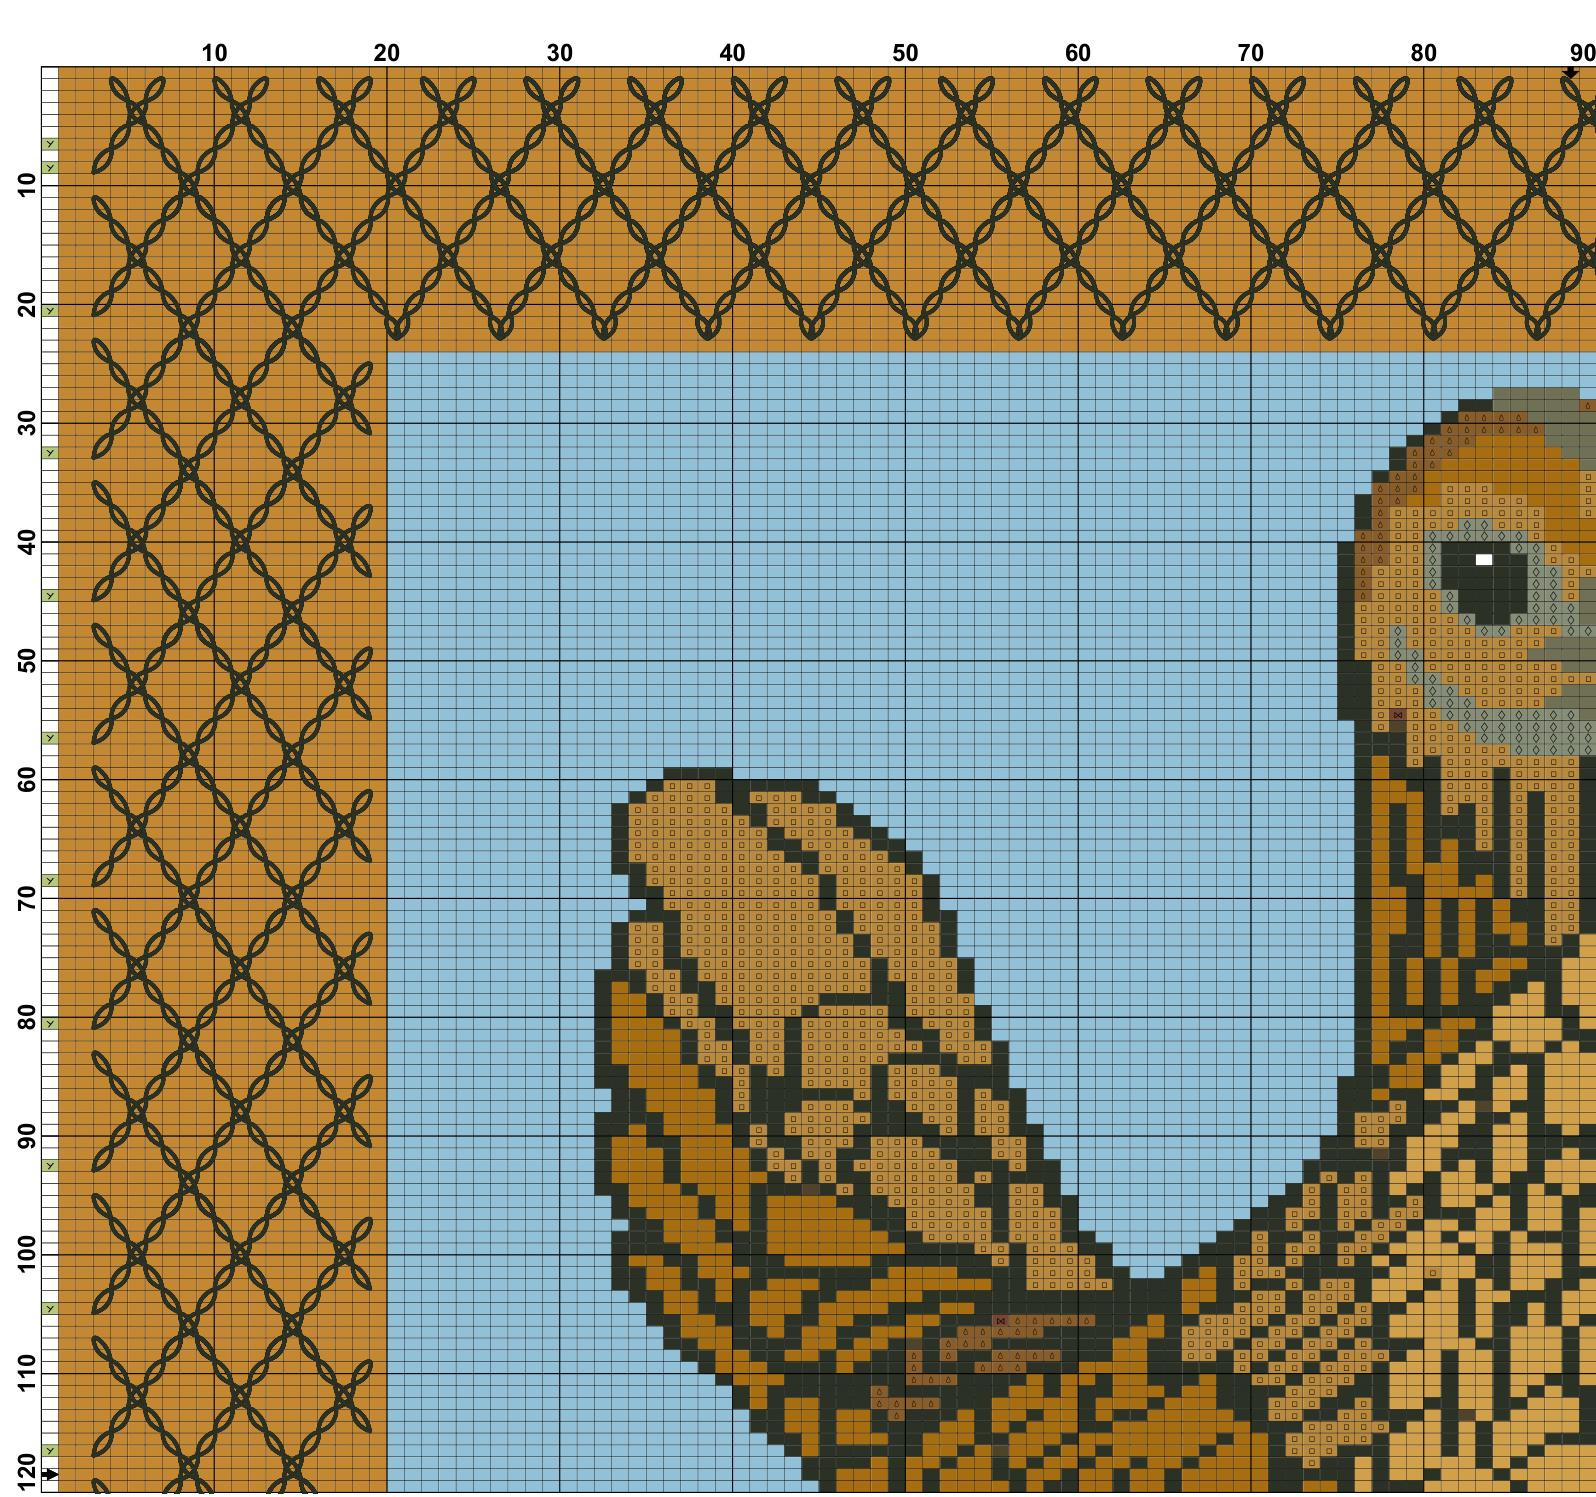
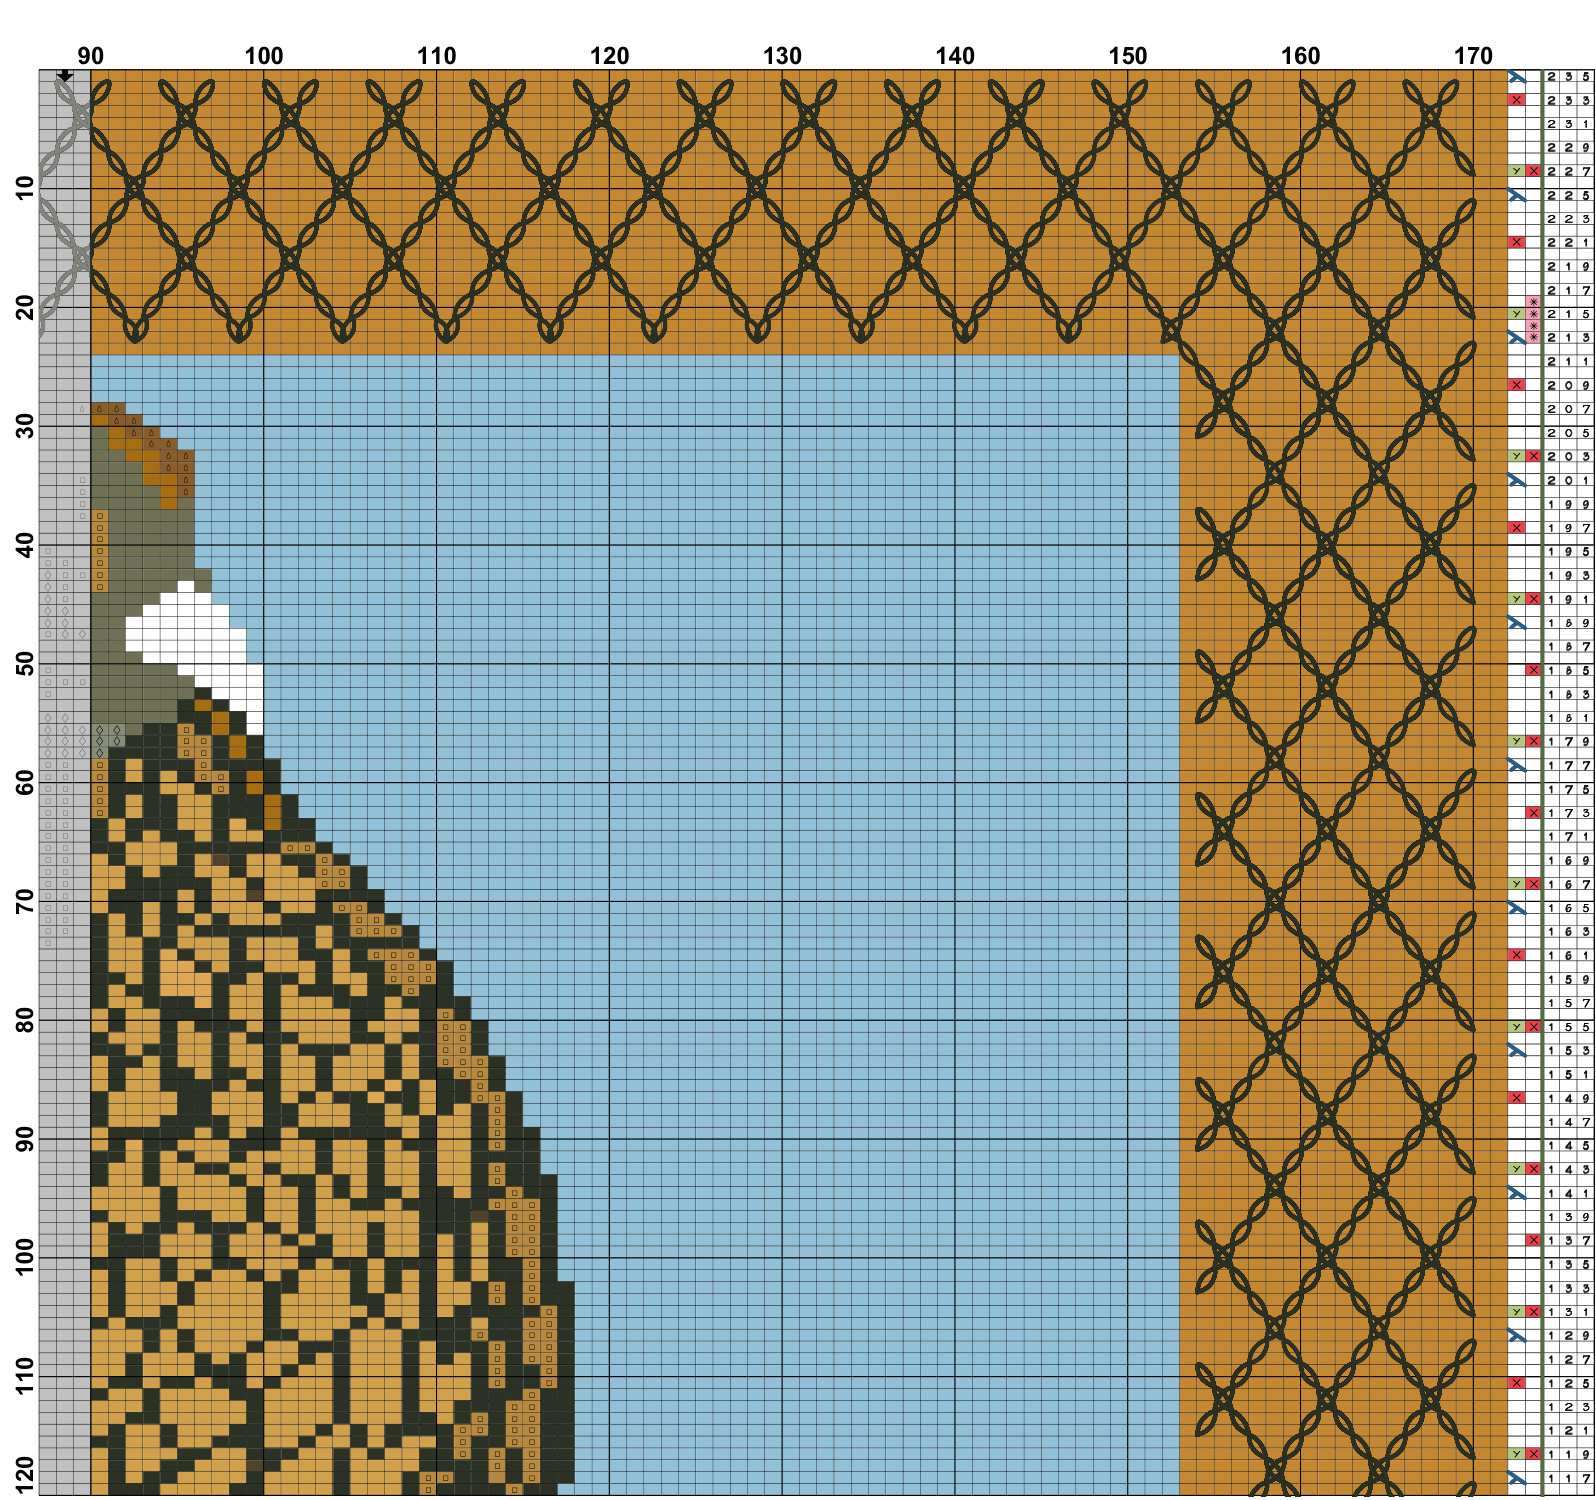
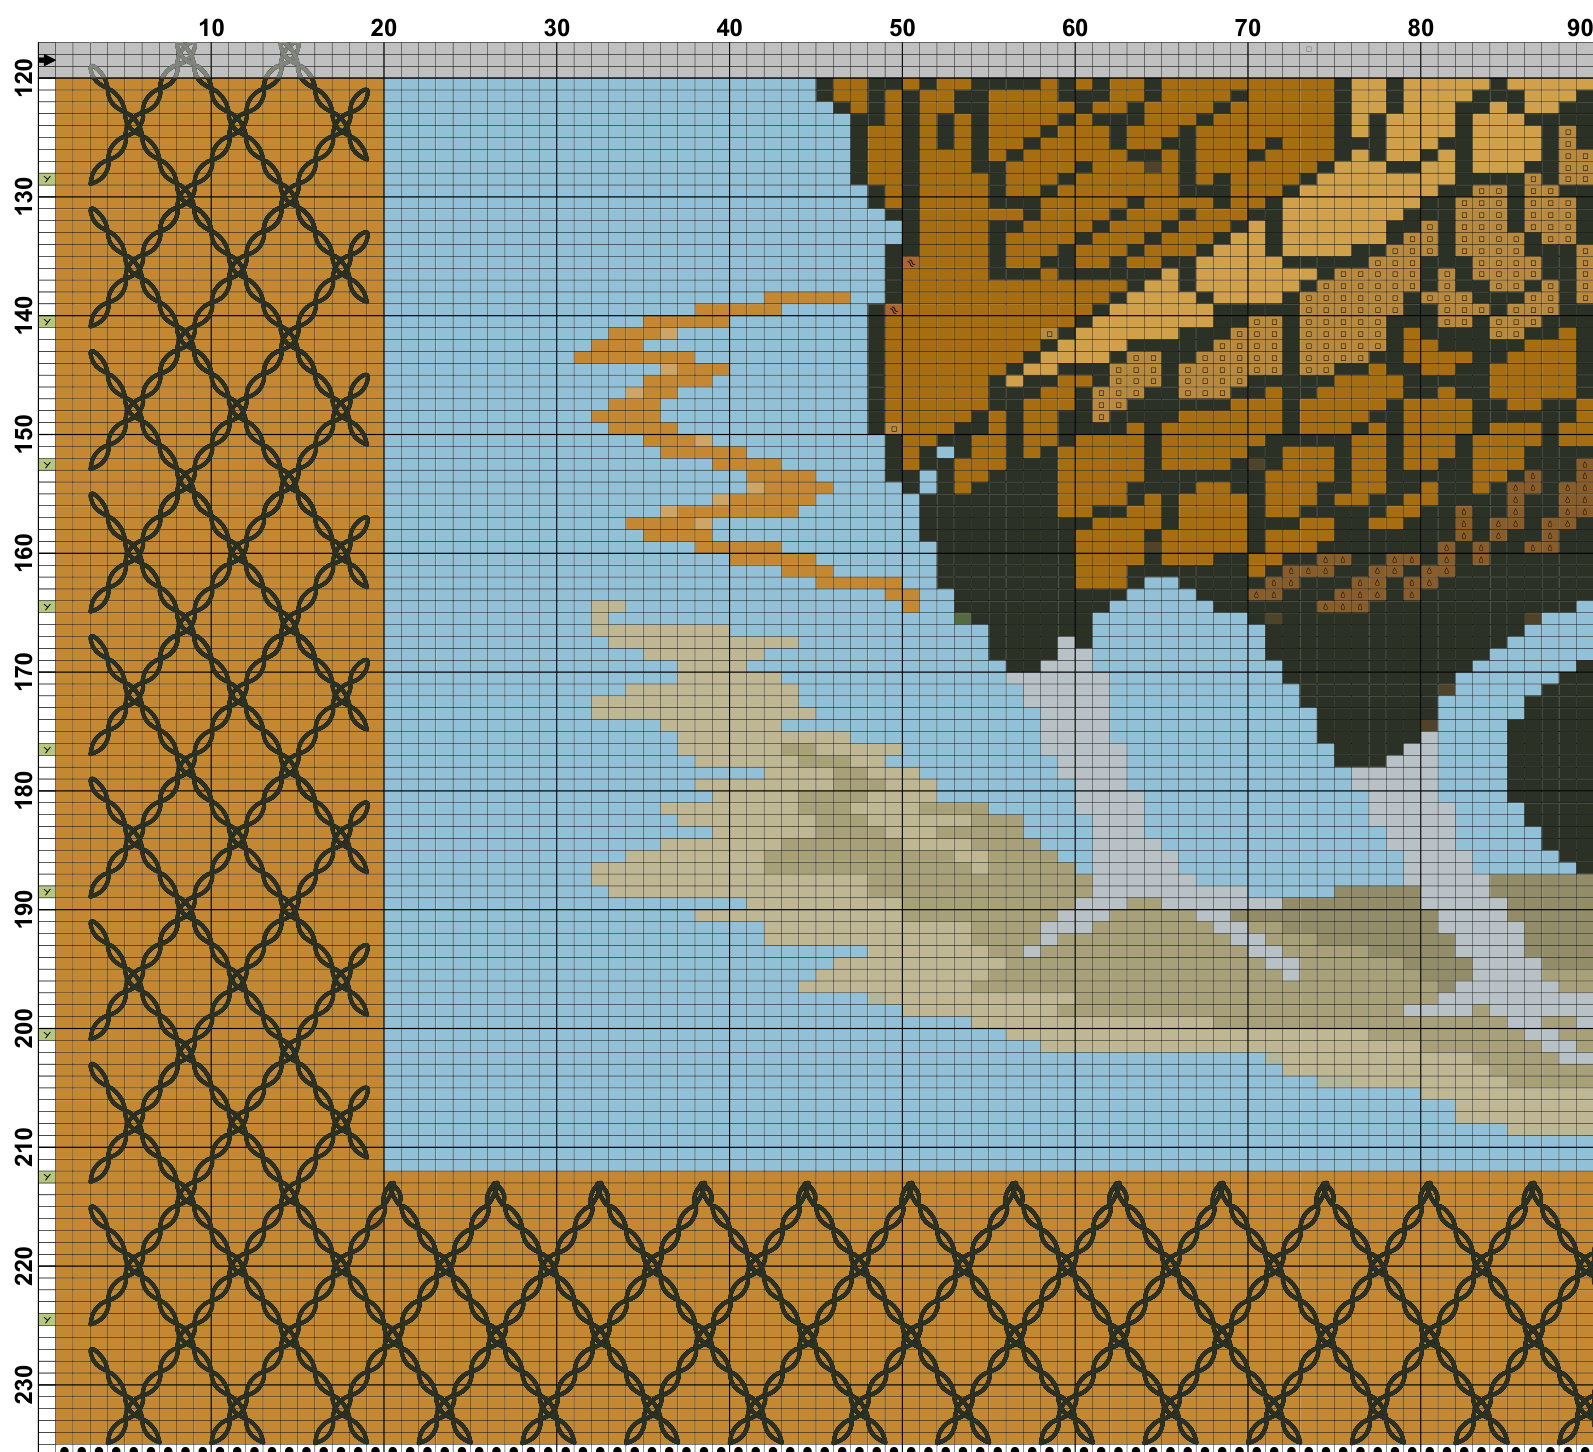
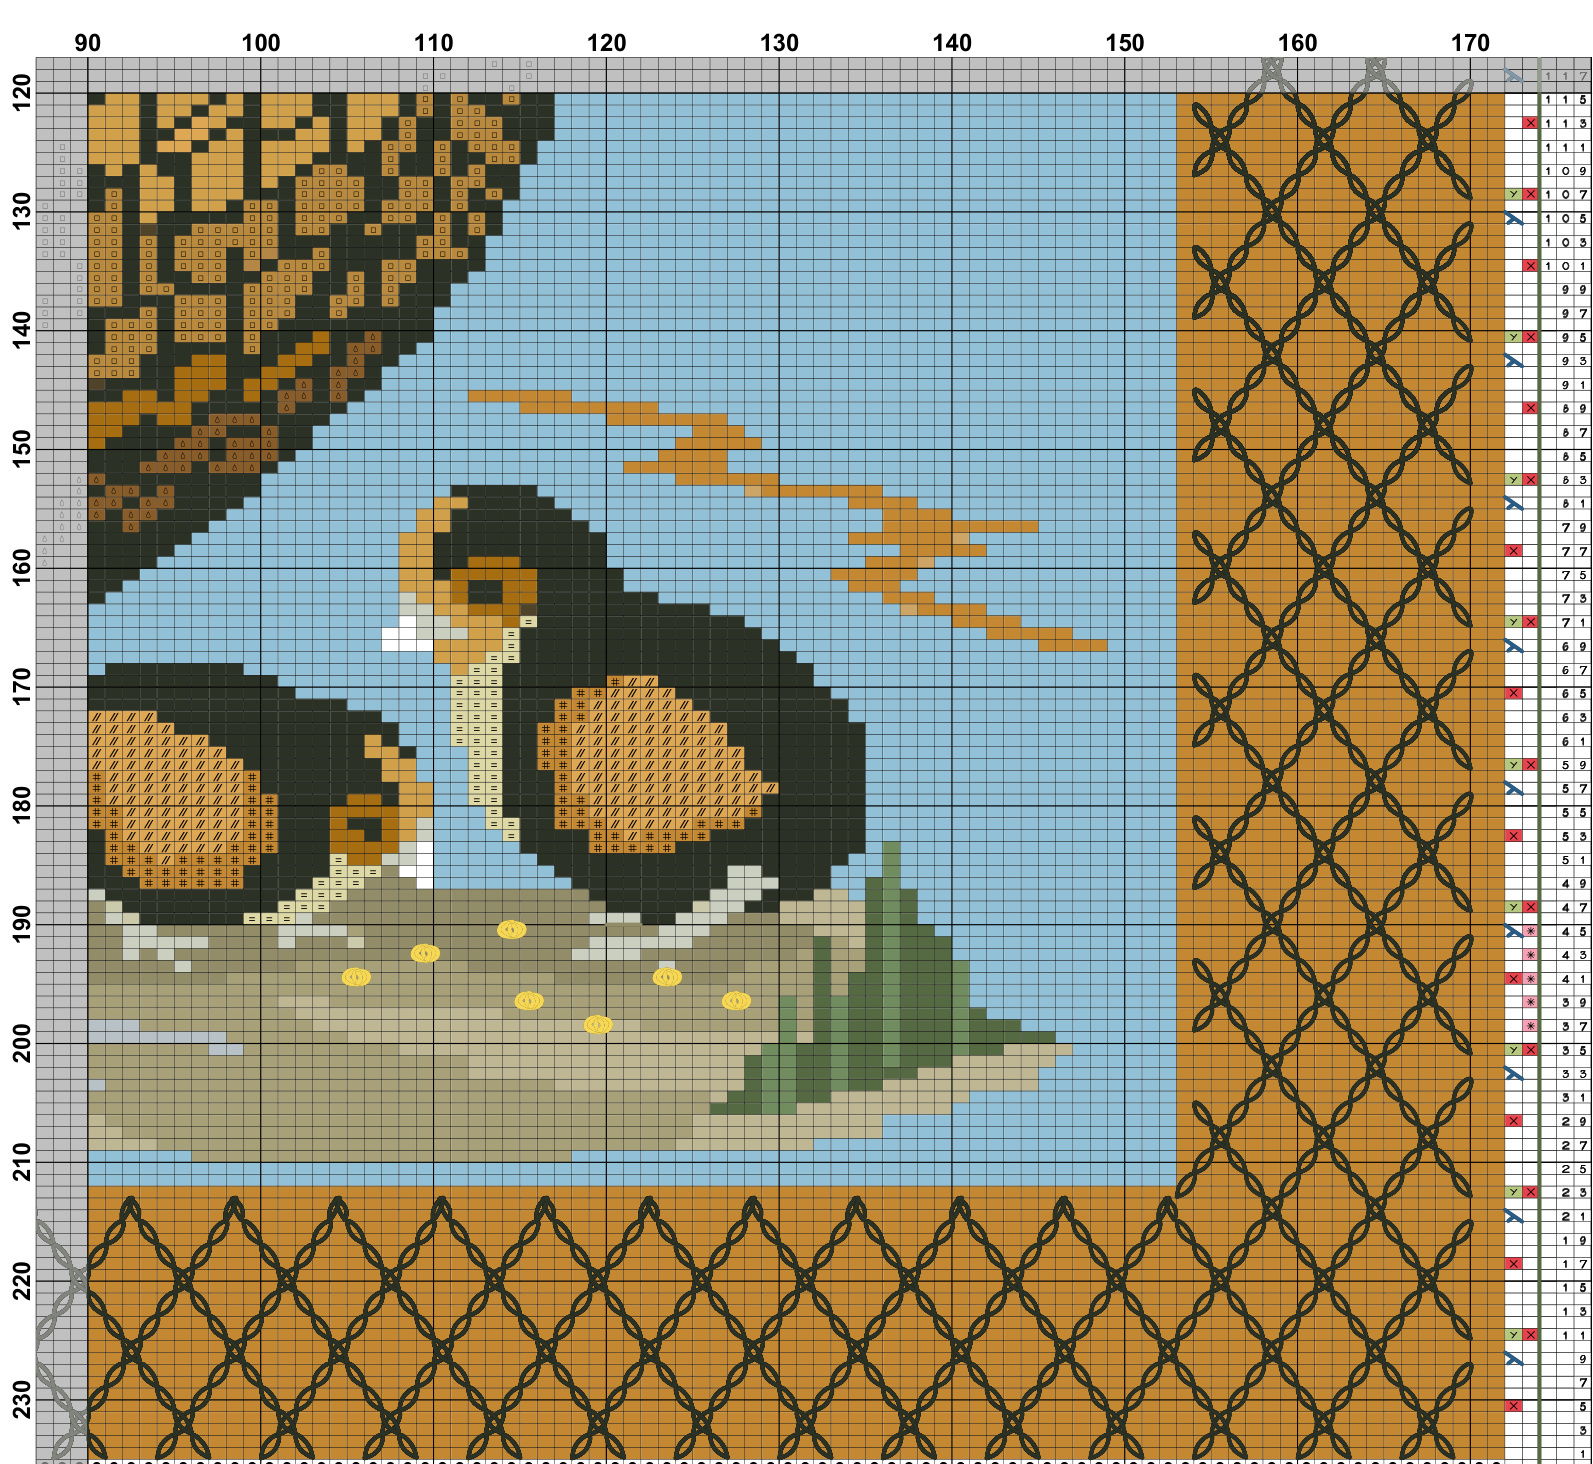
Sebrina Sebright and Chicks Pattern
Design size - 18 inches square pillow top Needles size -2/ 47 inch circle needle s size #0 or any size that will give you 9 sts and 13 rows to the inch. Yarn requirements- Pillow top only \*I get all my yarns from Knitpicks. The color selections are optional. You may prefer the more reddish browns for your hen and chicks. Knitpicks has a greatselection of shades.
Pillow Border -
Palette fingering - 1 skein -Brindle Heather \*If you opt to knit the back you will need at least 2 more skeins of the border fingering yarn. There will be enough lace weight left to do the back with the floating chains if desired. Gloss Lace Weight 1 skein Black Body of hen - Palette - 1 skein each of - Suede, Brass Heather, Bison, Black
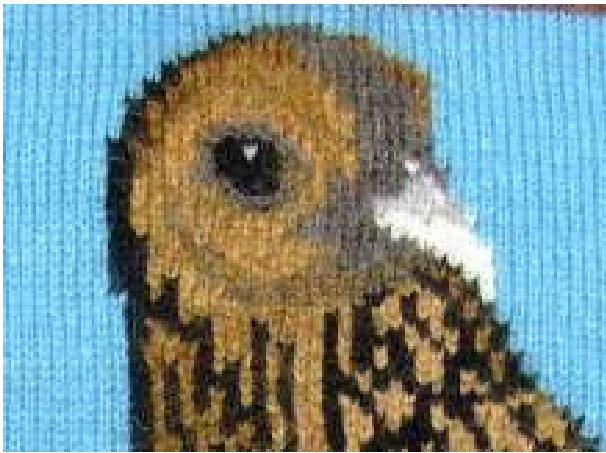
Suede and Brass Heather blend (1 ply of each) Brass Heather Brass Heather and Bison blend (1 ply of each) Head of hen - Palette - 1 skein of Pumice, 1 skein of White
Brass heather and pumice blend ( around neck area- 1 ply of each) biolzg.AloftIooowoiab+.Onoalzoinooobofblool.l Cicks-AloitLacewelgt.Oneskelneacnorblack,w
ite and Suede fingering yarn blend (1 ply of Suede , 2 strands of white? lack and Suede fingering yarn blend ( 1 ply of suede, 2 strands of Blacl
lack and Brass Heather fingering yarn ( 1 ply of BH, 2 strands of Black) Legs and feet of hen - Palette - 1 skein of Marble Heather \* I mixed one strand of Marble H, with one strand of Oster. Legs of chicks - you can use the Oster and ouline with Grey Mist Crocheted chains \*Gloss lace weight - 1 skein of Sterling (opt) You can do the detail with the Marble Heather . 1I opted for the shiny look. Ground - Palette - 1 skein each of -Oster, Coriander, Camel Heather, Clover, Tarregon(or any twogreen shades) Here again I did some blending , this is strictly optional. Any three colors of neutral shades for the ground would be fine. Sky - Palette - 1 skein Sky blue
Yarn Shopping List
Palette Fingering Yarn -one skein each of the following colors: \*Brindle Heather , Suede, Brass Heather, Bison, Black, Pumice,White, Marble Heather, Oster, Camel Heather, Coriander, Mist, Clover, Tarregon, and Sky \* Ifyou opt for knitting theback you will need 2 more skeins of your chosen color, orthe back ground of the frame.
Palette - Gloss Lace Weight:
pt) one hank of Sterling ( I used this for the detail on the legs of the he? Palette Aloft: One ball of Black , one ball of White.
Knitting Notes
Knit the main chart first. Check for loose stitches before you weave in your ends. I used Fair Isle and Armenian knitting technques for the color work. Duplicate stitches worked great for adding the Oster pads under the toes.
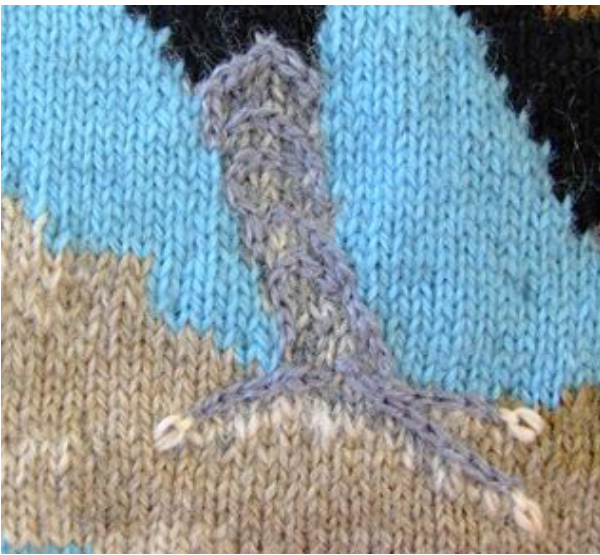
Crocheted chains were used for the leg and foot details. I also used them around the eye.
I also added the Grey (one ply) on the beak with duplicate stitches. a detailed tutorial on how to do the floating chains used on the border.

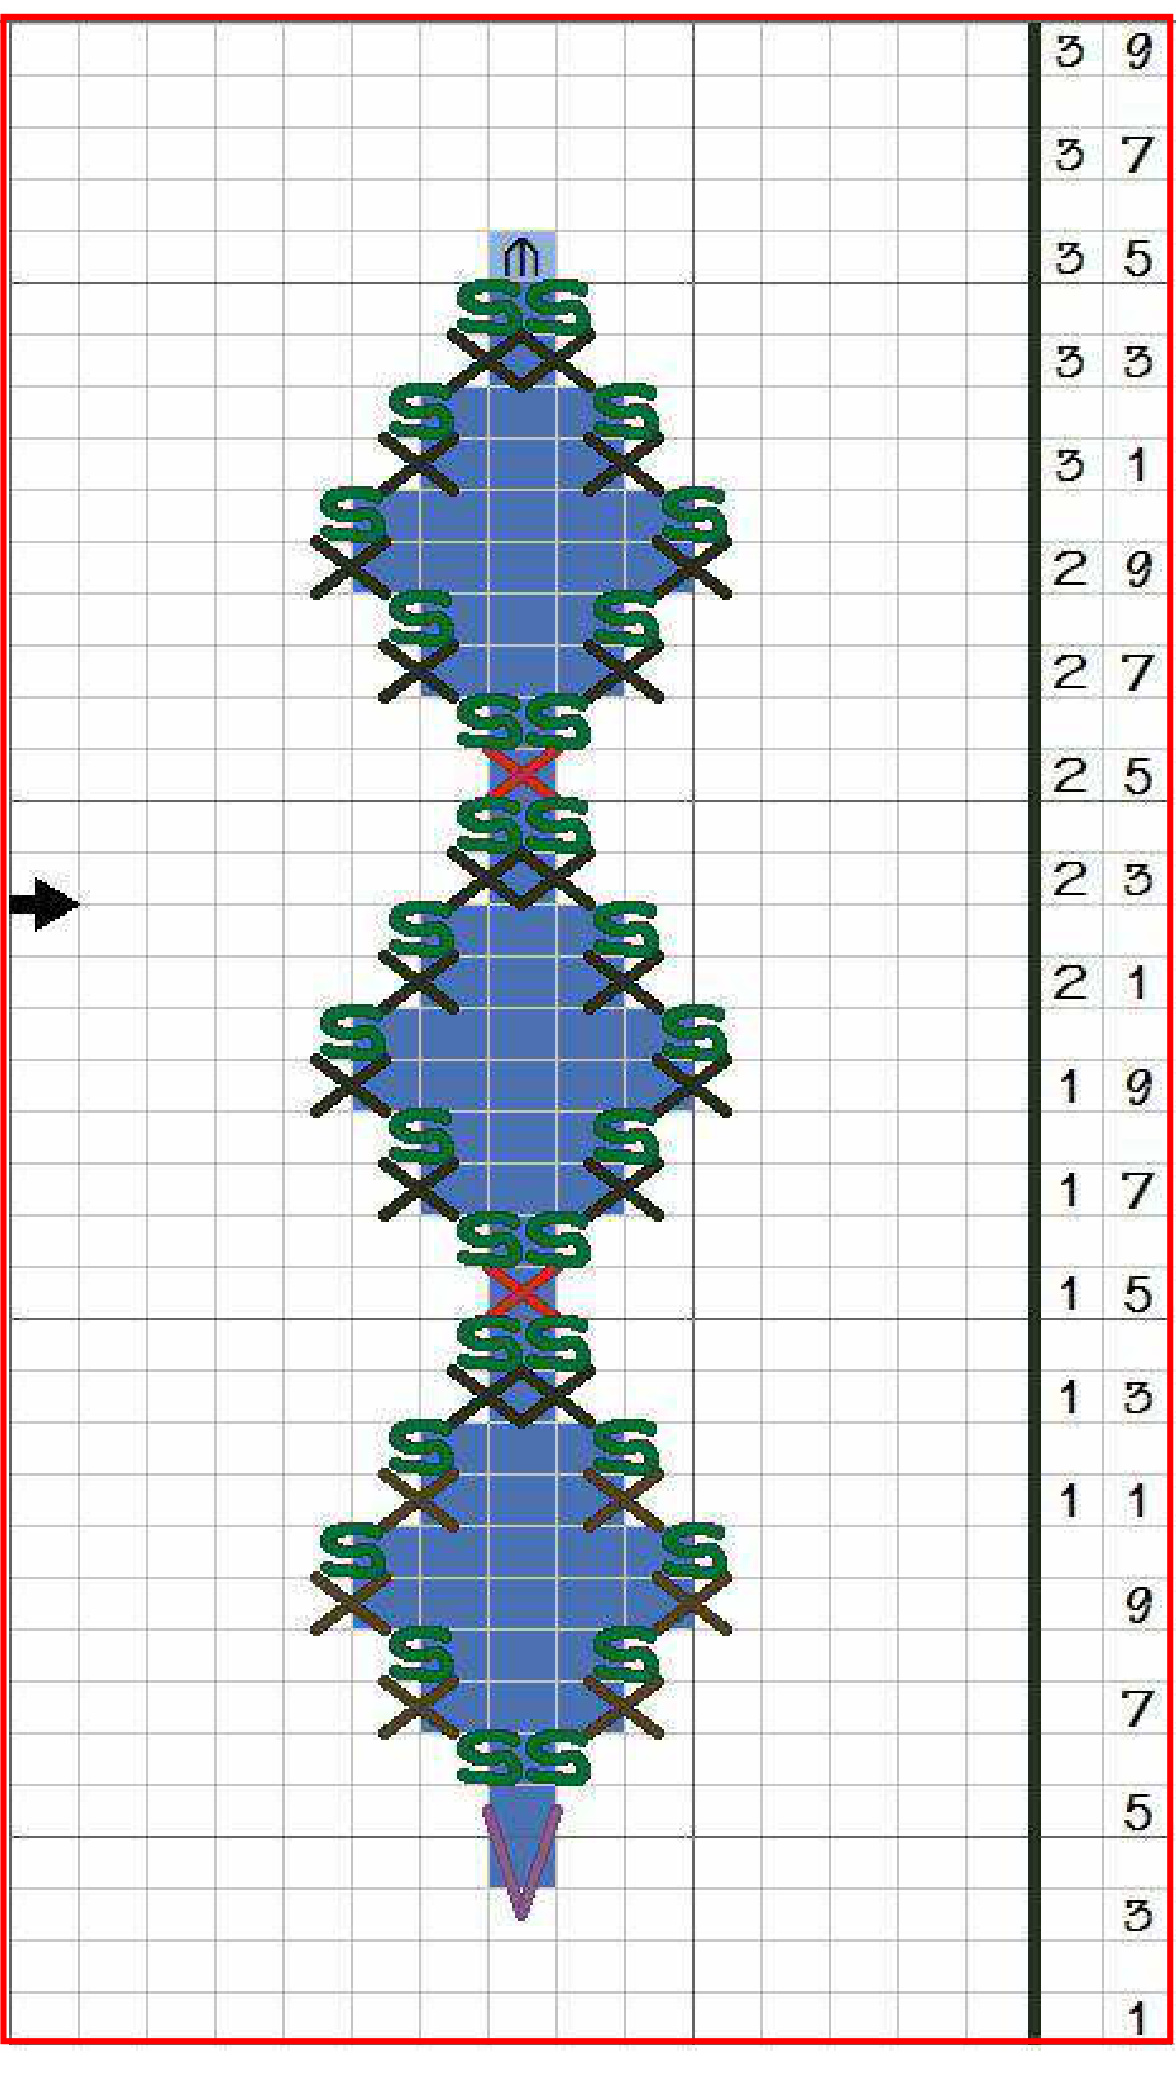
Knitting up the Main Chart
Begin your cast on with a piece of waste yarn, and chain up 178 stitches with a crochet hook. Break off, leaving about 6 inch tail. Pull the last stitch through and tie a loop in it to indicate the end you will be releasing later. Turning the chain over, count in 5 stitches and begin picking up your first row of the set up through the single loop on the back with your border color yarn. This is row marked with a “C" on the chart. Next set-up row - purl across. Begin row #1, and follow the chart, inserting the floating chain strands as indicated. See the tutorial attach for detailed instructions. Work the chart, then do all your detail stitches. Once you finished, turn the pillow top to the right , place a marker on the needle, and pick up 168 stitches down the left side. Pull needle A (your working 47 inch circle needle) through so that the stitches on the top and left side rest on the cord. Break off yarn, leaving a 6 inch tail. Turn the bottom up so that the purl side faces you. Beginning in the lower right corner of the pillow top, carefully release the chain, one stitch at a time, slipping them on to your 2nd 47 inch circle needle(B). Work right to left, pick up all the stitches across the bottom. Pull needle through until the stitch just rest on cord. Turn your work to the right side. Pick up the left end of your NB (bottom right hand corner), and leaving a 6 inch tail, turn pillow to the right, place a marker on the needle and pick up the stitches on the right edge (168). Place a marker on the needle and knit across the top stitches once more. Turn your work to the purl side. Re-position the needles by taking the released end of needle A, and picking up the stitches you just knitted with needle B across the top to the marker (top right hand corner). Pull the needle through so that the top and left side stitches are resting on NA, and the bottom and right side stitch are resting on needle B(See illustration on next page). Before going on secure the two yarn ends at the bottom corners. Now you are ready to block your pillow top.
Ready to Block
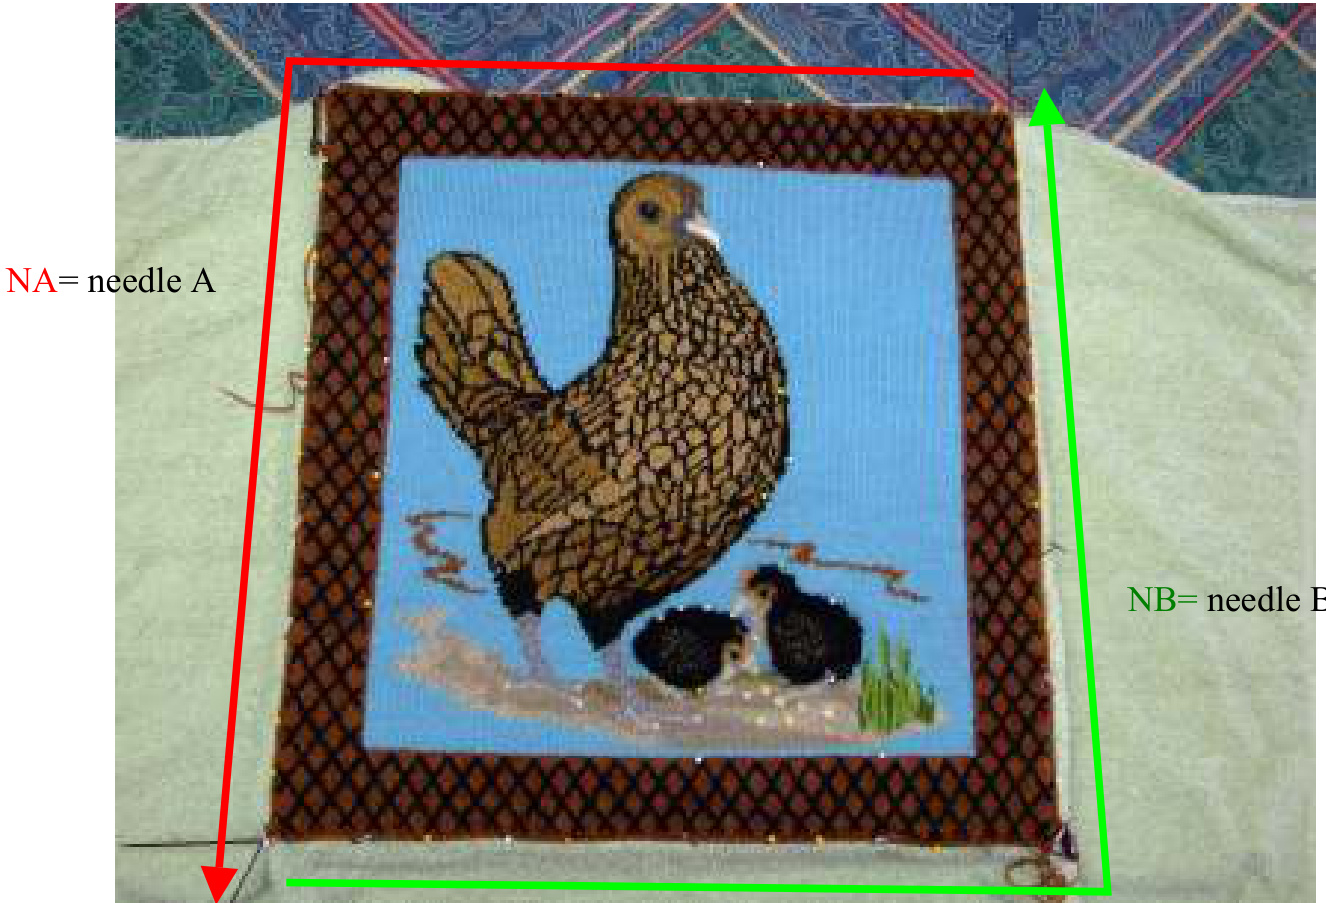
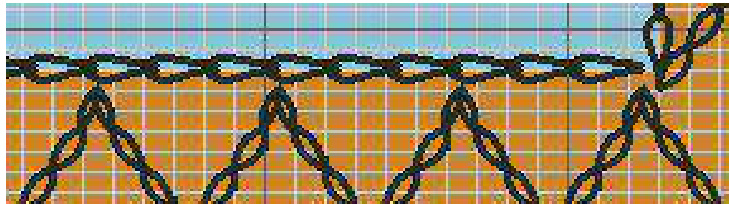
After soaking you work in cold water and wool wash, rinse it and wrap it in a towel to take out the moisture. Using NA and NB as your blocking rods, pin pillow top to size, 18 by 18. Make sure to line up your stitch rows horizontally and vertically. Let dry over night. It was at this stage that I decided to do the floating chains around the inside of the frame. I used a yarn needle to stitch the chains around the inside of the frame, as this gave me more control than the crochet hook. The chart shows you the intervals needed. I started at the bottom right edge and worked my way around, working right to left, anchoring my stitches in the last row of the border before the blue began. You can see the results on page 4. I found that a piece of yarn about 5 times the length of each section worked just fine. It is a bit time consuming but was well worth it.
Working up side, pick up loop in every 3rd stitch, skipping 2 in between. Working across right to left, pick up a loop every other stitch.
Once you are satisfied with your piece, slip a piece of nylon net measuring 19 by 19 underneath your pillow top and baste the edges to the netting. This will stabilize your top. The nylon net also makes it possible to stitch down any area that you need to secure without adding any weight or bulk. It also allows you to stuff any areas you wish to make 3D, helping to maintain the gauge. \*Note - I made the chicks 3D by adding one more strand of black Aloft to the wing area, took up the space with poly fill, and secured the gauge surrounding it by stitching it to the net. The next step is knitting a seam allowance ( about 6 row, plus BO) so that you can stitch the top to a fabric back. This pattern requires a 21 inch square of fabric, pre-washed and pressed. The extra bit allows for shrinkage. First, re-position your needle A so that you start the round in the upper right hand corner of the pillow top. To do this pick up the end of NA extending out of the bottom left corner of the pillow top. Bring it around the back of your work, and begin slipping the stitches at the right end of the top row onto the needle. Continue across until you get to the corner, or the beginning marker. Rnd #1 -YO, slip marker, M1 (this will be your center corner st.) YO, knit to end of needle. YO, M 1 in bar between the needles, YO, knit 4 sts off of NB. Pull NA through so sts rest on cord. Next, reach around and pick up the opposite end of NB at the upper right hand corner, using it, knit across the bottom sts to marker. YO, M1, YO, slip marker. Knit to end of NB. Repeat set up for corner, and knit 4 sts from NA. Pick up opposite end of NA at lower left hand corner and knit across to corner. \*Onceyou have established your corners, you don't have tokeep the markers in place, you can see the YO additions easily. Rnd #2. Knit around, knitting all YO's through back loop. Rnd #3. Knit around working the corners as in rnd #1, working one YO on each side of center of corner. Rnd #4. Repeat rnd #2. Rnds 5-6. Repeat rnds 3-4. Bind off all sts. Steam your seam allowance. I run a colored basting st around the pillow top as a sewing guide. Another method is to make the seam allowance a slightly different shade and us the change in color as a sewing guide. Either way works. Press a seam allowance on one edge of the fabric, then unfold. Place this edge on the bottom of the pillow top. Pin the pillow top to the backing, attaching the top, left and right side. Extend your sewing around the corner on the bottom edge at least 1 inch in from the corner. This keeps your corners neat, and it is easier to handle the closure this way. Clip corners of fabric, and turn right side out. Straighten edges and shape corners. Insert form and close open edge by hand stitching together. If you are careful no one will see the seam. I use a stitch resembling the mattress stitch. It works nicely.
Free Floating Chains
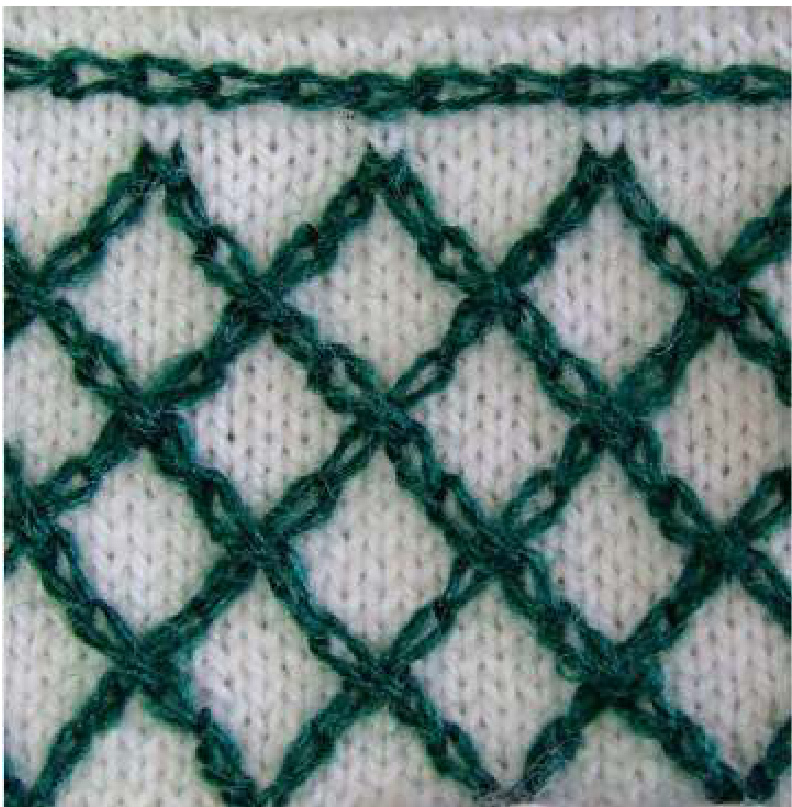
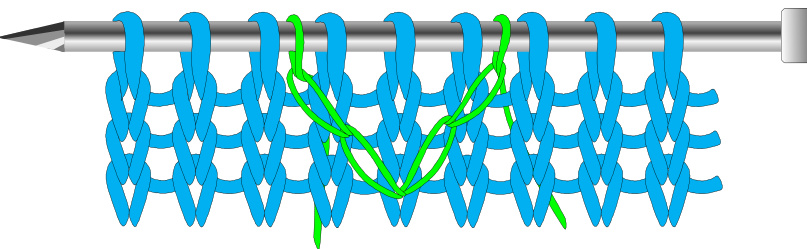
By Judith A Helms On the following pages I have illustrated how to make these chains. As the “free floating chain" moves between background stitches to form shapes, they do not disturb the original stitch count. These chains lie on top of the background stitches. The loops ride on the needle, ready for you to move them in any direction you choose. Once you learn the concept, you will be able to draw up your own designs using these little beauties. They are also adjustable, as they are worked on a continuous separate strand of yarn.,this allws you to tighten up any loose loops you may find later. You might think of this as “crocheting" with a knitting needle. The first illustration in this tutorial is how to make a free floating chain diamond pattern. Each diamond is begun with one strand of yarn, picked up in the middle, thus leaving 2 free ends to work in opposite directions. The second illustration is how to handle these chains when using them to overlay a border for a pillow( as I did on the border surrounding two of my pillow designs, Ms Red Hat Silkie, and Sebright Hen and Chicks), or you might want to use this technique for the bottom edge of a tunic or for and ornamental touch on the bottom edge of sleeves. I suggest that you read the entire tutorial through first, then try the pattern swatches on the last page. It take a bit of practice, but once you have the idea, you be able to make these chain with ease.
Tutorial Key
FC = floating chain RN = right needle LN = left needle WY = Working yarn = background yarn of heavier weight. CCR = cable chain right CCL = cable chain left CS = center stitch
Free Floating Chains Diamond
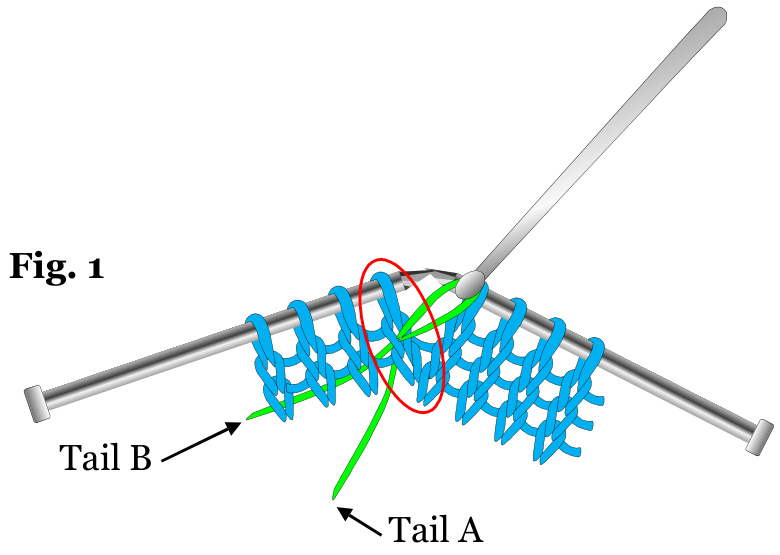
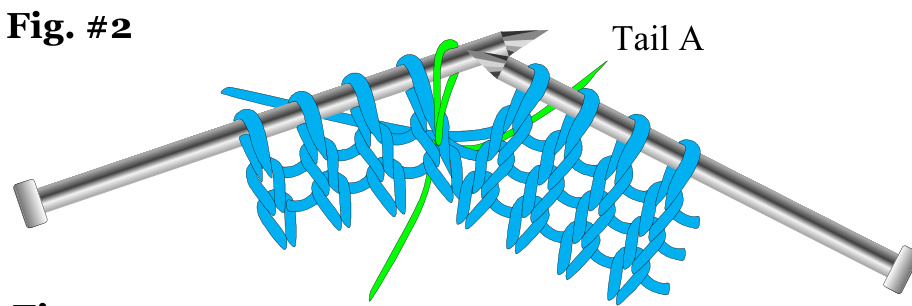
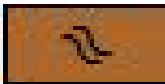
Fig. #3

Fig. #5 1. To begin the bottom of the free floating chain diamond, knit across to the stitch where you want the diamond to start. In the illustration I have it circled the stitch I have chosen in red. This will be the “center” stitch of your diamond. Plan an uneven number of stitches in between, ie; 5, 7, etc. 2. Using a crochet hook, stick through the stitch below the center stitch that is on the left needle( Fig. #1), and pull up a loop of your contrasting yarn that has been pick up in the middle. 3. Place this loop on the left needle with the left leg of the stitch on the top. (Fig. #2) 4. Lay your working yarn to the left and bring tail A of your FC yarn from underneath and knit the chain (green) through the back loop. (Fig. #3) 5. Pick up working yarn(blue) and knit the center stitch. Bring tail B of your FC yarn over the top of the working yarn and hold it in your left hand. Using your crochet hook, stick into the same center stitch again and pull through a second loop. ( Fig. #4) Place it on the left needle, making sure the front leg is on the top of the needle. Now grab tail B of the chain yarn and knit the loop through the back leg. When you have completed the steps above it should look like Fig. #5 When you finish setting up all the diamonds you want, knit to the end and turn. You will always slip these FC-loops on the purl rows.
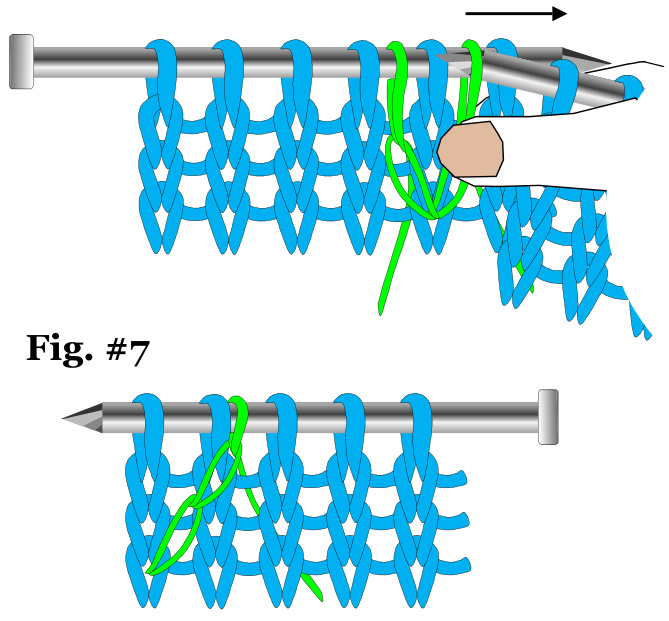
Fig. #6 6. After completing the purl row, you are ready to start enlarging your diamond. Knit to 1 stitch before the first chain. Reach across in front of the stitch with your RN, and stick the point of the needle into the front leg of the FC loop, Fig. # 6. Pinch the chain and the stitch to its right together with you right thumb and index finger. Gently pull both stitches off the needle to the right. While still holding the stitches tight, tip the needle toward you (so you can see) and pick up the stitch you released with the chain onto your LN, then pick up the chain loop through its back loop onto the LN. The stitches are now reversed and the chain has been "cabled" over to the right, one stitch. You will see this move referred to in my patterns as CCR (or cable chain right). You can now release the stitches you have been holding.
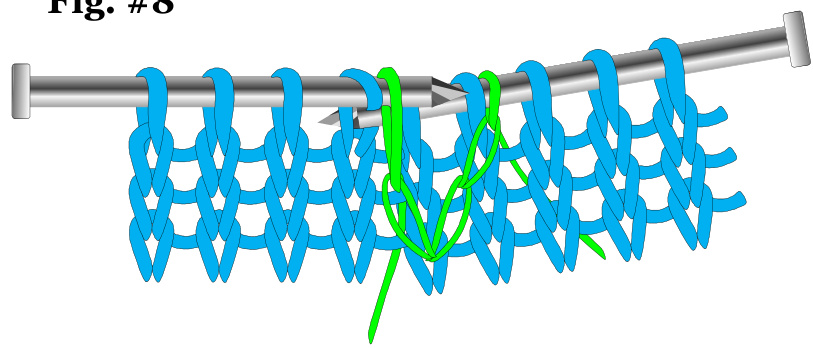
Fig. #9
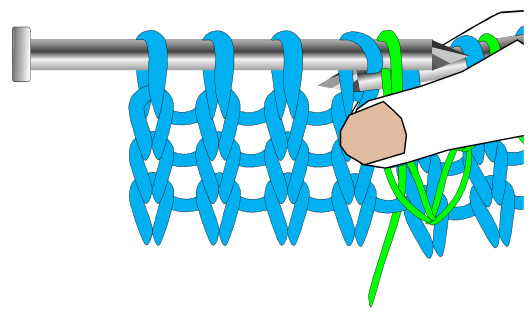
Fig. #10 7. Knit the FC by bringing the FC yarn up from underneath the working yarn and knit the FC through the back leg. Be sure to check your FC to make sure that it is laying flat against the surface of the work. Drop the FC yarn strand.
Once knitted it should look like Fig # 7. 8. With working yarn only, knit the next two stitches. You now have the next chain immediately to your left. This time we will be moving this chain one stitch to the left ( or CCL- cable chain left). 9. With your RN, reach around back of the LN to the stitch immediately to the left of the chain loop. Stick the tip of the needle into the stitch as if to knit (Fig. # 8). Pinch the FC and the stitch together as before and slid them off the needle to the right (Fig. 9). While still holding the stitches firmly between your thumb and index finger, pick up the chain loop with the LN. Immediately knit the stitch you just slipped unto the RN through the back loop. 10. Bring the FC yarn up from underneath the working yarn, knit the FC through the back leg, (checking first to see if it is lying open). Your diamond should now look like Fig. #10. Drop the FC yarn, and with the working yarn proceed to the next diamond, repeating steps 6-10 Now turn your work and purl across, slipping all chains.

Fig. 11 Fig. 12 One WY st between chains In Fig. #11, the chains have bee worked until there are 5 stitches in between. Now it is time to change directions. After purling the last row, and slipping the chains, we will begin the process of reversing the direction the chains move.
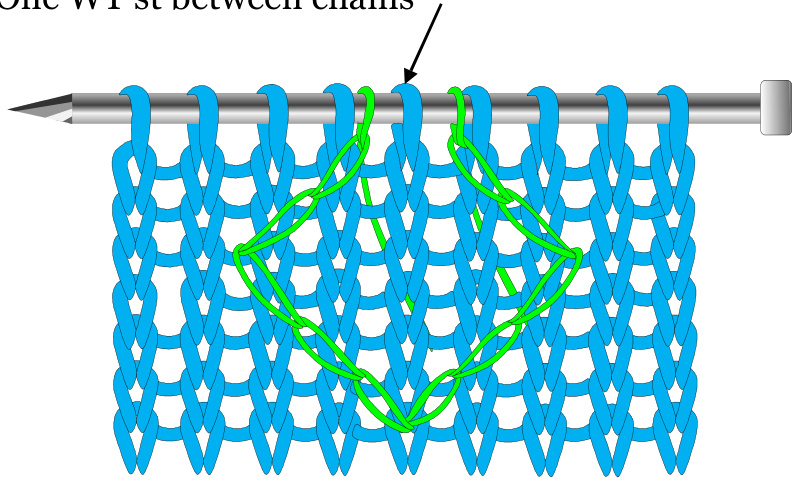
11. Knit to the FC. Now, CCL, Knit the background stitch with the WY, then knit the chain through the back loop, as before.(see steps 8-9). Knit 3 background stitches. CCR with the next FC loop. Knit chain, through back loop. Knit 3 background stitches. Repeat the process. Across. You now have 3 sts between the FC's. Turn. Purl across as before, slipping all chains. 12. Next row, repeat the process in step 11. You will now have one background stitch ( WY sts)between the chains. Fig. 12. Work purl row as before, slipping all chain loops. Fig. 13
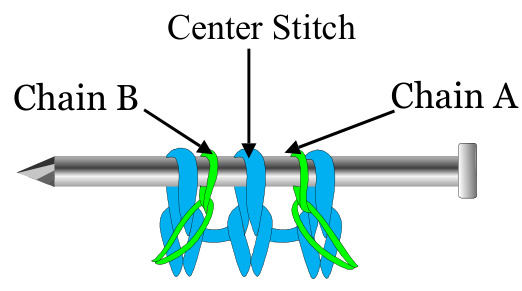
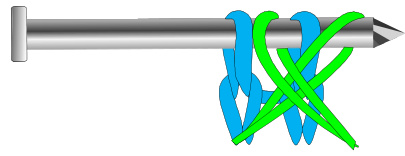
\*\* This next row is where we “Cross" the 3 stitches in the center , closing one diamond and starting another. I have identified the stitches we will be Working with in Fig. #13. On the following page I will wallk you step by step through the moves. It might seem a bit tricky at first, but with a little practice, you will soon be going through it like a breeze. Fig. #1
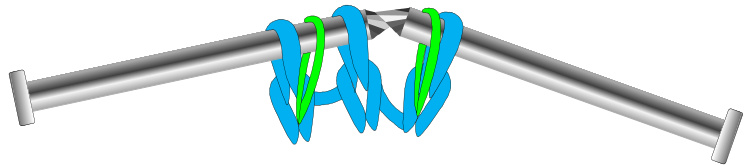
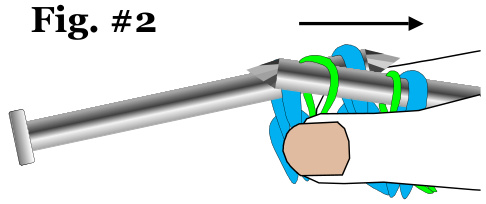
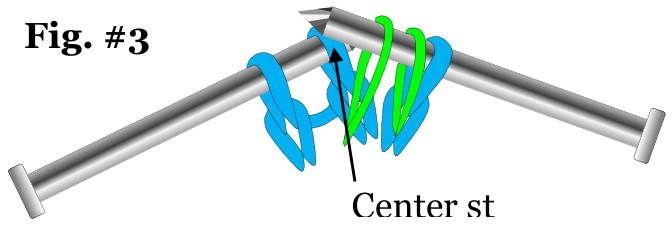
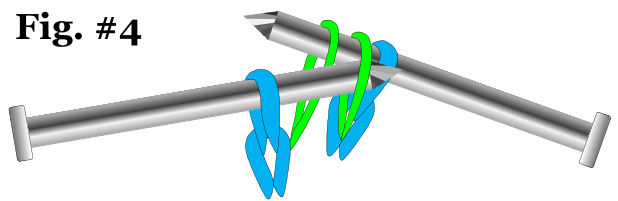
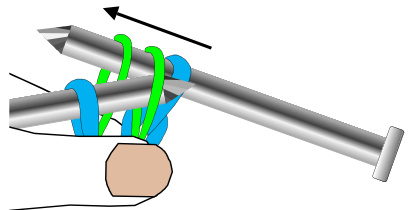
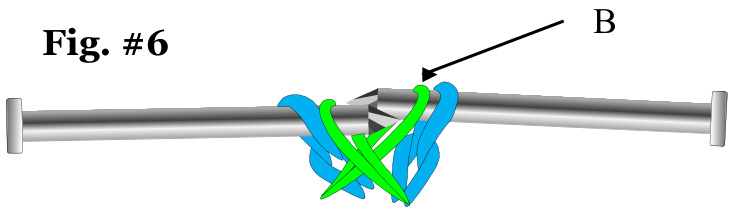
Fig. #7
The Cross
1. Knit to the first chain of the 3 center stitches. Slip Chain A, onto the RN, knitwise. Fig.#1 2. CCL floating chain B. Fig. #2 3. Slip the center stitch onto the LN. Leave chain B on the RN. Both chains are now on the RN. Fig. 3 4. Stick the point of the LN, into the front leg of chain A. Fig. #4 5. Pinch the two chain stitches together and pull off the RN, to the left. Fig. #5 6. Slip chain B onto the RN. Fig. #6 7. CCL chain A, slipping the center stitch on the RN. Slip all three stitches back to the LN. See Fig. #7 8. Using floating chain B's tail,(which will be the one to the left of the center stitch), knit chain B through the back loop. 9. Knit center stitch with working yarn through back loop. 10. Using floating chain A's tail,( the one to the right of the center stitch, knit chain A through the back loop. When finished your Cross should look like Fig #8.
Floating Chains Practice Swatch
Knitting Key
CCL - cable chain left (pg. #2, 8-9) CCR - cable chain right (pg #2, 6-7) LN = left needle RN = Right needle
Floating Chain Practice
The chart previous page was drawn upto help you get a since of how the chains move. It is a picture of the following written instructions. Use two weight of yarn for this swatch. 1. With your heavier yarn cast on 15 stitches. This row is #1 on the chart. Row 2- Purl across Row 3 - Knit across Row 4 - Purl across Row 5 - Knit 7; (st 8 is your center st); set up your diamond as described on page 2 of this tutorial with a long strand of your lighter weight yarn. Don't forget to pick the strand up in the middle. Row 6 - Purl across, slipping the chain loops. Row 7 - Knit 6, CCR, knit 3, CCL, knit 6. Row 8 - Repeat row 6. Row 9 - knit 5; CCR, knit 5, CCL, knit 5. Row 10 - Repeat row 6. Row 11 - Knit 5; CCL, knit 1, knit CC, knit 3, CCR, knit 6. Row 12 - Repeat row 6. Row 13 - Knit 6, CCL, knit 1, knit CC, knit 1, CCR, knit 7. Row 14 - Repeat row 6. Row 15 - Knit to the first CC. Work “the Cross" as described on page #4. Knit across the rest of the row. Row 16 - Repeat row 6. Row 17 - 26 Repeat rows 7-16, twice. Row 35 - To end the diamond, knit to the first FC. Slip it to the RN, knitwise. Knit the second FC and the center stitch together with the working yarn. Slip the first FC over the new stitch. Knit the rest of the row with the working yarn. Turn. Row 36 - Purl across. Judith A Helms - copyright 2012 Row 37 - Knit across. Row 38 - Purl across. Row 39 - Cast off sts.
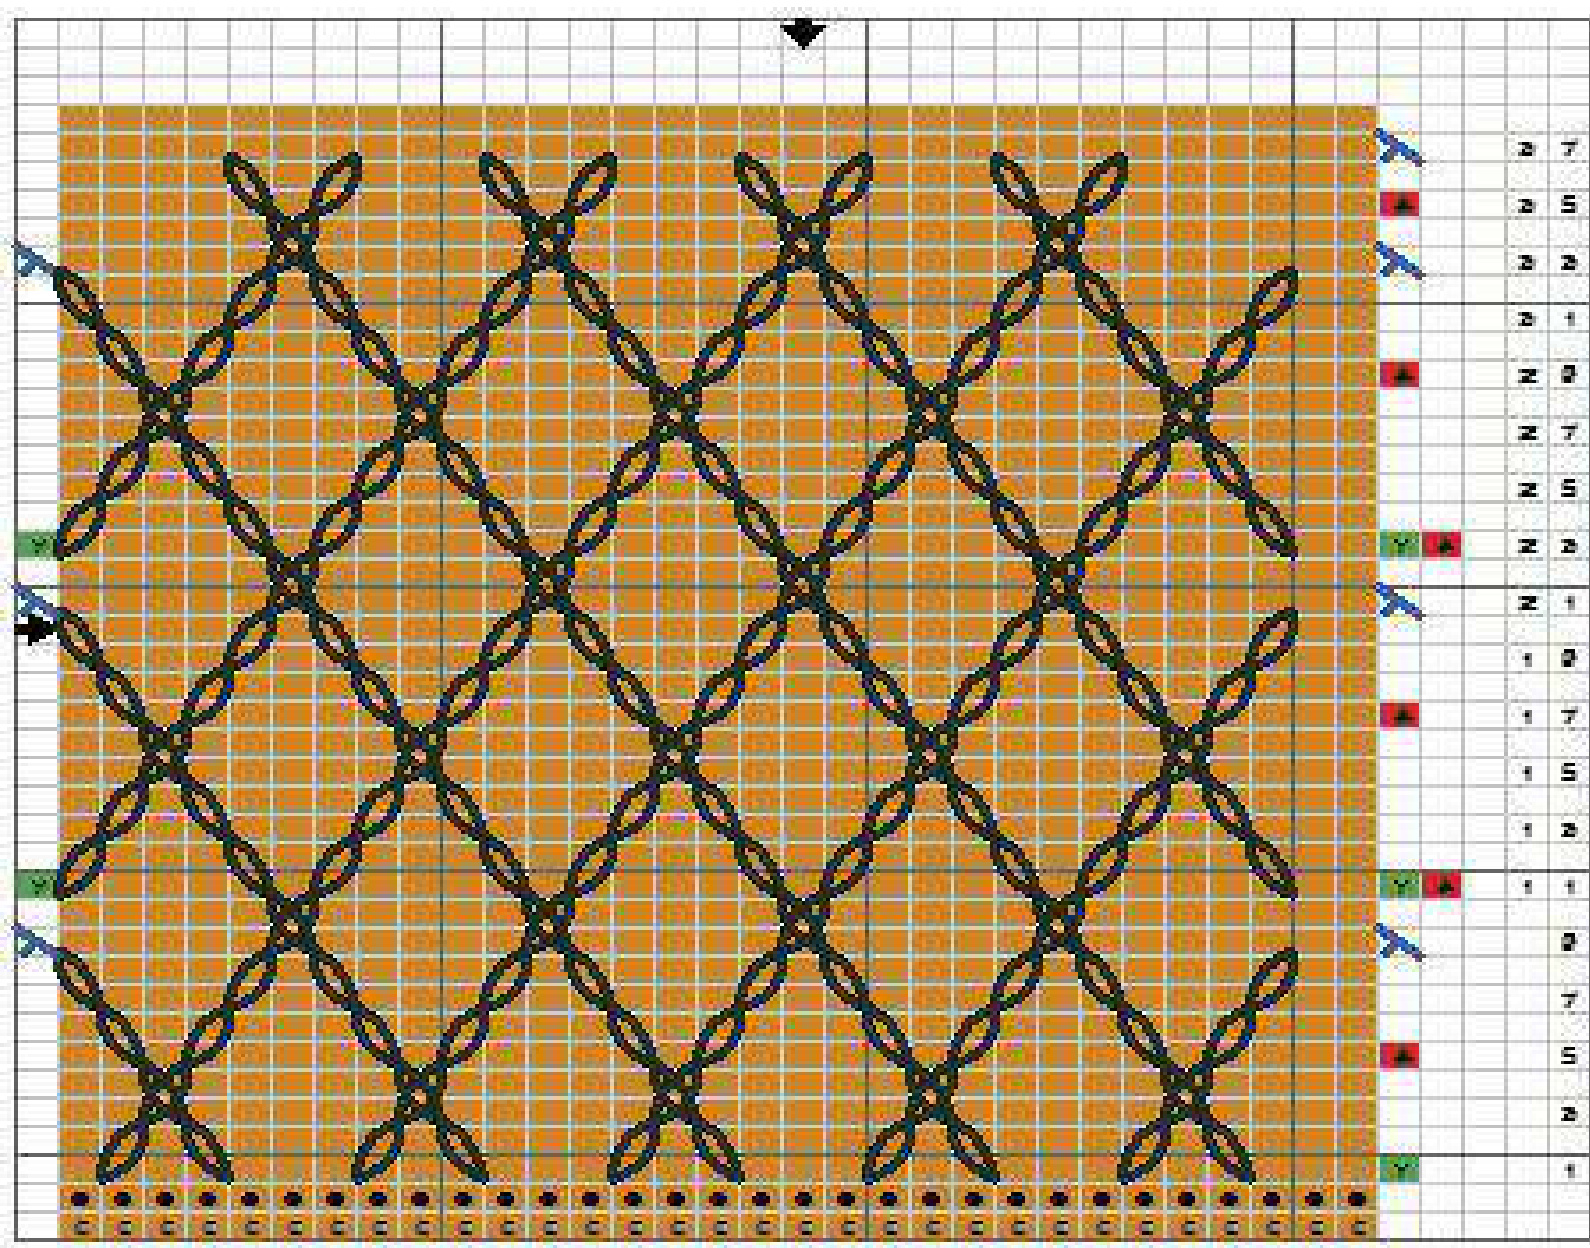
Free Floating Chains Diamond Border
In this section I will instruct you how to read my chart and give you added techniques for inserting the yarns. It is important to remember for this technique to look good it is again advisable to use two weights of yarn. You floating chains will show up better if they are constructed of the light weight. I used lace weight wool and silk over fingering yarn for all my pillow patterns. However, if you are thinking about using this technique for the bottom of a sweater or cuffs, you could use fingering weight over DK or regular 4 ply worsted. So.. Lets get started. First the chart.
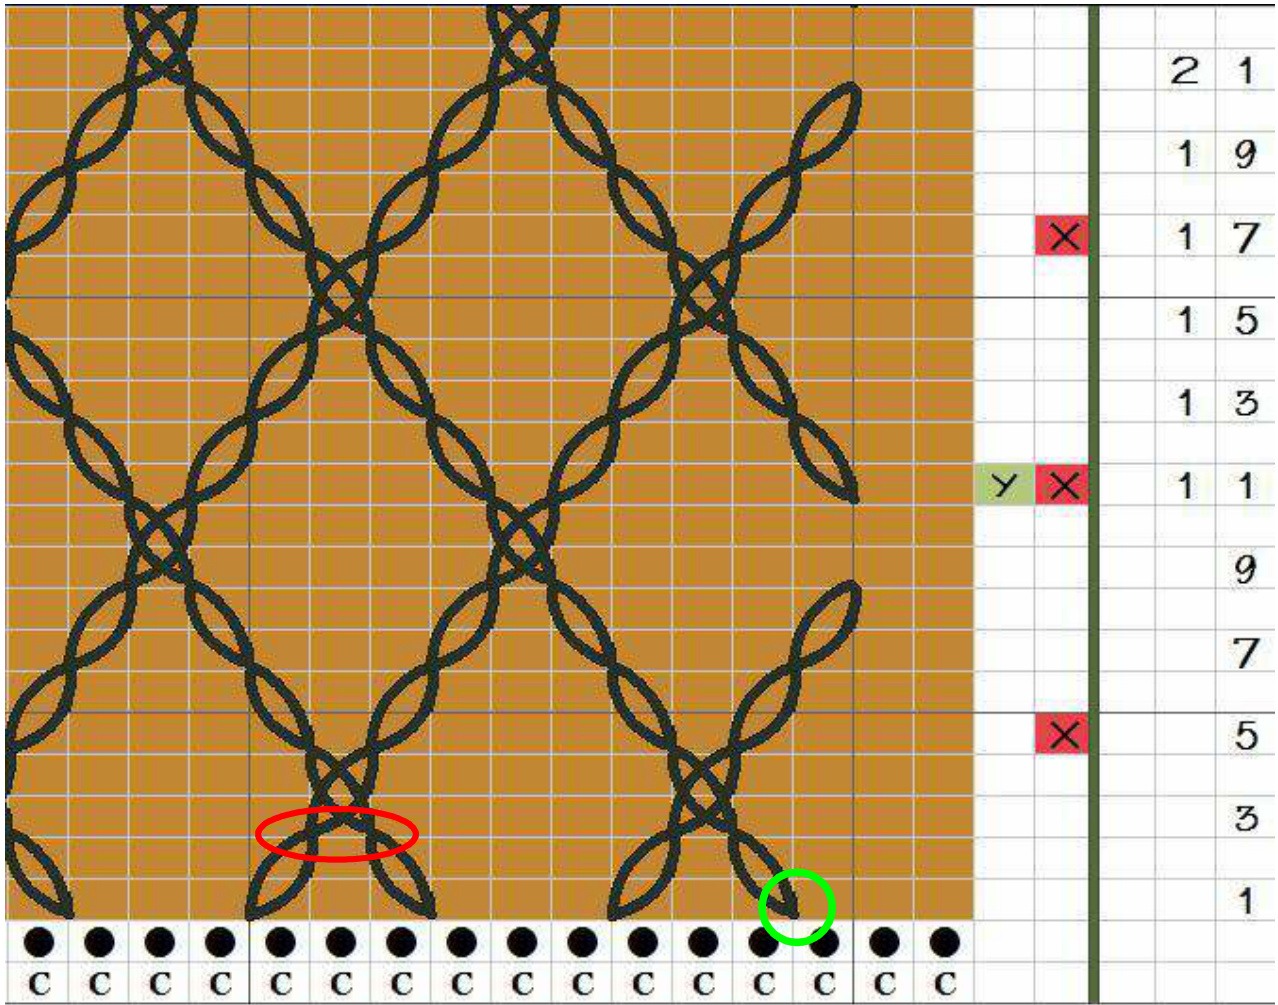
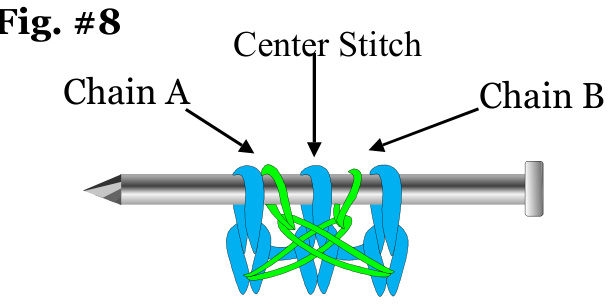
1. The first two rows of the chart are your set up. As indicated “C" stands for cast on, while the return row is purled. st numbered row of the chart is where you begin to insert the FC stranc 3. The circled area above indicates where the first FC strand is entered. You will notice that it between the 3rd and 4th stitch of the row of the chart. 4. The “cross" is indicated with the “X" in red. 5. The additional yarn insertions are indicated with the “Y" in green. 6. The base of the “cross" will always have a FC on each side of the center stitch. See red circle. 7. All movement of the floating chains occurs on the knit side of your work. All FC loops will be slipped on the purl rows.
FC Yarn Strand Insertion
1. Just as with the FC diamond practice, use the double ended strand where ever possible to eliminate unnecessary tails to weave in.
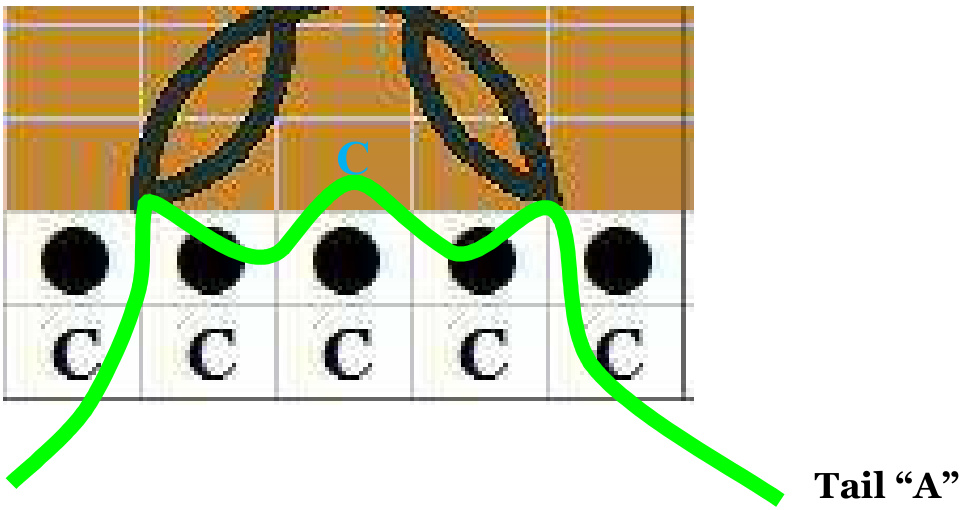
Tail“B" 2. Using about a 3o inch strand of your light weight yarn, fold it in half, and place it over your left index finger. Holding it in place behind you work, put your crochet hook under the bar between the stitches and pull up a loop. Place it on the LN, so that the left leg of the loop is on top. Using the right side tail ( A) bring the yarn underneath and up over the WY and knit the FC through the back loop. Drop the FC strand. 3. Knit 2 stitch with WY. Knit center stitch, trapping the “B" tail of the FC strand by going under the strand as you knit the center stitch. 4. Knit 1 with WY. Drop WY. 5. Insert hook between next stitch, pull up FC loop using tail “B". Place loop on LN making sure that the left leg is in front. Bring FC tail up from underneath the WY, and knit the FC through back loop. Drop FC strand. nit across to next FC strand insertion. Repeat process with new strand Make as many as needed. Turn. Purl across slipping all FC loops. Turi on chart, being careful to pick up the corresponding tail to each FC loo See pages 3-6 for instructions on moving chains
Beginning and Ending FC Strands on Sides
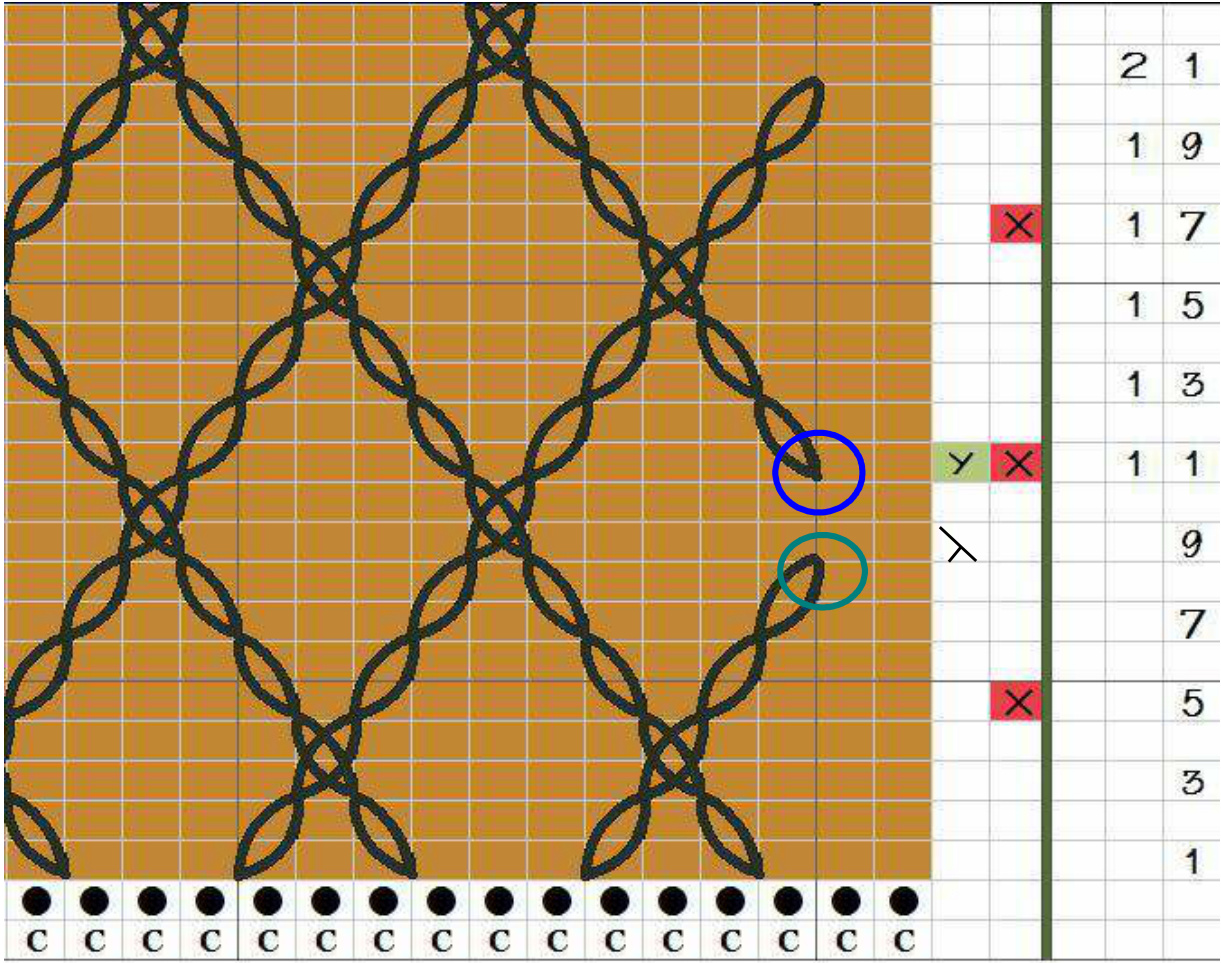
In row # 9 you will see the symbol of an upside down "Y". This means that you will end the surface appearance of this FC strand ( blue circle). To do this, knit the loop as before, then pull the free end of the FC strand through the loop. Bring it to the back of your work and drop it. Continue across the row, completing your chart. Repeat the process with the last FC loop in the row. Turn. Row 1o. Purl across slipping all FC loops on the needle. Turn. Row 11. This time you have a “Y" in the green box. You are going to pick up the discarded FC strand from row #9 and use it to make the new FC loop indicated on your chart. Just be careful to make sure it lies smoothly on the back surface of your work. Do NOT pull it up too tight. mber you can adjust the tension of these loops after they are complete ompleting chart. Insert new loop at end of row as indicated on the cha! Row 12. Purl across, slipping all FC loops on needle. Turn. Now you are on your way. You have allthe basic moves. Working the border practice chart will help you become familiar with the process in no time.
FC Practice Key
| K = knit | st = stitch | RN = right needle |
| P=1 purl | FC = floating chain | LN =left needle |
| CS center stitch 二 | WY = working yarn, or background yarn | |
Floating Chains Border Practice
Chart and Instructions
ow are knitted and the even rows are purled. Begin by casting on 31 sts Purl across. () Row #1 K 3 sts with WY. Insert hook underneath bar between st 3 and 4. Pull up loop from tail “A" of FC strand and place it on the RN. This is your first FC loop. K 3 with WY, trapping FC tail “B" in center stitch. Insert FC loop between sts 6 &7. Place st on RN. Knit 3 with WY. Repeat across until all FC loops have been added to you work. Row # 2. P across, slipping all FC loops on needle. Turn . Row #3. With WY, k 3; [: CCL, with WY k 1; k FC through back loop. Knit CS. CCR, moving FC one stitch to right. Knit FC through back loop. With WY, knit 4 :]. Repeat [: :]. Work across moving FC loops as indicated on the chart (CCL, Cs, CCR). You will have 1 FC loop each side of the CS, and 5 sts of WY inbetween. Row #4. P across, slipping all FC loops. Judith A Helms - copyright 2012 Rows #6-8. Work chart, moving FC loops as indicated. \*Always make sure that your loops are laying open on the surface of your work. Adjust the tension as you go. You can pull up any slack by turning to the back of your work and finding the corresponding single strand that connects the loops. Pull up gently, then work up from there follow the line toward the loops presently riding on your needle. Row #9. with WY, k 2; CCL, k FC through back loop. Stop! Pull the new loop just made completely through the FC, then drop the FC tail to the back. This ends the loop in this section. Continue across, working the chart as indicated. When you get to the last FC, repeat the process and drop it off to the back of your work. Finish the row knitting with the WY only, Turn. Row #1o. Purl across, slipping all the FC loops on the needles. Turn. Row #11. Knit 2, insert hook under bar between the stitch to your left, pick up the FC yarn you just discarded on row #9 and pull it through placing it on the LN. DO NOT KNIT THIS LOOP. Let this loop just ride your needle. You will be moving it into position in row #13. Work across row as. indicated in chart., working the “Cross” with 5 WY sts in between. Add the FC loop at the end of the row, as you did the one at the beginning. Row# 12 Purl across, slipping all FC loops. Rows # 13 - 38 Work the chart. Row # 39 bind off #31 sts. Finishing - Adjust all FC loops as desire, then weave in the ends along the lines of the chains on the backside.