| Sizing: S. 30(60) | Total stitches--eachNdl(both) M. | L 36(72) 40(80) |
| SockCircumferehceBalloffoot relaxed | ||
| S | M. L 7.25 | |
| Inches. Cm | 6.0 | 8.25 |
| CircumferenceActualBalloffoot | ||
| Inches. | S. 8.0 | M. L 9.0 |
| Cm. | 20 | 10.0 23 |
| 25 | ||
| Circumferencetop ofarchto back of heeltofit M. | ||
| S. | L | |
| Inches. | 11 11.6 | 12.5 |
| Cm | 82 29.5 | 31.8 |
MYSTERY SOCK CLUE 1:ToeAugust 2015, S.L. Myers Materials:\~1skeinlighttomedium fingering weight sockyarn.Sample knit uith:saffronDyeworks,Enya, 100% sw Merino, 2-ply; 440yds colorRosegold. Tools:Uso(2mm)24inch(61cm) circular needle,cableneedle,2 closedmarkers,darning heedle, maybe a safety pin, optional dental floss.:)
Gauge:
In stockinetteinround--9.oSt,13.5 rows per inch (3s St, s3 rows per 10 cm) In instep pattern in round --11 St,12 rows per inch (43 St, 47 rows per cm)
Abbreviations:
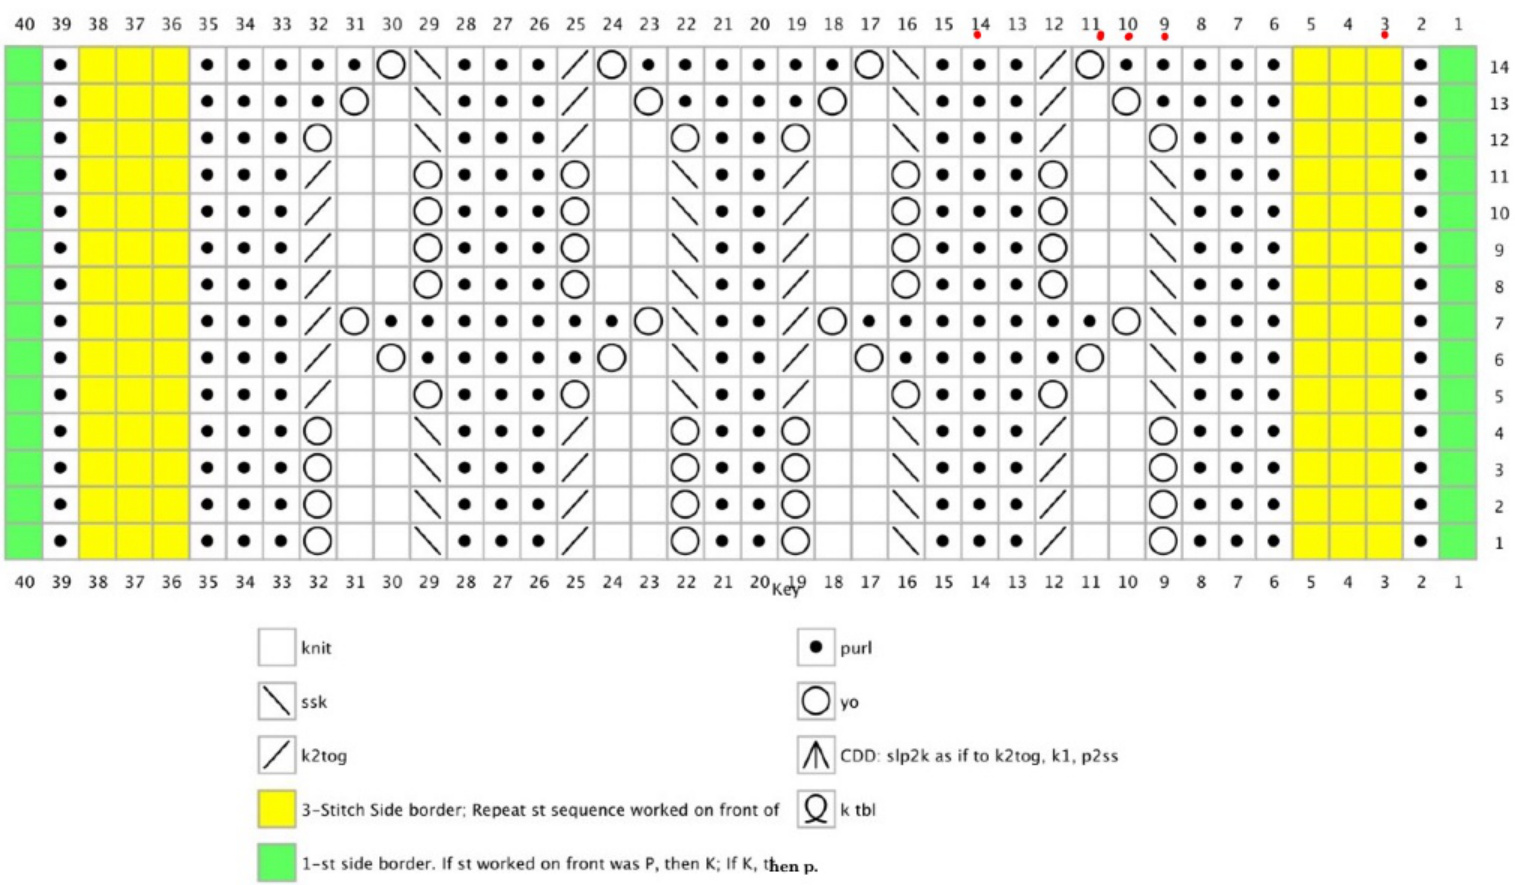
2/2RCPtwo over2rightcrosspurl.Seechart. 2/2LcPtwoover2leftcrosspurl.Seechart. BoRbeginningof round cocast on CDDcentereddoubledecrease DKS doubledknit stitch DPS doubledpurl stitch EoPeyeofpartridgestitchpattern kknit Kfbknitintofront of stitch then intoback of same stitch ktblknitthroughthebackloopofstitch kwiseknitwise k2tog knit 2 together, single decrease rightleaning LConeover1leftcross.See chart. ppurl ptbl purl through the backloop pwisepurlwise p2togpurl2together,singledecrease st(s)_stitch(es) RC one over1 rightcross.See chart. RNDround "inch slp slip ssk slp1 kwise,slp1 kwise, ktbl of both stitches,single decrease right leaning tbl through the back loop wybwithyarninback wyfwithyarninfront yoyarnover.See chart.
Conventions:
1)Directionsforsmallwrittenfirstwithehosefor medium ahd largein parehtheses.S(M,L) 2)Measurementsworkedininches,thencohverted to centimetres by.multiplying inches by 2.54 cm/ inch.ResultsareEhenrouhdedtonearest1.4 inchordecimalforinchesandcentimetres. Directions provided for 3 toe styles. Choose a style that works best for you. Does the shape created by your toes resemble that in figure 1 or figure 2? If you said figure 1, then an anatomical toe may fit best on your foot.Working ah anatomical toe uill require making mirror-image socks, left and right. If you said figure 2, Ehen your toes may be more comfortable in a rounded toe sock. This shape is symmetrical so is the same for both feet. Figure 3 is the traditional wedge-shaped tapered toe. Key Gray pen = sock fabric.
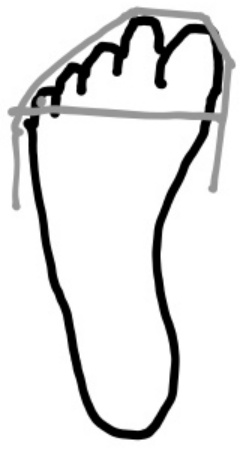
Figure 1:Anatomical Toe
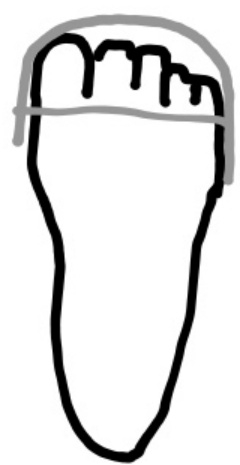
Figure 2:Rounded Toe
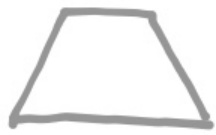
Figure 3:Traditional WedgeShapeTaperedToe
INCREASE METHOD --
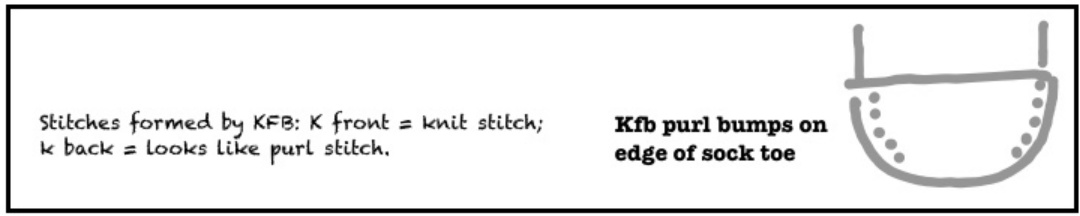
Kfb is used as the increase method for 2 reason: 1) ehis method adds a decorative element on ehe sock's toe edge that looks liketop-stitching; and 2)it is a tight increase with little elasticity, good for the toe where ease is typically not needed. Kfb's are made in the first stitch and next to last stitch of each needle so that the purl bump formed is symmetrical on each side of toe.
CLUE1:TOE
C0 10 (12, 14) stitches on each needle using Judy's Magic C0 or other method of yourchoice.PlaceBoRmarker.
Toe
Work directions on Needle 1 then repeat on Needle 2 for a complete round. Toe is shaped by a combination of increase and knit even rounds as described for eachtoe style.
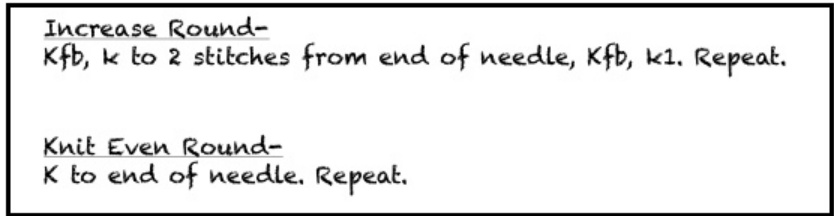
Note:The anatomical toeis shapedusing this general increase round andanAnatomical Increaseround described in directionsfor that toe style.
TraditionalWedge-Shaped Toe
Alternately work 1 increase round Ehen 1 knit even round 10 (12, 13) times until thereare3o(36,4o) stitches oheachneedle. Workknit even rouhd 3 (o, 2) times.Total rows worked 23(24, 28).
Rounded Toe
StEep1 Work ohly increase round 4 (5, s) times.[18 (22, 24) stitches oh each needle.] Step2 Alternately work 1 increase round Ehen 1 knit even round 4 (5, 6) times until Ehereare26(32,36)stitchesoheachneedle. Alternately work 1 increase round Ehen 2 knit even rounds 2 times until Ehere are3o(36,4o)stitchesoneachneedle.
Step 4
Work knit even rouhd s (3, s) times. Total rows worked 23 (24, 28).
CLUE1:TOE
Anatomical Toe
StEep1 Work only, geheral increase round 6 (8, 8) times. [22 (28, 30) stitches on eachneedle.] Step 2 Alternately work 1 Anatomical Increase round as described below, then 1 knitevehrouhd8(8,1o)timesuhtilthereare30(36,4o)stitchesoheach needle.Keep direction ofahatomicalincreaseconsistenton each sock.
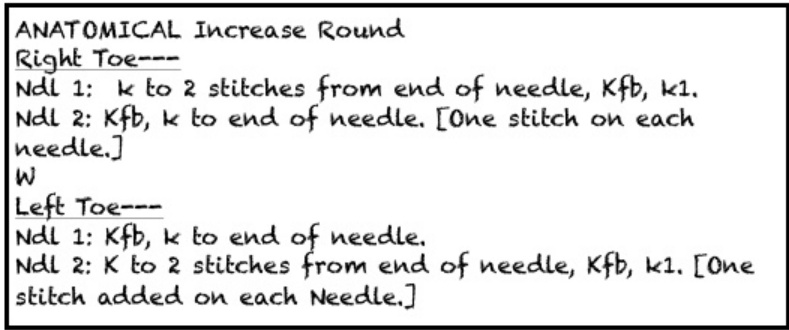
SEep3 WorkKnitevenrouhd1(o,o)times.Totalrouhdsworked23(24,28). After all toe rounds are complete, if you would like a longer toe, knit even to desiredLength. RECORDANYEXTRATOEROUNDSHERE: [Tech Note:At Ehis point,I like to checkmy stockinettegaugeintheround usingmy toefabric.That wayI cangetanidea ofwhetherIneedtochange the sock size I'm knitting tomatch my gauge, change my needle size to match pattern gauge,or donothing because everyehing is on target.)Note your findingshere: MYSTERY SOCK CLUE 2:Instep and Sole,Sock Foot August,2015,SLMyers
Needle 1 carries the instep stitches, Needle 2 sole stitches. The center instep stitches are worked in a traveling cable pattern. Instep borders varywithsize.
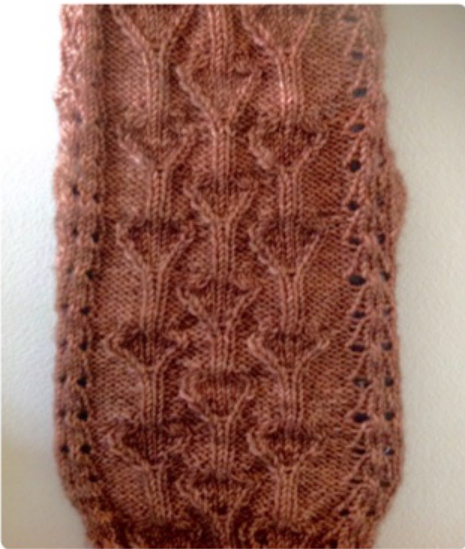
Instep Pattern (M)
SOCK FOOT (CO to Gusset)
Work ChareARows 1-2o=1verticalrepeat)foryour size on Needle1 repeating chareforlengthandstockinetteonNeedle2untilsockfrom Co measures geheric or calculated length (Co to Gusset Length). Measure length on the sole side. In Clue 3 you will have the option to work a stockinette or reinforced heel (EoPpattern). Ifyou plan to work a reinforced heel, then add about 1/4" (0.6 cm) to the Co'to gusset length. IMPoRTANT NoTE: Adjust the followinggeneric or calculated CO to Gusset length so that you stop knitting having worked one of the following rows of Chart A on instep: 1, 5,9,13,or17.Attheendofthisweek,you should beatB0RreadyforClue3.
GENERIC CO to Gusset LENGTH
The standard final socklength used: S: 8.75"/22 cm, M:9.25"/23cm, Note:I used the Knitty Survey results for my L: 1o"/25 cm. standardso(http/knitozblog.tom/202/07/fot Pattern Row gauge in Stockinelte in Ehe round: 13.s rows per inch (s.3 rows per cm) Given those parameters and for a stockinelte heel, work foot until the Co 比o Grusset Length is: S: 5.5"/14 cm, M: 5.5"/14 cm, L: 5.5"/14 cm.
CALCULATED CO LO GuSSeELENGTH
Divide44(s2,6o)totalrowsEhatwillbeworkedforgussetandheelturn [(28 (32, 36) gusset rows + 16 (20, 24) heel Eurn rows] by your row gauge (rows per unie either inches or centimeters) to get Ehe length of future heel portionofsock. Suberactfutureheellengthfromyourtotalsocklength(fromtipoftoeto back ofheel.) to get Ehelength to workfoot portion of the sock before stopping.(Don' adjustyour actual foot length for negative ease.Thevolume ofyourfootwilldoEhat.) Detailed descriptionofmathcanbefoundunder Pages tab of S.L. Myers'Designs forum on Ravelry.com. Record your Co to Gusset length here
MYSTERY SOCK CLUE 3: GUSSET,HEEL TURN,AND HEELFLAP
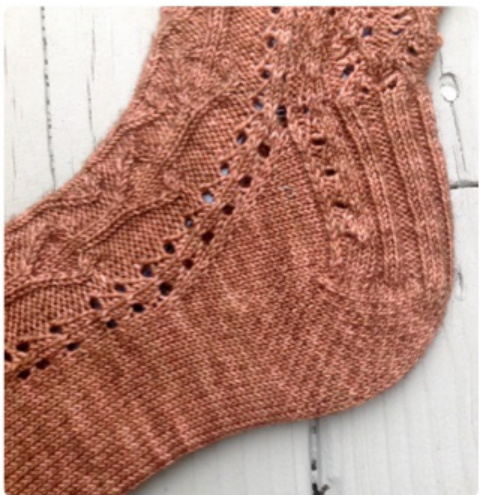
Gusset,Heel Turn,and Heel Flap (Note:Heel flappatternin picture is different from the one stated in directions.) Note:GussetincreasesstartafterworkingnextrowofChartAonthe instep.Should be eitherRow2,6,10,14,or18. You will end gusset work after working Row 1,5, 9, or 17 on instep dependingthenumberofgussetrowsnottherowonwhichyou stoppedfoot. Then, the last row of Chart A before suspending work on instep will be 2,6,10,14,or18,dependingon sock sizenottherow on whichyou stoppedfoot.
GUSSET
Directions for EoPreinforced heel start when adding the 7eh gusset stitch. Gusset stitches are added using Y0 as the increase method because 1) it makes a decorative edging along the instep; 2) it's easy to see what round you are working (increase or k even), ahd 3) it is a loose increase which provides ease in a section ofthesockwhere ease is needed.Aluays ktbl ofyofrom previous round. You may use ahother increase method of your choice. Ndl1 From BoR, work next row of Chare A. Record gusset stareing Row to use for secon sock Continue to work Chart A on Needle 1 repeating chart as needed until gusset is complete. only Needle2directionsfollou. Ndl 2 Rnd 1: k1, pm, yo, k to 1 stitch from end, yo, pm, k1. [Gusset markers placed.] Rhd 2: K1, sm, kebl, k lo 2 stitches from ehd, ktbl, sm, k1. Rhd 3 (Increase): K1, yo, k to 1 stitch from end slipping markers, yo, k1. Rhd 4 (Knit Even): k1, ktbl, k to 2 stitches from end slipping markers, ktbl, For stockinette heel: Repeat Rnds 3 and 4 twelve (fourteen, sixteen) more times uhtil Ehere are 14(16, 18) gusset stitches on each side of 30(36,40) heel stitches.Total stitches on Needle 2:58(68,76).Go to Heel Turn Section. ForReinforced(EoP)Heel:RepeatRnds3 and 4 above four more times uhtil there are 6gusset stitches on each ehd of Needle2,ehen continue in EoP heelusingthefollowingdirections. Reinforced (EoP) Heel Rnd 1 (Increase): K1, yo, k to marker, sm, \*(k1, slp1k wyib); repeat from \*to marker, sm,k to 1 stitch from end of 'heedle, yo, k1. Reinforced(EOP) Heel Rnds 2and 4(KnitEven):K1,ktbl,kto2 stitches from ehd slipping markers,ktbl, k1. inforced(Eop)HeelRnd3(Increase):K1,yo,k slpikwyib);repeatfrom\*tomarker,smkto1stitchfromehd Wee RepeaeReinforced(E0P) HeelRounds1-4untilEhereare14(16, 18)gusset stitches oh each side of 30(36,4o)heel stitches.Total stitches oh Needle2:58(68,76).Go to Heel Turn Section. [Note: Gusset will end after working Chart A Row 1, 5, 9, or 17 depending onsocksize.]
HEEL TURN
Heel Eurn is worked flat in short rous oh only the 3o(36,4o)heel stitches. During turn, work on instep and gusset stitches is suspended.The established pattern, stockinette or EoP, is continued during the turn. After each turn, keep tensiontightonthefirst3stitches.(TipfromCatBordhi.) There are several ways to double Ehe turning stitch for filling gaps when working short rous.For Ehis pattern, the turning stitch is doubled using a'method similar to that described by'Alice Yu (http:/tinyurl.com/ae7zjfk) and Patty-Jo White (hetp://linyurl.com/ohusu7lf). A DoubledKnit Stitch(Dks) is worked onright side of fabric ahd aDoubled Purl Stitch(DKP) on the wrong side as follows.
SPECIALSTITCHESFORHEELTURN
DPs-Doubled Purl Stitch.Workin pattern to turning stitch.Slip Eurning stitch pusise to right needle.with left needle tip,pick up frombottomtotopthepurlbumpofehestitchineheroudirectly beloutheturningstitchandpurl.Younouhave2loops coming fromthesamecollarstitchineherowbelow,bothontherighe needle,Movebothloopsofthedoubledpurlstitchtoleftneedle. Note: You may use a method of your choice for doubling the turning stitches,but make the number of turns specifiedinpattern.
Set-up for Heel Turn;
Ndl1:Worknext row of Chart A.Record roworked .[Rowshouldbeeither 2, 6, 10, 14, or 18.] Work is suspended on Needle 1 during heel turn. Ndl 2: k across first set of gusset stikches, sm. Work oh gusset stitches suspehded. Continuewith heelturn in establishedheelpattern either stockinetteorEop.
Heel Turn Stockinette
Rou1(Rs):Kto1stitchbefore marker,Dks inlast stitch(the turning stitch). Place both loops of DKs together on left needle.Turn.One active heel stitch decreased. Row2(Ws):Pto1 stitchbefore marker, slip last stitch (turning stitch) to right needle,makeDPs.Place bothloops ofDPson lefe needle,Turn.One active heel stitchdecreased. Row 3 (Rs): K to 1 stitch before doubled stitch from previous rou), make DPK, place both loops oh left needle.Turn.One active heel stitch decreased. Row4(ws):Pto1 stitch before doubledstitch fromprevious row.MakeDPs. Place both loops of doubled stitch on left needle. Turn. one active heel stitch decreased. RepeatRows3and4makinganewdoubledEurningstitch1stitchbeforeEhe doubled stitchof theprevious rou until there are8((1o,12) doubled stitches on each side of 14 (16,16) active heel stitches,ending on Ws rou.Turn.Go to finishingthebottomofheel.
Heel TurnEOP
Row 1 (Rs): \*(K1, slp1p uyib); repeat from \* to 2 stitches before marker, k1, using last stitch (Ehe Eurhing stitch) make DKs.Place both loops of DKs together on leftneedle.Turn.One active heel stitch decreased. Row2(ws):Pacrossheel stitches to1stitchbeforemarker.Slipthelast heel stitch(turning stitch)puisetorigheneedleuyif.Makedoubledpurl stitch(DPs). MovebothloopsofDPstoleftneedle.Turn.Oneactiveheelstitchdecreased. Row3(Rs):\*(K1, slp1p wyib);repeat from \*to 2 stitches before doubled stitch from previous rou,ki, make Dks.Place both loops of Dks on lefe needle.Turh. Row 4(ws):Pto 1 stitch before doubled stitch from previous row, slip next stitch pwise wyif to right needle, make DPs. Move both' loops of DPs to left needle.Turn. RepeatRows3and4makinganewdoubledEurning stitch1stitchbeforeEhe doubled stitchof theprevious rouuntil there are8(1o,12)doubled stitches on each sideof14(16,16)active heel stitches,ehding oh Wsrou.Turn.Go比o finishingtheheel.
FINISHING HEEL TURN
All doubled stitches are gone after working the next Ewo rouws. Both loops of each doubled stitch are worked together as one stitch. Work first rou in established pattern either stockinette (written first) or EOP (insidebrackets[J). Row1 (Rs):K or[for EOp \*(k1, slp1p,wyib),repeat from \*]比o Ehe first doubled stitch,knit both loops ofthe doubled stitchtogether as1 stitch,continue knitting doubled stitches in same manner to 1 stitch before marker, removing marker, work for your size ssk (p2tog, ssk) using Ehe last doubled heel stitch ahd 1 gusset stitch. Turn. Row2(ws) both Stockinette and E0P):Slp1pwyif,p.tofirse doubled stitch,work both loops of the doubled stitch together as 1stitch,continue purling doubled stitches in same manner to 1 stitch before marker, removing marker, work for your sizep2tog(k2tog,p2tog).Turn.
HEELFLAPANDGUSSETDECREASECHARTB
Gusset stitches are decreased whilemaking heel flap.Thefirst stitch ofeach rouis slipped;lastheelflap stitchofeachrouisworkedas showninchart togetherutth1gusset stitch.After eachturn,keeptension tight onthefirst 3 stitches. ChareBisdividedinto2sections. Section 1 is worked flat and shows Ehe vertical repeat of heel flap pattern. Section 2 is worked in the round and sets up for leg. Directions for working Chart B are in its legend and not repeated here. After completing Chart B, you are at BOR ready for Clue 4.
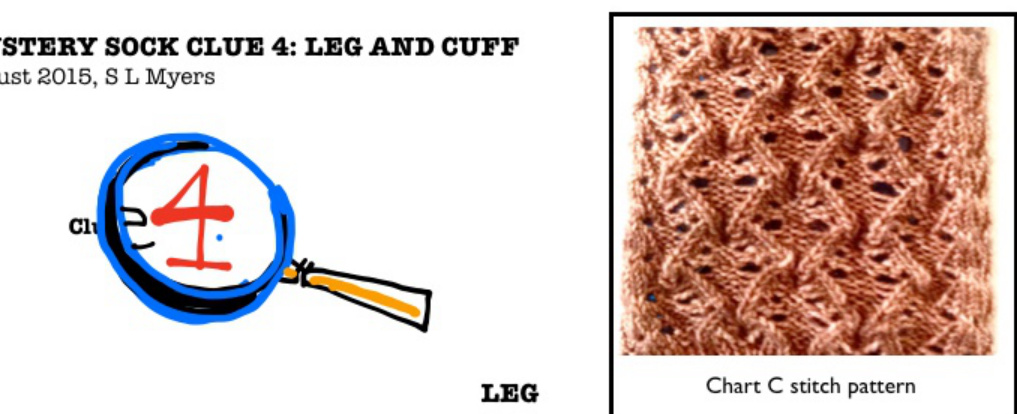
Work Chart A onfront of leg.Repeat samerou of Chart A on back of leg or work Rou 1 of Chart C. [Note: Back of'leg worked in Chare C provides more ease. Continue working consecutive rous of charts on front and back of leg,repeating charts as needed, until leg measures about an inch (2.s cm) short of desired length, ehding with ChartARow ioor2oforstarting cuff.[Note:Ifyou used ChartC,it willendwithincompletepattern.]

CUFF
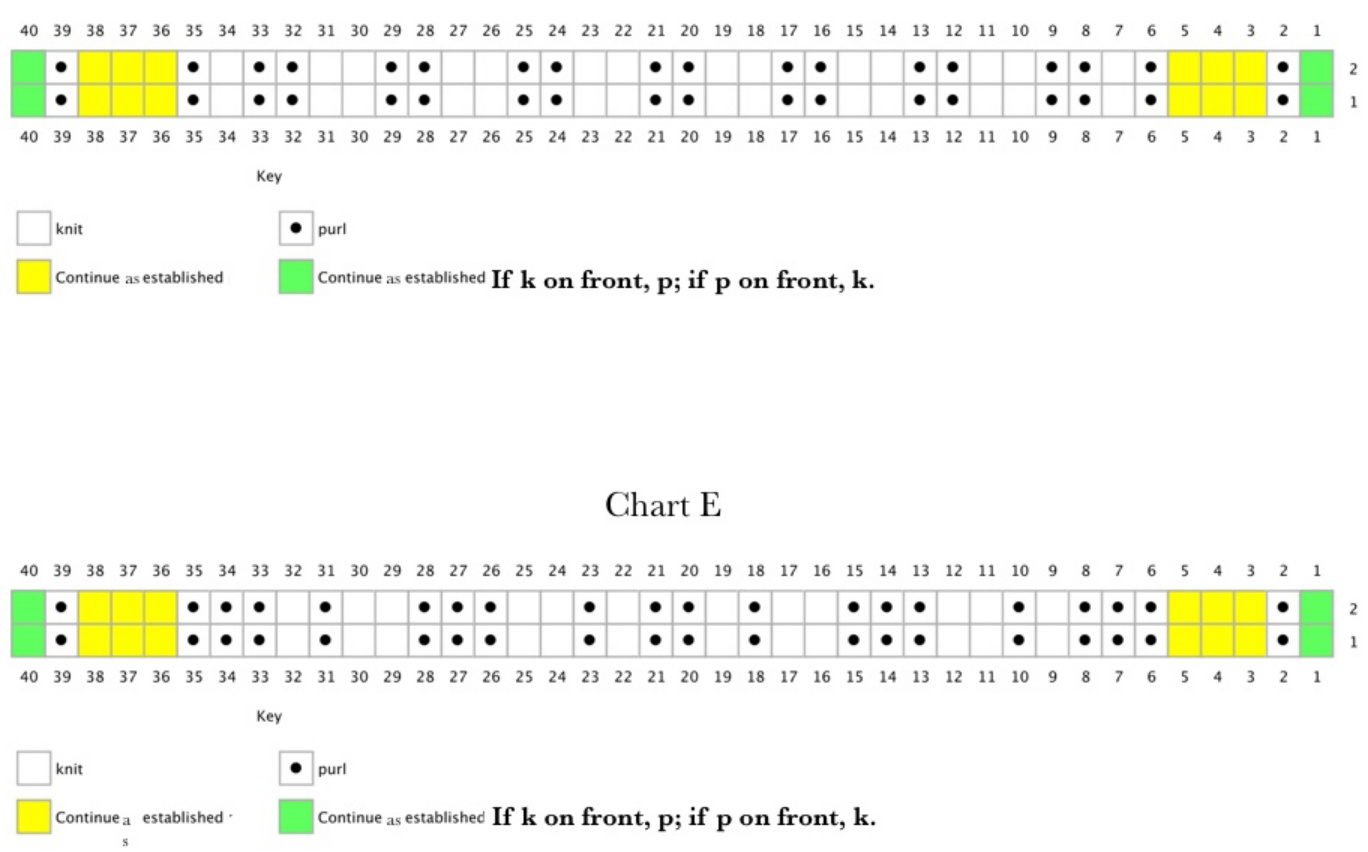
Cuff Charts show 2 vertical repeats of pattern. If you worked Chart A for front and back of leg, work Chart D Euwice around leg. If you Worked Charts A and C for leg, work Chart D for front of leg and Chart E forbackof Leg. Work chart(s) 7 times or to desired length for cuff
BIND-OFF
Loosely work Russian or stretchy bind-off of your choice. If you have trouble working loosely, use a needle acouple of sizes larger. RussianBind-off Step 1: k2, move stitches puise back to left needle, k2tog. Step 2:K1,move both stitches puise from right to left needle, k2tog. Repeat Step 2 to end.
FINISHING
Pullyarnthroughlastloopleavinga6inch(1scm)tail. Makejoblessfinish.hetp:/rinyurl.com/nsfx9pm Weaveinyarntails,block,andwear! Chart A Instep Size Small: Work Chart across instep and stockinette on sole. Repeat chart rows 1-20 for length, ending after working Chart A Row 1, 5, 9, 13, or 17 on instep and stockinette on sole, ending at BOR ready for Clue 3.
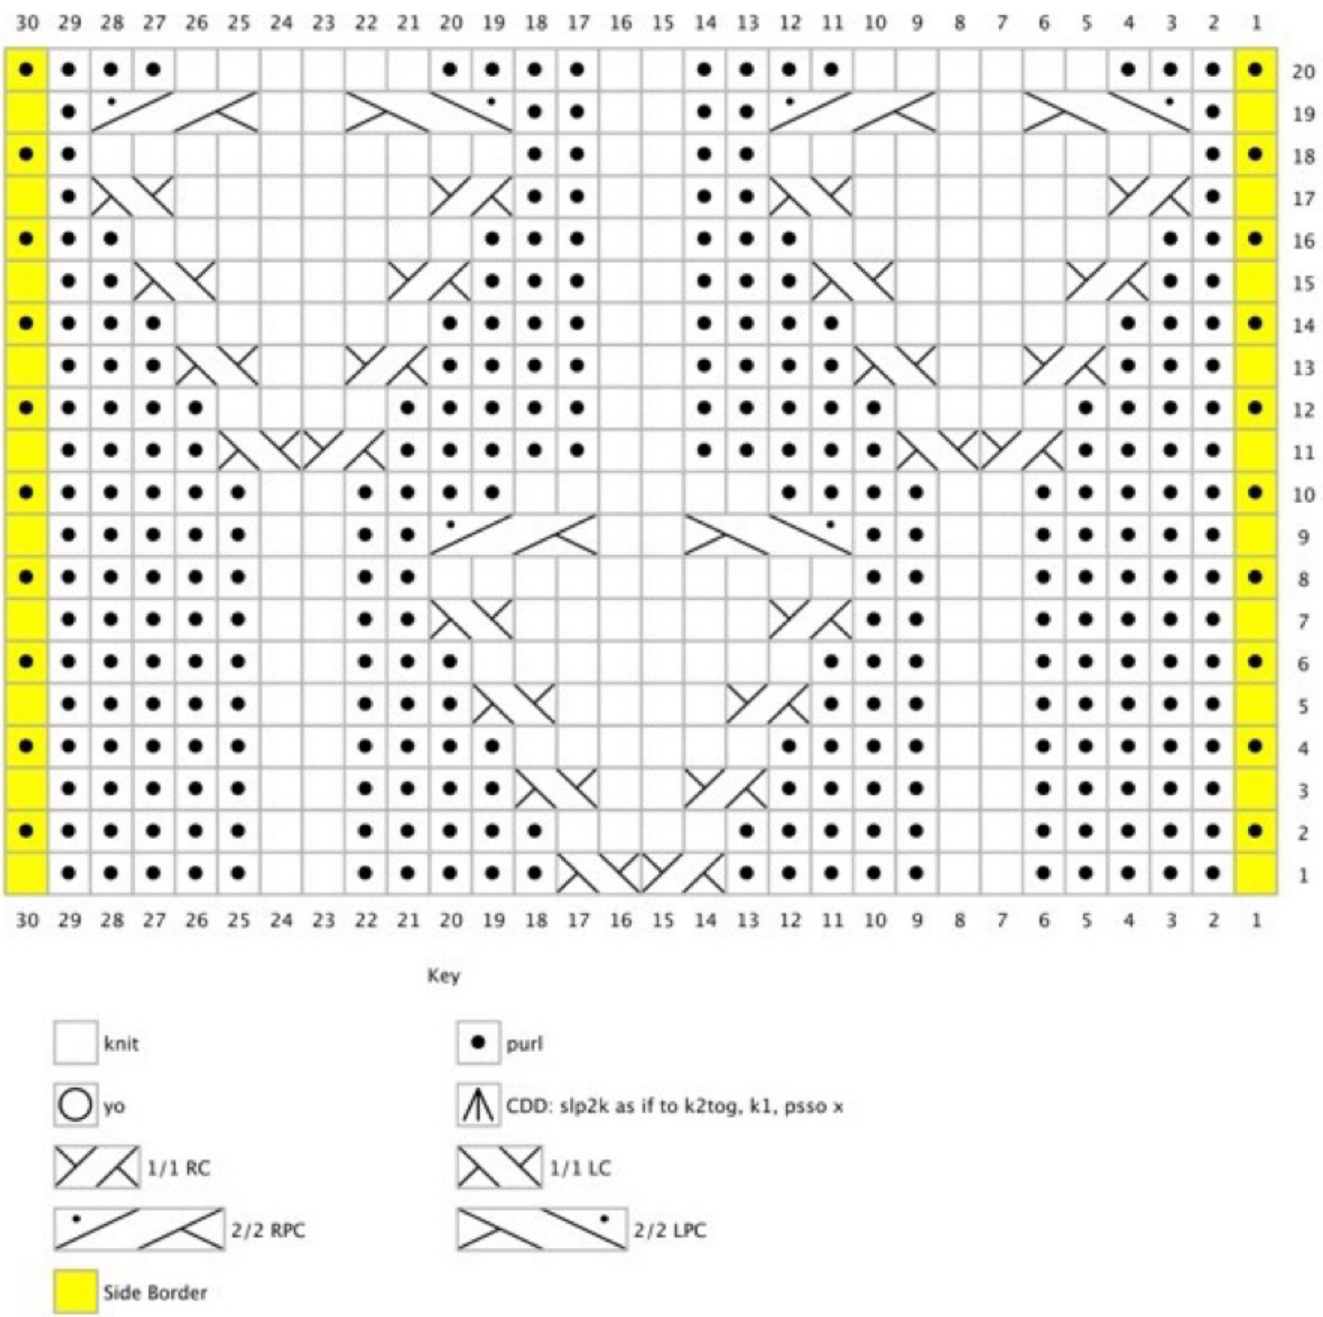
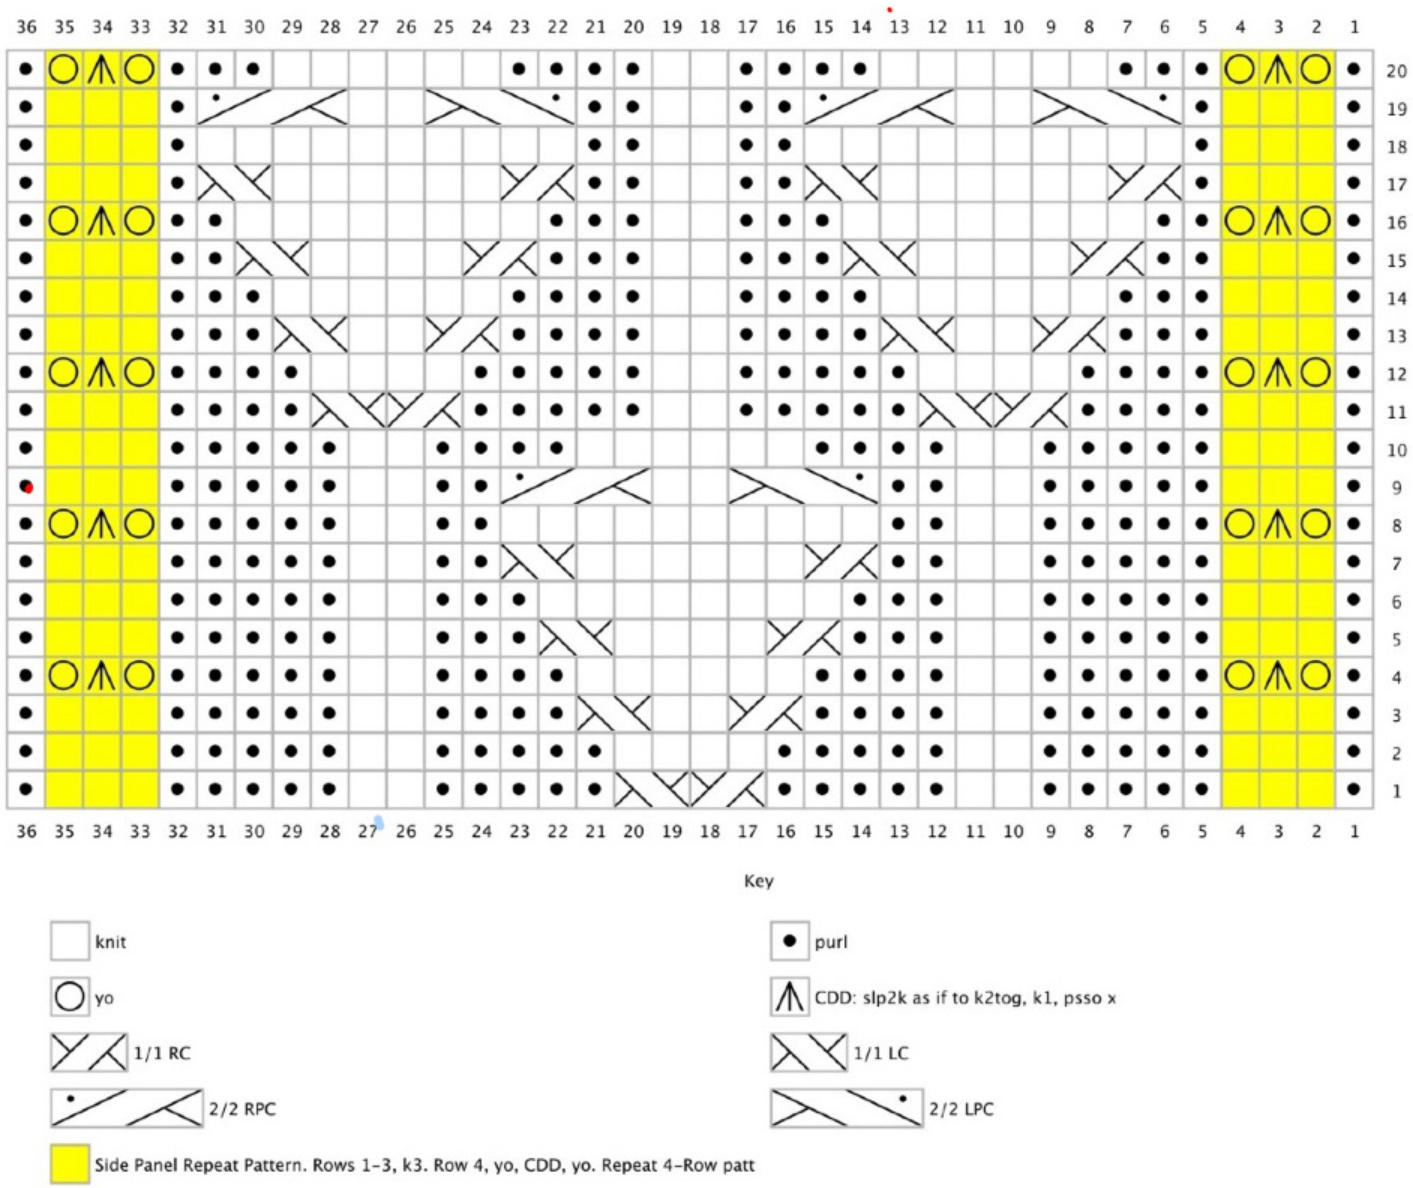
CDD: Insert right needle from left to right in front loops of next 2 stitches on the left needle. Move to right needle without knitting. K1, then slip individually the 2 slipped stitches over the new knit stitch. 1/1 RC: Insert right needle through front loops of next 2 stitches on left needle as if to k2tog, move to right needle without knitting. Slp2p back to left needle, ktbl both stitches in new order. 1/1 LC: Slp2p to right needle. Insert left needle from right to left through front loops of both stitches, remove right needle leaving stitches in new order of left needle. K each stitch in new order throughfront loop. 2/2 RPC: Slp next 2 stitches to cn holding them in the back of work. K2, p2 from cn 2/2 LPC: Slp next 2 stitches to cn holding them in front of work. P2, k2 from cn. Note: there are other ways to work 1/1 RC and LC. Use any method you like. Chart A Instep Size Medium: Work Chart across instep and stockinette on sole. Repeat chart rows 1-20 for length, ending after working Chart A Row 1, 5, 9, 13, or 17 on instep and stockinette on sole, ending atBORreadyfor Clue3.
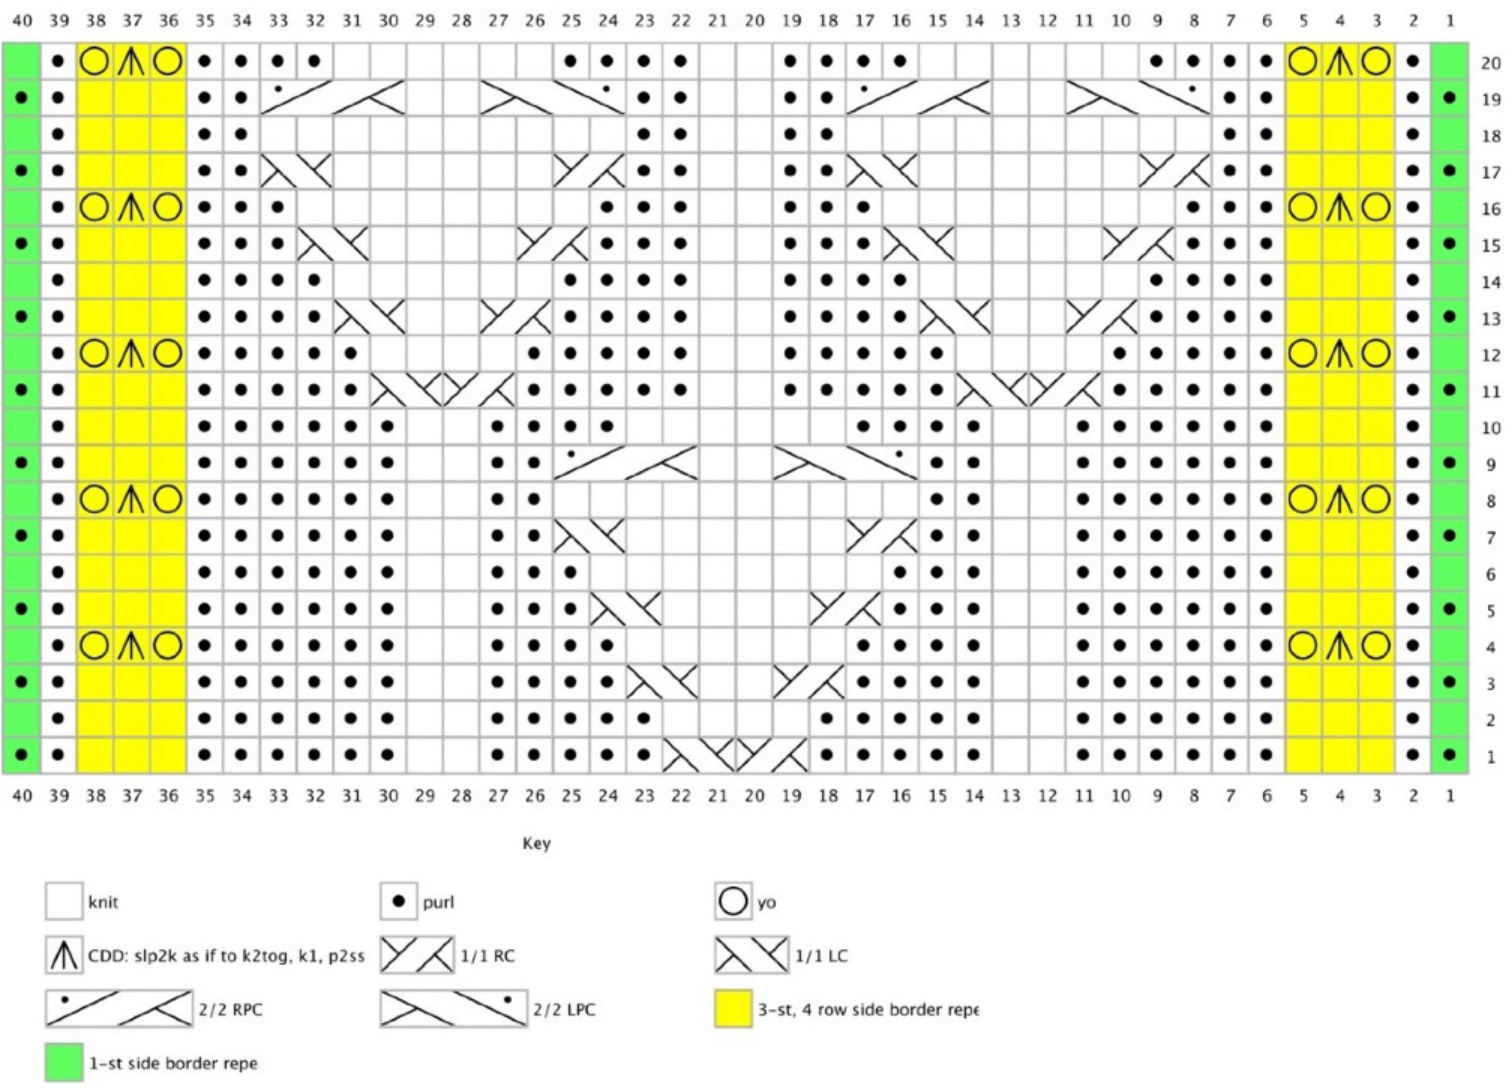
CDD: Insert right needle from left to right in front loops of next 2 stitches on the left needle. Move to right needle without knitting. K1, then slip individually the 2 slipped stitches over the new knit stitch. 1/1 RC: Insert right needle through front loops of next 2 stitches on left needle as if to k2tog, move to right needle without knitting. Slp2p back to left needle, ktbl both stitches in new order. 1/1 LC: Slp2p to right needle. Insert left needle from right to left through front loops of both stitches, remove right needle leaving stitches in new order of left needle. K each stitch in new order through front loop. 2/2 RPC: Slp next 2 stitches to cn holding them in the back of work. K2, p2 from cr 2/2 LPC: Slp next 2 stitches to cn holding them in front of work. P2, k2 from cn. Note: there are other ways to work 1/1 RC and LC. Use any method you like. Chart A Instep Size Large: Work Chart across instep and stockinette on sole. Repeat chart rows 1-20 for length, ending after working Chart A Row 1, 5, 9, 13, or 17 on instep and stockinette on sole, ending at BOR ready for Clue 3.
CDD: Insert right needle from left to right in front loops of next 2 stitches on the left needle. Move to right needle without knitting. K1, then slip individually the 2 slipped stitches over the new knit stitch. 1/1 RC: Insert right needle through front loops of next 2 stitches on left needle as if to k2tog, move to right needle without knitting. Slp2p back to left needle, ktbl both stitches in new order. 1/1 LC: Slp2p to right needle. Insert left needle from right to left through front loops of both stitches, remove right needle leaving stitches in new order of left needle. K each stitch in new order through front loop. 2/2 RPC: Slp next 2 stitches to cn holding them in the back of work. K2, p2 from cn. 2/2 LPC: Slp next 2 stitches to cn holding them in front of work. P2, k2 from cn. Note: there are other ways to work 1/1 RC and LC. Use any method you like. Chart B Heel Flap Size Small: Chart B has 2 sections. Work Rows 1 and 2 thirteen times until 1 unworked gusset stitch remains on each side of heel fap, ending WS row.Turn. Section 2 Needle 2: Work Row A to last 2 stitches. Ssk using 1 stitch cach side of gap. Switch needles Needle 1: Work next Row of Chart A from where you suspended work on instep. [Should be odd numbered row, so first and last stitch should be a knit stitch.] Switch needles. Needle 2: Work Row B, working the first 2 stitches together as p2tog. The last stitch of Row B is worked as p, ending at BOR ready to start Clue 4.
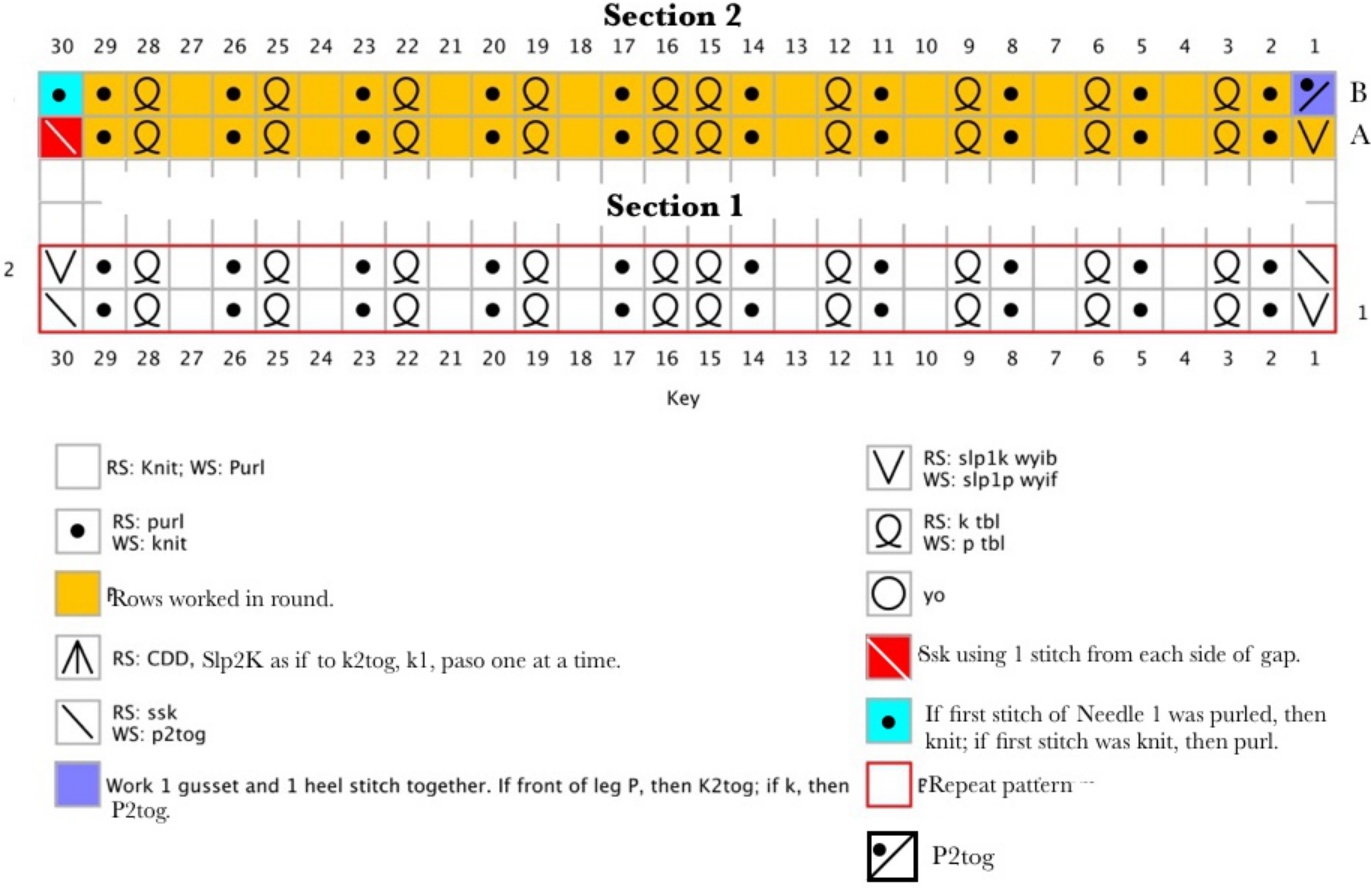
Chart B Heel Flap Size Medium: Chart B has 2 sections. Section 1 Work Rows 1-4 until 1 unworked gusset stitch remains on each side of heel fap, ending WS row. Turn. Section 2 Needle 2: Work Row A to last 2 stitches, working the border pattern stitches as they were worked on the last row of Chart A worked on instep. [Should be even numbered row so should be 3 knit stitches.] P2tog using 1 stitch each side of gap. Switch needles. Needle 1: Work next Row of Chart A from where you suspended work on instep. Needle 2: Row B, p2tog closing gap and decreasing final gusset stitch. Work both sets of border stitches as worked on the instep ending at BOR ready to start Clue 4.
Section 2
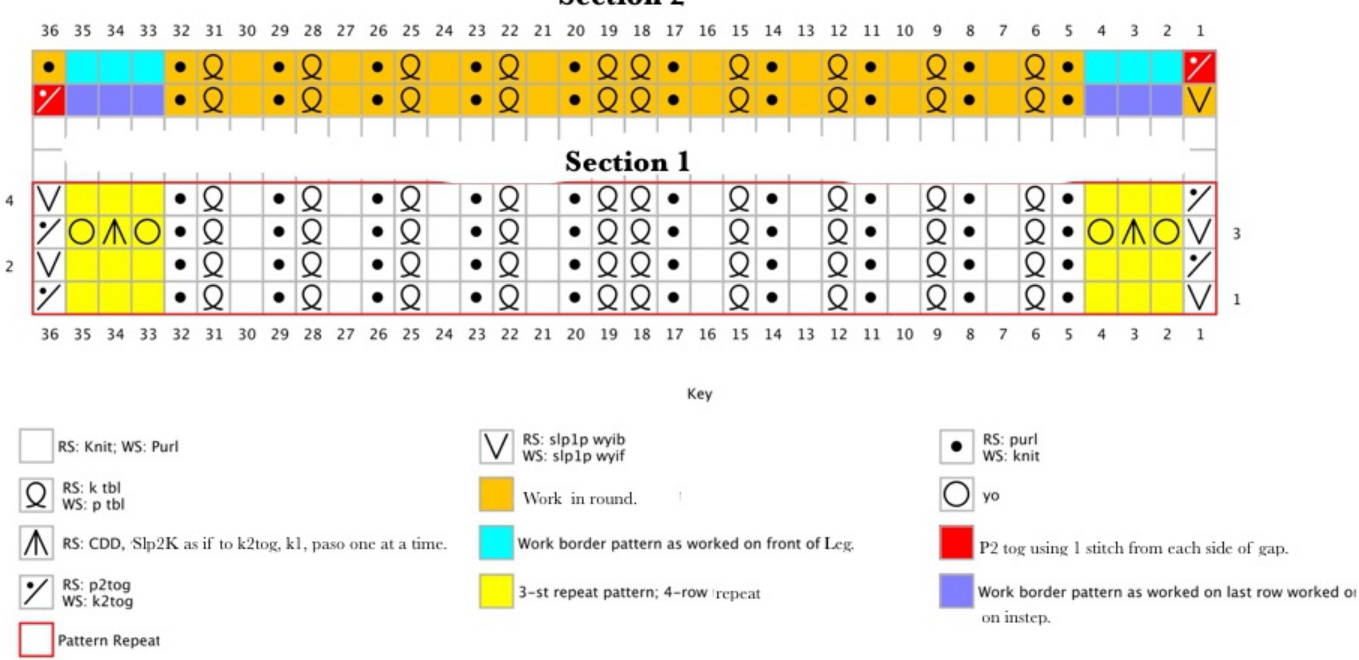
Chart B Heel Flap Size Large: Chart B has 2 sections. Section 1 Work Rows 1-4 until 1 unworked gusset stitch remains on each side of heel fap, ending WS row. Turn. Section 2 Needle 2: Work Row A to last 2 stitches, working the border pattern stitches as they were worked on the last row worked on instep, so should be knit stitches. P2tog using I stitch cach side of gap. Switchneedles. Needle 1: Work next Row of Chart A from where you suspended work on instep. [Should be even numbered row.] Switch needles. Needle 2: Work Row B. Work the first 2 stitches as p2tog and the border stitches as worked on the instep, ending at BOR ready to start Clue 4.
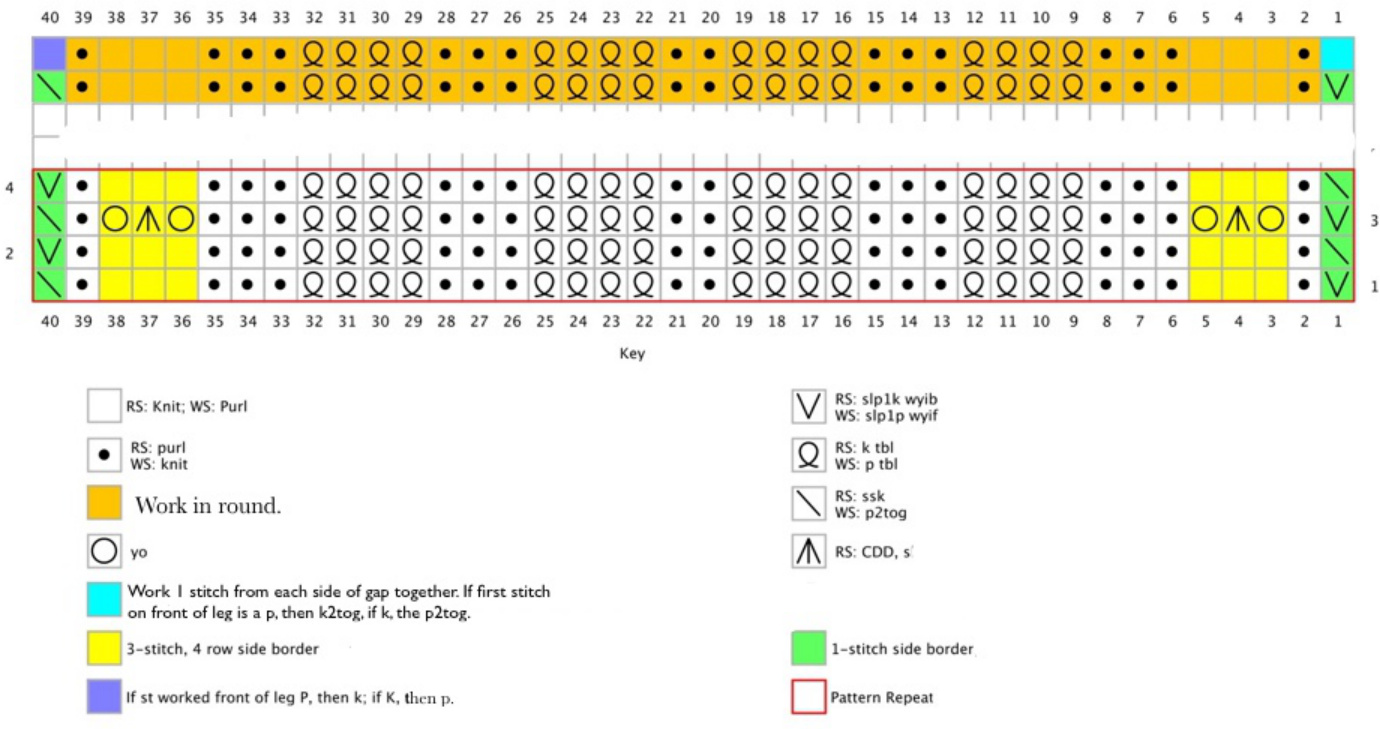
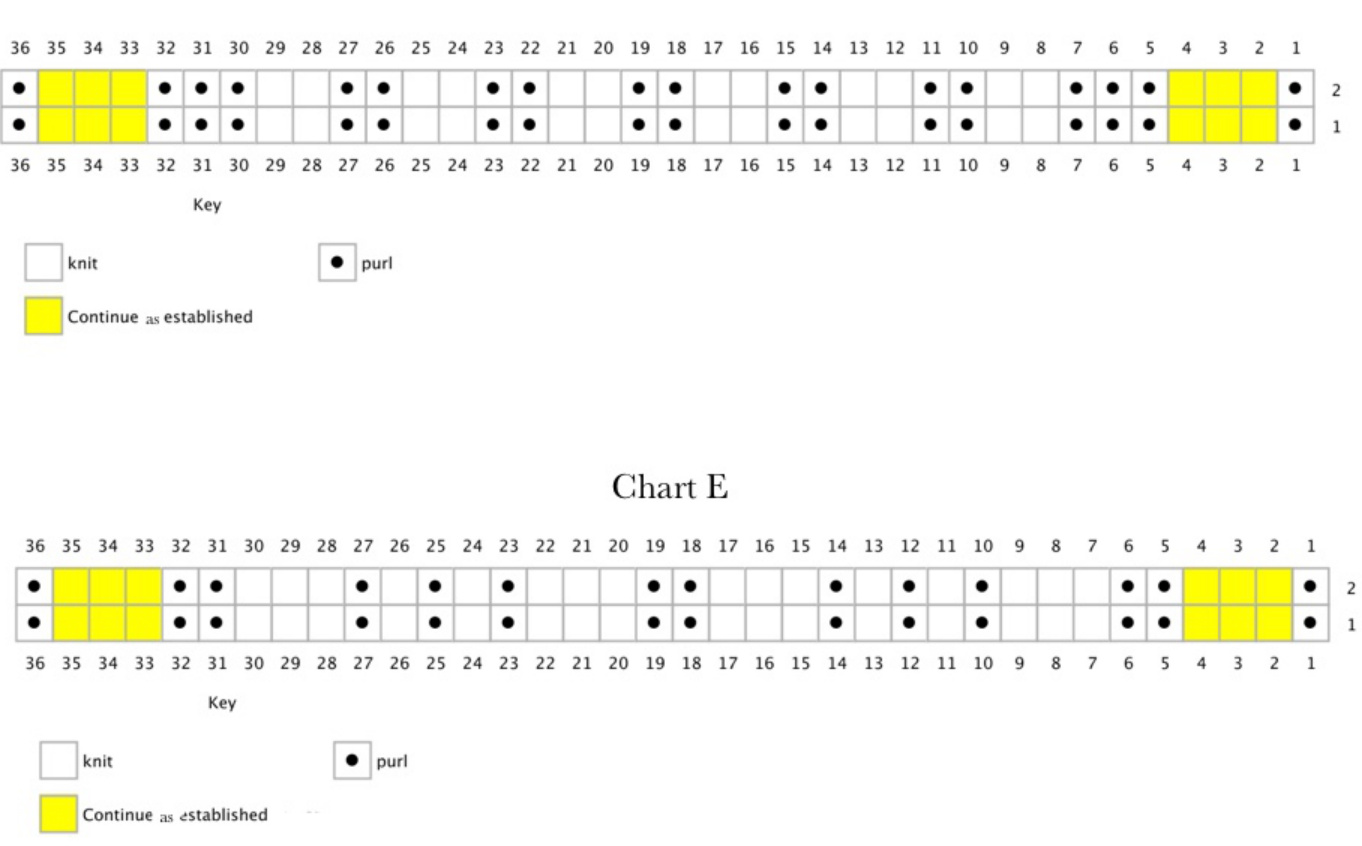
Chart C Back of Leg Size Small Work Chart A on front of leg and Chart C on back of leg. Repeat rows 1-14 for length. The 1-stitch side border (shown in yellow) is worked as p or k depending on how the first and last stitch were worked on Needle 1. If on Needle 1 they were purled, then k these stitches on the back of leg. If they were knit, then p these stitches on the back of leg. This will make a tiny beaded border between front and back of leg. If you prefer, you can work Chart A on back of leg. However, follow the same instructions for the yellowl-stitchborder.
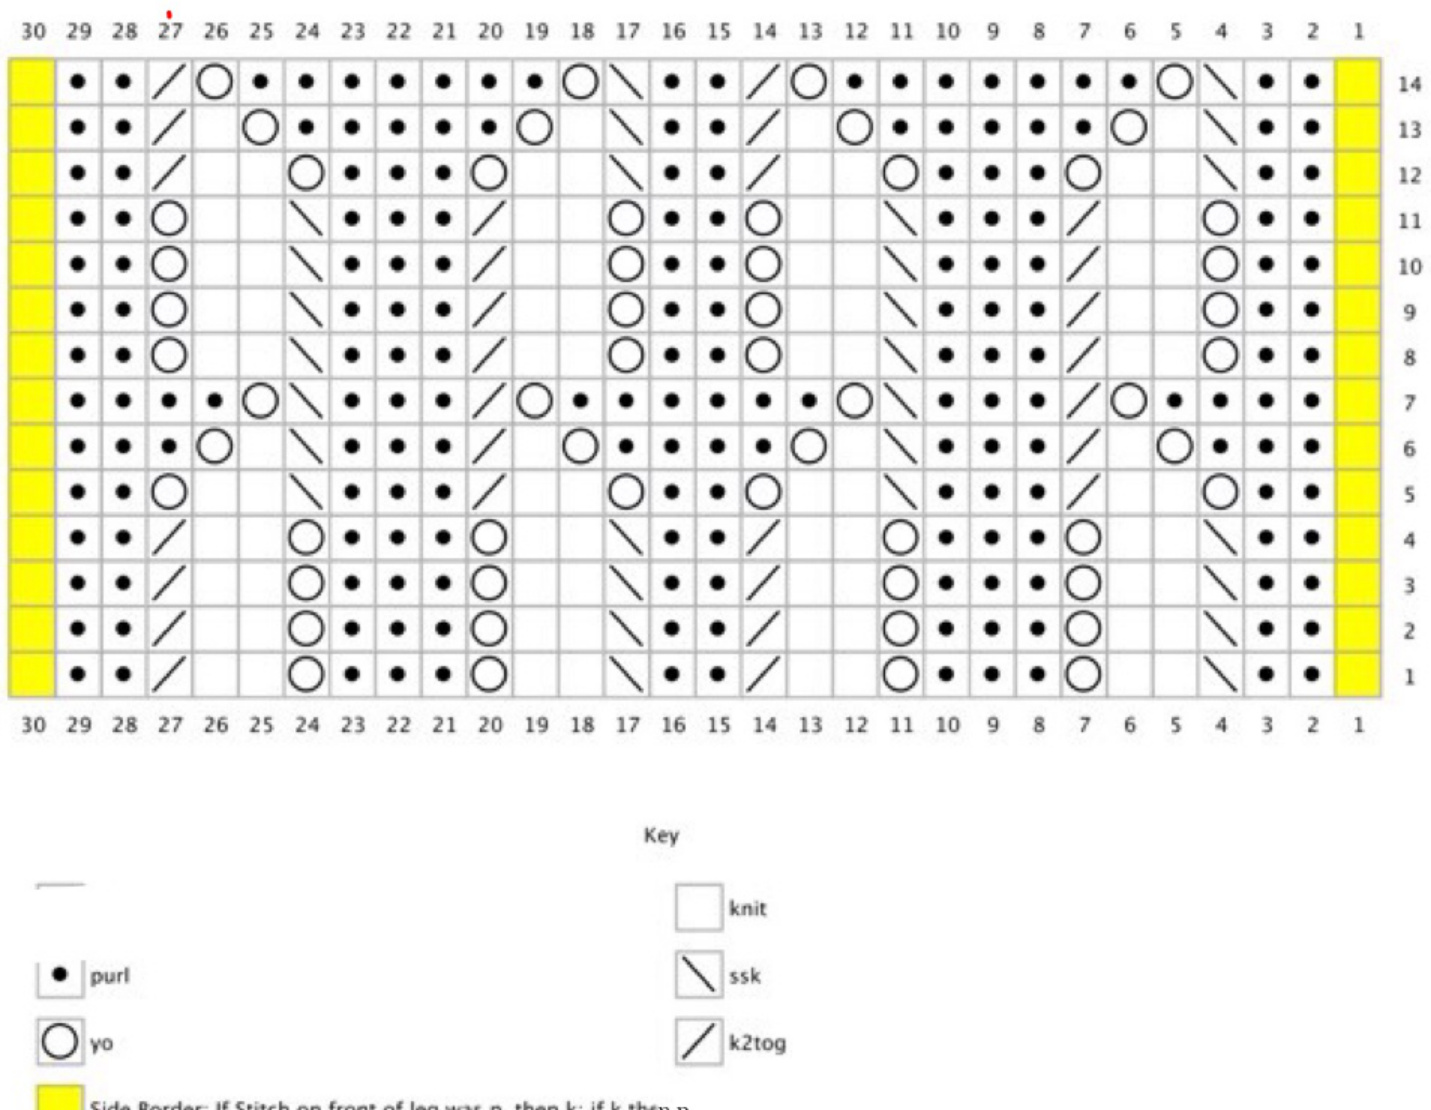
Chart C Back of Leg Size Medium: Work Chart A on front of leg and Chart C on back of leg, Repeat rows 1-14 for length. The 3-stitch side border (yellow cells) is worked the same as it is worked on front of leg. If you prefer, you can work Chart A on back of leg. However, follow the same instructions for the yellow3-stitchborder.
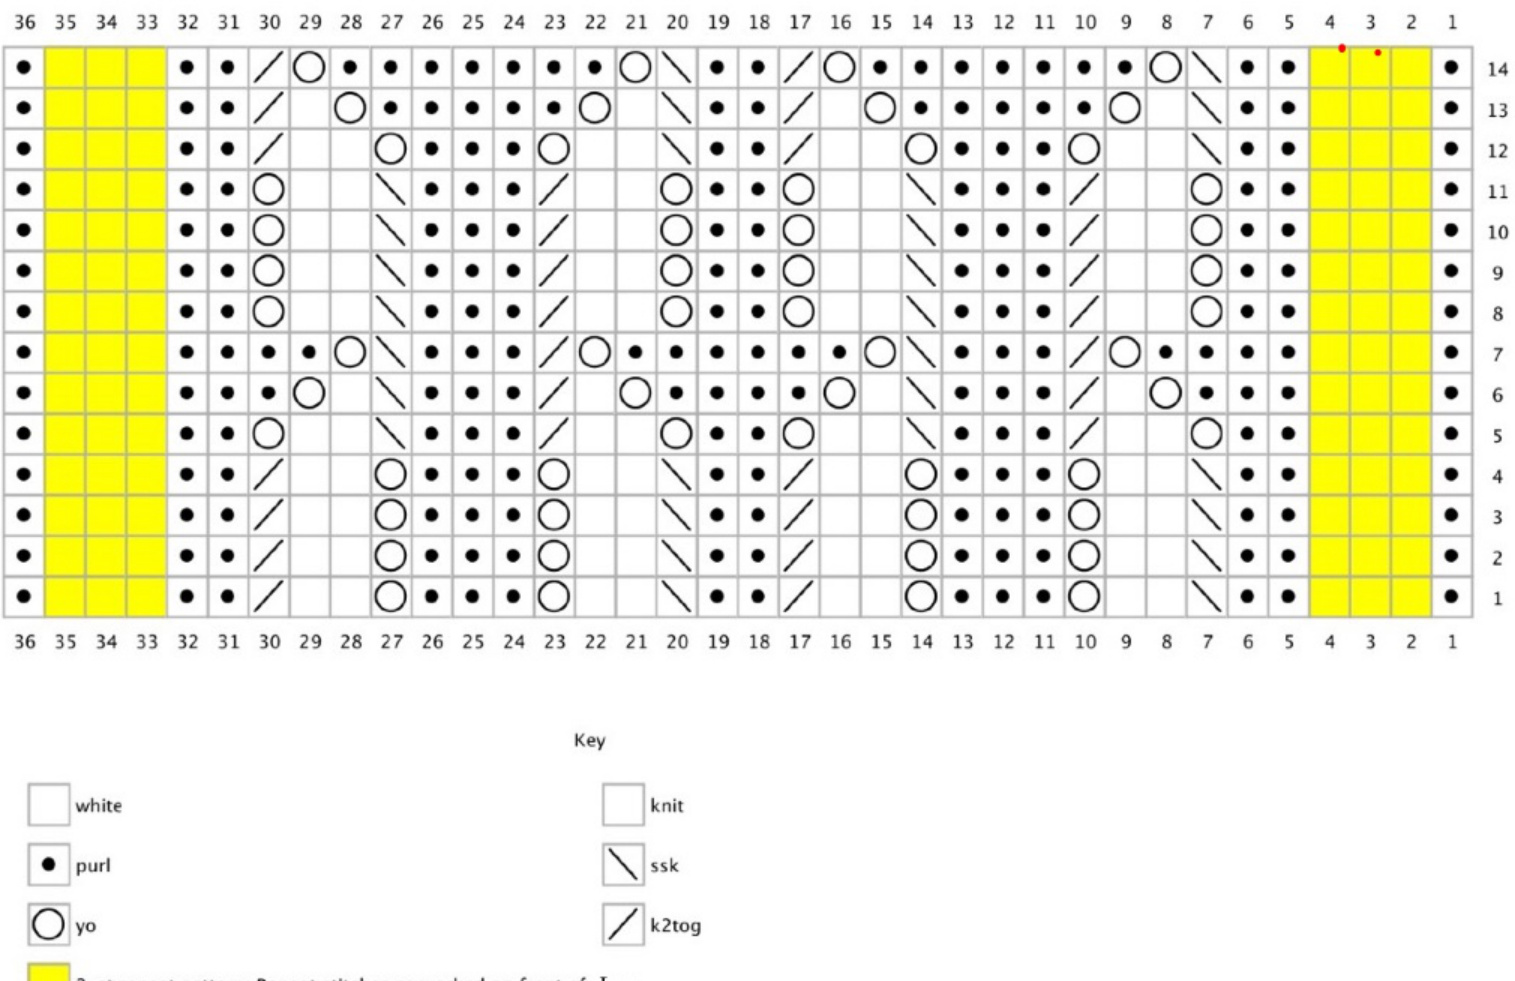
Chart C Back of Leg Size Large: Work Chart A on front of leg on Needle 1, and Chart C on back of leg, Needle 2. Repeat rows 1-14 for length. The 3-stitch side border (yellow cells) is worked the same as it is worked on front of leg on Needle 1 for each round. The 1-stitch side border (green cells) is worked as p or k depending on how the first and last stitch were worked on Needle 1. If on front of leg they were purled, then k these stitches on the back of leg. If they were knit, then p these stitches on the back of leg. This will make a tiny beaded border between front and back of leg. If you prefer, you can work Chart A on back of leg. However, follow the same instructions for the yellow 3-stitch border and green 1-stitch border.
Charts Cuff Size Small:
Charts D and E show 2 vertical pattern repeats. Border stitches (in yellow) are worked in established way to make a beaded ribbed border on the sides of sock. Work Chart D twice if you worked Chart A for back of leg. Work Chart D once on front of leg then Chart E on back of leg if you worked Chart C for back of leg. Chart D
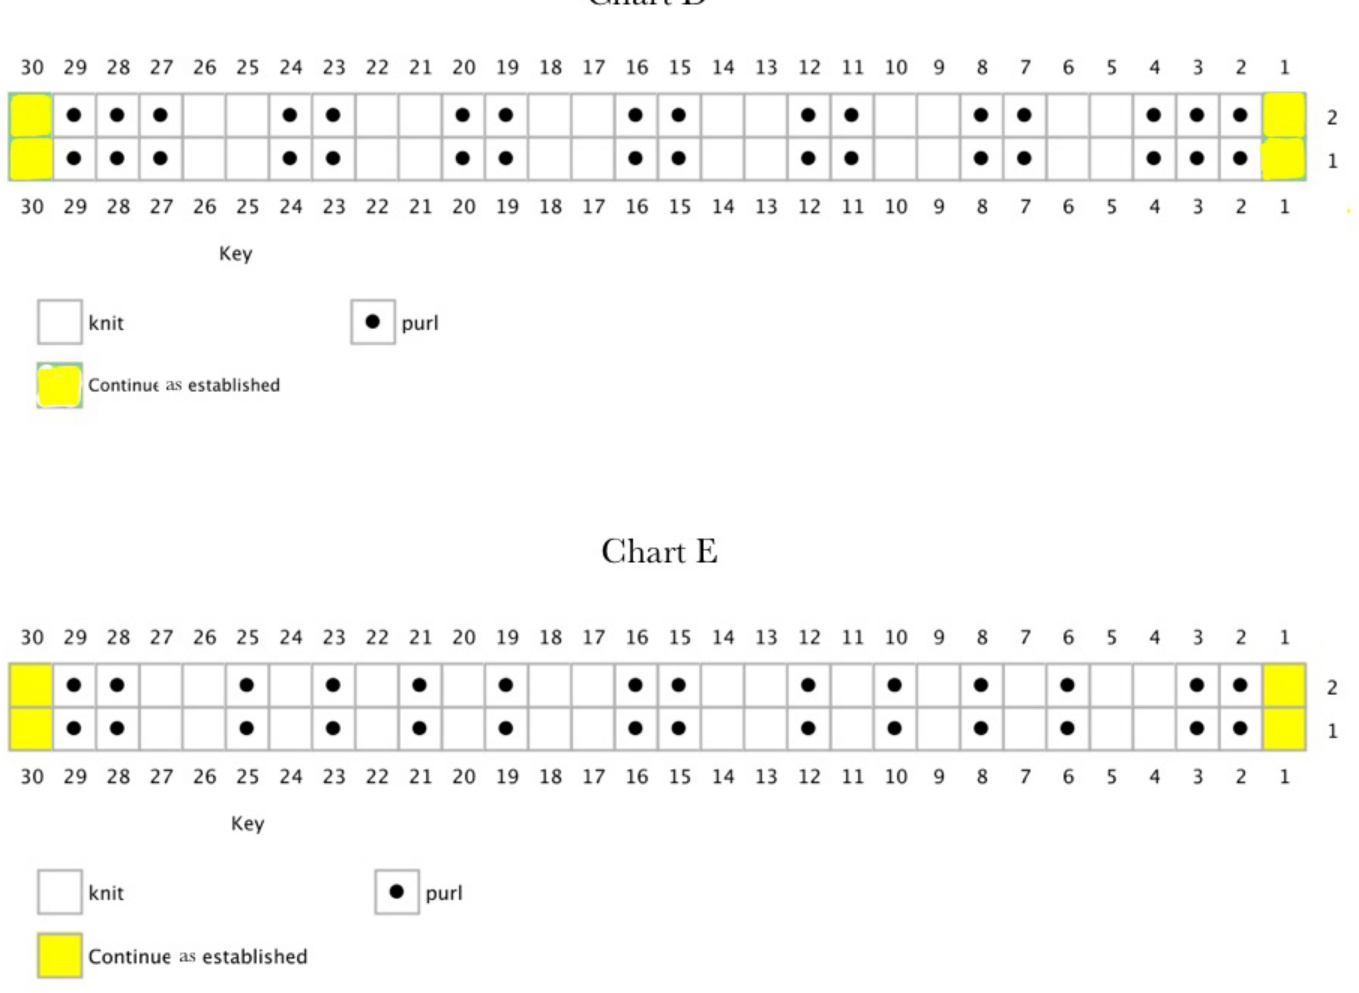
Charts Cuff Size Medium:
Charts D and E show 2 vertical pattern repeats. Border stitches (in yellow) are worked in established way to make a lacework border on the sides of sock. Work Chart D twice if you worked Chart A for back of leg. Work Chart D once on front of leg then Chart E on back of leg if you worked Chart C for back of leg. Chart D
Charts Cuff Size Large:
Charts D and E show 2 vertical pattern repeats. Border stitches are worked in established way to make a beaded ribbed and lacework border on the sides of sock. Work Chart D twice if you worked Chart A for back of leg. Work Chart D once on front of leg then Chart E on back of leg if you worked Chart C for back of leg. Chart D
Data for graph
| Table 1 | 6.8 | 7.5 Sock circumference with10%negative ease | 8 | 9 |
| 8 | 54.4 | 60 | 64 | 72 |
| 8.5 | 57.8 | 63.75 | 68 | 76.5 |
| G 9 A | 61.2 | 67.5 | 72 | 81 |
| U 9.5 G | 64.6 | 71.25 | 76 | 85.5 |
| E 10 | 68 | 75 | 80 | 06 |
| 10.5 | 71.4 | 78.75 | +8 | 94.5 |
| 11 | 74.8 | 82.5 | 88 | 66 |
A "cheat sheet" relating sock circumference at ballof fot to stockinette gauge in round. Circumference shown has 10% negative ease. Actual foot circumference shown within parentheses. How to use chart is shown in example that follows. Example: My foot circumference is 9 inches. For a sock with about 10% negative ease, I will look at the yellow bars in the figure (8" sock circumference). If my gauge with a particular yarn is 9 st/inch, then I would want to have a total stitch count of about 72 stitches. If the pattern has cables or is color work, I may need more stitches or want to look at the Orange bar which would be a sock circumference for my foot with no negative ease. In that case, I would want sock to have a total stitch count of about 80 stitches.

Sock circumference to fit with 10% negative ease.

Gauge:Stitches Per Inch (Stiches /cm) This is a nifty " cheat sheet" for working a toe-up sock. It travels well. The diagram shows sock from sole side. Gusset stitches are added to sole side of sock.Work is suspended on gusset stitches while the heel turn is made. The turn is finished off. Then the gusset stitches are worked off to back of leg stitch count. You can write in stitch counts and rows worked on the blueprint as illustrated.The blueprint along with the stitch pattern charts may be all you need to make a simple sock. Blueprint blank included for copying. Blueprint for Toe-up Faux Heel Flap Sock
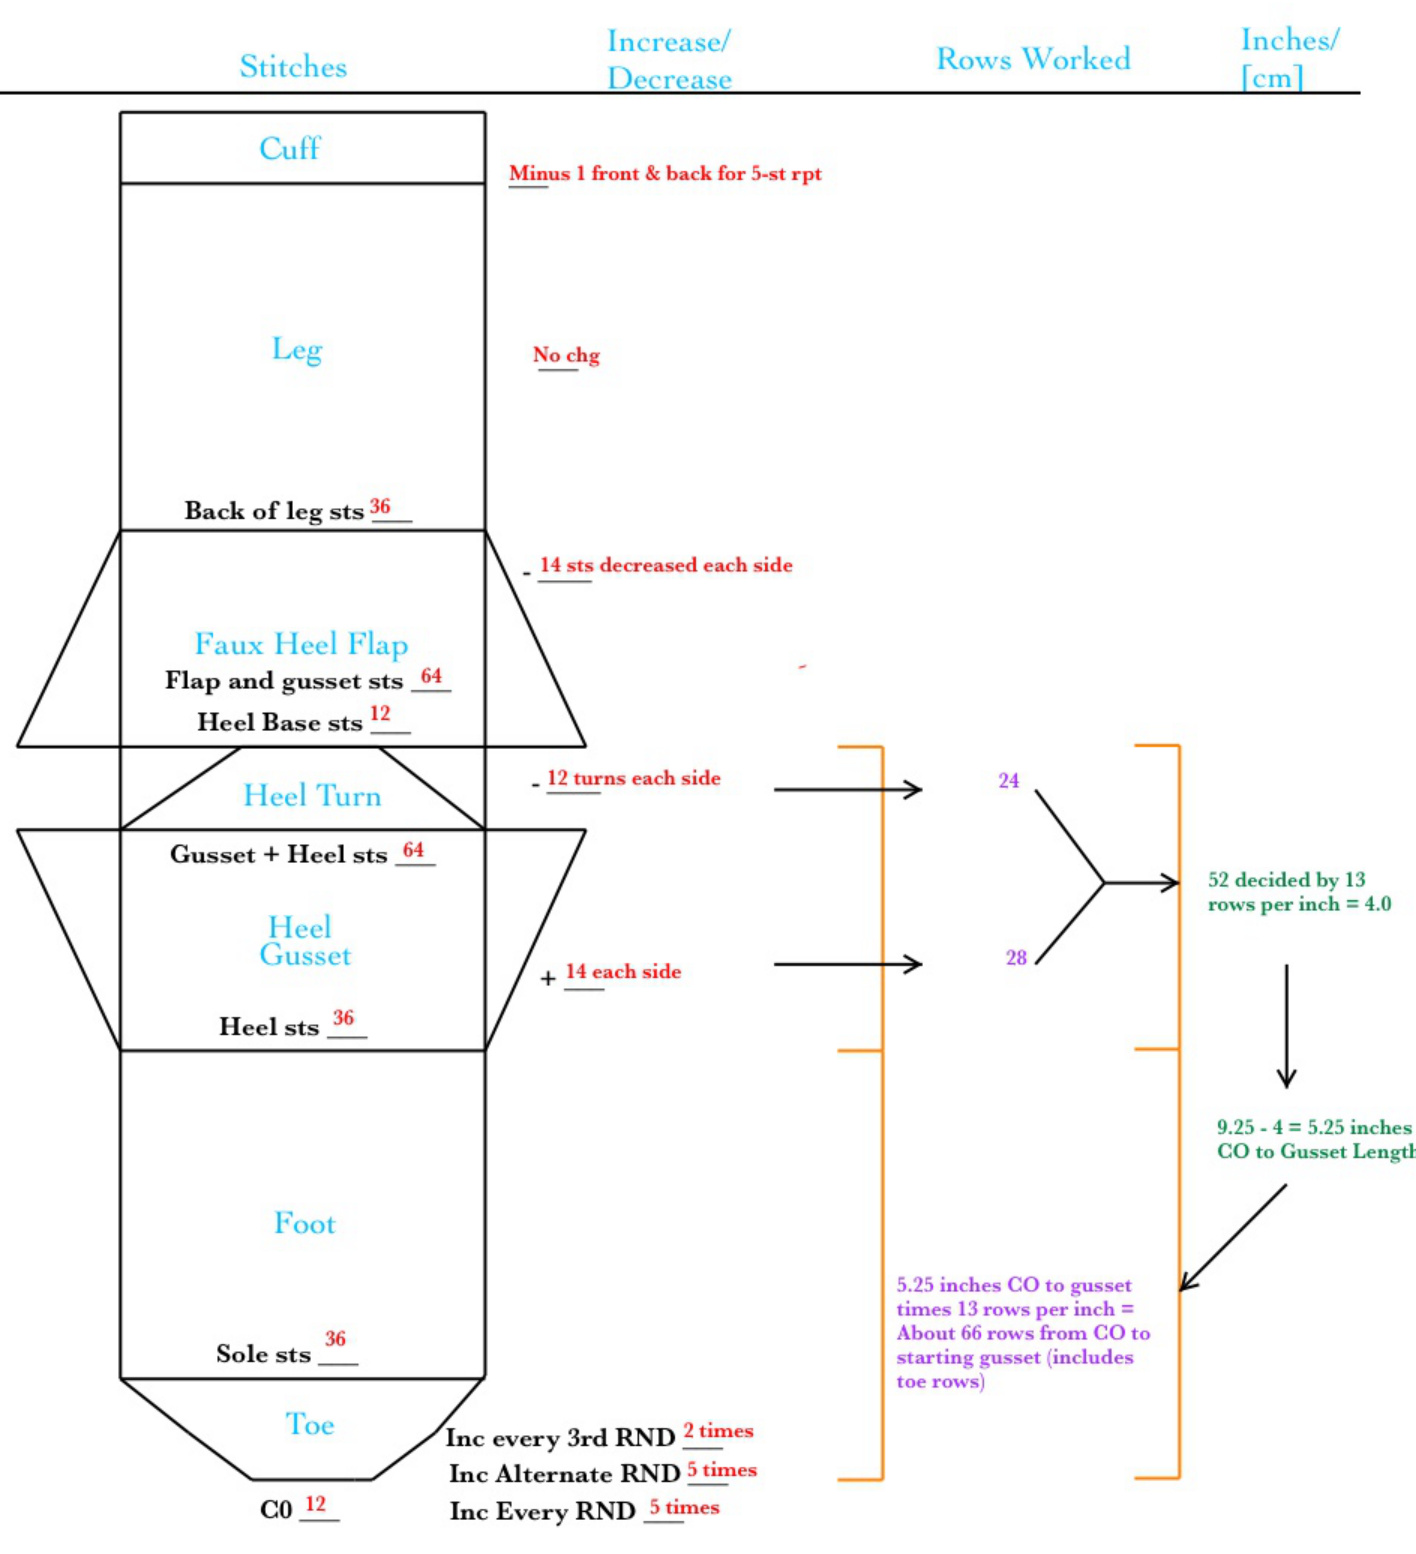
Gauge: sts, 13 rows per inch (cm)
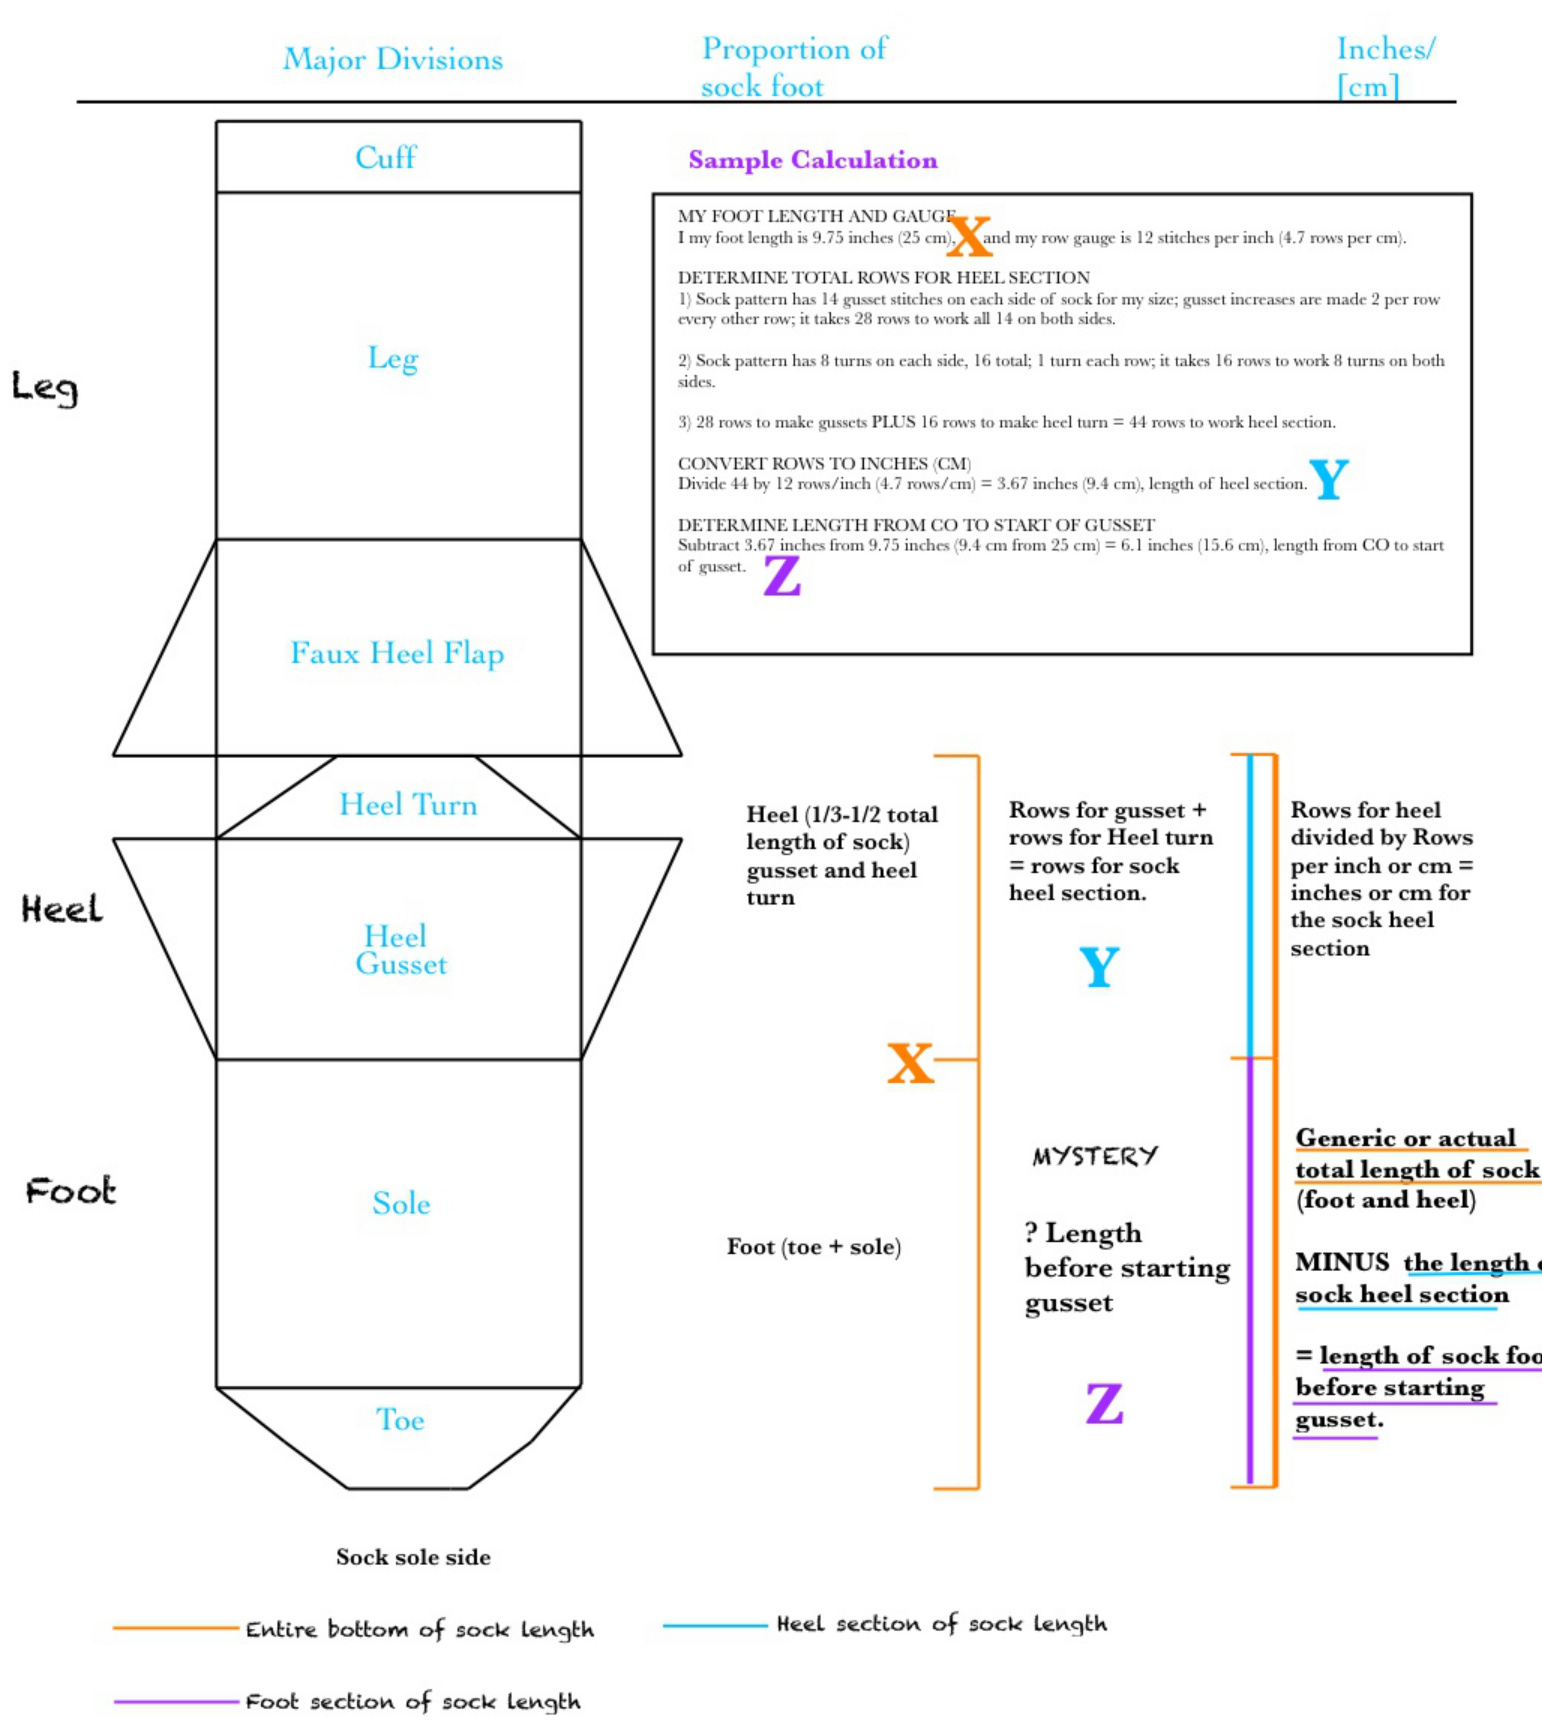
Figure 1: Blueprint Faux Heel Flap Sock If your row gauge matches pattern, you can adjust the generic sock foot length by 1/4 inch or 0.6 cm, adding or subtracting as appropriate.For example,if your actual foot length is 9.5 inches and the generic actual foot length for your size is 9.25, then add 1/4 inch (0.6 cm) to the generic sock foot length before starting gusset. You may need to add another 1/4 inch to this measurement when working reinforced heel to adjust for tighter gauge. If your row gauge is different from the pattern, then you may get a better fit by doing the math as steed on the diagram.
GUSSET Clue3
The gusset, a triangular wedge of added fabric, provides ease over the instep and around the instep and back of heel. Feet that havehighinsteps,that arefat,or that are narrowmayneed to adjust the standard gusset forabetterft. Highinsteorat feet:Increase thenumberof gusset stitcheswhich willngthenthegusset spreading the ease ver he instep of foot and also create a higher heel flap at the back of heel. Narrow feet: Decrease the number of gusset stitches which decreases the sock foot length and shortens the back of heel. Or use the same number gusset stitches, but increase the rate that the gusset stitches are added which will shorten the sock foot length, place the ease closer to the ankle where i's needed, but not affect the height of the hee flap.
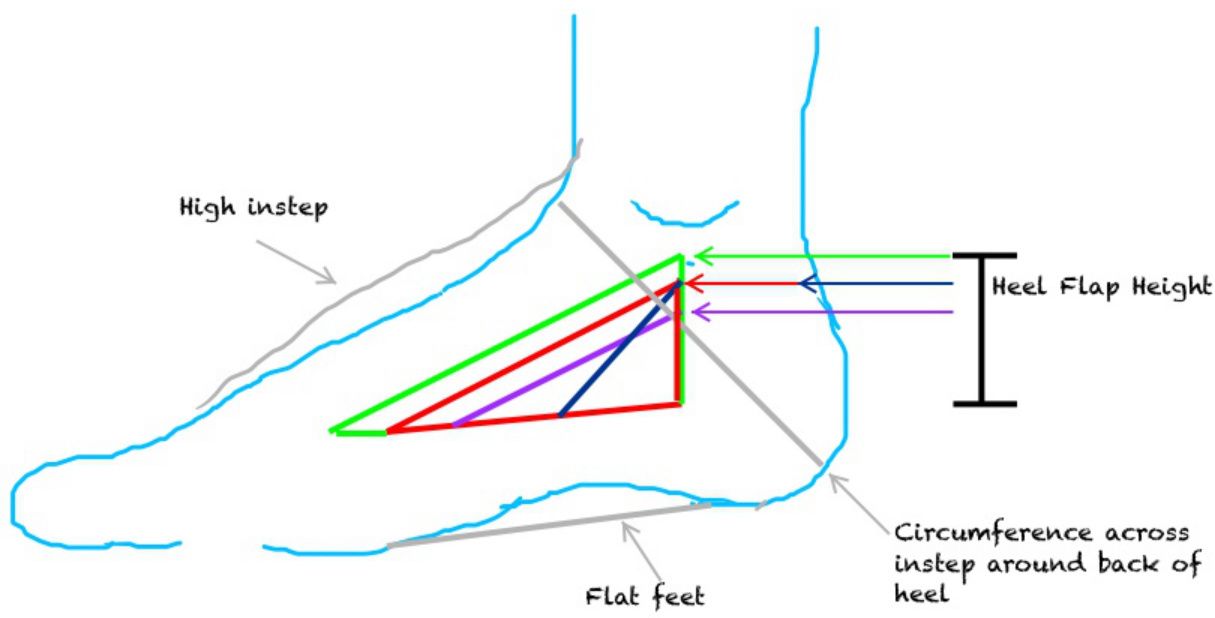
Gusset adds fabric for ease across instep and around instep and back of heel. Gehericgusset Added gusset stitches for high instep orflatfeet Fewergussetstitchesforthinfeet Faster gusset stitch increases for thinfeet


