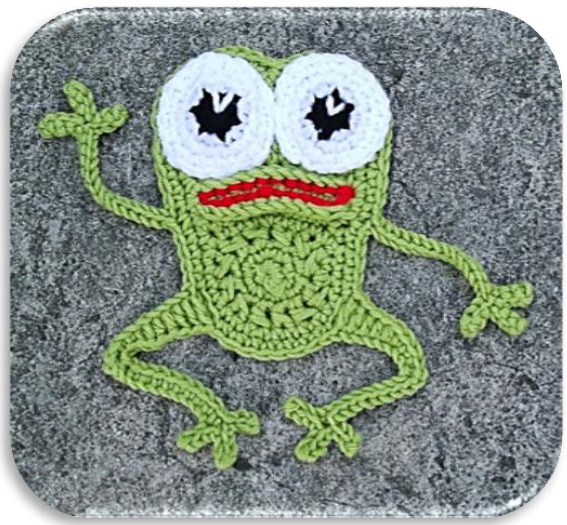
FROG FROM THE MYSTERY CAL (UK VERSION)

You will need approximately 50m of cotton type yarn, an appropriate size hook, a needle for neatening ends, 4 stitch markers and maybe a couple of beads.
This pattern is written in UK terms.
| UK abbreviation | UK term |
| opdq | back post double crochet |
| ch | chain |
| op | double crochet |
| dc3tog | double crochet 3sts together |
| opdy | front post double crochet |
| htr | half treble |
| pu | round |
| RS | right side |
| SS | slip stitch |
| ss3tog | slip stitch 3sts together |
| st(s) | stitch(es) |
| tr | treble |
| tr-7 group | group of 7tr in same st |
| WS | wrong side |
| yrh | yarn round hook |
ss3tog: (insert hook in next st and pull up a loop) twice - 3 loops on hook, insert hook into next st and pull up a loop, continue to bring loop through all other loops on hook. UK dc3tog: (insert hook in next st and pullup a loop) thre times, yrh and pull through all loops on hook.
Magic Ring
| 1. Take the yarn and wrap it around to form a ring. | 2. Do this once again. | 3. Insert the hook into the ring, yrh and draw loop through the ring. |
| 4. Work stitches into the ring, as instructed. | 5. Finally, pull the ring tight using the loose end. When you have closed the gap, weave in the loose end to secure. |
Commence body with a magic ring. Rnd 1: (RS) 6dc into ring - 6sts. Continuing in a spiral without joining, marking the start of each rnd with a stitch marker, Rnd 2: 2dc in each st around - 12sts. Rnd 3: (1htr in next st, 1htr around the stem of the previous htr) around - 24sts. Finish and smooth circle with 1htr in next st, 1dc in next st, ss in next st. Row 1: (RS) Working over the 9sts at the top of the circle only, 1ch, 1dc in each of first 4sts, 2dc in next st, 1dc in each of next 4sts, turn - 10sts. Row 2: (WS) Working over 9 of the 10sts only, 2dc in first st (Note: in this and subsequent rows, no turning chain are required unless specifically mentioned), 1dc in each of next 3sts, 2dc in next st, 1dc in each of next 3sts, 2dc in last st, turn - 12sts. low 3: 1ch, 1fpdc around each st across, turn - 12sts. You should make use of the'eye' of the ch to work the first fpdc. Place marker at each end of row. Row 4: Working behind the fpdc into dc from Row 2, 1ch, 1dc in each st across, turn - 12sts. Row 5: 1ch, 1bpdc in each st across, turn - 12sts. You should make use of the'eye' of the ch to work the first bpdc. Place marker at each end of row. Row 6: 1dc in each st across, turn - 12sts. Row 7: 1dc in each of next 5sts, 2dc in each of next 2sts, 1dc in each of next 5sts, turn - 14sts. Row 8: 1dc in each st across, turn - 14sts. Row 9: (RS) Miss first 3sts, 7tr in next st i.e. 4th st of row, miss 3sts, 1dc in next sp, miss 3sts, 7tr in next st, miss 2sts, ss in last st, rotate and continue around, 1dc in each st/row-end around until the beginning of the same row, DO NOT TURN. Row 10: (RS) 1dc in each of next 3tr - i.e. first 3sts of tr-7 group, 2dc in each of next 2sts, 1dc in next st, dc3tog over next 3sts, 1dc in next st, 2dc in each of next 2sts, 1dc in each of next 3sts, ss to next st to finish. Body completed.
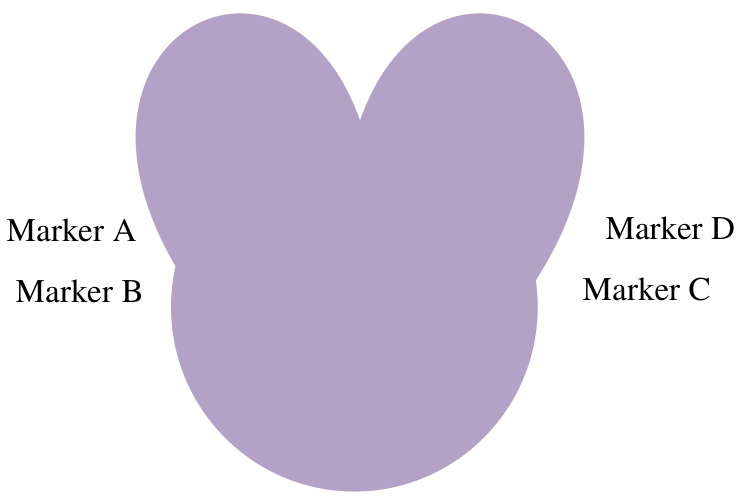
Right side view - markers will be referred to according to this placement Continue as follows, Rnd 1: 1dc in each st to marker A, 1dc in marked st, 18ch, 1dc in 2nd ch from hook, ss in next 2sts, (4ch, 1dc in 2nd ch from hook, ss in each of next 2sts) twice, ss in each ch back to body - arm completed, 1dc in each of next 5sts, 24ch, 1dc in 2nd ch from hook, ss in next 2sts, (4ch, 1dc in 2nd ch from hook, ss in next 2sts) twice, ss in each of next 9sts, ss3tog, 1dc in each of next 3sts, 1htr in each of next 3sts, 1tr in each of next 2sts, miss 2sts along body, 1dc in next st - leg completed, 1dc in each of next 8sts around body. Note: you may find your spacing different to that stated here - this can happen if you sneak an extra stitch in (or leave one out) around the edge. All you need to do if this happens is work the second leg symmetrical to the first and continue. 21ch, 1dc in 2nd ch from hook, ss in next 2sts, (4ch, 1dc in 2nd ch from hook, ss in next 2sts) twice, ss in each of next 8sts, 3ss in next st, 1dc in each of next 3sts, 1htr in each of next 3sts, 1tr in each of next 2sts, miss next st along body, 1dc in next st - legcompleted, 1dc in each st to Marker C, 1dc in marked st, 18ch, 1dc in 2nd ch from hook, ss in next 2sts, (4ch, 1dc in 2nd ch from hook, ss in each of next 2sts) twice, ss in each ch back to body - arm completed, 1dc in each of next 5sts, 2dc in each of next 6sts (around part of tr-7 group), dc3tog, 2dc in each of next 6sts, dc to end if necessary, ss to start of rnd to join. Fasten off and neaten ends. Proceed to eyes or attach two beads/buttons. Eyes (make 2) Commence eye in black with a magic ring. Row 1: (RS) 6dc into ring to make pupil picking up white with final dc - 6sts. Continuing in a spiral without joining, marking the start of each rnd with a stitch marker, Row 2: In white, 2dc in each st around - 12sts. Row3: (2dc in next st, 1dc in next st) around - 18sts. Row 4: (2dc in next st, 1dc in each of next 2sts) around - 24sts. Slip stitch in next st to finish. Fasten off leaving 30cm (12") for stitching in place Stitch in place over tr-7 groups from Row 9. Repeat for second eye. Neaten remaining ends. Attach hanging loop if desired. Use red to embroider a mouth/tongue to finish the frog, if desired.

FROG FROM THE MYSTERY CAL (US VERSION)
You will need approximately 50m of cotton type yarn, an appropriate size hook, a needle for neatening ends, 4 stitch markers and maybe a couple of beads.
This pattern in written in US terms.
| US abbreviation | US term |
| bpsc | back post single crochet |
| ch | chain |
| dc | double crochet |
| dc-7 group | group of 7dc in same st |
| fpsc | front post single crochet |
| hdc | half double crochet |
| pu1 | round |
| RS | right side |
| SC | single crochet |
| sc3tog | single crochet 3sts together |
| sl st | slip stitch |
| ss3tog | slip stitch 3sts together |
| st(s) | stitch(es) |
| WS | wrong side |
| yo | yarn over |
ss3tog: (insert hook in next st and pull up a loop) twice - 3 loops on hook, insert hook into next st and pull up a loop, continue to bring loop through all other loops on hook. US sc3tog: (insert hook in next st and pull up a loop) three times, yo and pull through all loops on hook.
Magic Ring
| 1. Take the yarn and wrap it around to form a ring. | 2. Do this once again. | 3. Insert the hook into the ring, yo and draw loop through the ring. |
| 4. Work stitches into the ring, as instructed. | 5. Finally, pull the ring tight using the loose end. When you have closed the gap, weave in the loose end to secure. |
Commence body with a magic ring. Rnd 1: (RS) 6sc into ring - 6sts. Continuing in a spiral without joining, marking the start of each rnd with a stitch marker, Rnd 2: 2sc in each st around - 12sts. Rnd 3: (1hdc in next st, 1hdc around the stem of the previous hdc) around - 24sts. Finish and smooth circle with 1hdc in next st, 1sc in next st, sl st in next st. Row 1: (RS) Working over the 9sts at the top of the circle only, 1ch, 1sc in each of first 4sts, 2sc in next st, 1sc in each of next 4sts, turn - 10sts. Row 2: (WS) Working over 9 of the 10sts only, 2sc in first st (Note: in this and subsequent rows, no turning chain are required unless specifically mentioned), 1sc in each of next 3sts, 2sc in next st, 1sc in each of next 3sts, 2sc in last st, turn - 12sts. Row 3: 1ch, 1fpsc around each st across, turn - 12sts. You should make use of the 'eye' of the ch to work the first fpsc. Place marker at each end of row. Row 4: Working behind the fpsc into sc from Row 2, 1ch, 1sc in each st across, turn - 12sts. Row 5: 1ch, 1bpsc in each st across, turn - 12sts. You should make use of the 'eye' of the ch to work the first bpsc. Place marker at each end of row. Row 6: 1sc in each st across, turn - 12sts. Row 7: 1sc in each of next 5sts, 2sc in each of next 2sts, 1sc in each of next 5sts, turn - 14sts. Row 8: 1sc in each st across, turn - 14sts. Row 9: (RS) Skip first 3sts, 7dc in next st i.e. 4th st of row, skip 3sts, 1sc in next sp, skip 3sts, 7dc in next st, skip 2sts, sl st in last st, rotate and continue around, 1sc in each st/row-end around until the beginning of the same row. DO NOT TURN. Row 10: (RS) 1sc in each of next 3dc - i.e. first 3sts of dc-7 group, 2sc in each of next 2sts, 1sc in next st, sc3tog over next 3sts, 1sc in next st, 2sc in each of next 2sts, 1sc in each of next 3sts, sl st to next st to finish. Body completed.
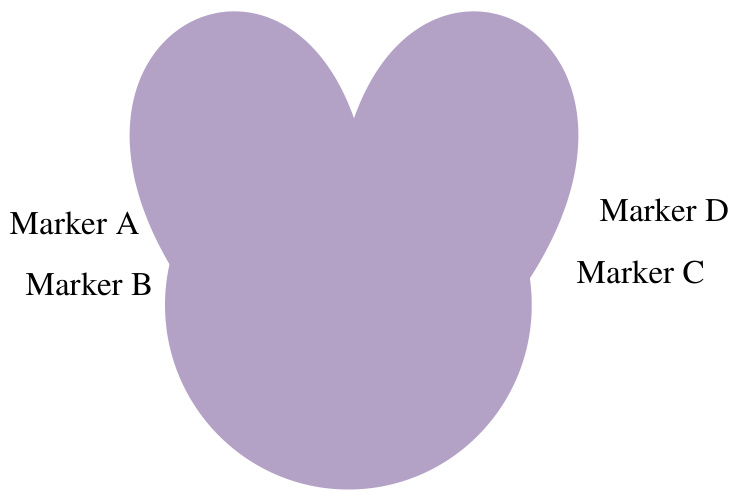
Right side view - markers will be referred to according to this placement Continue as follows, Rnd 1: 1sc in each st to marker A, 1sc in marked st, 18ch, 1sc in 2nd ch from hook, sl st in next 2sts, (4ch, 1sc in 2nd ch from hook, sl st in each of next 2sts) twice, sl st in each ch back to body - arm completed, 1sc in each of next 5sts, 24ch, 1sc in 2nd ch from hook, sl st in next 2sts, (4ch, 1sc in 2nd ch from hook, sl st in next 2sts) twice, sl st in each of next 9sts, ss3tog, 1sc in each of next 3sts, 1hdc in each of next 3sts, 1dc in each of next 2sts, skip 2sts along body, 1sc in next st - leg completed, 1sc in each of next 8sts around body. Note: you may find your spacing different to that stated here - this can happen if you sneak an extra stitch in (or leave one out) around the edge. All you need to do if this happens is work the second leg symmetrical to the first and continue. 21ch, 1sc in 2nd ch from hook, sl st in next 2sts, (4ch, 1sc in 2nd ch from hook, sl st in next 2sts) twice, sl st in each of next 8sts, 3sl st in next st, 1sc in each of next 3sts, 1hdc in each of next 3sts, 1dc in each of next 2sts, skip next st along body, 1sc in next st -leg completed, 1sc in each st to Marker C, 1sc in marked st, 18ch, 1sc in 2nd ch from hook, sl st in next 2sts, (4ch, 1sc in 2nd ch from hook, sl st in each of next 2sts) twice, sl st in each ch back to body - arm completed, 1sc in each of next 5sts, 2sc in each of next 6sts (around part of dc-7 group), sc3tog. 2sc in each of next 6sts, sc to end if necessary, sl st to start of rnd to join. Fasten off and neaten ends. Proceed to eyes or attach two beads/buttons. Eyes (make 2) Commence eye in black with a magic ring. Row 1: (RS) 6sc into ring to make pupil picking up white with final sc - 6sts. Continuing in a spiral without joining, marking the start of each rnd with a stitch marker, Row 2: In white, 2sc in each st around - 12sts. Row3: (2sc in next st, 1sc in next st) around - 18sts. Row 4: (2sc in next st, 1sc in each of next 2sts) around - 24sts. Slip stitch in next st to finish. Fasten off leaving 30cm (12") for stitching in place. Stitch in place over dc-7 groups from Row 9. Repeat for second eye. Neaten remaining ends. Attach hanging loop if desired. Use red to embroider a mouth/tongue to finish the frog, if desired.


