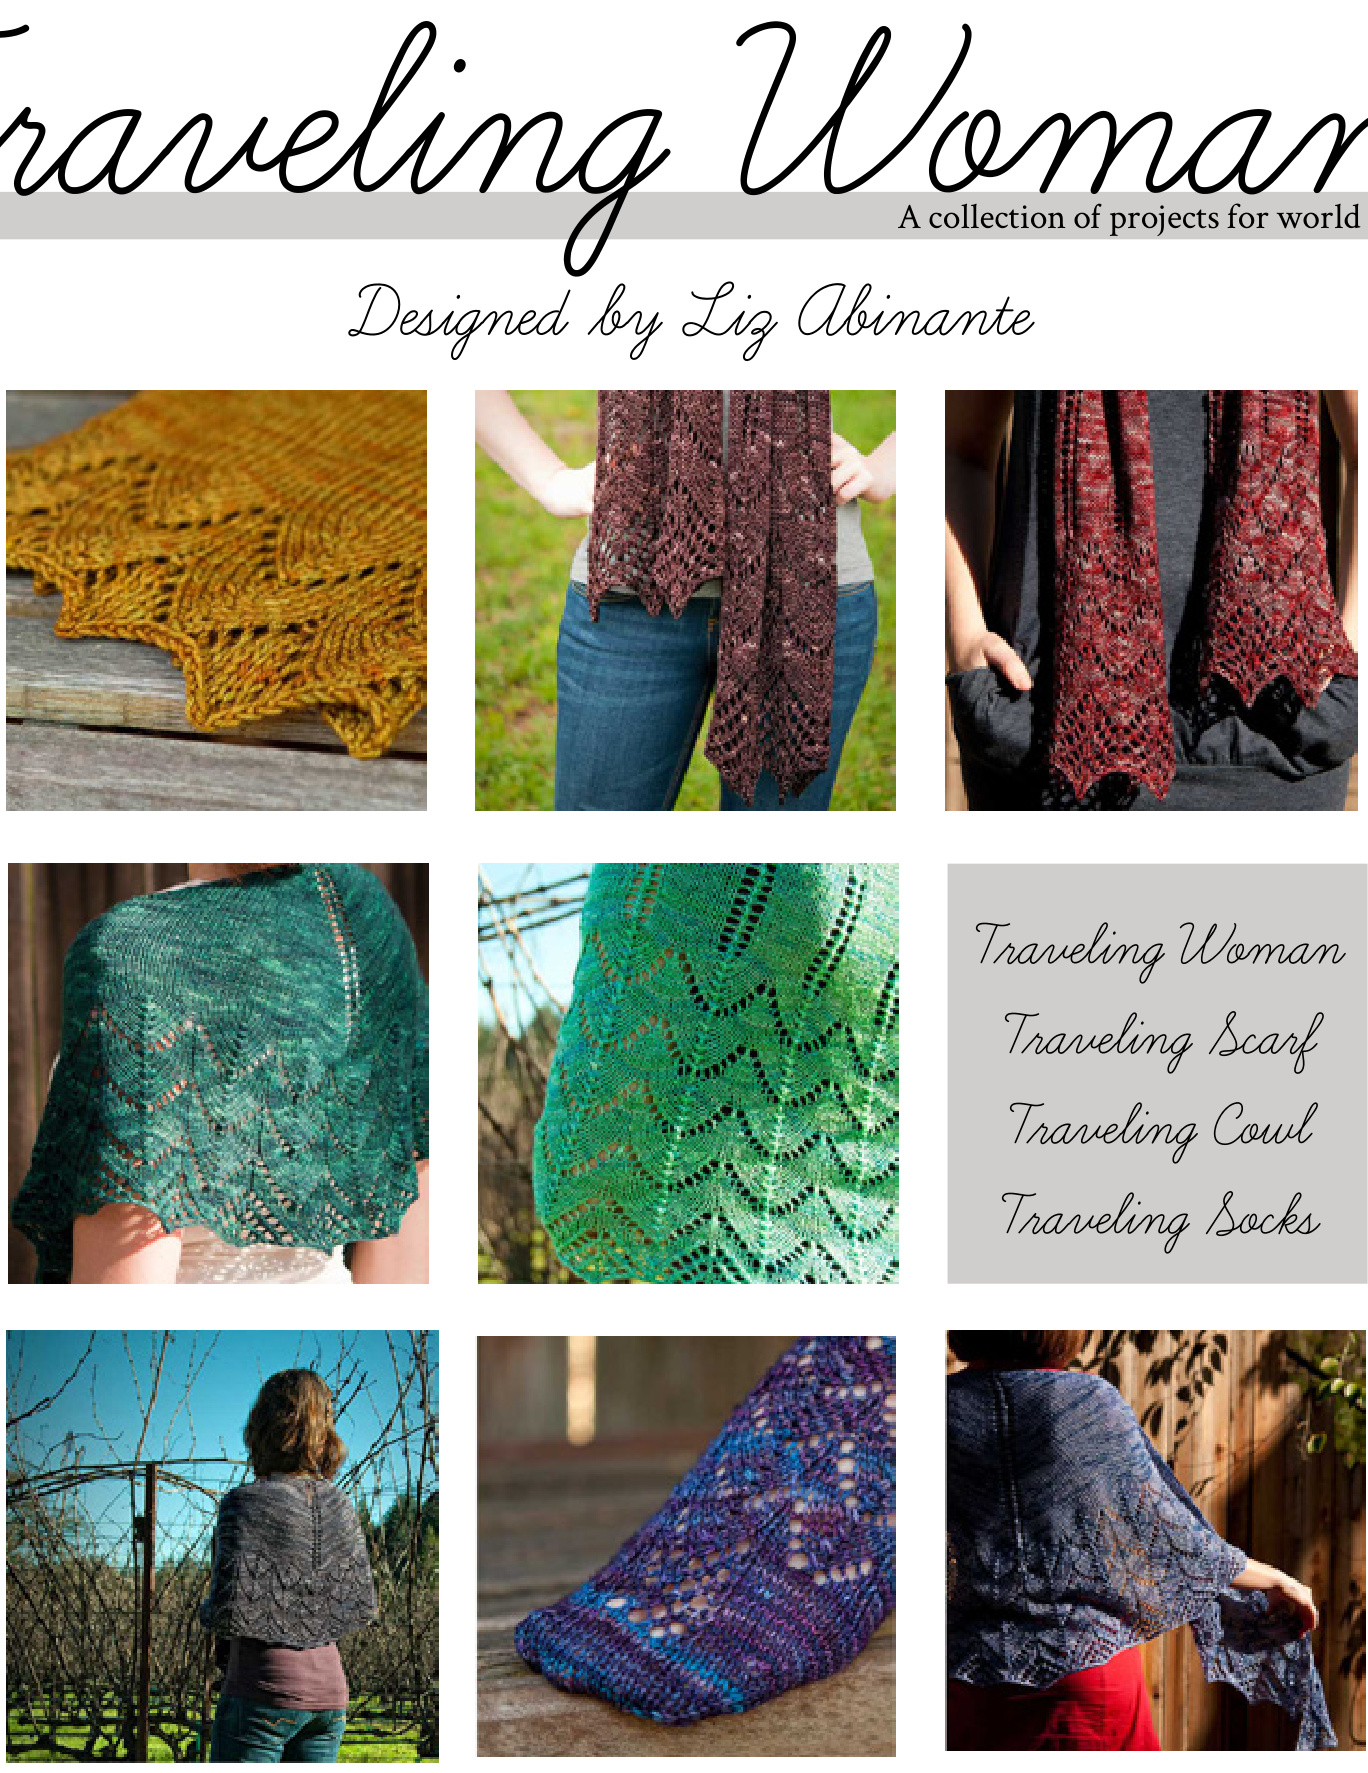
Contents
Introduction · page 3 A brief outline of the pattern.
Tips For Customizing · page 4 Customization tips applicable to all versions of the pattern.
Traveling Uoman The shawl that started it all. Semi-circle shape. Top down Laceweight, medium and xlarge Fingering weight, xsmall, small, medium and large Sport/DK weight, xsmall, small and slarge Worsted weight, large and xlarge
Traveling cap Adapted to use maximum yardage. Fingering weight, scarf Worsted weight, stole Additional sizing recommendations included
Traveling Coul Quick and cozy cowl knit in the round. Fingering weight, small and large Worsted weight, small and large Traveling Socks Cuff down socks with a heel flap.
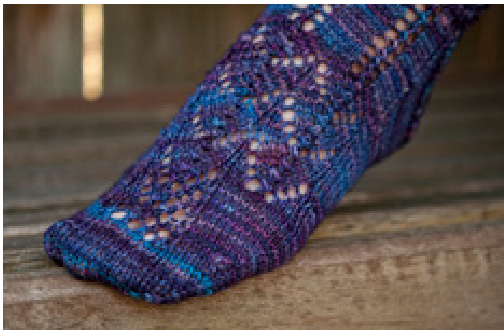
Fingering weight, small, medium, and large Sport weight, small, medium, and large Legends · page 57 A list of symbols and abbreviations used in the pattern Acknowledgements · page 58 Thanks, copyright information, and about the designer.
lntroduction
Dearest knitter, This booklet has been a long time coming. I released the original Traveling Woman pattern in August 2009. In December 2010, it reached 5,000 projects on Ravelry. Seriously, I'm flattered you've all chosen to knit my original free design. I appreciate your support in purchasing the complete booklet - what I like to think of as the “deluxe" version of Traveling Woman. In this booklet you will find four patterns: Traveling Woman,the original crescent shaped shawlette. Upgraded to include instructions for lace, fingering, sport, and worsted weight yarns in multiple sizes. A special set of instructions for a large laceweight shawl with eyelets. Traveling Scarf, a new version of the original pattern. Choose from a stole or scarf in worsted weight or a large or smallscarf in fingering weight. Eyelets have been added to the lace pattern to allow for an easier transition to the lace chart and to spice up the stockette body. Traveling Cowl, which has adapted the original pattern to be worked in the round. Instructions are provided for fingering and worsted weights, both in small (tight) and large (loose) sizes. Traveling Socks,because no pattern is complete without some cozy socks to keep you warm. Includes 3 sizes in each fingering and sport weight. Each pattern also includes a separate set of instructions and detailed notes if you wish to customize your knitted object to use a different yarn or gauge, or to be a different size. In addition to these specialized custom notes, there are instructions for general customization tips on the following page. Want a more prominent lace border? Prefer more pointed tips? In the mood for a manly knit? Itching to add beads? Suggestions for all of these options (and more) can be found on the next page. Thank you to all of the wonderful knitters who made this pattern possible! Happy knitting. inante feministy.com liz.abinante@gmail.com twitter: feministy ravelry: feministy
Tips For Customiging
I cannot stress this enough: Before customizing a pattern in this booklet, be sure to read through all of the instructions. Each individual patterns includes a special section that contains customizations specific to your project. If you're looking for: formulas for custom sizes, instructions on adding lace to the body of your project, or alternating the lace repeats, please see the specific pattern. This section contains general information that applies to all of the patterns in this book (except Traveling Socks - see below). These customizations can be worked without making adjustments to your knitting that involve a drastic re-writing of the instructions to the pattern of your choice.
A Note on Traveling Socks..
Because Traveling Socks have a ribbed cuff and no edge (socks kind of need toes!), some of these modifications will not apply to them. While you will easily be able to add beads to embellish your sock or adjust the pattern to be more masculine, you will not benefit from emphasizing the shawl points (there are no points). If you want to emphasize the lace on your sock, I have included special instructions for this in the “Pronounced Lace Edge" section.
Prmoumced Face Edge
One of the most frequent questions I get about Traveling Woman is whether or not the lace edge can be extended. The beauty of the lace pattern I've created for Traveling Woman is that it is easily repeated without hard math. To emphasize your points, repeat the last two rows of Chart B until you're satisfied with the length. I recommend 3 repeats of the last 2 rows (1 knit as part of the chart, plus 3 repeats of the last 2 rows). If you really want to pull your shawl to pronounced points, I recommend following the instructions for Emphasizing the Points (next page) as well. Traveling Uomanfor Men I love men in scarves. If you're a man, you should wear one. If you're a woman, you should make scarves for men so they're more fashionable. Or, even better, teach a man to knit so he can make his own Traveling Woman project and appreciate the term “labor of love" just a little bit more. I think that scarves are manly enough as they are, but the lace look just doesn't fit into the wardrobe of every man, and I'm not going to advise you knit something for anyone (regardless of their gender) is they aren't going to wear it. While Traveling Scarf lends itself well to most men's fashion sensibilities, it can be modified to be more androgynous for those who are less experimental with their fashion choices. I think Traveling Scarf, Cowl, and Socks are your best options for men, so many of these options are tailored to those patterns. To adapt the Traveling Woman patterns for men, you can think one of two ways: Think functionality, not fashion. Keep the chart as is and work it in a worsted weight for cozy winter warmth. Think fashion, not cold weather wear. This will help most with lighter weight yarns that make your project look dainty. Work m1L and m1R increases instead of yarn overs. Example: Instead of [yo, k5, slk2p, k5, yo] Work [m1L, k5, slk2p, m1R, yo]
General rules:
· Inside of the lace repeat: increases before slk2p should be m1L; increases after slk2p should be m 1R. · (applies to Traveling Woman only) Outside of the lace repeat: work the increase that matches the decrease next to the yo (k2tog with m1R, ssk with m1L). Or you can omit the patterning outside of the lace repeat except on row 11. Work the increases before the lace repeat as m1R; work the decreases after the lace repeat as m1L.
Emphasizing the Points
A lot of people have found the bind off that was included in the original version of Traveling Woman to be too tight, resulting in their points not being as bold as they would like. You have two options for emphasizing the points in your project: 1. Adjusting needle sizes 2. A looser bind off You can use these in conjunction with one another, or independently, depending on how sharp you want your points to be. If you want razor sharp points that are dramatically extended beyond the shawl, also check out the next section, Pronounced Lace Edge.
Option #1: Adjusting Needle Sizes
You will need three additional needle sizes for this method. The last 5 rows and the bind off row (6 rows including the bind off row) are knit with larger needles, increasing the needle size with every other row. I recommend increasing your needles according to their metric (mm) size, not their US (#) size. I've explained this in two ways. (A) The first explains it from the bind off row and works backwards: this helps if you mark on your chart from top-to-bottom when to switch needle sizes. (B) The second explains it as you would knit the project: this helps for people who don't like thinking backwards. You will get the same results no matter which set you follow.
(A) From bind off to body (backwards):
3. The bind off and the last RS row of Chart B should be work in a needle three sizes larger than your project needle. 2. The previous two rows (last WS row and second-to-last RS row of Chart B) should be worked in a needle two sizes larger than your body needle. 1. The previous two rows (second-to-last WS row and third-to-last RS row of Chart B) should be worked in a needle one size larger than your body needle. (B) From body to bind off(as you would knit): 1. The third-to-last RS row and the second-to-last WS row of Chart B should be worked in a needle one size larger than your body needle. 2. The second-to-last RS row and the last WS row of Chart B should be worked in a needle two sizes : larger than your body needle. 3. The last RS row of Chart B and the bind off · should be worked in a needle three sizes larger than your body needle.
Option #2: A Looser Bind Off
There are so many different ways to bind off loosely. Seriously, I couldn't even name them all (and I can name a lot). I like this bind off because it's sturdy, but still flexible. It will allow you to block your shawl thoroughly, but it will also help the shawl hold up to repeated wear. I don't know about you, but my shawls always get snagged on zippers, buttons, boddy pins, my glasses (don't ask), and velcro (maybe I should just wear leotards everywhere and shave my head?). This bind off holds up to the love (or abuse, depending on your perspective) that my shawls receive on a daily basis. Word of warning: this bind off eats up your yarn. Worked on the WS: p2, sl sts back to left ndl, p2tog. [p1, sl sts back to left ndl, p2tog] rpt to end. Worked on the RS: k2, sl sts back to left ndl, ssk. [k1, sl sts back to left ndl, ssk] rpt to end.
adding Beads
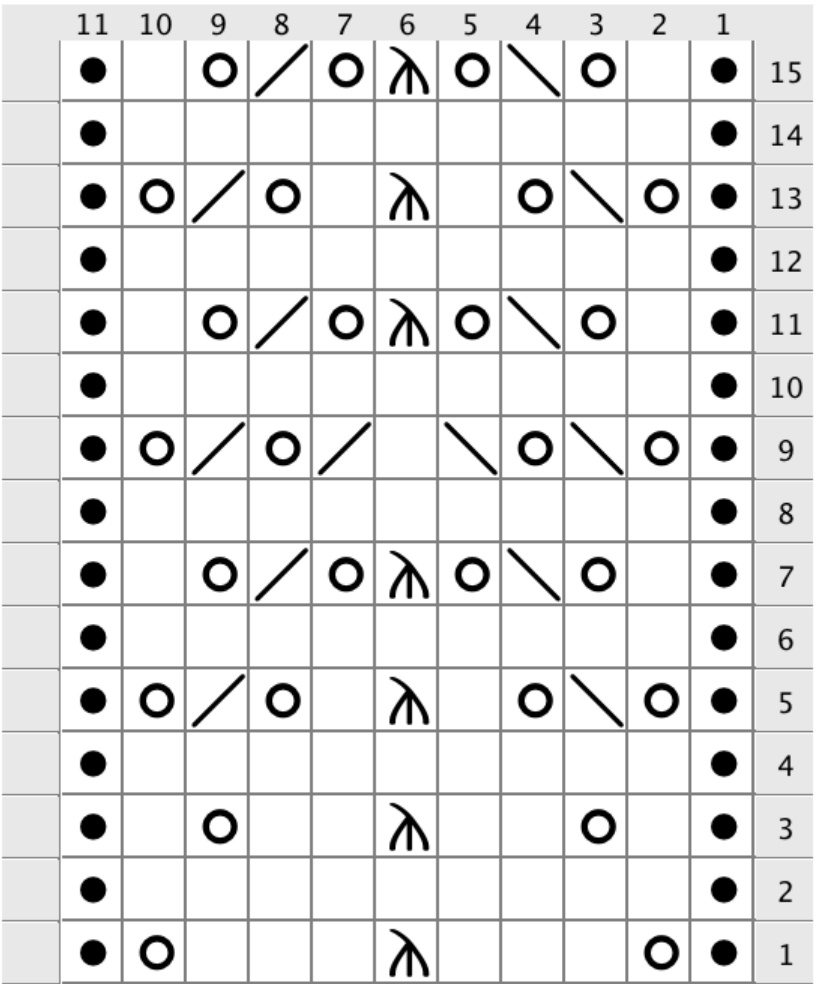
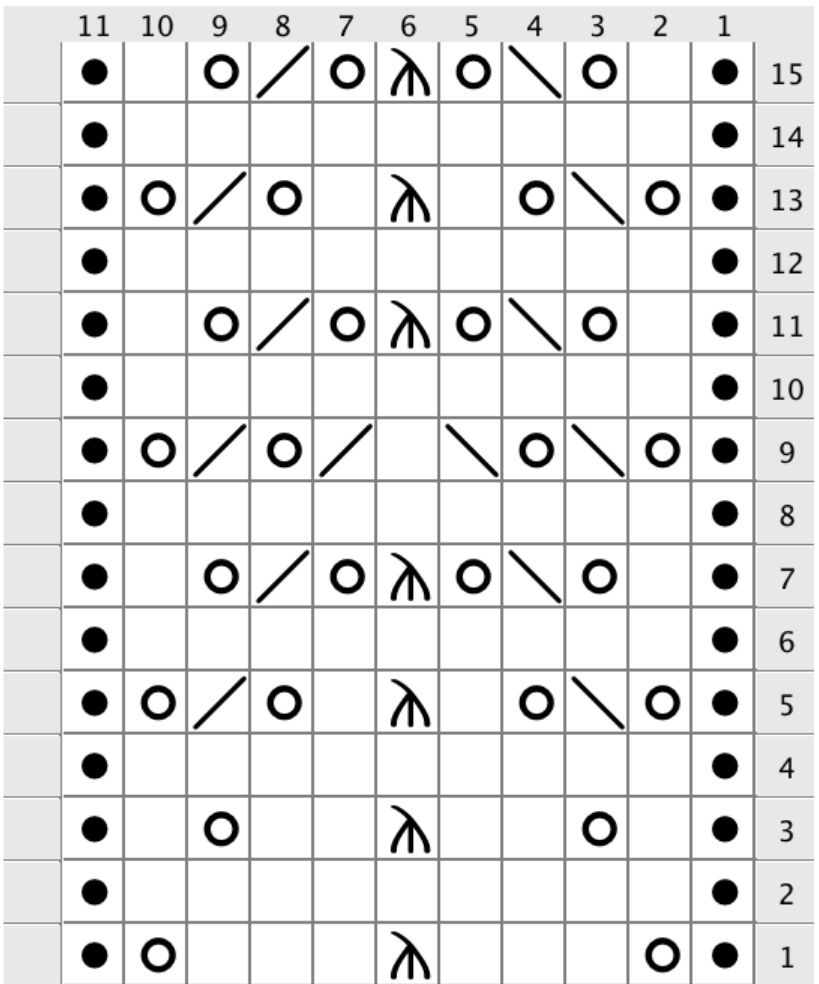
Once in my life I've knit a shawl with beads. It was a gorgeous piece of knitting, and it almost led me to commit murder. One word can be used to describe knitting with beads:tedious.But it's worth it. I recommend using the crochet hook method to place beads.\* Because placing beads on a shawl can be tedious, I've come up with a few different options in terms in bead placement. The number of beads you will need will change depending on how many lace repeats you do and which option you select. Remember to buy the appropriate beads for your yarn choice. Itty bitty tiny seed beads are not going to work for your worsted weight shawl. There are three different colors in the chart. For lots of beads, follow the instructions for Red. For a moderate amount of beads, follows the instructions for Purple. For a project minorly accented by beads, follow the instructions for Orange. If you really like beads, you may choose to add them to the spine of your Traveling Woman shawl. I recommend placing the beads on every other right side row (row 4, row 8, row 12, etc) on your center stitch. I suggest going through the pattern of choice and highlighting the chart to indicate where you are placing beads. The chart shown is the 14+1 repeat used for Traveling Woman: it includes the lace repeat and the stitches that fall outside of the repeat. It does not include the garter stitch border. Traveling Woman uses this chart for everysize. Traveling Scarf, Cowl, and Socks have different charts for their various sizes and don't include the stitches outside of the lace repeat. You can follow the suggested bead placement by scanning the Beads chart from top-to-bottom and highlighting the corresponding stitches on the pattern chart from top-to-bottom. Placing Beads on Decreases All of the beads are placed on right side rows. Most of the beads are placed on decreases. For those stitches, place the beads as follows:
Slip, slip, knit (ssk)
Place the bead on the first stitch on your left needle.
Knit 2 together (k2tog)
Place the bead on the second stitch on your left needle. Slip, knit 2 together, pass slip stitch over (slk2p) Place the bead on the second stitch on the left needle.
lnstructions
Decide how many beads you want on your shawl. Lots? Go with Red. Only a few? Follow Orange. Somewhere in the middle? Select Purple.
Red
For brave knitters and bead lovers. Place beads on all stitches with red, purple, and orange boxes.
Purple
For moderate bead lovers who like a bit of flair. Place beads on all stitches with purple and orange boxes.
Orange
For minor bead accents. Place beads on all stitches with orange boxes.
Bead Charts
CHMY
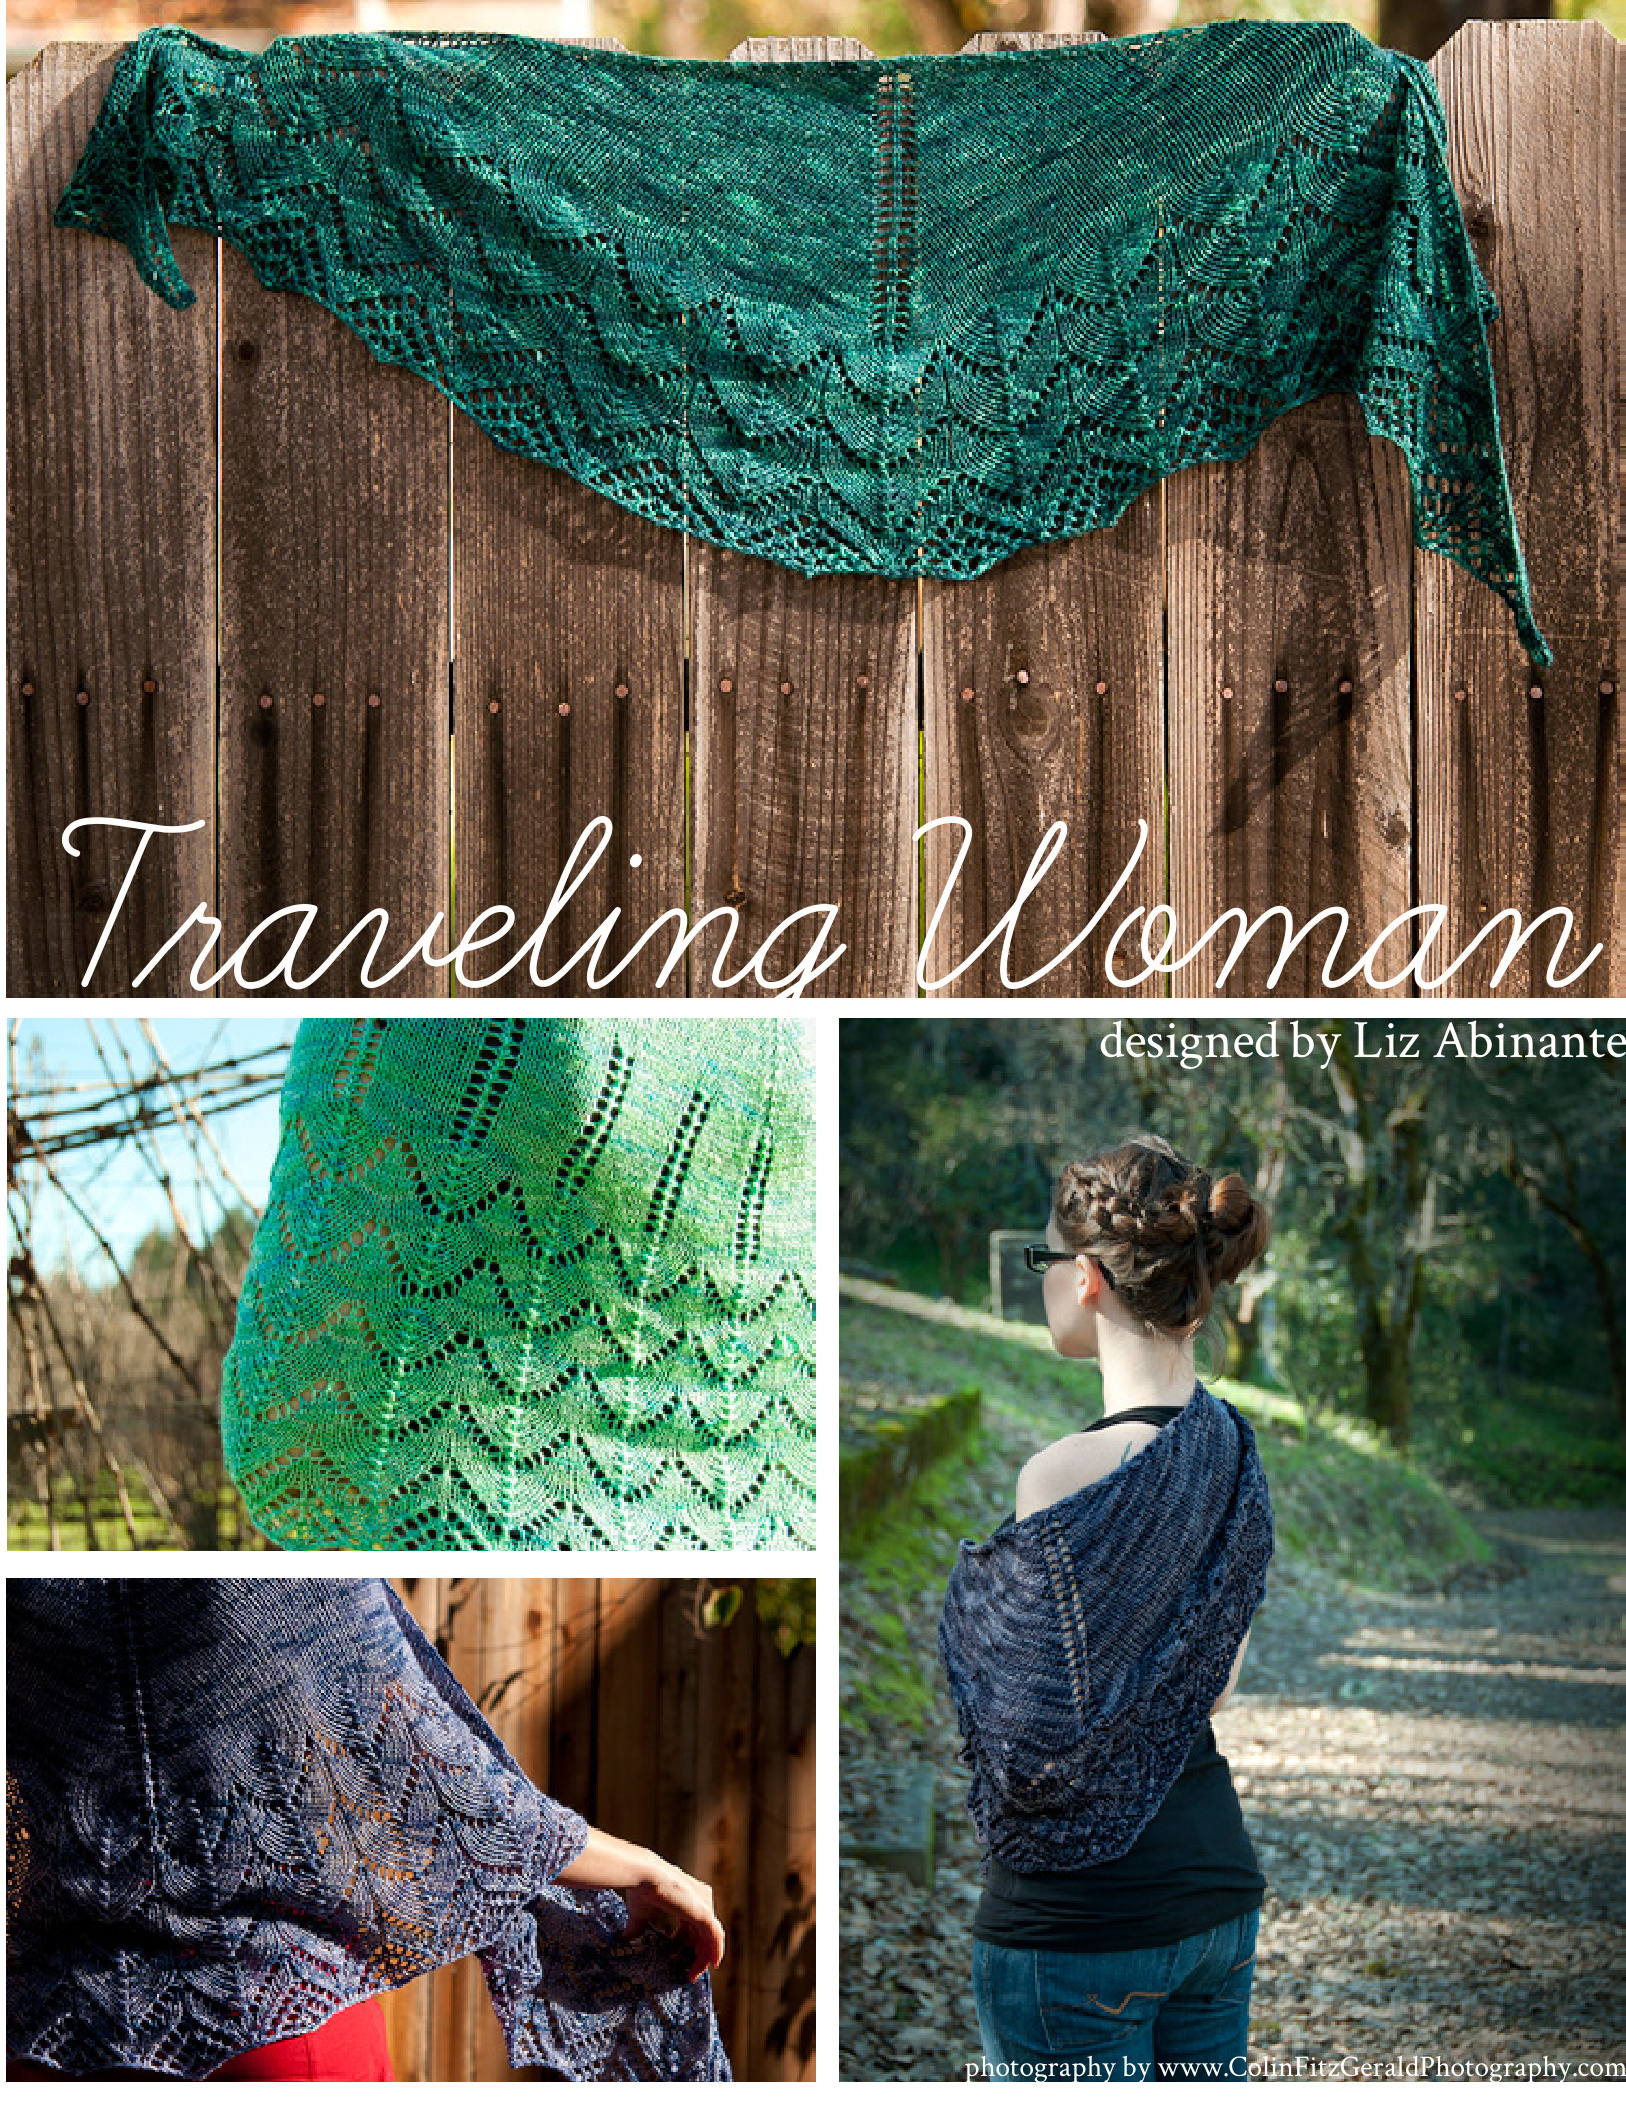
Traveling Uoman designed by Liz Abinante
Sizes and Customizations
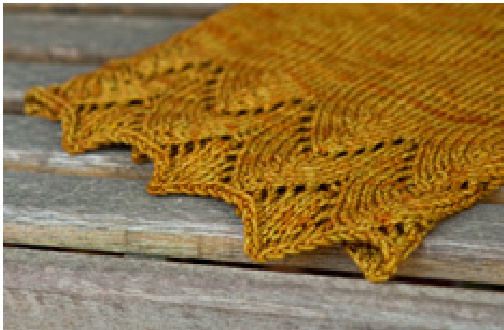
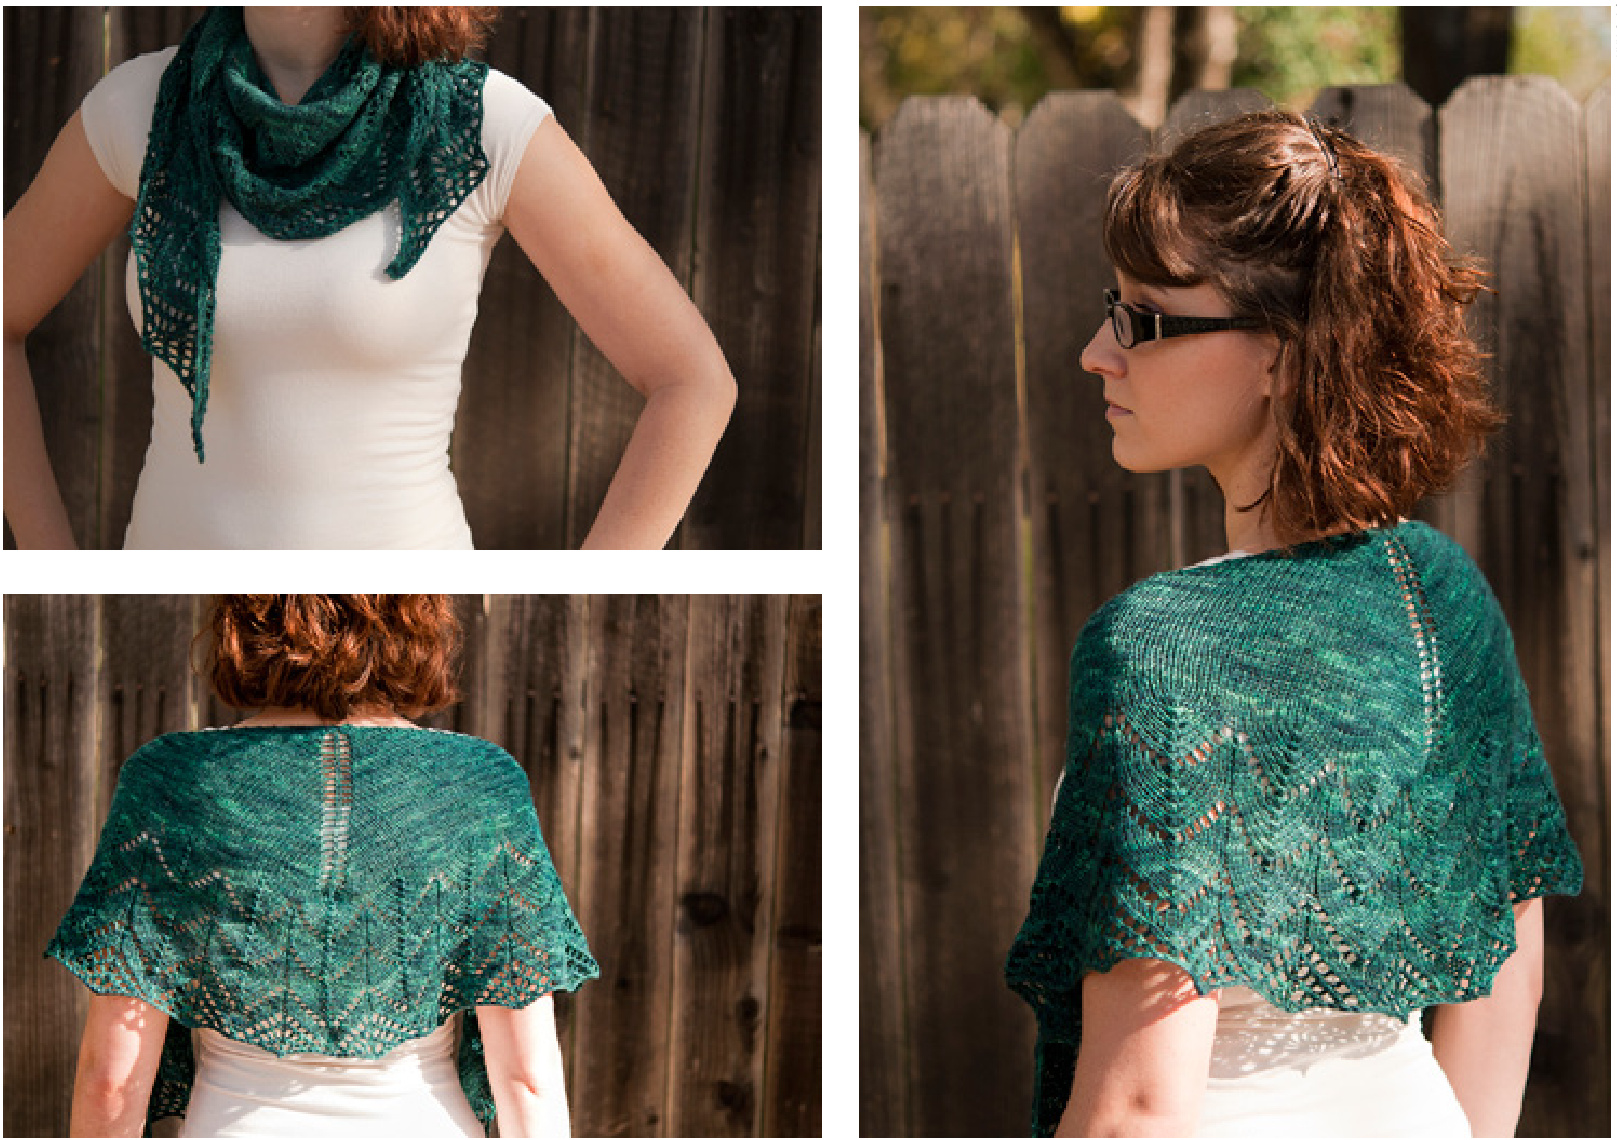
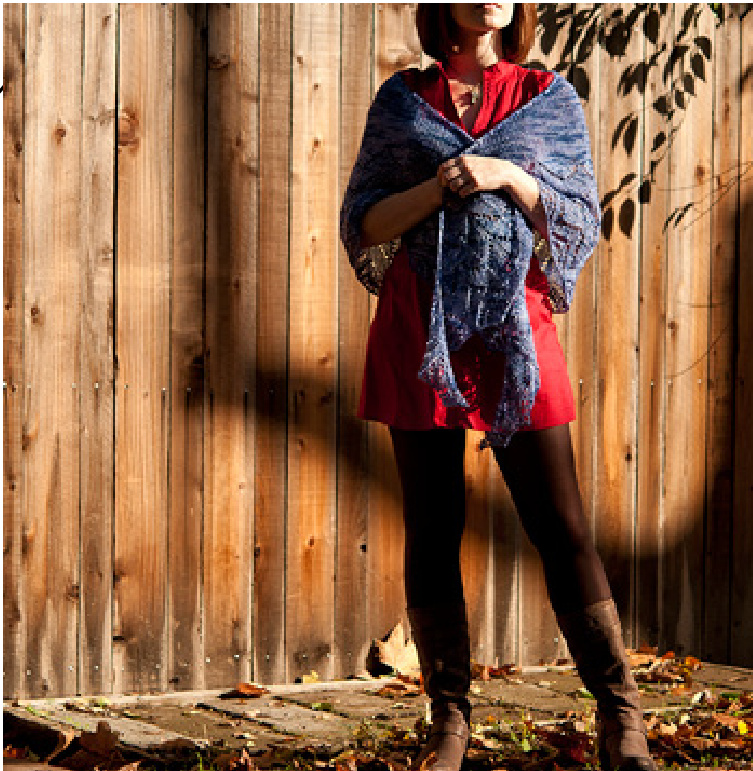
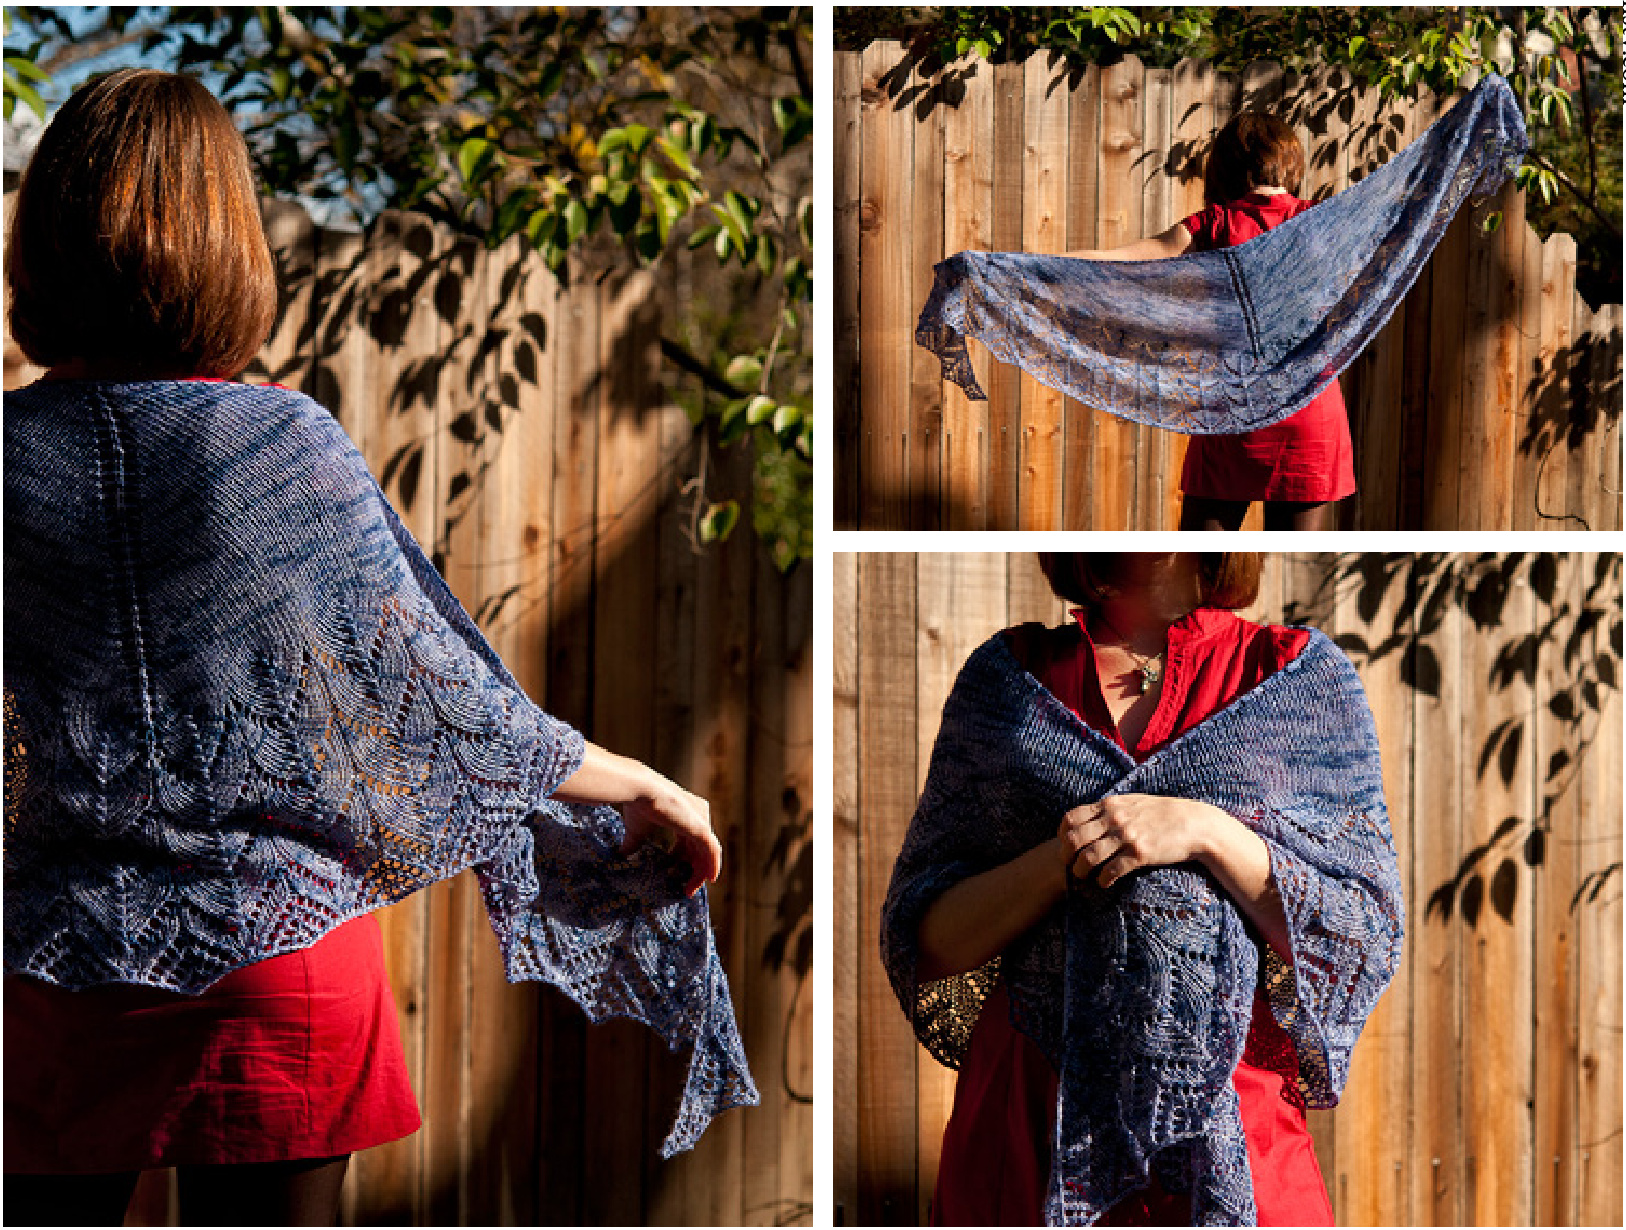
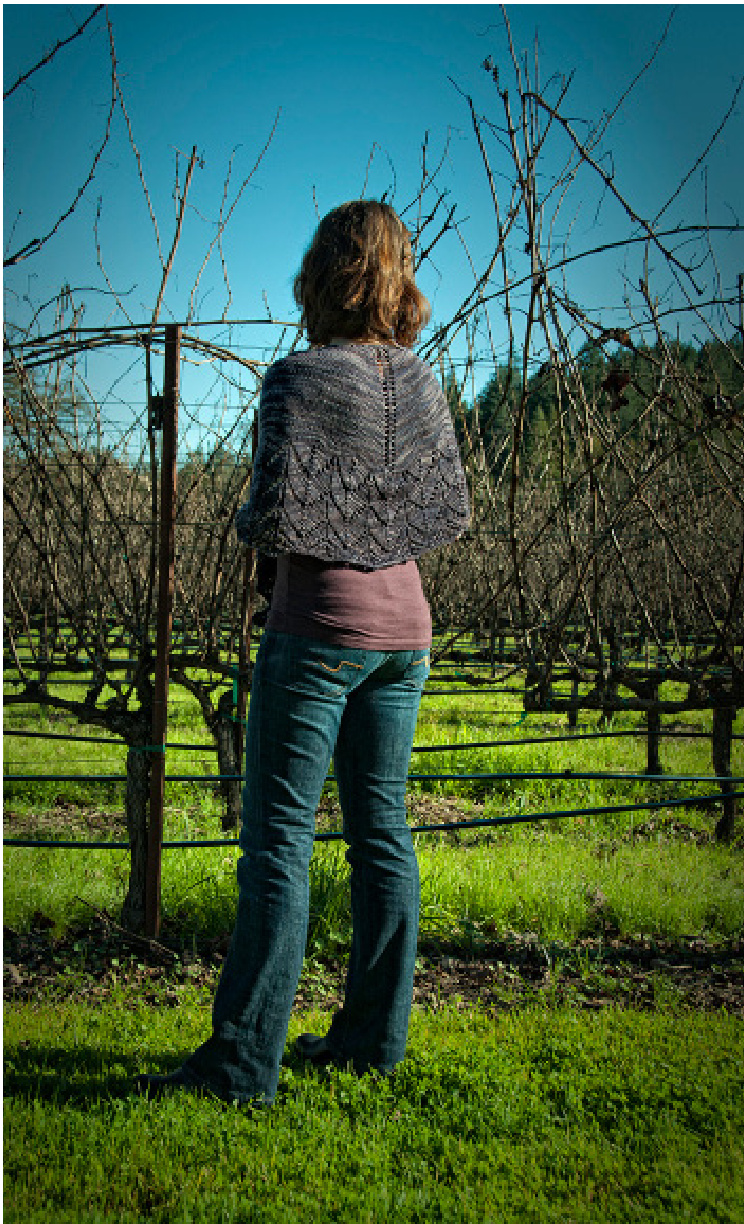
This is the pattern that started it all. The original. The first. The crazy idea that exploded into a series of four patterns. This new version of Traveling Woman contains the following sizes: lace (medium, xlarge), fingering (xsmall, small, medium, large), sport/dk (xsmall, small, xlarge), and worsted (large, xlarge). Instructions are divided up based on yarn weights. Yarn information, gauge, and needle sizes are provided with each individual set of instructions. All of the instructions use the same charts except for lace weight. Lace weight instructions have their own charts. If you wish to do custom sizing, there is a section at the end of the pattern with information and formulas. To customize your shawl further, please refer to the Customizing Your Traveling Woman section of the pattern. A special section for adding eyelets to the body of the shawl is included in this section.
About the original Traveling Woman
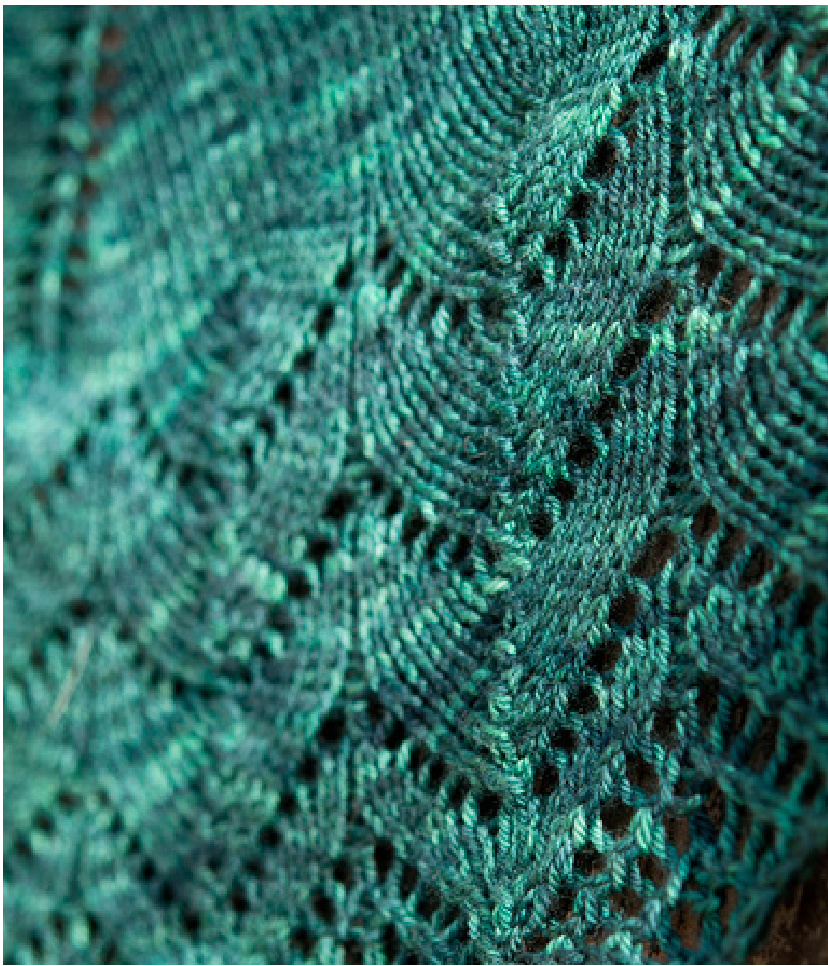
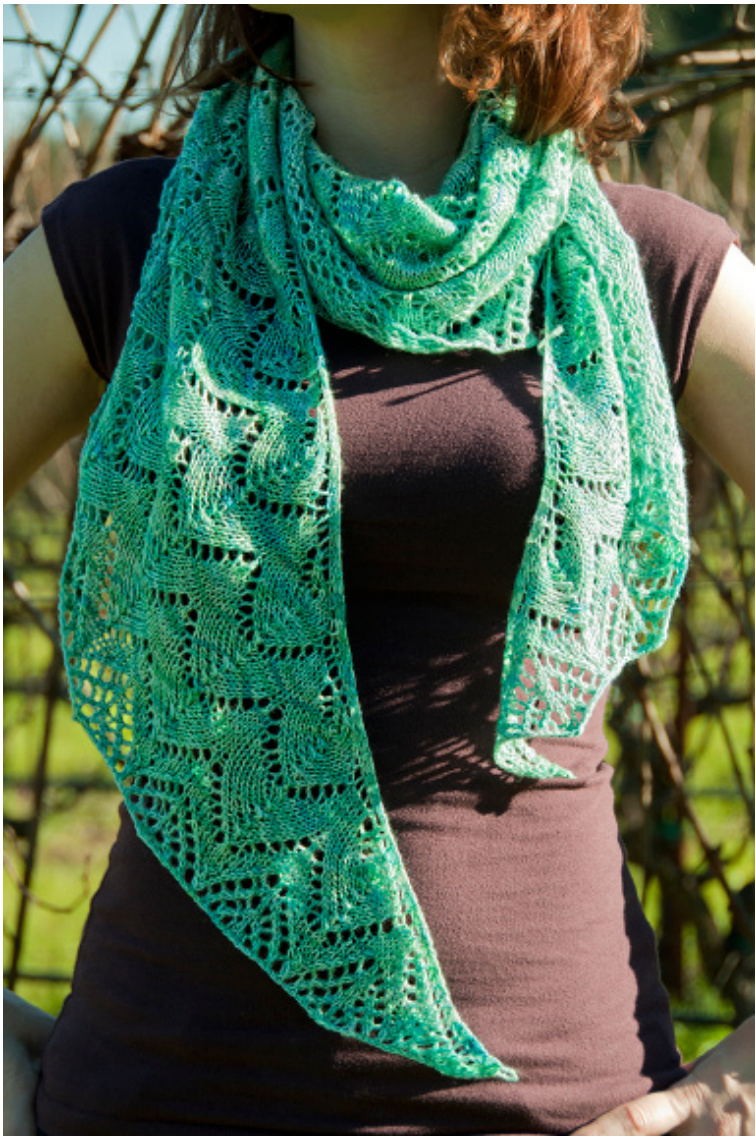
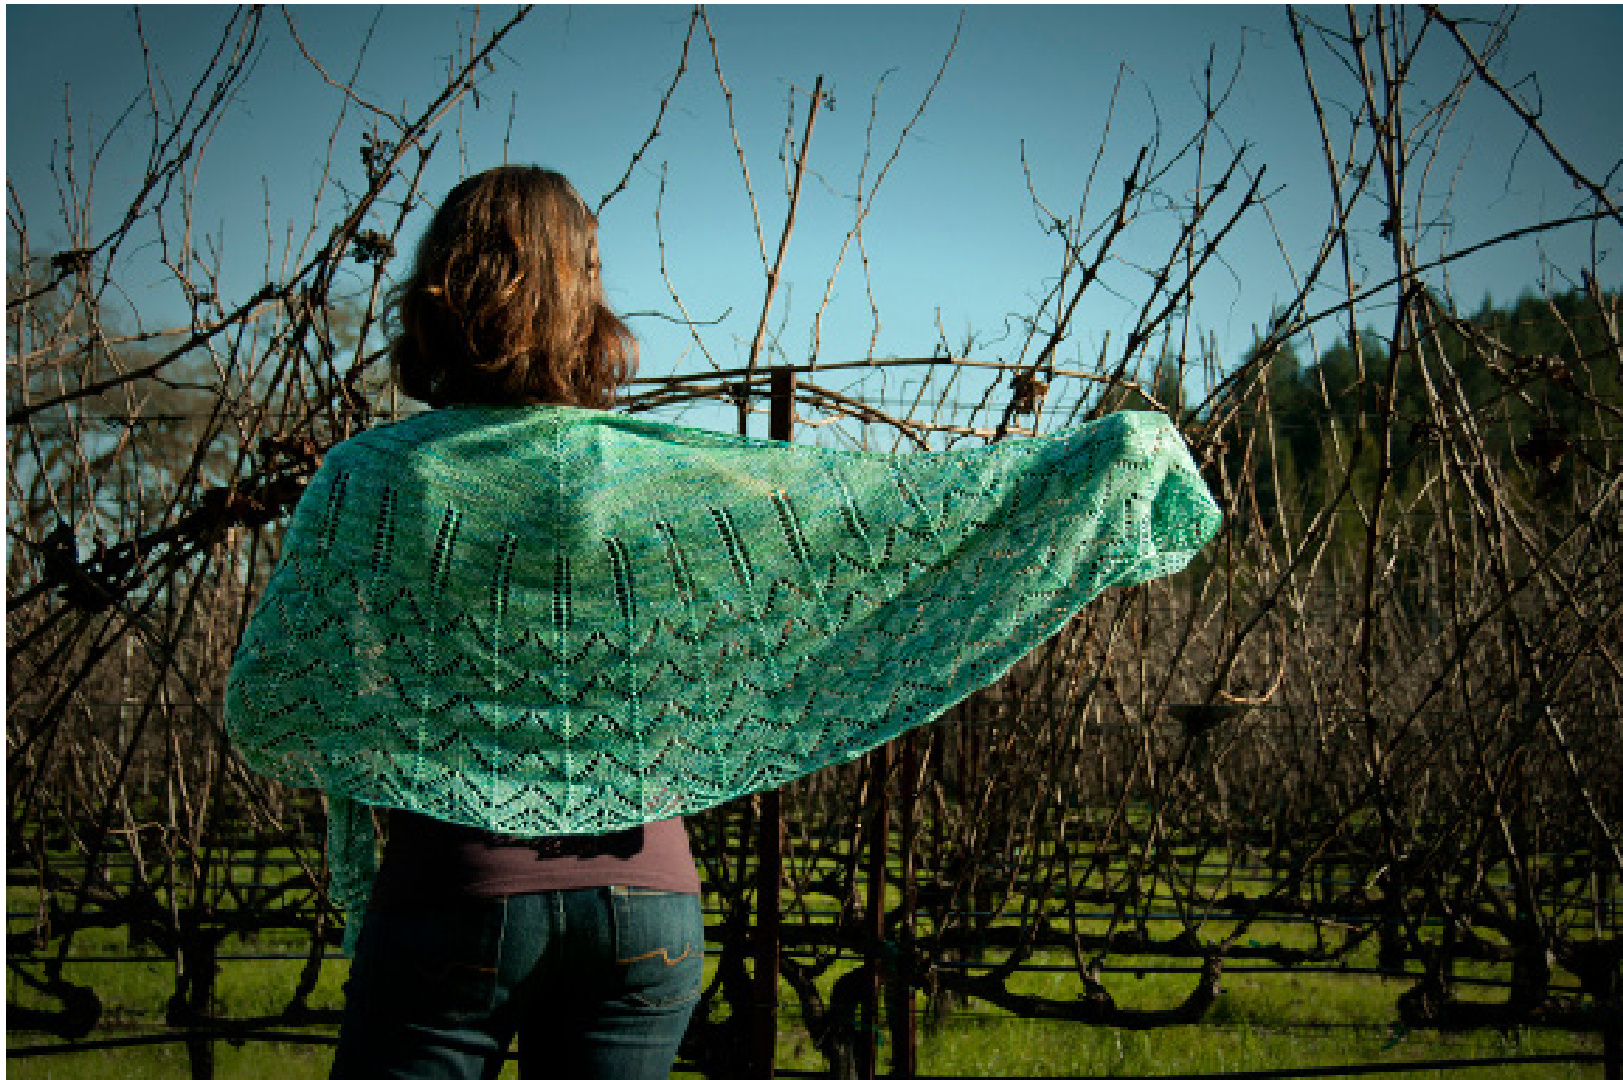
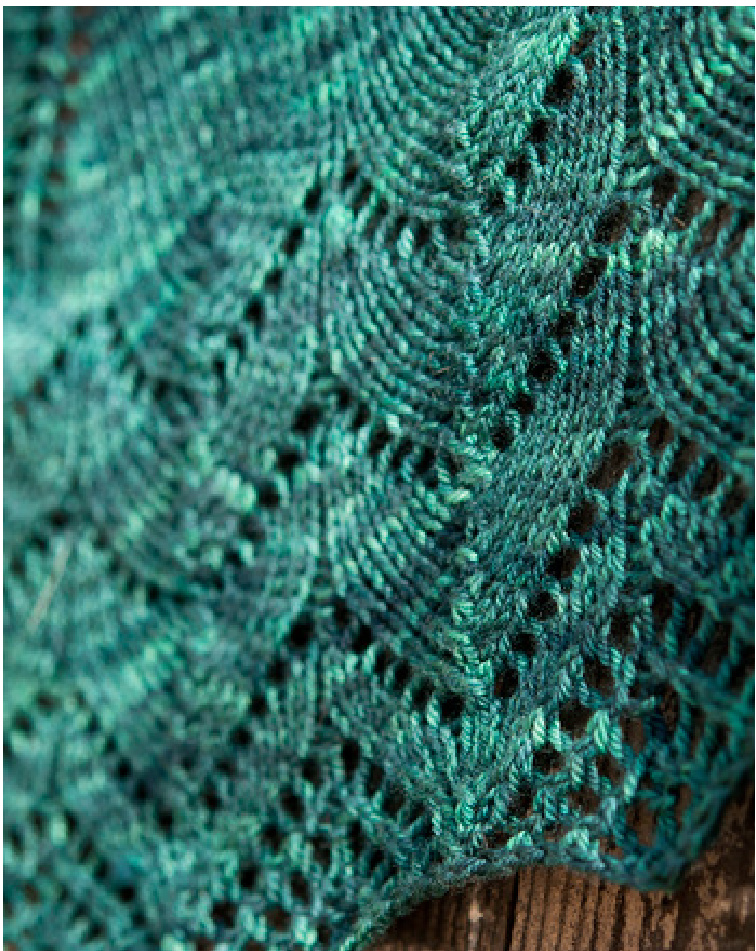
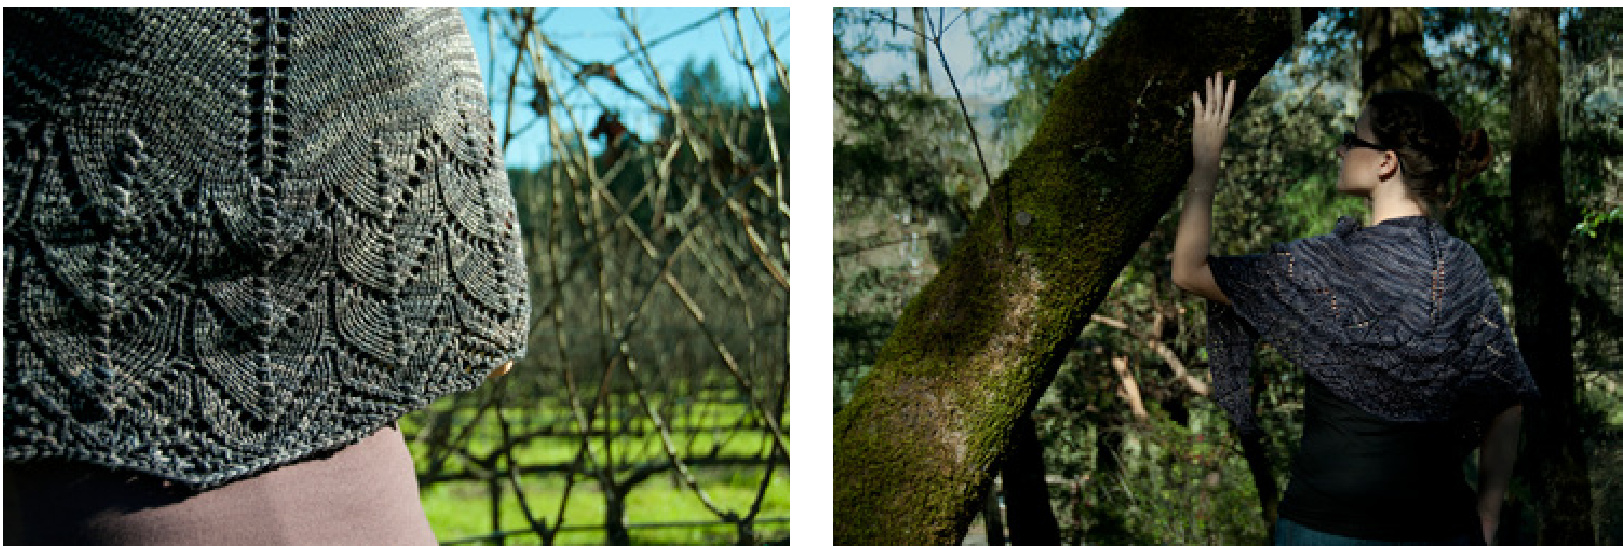
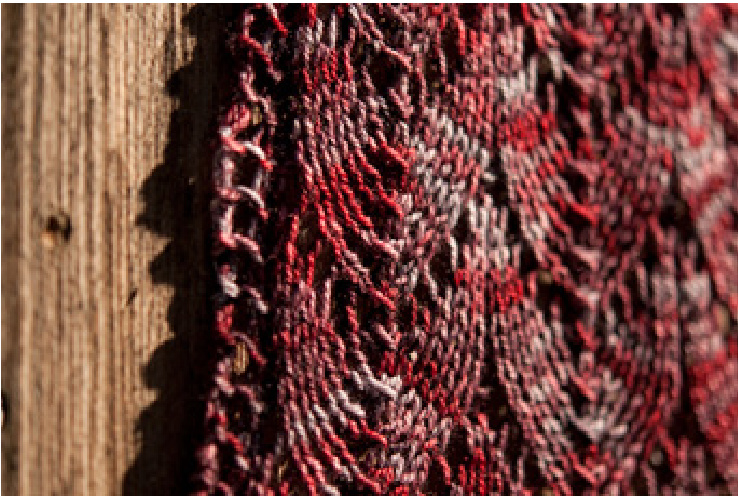
Being an indecisive individual, this shawl is named after two things. First, the song “Travelling Woman" by Bat for Lashes (she's British, hence the extra “1"). "Travelling Woman" is a song about a brilliant woman with a promising future, who loses it all because she fell in love with a man who had too much potential, and not enough substance. She sings: “Hang on, travelling woman / Don't sacrifice your plan / Cause it will come back to you / Before you lose it on the man." The edge of the shawl represents the dangerous web of love, as well as its highs and lows. Second, the character Angela Montenegro on Bones. If you're familiar with Angela's character, I think the song selection makes sense: she's artistic, a believer in love, and just the type who might get in a little too deep before she can find her way out (she did get married in Fiji to a complete stranger, afterall). This is the second in a series of patterns based on the characters from the Bones television show. And finally, the yarn used for the original shawl traveled from California to London: it's only fitting that the pattern be named Traveling Woman.
Instructions
Instructions are broken down based on yarn weights. All patterns use the same lace chart and written lace pattern. Each set of instructions includes: yarn, needle, and gauge information; set up instructions; line-by-line increase charts; and repeat information for the lace charts. Please read through the pattern thoroughly before beginning.
| Sizes | xsmall | small | medium | large | xlarge |
| Lace | x | X | |||
| Fingering | X | X | X | X | |
| Sport & DK | X | x | X | ||
| Worsted | x | X |
Lace Weight
Instructions
If one set of numbers is provided, it applies to all sizes. Size-specific information is provided as follows: medium (xlarge). Row by row stitch counts are on the following 2 pages. For instructions on adding eyelets and using make one increases in the body of the shawl, please see the customizations section.
Cast On
CO 3 sts. Knit 6 rows. Pick up and knit 6 sts along the lon edge and cast on edge (9 sts). (RS): k3, pm, yo, k1, pm, yo, k1, yo, k1, yo, pm, k3 (13 sts)
Increases
Row 1: (WS) k3, slm, yo, p to last m, yo, slm, k3 (15 sts) Row 2: k3, slm, yo, k to m, yo, slm, k1, slm, yo, k to m, yo, k3 (19 sts) Row 3: k3, slm, yo, p to last m, yo, slm, k3 (21 sts) Row 4: k3, slm, yo, k to m, yo, slm, k1, slm, yo, k to m, yo, k3(25 sts) Repeat rows 3-4 a total of 28 (33) times: 187 (217) sts total. See next page for row-by-row increase counts. Next row: k3, slm, yo, pfb,p to last m (removing both center markers as you come to them), pfb, yo, slm, k3. (189 sts) SizeXLarge onby Next row: k3, yo, p2tog, p to last 4 sts (removing both center markers as you come to them), p2tog, yo, k3. (217 sts)
Lace Charts
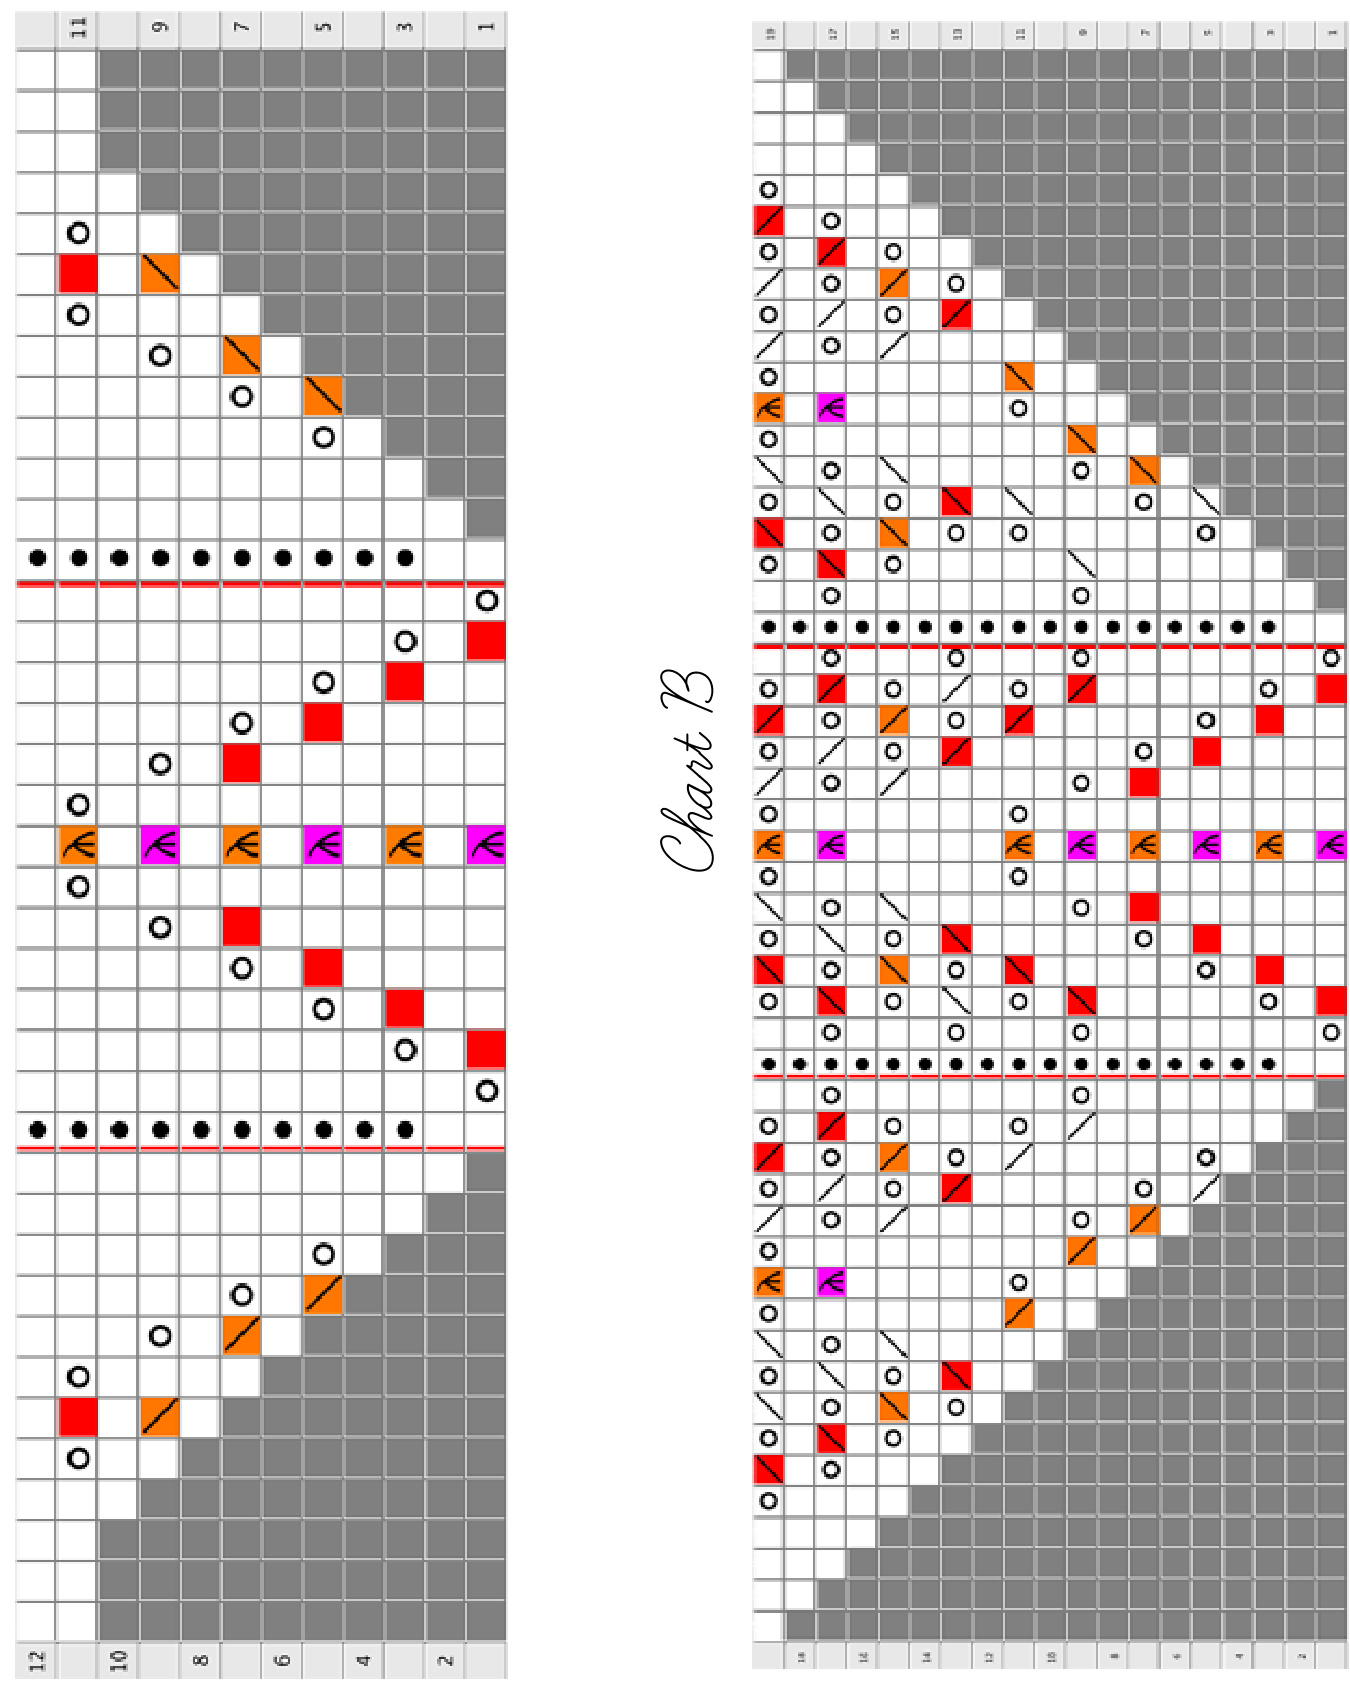
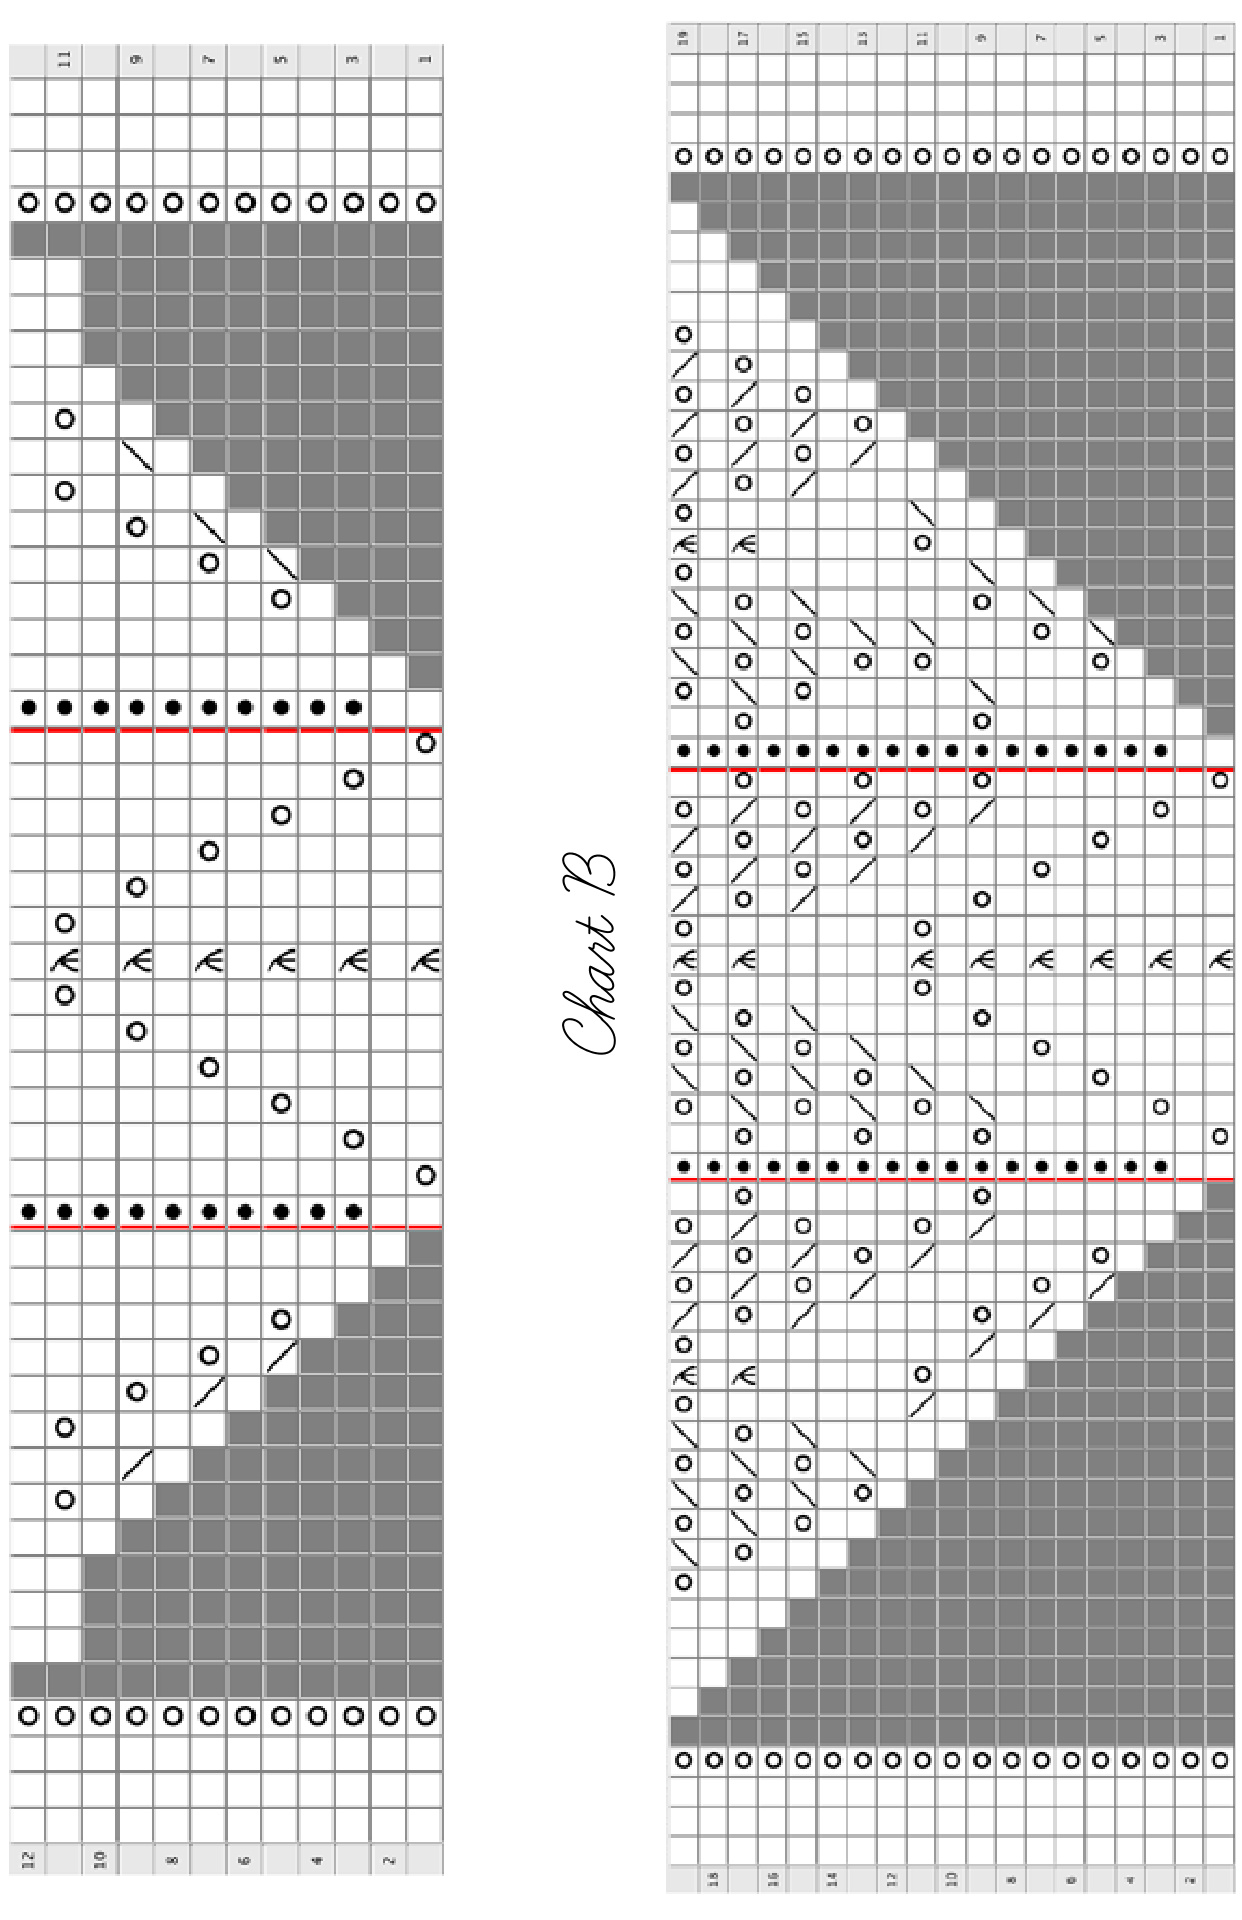
Work 2 (4) repeats of Chart A. Work 1 repeat of Chart B.
Bind Off
Depending on how much yarn you have left, you can do one of two bind offs. Both are done on a WS row. A looser bind off, if yardage is not a concern (seriously, this thing eats up yarn): p2, sl sts back to left ndl, p2tog. [p1, sl sts back to left ndl, p2tog] rpt to end. A loose bind off if yardage is a concern (from the original pattern): p2tog, [slip st back to left needle, p2tog] rpt to
Requirements Needle US #6 (4.0mm) needle Gauge, after blocking Per 1 inch: 6 sts. 6.5 rows. Per 4 inches: 24 sts. 26 rows.
Medium
Finished size: 16" depth, 57" wingspan Approximately 470 yards lace weight
XLarge (shown)
Finished size: 23.5" depth, 70" wingspan Sample knit in Little Red Bicycle Penny Farthing Lace (80% superwash merino, 10% cashmere, 10% nylon. 580 yards/115 grams), shown in Seaglass. Approximately 500 yards used. For instructions on adding eyelets to the body of the shawl please see the Customizations section of the pattern. Increases
| rs | Total sts | # of rpts | ||
| Row | 4 | 25 | 1 | |
| Row | 6 | 31 | 2 | |
| Row | 8 | 37 | 3 | |
| Row | 10 | 43 | 4 | |
| Row | 12 | 49 | 5 | |
| Row | 14 | 55 | 6 | |
| Row | 16 | 61 | 7 | |
| Row | 18 | 67 | 8 | |
| Row | 20 | 73 | 9 | |
| Row | 22 | 79 | 10 | |
| Row | 24 | 85 | 11 | |
| Row | 26 | 91 | 12 | |
| Row | 28 | 97 | 13 | |
| Row | 30 | 103 | 14 | |
| Row | 32 | 109 | 15 | |
| Row | 34 | 115 | 16 | |
| Row | 36 | 121 | 17 | |
| Row | 38 | 127 | 18 | |
| Row | 40 | 133 | 19 | |
| Row | 42 | 139 | 20 | |
| Row | 44 | 145 | 21 | |
| Row | 46 | 151 | 22 | |
| Row | 48 | 157 | 23 | |
| Row | 50 | 163 | 24 | |
| Row | 52 | 169 | 25 | |
| Row | 54 | 175 | 26 | |
| Row | 56 | 181 | 27 | |
| Row | 58 | 187 | 28 | |
| Row | 60 | 193 | 29 | |
| Row | 62 | 199 | 30 | |
| Row | 64 | 205 | 31 | |
| Row | 66 | 211 | 32 | |
| Row | 68 | 217 | 33 | |
Chart A Sizes Medium
| Total sts E | # of rpts | ||
| Row | 1 | 191 | |
| Row | 3 | 195 | |
| Row | 5 | 199 | |
| Row | 7 | 203 | |
| Row | 9 | 207 | |
| Row | 11 | 215 | |
| Row | 12 | 217 | 1 |
| Row | 1 | 219 | |
| Row | 3 | 223 | |
| Row | 5 | 227 | |
| Row | 7 | 231 | |
| Row | 9 | 235 | |
| Row | 11 | 243 | |
| Row | 12 | 245 | 2 |
Chart A Size XLarge
| Total sts |# of rpts | Total sts | # of rpts | |||||
| Row | 1 | 219 | Row | 1 | 275 | ||
| Row | 3 | 223 | Row | 3 | 279 | ||
| Row | 5 | 227 | Row | 5 | 283 | ||
| Row | 7 | 231 | Row | 7 | 287 | ||
| Row | 9 | 235 | Row | 9 | 291 | ||
| Row | 11 | 243 | Row | 11 | 299 | ||
| Row | 12 | 245 | 1 | Row | 12 | 301 | 3 |
| Row | 1 | 247 | Row | 1 | 303 | ||
| Row | 3 | 251 | Row | 3 | 307 | ||
| Row | 5 | 255 | Row | 5 | 311 | ||
| Row | 7 | 259 | Row | 7 | 315 | ||
| Row | 9 | 263 | Row | 9 | 319 | ||
| Row | 11 | 271 | Row | 11 | 327 | ||
| Row | 12 | 273 | 2 | Row | 12 | 329 | 4 |

Chart B, Size Medium
| Total sts | ||
| Row | 1 | 247 |
| Row | 3 | 251 |
| Row | 5 | 255 |
| Row | 7 | 259 |
| Row | 6 | 263 |
| Row | 11 | 267 |
| Row | 13 | 271 |
| Row | 15 | 275 |
| Row | 17 | 279 |
| Row | 19 | 283 |
Chart B, Size XLarge
| Total sts | ||
| Row | 1 | 331 |
| Row | 3 | 335 |
| Row | 5 | 339 |
| Row | 7 | 343 |
| Row | 9 | 347 |
| Row | 11 | 351 |
| Row | 13 | 355 |
| Row | 15 | 359 |
| Row | 17 | 363 |
| Row | 19 | 367 |
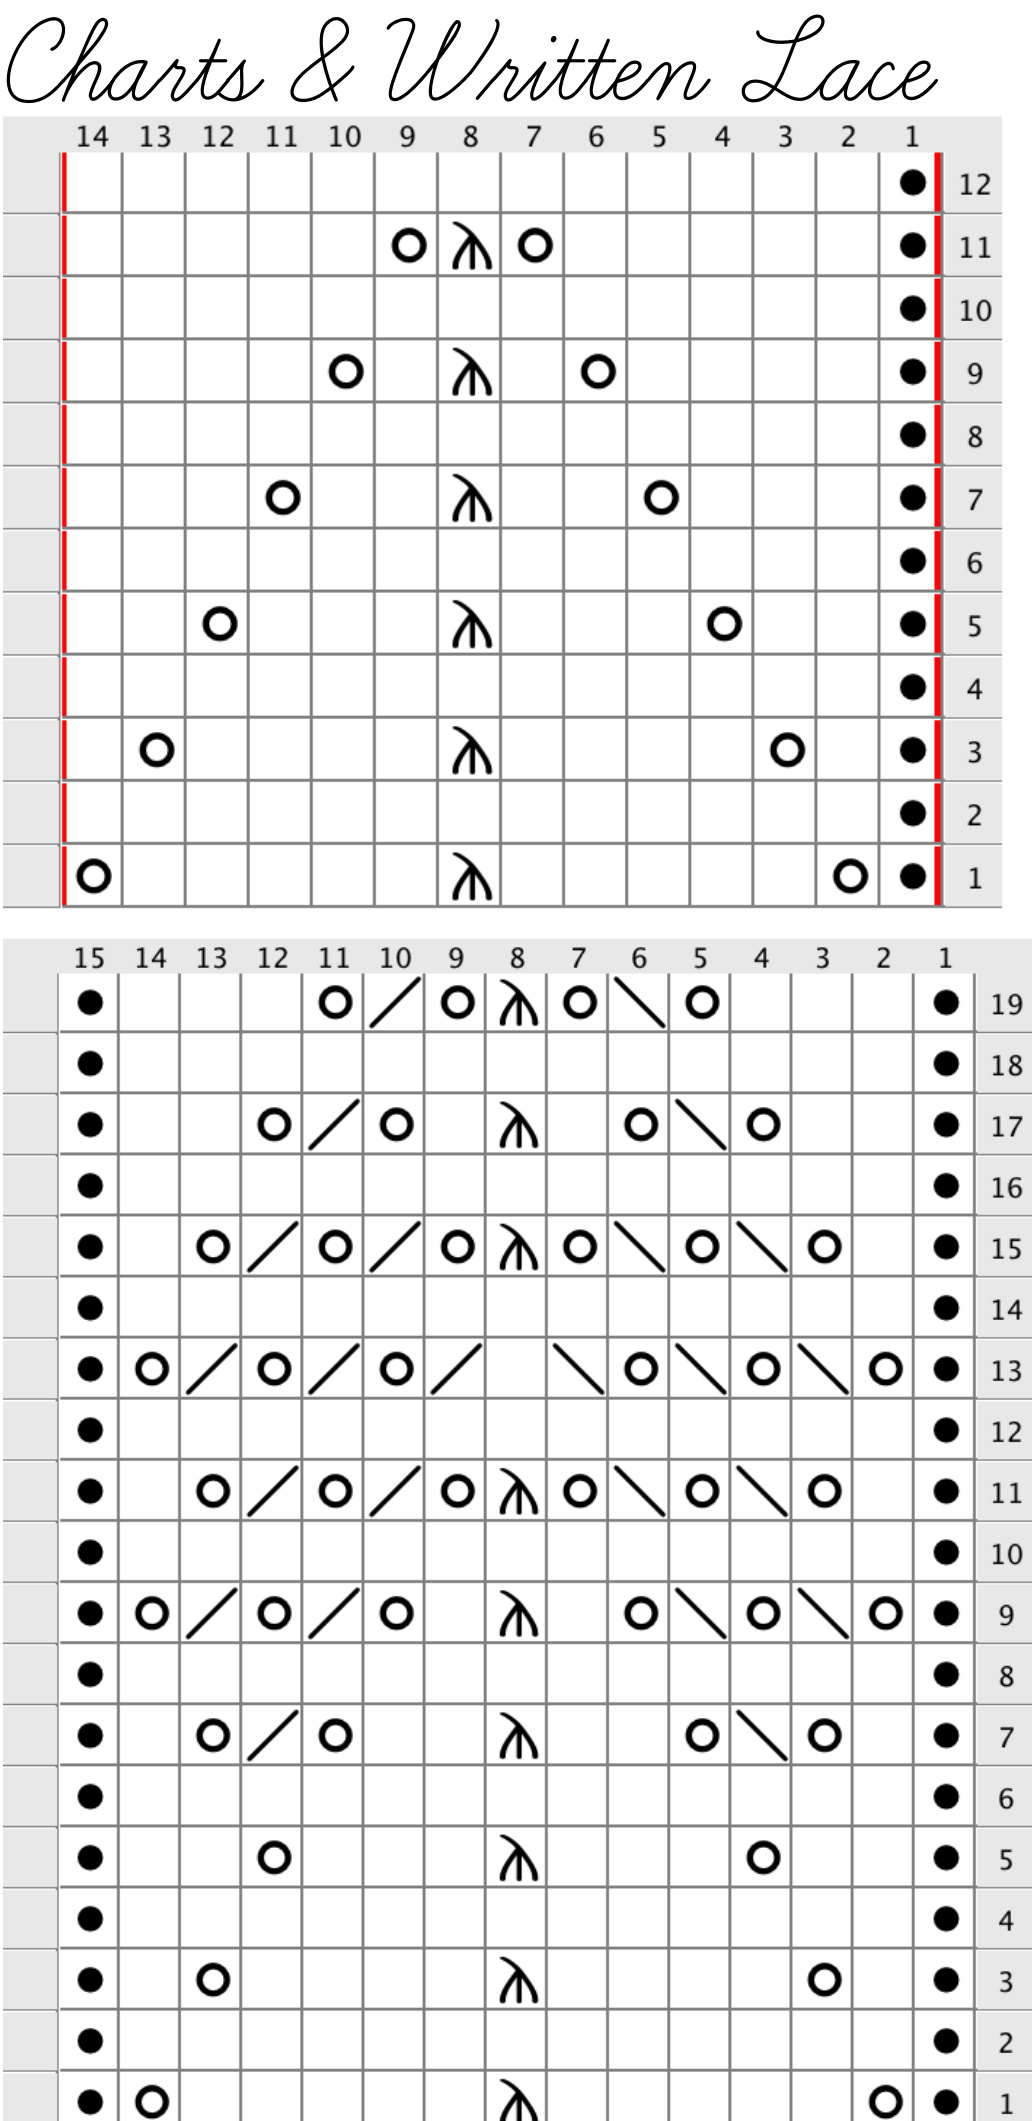
LaceUeightCharts These charts are onb for shawls knit using lace weight.
n u p q
Lace Ueight UrittenInstructions These instructions are onfor shals knit using lace weght.
Chart a
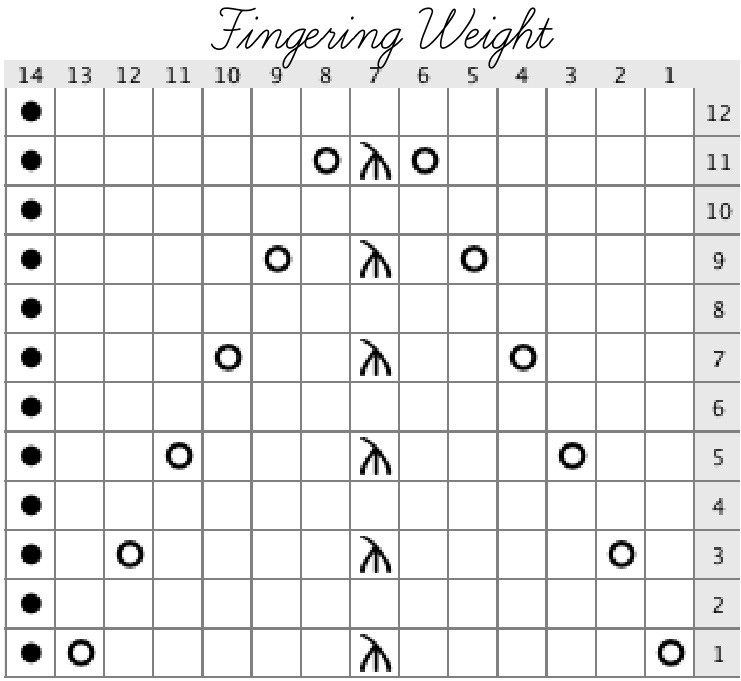
Row 1 (RS): k3, yo, k1, [yo, k5, slk2p, k5, yo, k1] to last 3 sts, yo, k3 Row 2: (and all WS rows) k3, yo, work sts in pattern (k the yos) to last 3 sts, yo, k3 Row 3: k3, yo, k2, p1, [k1, yo, k4, slk2p, k4, yo, k1, p1]to last 5 sts, k2, yo, k3 Row 5: k3, yo, k2tog, yo, k2, p1,[k2, yo, k3, slk2p, k3, yo, k2, p1]to last 7 sts, k2, yo, ssk, yo, k3 Row 7: k3, yo, k1, k2tog, yo, k3, p1,[k3, yo, k2, slk2p, k2, yo, k3, p1]to last 9 sts, k3, yo, ssk, k1, yo, k3 Row 9: k3, yo, k1, k2tog, k1, yo, k4, p1, [k4, yo, k1, slk2p, k1, yo, k4, p1]to last 11 sts, k4, yo, k1, ssk, k1, yo, k3 Row 11: k3, yo,k4, yo,k1, yo,k5, p1,[k5, yo, slk2p, yo, k5, p]to last 13 sts, k5, yo,k1, yo, k4, yo,k3 Row 12: as row 2
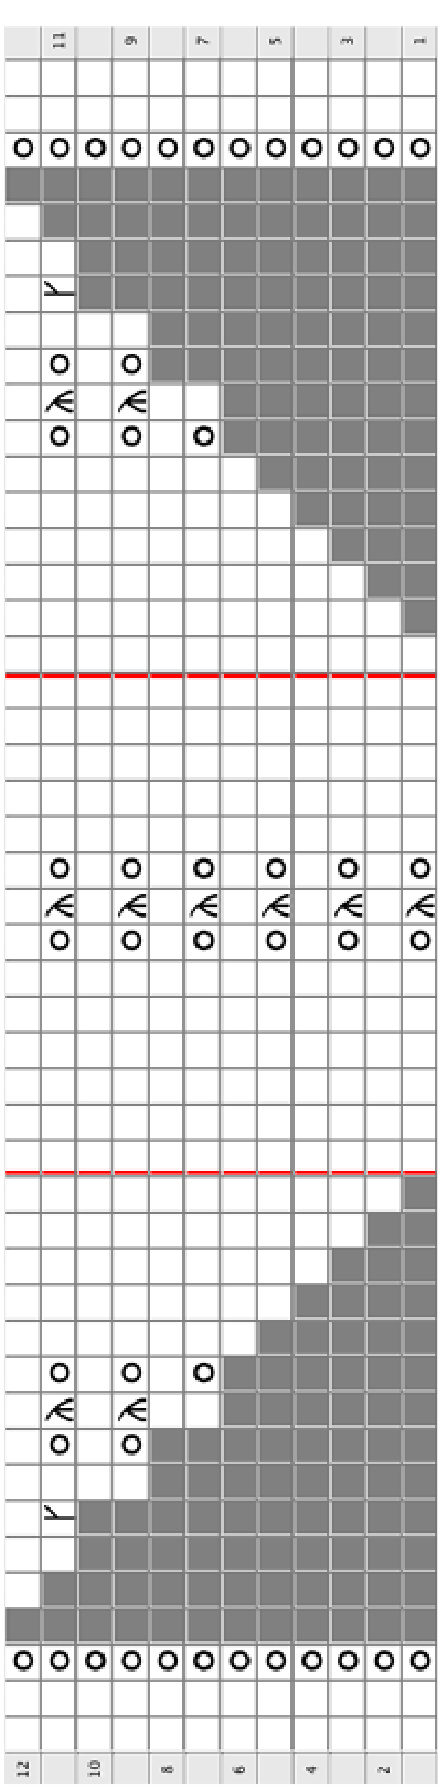
Chart B
Row 1 (RS): k3, yo, k1, [yo, k5, slk2p, k5, yo, k1]to last 3 sts, yo, k3 Row 2: (and all WS rows) k3, yo, work sts in pattern (k the yos) to last 3 sts, yo, k3 Row 3: k3, yo, k2, p1, [k1, yo, k4, slk2p, k4, yo, k1, p1] to last 5 sts, k2, yo, k3 Row 5: k3, yo, k2tog, yo, k2, p1, [k2, yo, k3, slk2p, k3, yo, k2, p1]to last 7 sts, k2, to, ssk, yo, k3 Row 7: k3, yo, k1, k2tog, yo, k3, p1,[k3, yo, k2, slk2p, k2, yo, k3, p1lto last 9 sts, k3, yo, ssk, k1, yo, k3 Row 9:k3, yo, [k2, k2tog, yo]2x, p1, lyo, ssk, k2, yo,k1, slk2p,k1, yo, k2, k2tog, yo, p]to last 11 sts, [yo, ssk,k] 2x, yo,k3 Row 11: k3, yo, k3, k2tog, yo, k2, k2tog, yo, k1, p1, [k1, yo, ssk, k2, yo, slk2p, yo, k2, k2tog, yo, k1, p1lto last 13 sts, k1, yo, ssk, k2, yo, ssk, k3, yo, k3 Row 13: k3, yo, k1, yo, sk, k5, k2tog, yo, k2, p1, [(yo, ssk) 2x, k5, (k2tog, yo) 2x, p1]to last 15 sts, k2, yo, ssk, k5, k2tog, yo, k1, yo, k3 Row 15: k3, yo, k2,[yo,ssk] 2x, k3,[k2tog, yo] 2x, k1, p1,[k1, (yo, ssk) 2x, k3, (k2tog, yo) 2x, k1, p1]to last 17 sts,k1, [yo, ssk] 2x, k3, [k2tog, yo] 2x, k2, yo, k3 Row 17: k3, yo, k3, yo, Sssk, yo] 2x, k1, slk2p, k1, yo, [k2tog, yo] 2x, p1,[yo, (ssk, yo) 2x, k1, slk2p, k1, yo, (k2tog, yo) 2x, p1] to last 19 sts, yo,[ssk, yo] 2x, k1, slk2p, k1, yo,[k2tog, yo] 2x, k3, yo, k3 Row 19: k3, yo, k4, yo,[ssk, yo] 3x, slk2p, yo,[k2tog, yo] 2x, k1, p1 [k1, yo, (ssk, yo) 2x, slk2p, yo, (k2tog, yo) 2x, k1, p1]to last 21 sts, k1, yo,[ssk, yo]3x, slk2p, yo, [k2tog, yo]2x, k4, yo, k3

Instructions
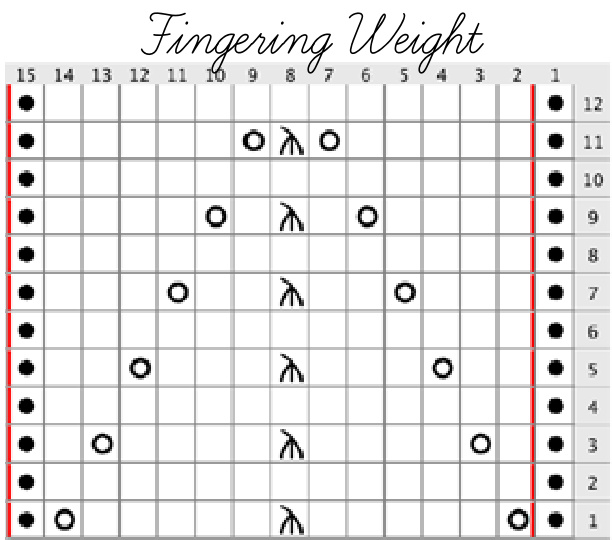
If one set of numbers is provided, it applies to all sizes. Size-specific information is provided as follows: xsmall (small, medium, large). Row by row stitch counts are on the following 2 pages.
Cast On
CO 3 sts. Knit 6 rows. Pick up and knit 6 sts along the long edge and cast on edge (9 sts).
Increases
Row 1: (WS) k2, pm, yo, p to last 2 sts, yo, pm, k2 (11 sts) Row 2: (RS) k2, slm, yo, k3, yo, pm, k1, pm, yo, k to marker, yo, slm, k2 (15 sts) Row 3: k2, slm, yo, p to last marker, yo, slm, k2 (17 sts) Row 4: k2, slm, yo, k to marker, yo, slm, k1, slm, yo, k to marker, yo, slm, k2 (21 sts) Repeat rows 3-4 a total of 24 (24, 24, 33) times: 159 (159, 159, 213) sts total. See next page for row-by-row increase counts. Sizes XSmall, Small, and Medium only Next Row: k2, yo, p2tog, p to last 4 sts (removing both center markers as you come to them), p2tog, yo, k2. (159 Sts) SizeLarge onbyNext row: k2, slm, yo, p to last 4 sts (removing both center markers as you come to them), yo, slm, k2 (215 sts)
Lace Charts
Work 2 (3, 4, 4) repeats of Chart A. Work 1 repeat of Chart B.
Bind Off
Depending on how much yarn you have left, you can do one of two bind offs. Both are done on a WS row. A looser bind off, if yardage is not a concern (seriously, this thing eats up yarn): p2, sl sts back to left ndl, p2tog. [p1, sl sts back to left ndl, p2togl rpt to end. A loose bind off if yardage is a concern (from the original pattern): p2tog, [slip st back to left needle, p2tog] rpt to end.
Requirements Needle US #6 (4.0mm) needle Gauge, after blocking Per 1 inch: 5 sts. 7.25 rows. Per 4 inches: 20 sts. 29 rows.
XSmall (shown)
Finished size: 15" depth, 48" wingspan Sample knit in The Plucky Knitter Merino Cashmere Nylon Fingering Weight (80% superwash merino, 10% cashmere, 10% nylon. 385 yards/115 grams), shown in Queensway. Approximately 310 yards used.
Small
Finished size: 17" depth, 56" wingspan Approximately 380 yards fingering weight
Medium
Finished size: 18" depth, 58" wingspan Approximately 440 yards fingering weight
Large
Finished size: 24" depth, 75" wingspan Approximately 600 yards fingering weight
Fingering Rou-ky-Rou Counts
Increases
| rs | Total sts | # of rpts | |
| Row | 4 | 21 | 1 |
| Row | 6 | 27 | 2 |
| Row | 8 | 33 | 3 4 |
| Row | 10 | 39 45 | 5 |
| Row | 12 | 51 | 6 |
| Row Row | 14 | 57 | 7 |
| Row | 16 | 63 | 8 |
| Row | 18 | 69 | 9 |
| Row | 20 | 75 | 10 |
| Row | 22 24 | 81 | 11 |
| Row | 26 | 87 | 12 |
| Row | 28 | 93 | 13 |
| Row | 30 | 99 | 14 |
| Row | 32 | 105 | 15 |
| Row | 34 | 111 | 16 |
| Row | 36 | 117 | 17 |
| Row | 38 | 123 | 18 |
| Row | 40 | 129 | 19 |
| Row | 42 | 135 | 20 |
| Row | 44 | 141 | 21 |
| Row | 46 | 147 | 22 |
| Row | 48 | 153 | 23 |
| Row | 50 | 159 | 24 |
| Size Large Onhy | |||
| Row | 52 | 165 | 25 |
| Row | 54 | 171 | 26 |
| Row | 56 | 177 | 27 |
| Row | 58 | 183 | 28 |
| Row | 60 | 189 | 29 |
| Row | 62 | 195 | 30 |
| Row | 64 | 201 | 31 |
| Row | 66 | 207 | 32 |
| Row | 68 | 213 | 33 |
Chart A Sizes XSmall, Small, & Medium
| Total sts | # of rpts | Total sts | # of rpts | ||||
| Row | 1 | 161 | Row | 1 | 217 | ||
| Row | 3 | 165 | Row | 3 | 221 | ||
| Row | 5 | 169 | Row | 5 | 225 | ||
| Row | 7 | 173 | Row | 7 | 229 | ||
| Row | 9 | 177 | Row | 9 | 233 | ||
| Row | 11 | 185 | Row | 11 | 241 | ||
| Row | 12 | 187 | 1 | Row | 12 | 243 | 3 |
| Row | 1 | 189 | Row | 1 | 245 | ||
| Row | 3 | 193 | Row | 3 | 249 | ||
| Row | 5 | 197 | Row | 5 | 253 | ||
| Row | 7 | 201 | Row | 7 | 257 | ||
| Row | 9 | 205 | Row | 9 | 261 | ||
| Row | 11 | 213 | Row | 11 | 269 | ||
| Row | 12 | 215 | 2 | Row | 12 | 271 | 4 |
Chart A Size Large
| Total sts | # of rpts | Total sts | # of rpts | ||||
| Row | 1 | 217 | Row | 1 | 273 | ||
| Row | 3 | 221 | Row | 3 | 277 | ||
| Row | 5 | 225 | Row | 5 | 281 | ||
| Row | 7 | 229 | Row | 7 | 285 | ||
| Row | 9 | 233 | Row | 9 | 289 | ||
| Row | 11 | 241 | Row | 11 | 297 | ||
| Row | 12 | 243 | 1 | Row | 12 | 299 | 3 |
| Row | 1 | 245 | Row | 1 | 301 | ||
| Row | 3 | 249 | Row | 3 | 305 | ||
| Row | 5 | 253 | Row | 5 | 309 | ||
| Row | 7 | 257 | Row | 7 | 313 | ||
| Row | 9 | 261 | Row | 9 | 317 | ||
| Row | 11 | 269 | Row | 11 | 325 | ||
| Row | 12 | 271 | 2 | Row | 12 | 327 | 4 |
Chart B, Size XSmall
| Total sts | ||
| Row | 1 | 217 |
| Row | 3 | 221 |
| Row | 5 | 225 |
| Row | 7 | 229 |
| Row | 9 | 233 |
| Row | 11 | 237 |
| Row | 13 | 241 |
| Row | 15 | 245 |
| Row | 17 | 249 |
| Row | 19 | 253 |
Chart B, Size Small
| Total sts | ||
| Row | 1 | 245 |
| Row | 3 | 249 |
| Row | 5 | 253 |
| Row | 7 | 257 |
| Row | 9 | 261 |
| Row | 11 | 265 |
| Row | 13 | 269 |
| Row | 15 | 273 |
| Row | 17 | 277 |
| Row | 19 | 281 |
Chart B, Size Medium
| Total sts | ||
| Row | 1 | 273 |
| Row | 3 | 277 |
| Row | 5 | 281 |
| Row | 7 | 285 |
| Row | 9 | 289 |
| Row | 11 | 293 |
| Row | 13 | 297 |
| Row | 15 | 301 |
| Row | 17 | 305 |
| Row | 19 | 309 |
Chart B, Size Large
| Total sts | ||
| Row | 1 | 329 |
| Row | 3 | 333 |
| Row | 5 | 337 |
| Row | 7 | 341 |
| Row | 6 | 345 |
| Row | 11 | 349 |
| Row | 13 | 353 |
| Row | 15 | 357 |
| Row | 17 | 361 |
| Row | 19 | 365 |
Sport & DK Ueights
Instructions
If one set of numbers is provided, it applies to all sizes. Size-specific information is provided as follows: xsmall (small, xlarge). Row by row stitch counts are on the following 2 pages.
Cast On
CO 3 sts. Knit 6 rows. Pick up and knit 6 sts along the long edge and cast on edge (9 sts).
Increases
Row 1: (WS) k2, pm, yo, p to last 2 sts, yo, pm, k2 (11 sts) Row 2: (RS) k2, slm, yo, k3, yo, pm, k1, pm, yo, k to marker, yo, slm, k2 (15 sts) Row 3: k2, slm, yo, p to last marker, yo, slm, k2 (17 sts) Row 4: k2, slm, yo, k to marker, yo, slm, k1, slm, yo, k to marker, yo, slm, k2 (21 sts) Repeat rows 3-4 a total of 24 (24, 31) times: 159 (159, 201) sts total. See next page for row-by-row increase counts. Next Row: k2, yo, p2tog, p to last 4 sts (removing both center markers as you come to them), p2tog, yo, k2. 159 (159, 201) sts
Lace Charts
Work 1 (2, 3) repeats of Chart A. Sizes XSmall and Small ony: Work 1 repeat of Chart B Size XLarge ony: Work rows 1-17 of Chart B.
Bind Off
Depending on how much yarn you have left, you can do one of two bind offs. Both are done on a WS row. A looser bind off, if yardage is not a concern (seriously, this thing eats up yarn): p2, sl sts back to left ndl, p2tog. [p1, sl sts back to left ndl, p2tog] rpt to end. A loose bind off if yardage is a concern (from the original pattern): p2tog, [slip st back to left needle, p2tog] rpt to end.
Reguirements Needle, Sizes XSmall & Small US #7 (4.5mm) needle Gauge, Sizes XSmall & Small Per 1 inch: 4.25 sts. 6.5 rows. Per 4 inches: 17 sts. 26 rows.
XSmall, Sport
Finished size: 14" depth, 50" wingspan Approximately 250 yards sport weight
Small, Sport
Finished size: 16" depth, 54" wingspan Approximately 335 yards sport weight Needle, Size XLarge US #8 (5.0mm) needle Gauge, Size XLarge Per 1 inch: 4 sts. 6 rows. Per 4 inches: 16 sts. 24 rows. XLarge, DK (shown) Finished size: 24" depth, 72" wingspan Sample knit in Femme Fatale Fibers Lilith DK (100% superwash merino. 260 yards/115 grams), shown in Mystic. Approximately 520 yards used. You will have no yarn left. Check your gauge carefully and have spare or matching yarn handy.
Spart & DK Rou-by-Rou Counts
Increases
| rs | Total sts | # of rpts | |
| Row | 4 | 21 | 1 |
| Row | 6 | 27 | 2 |
| Row | 8 | 33 | 3 |
| Row | 10 | 39 | 4 |
| Row | 12 | 45 | 5 |
| Row | 14 | 51 | 6 |
| Row | 16 | 57 | 7 |
| Row | 18 | 63 | 8 |
| Row | 20 | 69 | 9 |
| Row | 22 | 75 | 10 |
| Row | 24 | 81 | 11 |
| Row | 26 | 87 | 12 |
| Row | 28 | 93 | 13 |
| Row | 30 | 99 | 14 |
| Row | 32 | 105 | 15 |
| Row | 34 | 111 | 16 |
| Row | 36 | 117 | 17 |
| Row | 38 | 123 | 18 |
| Row | 40 | 129 | 19 |
| Row | 42 | 135 | 20 |
| Row | 44 | 141 | 21 |
| Row | 46 | 147 | 22 |
| Row Row | 48 | 153 | 23 |
| 50 Size XLarge Onb | 159 | 24 | |
| Row | 52 | 165 | 25 |
| Row | 54 | 171 | 26 |
| Row | 56 | 177 | 27 |
| Row | 58 | 183 | 28 |
| Row | 60 | 189 | 29 |
| Row | 62 | 195 | 30 |
| Row | 64 | 201 | 31 |
Chart A Sizes XSmall & Small
| Total sts | # of rpts | ||
| Row | 1 | 161 | |
| Row | 3 | 165 | |
| Row | 5 | 169 | |
| Row | 7 | 173 | |
| Row | 9 | 177 | |
| Row | 11 | 185 | |
| Row | 12 | 187 | 1 |
| Row | 1 | 189 | |
| Row | 3 | 193 | |
| Row | 5 | 197 | |
| Row | 7 | 201 | |
| Row | 9 | 205 | |
| Row | 11 | 213 | |
| Row | 12 | 215 | 2 |
Chart A Size XLarge
| Total sts | # of rpts | Total sts | # of rpts | ||||
| Row | 1 | 203 | Row | 1 | 259 | ||
| Row | 3 | 207 | Row | 3 | 263 | ||
| Row | 5 | 211 | Row | 5 | 267 | ||
| Row | 7 | 215 | Row | 7 | 271 | ||
| Row | 9 | 219 | Row | 9 | 275 | ||
| Row | 11 | 227 | Row | 11 | 283 | ||
| Row | 12 | 229 | 1 | Row | 12 | 285 | 3 |
| Row | 1 | 231 | Row | 1 | 287 | ||
| Row | 3 | 235 | Row | 3 | 291 | ||
| Row | 5 | 239 | Row | 5 | 295 | ||
| Row | 7 | 243 | Row | 7 | 299 | ||
| Row | 9 | 247 | Row | 9 | 303 | ||
| Row | 11 | 255 | Row | 11 | 311 | ||
| Row | 12 | 257 | 2 | Row | 12 | 313 | 4 |
Chart B, Size XSmall
| Total sts | ||
| Row | 1 | 189 |
| Row | 3 | 193 |
| Row | 5 | 197 |
| Row | 7 | 201 |
| Row | 9 | 205 |
| Row | 11 | 209 |
| Row | 13 | 213 |
| Row | 15 | 217 |
| Row | 17 | 221 |
| Row | 19 | 225 |
Chart B, Size Small
| Total sts | ||
| Row | 1 | 217 |
| Row | 3 | 221 |
| Row | 5 | 225 |
| Row | 7 | 229 |
| Row | 9 | 233 |
| Row | 11 | 237 |
| Row | 13 | 241 |
| Row | 15 | 245 |
| Row | 17 | 249 |
| Row | 19 | 253 |
Chart B, Size Large
| Total sts | ||
| Row | 1 | 315 |
| Row | 3 | 319 |
| Row | 5 | 323 |
| Row | 7 | 327 |
| Row | 9 | 331 |
| Row | 11 | 335 |
| Row | 13 | 339 |
| Row | 15 | 343 |
| Row | 17 | 347 |

Instructions
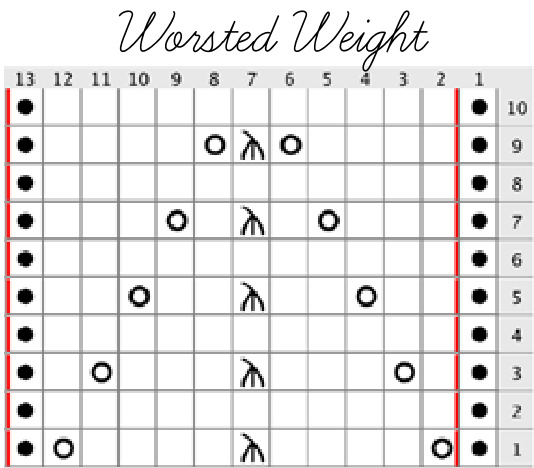
If one set of numbers is provided, it applies to all sizes. Size-specific information is provided as follows: large (xlarge). Row by row stitch counts are on the following page.
Cast On
CO 3 sts. Knit 6 rows. Pick up and knit 6 sts along the long edge and cast on edge (9 sts).
Increases
Row 1: (WS) k2, pm, yo, p to last 2 sts, yo, pm, k2 (11 sts) Row 2: (RS) k2, slm, yo, k3, yo, pm, k1, pm, yo, k to marker, yo, slm, k2 (15 sts) Row 3: k2, slm, yo, p to last marker, yo, slm, k2 (17 sts) Row 4: k2, slm, yo, k to marker, yo, slm, k1, slm, yo, k to marker, yo, slm, k2 (21 sts) Repeat rows 3-4 a total of 24 times: 159 sts total. See next page for row-by-row increase counts. Next Row: k2, yo, p2tog, p to last 4 sts (removing both center markers as you come to them), p2tog, yo, k2. (159 sts)
Lace Charts
Work 2 (3) repeats of Chart A. Work 1 repeat of Chart B.
Bind Off
Depending on how much yarn you have left, you can do one of two bind offs. Both are done on a WS row. A looser bind off, if yardage is not a concern (seriously, this thing eats up yarn): p2, sl sts back to left ndl, p2tog. [p1, sl sts back to left ndl, p2tog] rpt to end. A loose bind off if yardage is a concern (from the original pattern): p2tog, [slip st back to left needle, p2togl rpt to end.
Reguirements Needle US #9 (5.5mm) needle
Gauge
Per 1 inch: 4 sts. 5 rows. Per 4 inches: 16 sts. 20 rows.
Large (shown)
Finished size: 18.5" depth, 60" wingspan Sample knit in Malabrigo Rios (100% superwash merino. 210 yards/100 grams), shown in Pearl Ten. Approximately 390 yards used (<2 skeins). You will not have enough yarn for 3 repeats of Chart A with two skeins at this yardage.
XLarge
Finished size: 20" depth, 62" wingspan. Approximately 500 yards worsted weight
Uorsted Rou-by-Rou Counts
Increases
| rs | Total sts | # of rpts | |
| Row | 4 | 21 | 1 |
| Row | 6 | 27 | 2 |
| Row | 8 | 33 | 3 |
| Row | 10 | 39 | 4 |
| Row | 12 | 45 | 5 |
| Row | 14 | 51 | 6 |
| Row | 16 | 57 | 7 |
| Row | 18 | 63 | 8 |
| Row | 20 | 69 | 9 |
| Row | 22 | 75 | 10 |
| Row | 24 | 81 | 11 |
| Row | 26 | 87 | 12 |
| Row | 28 | 93 | 13 |
| Row | 30 | 99 | 14 |
| Row | 32 | 105 | 15 |
| Row | 34 | 111 | 16 |
| Row | 36 | 117 | 17 |
| Row | 38 | 123 | 18 |
| Row | 40 | 129 | 19 |
| Row | 42 | 135 | 20 |
| Row | 44 | 141 | 21 |
| Row | 46 | 147 | 22 |
| Row | 48 | 153 | 23 |
| Row | 50 | 159 | 24 |
Chart A
| Total sts | # of rpts | ||
| Row | 1 | 161 | |
| Row | 3 | 165 | |
| Row | 5 | 169 | |
| Row | 7 | 173 | |
| Row | 9 | 177 | |
| Row | 11 | 185 | |
| Row | 12 | 187 | 1 |
| Row | 1 | 189 | |
| Row | 3 | 193 | |
| Row | 5 | 197 | |
| Row | 7 | 201 | |
| Row | 9 | 205 | |
| Row | 11 | 213 | |
| Row | 12 | 215 | 2 |
| Row | 1 | 217 | |
| Row | 3 | 221 | |
| Row | 5 | 225 | |
| Row | 7 | 229 | |
| Row | 9 | 233 | |
| Row | 11 | 241 | |
| Row | 12 | 243 | 3 |
Chart B, Size Large
| Total sts | ||
| Row | 1 | 217 |
| Row | 3 | 221 |
| Row | 5 | 225 |
| Row | 7 | 229 |
| Row | 9 | 233 |
| Row | 11 | 237 |
| Row | 13 | 241 |
| Row | 15 | 245 |
| Row | 17 | 249 |
| Row | 19 | 253 |
Chart B, Size XLarge
| Total sts | ||
| Row | 1 | 245 |
| Row | 3 | 249 |
| Row | 5 | 253 |
| Row | 7 | 257 |
| Row | 9 | 261 |
| Row | 11 | 265 |
| Row | 13 | 269 |
| Row | 15 | 273 |
| Row | 17 | 277 |
| Row | 19 | 281 |
UrittenInstructions These instructions are for shawls knit using fingering, sport, , or wrste eg.
Chart a
Row 1 (RS): k2, yo, k1, [yo, k5, slk2p, k5, yo, k1] to last 2 sts, yo, k2 Row 2: (and all WS rows) k2, yo, work sts in pattern (k the yos) to last 2 sts, yo, k2 Row 3: k2, yo, k2, p1, [k1, yo, k4, slk2p, k4, yo, k1, p1]to last 4 sts, k2, yo, k2 Row 5: k2, yo, k2tog, yo, k2, p1, [k2, yo, k3, slk2p,k3, yo, k2, p1]to last 6 sts, k2, yo, ssk, yo, k2 Row 7: k2, yo, k1, k2tog, yo, k3, p1,[k3, yo, k2, slk2p, k2, yo, k3, p1]to last 8 sts,k3, yo, sk, k1, yo, k2 Row 9: k2, yo,k1, k2tog, k1, yo,k4, p1,[k4, yo, k1, slk2p, k1, yo,k4, p1lto last 10 sts, k4, yo, k1, ssk, k1, yo, k2 Row 11: k2, yo, k4, yo, k1, yo, k5, p1, [k5, yo, slk2p, yo, k5, p1]to last 12 sts, k5, yo, k1, yo, k4, yo, k2 Row 12: as row 2
Chart B
Row 1 (RS): k2, yo, k1, [yo, k5, slk2p, k5, yo, k1]to last 2 sts, yo, k2 Row 2: (and all WS rows) k2, yo, work sts in pattern (k the yos) to last 2 sts, yo, k2 Row 3: k2, yo, k2, p1, [k1, yo, k4, slk2p, k4, yo, k1, p1] to last 4 sts, k2, yo, k2 Row 5: k2, yo, k2tog, yo, k2, p1, [k2, yo, k3, slk2p,k3, yo, k2, p1]to last 6 sts, k2, to, ssk, yo, k2 Row 7: k2, yo, k1, k2tog, yo, k3, p1, [k3, yo, k2, slk2p, k2, yo,k3, p1]to last 8 sts, k3, yo, ssk, k1, yo, k2 Row 9: k2, yo,[k2, k2tog, yo]2x, p1, [yo, ssk, k2, yo, k1, slk2p, k1, yo, k2, k2tog, yo, p]to last 10 sts, [yo, ssk, k2] 2x, yo,k2 Row 11: k2, yo, k3, k2tog, yo,k2, k2tog, yo,k1, p1,[k1, yo, sk, k2, yo, slk2p, yo,k2, k2tog, yo,k1, p]to last 12 sts, k1, yo, ssk, k2, yo, sk, k3, yo, k2 Row 13: k2, yo, k1, yo, ssk, k5, k2tog, yo, k2, p1, [(yo, ssk) 2x, k5, (k2tog, yo) 2x, p1]to last 14 sts, k2, yo, ssk, k5, k2tog, yo, k1, yo, k2 Row 15: k2, yo, k2,[yo,ssk] 2x, k3, [k2tog, yo] 2x, k1, p1,[k1, (yo, sk) 2x, k3, (k2tog, yo) 2x, k1, p1] to last 16 sts, k1, [yo, ssk] 2x, k3, [k2tog, yo] 2x, k2, yo, k2 Row 17: k2, yo, k3, yo, [ssk, yo] 2x, k1, slk2p, k1, yo,[k2tog, yo] 2x, p1, [yo, (ssk, yo) 2x, k1, slk2p, k1, yo, (k2tog, yo) 2x, p1] to last 18 sts, yo, [ssk, yo] 2x, k1, slk2p, k1, yo,[k2tog, yo] 2x, k3, yo, k2 Row 19:k2, yo,k4, yo,[ssk, yo]3x, slk2p, yo,[k2tog, yo]2x, k1, p1 [k1, yo,(ssk, yo)2x, slk2p, yo, (k2tog, yo)2x,k1, p1] to last 20 sts, k1, yo, [ssk, yo]3x, slk2p, yo, [k2tog, yo] 2x, k4, yo, k2
Customiging Your Traveling Uoman
Invisible Spine Increases
Rather than working the shawl with a yarn over spine, you may choose to use make one increases instead (pictured right in the lace version). I have maintained yarn overs along the garter stitch border in this sample in order to facilitate easier blocking. I've used k2 border here because all of the yarn weights (except for lace) call for a k2 border. Lace weight calls for a k3 border. Adjust accordingly. Work make one increases as follows for the spine: (RS) k2, slm, yo, k to m, m1R, slm, k1, slm, m1L, k to m, yo, slm, k2 m1R: with your left needle, pick up the strand that runs between needles from back to front. Knit the st you just picked up through the front of the loop. m1L: with your left needle, pick up the strand that runs between needles from front to back. Knit the st you just picked up through the back loop. With a little bit of math, you can increase your shawl to almost any size. The basic math is as follows for a 2 stitch garter border:
| By | Moma | |||
| Increases | ||||
| rs | Total sts | # of rpts | ||
| Row | 4 | 21 | 1 | |
| Row | 6 | 27 | 2 | |
| Row | 8 | 33 | 3 | |
| Row | 10 | 39 | 4 | |
| Row | 12 | 45 | 5 | |
| Row | 14 | 51 | 6 | |
| Row | 16 | 57 | 7 | |
| Row | 18 | 63 | 8 | |
| Row | 20 | 69 | 9 | |
| Row | 22 | 75 | 10 | |
| Row | 24 | 81 | 11 | |
| Row | 26 | 87 | 12 | |
| Row | 28 | 93 | 13 | |
| Row | 30 | 99 | 14 | |
| Row | 32 | 105 | 15 | |
| Row | 34 | 111 | 16 17 | |
| Row | 36 | 117 | 18 | |
| Row | 38 | 123 | 129 | 19 |
| Row | 40 | 135 | 20 | |
| Row | 42 | 141 | 21 | |
| Row | 44 | 147 | 22 | |
| Row | 46 | 153 | 23 | |
| Row | 48 | 159 | 24 | |
| Row | 50 | 165 | 25 | |
| Row Row | 52 | 171 | 26 | |
| Row | 54 | 177 | 27 | |
| Row | 56 | 183 | 28 | |
| Row | 58 | 189 | 29 | |
| Row | 60 | 195 | 30 | |
| Row | 62 | 201 | 31 | |
| Row | 64 | 207 | 32 | |
| Row | 66 | 33 | ||
| Row | 68 | 213 | 34 | |
| 70 | 219 | |||
| Row | 72 | 225 | 35 | |
| Row | 74 | 231 | 36 | |
| Row | 76 | 237 | 37 | |
| Row | 78 | 243 | 38 | |
Change the +4 to +6 for lace weight.
Follow the set up instructions for any of the patterns (except for lace weight) to increase.
Custom Sizing
| # rpts across | X | 14 = | body sts |
| body sts | + | 1= | chart sts |
| chart sts | + | 4= | total sts |
Most of the time the increase math will require you to add decreases or extra increases on the last WS row before working Chart A. For examples on how to adjust your stitch count, see the different sets of size instructions.
Traveling Uoman with Eyelets
To add eyelets, you'll need to determine where in the stockinette body you'd like them to begin. For ease of substitution, the eyelet lace repeat is the same number of rows and stitches across as Chart A. To make the eyelets more aesthetically pleasing, I did not include the purl stitches on RS rows in Charts A and B: I worked them as knit stitches on RS rows instead. As a result, the eyelet chart does not contain purl stitches. In the sample shown, I increased to work 11 repeats across (161 sts). I worked 2 repeats of the eyelet chart, increasing as written to 217 sts (enough for 15 repeats across of Chart A). The eyelet chart shown has a two stitch garter border. If you are knitting the lace weight version, you'll need to work the border with 3 stitches as opposed to 2.
Lace Written
Row 1 (RS): k2, yo, k1 [k5, yo, slk2p, k6]to end, yo, k2 Row 2 (and all WS rows): k2, yo, p to last 2 sts, yo, k2 Row 3: k2, yo, k3, [k5, yo, slk2p, k6] to end, k2, yo, k2 Row 5: k2, yo, k5,[k5, yo, slk2p, k6] to end, k4, yo, k2 Row 7: k2, yo, k1, yo, k6,[k5, yo, slk2p, yo, k6]to end, k5, yo, k1, yo, k2 Row 9: k2, yo, k1, yo, slk2p, yo, k6,[k5, yo, slk2p, yo, k6] to end, k5, yo, slk2p, yo, k1, yo, k2 Row 11: k2, yo, k1, kfb, k1, yo, slk2p, yo, k6, [k5, yo, slk2p, k6]to end, k5, yo, slk2p, yo, k1, kfb, k1, yo, k2
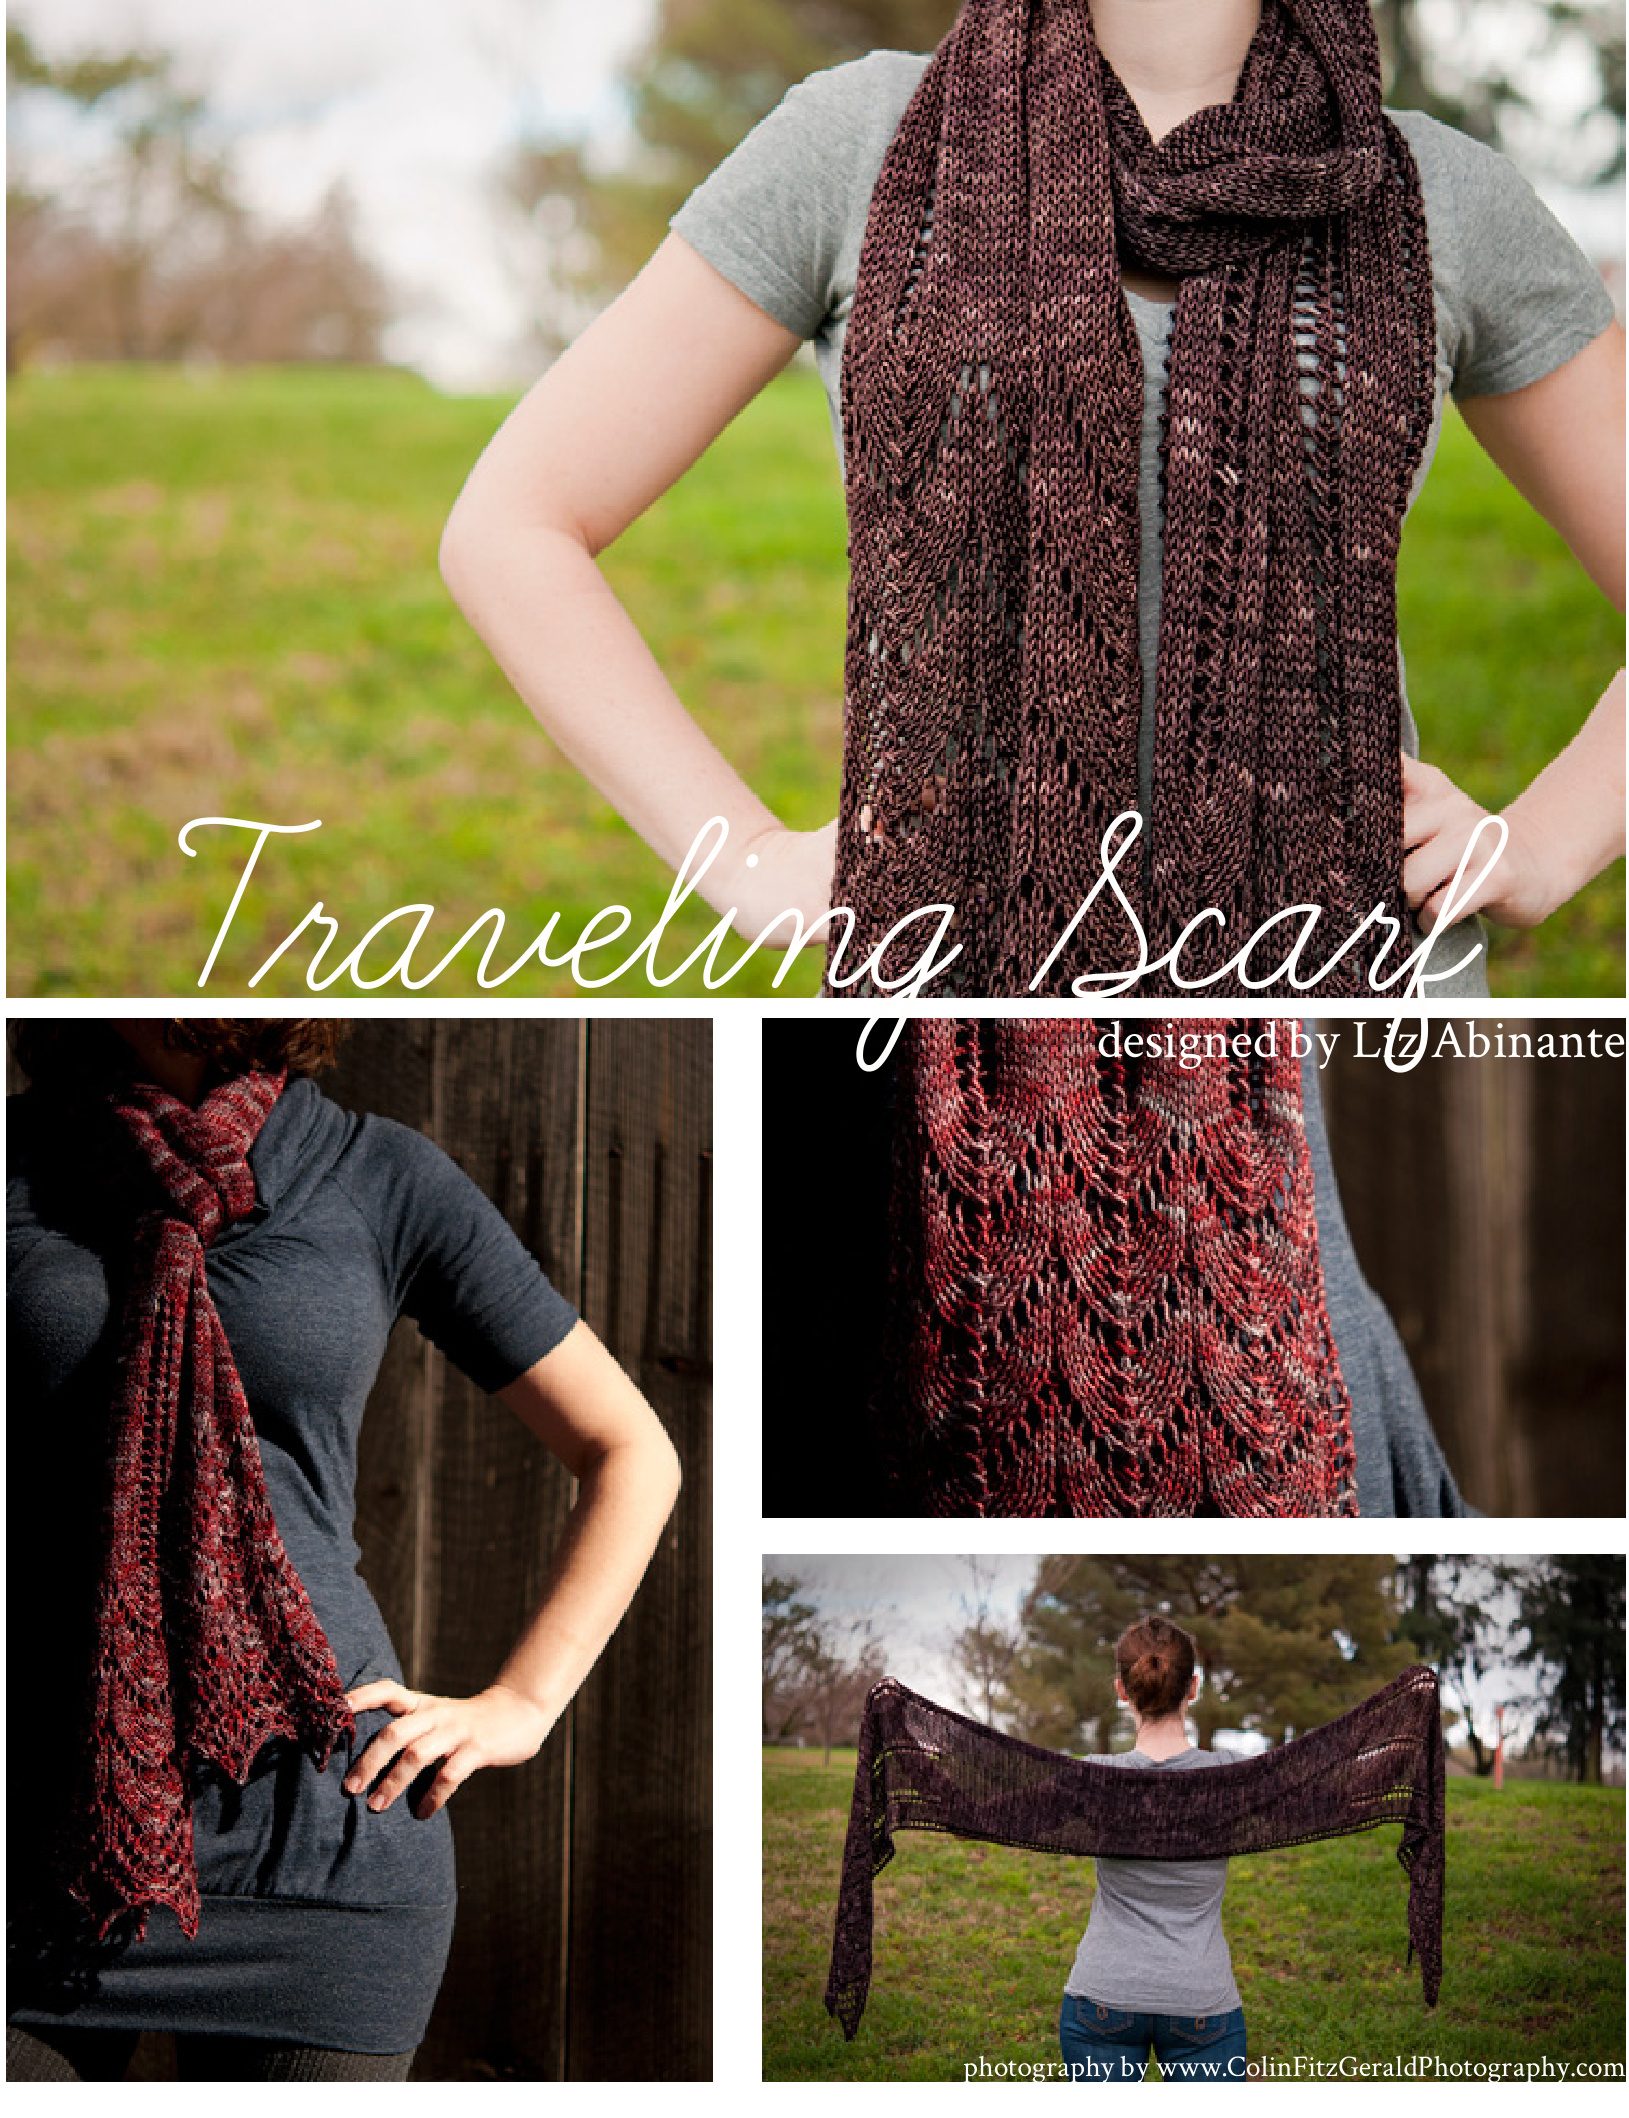
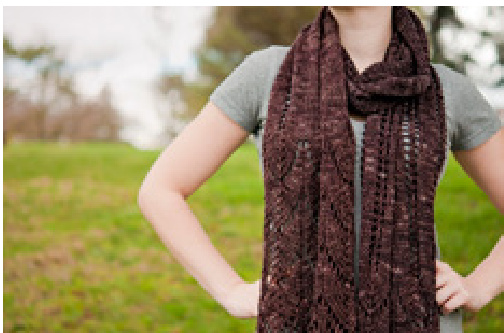
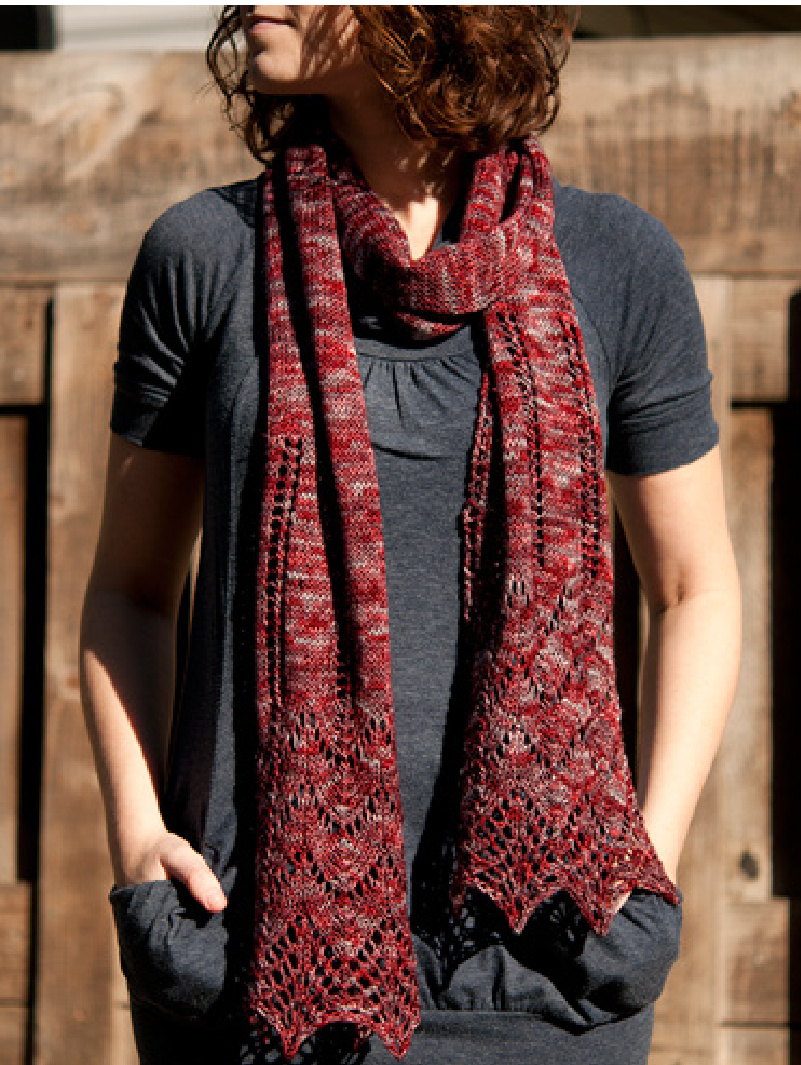
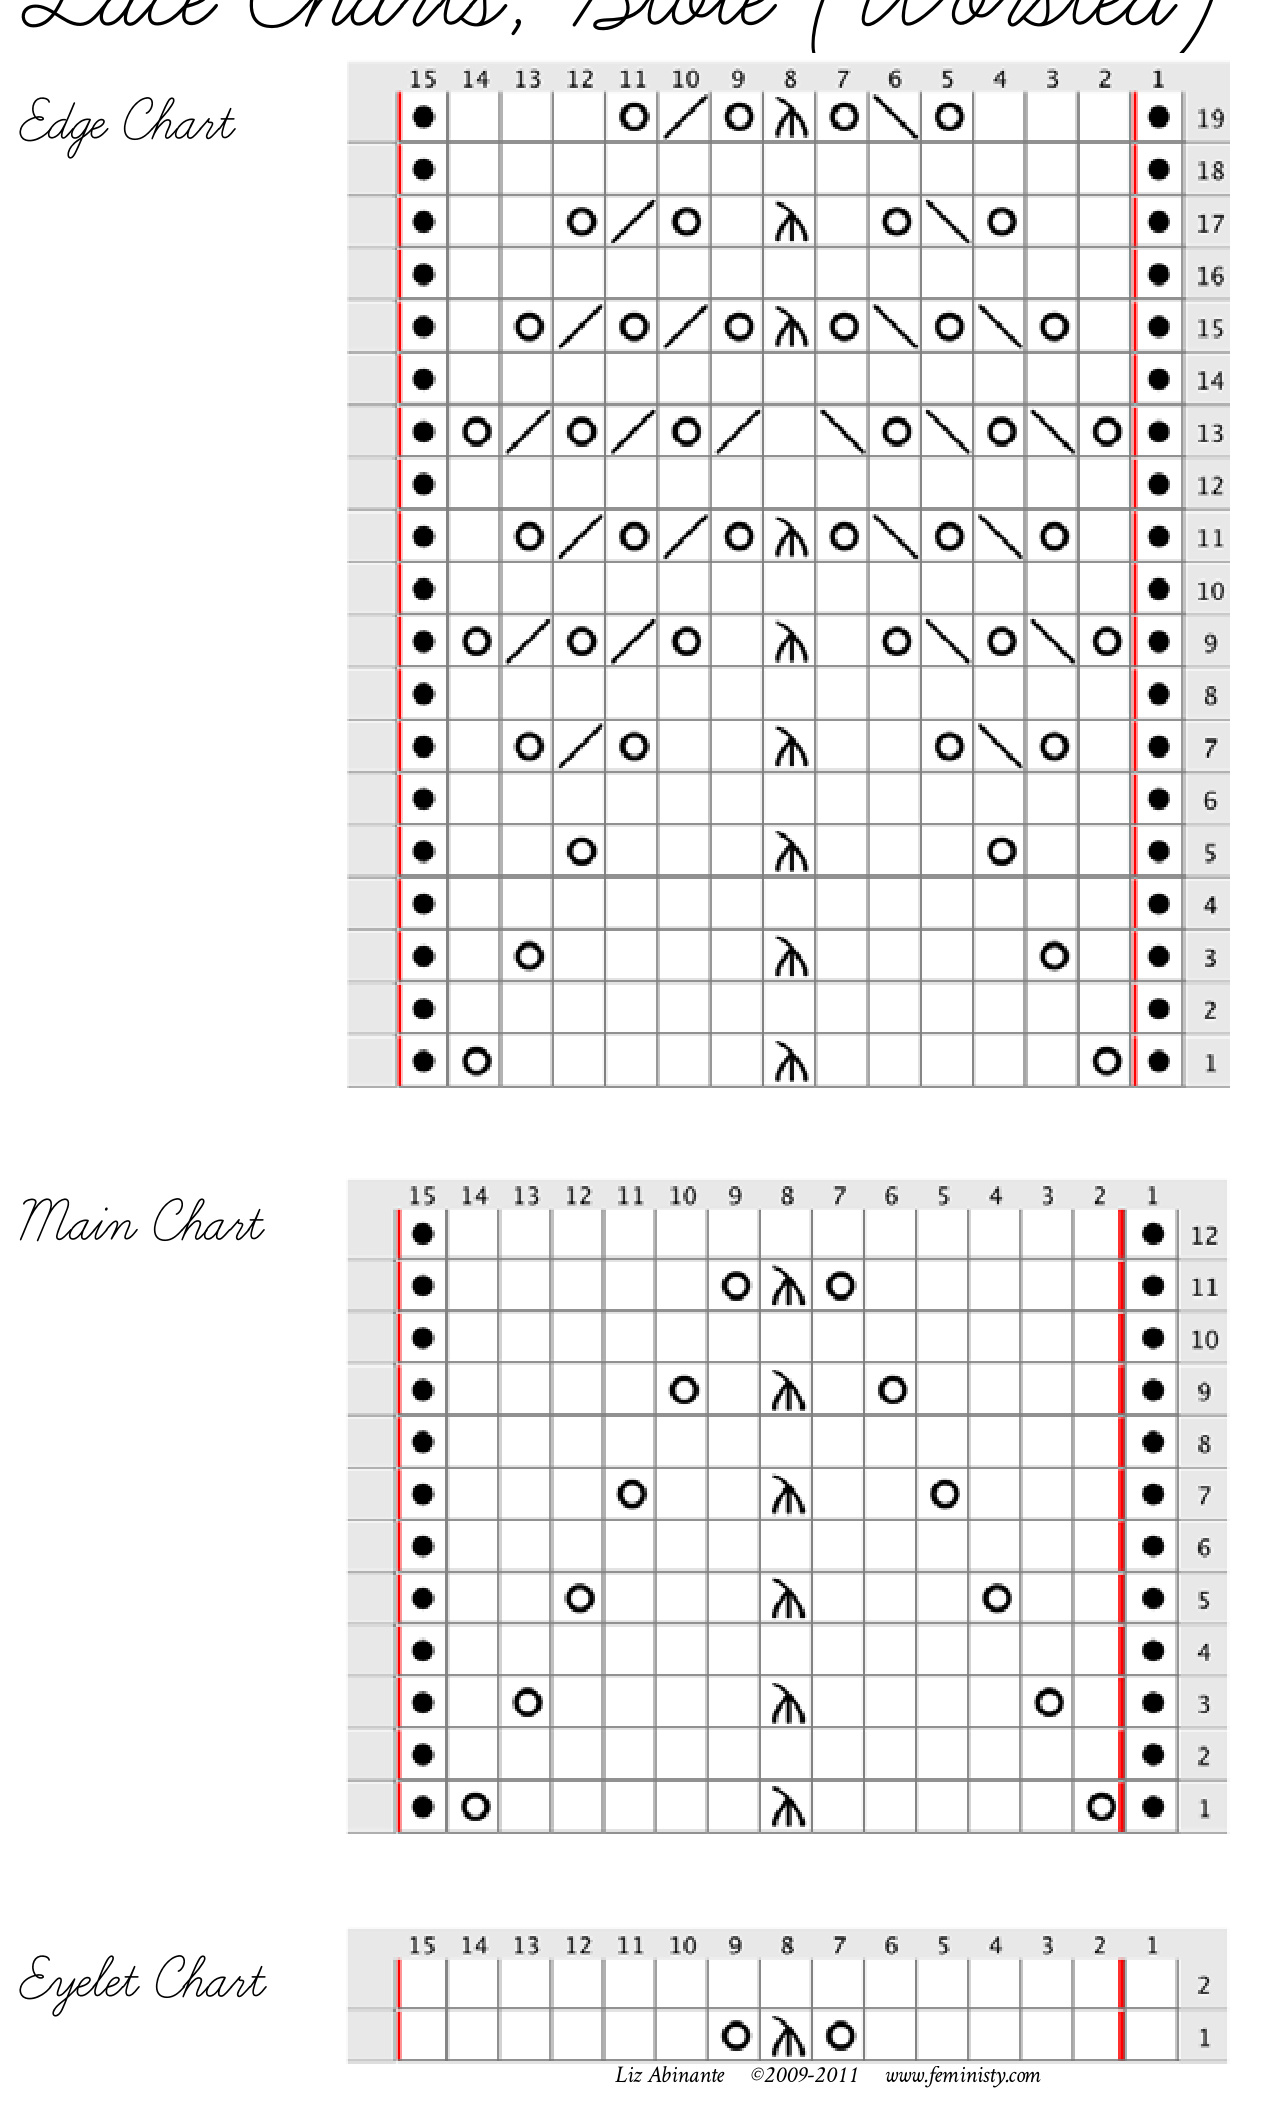
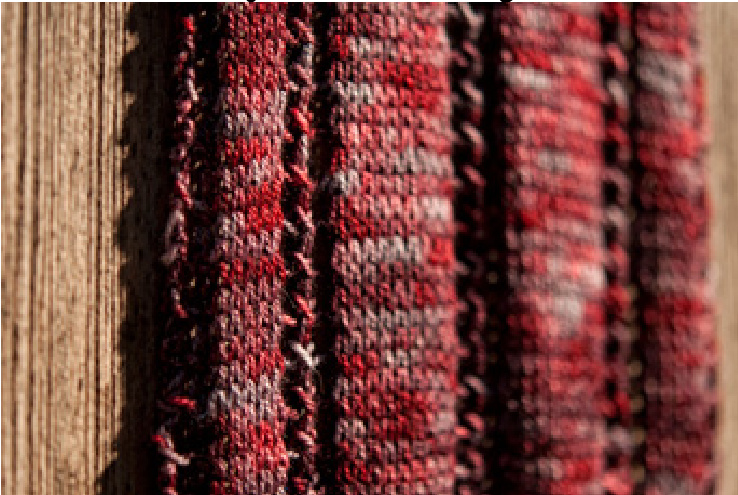
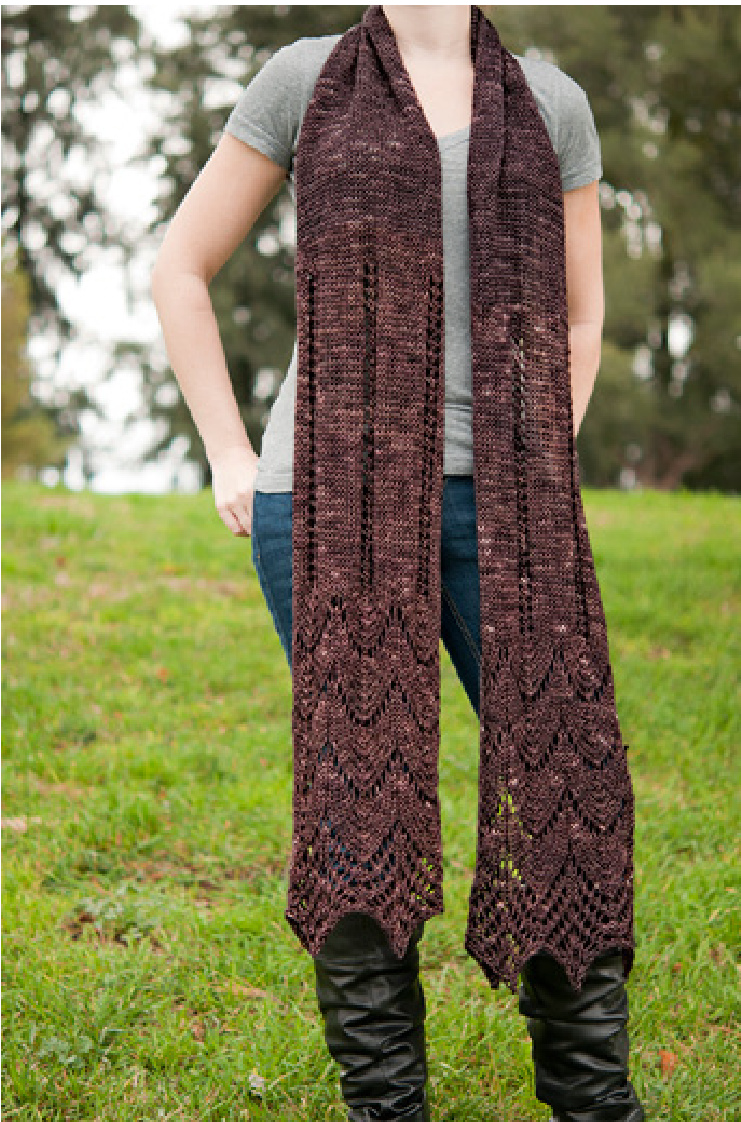
The stitch pattern used in Traveling Woman lends itself well to a scarf: a simple stockinette body, followed by eyelets that blend into the lace edging. Complete instructions are provided for two sizes: a fingering weight scarf (shown in red), and a worsted weight stole (shown in brown). Two pages with tips on customization are included at the end of the pattern. One focuses on lace customizations. The second includes instructions for custom sizing alone with a table for different yarn weights.
Fingering Weight Version, Scarf
125g fingering weight yarn Sample knit in Little Red Bicycle Hipster Sock (80% superwash merino, 20% nylon), shown in Leonidas. Approximately 450 yards. Finished size: 7" wide, 79" long Needle US #6 (4.0mm) needle Gauge, after blocking Per 1 inch: 6.25 sts. 5.25 rows. Per 4 inches: 25 sts. 21 rows.
Worsted Weight Version, Stole
300g worsted weight yarn Sample knit in Madelinetosh tosh vintage (100% superwash merino), shown in Kale. Approximately 600 yards. Finished size: 11" wide, 84" long. Needle US #9 (5.5mm) needle Gauge, after blocking Per 1 inch: 4 sts. 5 rows. Per 4 inches: 16 sts. 20 rows.
Instructions
There are two sets of instructions in this pattern, choose which one works best for you based on your skill level or tools available. Both methods are designed to use every last yard of yarn you have.
designed by Liz Abinante
Method #1: Without a scale
I don't like making gauge swatches for things like scarves, so I'm guessing there's a good chance you don't either. If you don't want to knit a gauge swatch, this method is for you. You'll make two edge pieces beginning with a provisional cast on, working the lace repeats and binding off. Select one of your two edge pieces and pick up from the provisional cast on to work the body in stockinette stitch. When you've almsot exhausted your yarn, graft the two pieces together.
Method #2: Using a scale
If you don't want to seam your scarf together and you have access to a food scale, this is the way to go. Using a provisional cast on, you will knit one edge. Weigh your yarn and note the number of grams used. Pick up from the provisional cast on and knit the body in stockinette until you have the number of grams remaining needed to complete the edge. No seaming necessary!
Method # 1 : Uithout a scale
Instructions are written as follows: fingering (worsted) When one set of instructions are provided, it applies to both worsted and fingering weight versions. [Brackets] indicate a repeat. There are two sets of charts, be sure to read from the correct chart when knitting. The garter border is not included on any of the lace charts. Written instructions for the lace charts are provided as well.
Garter Lace Border
Worked over two rows. Row 1 (RS): k0(1), k2tog, yo, k1(1). Work body as indicated to last 3(4) sts. k0(1), k2tog, yo, k1(1). Row 2: k border sts, working body as indicated.
Body
Select one completed edge piece. Pick up from the provisional CO. Row 1 (WS): k3(4), slm, p to m, slm, k3(4). Row 2 (RS): k0(1), k2tog, yo, k1(1), slm, k to m, slm, k0(1), k2tog, yo, k1(1). Repeat rows 1-2 until you have almost exhausted your yarn, be sure to end with a RS row. Leave enough yarn to graft your two pieces together. If you don't like grafting, you can use the three needle bind off to join your two pieces together. Make two. Provisionally CO 43(51) sts. Work one WS row as follows: k3(4), pm, p to last 3(4) sts, pm, k3(4). Row 1 (RS): k0(1), k2tog, yo, k1(1), slm, k to m, slm, k0(1), k2tog, yo, k1(1). Row 2: k3(4), slm, p to m, slm, k3(4). Repeat rows 1-2 three times, 6 rows total. Ready to begin a RS row. Using a spare needle of the same size, unravel and pick up the sts from the provisional CO of the other edge piece. Graft together both pieces together using a tapestry needle. Hold both scarf pieces together with the right side out: the wrong sides should be facing inwards towards each other. The edge piece without the stockinette body should be facing you.
Eyelets
Repeat the eyelet chart 20(26) times. Written instructions: Row 1 (RS): k0(1), k2tog, yo, k1(1), slm, k1(1) [k4(5), yo, slk2p, yo, k5(6)] 3x, slm, k0(1), yo, k2tog, k1(1). Row 2: k3(4), slm, p to m, slm, k3(4). Using your tapestry needle and the yarn from the edge piece with the stockinette body, work set-up as follows: Insert the tapestry needle into the piece closest to you (this should be the unworked edge) and thread it through the first stitch as if to purl. Then insert the tapesty needle into the first stitch on the body piece as if to knit.
Main Chart
Repeat the main chart 3 times, maintaining the garter lace border.
Edge Chart
Work the edge chart 1 time, maintaining the garter lace border. Bind off as follows: p2, sl sts back to left ndl, p2tog. [p1, sl sts back to left ndl, p2tog] rpt to end. Repeat the following steps: Edge piece: Insert the tapesty needle into the first stitch as if to knit, slipping the stitch off the needle. Insert the tapestry needle into the next stitch as if to purl. Body piece: Insert the tapestry needle into the first stitch as if to purl, slipping the stitch off the needle. Insert the tapestry needle into the next stitch as if to knit. Repeat these steps, carefully maintaining proper tension as you continue. Block and wear with love.
Method #2 : Using
a scale
Instructions are written as follows: fingering (worsted). When one set of instructions are provided, it applies to both worsted and fingering weight versions. [Brackets] indicate a repeat. There are two sets of charts, be sure to read from the correct chart when knitting. The garter border is not included on any of the lace charts. Written instructions for the lace charts are provided as well.
Garter Lace Border
Worked over two rows. Row 1 (RS): k0(1), k2tog, yo, k1(1). Work body as indicated to last 3(4) sts. k0(1), k2tog, yo, k1(1). Row 2: k border sts, working body as indicated. Weigh your yarn before beginning! Provisionally CO 43(51) sts. Work one WS row as follows: k3(4), pm, p to last 3(4) sts, pm, k3(4). Row 1 (RS): k0(1), k2tog, yo, k1(1), slm, k to m, slm, k0(1), k2tog, yo, k1(1). Row 2: k3(4), slm, p to m, slm, k3(4). Repeat rows 1-2 three times, 6 rows total. Ready to begin a RS row.
Eyelets
Repeat the eyelet chart 20(26) times. Written instructions: Row 1 (RS): k0(1), k2tog, yo, k1(1), slm, k1(1) [k4(5), yo, slk2p, yo, k5(6)] 3x, slm, k0(1), k2tog, yo, k1(1). Row 2: k3(4), slm, p to m, slm, k3(4).
Main Chart
Repeat the main chart 3 times, maintaining the garter lace border.
Edge Chart
Work the edge chart 1 time, maintaining the garter lace border. Bind off as follows: p2, sl sts back to left ndl, p2tog. Ip1, sl sts back to left ndl, p2tog] rpt to end. Weigh your yarn and note how many grams are needed to complete the edge. Write that number here: g, you'll need it soon. Pick up from the provisional CO, double checking that you have 43(51) sts. Work in stockinette st as follows: Row 1 (WS): k3(4), slm, p to m, slm, k3(4). Row 2 (RS): k0(1), k2tog, yo, k1(1), slm, k to m, slm, k0(1), k2tog, yo, k1(1). Repeat rows 1-2, weighing your yarn as you go. When youhave g remaining, work the edge in the same manner as you did previously. If you're worried about running out of yarn, I've taken care of that for you: your edge weight includes 7 extra rows that you won't need to work for the second edge. If you want to cut it close, you can work a few extra rows before beginning the second edge. Work the second edge identical to the first:
Eyelets
Repeat the eyelet chart 20(26) times. Written instructions: Row 1 (RS): k0(1), k2tog, yo, k1(1), slm, k1(1) [k4(5), yo, slk2p, yo, k5(6)] 3x, slm, k0(1), yo, k2tog, k1(1). Row 2: k3(4), slm, p to m, slm, k3(4).
Main Chart
Repeat the main chart 3 times, maintaining the garter lace border.
Edge Chart
Work the edge chart 1 time, maintaining the garter lace border. Bind off as follows: p2, sl sts back to left ndl, p2tog. [p1, sl sts back to left ndl, p2tog] rpt to end. Block and wear with love. Main Chart R1 (RS): p1 [yo, k4, slk2p, k4, yo, p1] R2 and all WS rows: k1 [p11, k1] R3: p1 [k1, yo, k3, slk2p, k3, yo, k1, p1] R5: p1 [k2, yo, k2, slk2p, k2, yo, k2, p1] R7: p1 [k3, yo, k1, slk2p, k1, yo, k3, p1] R9: p1 [k4, yo, slk2p, yo, k4, p1] R10: k1 [p11, k1] R1 (RS): p1 [yo, k4, slk2p, k4, yo, p1] R2 and all WS rows: k1 [p11, k1] R3: p1 [k1, yo, k3, slk2p, k3, yo, k1, p1] R5: p1 [k2, yo, k2, slk2p, k2, yo, k2, p1] R7: p1 [k1, yo, ssk, yo, k1, slk2p, k1, yo, k2tog, yo, k1, p1] R9: p1 [yo, ssk, yo, ssk, yo, slk2p, yo, k2tog, yo, k2tog, yo, p1] R11: p1 [k1, yo, ssk, yo, ssk, k1, k2tog, yo, k2tog, yo, k1, p1] R13: p1 [yo, ssk, yo, ssk, yo, slk2p, yo, k2tog, yo, k2tog, yo, p1] R15: p1 [k1, yo, ssk, yo, k1, slk2p, k1, yo, k2tog, yo, k1, p1] R17: p1 [yo, ssk, yo, ssk, yo, slk2p, yo, k2tog, yo, k2tog, yo, p1]
/Chart Instructions Read charts from right to left, bottom to top. Odd numbered rowsare right side rows. Stitches outlined in red are to be repeated until the edge markers. The first stitch on each chart is not to be repeated: it should be worked once at the beginning of every row. Work charts as follows: Work garter lace border, slip marker, work chart to marker, slip marker, work garter lace border. The garter lace border is not charted.
Uritten Lace, Stole Uorsted
I/urlUru R1 (RS): p1 [yo, k5, slk2p, k5, yo, p1] R2 and all WS rows: k1 [p13, k1] R3: p1 [k1, yo, k4, slk2p, k4, yo, k1, p1] R5: p1 [k2, yo, k3, slk2p, k3, yo, k2, p1] R7: p1 [k3, yo, k2, slk2p, k2, yo, k3, p1] R9: p1 [k4, yo, k1, slk2p, k1, yo, k4, p1] R11: p1 [k5, yo, slk2p, yo, k5, p1] R12: k1 [p11, k1] R1 (RS): p1 [yo, k5, slk2p, k5, yo, p1] R2 and all WS rows: k1 [p13, k1] R3: p1 [k1, yo, k4, slk2p, k4, yo, k1, p1] R5: p1 [k2, yo, k3, slk2p, k3, yo, k2, p1] R7: p1 [k1, yo, ssk, yo, k2, slk2p, k2, yo, k2tog, yo, k1, p1] R9: p1 [(yo, ssk) 2x, yo, k1, slk2p, k1, (yo, k2tog) 2x, yo, p1] R11: p1 [k1, (yo, ssk) 2x, yo, slk2p, (yo, k2tog) 2x, yo, k1, p1] R13: p1 [(yo, ssk) 3x, k1, (k2tog, yo) 3x, p1] R15: p1 [k1, (yo, sk) 2x, yo, slk2p, (yo, k2tog) 2x, yo, k1, p1] R17: p1 [k2, yo, ssk, yo, k1, slk2p, k1, yo, k2tog, yo, k2, p1] R19: p1 [k3, yo, ssk, yo, slk2p, yo, k2tog, yo, k3, p1] Chart Instructions Read charts from right to left, bottom to top. Odd numbered rowsare right side rows. Stitches outlined in red are to be repeated until the edge markers. The first stitch on each chart is not to be repeated: it should be worked once at the beginning of every row. Work charts as follows: Work garter lace border, slip marker, work chart to marker, slip marker, work garter lace border. The garter lace border is not charted.
Customiging Your Trareling Scarf
To work the entire body in lace:
You can begin the scarf in the same manner as written in the pattern. Make sure you begin with a wrong side row. When you in-zip your provisional cast on, you may be off by one stitch. Your eyelets should line up! If they don't, try and find where the problem is. You may have to increase or decrease a stitch somewhere to make it work. To work the entire body in the main lace chart, work ONE wrong side row before beginning the lace chart. When you unravel your provisional cast on, begin with the first lace row of the chart. Each side of the scarf should use half of your yarn.
To prevent the edges from flaring:
Because stockinette stitch isn't as stretchy as the lace used for this pattern, the edges of the scarf will flare out slightly. Knit the eyelets and main lace chart in the same size needle. When you reach the edge chart, work this is in a needle 1-2 sizes smaller than the remainder of the scarf. To achieve sharper points, you may want to bind off with the original needle.
To prevent the skinnier scarf from curling:
You have a few options here. The first of which is to allocate more garter stitch for the edges. That's kind of boring, though. You can also work the entire body in eyelets (see above). Optionally, you can work the entire body in eyelets and add a purl stitch in between them. Remember to k these stitches on the next row! They will line up with the p stitches in the main lace chart. Fingering/scarf (12 +1 chart): [border], p1, [k4, yo, slk2p, yo, k4, p1] rpt to end, [border]. Worsted/stole (14 + 1 chart): [border], p1, [k5, yo, slk2p, yo, k5, p1] rpt to end, [border].

The lace chart is a multiple of 12 + 1 (or 14 + 1 for the worsted weight/stole version). The 12 + 1 fingering weight chart is for scarves. The 14 + 1 worsted weight chart is for stoles. Scarves scarves have an edging of 3 stitches, stoles have an edging of 4 stitches. To adjust sizing, use the following formula (changing “12" to “14" if you use the larger chart): Z = number of lace repeats across Y = number of edge stitches, each side W + V = cast on number
Provisionally cast on W + V sts. Follow the instructions for either Method #1 or #2, whichever you prefer. Make sure you use the correct chart. If you're not sure where to start, I've provided some suggestions below for scarves and stoles in different yarn Weights.
| Scarf & Stole | Lace | Sport | DK | Aran | Bulky | |
| Needle size | US5 3.75mm | US7 4.5mm | US8 5.0mm | US10 6.0mm | US11 8.0mm | |
| Sizing for scarves | Worsted | Aran Bulky | ||||
| # of rpts across (width) | Lace 4 | Sport 3 | DK 3 | 2 | 2 | 1 |
| # of border sts (each side) | 3 | 3 | 3 | 3 | 3 | 3 |
| CO # (using fingering wt charts) | 55 | 43 | 43 | 31 | 31 19 | |
| # of eyelet rpts | 25 | 20 | 20 | 15 | 15 10 | |
| # of main chart rpts | 4 | 3 | 3 | 3 | 2 2 | |
| Sizing for stoles | Lace | Fingering | Sport | DK | Aran | |
| # of rpts across (width) | 6 | 5 | 5 | 5 | Bulky 4 3 | |
| # of border sts | 4 | 4 | 4 | 4 | 4 | |
| CO # (using worsted wt charts) | 93 | 79 | 79 | 79 | 4 65 51 | |
| # of eyelet rpts | 35 | 25 | 30 | 35 | 20 | |
| # of main chart rpts | 5 | 4 | 4 | 4 | 25 3 3 | |
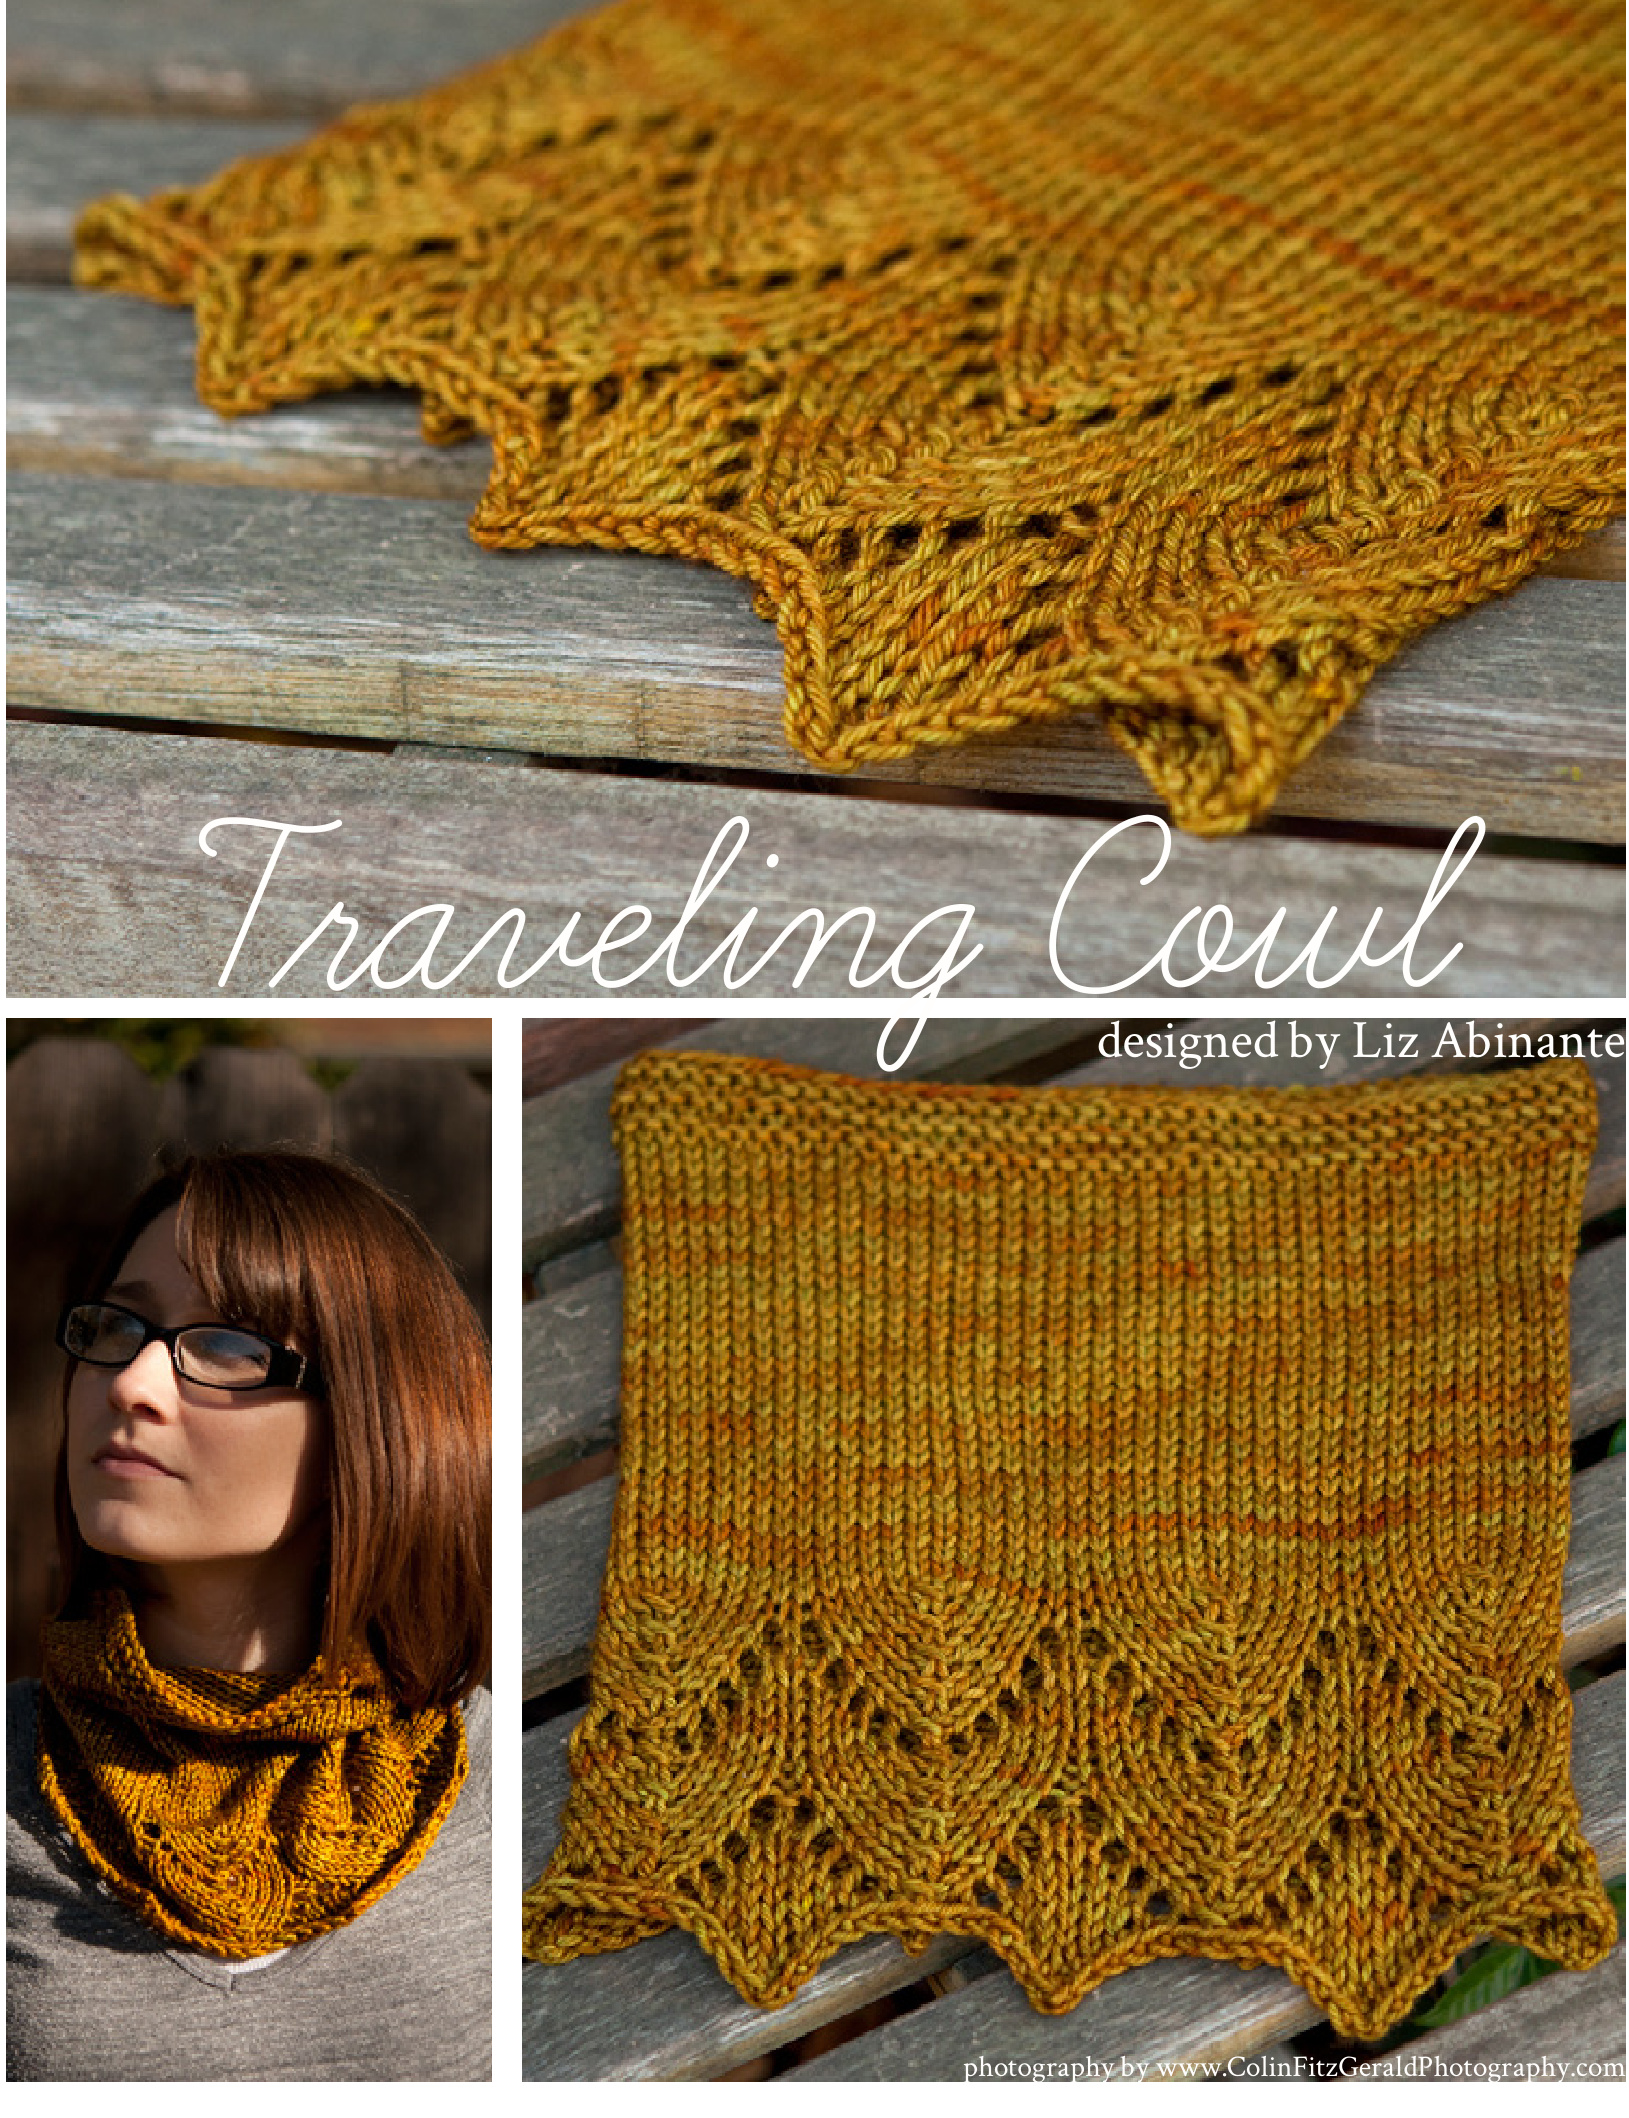
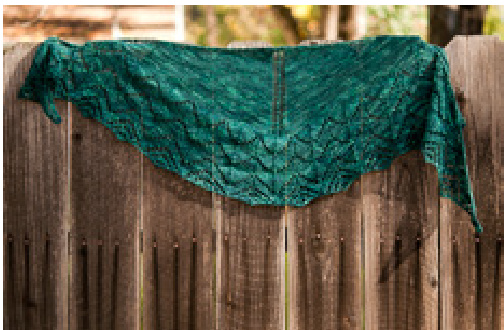
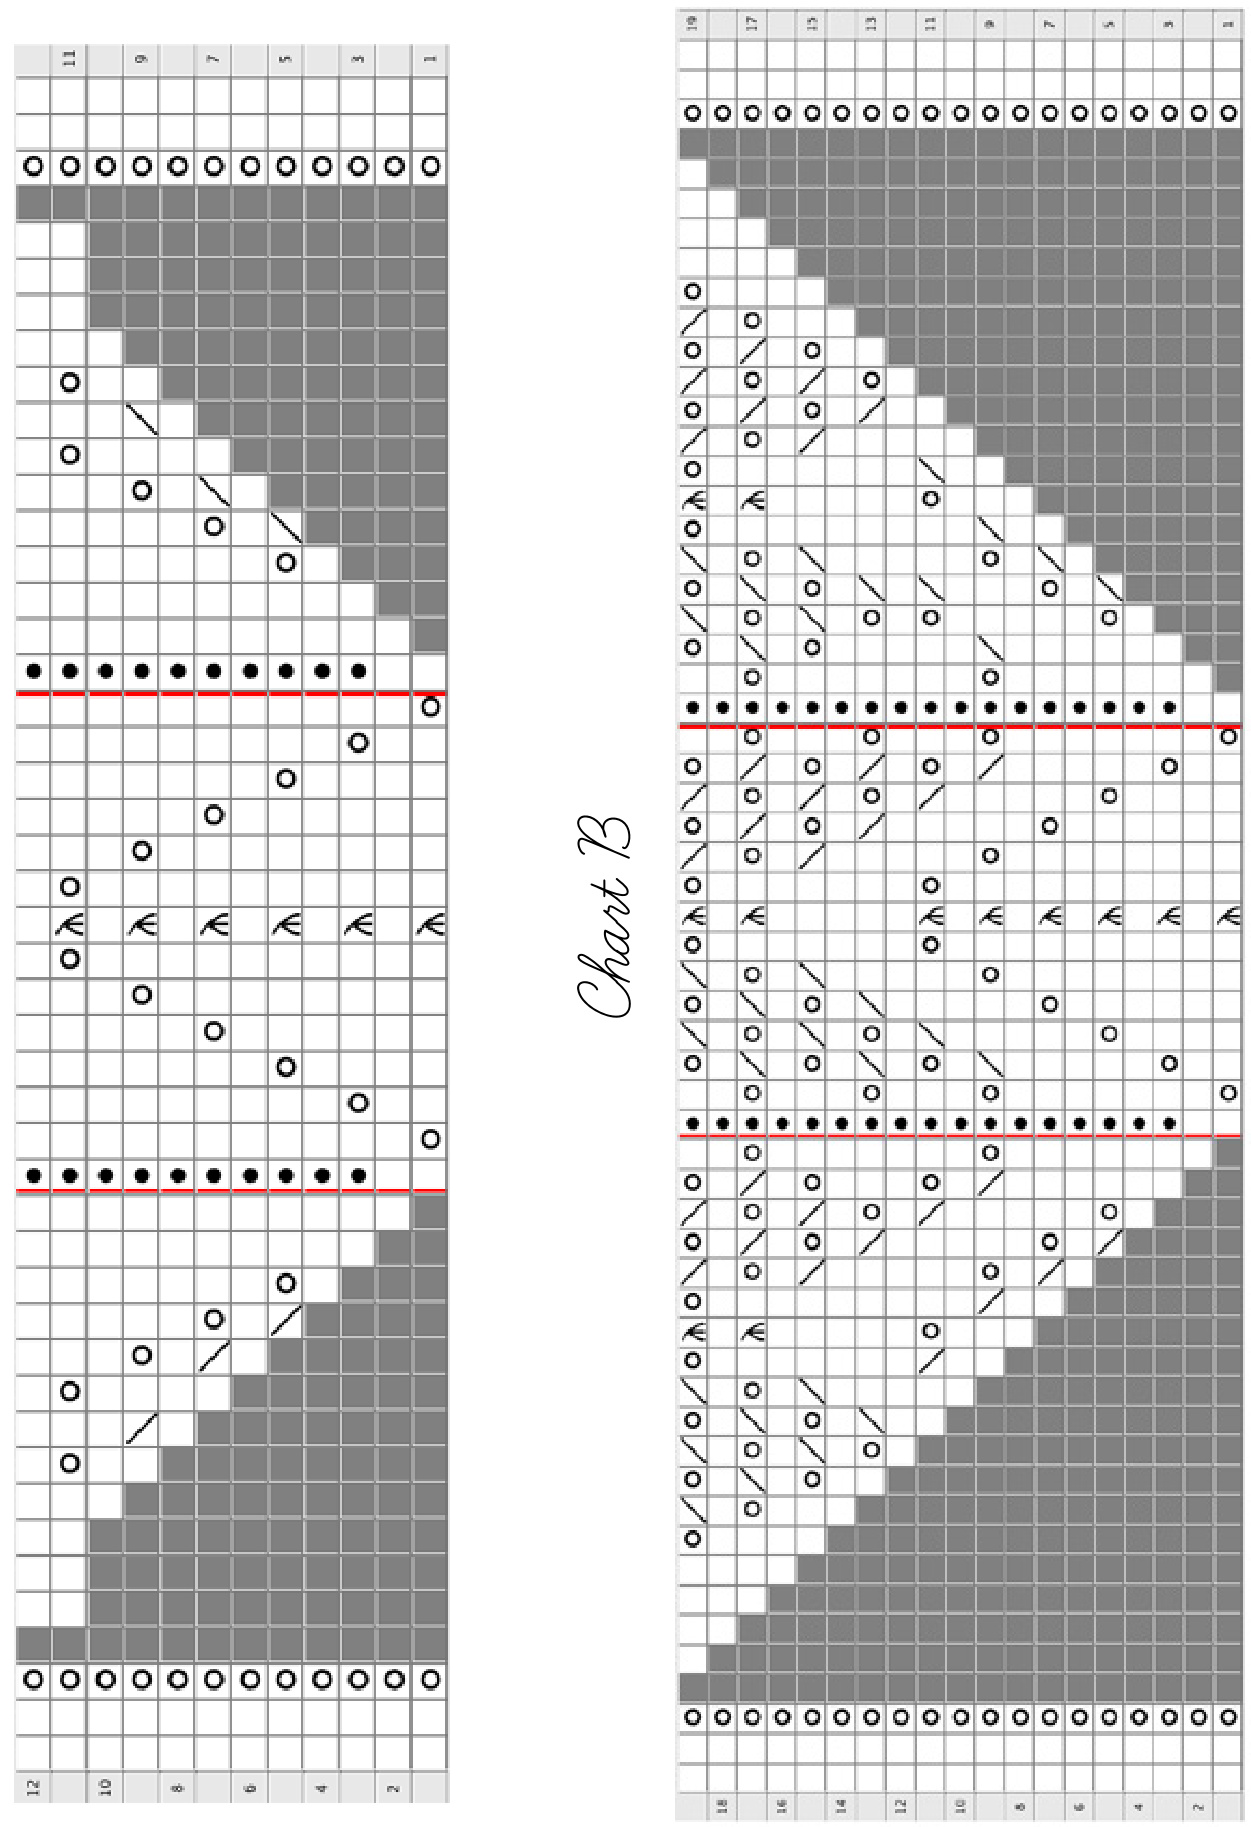
Traveling Coul
designed by Liz Abinante
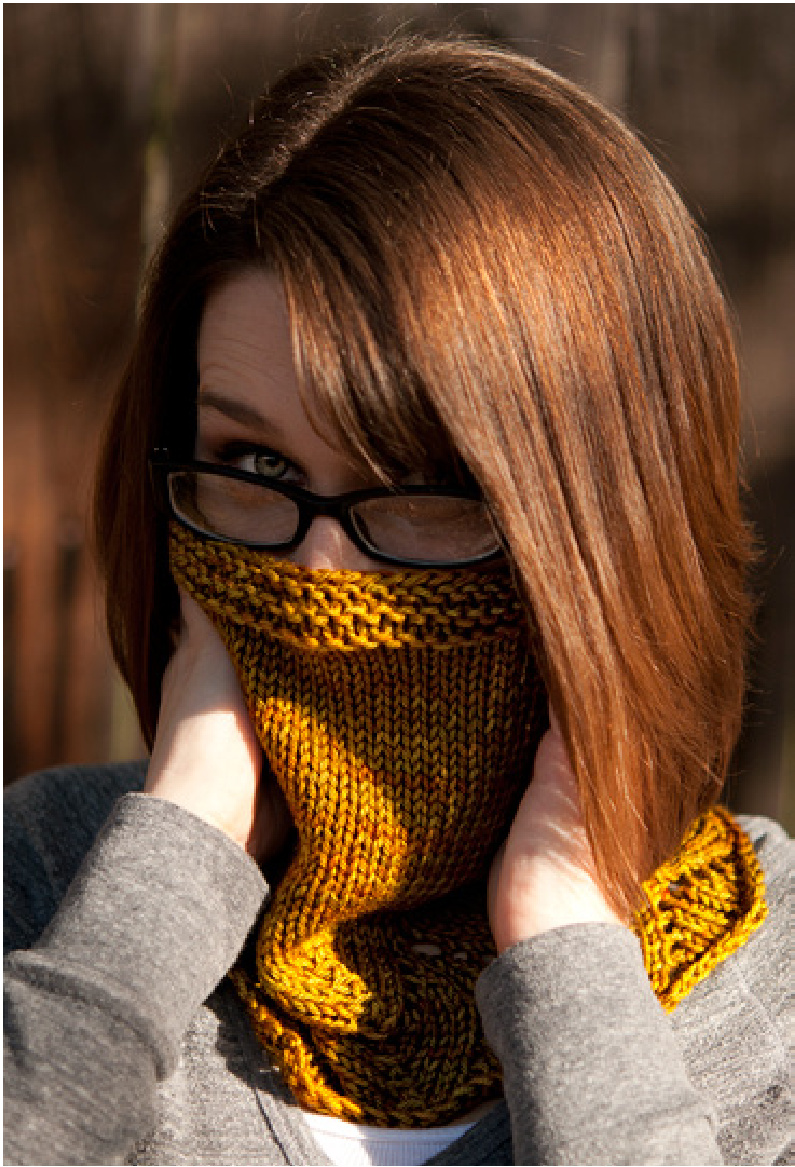
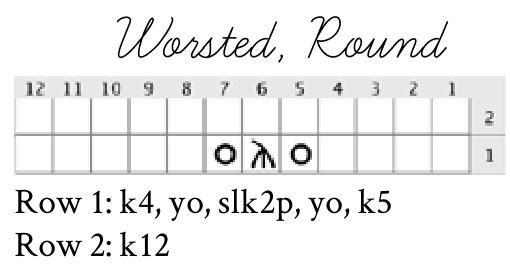
I love cowls. This love I have for cowls is a newly discovered one, something Ive only recently given into. I didn't really understand their purpose, and they kind of reminded me of a noose. But then I knit one and realized how awesome they are. My love for cowls is complicated: on warm days when I ride my bike, I prefer a looser fit (pictured right) that gently falls. On cold days when I'm forced to leave the house, I grab a snug fitting cowl to keep the warmth in. In honor of my love for cowls and my indecisiveness, this pattern provides instructions for both loose and snug fitting cowls in fingering and worsted weight (pictured). The pattern includes instructions for both working in the round and working flat. Although I'm partial to working anything and everything in the round, imagine how cute your Traveling Cowl would look with some exoticbuttons! For working in the round, you will need a 16" circular needle in the size listed below.
Fingering Weight
Approximately 100g fingering weight yarn
Needle & Gauge
Large, round: 22" circumference, 9" long (to point) Large, flat: 24" circumference, 9" long (to point) US #6 (4.0mm) needle. Gauge per inch: 5 sts, 7 rows. Small, round: 18" circumference, 9.5" long (to point) Small, flat: 19" circumference, 9.5" long (to point) US #5 (3.75mm) needle. Gauge per inch: 5.5 sts, 8 rows.
Worsted Weight
Large sample knit in Fiberphile Super Squish Worsted (100% superwash merino), shown in Mossy Bank. 200 yards per 100 grams.
Needle & Gauge
Large, round: 21" circumference, 9.5" long (to point) Large, flat: 22.5" circumference, 9.5" long (to point) US #9 (5.5mm) needle. Gauge per inch: 4 sts sts, 5 rows.
Small, round: 17" circumference, 9" long (to point) Small, flat: 16" circumference, 9" long (to point) US #7 (4.5mm) needle. Gauge per inch: 5 sts, 6 rows.
Instructions
Two sets of instructions are included in this pattern: knitting in the round or worked flat. Custom options include: adding eyelets and adjusting the height of your cowl.
lnstructions: In the Round
Instructions are provided for all sizes in tables. If one set of instructions are present, it applies to all 4 sizes. Using a 16" circular needle in the size required, cast on:
| fingering sm | fingering lg | worsted sm | worsted lg |
| 98 | 112 | 84 | 84 |
stitches, place marker, and join in the round.
Garter stitch:
Row 1: k Row 2: p Repeat rows 1-2 times, for a total of
| fingering sm | fingering lg | worsteds sm | worsted lg |
| 4 | 4 | 3 | 3 |
rows.
| fingering sm | fingering Ig | worsted sm | worsted lg |
| 8 | 8 | 6 | 6 |
Work in stockinette stitch (knit every row) for Switch to lace chart. Work Bind off as follows: k2, sl sts back to left ndl, ssk. [k1, sl sts back to left ndl, ssk] rpt to end.
| fingering sm | fingering lg | worsted sm | worsted lg |
| 4.5 | 5 | 5 | 6.5 |
inches.
| fingering sm | fingering lg | worsteds sm | worsted Ig |
| 4 | 3 | 3 | 2 |
rpts of lace chart. Block your cowl by pulling the purl stitches to points.
Row 1: yo, k5, slk2p, k5, yo, p1 Row 2 (and all even rows): k13, p1 Row 3: k1, yo, k4, slk2p, k4, yo, k1, p1 Row 5: k2, yo, k3, slk2p, k3, yo, k2, p1 Row 7: k3, yo, k2, slk2p, k2, yo, k3, p1 Row 9: k4, yo, k1, slk2p, k1, yo, k4, p1 Row 11: k5, yo, slk2p, yo, k5, p1 Row 1: yo, k4, slk2p, k4, yo, p1 Row 2 (and all even rows): k11, p1 Row 3: k1, yo, k3, slk2p, k3, yo, k1, p1 Row 5: k2, yo, k2, slk2p, k2, yo, k2, p1 Row 7: k3, yo, k1, slk2p, k1, yo, k3, p1 Row 9: k4, yo, slk2p, yo, k4, p1

| 12.11.10 | 9 | 8765 | 4 | |||||||||
| 10 | ||||||||||||
| oKo | 6 | |||||||||||
| 8 | ||||||||||||
| 0 | K | 0 | 7 | |||||||||
| 6 | ||||||||||||
| 0 | 0 | 5 | ||||||||||
| 4 | ||||||||||||
| 0 | K | 0 | 3 | |||||||||
| 2 | ||||||||||||
| o | K | 0 | 1 | |||||||||
Instructions:Uorked Jlat
Instructions are provided for all sizes in tables. If one set of instructions are present, it applies to all 4 sizes.
Button Holes
I recommend placing button holes every 1.5-2 inches. Work your button holes at the beginning or end of each row in the garter stitch border. Fingering weight (or smaller buttons): Row 1 (RS): k2, k2tog, yo, k3. Row 2: k all sts Worsted weight (or larger buttons): Row 1 (RS): k1, k2tog, yo 2x, k2tog, k1 Row 2: k2, [k1, p1] in the double yo, k2 Mark your button band as follows on the first row: Row 1: k Cast on:
| fingering sm | fingering lg | worsted sm | worsted lg |
| 104 | 119 | 77 | 90 |
stitches. Do not join in the round.
| fingering sm | fingering lg | worsteds sm | worsted Ig |
| 7 | 7 | 6 | 6 |
sts, pm, k to last
| fingering sm | fingering Ig | worsted sm | worsted lg |
| 7 | 7 | 6 | 6 |
sts, pm, k to end. Knit
| fingering sm | fingering lg | worsteds sm | worsted Ig |
| 8 | 8 | 6 | 6 |
rows in garter stitch. Keeping the border in garter stitch, work cowl body in stockinette stitch (k one row, p one row) for
| fingering sm | fingering lg | worsted sm | worsted lg |
| 4.5 | 5 | 5 | 6.5 |
inches. Switch to lace chart. Work Bind off on a WS row as follows: p2, sl sts back to left ndl, p2tog. [p1, sl sts back to left ndl, p2tog] rpt to end.
| fingering sm | fingering lg | worsted s sm | worsted Ig |
| 4 | 3 | 3 | 2 |
rpts of lace chart. Block your cowl by pulling the purl stitches to points.
Repeat is outlined in red. Row 1: p1 [yo, k5, slk2p, k5, yo, p1] Row 2 (and all WS rows): p1 [k13, p1] Row 3: p1 [k1, yo, k4, slk2p, k4, yo, k1, p1] Row 5: p1[k2, yo, k3, slk2p, k3, yo, k2, p1] Row 7: p1[k3, yo, k2, slk2p, k2, yo, k3, p1] Row 9: p1[k4, yo, k1, slk2p, k1, yo, k4, p1] Row 11: p1[k5, yo, slk2p, yo, k5, p1]
Row 1: p1 [yo, k4, slk2p, k4, yo, p1] Row 2 (and all WS rows): p1 [k11, p1] Row 3: p1 [k1, yo, k3, slk2p, k3, yo, k1, p1] Row 5: p1 [k2, yo, k2, slk2p, k2, yo, k2, p1] Row 7: p1 [k3, yo, k1, slk2p, k1, yo, k3, p1] Row 9: p1 [k4, yo, slk2p, yo, k4, p1]
To adjust the height &f the coWl
For a shorter cowl, work fewer rows in stockinette stitch. Maintaining the same number of lace repeats will emphasize the lace rather than the plain body of the cowl. For a longer cowl, work the amount of stockinette stitch as called for. Add more repeats of the lace chart to emphasize the lace pattern.
To make a double wrap cowl
If you would like to make a cowl that can be wrapped around your neck twice, you'll need to increase your stitch count 2.5 times over. I would recommend this only for the knit in the round version. Cast on estimates, moderately snug fit, but not choking you (using smaller needle): Fingering: 252 (46") Worsted: 216 (43") To add eyelets to your cowl, knit fewer inches of stockinette stitch. Repeat the eyelet chart 6 times (fingering) or 5 times (worsted) for each lace chart repeat you plan on working. For extra eyelets, work the eyelet chart 12 times (fingering) or 10 times (worsted) for each lace chart repeat.
Row 1: k5, yo, slk2p, yo, k6 Row 2: k14

Row 1: k1 [k4, yo, slk2p, yo, k5] Row 2: p1 [p13]

Row 1: k1 [k5, yo, slk2p, yo, k6] Row 2: p1 [p14]
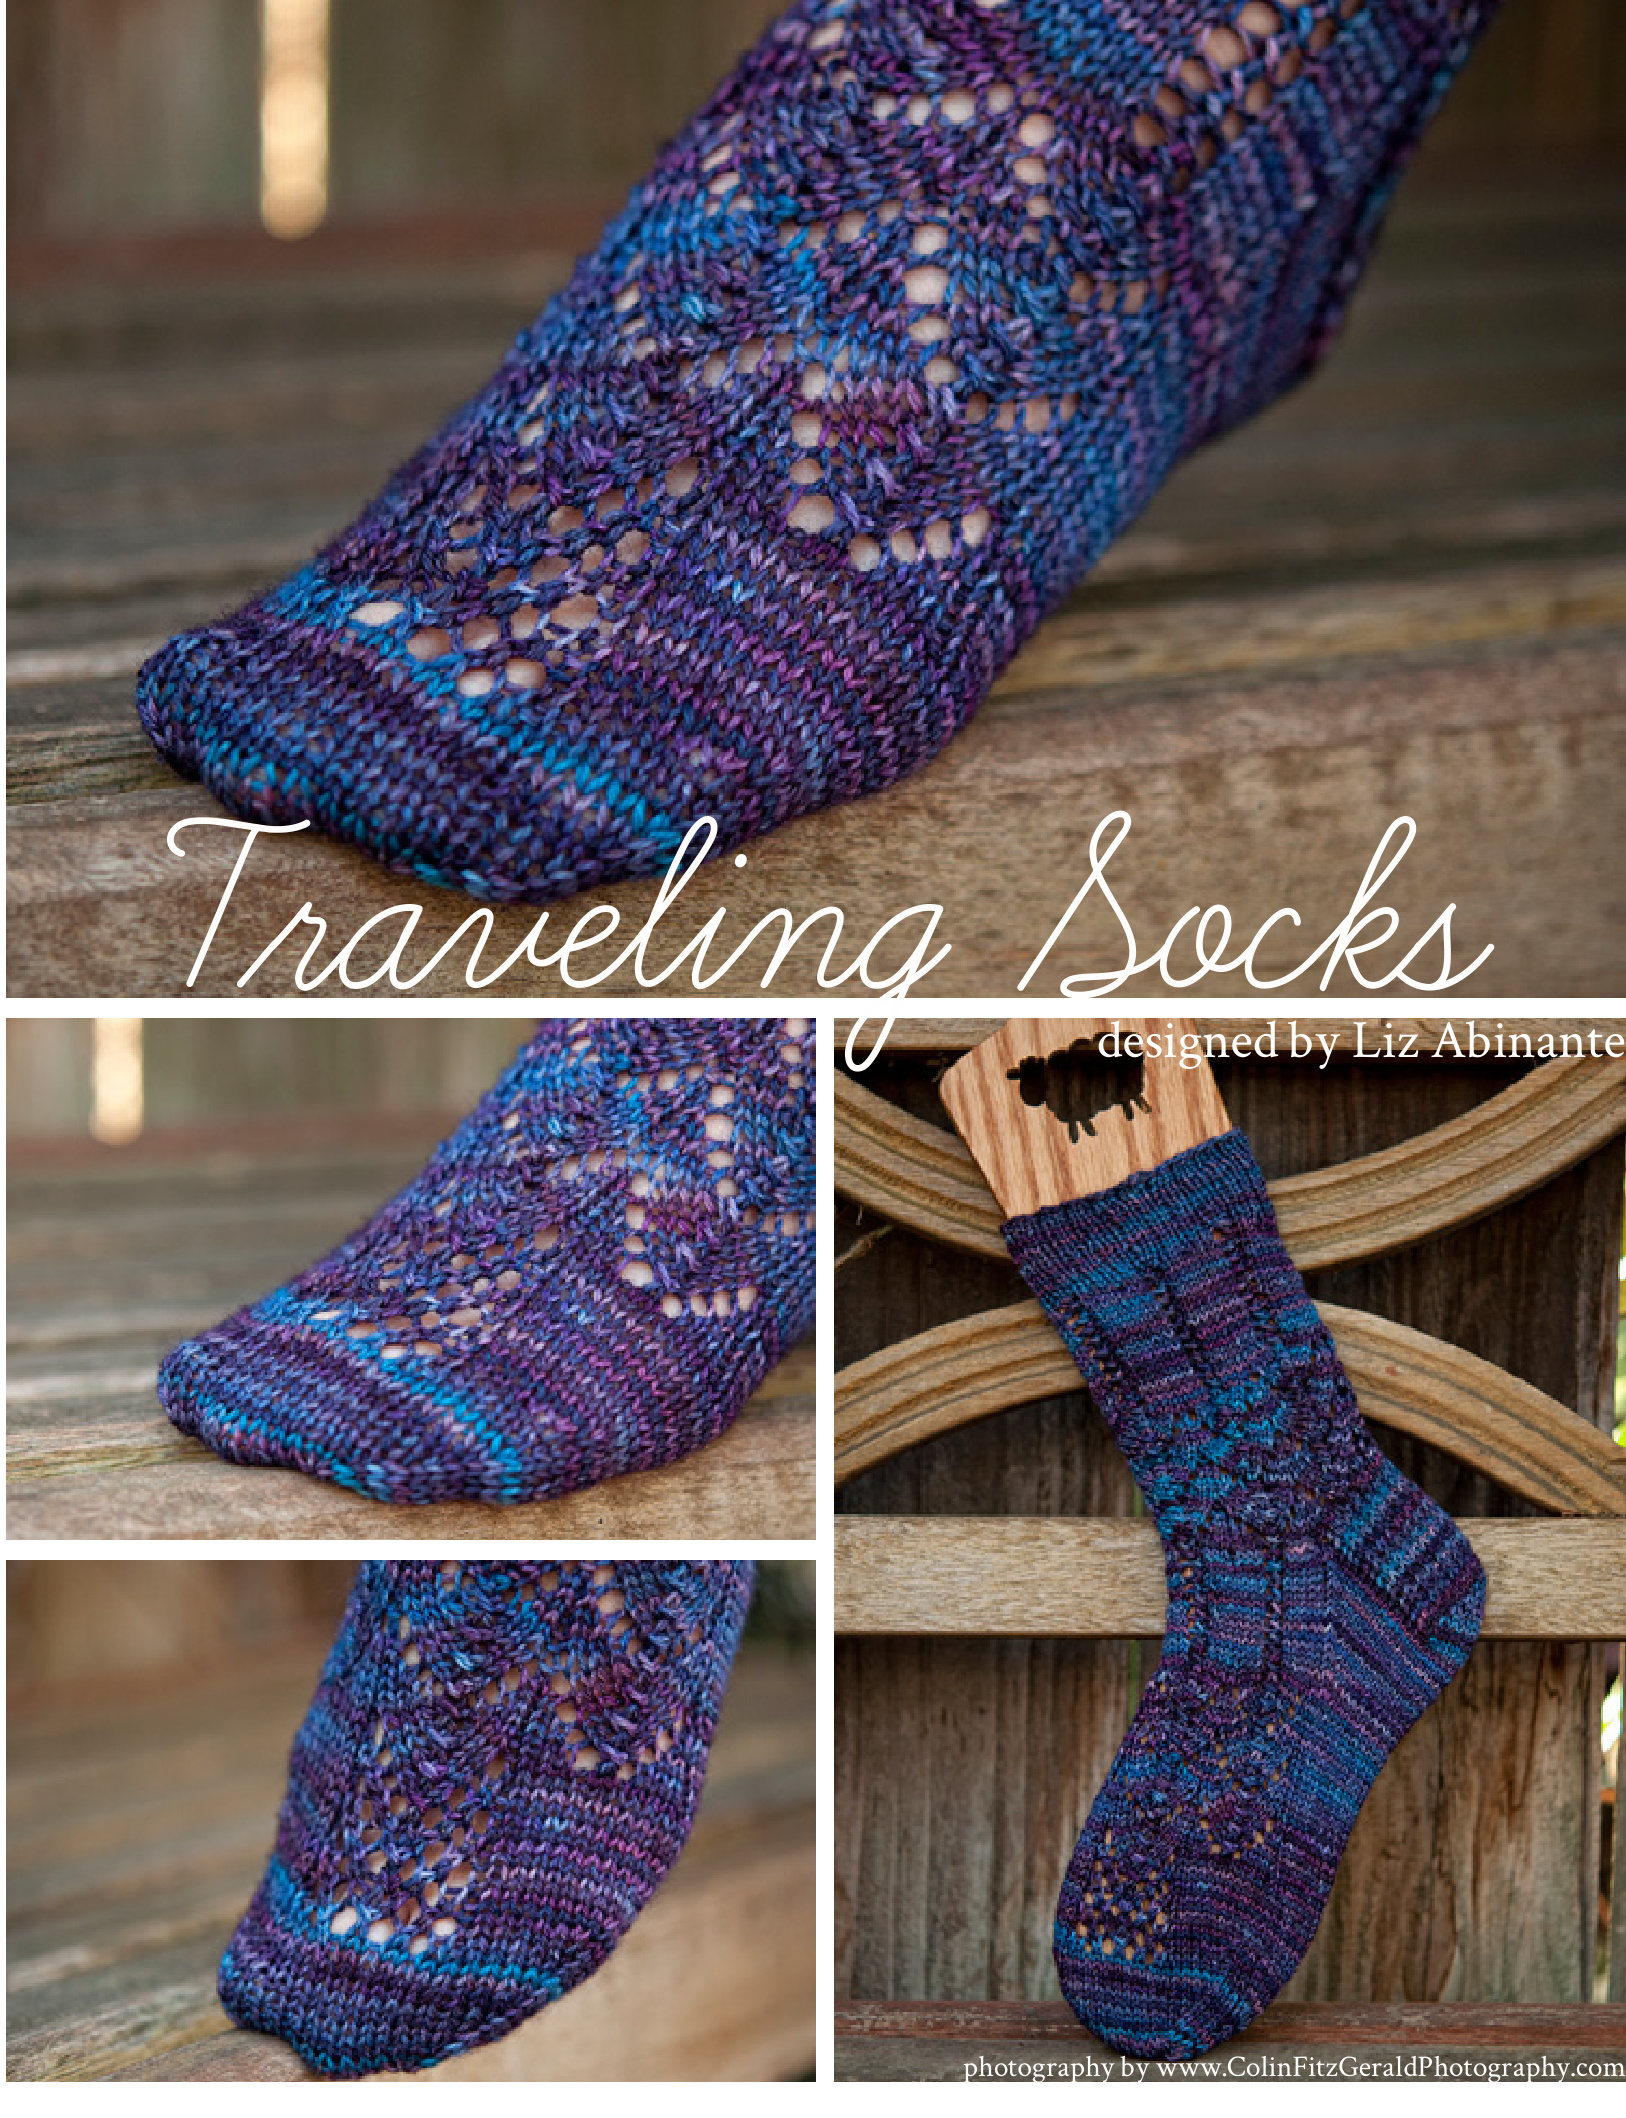
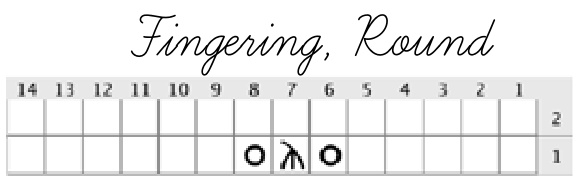
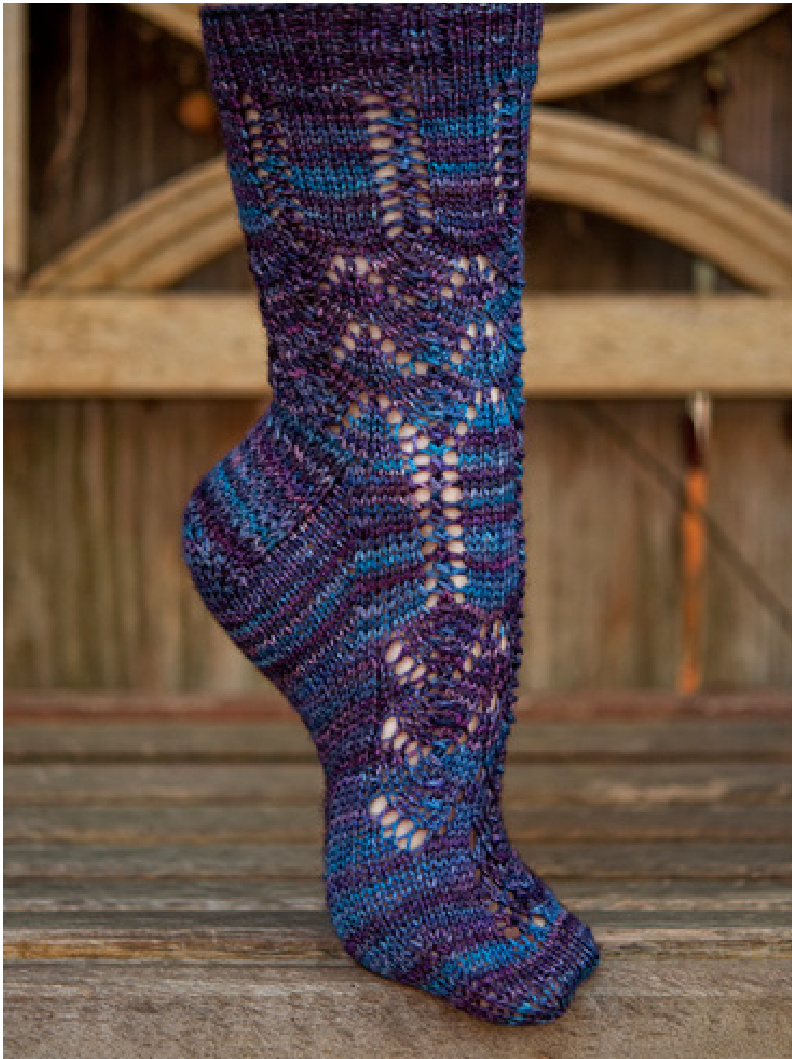
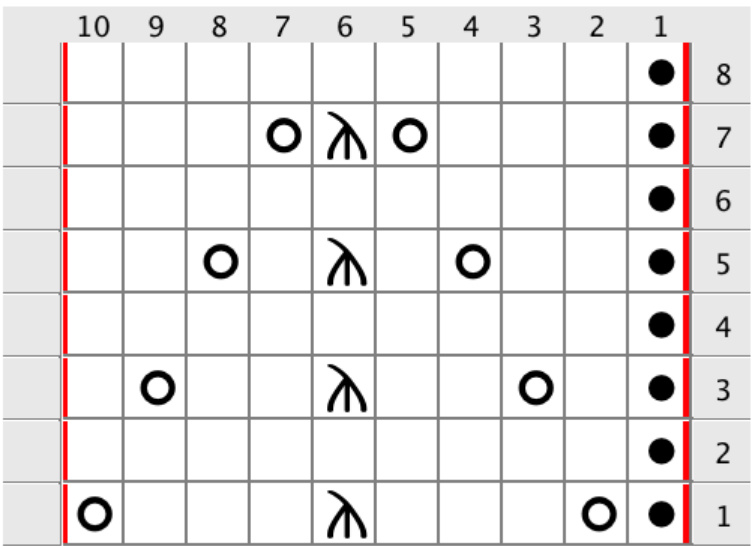
Traneling SOcks
To convert Traveling Woman into socks, I had to get a little creative. There's no defined edge to a sock other than the cuff, and you don't want a lacey cuff that can't keep your sock up. These socks can be knit myriad ways, so be sure to check out the section on customizing if you want something a little different. The lace pattern is extremely stretchy and very forgiving. If you're worried the sock will be too narrow, you will be pleasantly surprised. The stretchy nature of the stitch pattern was taken into account during the sizing process.
Fingering Weight Version
Small (US women's 7-7.5 shoe) Sample knit in Malabrigo Sock (100% superwash merino), shown in Abril. This is a light fingering weight yarn. If you use a standard fingering weight your sock may work up larger. Try going down a needlesize. Medium (US women's 8-8.5 shoe), 400 yards Large (US women's 9-10 shoe), \~475-500 yards Needle, all sizes US #1 1/2 (2.25mm) needle Gauge, after blocking Per 1 inch: 7.5 sts
Sport Weight Version
Small (US women's 7-7.5 shoe), 250 yards Medium (US women's 8-8.5 shoe), 300 yards Large (US women's 9-10 shoe), \~350 yards Needle, all sizes US #2 1/2 (3.0mm) needle
Instructions
This pattern is written for 2 circular needles (or Magic Loop). If you prefer using DPNs, you may want to use stitch markers as well. Instructions are written out individually: each page contains all of the information you need to knit the pattern.
designed by Liz Abinante
You will only need to print two pages for the size you choose to knit. Each eyelet repeat is knit over two rows, so you can easily adjust the length of the leg and foot if you're concerned about size. Yardages are approximations and may vary depending on the length of the leg. This pattern is designed to be knit from the cuff down, however there are instructions provided for toe up construction in the Customizing Your Traveling Socks section. Some sizes feature toe decreases in the edge chart. Be sure to read through your instructions thoroughly! If you are interested in further customizing your socks, see the Customizing Your Traveling Socks page at the end of this pattern.
lnstructions
| The Basics | s CO 60 sts. Join in the round and work in (p1, k2) ribbing until the cuff measures 1" from C |
| Leg | Work 10 rpts of the eyelet chart. Work 3 rpts of the main chart. |
| Heel Flap | The heel is knit across 30 sts on ndl2 only. |
| Row 1: [WS] sl1, p to end, turn work | |
| Row 2: [RS] sl1, k to end, turn work Work these two rows 14 times more (15 times total, adding up to 30 rows total). | |
| Heel Turn | Row 1: [RS] k16, ssk, k1, turn work |
| Row 2: [WS] sl1, p5, p2tog, p1, turn work Row 3: sl1, k to 1 st before the gap, ssk, k1, turn work | |
| Row 4: sl1, p to 1 st before the gap, p2tog, p1, turn work | |
| Continue in this manner until all sts have been worked, ending with a WS row. Proceed to | |
| Gusset | |
| see Foot for lace patt rpts (ndl2) K across heel sts. Pick up and k every sl stitch along the heel flap. | |
| (ndl1) K the foot sts in lace pattern as established, inc 1st at the end of the ndl. (31 sts nd | |
| Pick up and k every sl stitch along the other side of the heel. | |
| Rearrange your sts so that all of the picked up gusset stitches are on ndl2 (instep). | |
| Gusset Dec | see Foot for lace patt rpts |
| Row 1: [ndl2] k1, ssk, k to last 3 sts, k2tog, k1. [ndl1] in patt | |
| Row 2: K all gusset and heel sts, keeping the foot in patt. | |
| Stop decreasing after you have 30 sts for the instep (ndl2). | |
| Foot | Work lace on ndl1 onb. Work 10 rpts eyelet chart. Work 3 rpts main chart. |
| At the end of each row on the foot, you will have 1 extra un-charted st. | |
| When working eyelets, k the last st. When working main chart, p the last st. | |
| Next row: k10, pm, edge row 1, pm, k10. Repeat this row 10x total on ndl1 following the edge chart. You should be ready to begin | |
| row 11. Begin toe decreases. | |
| Toe Dec | |
| Row 1: [ndl2] k1, ssk, k to last 3sts, k2tog, k1. [ndl1] k1, ssk, k to m, edge row 11, k to last 3sts | |
| Row 2: [ndl2] k all sts. [ndl1] k to m, edge row 12, k to end. | |
| Row 3: [ndl2] as row 1. [ndl1] k1, ssk, k to m, edge row 13, k to last 3sts, k2tog, k1. | |
| Row 4: [ndl2] k all sts. [ndl1] k to m, edge row 14, k to end. | |
| Row 5: [ndl2] as row 1. [ndl1] k1, ssk, k to m, edge row 15, k to last 3sts, k2tog, k1. | |
| Row 6: k all sts (removing markers as you come to them) Row 7: [ndl2] k1, ssk, k to last 3 sts, k2tog, k1. [ndl1] k1, ssk, k to last 3sts, k2tog, k1. | |
| Row 8: k all sts | |
| Repeat rows 7-8 until 29 sts total remain (14 on ndl2, 15 on ndl1). | |
| Next row: [ndl2] k1, ssk, k to last 3 sts, k2tog, k1. [ndl1], k1, ssk, k to last 4 sts, k3tog, k1. (24 Liz Abinante 2009-2011www.feministy.com | |
| Graft toe together and weave in ends. | |

| 10 | 9 | 8 | 7 | 6 | 5 | 4 | 3 | 2 | 1 | ||
| 2 | |||||||||||
| o | o | 1 |
Row 1: k4, yo, slk2p, yo, k3. Row 2: k all sts
Main Chart
Row 1: p1, yo, k3, slk2p, k3, yo. Row 2 (and all even rows): p1, k9. Row 3: p1, k1, yo, k2, slk2p, k2, yo, k1. Row 5: p1, k2, yo, k1, slk2p, k1, yo, k2. Row 7: p1, k3, yo, slk2p, yo, k3. Row 8: as row 2. Row 1: p1, yo, k3, slk2p, k3, yo, p1. Row 2 (and all even rows): p1, k9, p1. Row 3: p1, k1, yo, k2, slk2p, k2, yo, k1, p1. Row 5: p1, yo, ssk, yo, k1, slk2p, k1, yo, k2tog, yo, p1. Row 7: p1, k1, yo, ssk, yo, slk2p, yo, k2tog, yo, k1, p1. Row 9: p1, (yo, sk)2x, k1, (k2tog, yo)2x, p1 Row 11: as row 7. Row 13: as row 5. Row 15: as row 7.
lnstructions
Basics CO 52 sts. Join in the round and work in (k2, p1) ribbing until the cuff measures 1" from CO. Leg Work 5 rpts of the eyelet chart. Work 3 rpts of the main chart.
Heel Flap
The heel is knit across 26 sts on ndl2 onhy. Row 1: [WS] sl1, p to end, turn work Row 2: [RS] sl1, k to end, turn work Work these two rows 12 times more (13 times total, adding up to 26 rows total).
Heel Turn
Row 1: [RS] k14, ssk, k1, turn work Row 2: [WS] sl1, p5, p2tog, p1, turn work Row 3: sl1, k to 1 st before the gap, ssk, k1, turn work Row 4: sl1, p to 1 st before the gap, p2tog, p1, turn work Continue in this manner until all sts have been worked, ending with a WS row. Proceed to gusset.
Gusset
see Foot for lace patt rpts (ndl2) K across heel sts. Pick up and k every sl stitch along the heel flap. (ndl1) K the foot sts in lace pattern as established. Pick up and k every sl stitch along the other side of the heel. Rearrange your sts so that all of the picked up gusset stitches are on ndl2 (instep).
Gusset Dec
see Foot for lace patt rpts Row 1: [ndl2] k1, ssk, k to last 3 sts, k2tog, k1. [ndl1] in patt Row 2: K all gusset and heel sts, keeping the foot in patt. Stop decreasing after you have 26 sts for the instep (ndl2).
Foot
Work lace on ndl1 onby. Work 5 rpts eyelet chart. Work 2 rpts main chart. Work 1 rpt edge chart.
Toe Dec
Row 1: [ndl2] k1, sk, k to last 3 sts, k2tog, k1. [ndl1] k1, ssk, k to last 3 sts, k2tog, k1. Row 2: [ndl2] k all sts. [ndl1] k all sts. Repeat rows 1-2 until 20 sts remain. Graft toe together and weave in ends.


Main Chart
Row 1: p1, yo, k4, slk2p, k4, yo, p1. Row 2 (and all even rows): p1, k11, p1. Row 3: p1, k1, yo, k3, slk2p, k3, yo, k1, p1. Row 5: p1, k2, yo, k2, slk2p, k2, yo, k2, p1. Row 7: p1, k3, yo, k1, slk2p, k1, yo, k3, p1. Row 9: p1, k4, yo, slk2p, yo, k4, p1. Row 10: as row 2. Row 1: p1, yo, k4, slk2p, k4, yo, p1. Row 2 (and all even rows): p1, k11, p1. Row 3: p1, k1, yo, k3, slk2p, k3, yo, k1, p1. Row 5: p1, k2, yo, k2, slk2p, k2, yo, k2, p1. Row 7: p1, k1, yo, ssk, yo, k1, slk2p, k1, yo, k2tog, yo, k1, p1. Row 9: p1, (yo, ssk) 2x, yo, slk2p, (yo, k2tog) 2x, yo, p1. Row 11: p1, k1, (yo, ssk) 2x, k1, (k2tog, yo) k1, p1. Row 13: as row 9. Row 15: as row 7. Row 17: p1, k2, yo, ssk, yo, slk2p, yo, k2tog, yo, k2, p1.
lnstructions
e Basics CO 66 sts. Join in the round and work in (p1, k2) ribbing until the cuff measures 1" from CO. Leg Work 10 rpts of the eyelet chart. Work 3 rpts of the main chart.
Heel Flap
The heel is knit across 33 sts on ndl2 onhy. Row 1: [WS] sl1, p to end, turn work Row 2: [RS] sl1, k to end, turn work Work these two rows 14 times more (15 times total, adding up to 30 rows total).
Heel Turn
Row 1: [RS] k17, ssk, k1, turn work Row 2: [WS] sl1, p5, p2tog, p1, turn work Row 3: sl1, k to 1 st before the gap, ssk, k1, turn work Row 4: sl1, p to 1 st before the gap, p2tog, p1, turn work Continue in this manner until all sts have been worked, ending with a WS row. Proceed to gusset.
Gusset
seeFoot for lace pattrpts (ndl2) K across heel sts. Pick up and k every sl stitch along the heel flap. (ndl1) K the foot sts in lace pattern as established. Pick up and k every sl stitch along the other side of the heel. Rearrange your sts so that all of the picked up gusset stitches are on ndl2 (instep)
Gusset Dec
see Foot for lace patt rpts Row 1: [ndl2] k1, ssk, k to last 3 sts, k2tog, k1. [ndl1] in patt Row 2: K all gusset and heel sts, keeping the foot in patt. Stop decreasing after you have 30 sts for the instep (ndl2).
Foot
Work lace on ndl1 onhy. Work 10 rpts eyelet chart. Work 3 rpts main chart. Next row: k11, pm, edge row 1, pm, k11. Repeat this row 10x total on ndl1, slipping markers as you come to them. You should be ready to begin edge chart row 11. Begin toe decreases.
Toe Dec
Row 1:[ndl2] k1, ssk, kto last 3sts, k2tog, k1. [ndl1] k1, sk, kto m, edge row 11, k to last 3sts, k2tog, k1. Row 2: [ndl2] k all sts. [ndl1] k to m, edge row 12, k to end. Row 3: [ndl2] as row 1. [ndl1] k1, ssk, k to m, edge row 13, k to last 3sts, k2tog, k1. Row 4: [ndl2] k all sts. [ndl1] k to m, edge row 14, k to end. Row 5: [ndl2] as row 1. [ndl1] k1, ssk, k to m, edge row 15, k to last 3sts, k2tog, k1. Row 6: k all sts (removing markers on ndl1 as you come to them) Row 7:[ndl2] k1, sk, k to last 3 sts, k2tog, k1. [ndl1] k1, sk, k to last 3sts, k2tog, k1. Row 8: k all sts Repeat rows 7-8 until 26 sts total remain (13 on ndl2, 13 on ndl1). Graft toe together and weave in ends.

| 11 | 10 | 9 | 8 | 7 | 6 | 5 | 4 | 3 | 2 | 1 | ||
| 2 | ||||||||||||
| 0 | 0 | 1 |

Row 1: k4, yo, slk2p, yo, k4. Row 2: k all sts
Main Chart
Row 1: p1, yo, k3, slk2p, k3, yo, p1. Row 2 (and all even rows): p1, k9, p1. Row 3: p1, k1, yo, k2, slk2p, k2, yo, k1, p1. Row 5: p1, k2, yo, k1, slk2p, k1, yo, k2, p1. Row 7: p1, k3, yo, slk2p, yo, k3, p1. Row 8: as row 2. Row 1: p1, yo, k3, slk2p, k3, yo, p1. Row 2 (and all even rows): p1, k9, p1. Row 3: p1, k1, yo, k2, slk2p, k2, yo, k1, p1. Row 5: p1, yo, ssk, yo, k1, slk2p, k1, yo, k2tog, yo, p1. Row 7: p1, k1, yo, ssk, yo, slk2p, yo, k2tog, yo, k1, p1. Row 9: p1, (yo, ssk)2x, k1, (k2tog, yo)2x, p1 Row 11: as row 7. Row 13: as row 5. Row 15: as row 7.
lnstructions
: Basics CO 56 sts. Join in the round and work in (p2, k2) ribbing until the cuff measures 1" from CO. Leg Work 10 rpts of the eyelet chart. Work 3 rpts of the main chart.
Heel Flap
The heel is knit across 28 sts on ndl2 onhy. Row 1: [WS] sl1, p to end, turn work Row 2: [RS] sl1, k to end, turn work Work these two rows 14 times more (15 times total, adding up to 30 rows total)
Heel Turn
Row 1: [RS] k15, ssk, k1, turn work Row 2: [WS] sl1, p5, p2tog, p1, turn work Row 3: sl1, k to 1 st before the gap, ssk, k1, turn work Row 4: sl1, p to 1 st before the gap, p2tog, p1,turn work Continue in this manner until all sts have been worked, ending with a WS row. Proceed to gusset.
Gusset
seeFootfor lacepatt rpts (ndl2) K across heel sts. Pick up and k every sl stitch along the heel flap. (ndl1) K the foot sts in lace pattern as established, inc 1 st at the end of the ndl. (29 sts ndl1) Pick up and k every sl stitch along the other side of the heel. Rearrange your sts so that all of the picked up gusset stitches are on ndl2 (instep).
Gusset Dec
see Foot for lace patt rpts Row 1: [ndl2] k1, ssk, k to last 3 sts, k2tog, k1. [ndl1]in patt Row 2: K all gusset and heel sts, keeping the foot in patt. Stop decreasing after you have 28 sts for the instep (ndl2).
Foot
Work lace on ndl1 ony. Work 10 rpts eyelet chart. Work 2 rpts main chart. Work 1 rpt edge char At the end of each row on the foot, you will have 1 extra st that is not charted. When working eyelets, k the last st. When working main chart, p the last st. When working edge chart, this stitch is charted.
Toe Dec
Row 1: [ndl2] k1, ssk, k to last 3sts, k2tog, k1. [ndl1] k1, ssk, k to last 3sts, k2tog, k1. Row 2: [ndl2] k all sts. [ndl1] k all sts. Repeat rows 1-2 until 25 sts total remain (12 on ndl2, 13 on ndl1). Next row: [nd12] k1,ssk, k to last 3 sts, k2tog, k1.[nd1], k1, sk, k to last 4 sts, k3tog, k1. (20 sts total) Graft toe together and weave in ends.
| 1413121110 | 8 | 7 | 6 | 4 | 3 | 2 | 1 | Eyelet | Chart | |||||||
| 2 | Row 1: k6, yo, slk2p, yo, k5. | |||||||||||||||
| 0 | y 0 | 1 | Row2:kallsts |
Row 1: p1, yo, k5, slk2p, k5, yo. Row 2 (and all even rows): p1, k13, p1. Row 3: p1, k1, yo, k4, slk2p, k4, yo, k1. Row 5: p1, k2, yo, k3, slk2p, k3, yo, k2. Row 7: p1, k3, yo, k2, slk2p, k2, yo, k3. Row 9: p1, k4, yo, k1, slk2p, k1, yo, k4. Row 11: p1, k5, yo, slk2p, yo, k5. Row 12: as row 2. Row 1: p1, yo, k5, slk2p, k5, yo, p1. Row 2 (and all even rows): p1, k13, p1. Row 3: p1, k1, yo, k4, slk2p, k4, yo, k1, p1. Row 5: p1, k2, yo, k3, slk2p, k3, yo, k2, p1. Row 7: p1, k1, yo, ssk, yo, k2, slk2p, k2, yo, k2tog, yo, k1, p1. Row 9: p1, (yo, ssk) 2x, yo, k1, slk2p, k1, (yo, k2tog) 2x, yo, p1. Row 11: p1, k1, (yo, ssk) 2x, yo, slk2p, (yo, k2tog) 2x, yo, k1, p1. Row 13: p1, (yo, ssk) 3x, k1, (k2tog, yo) 3x, p1. Row 15: as row 11. Row 17: p1, k2, yo, ssk, yo, k1, slk2p, k1, yo, k2tog, yo, k2, p1. Row 19: p1, k3, yo, ssk, yo, slk2p, yo, k2tog, yo, k3, p1.
lnstruuctions
| The Basics | CO 72 sts. Join in the round and work in (p1, k2) ribbing until the cuff measures 1" from |
| Leg | Work 15 rpts of the eyelet chart. Work 3 rpts of the main chart. |
| Heel Flap | The heel is knit across 36 sts on ndl2 only. |
| Row 1: [WS] sl1, p to end, turn work | |
| Row 2: [RS] sl1, k to end, turn work | |
| Work these two rows 16 times more (17 times total, adding up to 34 rows total). | |
| Heel Turn | Row 1: [RS] k19, ssk, k1, turn work |
| Row 2: [WS] sl1, p5, p2tog, p1, turn work | |
| Row 3: sl1, k to 1 st before the gap, ssk, k1, turn work | |
| Row 4: sl1, p to 1 st before the gap, p2tog, p1, turn work | |
| Continue in this manner until all sts have been worked, ending with a WS row. Proceed | |
| Gusset | see Foot for lace patt rpts |
| (ndl2) K across heel sts. Pick up and k every sl stitch along the heel flap. | |
| (ndl1) K the foot sts in lace pattern as established, inc 1 st at the end of the ndl. (37 sts n | |
| Pick up and k every sl stitch along the other side of the heel. | |
| Rearrange your sts so that all of the picked up gusset stitches are on ndl2 (instep). | |
| Gusset Dec | see Foot for lace patt rpts |
| Row 1: [ndl2] k1, ssk, k to last 3 sts, k2tog, k1. [ndl1] in patt | |
| Row 2: K all gusset and heel sts, keeping the foot in patt. | |
| Stop decreasing after you have 28 sts for the instep (ndl2). | |
| Foot | |
| Work lace on ndl1 onh. Work 15 rpts eyelet chart. Work 3 rpts edge chart. At the end of each row on the foot, you will have 1 extra st that is not charted. | |
| When working eyelets, k the last st. When working main chart, p the last st. | |
| Next row: k12, pm, edge row 1, pm, k12. | |
| Repeat this row 10x total on ndl1 following the edge chart. You should be ready to begin chart row 11. Begin toe decreases. | |
| Toe Dec | |
| Row 1: [ndl2] k1, ssk, k to last 3sts, k2tog, k1. [ndl1] k1, ssk, k to m, edge row 11, k to last 3s | |
| Row 2: [ndl2] k all sts. [ndl1] k to m, edge row 12, k to end. | |
| Row 3: [ndl2] as row 1. [ndl1] k1, ssk, k to m, edge row 13, k to last 3sts, k2tog, k1. | |
| Row 4: [ndl2] k all sts. [ndl1] k to m, edge row 14, k to end. | |
| Row 5: [ndl2] as row 1. [ndl1] k1, ssk, k to m, edge row 15, k to last 3sts, k2tog, k1. | |
| Row 6: k all sts | |
| Row 7: [ndl2] as row 1. [ndl1] k1, ssk, k to m, edge row 17, k to last 3sts, k2tog, k1. | |
| Row 8: k all sts (removing markers on ndl1 as you come to them) | |
| Row 9: [ndl2] k1, ssk, k to last 3sts, k2tog, k1. [ndl1] k1, ssk, k to last 3sts, k2tog, k1. | |
| Next row: k all sts | Repeat rows 8-9 until 29 sts total remain (14 on ndl2, 15 on ndl1). |
| Next row: [ndl2] k1, ssk, k to last 3 sts, k2tog, k1. [ndl1], k1, ssk, k to last 4 sts, k3tog, k1. (2 Graft toe together and weave in ends. Liz Abinante 2009-2011www.feministy.com |

geletChart Row 1: k5, yo, slk2p, yo, k4. Row 2: k all sts Main Chart Row 1: p1, yo, k4, slk2p, k4, yo. Row 2 (and all even rows): p1, k11. Row 3: p1, k1, yo, k3, slk2p, k3, yo, k1. Row 5: p1, k2, yo, k2, slk2p, k2, yo, k2. Row 7: p1, k3, yo, k1, slk2p, k1, yo, k3. Row 9: p1, k4, yo, slk2p, yo, k4. Row 10: as row 2.
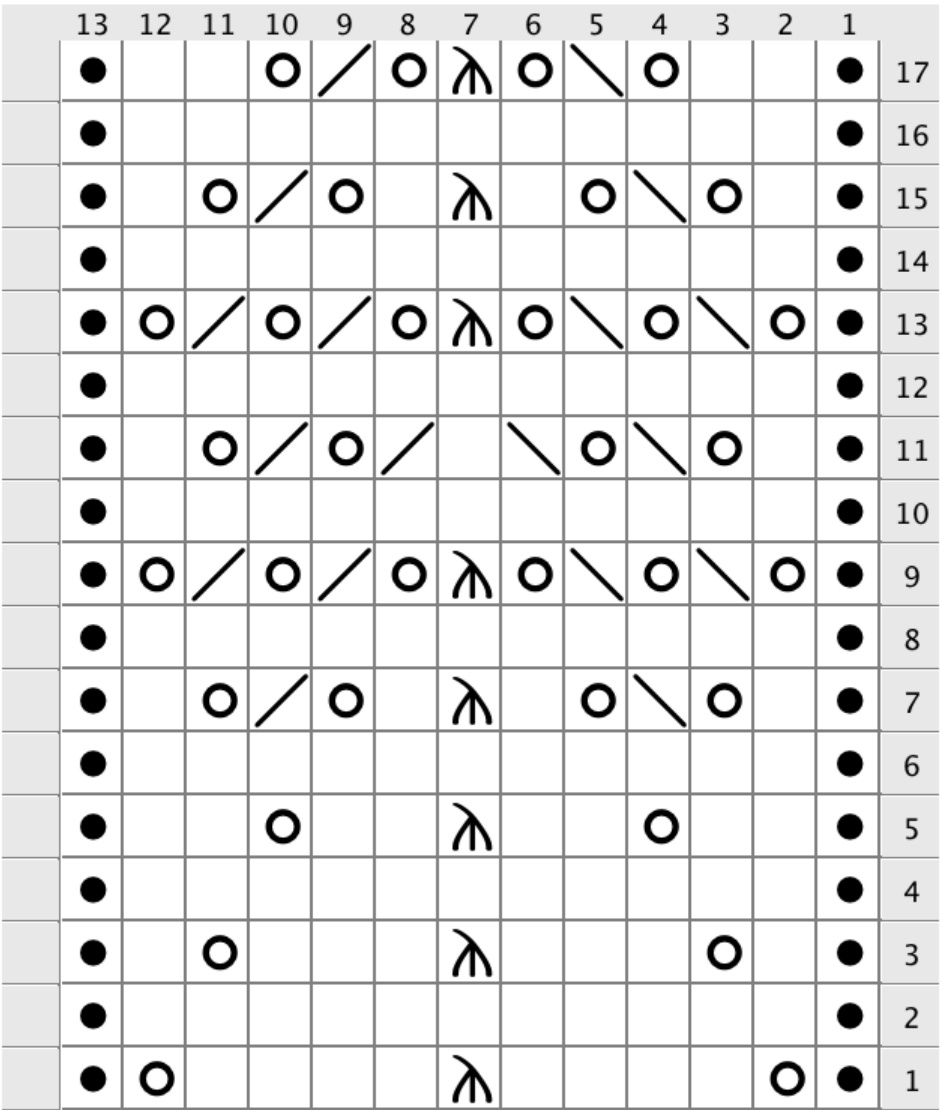
Row 1: p1, yo, k4, slk2p, k4, yo, p1. Row 2 (and all even rows): p1, k11, p1. Row 3: p1, k1, yo, k3, slk2p, k3, yo, k1, p1. Row 5: p1, k2, yo, k2, slk2p, k2, yo, k2, p1. Row 7: p1, k1, yo, ssk, yo, k1, slk2p, k1, yo, k2tog, yo, k1, p1. Row 9: p1,(yo, ssk) 2x, yo, slk2p, (yo, k2tog) 2x, yo, p1. Row 11: p1, k1, (yo, ssk) 2x, k1, (k2tog, yo) k1, p1. Row 13: as row 9. Row 15: as row 7. Row 17: p1, k2, yo, ssk, yo, slk2p, yo, k2tog, yo, k2, p1.
| size larg Instruuctions weight sp | |
| The Basics | CO 60 sts. Join in the round and work in (p1, k2) ribbing until the cuff measures 1" from C |
| Leg | Work 10 rpts of the eyelet chart. Work 3 rpts of the main chart. |
| Heel Flap | |
| The heel is knit across 30 sts on ndl2 onhy. Row 1: [WS] sl1, p to end, turn work | |
| Row 2: [RS] sl1, k to end, turn work | |
| Work these two rows 14 times more (15 times total, adding up to 30 rows total). | |
| Heel Turn | Row 1: [RS] k16, ssk, k1, turn work |
| Row 2: [WS] sl1, p5, p2tog, p1, turn work Row 3: sl1, k to 1 st before the gap, ssk, k1, turn work | |
| Row 4: sl1, p to 1 st before the gap, p2tog, p1, turn work | |
| Continue in this manner until all sts have been worked, ending with a WS row. Proceed to | |
| Gusset | seeFootforlacepattrpts |
| s | |
| (ndl1) K the foot sts in lace pattern as established, inc 1 st at the end of the ndl. (31 sts ndl | |
| Pick up and k every sl stitch along the other side of the heel. | |
| Gusset Dec | Rearrange your sts so that all of the picked up gusset stitches are on ndl2 (instep). |
| see Foot for lace patt rpts | |
| Row 1: [ndl2] k1, ssk, k to last 3 sts, k2tog, k1. [ndl1] in patt Row 2: K all gusset and heel sts, keeping the foot in patt. | |
| Stop decreasing after you have 30 sts for the instep (ndl2). | |
| Foot | |
| Work lace on ndl1 onh. Work 10 rpts eyelet chart. Work 3 rpts main chart. At the end of each row on the foot, you will have 1 extra st that is not charted. | |
| When working eyelets, k the last st. When working main chart, p the last st. | |
| Next row: k10, pm, edge row 1, pm, k10. | |
| Toe Dec | Repeat this row 10x total on ndl1 following the edge chart. You should be ready to begin e |
| row 11. Begin toe decreases. | |
| Row 1: [ndl2] k1, ssk, k to last 3sts, k2tog, k1. [ndl1] k1, ssk, k to m, edge row 11, k to last 3sts Row 2: [ndl2] k all sts. [ndl1] k to m, edge row 12, k to end. | |
| Row 3: [ndl2] as row 1. [ndl1] k1, ssk, k to m, edge row 13, k to last 3sts, k2tog, k1. | |
| Row 4: [ndl2] k all sts. [ndl1] k to m, edge row 14, k to end. | |
| Row 5: [ndl2] as row 1. [ndl1] k1, ssk, k to m, edge row 15, k to last 3sts, k2tog, k1. | |
| Row 6: k all sts (removing markers as you come to them) | |
| Row 7: [ndl2] k1, ssk, k to last 3 sts, k2tog, k1. [ndl1] k1, ssk, k to last 3sts, k2tog, k1. | |
| Row 8: k all sts | |
| Repeat rows 7-8 until 29 sts total remain (14 on ndl2, 15 on ndl1). | |
| Graft toe together and weave in ends. | Next row: [ndl2] k1, ssk, k to last 3 sts, k2tog, k1. [ndl1], k1, ssk, k to last 4 sts, k3tog, k1. (24 |

| 10 | 9 | 8 | 7 | 6 | 5 | 4 | 3 | 2 | 1 | ||
| 2 | |||||||||||
| o | o | 1 |
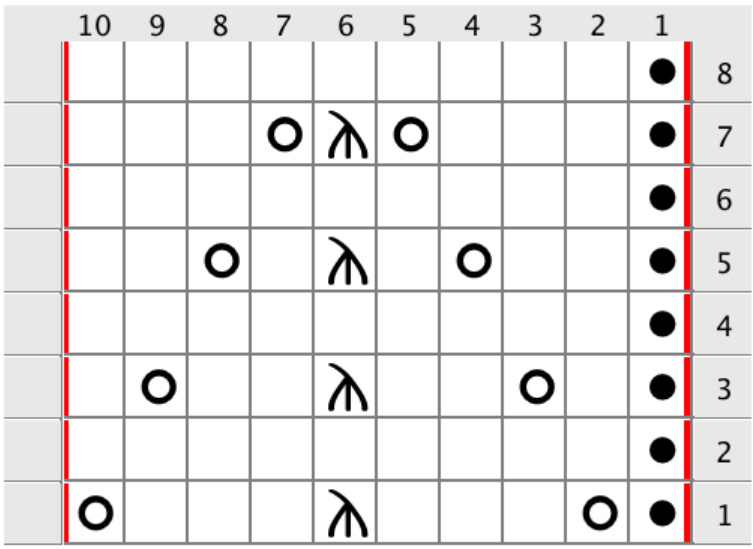

Main Chart Row 1: k4, yo, slk2p, yo, k3. Row 2: k all sts
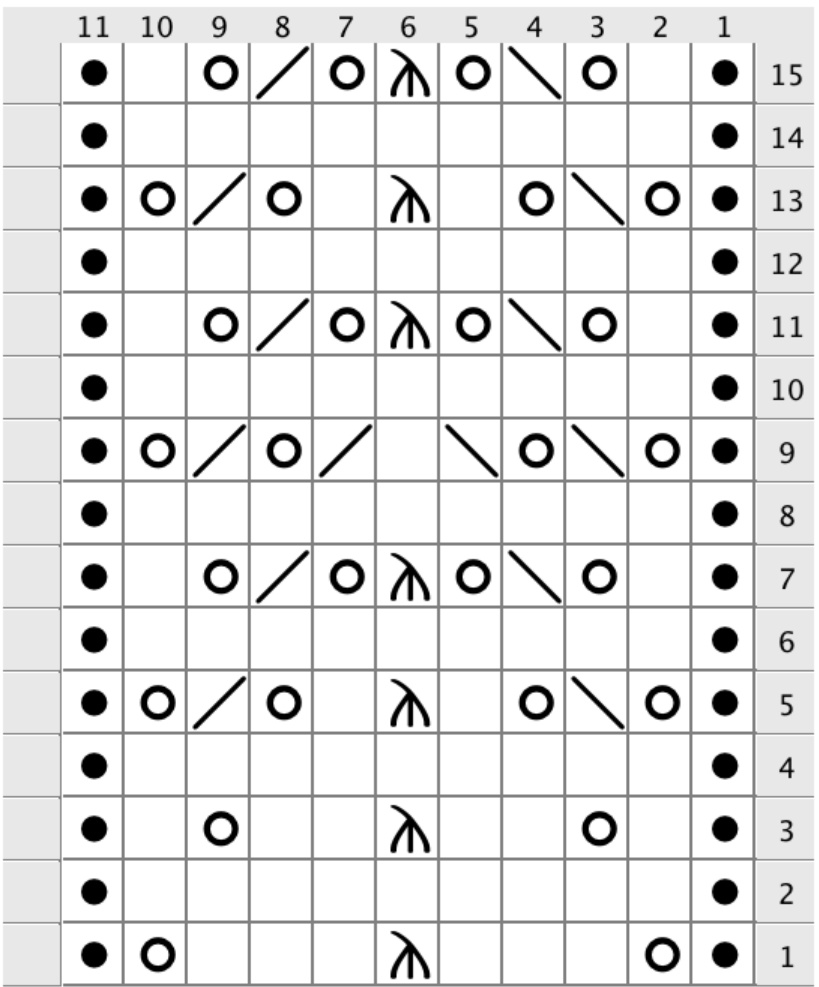
Row 1: p1, yo, k3, slk2p, k3, yo. Row 2 (and all even rows): p1, k9. Row 3: p1, k1, yo, k2, slk2p, k2, yo, k1. Row 5: p1, k2, yo, k1, slk2p, k1, yo, k2. Row 7: p1, k3, yo, slk2p, yo, k3. Row 8: as row 2. Row 1: p1, yo, k3, slk2p, k3, yo, p1. Row 2 (and all even rows): p1, k9, p1. Row 3: p1, k1, yo, k2, slk2p, k2, yo, k1, p1. Row 5: p1, yo, ssk, yo, k1, slk2p, k1, yo, k2tog, yo, p1. Row 7: p1, k1, yo, ssk, yo, slk2p, yo, k2tog, yo, k1, p1. Row 9: p1,(yo, sk)2x, k1, (k2tog, yo)2x, p1 Row 11: as row 7. Row 13: as row 5. Row 15: as row 7.
Customiging Your Traneling Socks
Lace Patterns
Toe Up
I have combined the lace charts according to size, but you can rearrange them based on your preference. The pattern is very stretchy: the combination of the lace decreases and stockinette stitch make it easy to work and comfortable to wear. Happily, this pattern can be knit using any combination of the lace charts (within your selected size, of course). I have provided instructions that alternate the eyelet and main stitch patterns, ending with an abbreviated edge chart on the toe section of the foot. You can adjust the order however you choose.
Star Toe
A star toe is well suited for this pattern. Instead of a wedge toe, a star toe places 4 decreases in a visible spiral. Begin working the star toe after you finish the edge chart. These instructions are written for 2 circular needles or magic loop and require 2 markers.\* To work a star toe: A.) Divide the number of stitches by 4: B.) Subtract 2 from that number: .(x) \*If you're using 5 DPNs, arrange your stitches evenl and do not use markers. Work as follows, starting with the beginning of a needle: Row 1: [k x sts, k2tog, pm, k x sts, k2tog] 2x Row 2: k all sts Row 3: [k to 2 sts before m, k2tog, k to 2 sts before end of ndl, k2tog] 2x Repeat rows 2-3 until 8 sts remain. [k2tog]4x and cut yarn, pull through the remaining sts and cinch toe. For the fingering weight medium, you'll have to work two k3togs (one on each needle) as follows: Row 1: [k14, pm, k3tog, k14, k2tog] 2x Row 2: k all sts Row 3: [k to m, k2tog, k to 2 sts before end of ndl, k2tog] Repeat rows 2-3 until 8 sts remain. [k2tog]4x and cut yarn, cinching the toe together. You can knit these toe up as well. You will need to flip the charts to do this. It's fairly easy: instead of beginning with row 1, begin with the last row of each chart. If you are working a pattern that incorporates toe decreases into the edge chart, you'll need to begin the edge chart while working the increases for your toe. Because of this, you probably shouldn't do a short row heel. My preferred method is to use Judy's Magic Cast On and either do decorative increases (yarn overs) or kfb.
YarnUeights
fhave written 6 different sizes into this pattern for fingering and sport weight yarns, but there's no reason you couldn't adjust them further to use worsted weight. The pattern knits up extremely quickly, and a pair of worsted weight Traveling Socks would make a very comfortable and warm gift for anyone worthy. abbreviations k: knit p: purl sl: slip tbl: through the back loop kfb: knit through the front and back loop psso: pass the slipped stitch over k2tog: knit two together k3tog: knit three together ssk: slip, slip, knit two slipped stitches together p2tog: purl two together slk2p: sl1, k2tog, psso CO: cast on BO: bind off st: stitch sts: stitches rem: remain(ing) rpt: repeat rpts: repeats ndl: needle yo: yarn over RS: right side WS: wrong side

knit RS:knit stitch WS: purl stitch yo RS: Yarn Over WS: Yarn Over No Stitch RS: Placeholder - No stitch made.

sl1 k2tog pss0 RS: slip 1, k2tog, pass slip stitch over k2tog

purl RS: purl stitch WS: knit stitch

k2tog RS: Knit two stitches together as one stitch ssk RS: Slip one stitch as if to knit, Slip another stitch as if to knit. Insert left-hand needle into front of these 2 stitches and knit them together kfb RS: Knit into the front and back of the stitch


I cannot possibly thank everyone who helped me with this pattern, but I'll do my best to try. Didi of Little Red Bicycle for her gorgeous yarns, tech editing, and all around amazingness. cial thanks to Jana for being my sample guru even when my head was falling off Georgia of Fiberphile Yarns for sending me some of her beautiful worsted weight. Colin of colinfitzgeraldphotography.com for patiently taking and editing hundreds of photos, and for making me tea while I knitted endless versions of this pattern. To the folks at Ravelry for introducing me to designing and for the wonderful community members who encouraged me to re-release Traveling Woman. And, most importantly, to my mom for raising me to think that knitting was inferior to crocheting. I keep designing in the hopes that Ill prove her wrong someday.

Liz Abinante is the author of numerous popular patterns, including Traveling Woman and Saroyan. She is best known for creating unique patterns for a wide range of skill levels that include options for easy customization and sizing. Her favorite things to knit are shawls and scarves. She loves to teach, read, write, and bake bread (and somehow manages to take obsessive notes for all three). In an attempt to prove she has ambitions that actually include her college education, she studies for her second Master's degree in Literature when she's not knitting. She knits (and lives) in scenic northern California and blogs at feministy.com. e direct all love letters, questions, and support inquiries to liz.abinante@gmail.co The entire Contents of this pattern and the knitted design to which it refers are subject to copyright. By purchasing this pattern you have the right to print and use this pattern only for your personal non-commercial use. Without the permission of Liz Abinante you may not distribute or sell copies of this pattern. You may not sell any items produced using the directions in this pattern without purchasing a Sellers License. You may not teach a class using this pattern without purchasing a Course Instruction License.

She realby likes to make funny faces when having her picture taken.

All photos are property of Colin FitzGerald and Liz Abinante and may not be republished under any circumstances.


