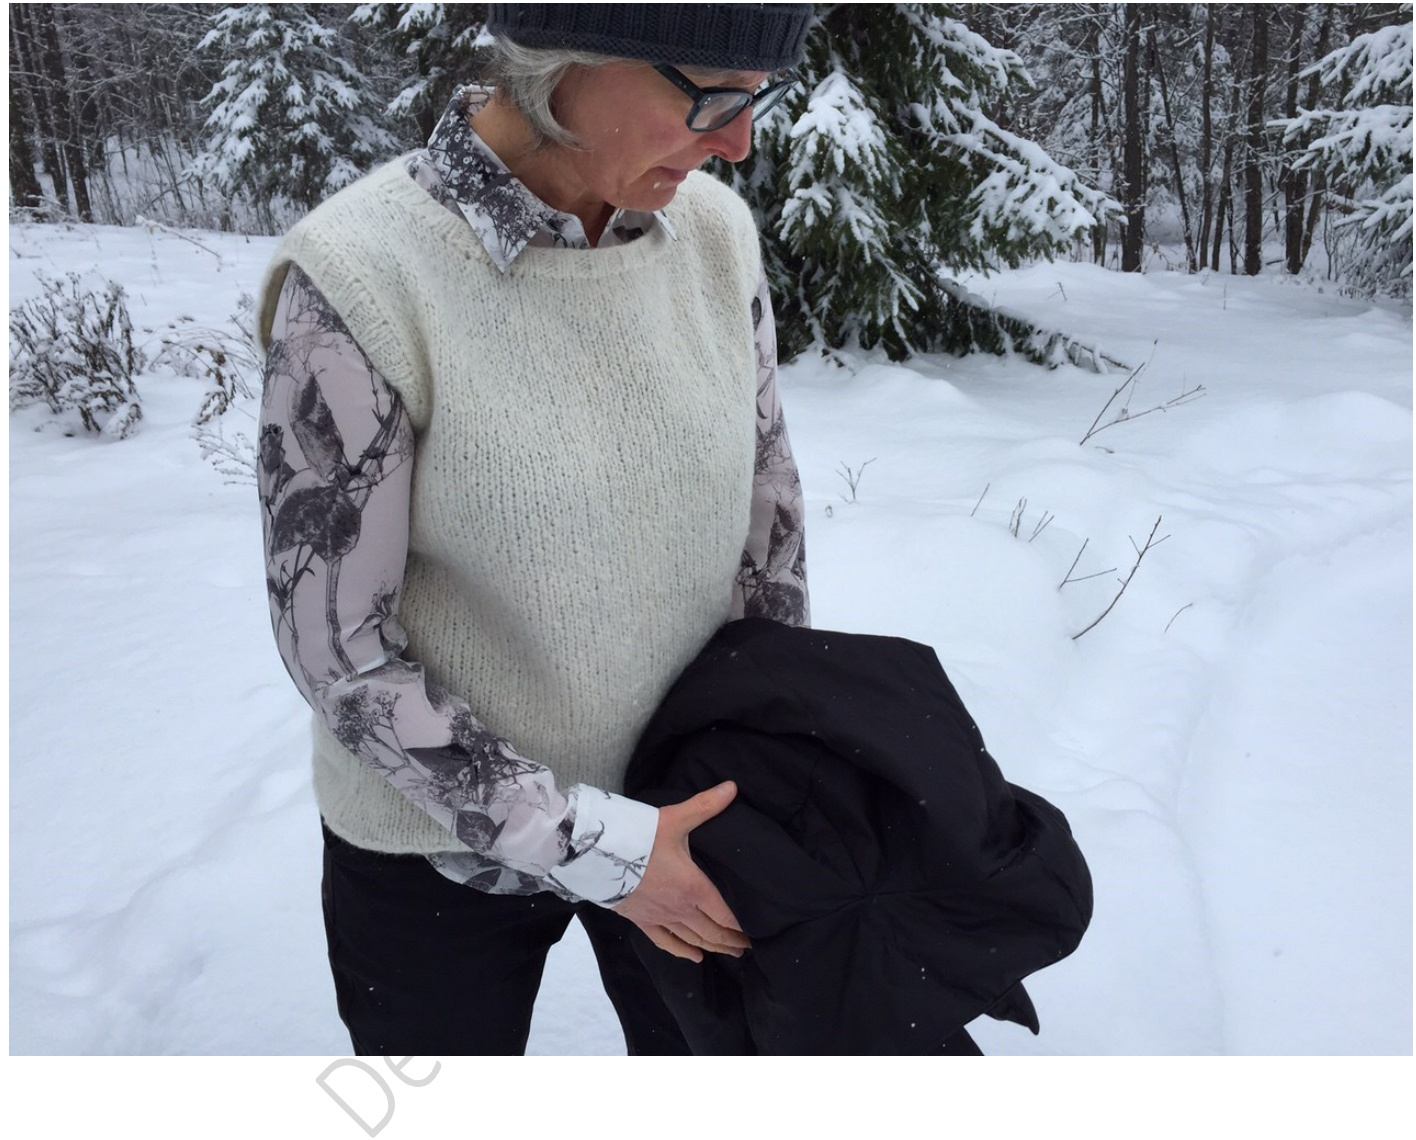
BRUSH FLEECE VEST
By Carla Wolff This is a quick little knit when you are searching for a little warmth. I designed this piece to go traveling with me. This vest offers just enough warmth as a quick layer over something simple and small enough to fit under a coat. I was so pleased with the results I promptly knit three versions of it. ...let's go for a walk.
Design Details:
Rowan's brushed fleece makes another appearance in a pattern that is quick to knit and very functional as a garment. Alpaca offers a soft fibre with lots of loft . Adding more knitting details to this piece is simple and adds variety to your knitting. Add a slimming intarsia stripe right up the middle, or some Kid Silk haze to make it extra fluffy and subtle colour mix. Knit a few more rows if you are taller so the length suits your style.
Sizes
Small/medium (medium/large)
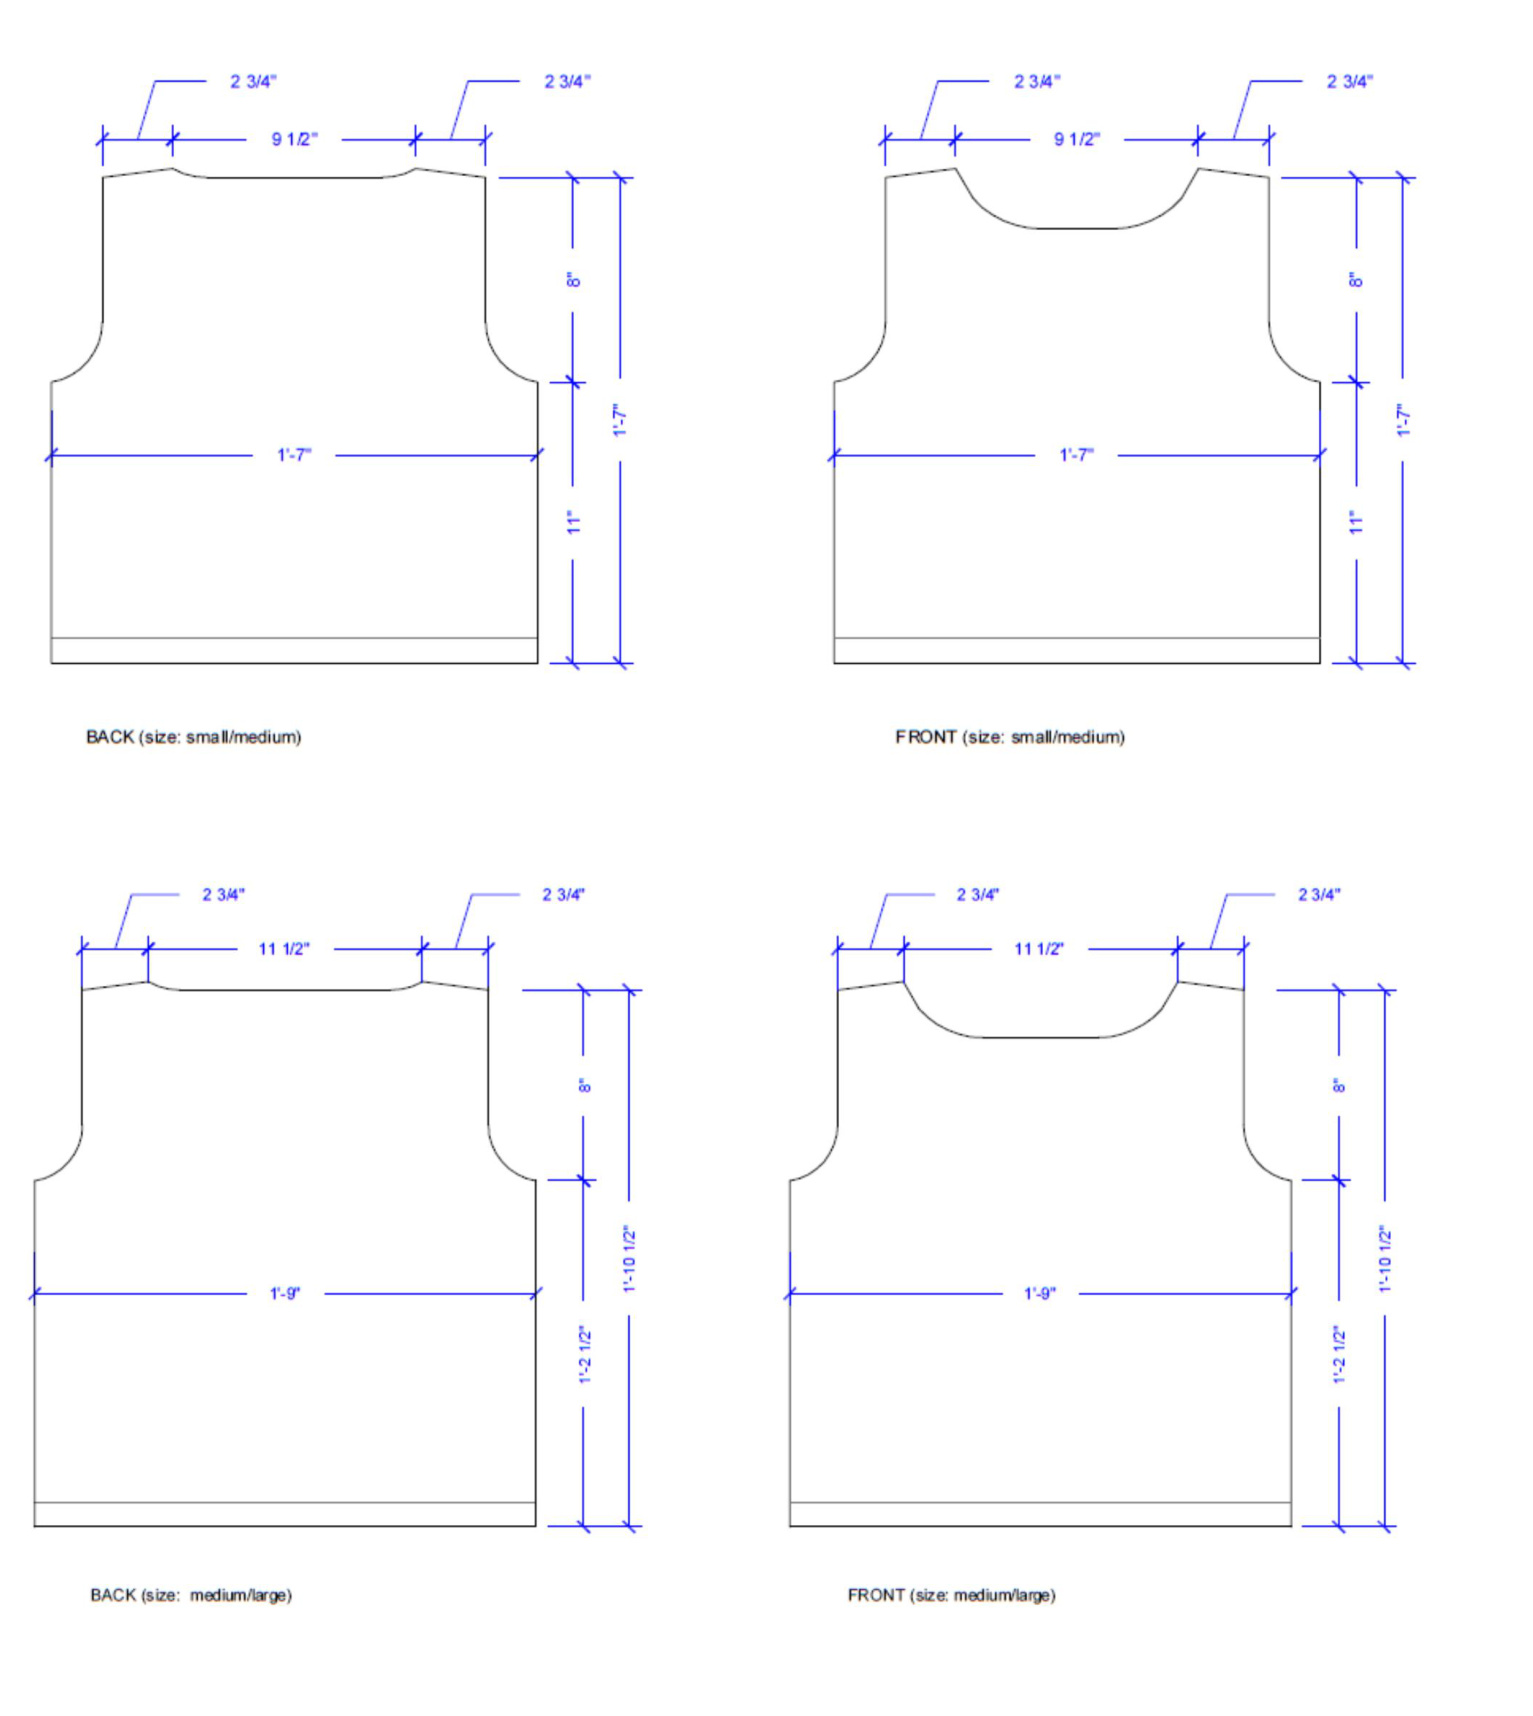
Finished Dimensions
98 cm (small/medium) 110 (medium/large) at bust 98 cm (small/medium) 110 (medium/large) at lower edge 28 cm (small/medium) 38 (medium/large) to underarm at front 50 cm (small/medium) 54 (medium/large) centre back
Yarn
Rowan yarns are used throughout for best results. www.knitrowan.com Brushed fleece (wool, alpaca, polymide) 5 balls X 50 gm approximately 525m (uses approx. 500- 520m) in shade Cove (SH251), Heath (SH256) with Peat (SH262) and Lag0on (SH264) with Kid Silk Haze for accents,Wicked (SH599) Provide an extra ball to swatch Use up your leftovers for tipping and embroidery
Needles
5mm circular needle (60cm and 40cm) 6mm circular needle (60cm) Tapestryneedle Stitch markers (l use pear pins to place at both ends of every 1oth row to maintain the same row count for the fronts and the back after the rib)
Tension
13 sts and 19 rows to 10 cm measured over st st using 6 mm needles BRUSHED FLEECE VEST
Pattern stitches
2 X 2 rib: Knit 2 sts, Purl 2 sts Stockinette stitch. Stitches are knit on the right side and purled on the wrong side. This technique is the most commonly used in knitting and creates flat even fabric on the right side and tight ridges on the Wrongside.
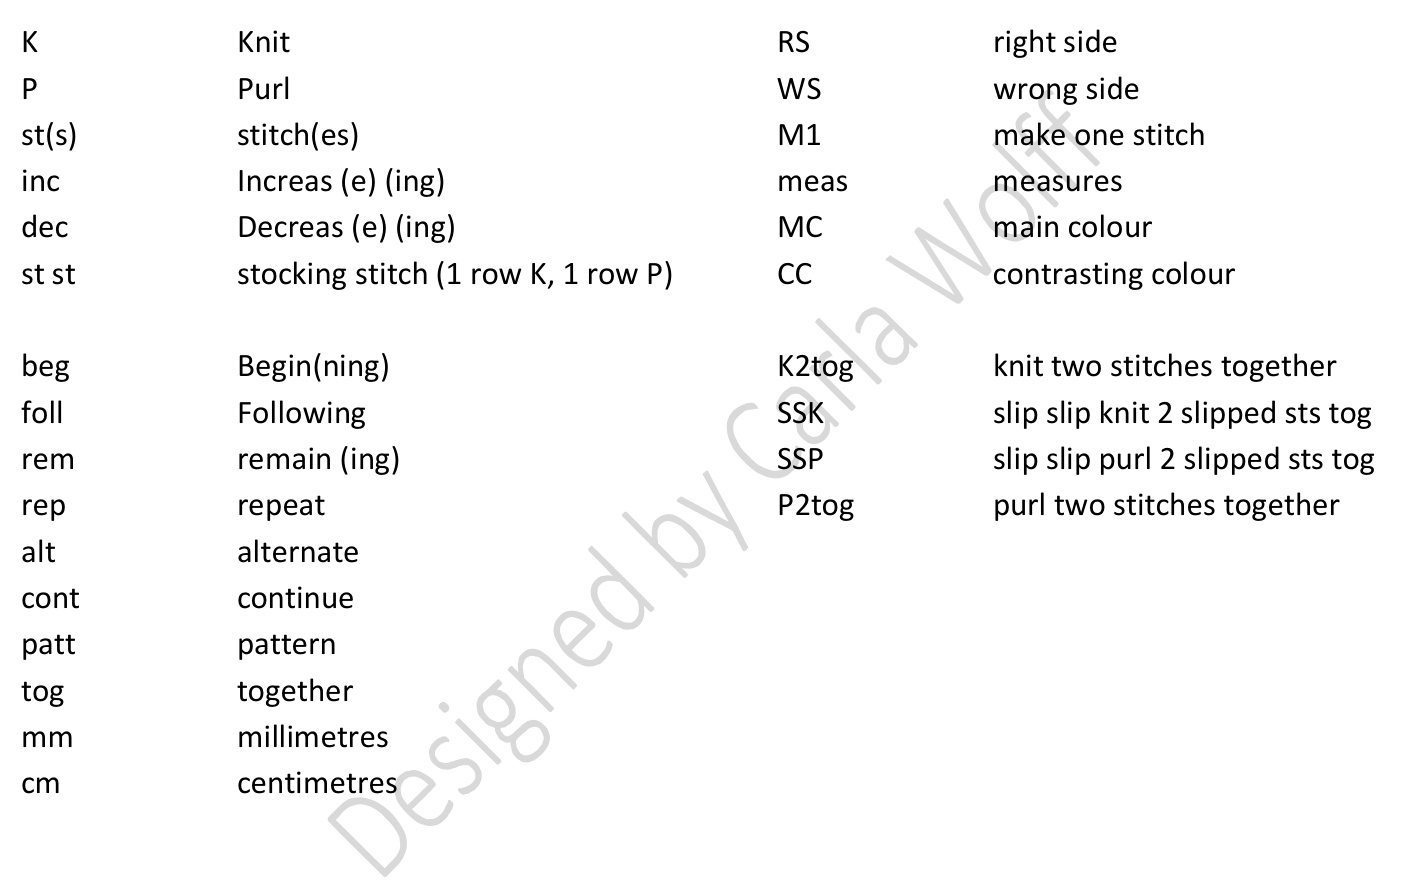
Index of terms and abbreviations
BACK
Cast on 70 (82) sts using 5.00mm needles and the crochet chain cast on Row 1 Rib: K2, \*P2, K2, rep from \* to end. Row 2 Rib: P2, \*K2, P2, rep from \* to end. These two rows form rib. Rib for 8 rows ending with a Rs facing for next row. Dec Row: K3 (K9), \*SSK, K10, rep from \* twice, knit 12, (K2tog, K10) twice, K3 (K9). 64 (76) sts Change to 6mm needles and purl next row. Continue in St st until piece measures 28cm (40cm) or 11" (16") from cast on edge.
Shape armhole
Bind off 3 sts at beg of next 2 rows. Dec Row 1: dec 1 st at both ends of row in this manner, K2, SSK, knit to last 4 sts, K2tog, K2. Dec Row 2: dec 1 st at both ends of row in this manner, P2, P2tog, knit to last 4 sts, SSK purlwise, P2. Dec Row 3: dec 1 st at both ends of row in this manner, K2, SSK, knit to last 4 sts, K2tog, K2. Row 4: Purl all stitches Dec Row 5: dec 1 st at both ends of row in this manner, K2, SSK, knit to last 4 sts, K2tog, K2. Row 6: Purl all stitches Dec Row 7: dec 1 st at both ends of row in this manner, K2, SSK, knit to last 4 sts, K2tog, K2. Row 8: Purl all stitches 48 (60) sts Work even until armhole measures 20cm or 8". Place a stitch marker at centre 2 stitches.
Shape shoulders
Bind off 4 sts at beg of next 2 rows. Bind off 4 sts, work 6 sts and bind off centre 20 (30) sts, work 10 sts. Shape neck, bind off 2 sts at neck edge of next 2 rows. Bind off rem 4 sts of shoulder shaping.
FRONT
Work as given for back to 12 rows less than at back neck. Note for intarsia detail: (Created for size small/medium). After lower rib is complete and decrease row has been worked, change to stocking stitch and work 26 sts in colour A, work centre 18 sts in colour B, work 26 sts in colour A. Using the intarsia method maintain colour bar in this manner until piece is ready for front neck detail 12 rows less than at back neck. Place a stitch marker on centre 2 stitches.
Shape neck
Knit to centre 22 sts, bind off centre 22 sts and shape both sides of neck at the same time. Bind off 3 sts at both neck edges. Bind off 2 sts at both neck edges. Dec 1 st at both neck edges (for larger size, continue to decrease 1 st both sides of neck until you have 12 sts rem for shoulder on both sides) Work straight until armhole measures the same as for the back to begin shaping shoulders.
Shape shoulders
Bind off 4 sts at both armhole sides 3 times, to match back.
MAKING UP
Join shoulder seams.
Neckband
With right side facing and 5mm circular needle starting at left shoulder pick up and knit 12(16) down front left slope of neck, 20 sts across front neck 12(16) up front right, 4 sts down back right neck, 28(38) sts across back neck and 4 sts up back left neck. Work in 2 X 2 rib starting with K2, and making sure that the centre 2 sts are the centre of a K2 at front and the centre 2 sts at the centre back are centre of a P2. This will make an even neck rib. Work rib for a further 4 rows. Bind off loosely. Sew in tail. At armhole edge, pick up and knit 3 sts for every 4 rows. 66sts Work 4 rows in 2X2 rib. Bind off loosely. Sew side seams Block sweater by hand washing in mild soap and shape to measurements from chart. Roll up in 2 heavy towels and press out the excess water. Air dry until completely dry to the touch. Reshape during the drying process if necessary. Enjoy your beautiful, warm sweater.