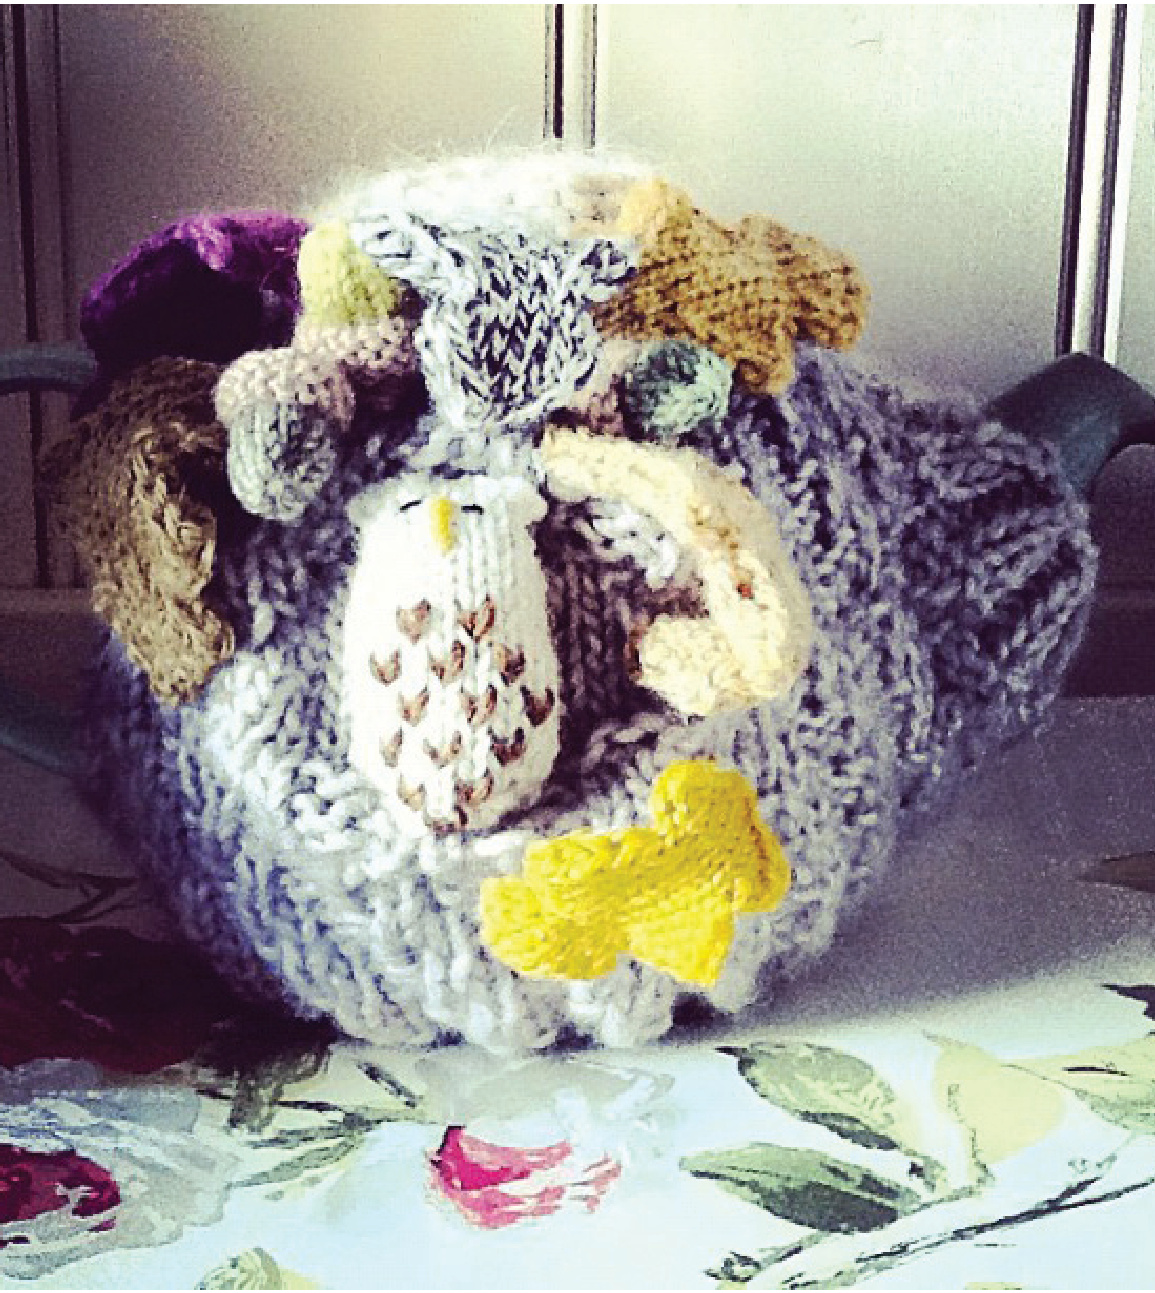
Little owl in the tree COsy
...for the cosy YARN 2 x 50g balls of any chunky/ bulky weight yarn in MC and yarn C - I used Twilleys Of Stamford Freedom Spirit Chunky shade 803 Dream a small amount Garn Studio Drops Alaska shade 55 Beige NEEDLES 5mm (US 8) (either 12 inch circular or set 5 double pointed dpns) GAUGE 9 stitches and 12 rows all counted over a 5cm/ 2in square as stocking stitch and as main colour using size needles suggested - adjust your needle size to get the correct tension asnecessary.
...for the owl
YARN small amount DK/ light worsted weight yarn in MC, I used a small amount Garn Stdio Drops Lima shade 0100 Off White (MC) plus a length of gold coloured DK yarn for the beak and brown yarn for the feathers NEEDLES set 3 3.25 (US 3) double pointed needles GAUGE 13 stitches and 15 rows all counted over a 5cm/ 2in square as stocking stitch and as main colour using size needles suggested - adjust your needle size to get the correct tension asnecessary. NOTIONS Black cotton thread and sewing needle for the eyes and toy flling or something similar. For the yarn for the leaves and acorn see pattern. Techniques and abbreviations can be found at the end of the patterns Tea cosy Beg with the bottom of the cosy, cast on 72sts in yarn MC. \*if using dpns, divide sts by slipping them p-wise over four dpns: N1 -18sts, n2 - 18sts, n3 - 18sts, n4 - 18sts. Being careful not to twist the stitches, join in the round and continue asfollows: Rnd 1 [P2, k2] 18 times. Place marker. Rep last rnd twice. Rnd 4 K1, \*p2, k2, rep from \* to last 3 stitches before marker, p2, k1. Divide for spout Rnd 5 (inc) K1, [p2, k2] 8 times, p1, pfkb, k1, m1, k1, [p2, k2] 8 times, p2, k1. 74sts Rnd 6 K1, [p2, k2] 8 times, p2, place marker (for spout), k4, place marker (for spout), [p2, k2] 8 times, p2, k1. Rnd 7 (inc) [K2, p2] 8 times, k2, p1, slip marker onto RH needle, m1, k4, m1, slip marker onto RH needle, k1, p2, [k2, p2] 8 times. 76sts Rnd 8 [K2, p2] 8 times, k2, p1, slip marker onto RH needle, k6, slip marker onto RH needle, k1, p2, [k2, p2] 8 times. Rnd 9 (inc) [K2, p2] 8 times, k2, p1, slip marker onto RH needle, m1, k6, m1, slip marker onto RH needle, k1, p2, [k2, p2] 8 times. 78sts Rnd 10 P1, [k2, p2] 8 times, k2, slip marker onto RH needle, k8, slip marker onto RH needle, [k2, p2] 8 times, k2, p1. Rnd 11 (inc), P1 [k2, p2] 8 times, k2, slip marker onto RH needle, m1, k8, m1, slip marker onto RH needle, [k2, p2] 8 times, k2, p1. 80sts Rnd 12 P1, [k2, p2] 8 times, k2, slip marker onto RH needle, k10, slip marker onto RH needle, [k2, p2] 8 times, k2, p1 Rnd 13 (inc) [P2, k2] 8 times, p2, k1, slip marker onto RH needle, m1, k10, m1, slip marker onto RH needle, p1, k2, [p2, k2] 8 times. 82sts. Turn the work so that WS is facing. Now work in rows as follows:
Divide for handle
Row 14 [P2, k2] 8 times, p2, k1, slip marker onto RH needle, p12 slide last 12 sts (the spout stitches between the row markers) onto a length of spare yarn to rejoin later, p1, k2, [p2, k2] 8 times.
First side
Row 15 (RS) [P2, k2] 8 times, p2, k1. Row 16 (WS) K2, [p2, k2] 8 times, p1. Row 17 K1, [p2, k2] 8 times, p2. Row 18 As row 16. Row 19 [K2, p2] 8 times, k2, p1 Row 20 K1, p2, [K2, p2] 8 times. Row 21 As row 19. Row 22 P2, [K2, p2] 8 times, k1. Rnd 23 P1, [k2, p2] 8 times, k2 Row 24 As row 22. Row 25 [P2, k2] 8 times, p2, k1 Cut yarn, (leave sts over 2 needles if using dpns). With RS facing, rejoin yarn to the 2nd side beginning the row fron where you have divide for the spout.
2nd side
Row 15 (RS) P1, k2, [p2, k2] 8 times. Row 16 (WS) P1, [k2, p2] 8 times, p2. Row 17 [P2, k2] 8 times, p2, k1. Row 18 As row 16. ... create hollow by working short rows as follows .. Row 19 k1, p2, [k2, p2] 6 times, w+tK. P16, w+tP. K15, w+tK P14, w+tP. K13, w+tK P12, w+tP. K11, w+tK P10, w+tP. K9, w+tK P8, w+tP. K7, w+tK P6, w+tP. K5, w+tK P4, w+tP. K3, w+tK P2, w+tP. K13, P2, k2, p2. Row 20 [K2, p2] 8 times, k2, p1.
dl cosy page #5
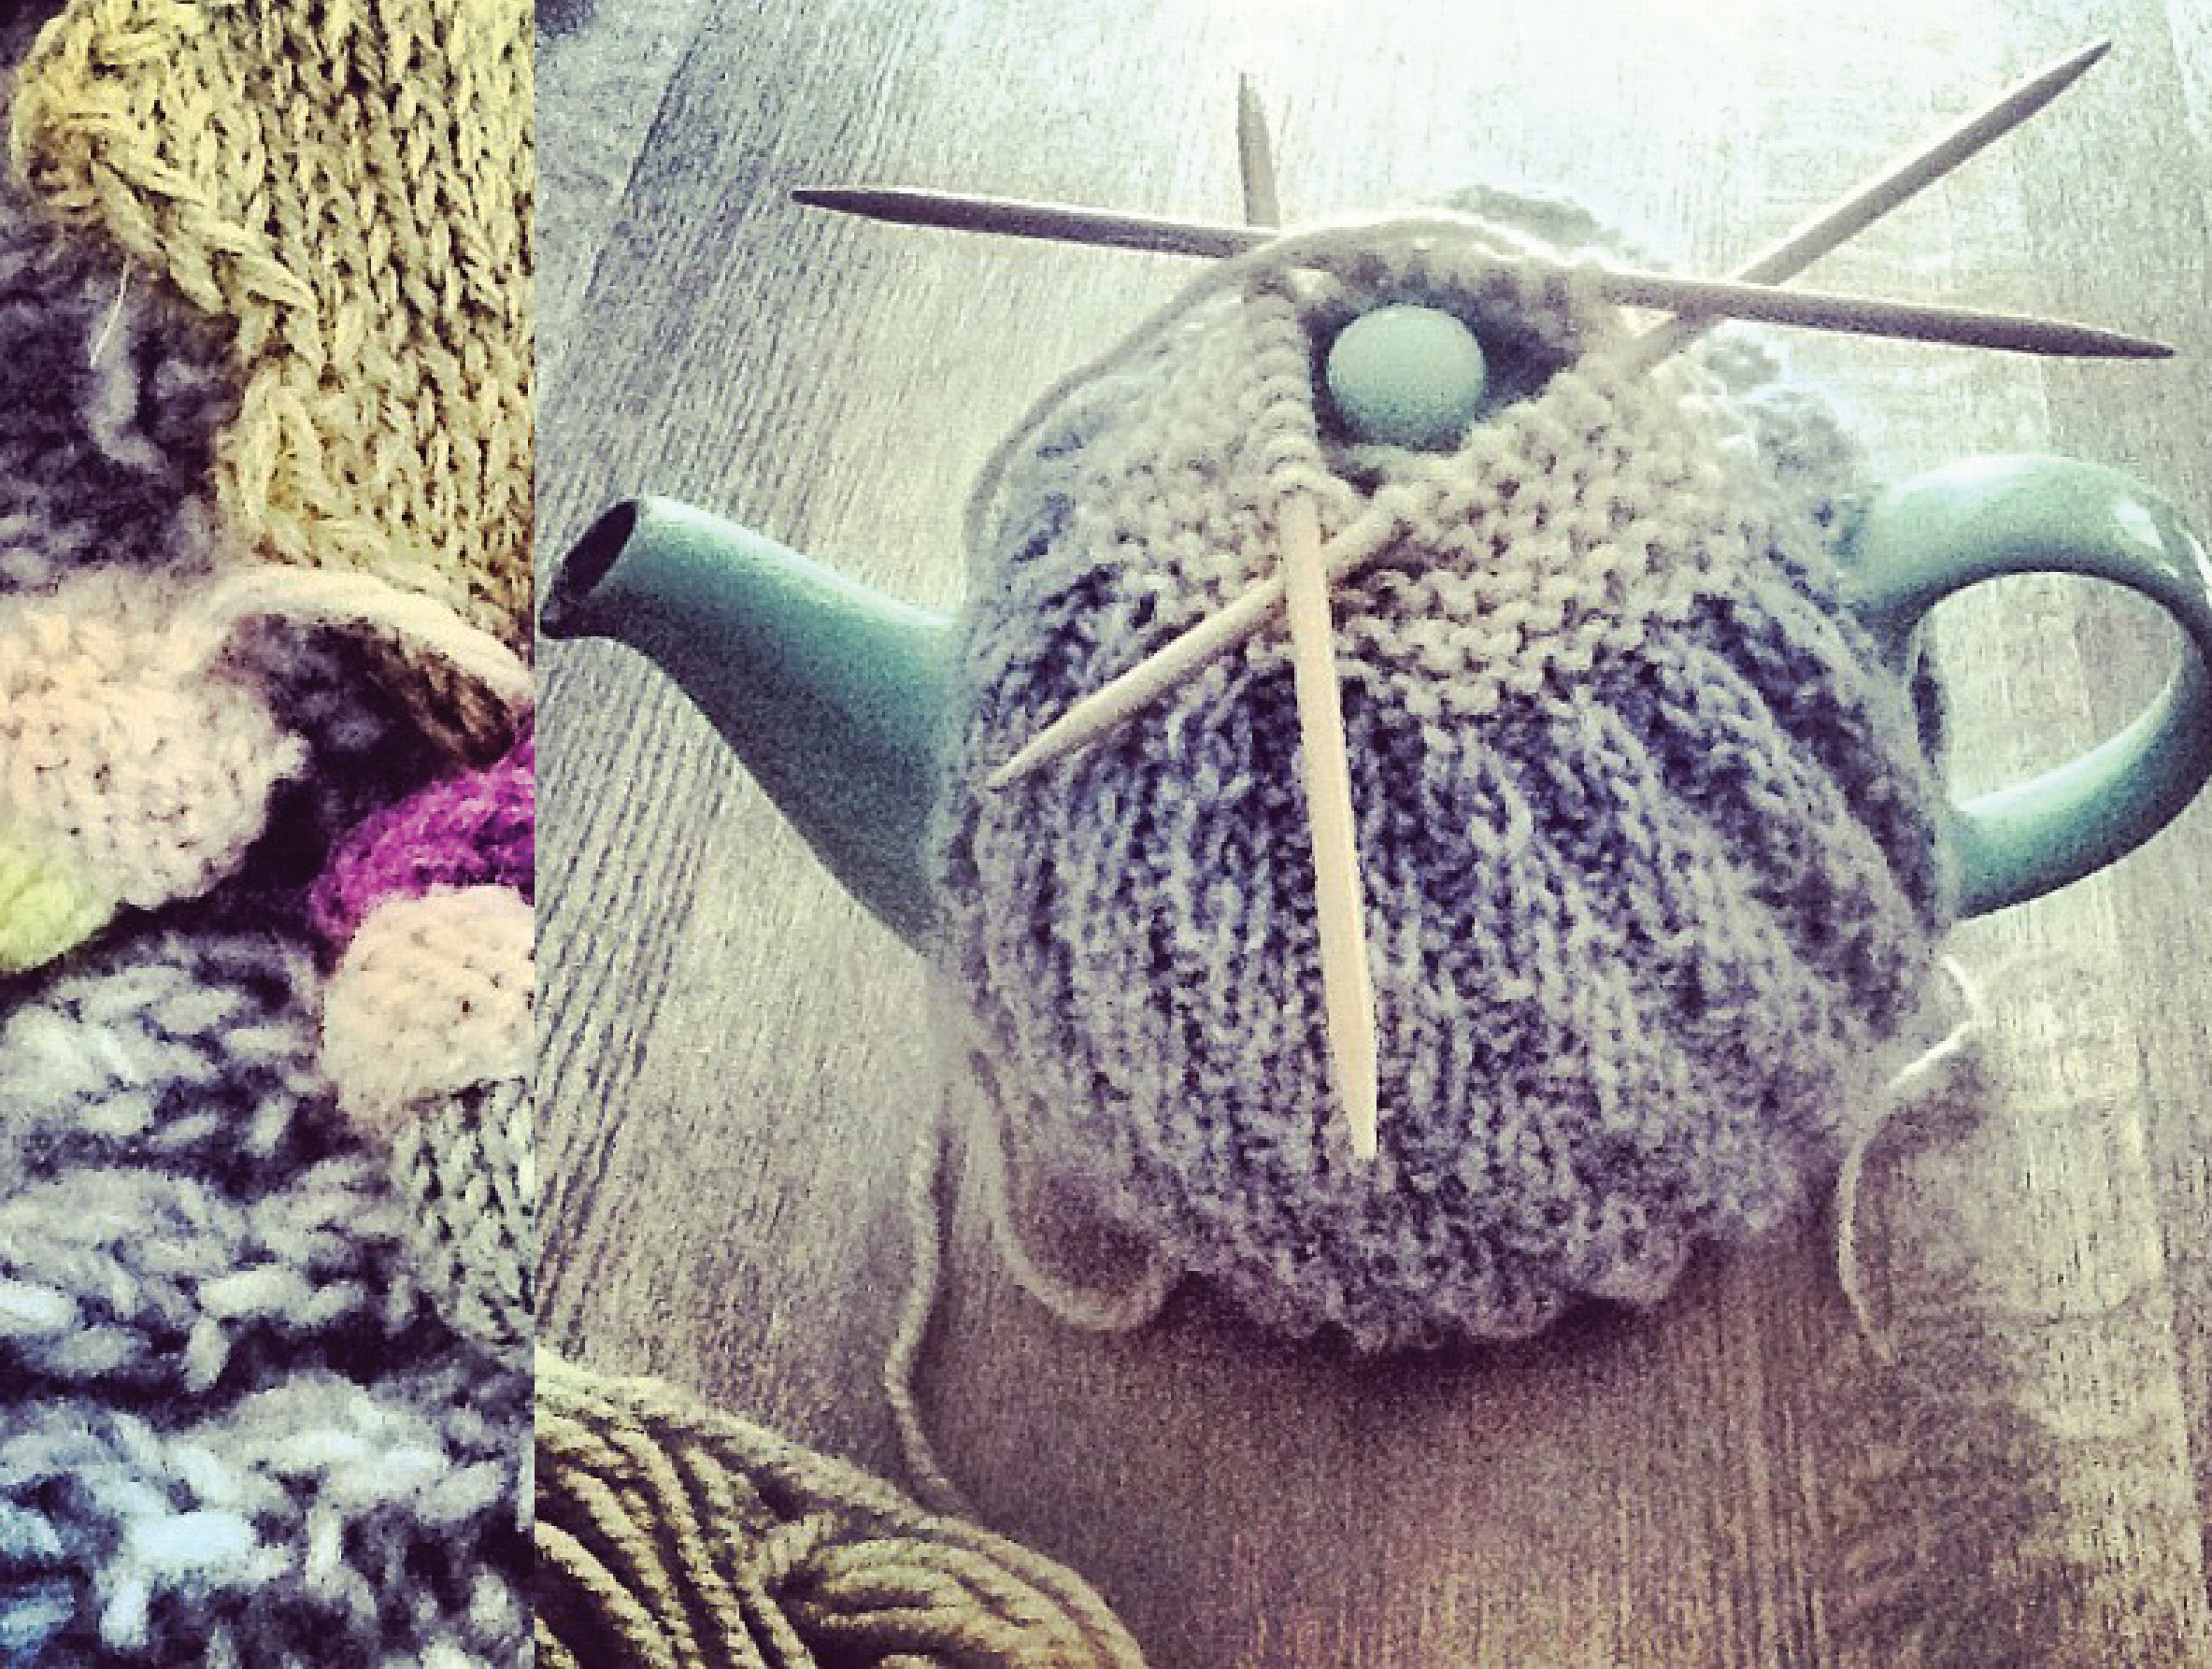
Row 21 k1, p2, [k2, p2] 8 times Row 22 K1, p2,[k2, p2] 8 times. Rnd 23 [K2, p2] 8 times, k2, p1 Row 24 As row 22. Row 25 P1, k2, [p2, k2] 8 times. .. join the 2 sides together across the top of the spout .. Rnd 26 (inc) [P2, k2] 8 times, p2, k1, backward loop cast on 2 sts, (place a marker in between the 2 cast on sts. p1, k2, [p2, k2] 8 times. 72sts Row 25 [P2, k2] 18 times. Row 26 As row 25. Row 27 K1, [p2, k2] 17 times, p2, k1. Do not turn the work anymore as you will now join for working in the round as follows: .. join across the top of the handle.. Rnd 28 As row 27. ... work decreases for top of the cosy... Rnd 29 (dec) K1, [p2 tog, k2tog] 17 times, p2tog, knit last stitch and 1st stitch of next rnd together. 36sts Rnd 29 [p1, k1] 17 times. Cut yarn MC. ... change to yarn C for the very top of the cosy.. Rnd 30 P36. Rnd 31 (dec) [K7, k2tog] 4 times. 32sts Rnd 32 P32. Rnd 33 (dec) [K6, k2tog] 4 times. 28sts Rnd 34 P28. Rnd 35 (dec) [K5, k2tog] 4 times. 24sts Rnd 36 P24. Rnd 37 (dec) [K4, k2tog] 4 times. 20sts Rnd 38 P20. Rnd 39 (dec) [K3, k2tog] 4 times. 16sts Rnd 40 P20. Rnd 41 (dec) [K2, k2tog] 4 times. 12sts Rnd 42 P12. Rnd 43 (dec) [K1, k2tog] 4 times. 8sts If you have a nobble on the top of the lid of the teapot (see picture on next page), bind off here if not - if the teapot lid lies fush then: Cut yarn, use to thread through rem sts, pull up to close the hole and secure the end to inside of cosy.
Spout
Slide 12sts held on spare yarn from spout to a dpn. Rejoin yarn MC at marker. Pup& k 14 sts down to the 12 sts on the needle, [k2, p2] three times, pup&k 14 sts back up to marker, have stitches divided over 3 needles. Join in the round. 40sts Rep last rnd twice. Rnd 4 K1,[p2, k2] 9 times, p2, k1. Rnd 6 (dec) P2tog, p1, [k2, p2] 3 times, k2, p2tog, k2tog, [p2, k2] 4 times, p1, skpo. 36sts. Rnd 7 [P2, k2] 4 times, p1, k1, [p2, k2] 4 times, p2. Rnd 8 (dec) [P2tog, k2tog] 4 times, p1, k1, [p2, k2] 4 times, p2tog. 19sts. Bind off in k1, p1 rib pattern.
Owl
Using 3.25 )US 3) needles and owl yarn MC cast on 8sts onto one needle then using simple sock toe cast on, cont as follows: \*1. Hold needle with cast on stitches in left hand. 2. Hold 2 empty dpns parallel in right hand 3. Slip 1st cast on st p-wise onto the dpn closest to you and off the needle in the left hand, then slip the next cast on st onto the dpn farthest away and off the RH needle.\*\* Repeat step 3 until all 8 stitches are divided onto the 2 parallel dpns, 4 sts on the front dpn and 4 sts on the back. Slide sts to the Other ends of the dpns, working yarn at back. RS facing, cont working in the rnd, beginning by knitting the sts on the back dpn - work stitches over two dpns, using a 3rd dpn to knit with: Rnd 1 (inc) Kfb, k2, kfb, kfb, k2, kfb. 12sts. Place a row marker. Rnd 2 K10. Rnd 3 (inc) Kfb, k4, kfb, kfb, k4, kfb. 16sts.
dwl cosy page #8
Rnd 4 K16.
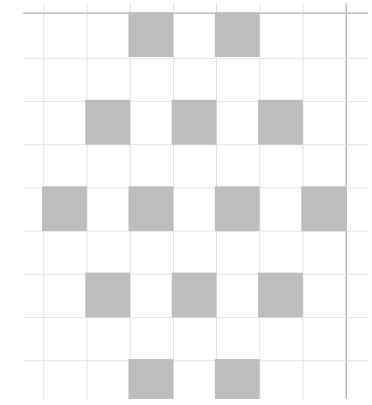
Rep last rnd 9 times. .. add feather detail.. Thread up a yarn sewing needle with a length (approx 20cm/ 8 in) yarn C. Working along the row of ‘v’ shaped knitted stitches directly beneath the row you have just knitted and on one side only work duplicate stitch over each alternate ‘v', leave a row then on the row directly beneath that (apart from last row) work duplicate stitches in between the one on the first row. See the chart for more detail: Each square represents a ‘v’ shaped duplicate stitch
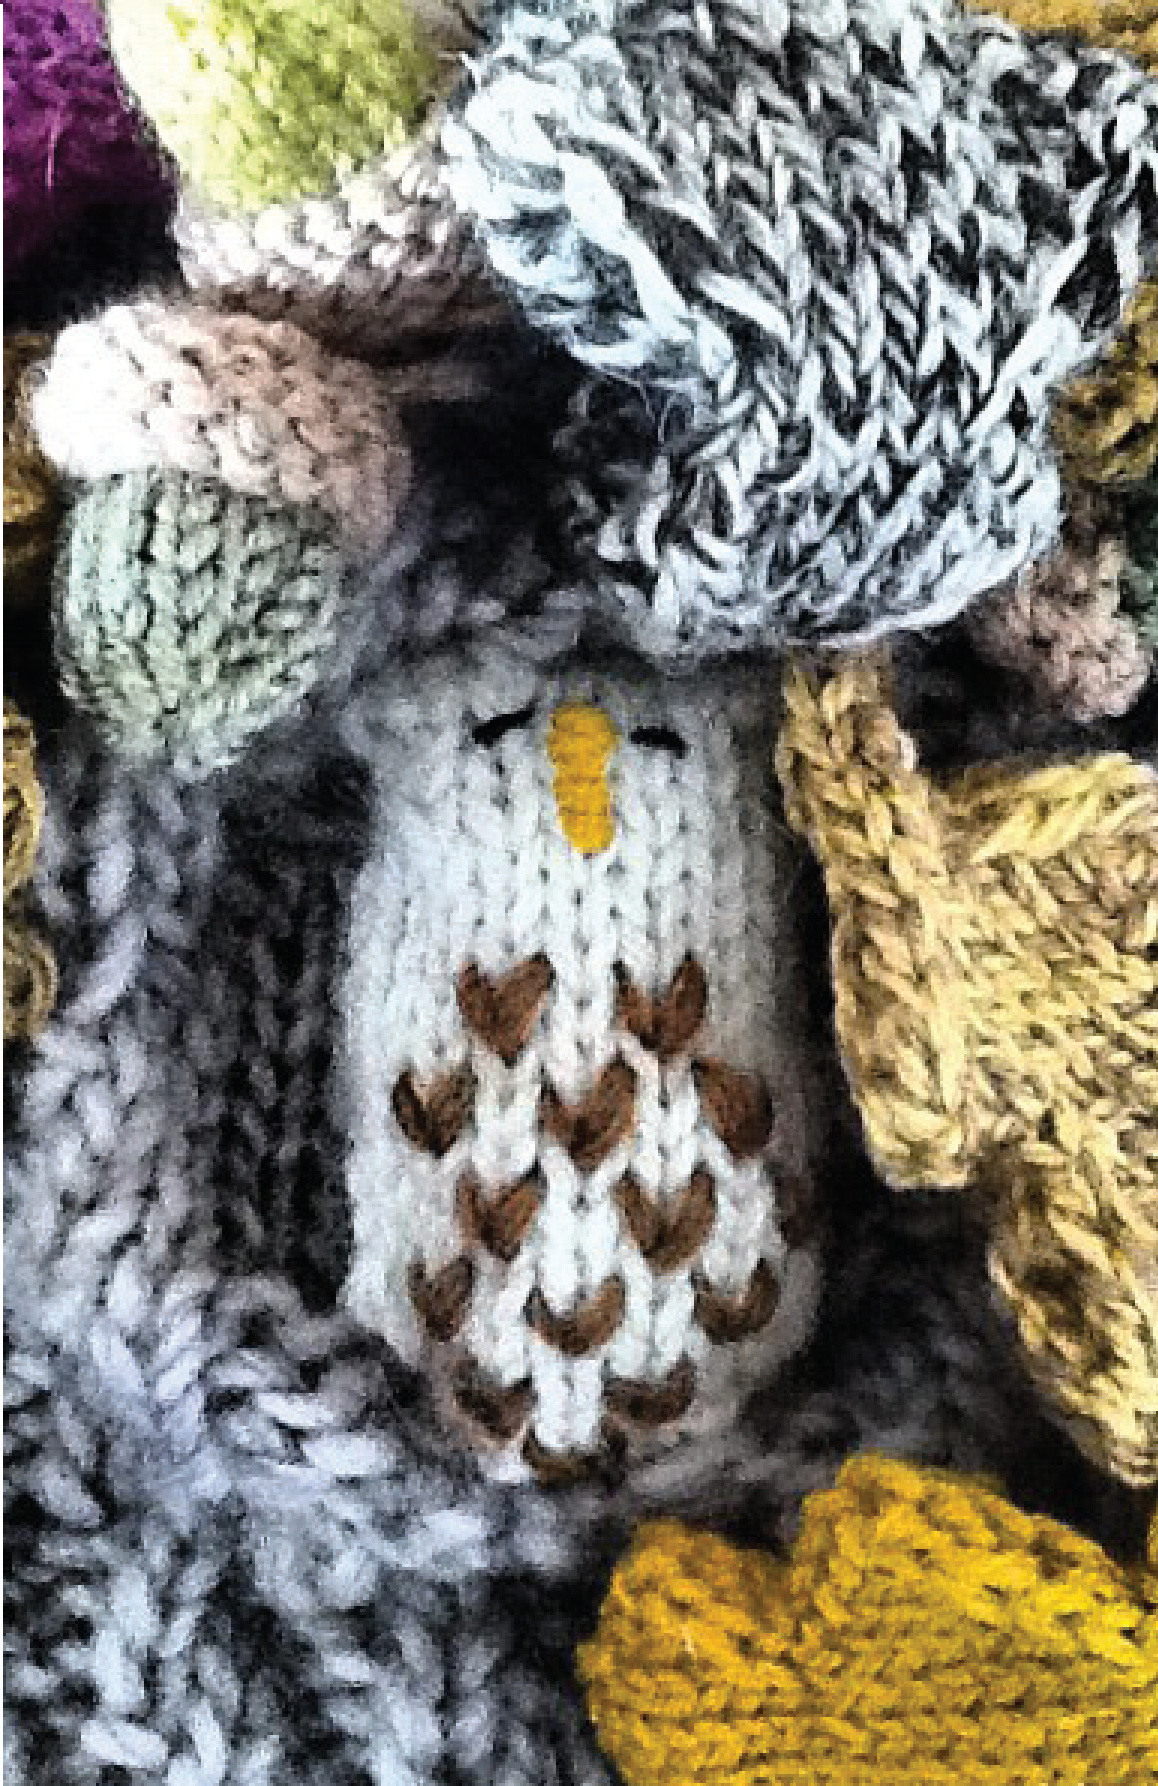
Rnd 15 (dec) K2tog, k4, skpo, k2tog, k4, skpo. Rnd 17 (inc) Kfb, k4, kfb, kfb, k4, kfb. 16sts Rnd 18 (dec) Bind off 1st, k4, bind off 1, bind off 1, k6, bind off 1.12sts Rnd 19 (dec) K2tog, k2, skpo, k2tog, k2, skpo. 8sts. Stuff the owl - not too padded. Close the top seam with Kitchener Stitch. To work the beak, thread up a yarn needle with a short length of beak colour yarn, take a stitch down spanning 3 rows of knitting - and in the middle of the face , 2 rows down from the sewn up edge. Work tiny stitches horizontally across the long verticle stitch, wrapping it, secure the end through to the back of the owl. Work two slits for eyes with a short length od balck sewing thread used double. Slip the cosy onto the teapot and encase the owl into the hollow - fiddle around with it a bit to get it just right then sew the owl in place with the cosy still on the teapot.
dwl cosy page #10
Oak leaves & acorns
Leaf: Using 3.25mm (US 3) needles and any leaf coloured yarn in DK weight cast on 6sts, work cast on as Owl from \* to \*\*. Repeat step 3 until all 6 stitches are divided onto the 2 parallel dpns, 3sts on the front dpn and 3 sts on the back. Slide sts to the other ends of the dpns, working yarn at back. RS facing, cont working in the rnd, beginning by knitting the sts on the back dpn - working stitches over two dpns, using a 3rd dpn to knit with as follows: Rnd 1 K6. Rnd 2 (inc) Kfb, k1, kfb, kfb, k1, kfb. 10sts (therefore 5sts on each dpn) Rnd 3 K10. Rnd 4 (inc) Kfb, k3, kfb, kfb, k3, kfb. 14sts Rnd 5 (inc) Kfb, k5, kfb, kfb, k5, kfb. 18sts Continue to increase as before, on each rnd, (increasing 2sts onto each dpn - one at beg and one at the end of each needle - 4sts in total) until there are 26sts (13 sts on each dpn). Continue to decrease as before, on each rnd (decreasing 2sts from each dpn - one at beg and one at the end of each needle - 4sts in total) until there are 10sts (5 sts on each dpn).
Rnd 19 K10.
Continue to increase as before, on each rnd until there are 18sts (9 sts on each dpn).
Rnd 22 K18.
Continue to decrease as before, on each rnd until there are 6sts (3 sts on each dpn). Rep last rnd once. Rnd 28 (dec) K2 tog, k1, k2 tog, k1 4sts
Rnd 29 K4.
Rep last rnd once. Leaving a longish tail end, cut yarn, thread up a yarn sewing needle. Graft 2 sts on front dpn with 2 sts from back dpn working Kitchener st.
Acorn base
Using 3mm (US size 2) needles and any spare 4-ply, sock or sport yarn cast on 6 sts. Rnd 1 (inc) Kfb 6 times, knitting each set of 4 sts over 3 needles. 12sts Rnd 2 K12. Rnd 3 (inc) K2, [m1, k4] twice, m1, k2. 15sts.
Rnd 4 K15.
Rep last rnd once. Bind off.
Acorn nut
Leave a long tail end (for stuffing the nut with later), using 3mm (US size 2) needles and any spare 4-ply, sock or sport yarn cast On 6 sts. Rnd 1 (inc) Kfb 6 times, knitting each set of 4 sts over 3 needles. Rnd 2 K12. 12sts ep last rnd 7 times. Cut yarn, thread end through all sts, stuff nut with the tail end from cast on, pull up tight to close the hole. Sew nut to the inside of the base. The WS of the base facing outer most. Bind off. Sew the leaves and the acorns ^artistically' (placing the leaves so they look natural) onto the tea cosy - again, I did this with the cosy placed on the teapot so I could get the overall impression - using the tea cosy yarn to sew them on with.
Abbreviations & techniques
cm centimetre/s CO cast on cont continue dec decrease DK double knit yarn weight ft foot/ feet as in measurements gm gram/ mes in inch/es inc increase k knit/ knitting kfb knit into front, then back LH/ RS left hand/ left side m1 make a stitch (see definitions) mc main colour mm millimetre P purl patt pattern pfkb purl into front, knit into back pup&k pick up and knit (see definitions) rep repeat rem remaining RH/RS right hand/ right side skpo slip next stitch, knit the next stitch pass slipped stitch over the knitted stitch (see definitions) sl slip st/sts stitch/es WS wrong side yf Bring yarn to front of work and over the needle from front to back to make a stitch yo bring yarn over the needle from back to front to make a stitch
A brief how-to section - for more detailed instructions try the many hundres of u-tube videos, a great source of knowledge - I myself have learnt an awful lot from them!
Slip knot this is generally how to begin knitting or crochet and usually becomes the first stitch; it is the beginning of the cast on method adopted for these patterns and it is also how to begin a crochet chain. To make a slip knot work the yarn, with your fingers, into a half knot but don't pull the knot closed - this will leave you with a loop. Slip the point of the knitting needle, or crochet hook for crochet projects, under the loop then pull the working yarn, this is attached to the yarn ball, gently until the knot lies, not too tightly, onto the needle or hook.
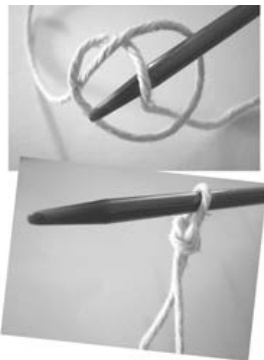
Cast on placing stitches on the needle to begin knitting. There are many ways to cast on although (unless stated otherwise within the pattern) the Knitting-on method is the type I have adopted throughout most of my patterns. Leaving about a 20cm/ 8in tail end, make a slip knot. Place the slip knot onto the tip of one of the needles, Fig 1 above - the yarn from the ball (the working yarn) should be ready to work on the right of the knot. Begin adding stitches to the needle by taking the needle with the slip knot in your left hand. With the other needle in your right hand, \*push the tip of the right-hand needle into the slip knot loop (1st stitch) from the front to the back of the loop and under the left-hand needle se below. Now wrap the working yarn around the tip of the right-hand needle, over from front to back. Slide the tip of the right-hand needle down to catch this new loop of yarn. Lift the loop up and place it onto the left-hand needle. Repeat from \* to \*\* until you have cast on the number of stitches needed.
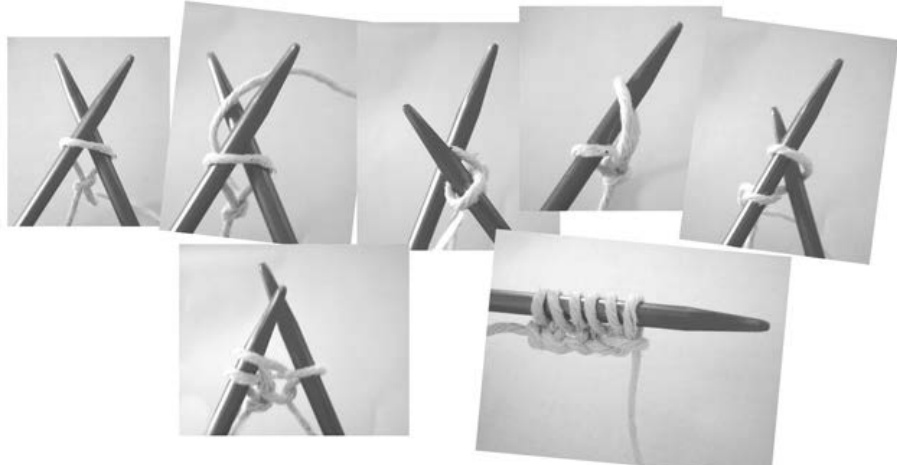
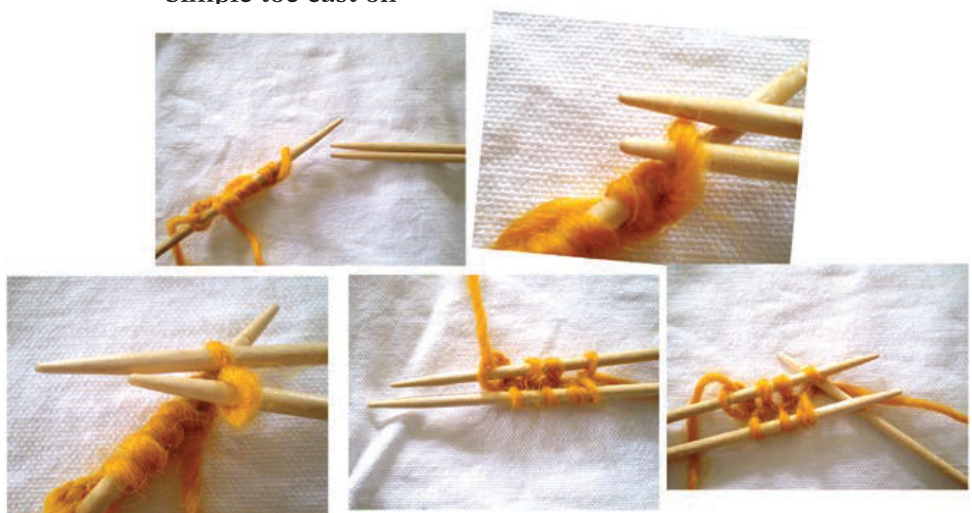
Backward loop cast on (bl) an alternative cast on method useful when adding stitches in the middle of a row. Basically you twist a loop of yarn around your forefinger then slip this new loop onto the right-hand needle to increase a stitch. Hold the working yarn in your left hand with the needle in your right. Extend your left forefinger parallel to the yarn, dip your finger under the yarn and towards you, you should have a single loop of yarn around your finger. Move the tip of the right-hand needle from the base of your finger so that the needle is through the loop on your finger. Remove your finger, tighten the loop on the needle. Simple toe cast on is a really useful cast on method when you want to knit a 3D pattern in its entirety - that means no sewing up or seaming as this cast on method begins by knitting two sides (be it front and back for eg.) at the same time! You work the entire pattern over two needles with a third needle to knit with and the pattern is generally written referring to first the needle then the second needle. I've written these instructions within the pattern for your ease, however here they are again with diagrams. 1. Hold needle with cast on stitches in left hand. 2. Hold 2 empty dpns parallel in right hand. 3. Slip 1st cast on st p-wise onto the dpn closest to you and off the needle in the left hand, then slip the next cast on st onto the dpn farthest away and off the RH needle. Repeat step 3 until allstitches are divided evenly onto the 2 parallel dpns. Slide sts to the other ends of the dpns (see last 2 pics) working yarn at back, begin knitting.
Simple toe cast on
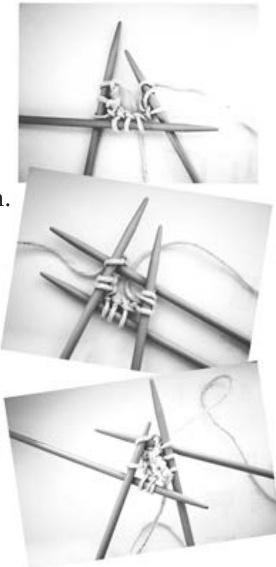
Knit one of the two most basic stitches in knitting. There are other methods - this is the one I adopt: Hold the full needle (the needle with all the stitches on) in your left hand and the empty needle in you right. Insert the tip of the needle in your right hand into the first stitch from left to right, front to back. Wrap the working yarn around the back needle (right-hand needle) counter clockwise. Draw the loop through the stitch at the front of the work - this is the new stitch. Now slide the old stitch from the left needle. Purl the second of the two basic stitches. This is the reverse of a knitted’ stitch and loops like a horizontal bar. To work a purl stitch, insert the needle from right to left in front of the work with the yarn at the front. Wrap the yarn around the right-hand needle in front of the work counter clockwise as you did for knit'. Draw the loop through the stitch, slide the old stitch off the needle. Knitting in the round (rnd) is a process of working seamless knitting, It is working knitting around and around without having a beginning or an end - the start of the piece is however marked by a stitch marker of knotted loop of spare yarn. And it is worked, in the with three, four, five double pointed needles (dpns). To join for working in the round’ begin with two of the double pointed needles and cast on in the normal way then spread the stitches as evenly as numbers will allow dividing them over of the number needles stated in the pattern. Arrange the stitches so that the loops are lined up on the top of each dpn, the working section/ cast on edge with the working yarn to your right, ready to begin to knit - taking care not to twist the yarn around the needles as you link the last cast on stitch with the first cast on stitch by, using your working needle, knitting into it. Subsequent rounds are worked from the first stitch after the marker up to the last stitch before the marker. This marker you slip onto the righthand needle before beginning another round. At the end of each rnd you should have the same number of stitches on each needle that you started with. With the first couple of rounds check to see that the stitches are not twisting/ spiralling around the needles, after that you can be reassured that this will not happen. Note: When you are working in the round you never see the wrong side of the fabric so to make stocking stitch, all rounds are worked all knit (no purling), garter stitch is one round knit, next round purl.
Decreasing
K2 tog knit 2 sts together. This is one of the techniques I've used to decrease a stitch in the row (the other is written below). Insert the tip of the needle in your right hand into the next two stitches on the left needle from left to right, front to back (as if to knit). Wrap the working yarn around the back needle (right-hand needle) counter clockwise. Draw the loop through both stitches at the front of the work - leaving one stitch remaining. Now slide this stitch from the left needle. One stitch decreased. To decrease on a purl row simply work up to where it states P2 tog then purl the two stitches together (P2 tog). P2 tog purl 2 sts together. As purling - insert the needle from right to left in front of the work this time into the next two stitches with the yarn at the front. Wrap the yarn around the right-hand needle in front of the work counter clockwise as you did for ‘purl draw the loop through the two stitches, then slide the remaining stitch off the needle. One stitch decreased. Skpo slip stitch, knit a stitch then pass the slipped stitch over - a simple decrease sometimes used with K2 tog to give an even and balanced decrease at the ends or within a row. Simply work up to where the decrease is to be, for example: K5, skpo, k3 - knit 5 sts, slip the next stitch by inserting the right needle into the stitch as if to knit and moving it over to the right needle without winding the working yarn around it, knit the next stitch (a), then with the left needle, pick up the slipped stitch from the right needle and pass it over the knitted stitch (a) and off the needle to lose' a stitch. One stitch decreased.
Increasing
M1 an increase stitch, used primarily a within a row. Knit to where the increase is to occur, in a pattern this will read as k5, m1 - for example, so knit 5 sts, slip the righthand needle front to back, under the horizontal bar that lies before the next stitch, slip left-hand needle through, from front to back, the picked up bar and allow the stitch to remain on the left-hand needle then, with the right-hand needle, knit into the back of the newly made loop to complete the new stitch. Carry on knitting along the row or round unless otherwise stated. Pick up and knit (pup&k) - to join a finished row or cast on or cast off edges with new stitches. E.g. To create the gusset of a sock or edge of a shoe or neckline/ collar to an item of clothing, you work pick up and knit. With the right side of the work facing and one needle in the right hand, \*insert the needle tip through the knitted fabric to the back, at least two strands from the edge. Wrap counter clockwise, as if to knit, the working yarn around the needle and draw this loop through the fabric to the right side/ front of the work, leave this loop/ new stitch on the needle\*\* - one stitch picked up. Continue from \* to \*\* working along the finished edge picking up more stitches. The pattern will direct you how many stitches are to be ‘picked up'.
Sewing seams
Mattress seam is the seam that gives you a non-bulky join - perfect for smallitems like dolls′ clothes. Always use a blunt ended, large-eyed, yarn needle (so not to split the stitches) and matching yarn when sewing up your work. Lay the pieces to be sewn up side by side, matching row end stitches or cast on/ cast off stitches. When joining a vertical/ side seam - insert the threaded up yarn needle in between the first and second stitches on the lower edge of one of the pieces to be joined. With your needle, pick up the first horizontal bar, that look like a ladder rung, and pull the yarn through. Go to the other piece and pick up the adjacent ladder rung? / horizontal bar. Continue picking up the horizontal bars along the edges of the two sides going back and forth from piece to piece, as the sides are joined. When sewing up horizontal/ cast on and or cast of edges - insert the threaded up yarn needle just inside the cast on or cast off edge of one of the pieces to be joined. With your needle, pick up the two strands that make the V' shape of a knitted stitch - at the bottom of the V not the top, pull the yarn through. Go to the other piece and pick up the corresponding V stitch. Continue picking up the V shaped stitches along the edges of the two sides going back and forth from piece to piece. Kitchener stitch or grafting: to graft' or sew together live′ stitches held on double pointed needles (dpns) that are held parallel in your left hand. 1. Thread up a yarn needle with the tail end as mentioned in the pattern, insert the threaded needle purl-wise into the first two stitches on the double pointed needle (dpn) closest to you, pull the yarn through, leave the stitches on the needle. 2. Insert the threaded needle into the first two stitches on the back dpn knit-wise, pull yarn through, leave those stitches on the dpn. 3. Insert the threaded needle into the frst two front stitches again this time knit-wise, then slip those stitches off the dpn then bring the threaded needle through the next front stitch as if to purl it - leave this stitch on the needle. 4. Insert the threaded needle into the first two back stitches, this time purl-wise, then slip those stitches of the dpn, bring the threaded needle through the next back stitch knit-wise - leave this stitch on the needle. 5. \*Insert the threaded needle into the first front stitch knit-wise, then slip that stitch off the dpn, then bring threaded needle through the next front stitch purl-wise, leave this stitch on the needle. 6. Insert the threaded needle into the first back stitch purl-wise, then slip that stitch off the dpn, then bring threaded needle through the next back stitch knit-wise - leave this stitch on the needle.\*\* Repeat from \* to \*\* until there are 4 stitches remaining - two on the front needle and two on the back. 7. Insert the threaded needle knit-wise into the two stitches on the double pointed needle (dpn) closest to you and off the needle, then into the remaining two sts from back needle - purl-wise then off the needle. 8. Secure the end. You may need to pull the last finished-off pair of stitches in to WS of the mitten with a crochet hook to really neaten it. i cord - an i cord, as the name suggests, is a cord or tube like a thick knitted string. Using 2 double pointed needles (dpns) cast on the number of stitches as directed within the pattern and knit across them. Then, instead of turning your knitting as you normally would, slide the stitches to the opposite end of the needle with the same side of the work stil facing you. The working yarn will be at the wrong side of the work. Keeping the working yarn at the back, knit across the stitches. Slide the stitches to the opposite end of the needle again, with the working yarn at the back, knit across the stitches, drawing the knitting into a tube made of garter stitches. Pull the yarn quite tightly when knitting the first stitch. To reiterate - the working yarn is always on the Wrong side of the cord, the right side of the wrong is always facing you. Straight stitches. Simply take a threaded needle, secured on the wrong side, from the back to the front of the fabric, work even or random small or medium straight line stitches in the direction shown either from a template or referring to photographs.


