Plain Jane Creations
Knitted and Felted Shoulder Bag #4 @ 2007 by Lisa Ashton Australia hope youjmakingthis prjctandthank youforyouuppo.easrmerthecontentsofthis pat are protetedby coprht and youmust ntreprducetbyan means nclding phtcopingrmakinand seling the item for personal gain. tomashto@bigpond.net.au orvia my blog htp://plainjanereations.blogspot.com
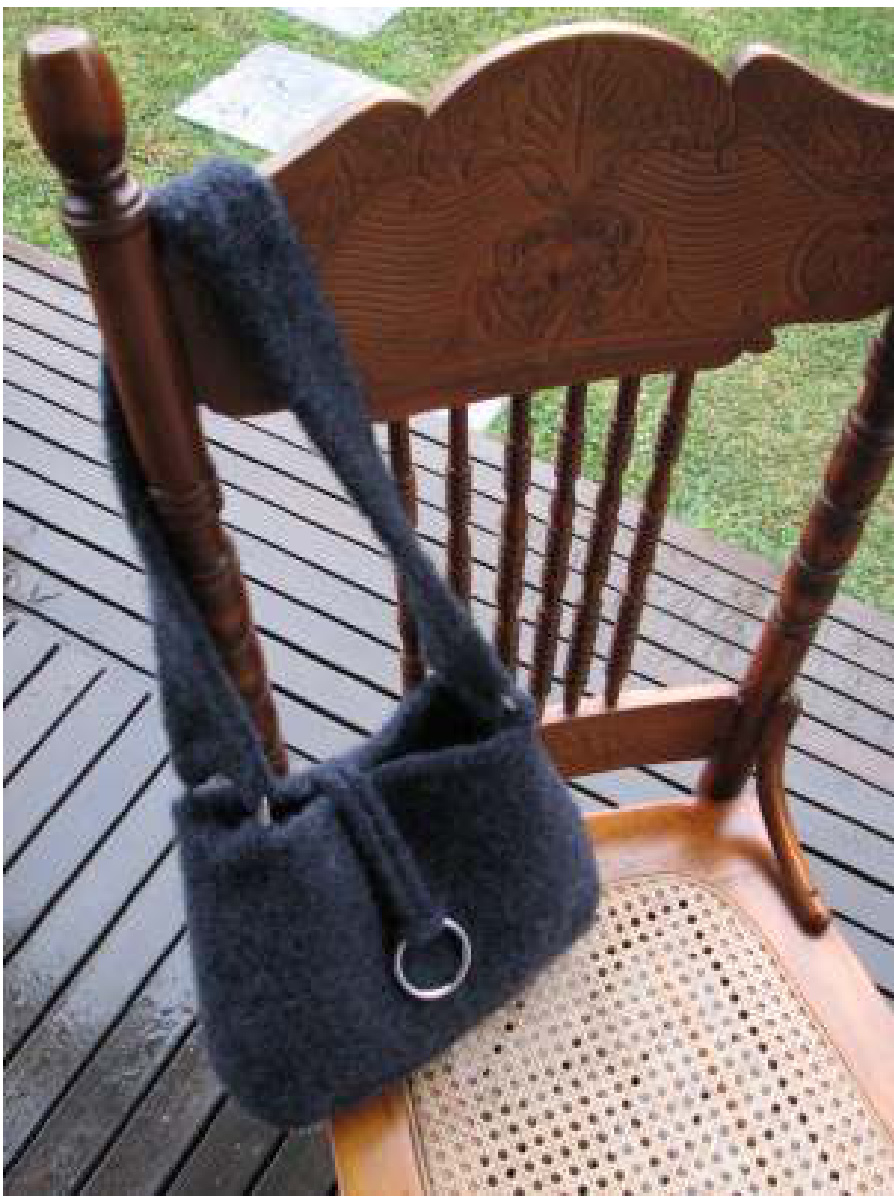
Knitted and Felted Shoulderbag#4
Designed by Lisa Ashton $\copyright$ 2007 Please allwme the rghttoeaalving from crating andwriting my pattes You wil need to choose only one colour for this bag and you wil need $5\,\times\,5\,\mathrm{Og}$ balls. I recommend Panda 8 ply Woobale 50og and $\phi\mid\mathfrak{m}$ (double knitting weight) woolasit felts beautiful. Do not buy superwashed woolasit wll not felt. 80cm long 5.5mm or UlSA size 9 circular knitting needle one set of double pointed $5.5\,\mathsf{m m}$ or USA size 9 needles (you will only need 1 pair forthis pattern but they come as a set of4) $2\,\times\,60\mathsf{m m}$ and $1\,\times\,50\,\mathrm{mm}$ stainless steel rings (available from marine shops) scissors or snips lead pencil 4 stitch markers (These can be loops of wool or smallplastic rings that fit over your needles that are used to mark the 4 corners and are slipped from left needle to right needle each time you come across one) Large tapestry needle for sewing in threads after knitting is completed. Tension should be17 stitches and 22 rows to 10cm on $5.5\,\mathsf{m m}$ needles. If you knit looser than this you may require more wool but your bag willstill felt beautiflly. To begin cast on 60 stitches using whichever method you choose with the Circular needles.
Knit 7rows fgartestith planknittin npurows),thsretanlefomsthebaseoftha Next leaving the 60 stitches on your needle place a stitch marker that is different to the others (tie on a bit of coloured woolonto one marker so you will now thisisthe begining o th row) on youright nedle and then knit up 25 stitches across the next short side of the rectangle. \*/ knit up the knot on the edge ofeach ridge and then the Strand in between these knots, there are I3 knots and 12 gaps so 25 stitches are easy o pick up. Plae nextstith markthnknitup6stithsalongyourcastodge, placeext sthmarandthnkitu5 stitchesnthsht sidfretanl,lacelaststitchmarkrandthnitacrosth6stitchsthatareny left needle. You wil now have 170 stitches on your needle and be at the beginning of your next row. The odd stith marker designates the beginning of a new row and the other markers help you find the corners of the bag where you willbe decreasin to shapec the bag The rest of thebag is worked in stocking stitch (smooth knitting and because you are working oncircularneedes every row willbe knit, notone rowknit andne row puras you wouldif you were knitting ona pairofneedes, bonu! Knit 15 rows $1\textcircled{6}^{t h}$ row is the dcrease row and is as follows; kit stitches together each side of the stith markes soyou wil effectivly remve 8 stithes from the rowwitheachrow of decreasing \*Therefore afterdecreasin number lyou willhave 162 stitches. Now repeat rows 1 - 16 as described above until you have completed 5 decreases, you wll have 130 stitches (80 rows frombase). Knit 3 more rows.
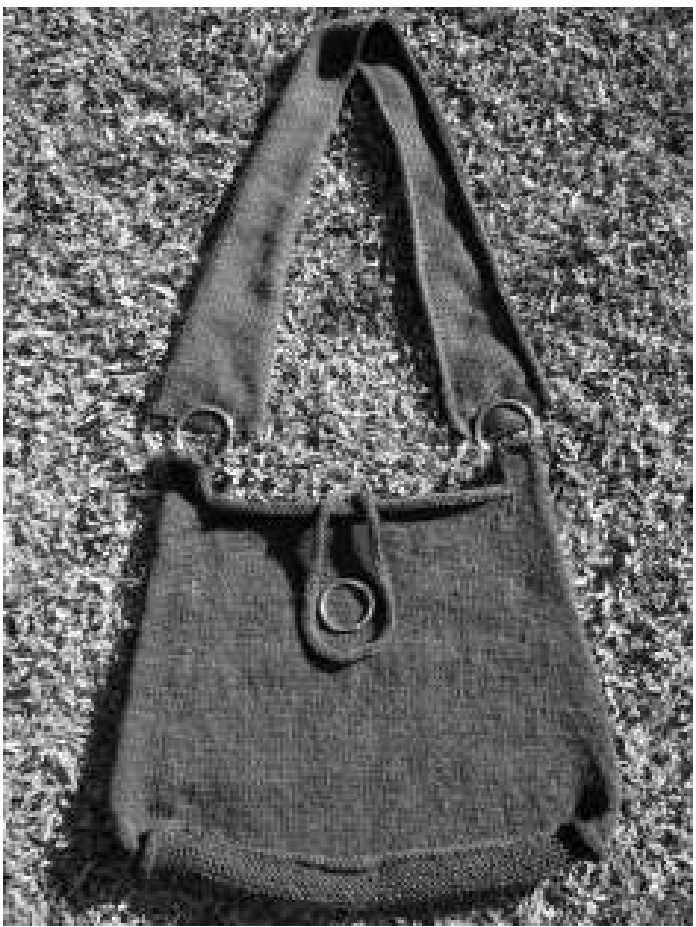
Ring attachment tabs
In the next row youwil be casting offthe5stitchesfrom the front and backtopedgesandkeein the 15stithes from the narrow sides, remove your stitch markers as you work this row. Break off yarn leaving a 4” (1ocm) tail slip the next 15 stitches acrossfrom the left nedle to the rght needle purlwise. Now recmmene with ourwol, don'tie the woolonjust begin workingagainleaving a 4” (1ocm) til that will be darned in when kniting s complete. Cast off next 50 stitches, break off woolleaving a4” (1Ocm) tail, slip the next 15 stitches from the lft needle to the right needle purlwise. Now recommence with your wool as before and cast off the next 50 stitches. Thetwolots of 1 stitches youhave slpped are what wll beme the short tabs that youwilattach the twolarger stainless steel rings to once the bag has been felted. Next row knit across the 15 slippedstitches you slipped first, continue working on these stitches working stocking stitch as before but as you are now not working in the round you wil work one row knit and the next row purl for 12 rows total. Cast off 15 stitches and break off wool leaving a 4" (10cm) tal. Recommence with your woolleaving a 4"(10cm) tail on the other 15 stitches and work 12 rows of stocking stitch as you did on the other side, cast off the 15 stitches and leave a 4" (1Ocm) tail.
Knitted on I-cord trims
Thisroledg trmfnshffrwdefkitingeatifll it canastpthgerolinanisgret defining thbase; and surprisingly is very quickto do.You can cast on 3or4 stitchesitily for this -cord bu havechosen3,asitisafinerdge. \*ease not thediagram showsan-cordedge that was knit usingastithcast On. Tightenthstithwheyourj youwlhittinthetatieoffml anddainllt ens th lop f or stchnes rim flong tals after darmings Take a pair of double point needles and cast on 3 stitches leaving a 4" (1Ocm) tailand then with right side of your bag facing knit up a stitch at the corner of the ring attachment tabs.
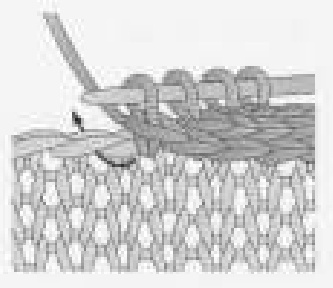
Now slide yourstithestothe right endof the double point needle ready tobe knitted again. Knit 2 stitches then knit 2 stitches together through the back of their loops, pick up and knit the next stitch through the knot on the edge of the tab. This rowis eateduntil youhaveknit upvery knt n thdgeof th tab th stithesf yourcast fftpde and thenup the knots onthe dge ofthe othertab.Cast ffthe I-cord stitches andleavea4” (1ocm) tail. Repeat this I-cord trim on the other side of your bag. Nowforthe l-cord around the base, which aws thebagtostandupquite wllonit'sw Begin at a corner and pick up and knit across the top loops of the 60 stitches of one long side,turn the corner and now pick up and knit each of the 2 loops between each of the ridges(this wil be about 26 stitches),turn the corner and again pick up and knit acrossthe toploops of the 60 stitches on the otherlong sid,tun the comer and pick and knit each of the loops between cach of the ridges again approximately 26 stitchs). You wil be back at the begining now, cast off and leave a al for sewing beginning and end o l-cord together.
Strap
With a pairof double pointed needles orthe circular needle cast on 15 stitches. The strap of the bag is workedin stocking stitch (smooth knitting) one row knit and one row purl. Rows 1- 50 Knit one row and the next row purl, repeat. Row 5 1 Decrease in this row; knit 1, knit 2 stitches together, knit tolast 3 stitches then knit 2 stitches together, knit 1. (13 stitches) Rows 52 - 100 Purl one row and then nxt row knit, eat. Row 101 Decrease as for row 5 1. (11 stitches) Rows 102 - 150 Purl one row and then next row knit, repeat. Row 151 Increase in this row; knitinto front ofthefirst stitch then knit into the back of the same stitch, knit to last 2 stitches then knit into front of the next stitch then into the back of the same stitch, knit 1. (13 stitches) Rows 152 - 200 Purl one row and then next row knit,repeat. Row 201 Increase in this row; Knit into front ofthefirst stitch then knit into the back of the same stitch, knit to last 2 stitches then knit into front of the next stitch then into the back of the same stitch, knit 1. (15 stitches) Rows 202 - 250 Purl one row and then next row knit, repeat. Row25 1 Cast off 15 stitches knitwise. Now younedtoknit aknittednl-cord trimneachlngsidef yourstrapas youdidforthemainbagtopde andbase utine. eginat one comerwith the rght ide facing you, pickupand knit each knot on the sidede. Don't knit too tightly Repeat on opposite side.
I-cord closure
Next you needtoknit alengthof l-cord that willsuspend the smaller stainless steeasaweighttoclose yourshoulder bag to deter prying cyes and unwanted hands. The method is similar to the attached J-cord but even easier. With a pair of double pointed needles cast on4 stitches. Knit acrossthese fourstitchesthen slide thembackacross the needle ready tobe knitted again.Pull wolfirm and kit across again, this actionclosesthe flat knitin inta tube which wil become long and thinjust like apiecofFrench knitting youmight have done with a cottonrl when $y\mathrm{ou}$ were a child, but thisis a much faster method.Continue by sliding the 4 stitches back to the rnght and knitting themagain and again. Knit this cord tillitis 18" (45cm) long. Cast off and with darning needle sink the tails into the
Bag finishing
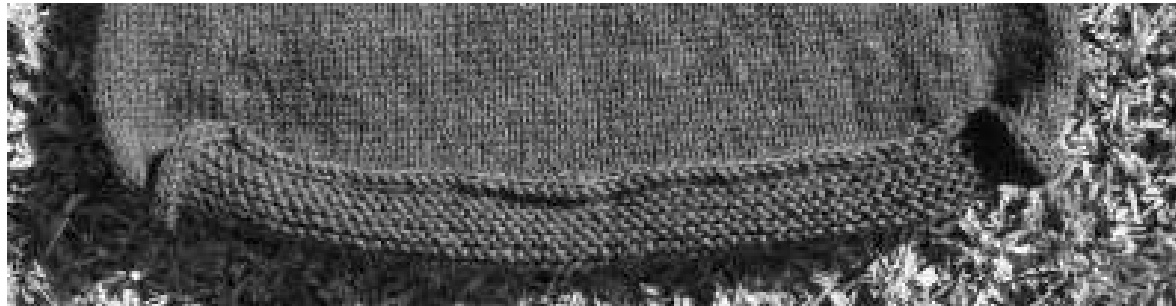
Join beginning to end of the I-cord trim around the base of your bag as neatly as you can with your darning needle and the tails you left for this purpose. Bury l-cord tails down the centre of the cord. Darn in all the other tails under the loops of 6 or 7 stitches. T rim allong tails after darning. This photo shows my bag with all-cords completed just before it was felted. \*Note the strap and the closure cord are not attached to main bag before felting.
Washing Machine Felting
This is how I felt all $\mathfrak{m}\mathfrak{y}$ knitting. Take a before photo now if $y\mathrm{ou}$ want or some measurements so you can see how much it changes.
$\mathsf{M}_{\mathfrak{y}}$ bag after felting was approximately $1\ 2^{\,s}$ wide by 8" high $(30c m\times20c m)$ and the shoulder strap includin rings is $31"(79c m)$ thisis about a $1/3$ smallerthan before felig. Set your machine on the longest wash it will do, HOT wash and COLD rinse, on the lowest water level you can, place a pair of jeans or some heavy item of non fluffng clothing and one capful of wool wash (Ma's Woolwash or Softly are two that I have used) and your knitted item right side out. on't use alingerie bag to protect your knitted item you wantotreatitvery badly with agitation, rubbing and hot water soit wilflt beautifuly. keeanyeonthwahcyl, heck thatisfeltinvery minte rsowhe thhtwashiscomletewiit back to thestat, top up the hot wateran le it go again, $\mathrm{b}_{y}$ the end o the secon hot wash whichis between 15-20 minutes I find that the felting is good.
Whnchecinnthfelingproechethatthstapisntrollininnitslfangefelttogeth itsll it back into aflat strap and then continue machine felting making sure you checkit every 5 minutes orso.
When you can see no stitch definition andthe tem fes lovely and thick with nice even texture let the machine carry on and rinse the item thoroughly in cold water and spin out allthe excess water. If you have afront loader and you can't openit during the cycle just doashorter intil wash of say 1 minutes in HOT water and then a cold rinse,then you can check it at the end of the whole cycle and you can always do anothertillt is flted comletel.Read yourmachinebook tocheck onthe length of the washing section ofthecyle and this wil guide you for your settins. Remember you are trying to be a rough as posible whn you are machine felting, don't use the wollns gentle cycle! Nowget the 3 pieces out and pullthem into shape, don't be toogentl tis very strong and very pliable now. Place inanice sunny wam spottdryfullsun isokandifyouaredsperate youcanusethdryeutitcabehad to control the shape with the dryer. Ifyou want you cangive the drieditemagood steam press with the iron andthenleti standtocompletely dy.
Post felting bag assembly
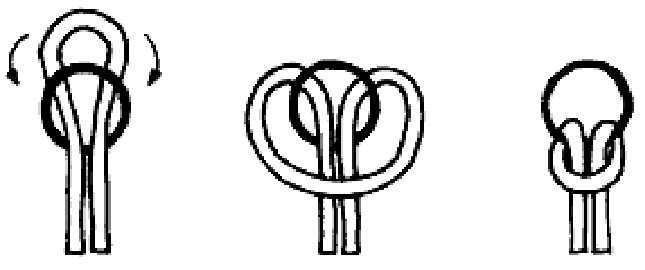
With anthfunfldwlfrmyouba spstiththtwlaengsteachdofthestraandt attachment tabs on the main bag with a $1/2^{}^{}$ $\left(1.5\mathsf{c m}\right)$ hem to the inside, puling stitches ver fim, kno off and bury ails within the felted fabric. Fold the I-cord closure cord in half and loop it onto your smaller stainless steel ring, secure with a couple of hidden stitches under the Larks Head knot shown to the right. Find the centre of the top edge and stitch the two ends of the I-cord losure cord separately just under the top edge knitted on I-cord trim with a length of unfelted wool, make certain it is very secure, knot off and bury tails of wool within the felted fabric.
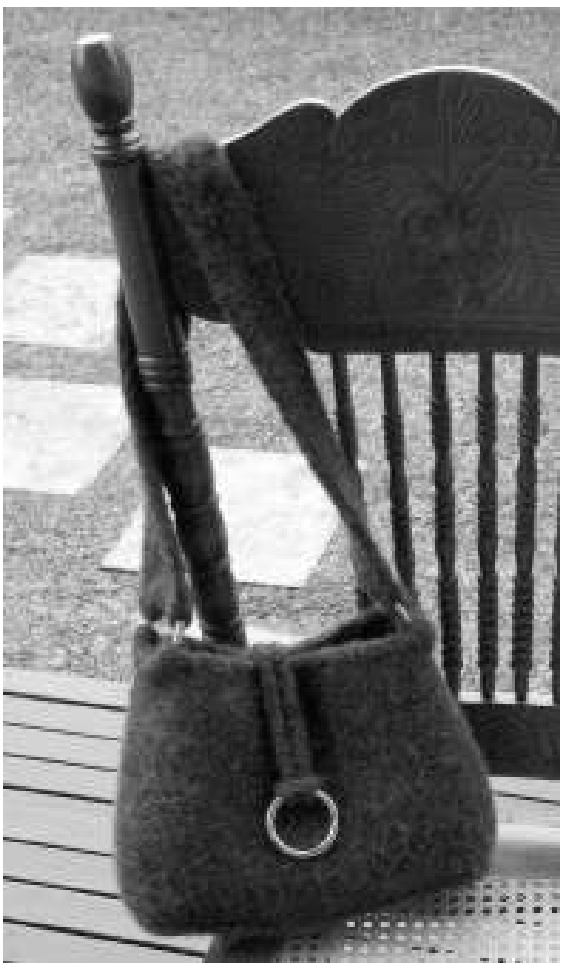
Now you have avery stylish shoulderbagthat is very comfortableto carry andwll reate interest wherever yougo.


