Knitted Desiqns
Princess Lace Top
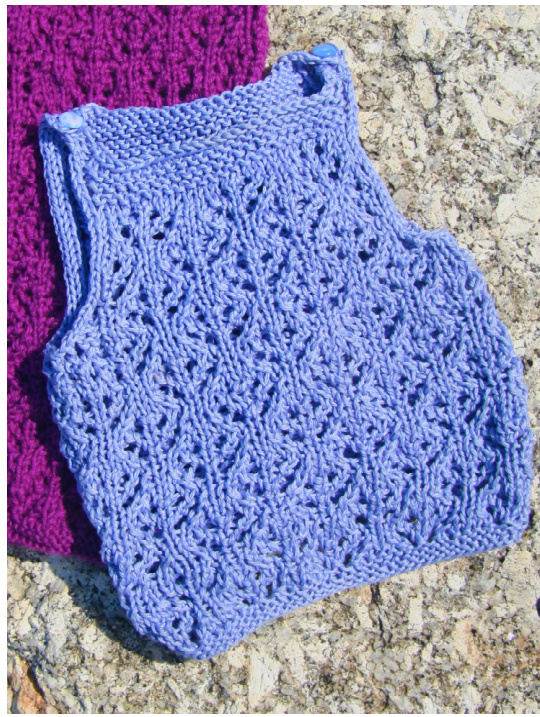
The scoop: Our grandmothers paired lace with all kinds of everyday clothing and this little tank is that kind of vintage charm. It can be worn alone, or over a T-shirt or turtleneck. That special little girl will look like a character out of her favorite fairy tale. For those looking to get familiar with basic lace knitting techniques, this is a smaller project that uses a DK weight yarn, which makes for easier handling and faster mastery of the stitch pattern. You'll find it difficult to knit just one! Sizes: 2Tand (4T) Materials needed: approx. 350 yds. DK weight yarn, needle size called for on label or those needed to knit to gauge, tape measure, blunt tapestry needle (for finishing), and 2 buttons of your choice (smooth-edged work best) NOTE: for our prototypes, we test knit with Classic Elite's Provence Egyptian cotton (2 skeins), the 2T in blue and Cascade's King Cole Merino Blend DK Superwash (4 skeins). Test Swatch: We highly recommend you knit a swatch to check your gauge before starting this project to ensure an accurate fit. Washing the swatch is also a good idea. Working the swatch will familiarize you with both the drape of the yarn and the lace pattern before starting the actual garment. To swatch: CO 33 sts. Work for 24 rows in the Lace Pattern and measure. Your swatch should be approx. 7 in. wide and 3 in. long. FRONT PIECE: CO 41(49) sts. K6 rows or until you have 3 garter st. rows on both your RS and WS. Begin working Lace Pattern. Lace Pattern (multiple of 8 sts. +1; a 12 row repeat): Row 1 (RS): K2, \*k2tog, yo, k1, yo, ssk, k3; repeat from \*ending last rep. with k2. Row 2 and all WS rows: Purl all sts. Row 3: K1, \*k2tog, yo, k3, yo, ssk, k1; repeat from \* to end. Row 5: Repeat Row 1. Row 7: K1, \*yo, ssk, k3, k2tog, yo, k1; repeat from \* to end. Row 9: K2, \*yo, ssk, k1, k2tog, yo, k3: repeat from \* ending last rep. with k2. Row 11: Repeat row 7. Row 12 (WS): Purl all sts. Repeat Rows 1-12 for Lace Pattern. Knit in Lace Pattern until piece measures approx. 7(8) in. End with Row 12 of the Lace Pattern. (This ensures that when you do the first bind off (BO) for the armhole you will be working on the RS.) Armholes: On the RS, BO 4 sts. Purl 3 sts. Then begin Row 1 of Lace Pattern as before. Work Lace Pattern to the end of Row 1. On the next row (WS), BO 4 sts. Knit 3 sts., then P to the last 4 sts and k4. End of Row 2. Row 3 (RS): P 4 sts. Work Lace Pattern (you should be on Row 3) to last 4 sts., then p4. Row 4 (WS): K 4 sts. P across to last 4 sts. and k4. Continue working in Lace Pattern, purling 4 sts. at the beginning and end of each RS row and knitting 4 sts. at the beginning and end of each WS row. Work armhole until it measures approx. 5 $(5\ \frac{1}{2})$ in., ending with a WS row.
Front Neckline Trim:
RS: P4, knit across to last 4 sts., p4. Ws: K all sts. Repeat the above 2 rows 2 more times. You will have a total of 3 Garter Stitch rows on the RS. RS: P4, K to last 4 sts., p4. WS: K4, P to last 4 sts., k4. RS: P4, BO all the k sts. in knit, then p the last 4 sts. WS: K4. RS: P4. WS: BO the 4 sts. in knit: cut yarn, and leave a tail for finishing. Attach yarn on the other shoulder on the RS. P4(RS), then K4(WS). BO on next row, all sts. in purl. Cut yarn and leave a tail for finishing.
Back Piece:
The back is worked the same as the front. When the armhole measures approx.5 $(5\ \frac{1}{2})$ in., end with a WS row and begin Back Neckline shaping.
Back Neckline:
RS: P4, Kto last 4 sts., $p4$ Ws: K all sts. Repeat the above 2 rows 2 more times. You will have a total of 3 Garter Stitch rows on the RS. RS: P4, K across to last 4 sts., p4. WS: K4, P across to last 4 sts., k4. Repeat the above 2 rows 1 more time. Working on the RS, BO P sts. in P, and K sts. in K. Cut yarn and leave a tail for finishing. You may use the tail for making a single crochet chain st. button hole loop, and it can be attached to the tab. You can also plan to push the button through the knitted work without a button hole or loop: just push the button through the work in the little tab that has been created by the extra 2 rows of work. (This is where is it wise to use a smooth-edged button, which works fine.) Sew side seams (work from the outside). Attach the 2 buttons of your choice to the front piece tab, where you began the 4 st. work. Blocking: You may choose to block your work if you find the armhole edges roll a bit. This is accomplished by ironing on a setting appropriate to the fiber you have used. (Wool will require a lower setting than cotton.)
Level of difficulty: EASY
Care Instructions: Most hand knitted garments should be washed by hand. Alternatively, you may follow the care instructions on the fiber label if you have worked with a washable wool, wool blend, or cotton. We do highly recommend that when machine washing, you place the garment in a lingerie bag to prevent excessive stretching, and dry flat or on a drying rack.


