BASEBALL SOCKS (FESTIVE KNTTTING PATTERN WITHOUT PINSTRIPES)
BY MEREDITH DAVEY This is agreaittt ftutaalfahk at tiz are ize woman who wears a size 8 shoe ora child who wears a size 6 shoe (with a footapproximately $9\%$ inches long) and a smaller size for a woman who wears size $5\,^{1}\!/\!_{2}$ shoe or a child who wears a size 4 shoe (with a foot approximately $8\%$ inches long).
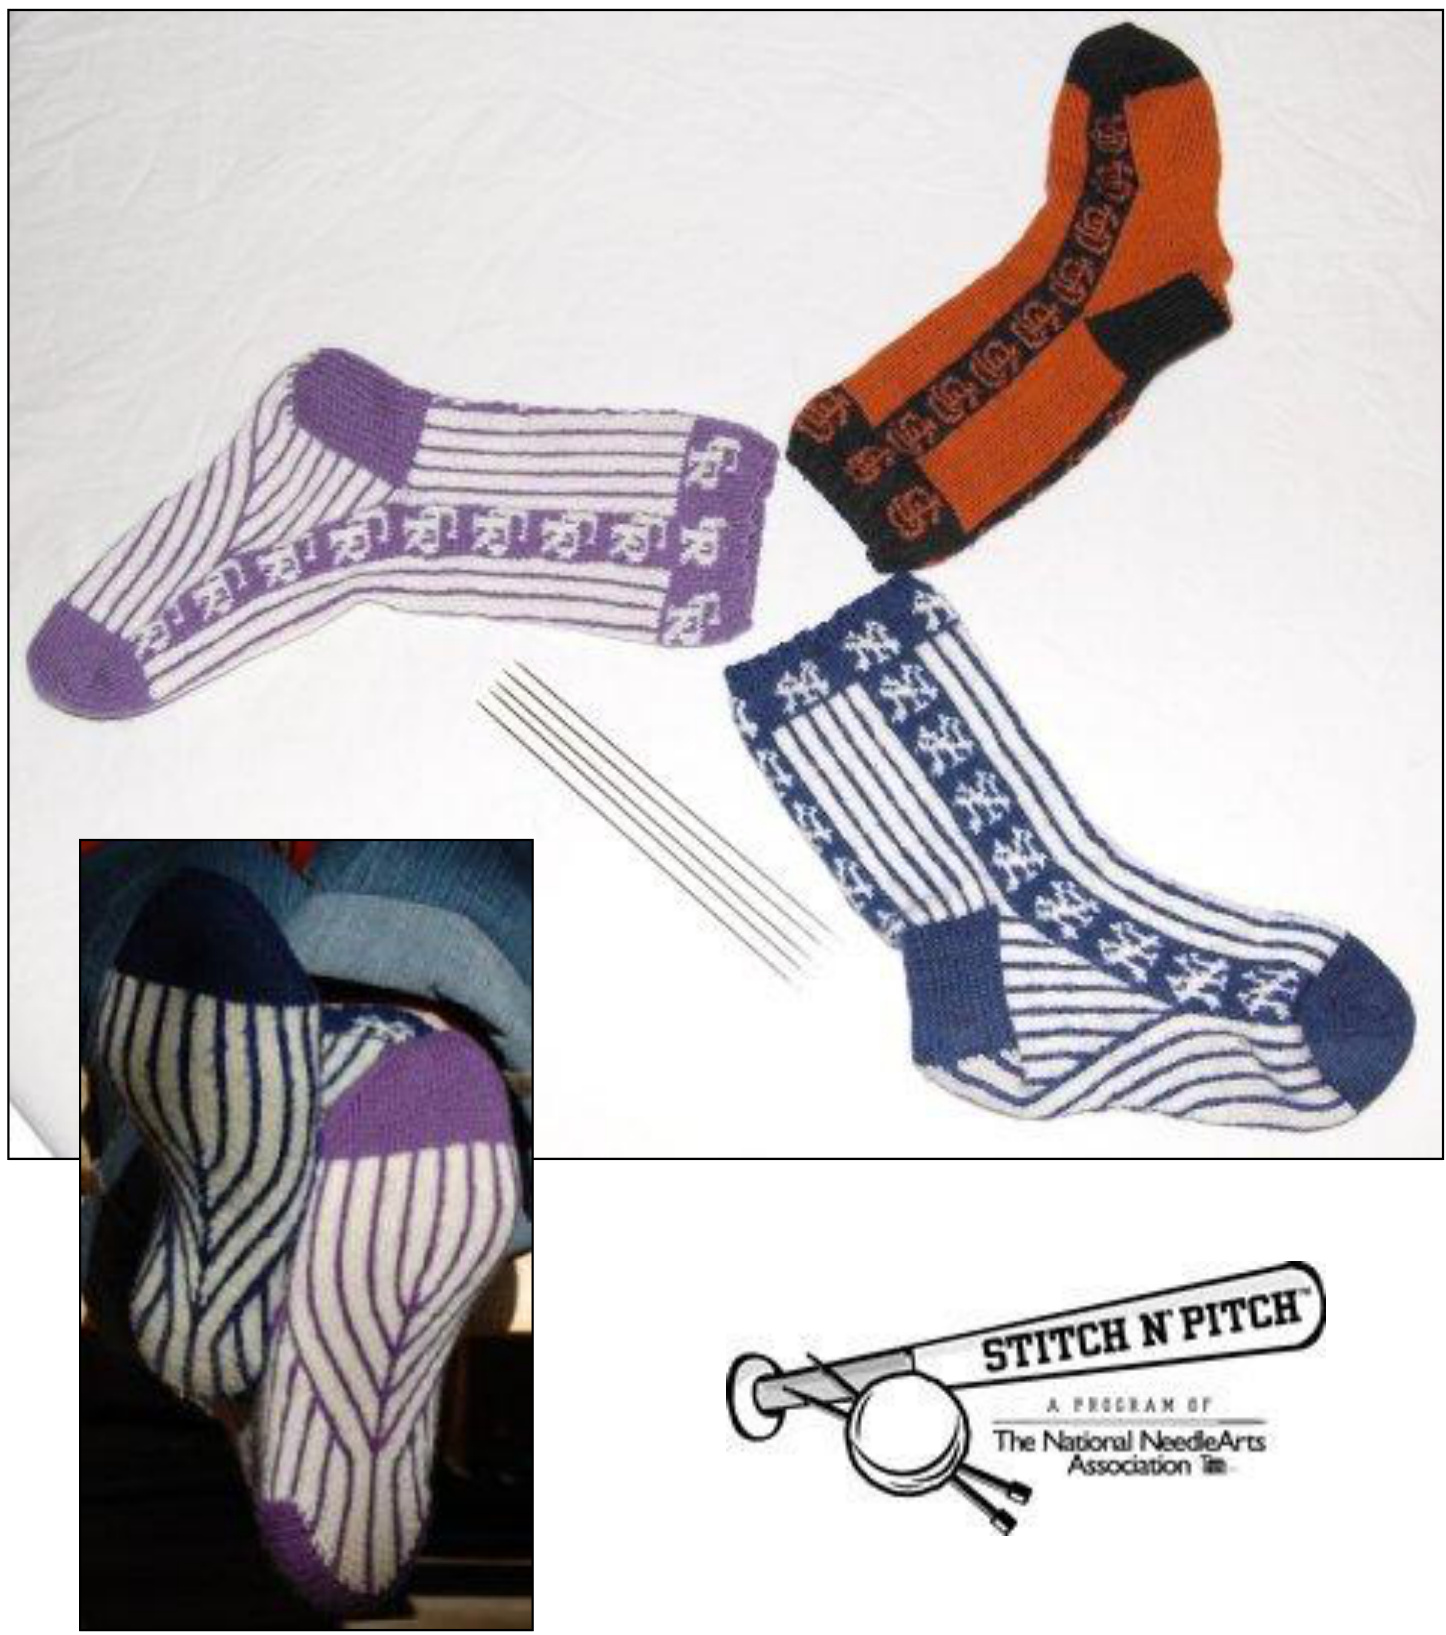
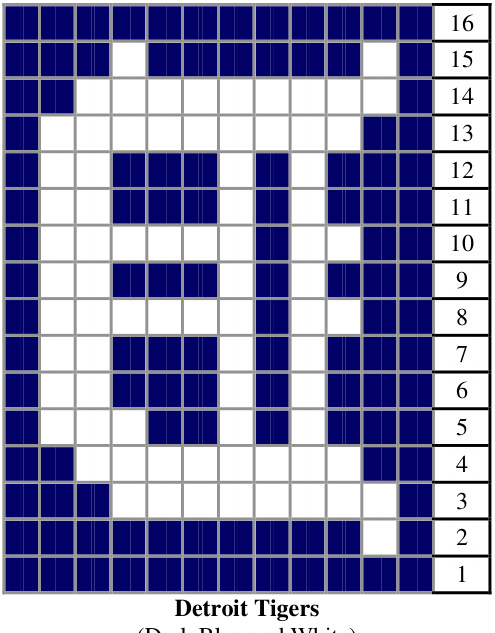
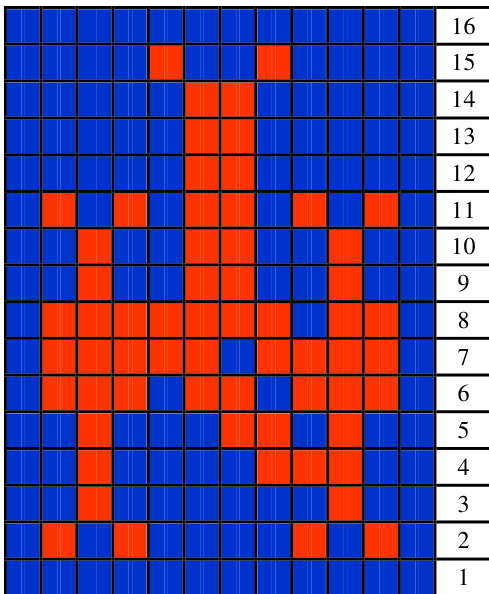
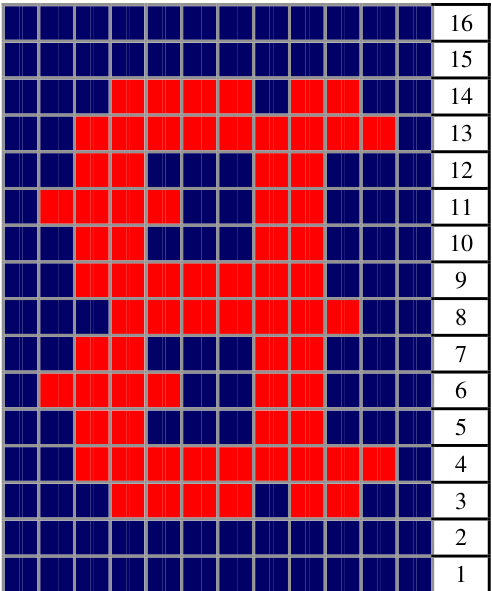
I have included stitch patterns for 27 of the 30 current Major League Baseball teams and the Brooklyn Dodgers. (They are shown at the end.) You will note that all of the logos are upside down; this is deliberate. This is a top-down sock patern, so you wil folow the chart from bottom to top (this will make sense once you start knitting). I have also included a blank grid, if you would like to design and knit the logo of your favorite minor league or litte league team. (Just remember to design the logo upside down.)
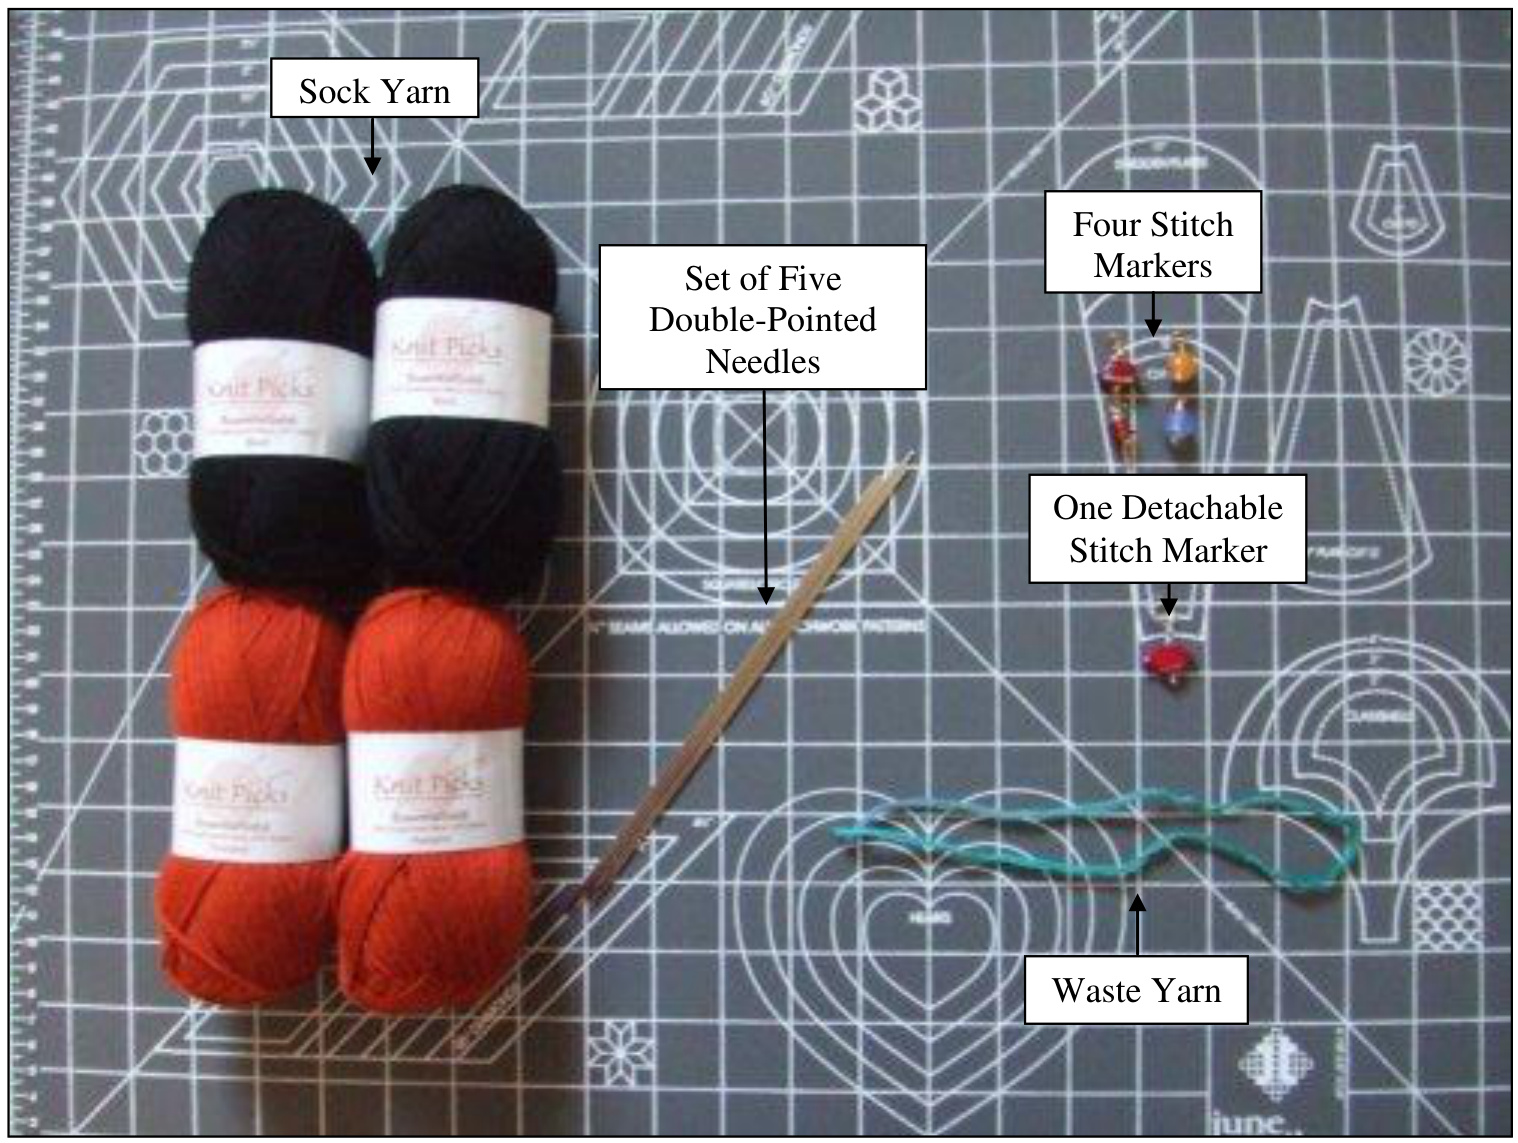
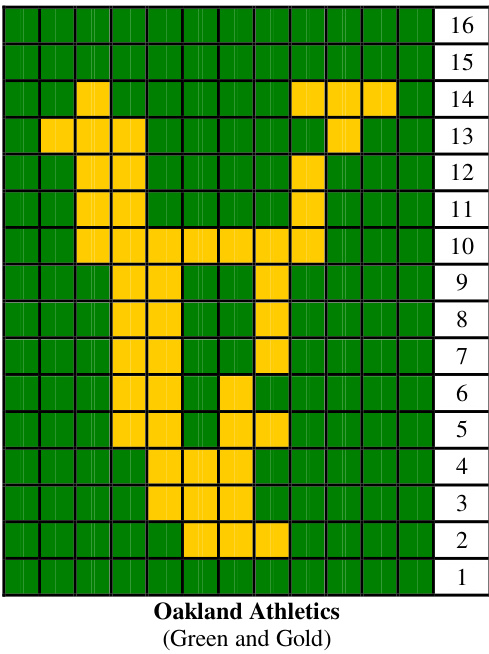
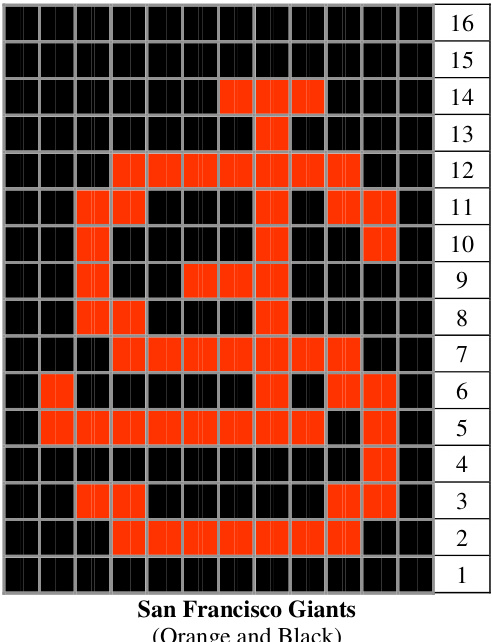
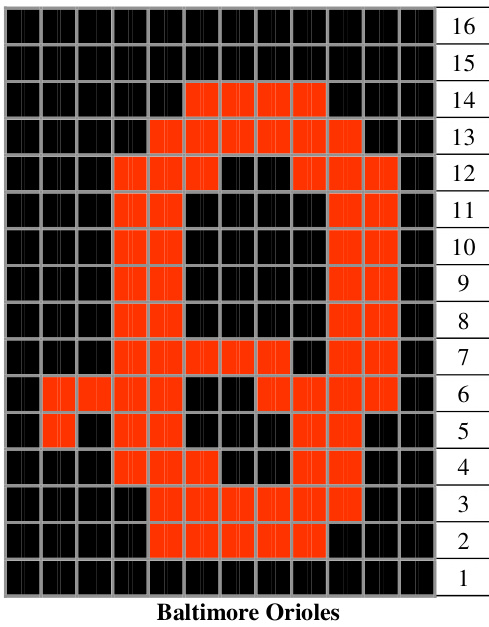
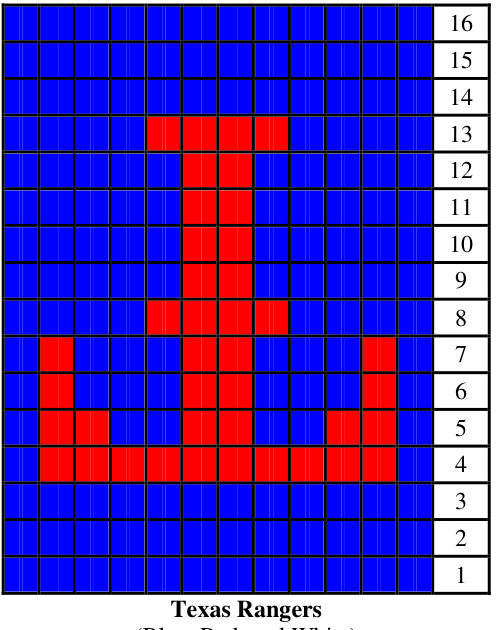
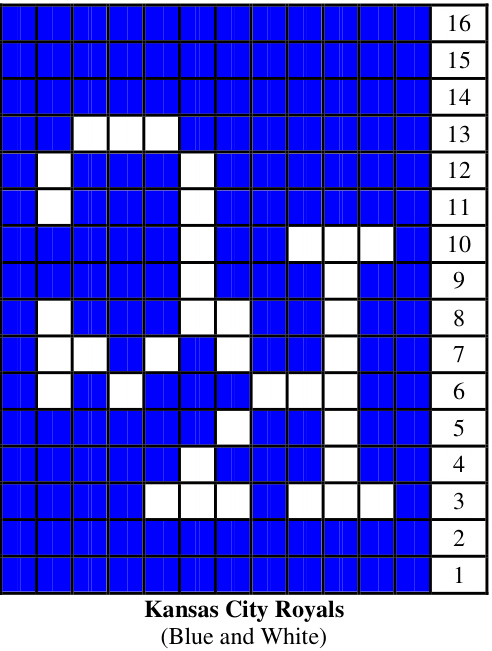
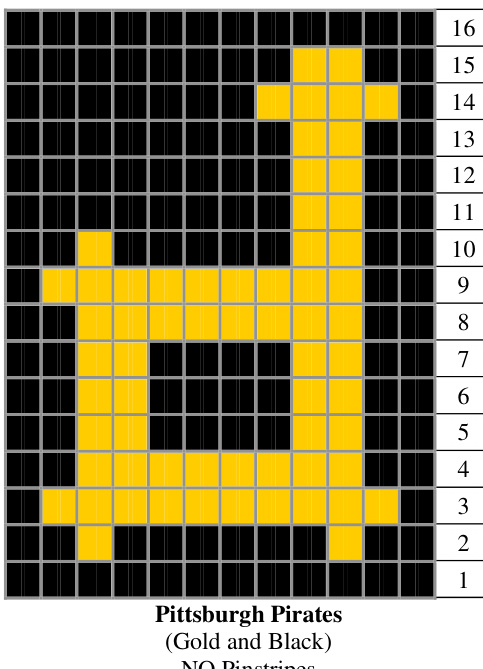
Sock yarn (fingering weight) in the your team colors. Get sock yarn specificallyitypically knits at about 30 stitches/ 4 inches, and is about $75\%$ wooland $25\%$ nylon. You will need approximately 400 yards (2-50 gram skeins) of your main color (MC), 400 yards (2-50 gram skeins) of your contrast color (CC),and 400 yards (2-50 gram skeins) of your second contrast color (CC2), if your team's sock has three colors. The list of team yarn colors is as follows: ■ NEW! Brooklyn Dodgers: (MC)-White, (CC)-Blue ■ NEW! Tampa Bay Rays: (MC)-White, (CC)-Blue ■ Los Angeles Angels of Anaheim: (MC)-White, (CC)-Dark Blue, (CC2)-Red ■ Oakland Athletics: (MC)-Gold, (CC)-Green ■ Toronto Blue Jays: (MC)-White, (CC)-Blue ■ Atlanta Braves: (MC)-White, (CC)-Dark Blue, (CC2)-Red ■ Milwaukee Brewers: (MC)-White, (CC)-Dark Blue ■ St. Louis Cardinals: (MC)-White, (CC)-Red ■ Arizona Diamondbacks: (MC)-Black, (CC)-Dark Red ■ Los Angeles Dodgers: (MC)-White, (CC)-Blue San Francisco Giants: (MC)-Orange, (CC)-Black ■ Cleveland Indians: (MC)-White, (CC)-Dark Blue, (CC2)-Red ■ Washington Nationals: (MC)-White, (CC)-Red ■ Baltimore Orioles: (MC)-Orange, (CC)-Black ■ San Diego Padres: (MC)-White, (CC)-Dark Blue, (CC2)-Taupe ■ Pittsburgh Pirates: (MC)-Gold, (CC)-Black ■ Texas Rangers: (MC)-White, (CC)-Blue, (CC2)-Red ■ Boston Red Sox: (MC)-White, (CC)-Dark Blue, (CC2)-Red ■ Cincinnati Reds: (MC)-White, (CC)-Red ■ Kansas City Royals: (MC)-White, (CC)-Blue Detroit Tigers: (MC)-White, (CC)-Dark Blue ·A set of five Size O $\mathrm{2\mm})$ double-pointed (DP) needles for the larger size, a set of five Size 000 ( $\mathrm{\left\lfloor.5\mm\right\rangle}$ doublepntedal i att discussed below.) Four stitch markers (for marking stitches along needles) One detachable stitchmarkr (to mark theeginning of your row. Ioften use apaper clipora safety pinfor this.) ? Waste yarn (for knitting the hee flap and testing sock size) ? Blunt tapestry needl (not shown)
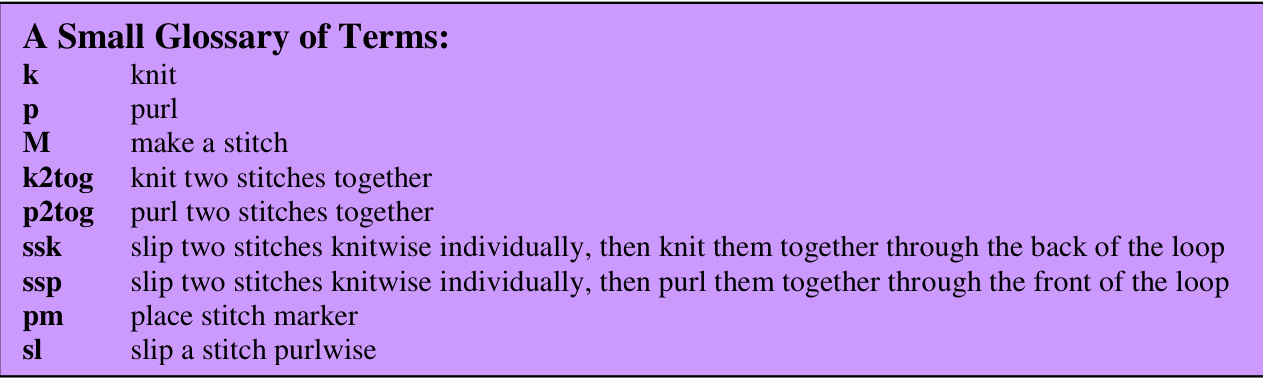
Stitch gauge:
Uusing the long-tail cast-on or whichever cast-on you prefer),cast on 30 stitches and knit a swatch at least $2^{\circ}$ long Measure the number of stitches in two inches. You should have 20 stitches/2 inches for the larger size, or 22 stitches /2 inches for the smaller size. The correct gauge is very important for a proper fit. Instructions:
Casting On:
Malke a slip knot aproximaely 1 yard into C yarn $\cdot$ Hook your si knot over two DP needles UIsing the long-tail cast-on over two DP needles (or whichever cast-on you prefer), cast on 80 stitches.
Knitting the Cuff:
Distribute your 80 stitches evenly over 4 needles (20 stitches to a needle). Forming the needles into a circle, join the stitches in the round, being careful not to twist the stitches (otherwise you will end up with a mobius sock $\circledast$ ).Attach your detachable stitch marker at the beginning of your row, to keep track. Move this marker down as you work, so you do not get confused. Begin knitting in the following pattern: $*\mathrm{l}_{\xi2}$ , $\mathrm{p}2^{*}$ , repeat until the end of the row. Continue this $2\mathbf{x}2$ ribbing for 5 more rows (6 rows total). Aftaisth9s the following pattern: \*k5, M1\*, repeat until the end of the row. Once you ncrease your stitch count to96, rearrange your stithes ont 3needs, with 32 stitchs on each need. Place a stitch marker 16 stitches in on each needle. Your knitting should nowbe divided into six equal sections of 16 stitches each. You have now reached the logo pattern! Find your logo pattern (cut it out and tape it to a small piece of cardboard if you need to) and be prepared to follow it. This next row willstat at Row 2 of your logo pattern. If necessary, your logo may call for MC (and/or CC2) at this point. When you find you have to add an additional color(s), be sure to strand the non-knitted color along the back fairly loosely. Your knitting should lie flat (it should not pucker), and you should be able to stretch the stranded knitting slightly beyond its normal knitted tension. Try not to let any one strand hang loose for longer than 3-6 stitches. In those cases, wrap the stranded yarn with the knitted yarn, so the loose threads stay close to the fabric.
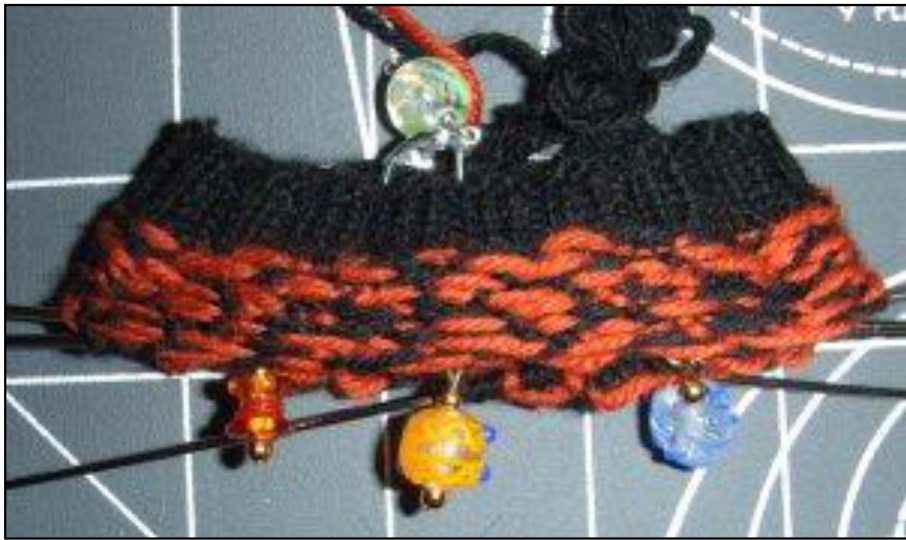
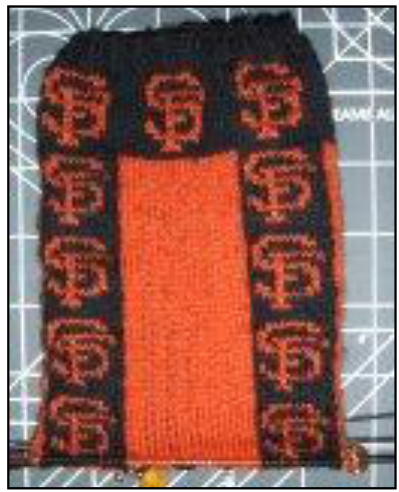
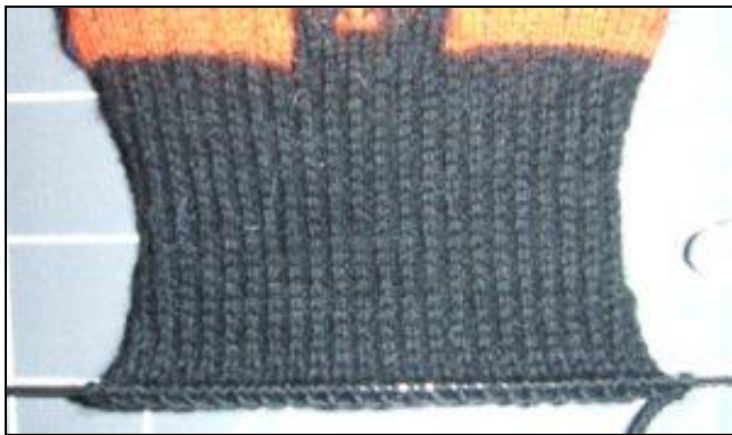
An example of stranding in the cuff along the inside (wrong side) of the fabric. Notice that the MC (orange) is twisted in every 3-6 stitches. Knit the next few rows as follows: \*Knit Row 2 of logo pattern, $\mathrm{k4}$ $\mathrm{CC*}$ , repeat until the end of the row (a total of six times). This is a 16- stitch repeat, and should end either at a stitch marker or the end of a needle. ·Knit Rows 3-15 of the logo pattern in a similar fashion: \*knit row of logo pattern, $\mathrm{k4}$ f $\mathrm{CC*}$ , repeat until the end of the row. As you knit Row 16, decrease to 93 stitches as follows: $*_{\mathrm{k}30}$ of CC, $\mathrm{k}2\mathrm{tog^{*}}$ , repeat until the end of the row. There will be three repeats total, one per needle. Your final cuff should look something like this:

After you have finished the cuff, now would be a good time to check that your sock will actually fit. Starting from the first stitchf yurrow, thread allof yor stithentoyurwast ya,uing the tapestryneed.Trytoplth cuff over you heel and anle. It mightbe a litte snug ver you hel ut the pont is, i shoul fit. Ifit is too tit $\circledast$ (do not worry, this has happened tome too),try anothr gauge swatch on largerneedles with 18 stitches/2 inches for th larger size, or 20 stitches/ 2 inches for the smaller size. Then go back to “Casting $\mathrm{On}^{\mathfrak{s}}$ and try again. If it does fit, re thread your knitting back onto your needles and move onto the leg.
Knitting the Leg:
tart from the beginning of the round and knit as follows: 1.Start with Row 1 of your team logo. (You should be knitting already with CC [and maybe CC2] ball A.) Knit team logo (over 12 stitches, stranding MC), pm, k19 MC (NO STRANDING OF CC), attach CC (and CC2) ball B and knit next team logo (over 12 sitches,stranding MC), pm, k19 MC (NO STRANDING OF CC), attach CC (and CC2) ball C and knit next team logo (over 12 stitches, stranding MC), pm, k19 MC (NO STRANDING OF CC). You should now be carrying three separate lines of CC (and CC2), one (two) for each column of logo, but only the MC should be stranded behind the logos. 2.When you come to the logos on Row 2, you will find that your CC lines are on the far side. This may seem like a problem, but this is where we
3. Complete Row 2 as follows: \*knit team logo using festive knitting with the appropriate individual CC (and CC2) yarn, k19 of $\mathrm{MC^{*}}$ , repeat between the $^{**}$ until the end o the row. There will be 3 repeats total, one per needle. 4. Complete Row 3 as follows: \*knit tam logo normally with the appropriate individual CC (and CC2) yarn, $\boldsymbol{\mathrm{k}}19$ f $\mathrm{MC*}$ , repeat between the \*\* until the end of the row. 5. Alternately repeat Steps 3. and 4. for even and odd rows of the team logo pattern, until you reach Row 16 (you will end with Step 3.). Repeat Steps 5. three more tmes, for a total of4 repeats of the logo pate.
Knitting the Heel Flap:
At the end of your fourth repeat of the leg team logo pattern, start the heel flap. Rearrange your stitches as follows: ●Needle 1 (including the first team logo): 30 stitches. Remove the stitch marker from this needle · Needle 4: 18 stitches Set aside the removable stitch marker for now. Put the remaining 45 stitches on waste yarn. The heel flp begins as follows: Ifyou have a CC2 strand, cut it at this point with a 4-inch tail. Knit Row 1 of the first team logo, then k18 of MC (to the end of Needle 1). For this frst row, strand CC behind MC up to this point (you will need it in a minute). · Combine allstitches not on the waste yarn onto one needle. (While working the heel flap, you should only need two needes.) Cut your MC, leaving a 4-inch tail. Turn your work and purl back with CC for 48 stitches (these should be all of your live stitches). Using CC, work the heel flap uing the “Eye of the Parridgetechnique (which looks litte likek, p ribbing): 1.° \*sl1, $^{\,1\ast}$ , repeat until the end of the row. Turn. 2. Sl1, p to end of row. Turn. 3. Repeat Steps 1 and 2. twenty-four times, for a total of forty-eight rows. 4. Repeat Step 1. one final time.
How to do FESTIVE KNITTING:
Examiepaafllfuaeanstnyustat witacft stitches, and sip each of th CC andCC stithes a if to pul. lipstithes allthe wayto th endof the ogo pat.
Knit the MC stitches in your row.
Slip any stitches that are supposed to be CC. 2. Turn your work around so that you are looking at the inside (wrong side) of the sock; now you can purl. (You should notice that, from this side,yourC and ine is nowin therght place to purlStarting frm this end of thelogo, take yourCandines and purl back along thlog, seificallyint the stitchs yuhad slipdbeore, ad slipping the MC stitches you had previously knit. When you have finished this row of the logo, tun your work and slip the logo stitches once again. You wil ow be ready to continue the MC pattern.
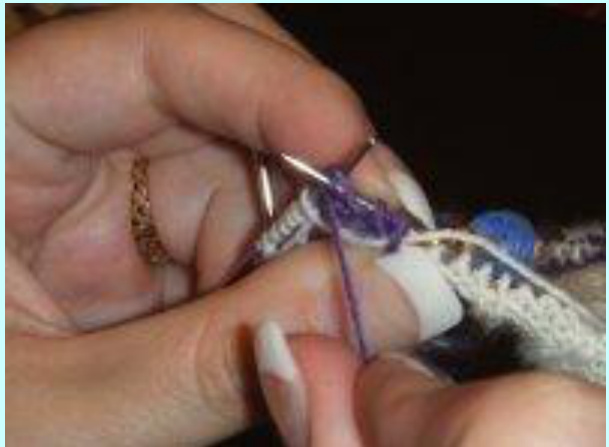
Slip the stitches you had already knit with the MC. Turn your work and pur the stitches you had slipped previously. NOTE: BE VERY CAREFUL TO KEEP YOUR TENSION LOOSE ENOUGH. IT IS VERY EASY TO MAKE FESTIVE KNITTING PUCKER, ESPECIALLY AT THE EDGES. But whatmyCCandCC2lineisat thewrong endandIhavenoMCstitches in theteam logo patten row.hould Ijust slip all 12 stitches and purl back? Good question. No. At the top or bottom of your logo, you are likely to run into a row where you need to do festive knitting, but it looks like you should strand across 12 stitches, which is too far. In that case (see the pictures below), make a point of twisting the CC and CC2 yarn around the MC yarn every 3-6 stitches as you purl. Additionally, make sure to pull your MC yarn tight(ish) behind your CC and CC2 yarn after you have caught your stitches.
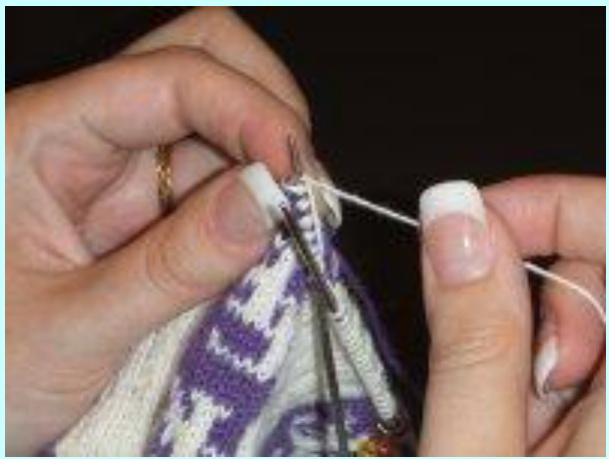
1. Slip all the team logo stitches.
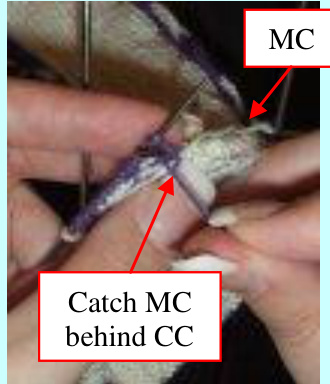
2. Catch your MC yarn with your first purled CC stitch.
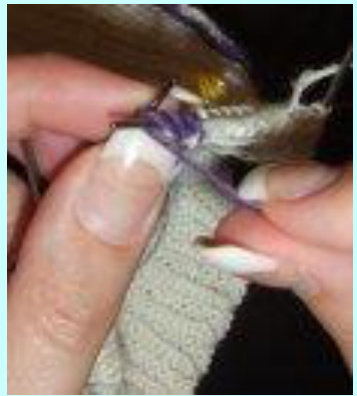
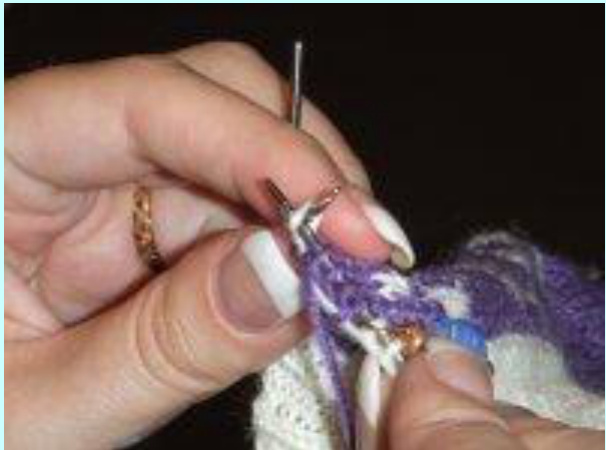
3. Purl a few stitches, holding the caught MC loosely.
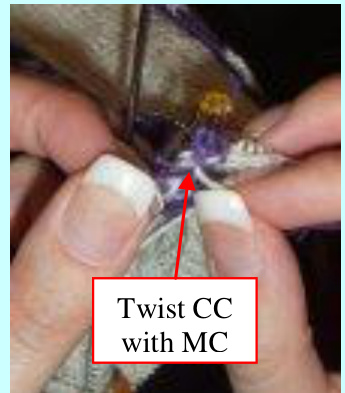
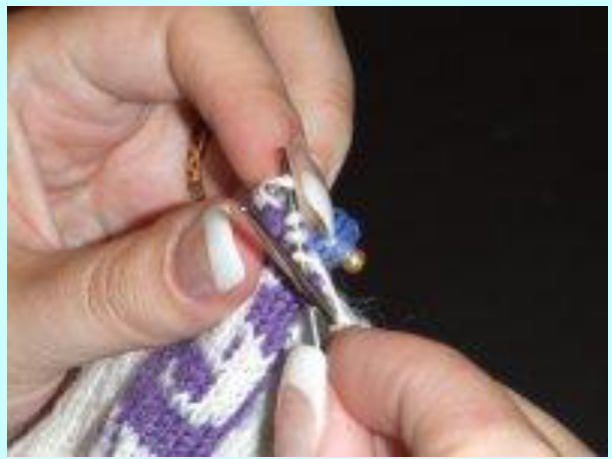
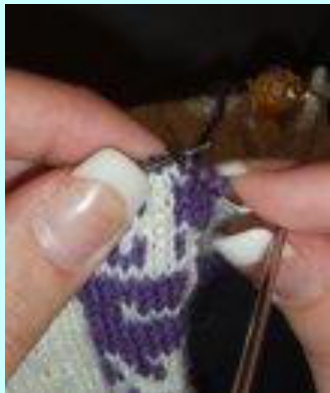
4. Twist the CC with the caught MC. Purl a few more stitches. Repeat 4. Your final heel flap will look something like this:
Turning the Heel:
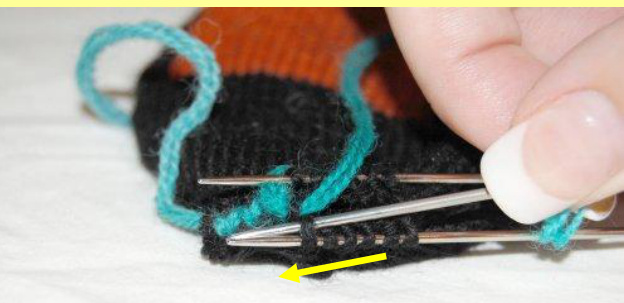
Work as follows: 1.Cut ball A of CC, leaving a4-inch tail. Sl23 stitches purlwise, so you are starting from the middle of the row. Starting from the purl side, with MC, p2tog, 2tog, p1, turn your work to start knitting in the opposite direction (yes, I know you are in the middle of the row). 2.You should now be looking at the knit side. Sl1, k2, ssk, k1, turn your work. 3.Younwhulbe lking at the purl sid. l pul utiln stchfre ticable gapin the stith (see the pcture below). P2tog across this gap, pi, turn your work. 4.You now shouldbe looking at the knit side. Sl, knit until one stitchbefore nticeale gap in the stitches (see the picture below). Ssk across this gap, k1, turn your work.
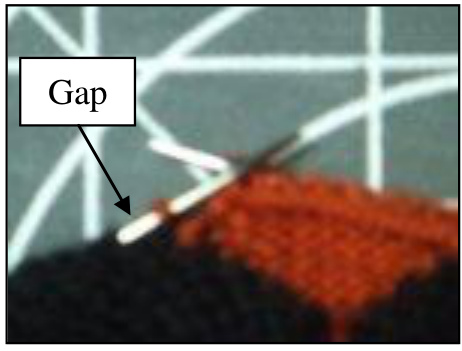
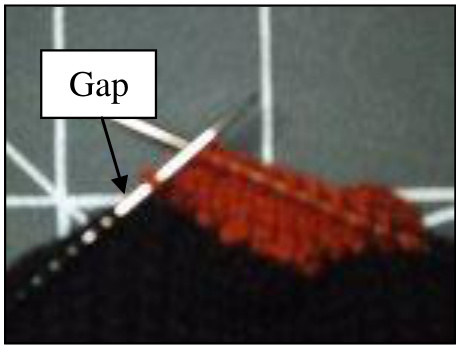
The "gap" in heel turning as you knit. Repeat Steps 3. and 4. until there are no stitches left, ending with Step4.Towards the end, you willprobably have t do a p2tog orsska the end of the row;, this is fine. In the end, you willhave 25 stitches of MC on your needle. Congratulations! You have successfully turned a hee!

Knitting the Foot:
Knitting the foot consists of several parts. When you pick up your stitches around the heel, you willfind you have many more stitches than the number you need to go around your foot. Therefore, you will decrease these extra stitches out in gussets. At the same time, you will begin working the arch-shaped, fitted portion along the bottom of the foot. (All of this, of course, while you are continuing the logo repeats fo the remaining two columns $\circledast$ 一 Knit as follows: 1. Move the stitches held on the waste yarn to a new needle, removing waste yarn. 2. Starting from the end of your turned hee, use a new needle to pick up and $\mathrm{k}26$ stitches along the side of the heel flap, using MC. The final stitch between the heel flap and the stithes from the waste yar may become loose, so twist this “corner” stitch once or twice before knitting it.
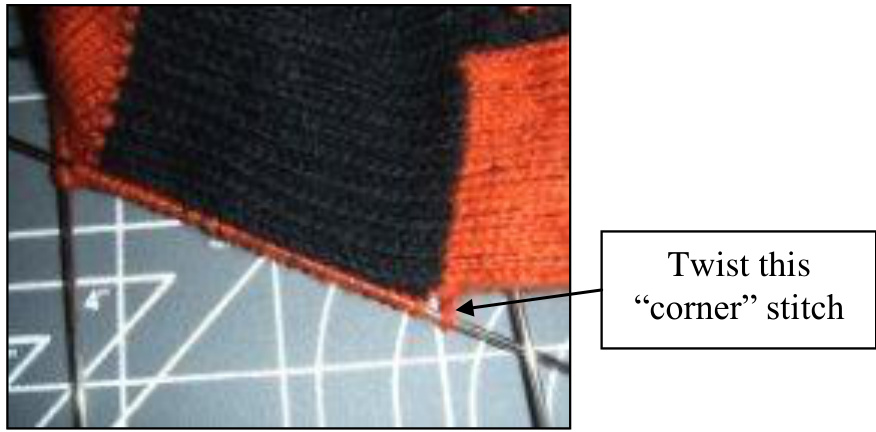
An example of the picked-up heel flap stitches 3. Knit the first stitch from the waste yarn and transfer it to the previous needle, so all of your MC stitches are on the same needle. 4. Knit the stitches formerly on the waste yarn as follows: Knit Row 1 of team logo (this should be a continuation of the previous column, using ball B of CC), pm, k19 MC, pm, knit Row 1 of team logo (this should be a continuation of the previous column, using ball C of CC), k1 MC. 5. Use another new needle to pick up and $\mathtt{k26}$ stitches along the final side of the heel flap, using MC. Since the first stitch between the heel flap and the stitches from the waste yarn may become loose, twist this corner stitch once or twice before knitting it, as you did with the other corner stitch. Transfer the final stitch of the stitches formerly on the waste yarn (the only MC stitch after the second team logo) onto this needle. 6. You should now have four needes withstitches. Knit twelvestitches into the next needle this should line up with the center of the heel) and rearrange your needles as follows: ●Needle 1: 40 stitches (from rough heel center to beginning of first team logo) Needle 2: 22 stitches from beginning of first team logo to rough center of top of foot, also called the instep) ●Needle 3: 21 stitches (from rough center of instep to end of second team logo) ? Needle 4: 39 stitches (from end of second team logo to rough heel center) 7.Place your detachable stch marker linedup with the frst stith ofNeed 1 (at heel center). This is where your row will tart from now. 8. To decrease your gusset: a.First row: Knit,follwing pattern, using festive knitting in the logo colms thes wil be the evennumbered team logo rows). b. Second row: Needle 1: Knit MC to one stitch from end of needle. Slip last stitch to Needle 2. Needle 2: K2tog within pattern (so that the MC stitch disappears behind the team logo pattern). Finish team logo pattern. K10 MC. Needle 3: K9 MC. Knit first 11 stitches of team logo. Slip last stitch of team logo knitwise. Slip first stitch of Needle 4 to Needle 3 knitwise. Knit these stitches together through the back of the loop, like ssk (so that the MC stitch disappears behind the team logo pattern).
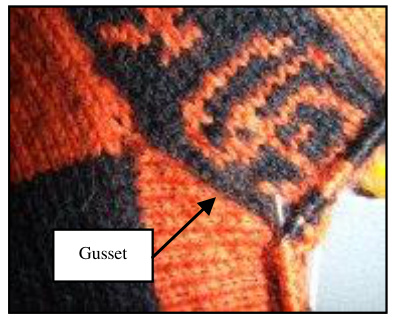
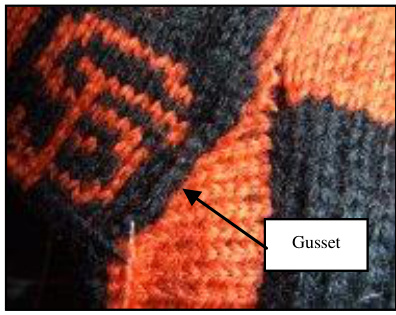
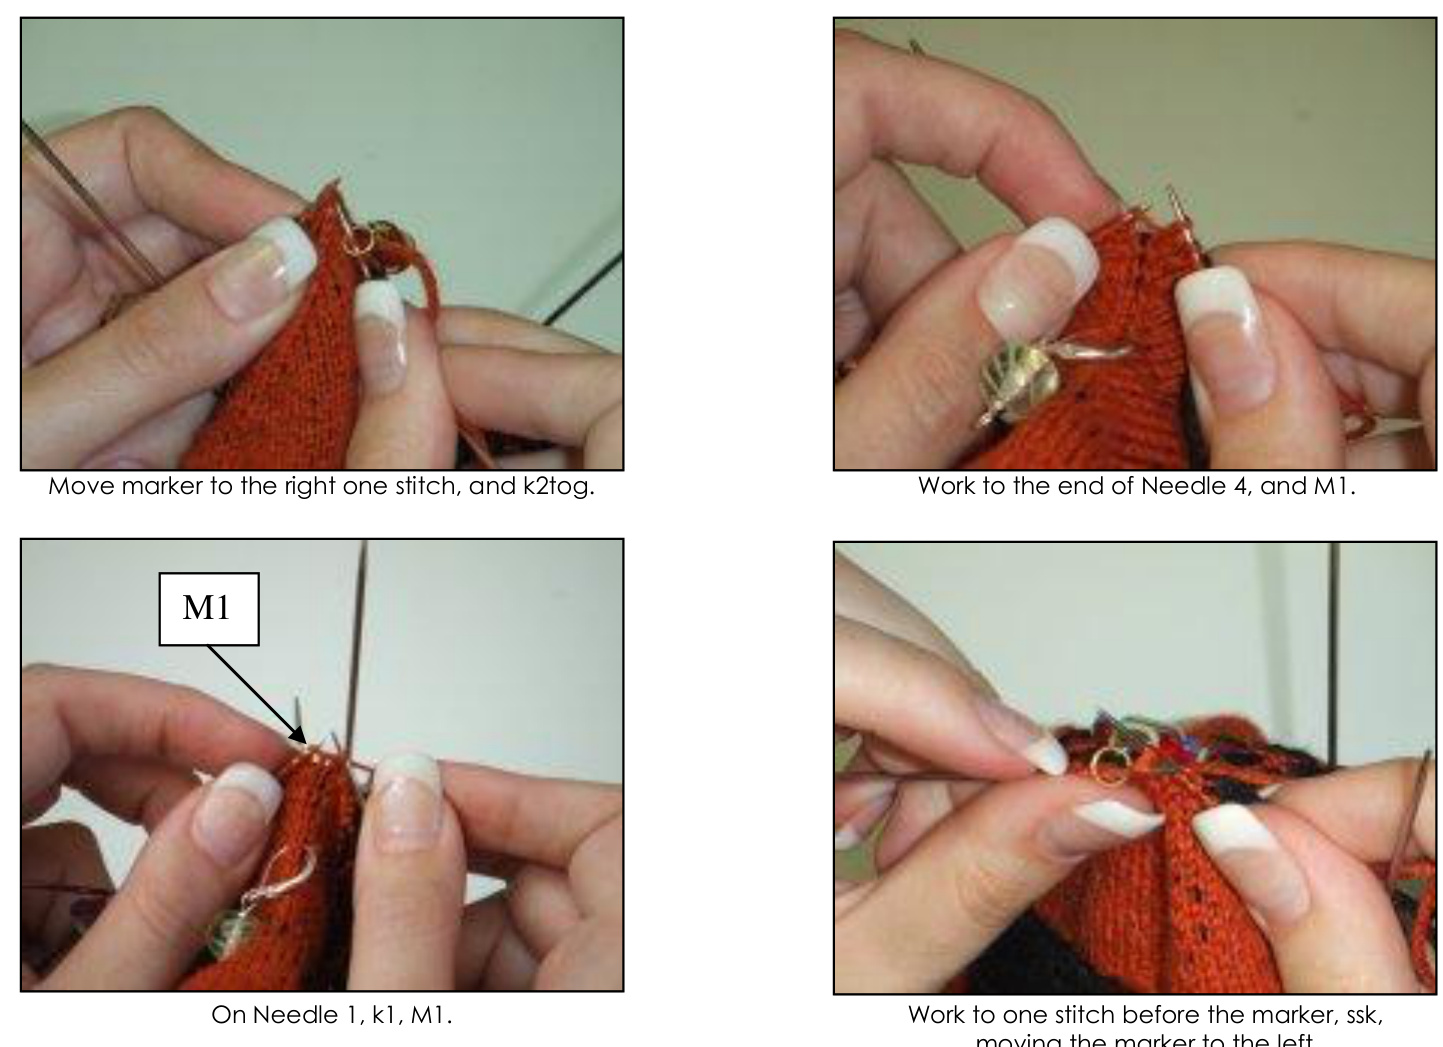
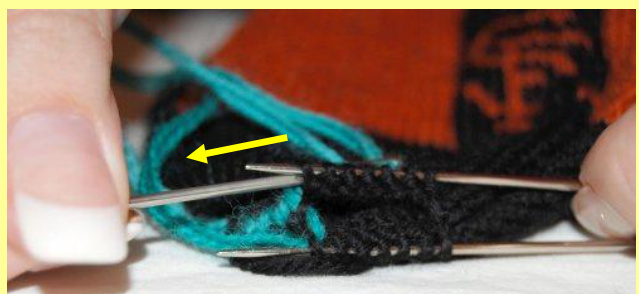
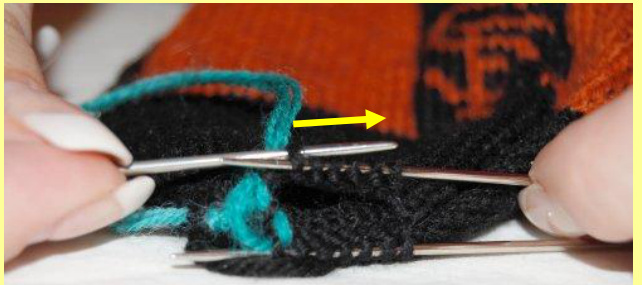
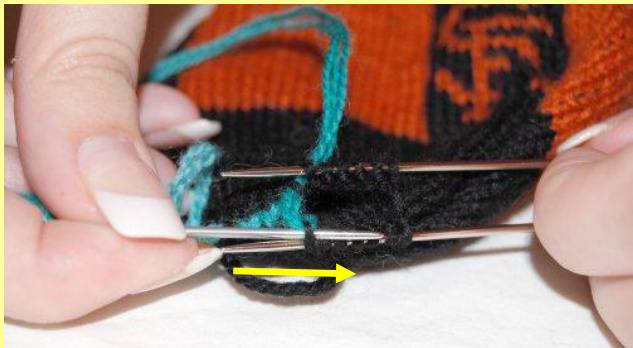
Example of decreasing gusset on right side 9. Knit six rows of gusst decreases Stes 8. a. and b.) before you start toinclude the arch shaping. The arh shaping occurs on the uerside of th foot and creates abiasstitch that causes the socktohug the archof yur foot in a way that store-bought socks never do $\circledcirc$ . Knit the arch shaping as follows: a.Knit the seventh row of gusset decrease until five stitches from the end of Needle 4. Pm, k2tog, k3 (you should be at the end of Needle 4), M1. b. At the beginning of Needl 1, k1 (your center bottom stitch), M1, k3,ssk, pm. C. Continue knitting the next row of your gusset decrease (this will be Row 8. b.). When you come back to the bottom, knit straight through on Needles 4 and 1. d.Continue kniting the next row of your gusset decrease (this willbe Row 8. a.), until one stitch borethaesthrn knit to the end of the Needle 4, M1. At the beginning of Needle 1, k1, Mi, knit to one stitch before the marker, s, moving the marker to just ater the ssk stitch. (The pictures below show the steps.) e. Continue Steps c. and d. until you can count 20 stitches between your center bottom stitch and your markers. (You will finish your arch shaping before you finish your gusset decreases.) 10. Continue a. and b. in Step 8. until you have decreased to 82 stitches total, removing stitch markers when appropriate. 11. Afe you nsh th gusst decreas, ontinue knitting the foot oer thse2 stitchs utilyou have dd another four reeats of the team logo pattern. There shouldbe nine repeats total along the twolong columns: one in the cuff $+$ four in the leg $+$ four in the foot. Finish your final row at the bottom of the foot, at the end of Needle 4. Afteryousht guset as, cotiuwring fotetstithutilyuhavdd ant repeats of the team logo pattrn. There should be nine repeats total along the two long colmns: one in the cff $^+$ four in the $\log^{+}$ four in the foot. Finish your final row at the bottom of the foot, at the end of Needle 4.
Knitting the Toe:
Toevenout your stitches, shift one stitchfrm Needl 2toNede and one stitch frmNeede 3 toNeedle4 (y, I know we have just stolen stitches from the team logos!l) You should now have as follows: Needle 1: 21 stitches · Needle 2: 21 stitches Needle 3: 20 stitches Needle 4: 20 stitches
Continue your patten until the end of Needl 1, making sure to knit the last stitch in CC, as it is part of the team logo column. Cut your MC (and poibly CC2) yarn, leaving a 4-inch tail. Move your detachable stitch marker to between Needl and Needle 2, as our round wil now be starting from here. Starting from Needle 2, and using only CC, knit the following decreases: 1. Knit entire row. 2. Knit as follows: ·Needle 2: K1, ssk, knit to end. ■ Needle 3: Knit to last three stitches, k2tog, k1. ■ Needle 4: K1, ssk, knit to end. ■ Needle 1: Knit to last three stitches, k2tog, k1. 3. Repeat Steps 1. and 2. until 42 stitches remain. 4. Repeat Step 2. until 22 stitches remain. Slip the stitches from Needle 3 to Needle 2, and the stitches from Needle 4 to Needle 1. You should have two needles with 11 stitches each. Cut the CC yarn, leaving a 12-inch tail. Thread the 12-inch tail onto the tapestry needle and use the Kitchener Stitch se the box below) to graft the toe. Afterwards, turn the sock inside out and use the tapesry needle to weave in any remaining loose ends, remembering to pull the associated stitches tight. Photographs by Laurel Rachmeler, Meredith Davey, and Pamela Batchelor.
1. Pass the tapestry needle through the first stitch on the front needle as if to knit. Drop that stitch off the needle and pull the yarn through. 2. Slide the tapestry needle through the next stitch on the front needle as if to purl. Leave this stitch on the needle.
3. Pass the tapestry needle through the first stitch on the back needle as if to purl. Drop that stitch off the needle and pull the yarn through.
4. Slide the tapestry needle through the next stitch on the back needle as if to knit. Leave this stitch on the needle. NEW LOGOS! Brooklyn Dodgers and Tampa Bay Rays
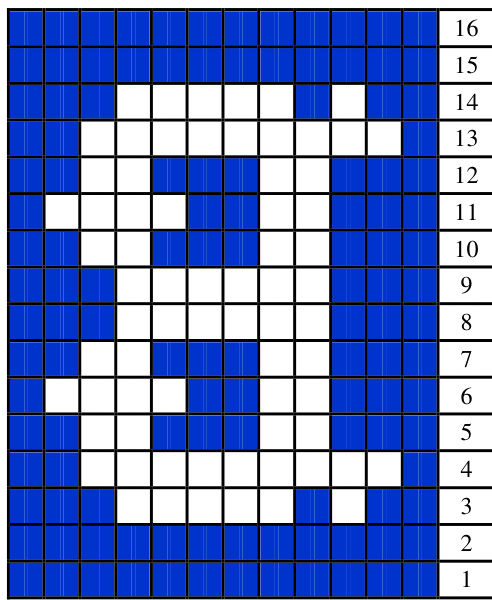
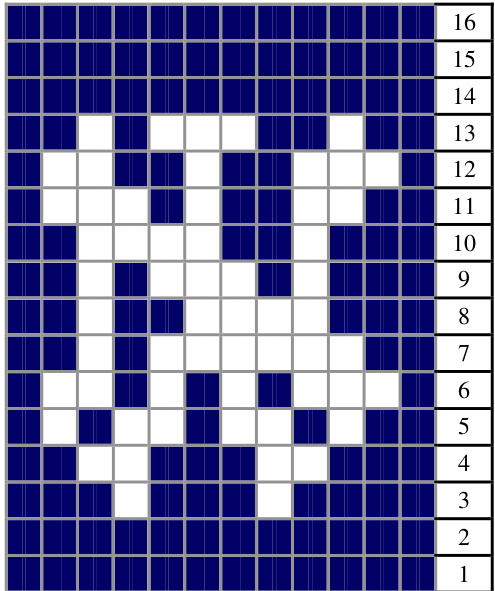
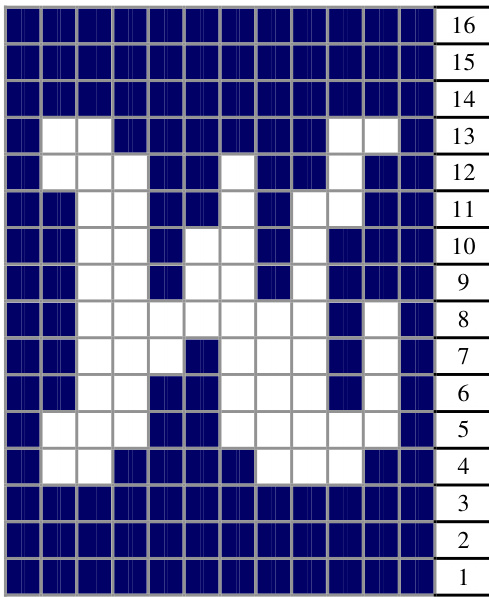
NEW! Brooklyn Dodgers (Blue and White) NO Pinstripes
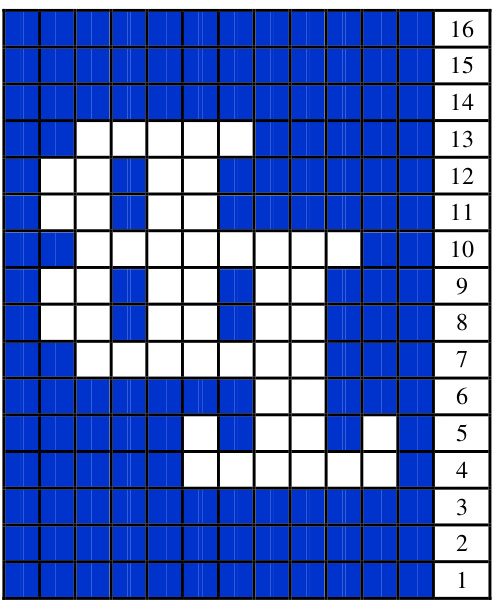
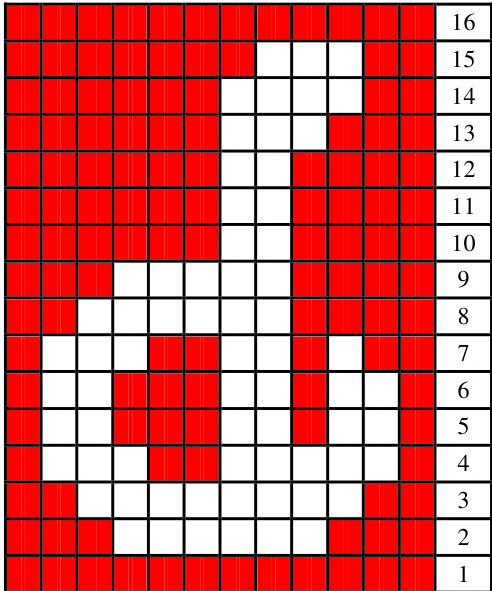
NEW! Tampa Bay Rays (Blue and White) NO Pinstripes
Chicago Cubs (Blue, Red, and White) PINSTRIPES: Blue
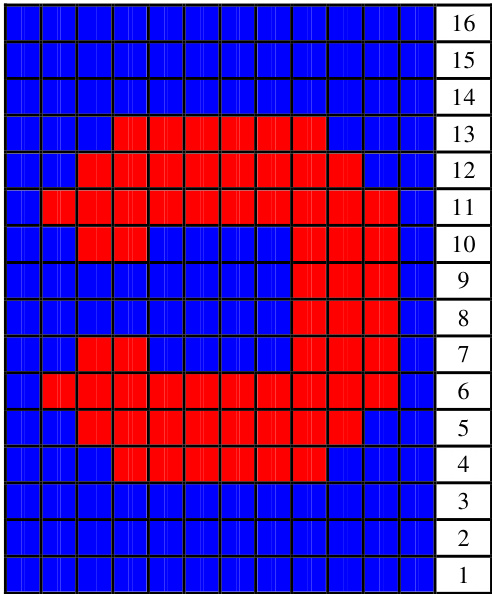
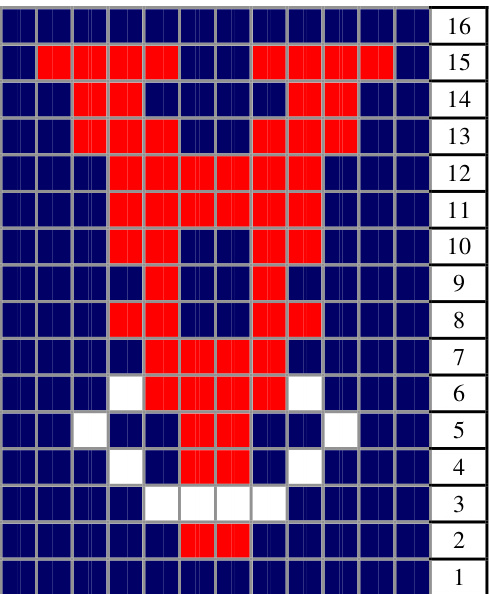
New York Mets (Bright Blue, Orange, and White) PINSTRIPES: Blue
Philadelphia Phillies (Red and White) PINSTRIPES: Red
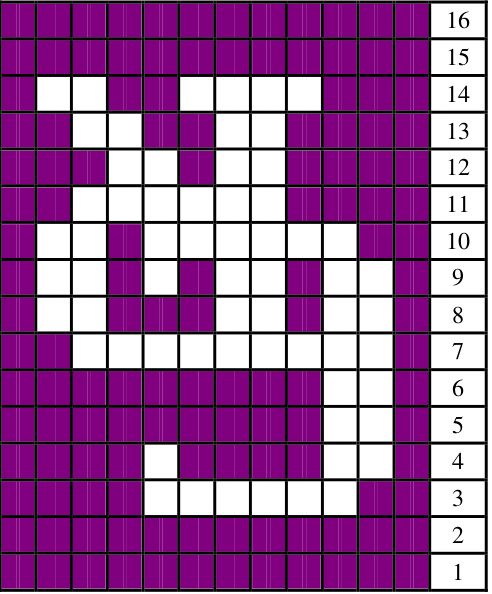
Colorado Rockies (Purple and White) PINSTRIPES: Purple
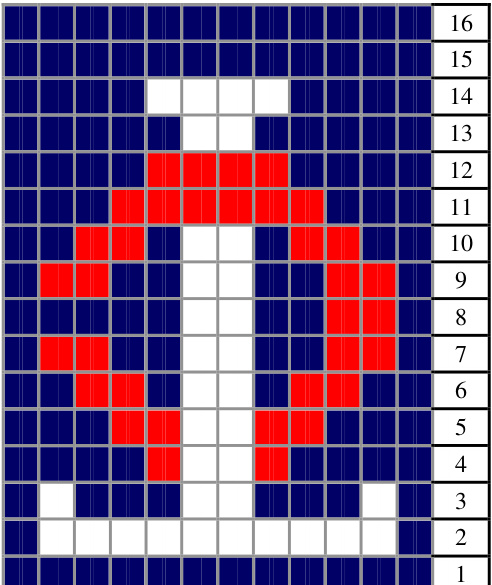
Minnesota Twins (Dark Blue, Red, and White) PINSTRIPES: Dark Blue
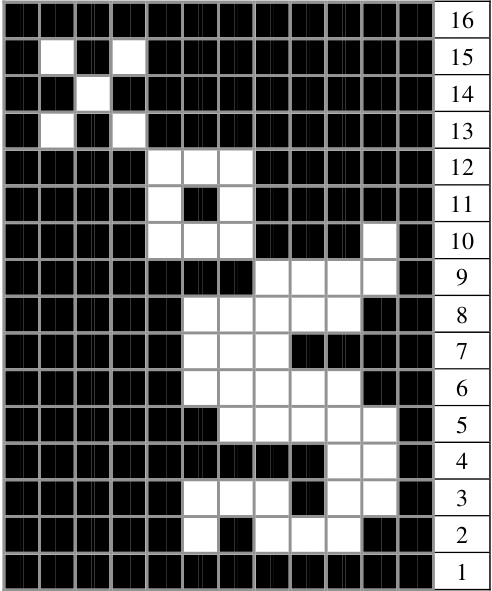
New York Yankees (Dark Blue and White) PINSTRIPES: Dark Blue
Chicago White Sox (Black and White) PINSTRIPES: Black
Los Angeles Angels of Anaheim (Dark Blue, Red, and White) NO Pinstripes

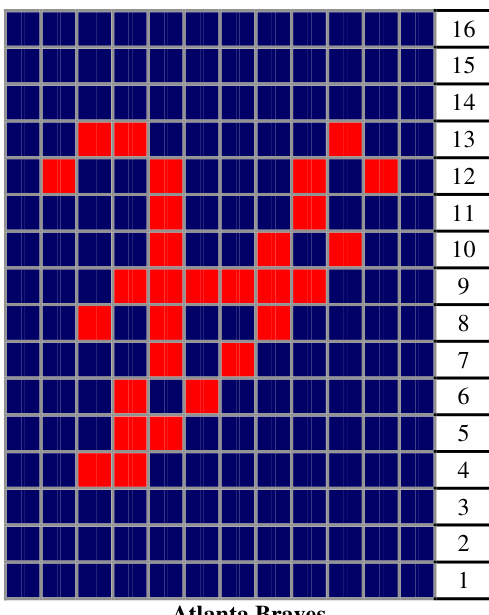
Auata Draves (Dark Blue, Red, and White) NO Pinstripes
Milwaukee Brewers (Dark Blue and White) NO Pinstripes
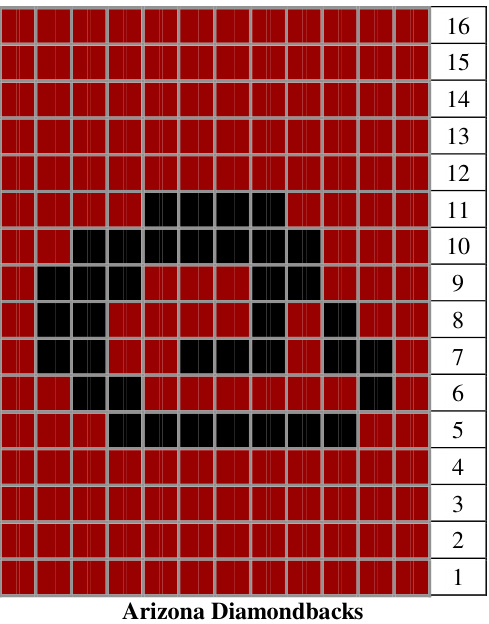
(Black and Dark Red) NO Pinstripes

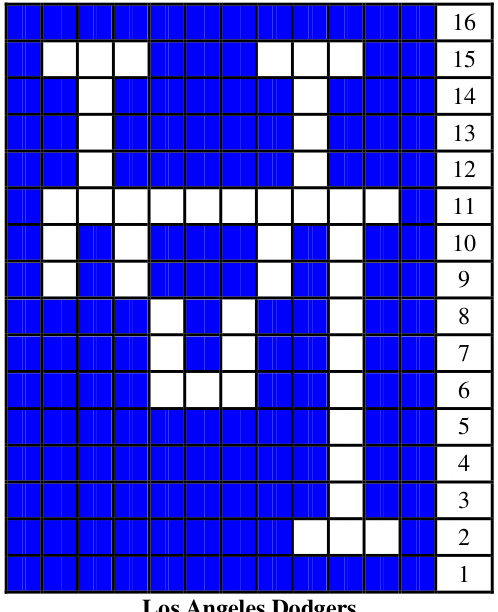
Los Angeles Dodgers (Blue and White) NO Pinstripes
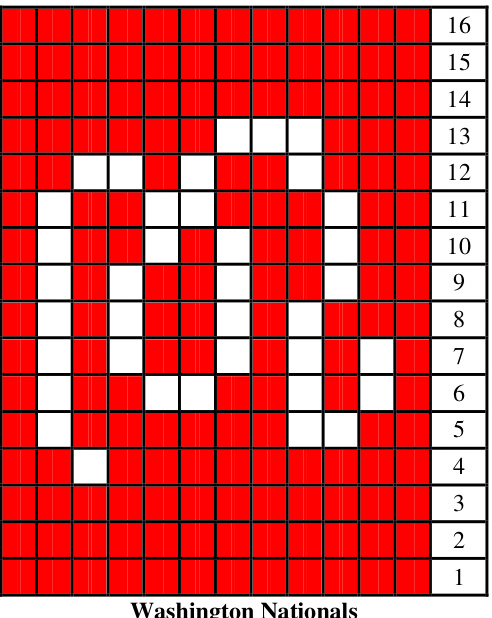
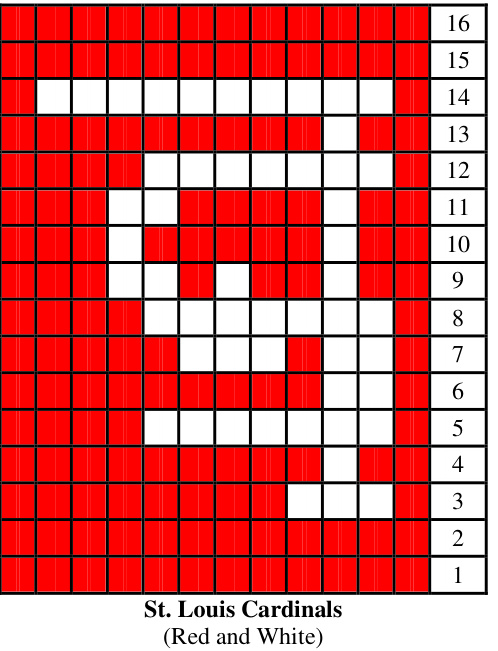
(Red and White) NO Pinstripes
San Diego Padres (Dark Blue, Taupe, and White) NO Pinstripes
Boston Red Sox (Dark Blue, Red, and White) NO Pinstripes
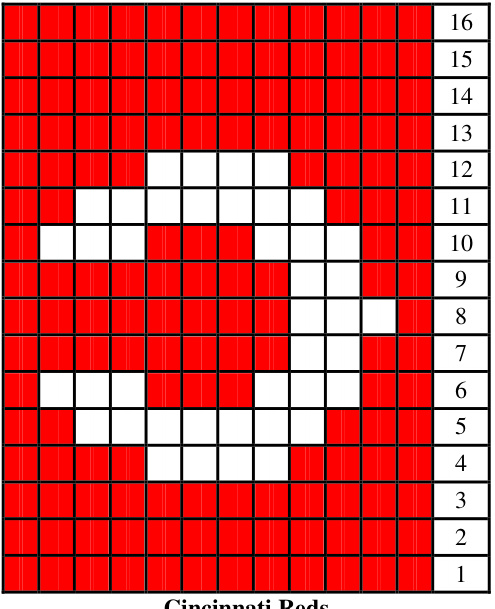
Cincinnati Reds (Red and White) NO Pinstripes